1
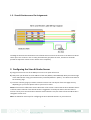
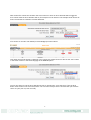
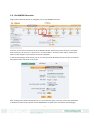
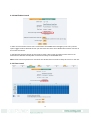
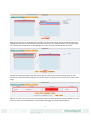
 RMS‐I‐AS Siren & Strobe Sensor © 2012 CONTEG, spol. s r.o. All rights reserved. No part of this publication may be used, reproduced, photocopied, transmitted or stored in any retrieval system of any nature, without the written permission of the copyright owner. Although this manual was prepared and checked with the best care, CONTEG, spol. s r.o. cannot accept any liability for omissions or errors in this publication. Due to the continuous development and progress, CONTEG, spol. s r.o. also reserves the right to change details and technical specifications of the products described in this manual. Such changes along with eventual errors or printing errata shall not constitute grounds for compensation. 2
Content 1. Introduction ........................................................................................................................................ 3 1.1. Specifications & Features: ................................................................................................................... 4 1.2. Siren & Strobe Sensor OIDs ................................................................................................................. 4 1.3. Siren & Strobe sensor Pin Assignments .............................................................................................. 5 2. Configuring the Siren & Strobe Sensor ............................................................................................... 5 2.1. On RAMOS Optima units ..................................................................................................................... 6 2.1.1. Linking the Siren & Strobe To Another Sensor ................................................................................... 7 2.2. On RAMOS Ultra units ......................................................................................................................... 9 2.2.1. Manual control .................................................................................................................................. 10 2.2.2. Notification Control .......................................................................................................................... 12 2.2.3. Time Control ...................................................................................................................................... 12 3. Creating Siren Action ........................................................................................................................ 13 4. Link Sensor to Siren Action ............................................................................................................... 14 1. Introduction The Siren & Strobe sensor is a combination sensor that emits a loud piercing sound and a visual blinking strobe light. It makes an important addition to security and safety. These Siren & Strobes are easy to install and configure. Located at data center entrances, in security areas or at remote sites to alert personnel to trouble or identify intruders are just three examples of how the Siren & Strobe sensors can be utilized. The Siren & Strobe sensor can be activated manually or triggered by any other sensor connected to the RAMOS Optima or Ultra. Linking the Siren & Strobe sensors to PIR motion sensors or IR parameter beam sensors is two good examples of how these can be used in a security environment. Also linking the Siren & Strobe sensors to Smoke Sensors or water sensors is two further examples of how the sensors can be used in environmental alerting. This sensor cannot be used as a standalone sensor. 3
1.1. Specifications & Features: o
On/Off visual and audio alarm from the Siren & Strobe o
Alarm Sound : 100±3db@100cm o
Strobe Flash Frequency : _400 Times/Minute o
Light Source : Super bright LEDs x8 o
Dimension : 72×123×45 mm o
Sensor type ‐ open/closed contact switch o
Power source: powered by the unit. No additional power needed. o
The unit auto detects the presence of the Siren & Strobe o
Maximum cable extension run length: 30 meters or 100 feet. 1.2. Siren & Strobe Sensor OIDs For normal state, return value = 2 For alarm state, return value = 4 The value of the Status for the OID for switch sensors can be Normal, No Status, Critical, or sensorError. A popular OID for Siren Strobe Sensors is the status: For RJ45#1, it is .1.3.6.1.4.1.3854.1.2.2.1.18.1.3.0 You can also control the Siren & Strobe sensor using the following SNMP set commands. You can turn on and off the siren strobe with this command below: snmpset ‐m all ‐v 1 ‐c <community> <IPaddress> .1.3.6.1.4.1.3854.1.2.2.1.18.1.25.<port> i <option> When the option is: 1 = allow‐sensor‐control 3 = turn‐on 4 = turn off 7 = cycle‐Off‐On‐Off 8 = cycle‐On‐Off‐On 4
1.3. Siren & Strobe sensor Pin Assignments The diagram above shows the bottom view of the RJ‐45 connector that connects to the base units RJ‐45 sensor port. You can wire in line a 5 ohm potentiometer (pot) with the siren, and then it would be possible to adjust the volume or turn off the siren completely. 2. Configuring the Siren & Strobe Sensor a) Plug the sensor into one of the RJ45 ports on the rear panel of the unit. b) Now point your browser to the IP address of the unit (default, 192.168.0.100). Next you need to login as the administrator using your administrator password (default is “public”). You will then be taken to the summary page. c) From the summary page you need to select the sensors tab. The layout of the next page will vary depending on your unit so please refer to your unit’s manual. Status: If the sensor is offline the status is No Status. If the sensor is online and the Siren & Strobe sensor is off the status is Normal. If the Siren & Strobe is triggered or manually turned on then the status is Critical. If at any time communications with the Siren & Strobe is lost, the status of the Siren & Strobe is changed to sensor Error. Note: see below for exact steps for configuring the Siren & Strobe Sensors on your base unit. 5
2.1. On RAMOS Optima units Plug the Siren & Strobe Sensor to the intelligent sensor port. Then log in to the RAMOS Optima web interface as the administrator, navigate to the Sensors page, click on the Siren & Strobe Light link in the Alarm Security column on the left of the screen. Now ensure that the “Go Online\Offline” option is set to Online. You can now rename your Siren & Strobe to whatever you wish. You can also rename the Descriptions to match what sensor will trigger the Siren & Strobe. You would then save your settings as shown in the screen shot above. If you will have the Siren & Strobe sensor that will be triggered by another sensor connected to your RAMOS Optima, then you will need to make sure the “Allow Sensor to Control” is selected in the Manual Siren & Strobe Light Control area as shown in the screen shot above. You can also set in which state the sensor will be in the Normal State and also View the sensors that are linked with your Siren & Strobe. 6
By choosing either the Siren On or Siren Off from the drop down list you are able to manually control the sensor from the web interface. 2.1.1. Linking the Siren & Strobe To Another Sensor In this segment we will describe how to link your Siren & Strobe Sensor to another sensor that is connected to your base unit. In this example we will use our Smoke Sensor that has been previously setup on the RAMOS Optima. Please see the user manual for the Smoke Sensor for more information on how to setup this sensor. 1. 2. 4.
3. Step is the choosing a sensor port of the list (in this case port 3 re‐named to Smoke detector) After connecting and setting up the Smoke Sensor on our RAMOS Optima we will click on the sensor link shown in the Sensor Settings page above. We then click on the Siren Control tab for this sensor and then from the drop down menu we will select the port that our Siren & Strobe Sensor is connected to. 7
Next we will first choose the condition the sensor will be in when our Siren & Strobe will be triggered then choose what the Siren & Strobe will do, for example Turn On which in the example shown above we had re‐named the On condition to Smoke Detected. If we choose to Turn On Until Acked (or Acknowledged) as shown above. Then when the Siren & Strobe is triggered, in this case by the Smoke Sensor we will see the “Ack” button in the Action column in the Summery page of the RAMOS Optima. You are also able to Cycle the Siren & Strobe Sensor by selecting the “Cycle the Siren” from the drop down menu shown in the screen shot above. You can enter the Cycle Time is seconds that you want the sensor to cycle (turn on, then turn off). 8
2.2. On RAMOS Ultra units Plug the Siren & Strobe Sensor to intelligent port on your RAMOS Ultra unit. As shown in the screen shot above the Siren & Strobe Sensor will be auto sensed. If there is a problem with the sensor, you may see a “sensor error” or sensor offline”. Check the cable and try another port. Please contact support if you continue to have this problem. In the Normal Settings screen above you can re‐name your Siren & Strobe and you can also re‐name the Descriptions when the sensor is On or Off. After clicking on the Advanced Settings tab you can enable the graph, enter the sensor URL and Enable or Disable the Filter Status. (Please see the RAMOS Ultra or Optima user manual for these settings). 9
In the “Siren & Strobe Light Control Mode” setting, you will choose mode type your sensor will be in: Manual Control: allows you to manually control the sensor from the Summery page. Notification Control: allows a sensor to control it Time Control: allows you to enable or disable the sensor by a date and time. 2.2.1. Manual control The “Siren & Strobe Light Control setting is how you want the sensor to act if it is set in the manual control mode. The Toggle field allows you enter a time in seconds for the sensor to toggle on or off and the Test button allows you to test the Siren & Strobe sensor. If the sensor is set to Manually Control, then you can turn on and off the sensor from the Summery page as shown above. By moussing over the Off status the On button will pop up and when this is clicked on the Siren & Strobe sensor will turn on. Then when moussing over the On button in the Summery page the Off button will appear allowing you to manually turn the sensor Off again as shown in the screen shot above. 10
You are able to select the Toggle Off‐On or Toggle On‐Off from the Siren & Strobe Light Control drop down list. If you have the sensor set to Toggle Off‐On, the sensor will stay off for 5 seconds (or however long you have the Toggle field set to then turn On. If you have the sensor set to Toggle On‐Off, the sensor will stay On for 5 seconds (or however long you have the Toggle field set to then turn Off. 11
2.2.2. Notification Control In order to have another sensor that is connected to the RAMOS Ultra intelligent ports or dry contact inputs trigger the Siren & Strobe sensor you must have the sensor set to Notification Control as shown in the screen shot above. In the following segment we will go over how to create a Siren action and then link this action to an Smoke Sensor that has already been connected and setup on the RAMOS Ultra. Note: Please see the separate user manual for the Smoke Sensor on how to setup this sensor on the unit. 2.2.3. Time Control 12
When selecting the Time Control option mode, you can enable or disable the sensor in regards to the day of the week and the time of the day as shown in the screen shot above. 3. Creating Siren Action To setup the Siren action you first need to navigate to the Notification page, then after clicking on the Action link in the left column, you will click on the “Create” button to launch the new Action Wizard in the RAMOS Ultra web interface as shown in the screen shot on the previous page. Now we will select the Siren Action from the “Select an Action Type” drop down list and click on the Next button as shown in the screen shot above. 13
In the next screen of the new Action Wizard we will choose where the Siren & Strobe is connected either the Main Module (base units 8 RJ‐45 intelligent sensor ports) or one of the Expansion Units. Then we will choose the Port the sensor is connected to and then we will choose how the sensor will act, either turning on until acknowledged, until the sensor returns to normal or a defined time as shown in the screen shot above. We can now add a delay time if we want the sensor to be delayed before being turned on then we will click on the Finish button to complete the new Siren Action Wizard as shown in the screen shot above. Now we can see our new Siren Action has been created and is now in our Actions listing ready to be linked up to a sensor and notification on the unit. 4. Link Sensor to Siren Action Now that we have created our Siren Action we would then need to link a sensor to this action and also a notification. In this example we will link our Siren & Strobe Action to a Smoke Sensor that has already been connected and setup on one of the sensor ports of the RAMOS Ultra unit. We first click on the “Link Sensor To Action” link in the left column then click on the “Create” button that will launch the “Link Sensor To Action” Wizard as shown in the screen shot above. Note: Please see the Smoke Sensor user manual on how to setup this sensor on the RAMOS Ultra. 14
After the Link Sensor To Action Wizard is started in our first screen shown above we will first select the Module that our sensor is connected to, then select the sensor in the Sensor field. In this example again we are using the Smoke Sensor so we highlight this sensor and click the Next button as shown. We then will select the Status, and then choose our new Siren from the Action listing which we had previously created and finally clicking on the “Finish” button as shown in the screen shot on the previous page. Now we can see in our list of the sensors linked to actions we have our Smoke Sensor linked to our Siren Action so when the Smoke Detector is activated this will trigger the Siren & Strobe Sensor. 15
Note: You can also add other Action Notifications to this for example an email, SMS or voice call alert. Please see each separate manual for each of the notifications Actions. This concludes the Siren & Strobe User manual. Please contact [email protected] if you have any further technical questions or problems setting up your modem or your alerts. Thanks for Choosing RAMOS! 16