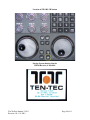
1
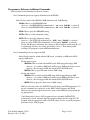
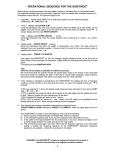
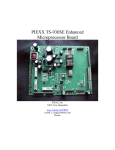
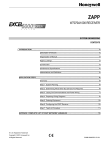
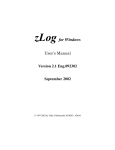
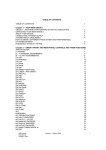
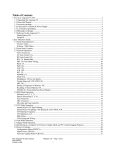
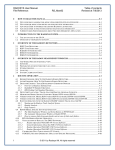
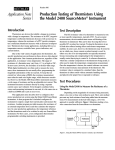
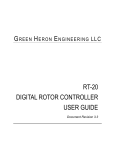
Ten-Tec Orion/Orion II
Users Manual Addendum
Firmware Version V3
It is very important that you read this document in its entirety before using the V3
firmware. Some features behave differently than they did in the V1 and V2 firmware.
Purpose:
The purpose of this document is to identify the changes that were made to generate the V3 firmware
builds for the Orion Model 565 and the Orion II Model 566, [Orion(s)]. The changes include new
features, enhancements to existing features, and resolution of various problems. The V3 firmware is the
first version to support the Model RX366 High Performance Sub Receiver. The RX366 brings a new
level of performance for the Orion(s) and a competitive advantage for Contesters and DXers alike.
Pictures in this addendum are from the 566. 565 differences are noted.
What’s New:
Changes common to both Orion 565 and Orion II 566 are listed together. Refer to model specific
changes later in this document.
-
Added Support for Model RX366 High Performance Sub Receiver. [Refer to 74467, RX366
Instructions and Operation Manual for detailed information].
-
Enhanced Sub Receiver performance includes:
- Ability to add three user installable and configurable hardware filters:
These filters are the same as used in the Eagle/Orion II.:
15kHz, 6kHz, 2.4kHz, 1.8kHz, 1kHz, 600Hz, 300Hz, (2.4kHz filter factory installed)
- 10dB Attenuator and 12dB Preamp and 9MHz IF Output.
- V3 firmware provides the ability to fine-tune the frequency of the RX366 to within 0.1Hz of
the Main RX. Locked to eliminate drift.
-
To support the added filters and configuration thereof, the following menu items were added to
the “Filtr” Menu:
Sub-Rx Slot 1
Sub-Rx Slot 2
Sub-Rx Slot 3
New “Filtr” Menu in Orion II
Ten-Tec Part Number 74474
Revision 1.0, 1-31-2012
Page 1 of 11
-
Added Support for the RX366 High Performance Sub Receiver [Continued]
-
Once the Sub-Rx Slot menu items are selected to match the actual filters installed into the
RX366, the software will select the appropriate hardware filter when the Sub-RX BW is
adjusted.
-
If all Sub-Rx Slot menu items are None, which is also the case when either a RAM Clear or
MASTER RESET has been performed, then the software will always select Sub-RX Slot 1.
-
While the 15kHz filter is one of the optional hardware filters, the DSP filter is limited to
9kHz for the Sub Receiver.
-
Added User Adjustable oscillator/frequency alignment between main receiver and RX366
Sub Receiver. See the “Diversity“ section in the RX366 Installation manual for the
procedure on how to align the frequency of the sub receiver to that of the main receiver.
Comments on the RX366 and V3 firmware:
With V3 installed and the RX366 installed, the Orion(s) now have vastly superior performance to the
original sub-receiver in terms of immunity to interference from adjacent strong signals and immunity to
overloading from very strong signals present on the band.
Ten-Tec Part Number 74474
Revision 1.0, 1-31-2012
Page 2 of 11
-
Added Selective Audio Filtering (SAF).
-
Selective Audio Filtering – An improvement on the industry standard approach to Audio Peak
Filter (APF) whereby a selected region within the passband can be amplified in audio for more
clarity. Improvements that SAF brings over current APF implementations include the addition
of a Width adjustment and the fact that SAF is available in all modes, whereas APF is usually
limited to CW only.
-
-
SAF uses the configurable NOTCH Center Frequency (CF:) and Width (W:) parameters.
-
Audio within the SAF region will be increased
-
Audio outside of the selected SAF region will be attenuated by up to 30dB from the
peaked SAF region. Amount of “peaking” and “attenuation” is affected by the location
of the Center Frequency and the Width.
Both the SAF and NOTCH receiver functions share the front panel NOTCH button to turn
the feature on / off. It is therefore necessary to configure the button to control either the
SAF or the NOTCH. The configuration is managed in the “RX” Menu with the addition of
the following two new menu items:
NOTCH Btn Main
NOTCH Btn Sub
(selections include NOTCH or SAF)
(selections include NOTCH or SAF)
New “RX” Menu in Orion II
NOTE: For the Orion 565, the two new menu items for NOTCH button usage are:
NOTCH Button Main(selections include NOTCH or SAF)
NOTCH Button Sub (selections include NOTCH or SAF)
Ten-Tec Part Number 74474
Revision 1.0, 1-31-2012
Page 3 of 11
-
Added Selective Audio Filtering (SAF). [continued].
-
As shown in the previous Picture, SAF was selected as the function for the NOTCH
button for Main, and NOTCH was selected as the function for the NOTCH button for
Sub.
-
SAF action per receiver is identified by the presence of the text “SAF” underneath the
headphones for each receiver. The following picture shows how the menu selection in
the previous example is depicted on the main receiver display.
Main Receiver Display showing SAF enabled for MAIN
-
-
Note the text “SAF” underneath the main headphones. This indicates that the
NOTCH button, when MAIN-RX is selected, will perform the SAF function. Since
the NOTCH text shows off (instead of CF:xxxHz or W:xxxHz), this means SAF is
enabled, but not functioning yet. Pressing NOTCH would then engage SAF filtering.
-
If SAF had been selected for the SUB-RX, then the text “SAF” would have appeared
underneath the Sub Headphones. Since it is not shown in the above picture, this
means that when SUB-RX is selected, the NOTCH button performs the Manual
Notch feature.
There is also a method to change the function of the NOTCH button while on the radio
screen.
-
-
If MAIN-RX is selected, then a long press of NOTCH will change the current
meaning of the NOTCH button for the MAIN-RX. This allows the user to switch
back and forth between NOTCH’ing the passband, and SAF’ing the passband.
This “change of NOTCH button meaning” functionality works regardless of whether
SAF is or is not engaged. It also changes functionality regardless of whether
NOTCH is or is not engaged. This provides the user an easy way to improve
readability of a signal, then notch that signal out, listen for the next signal, etc.
working contacts in sequential order a minimum amount of effort.
Ten-Tec Part Number 74474
Page 4 of 11
Revision 1.0, 1-31-2012
-
Added Selective Audio Filtering (SAF). [continued].
- SAF Adjustment Parameters
-
-
Center Frequency (CF:) – A frequency value that is generally between the minimum hz
value of a passband and the maximum value of a passband. Similar to NOTCH Center
Frequency. The values can be anything from 0hz to 4kHz.
-
Center Frequency is normally adjustable in 10hz steps.
-
When Width is set to 10 or 20hz, then Center Frequency is adjustable in 1hz steps.
Width (W:) – The frequency range to apply the SAF adjustment. Similar to Manual
Notch Width. The value range is 10hz to 300hz in 10hz steps. Most other manufacturer
implementation of APF does not permit a width adjustment. This is very helpful in
narrowing or widening the SAF region based upon the operational mode and the
conditions of the band and condition of the pileup.
-
Modes: SAF works in all radio modes, AM, FM, USB, LSB, UCW, LCW, AM, FM, FSK.
The fact that SAF works in any mode permits SAF to help work RTTY or other digital
modes that normally would not be copy-able without the signal enhancing capabilities of
SAF. Most other APFs only work in CW modes.
-
Added SAF /NOTCH Tracking (on/off) This is one of the new Scalable Diversity Tracking
“SDT” features that provides a mechanism for a user that wants certain parameters he/she
adjusts for the main receiver to also take effect in the sub receiver automatically. See the
bullet item for [Added Scalable Diversity Tracking “SDT”] for more info on the other new
Tracking features.
Comments on SAF:
CW Mode
Optimal use of SAF in CW is intended for improving readability of weak signals. Thus, SAF is
intended for occasional, and not general, use. Optimal SAF width for CW is 10hz or 20hz. The
SAF center frequency should be set initially to the sidetone pitch. First tune in the cw signal
and try to match it to the sidetone pitch - use the Orion(s) SPOT function to help. Now push the
NOTCH button to engage the SAF. With width set to 10hz or 20hz, slowly vary the center
frequency till the signal is optimally peaked. It'
s important to have the RF Gain correctly set to
enhance the signal to noise ratio with SAF engaged. The RF Gain is properly set if you engage
SAF with no signal present and you hear slight ringing at 10-20hz width. Perform this check by
just tuning in band noise with no signal in the passband and engaging SAF. No ringing means
not enough RF Gain and moderate ringing means too much RF Gain.
SSB/AM Mode
SAF can greatly improve readability of weaker ssb and am signals. The SAF width should be
set to 300hz. Tune in the signal and engage SAF. Adjust the center frequency for best
readability, usually in the range of 300-600hz.
Ten-Tec Part Number 74474
Revision 1.0, 1-31-2012
Page 5 of 11
-
Added Scalable Diversity Tracking (SDT). SDT provides a mechanism for a user that wants certain
parameters he/she adjusts for the main receiver to also take effect in the sub receiver automatically.
- Combined BW and PBT Tracking into a single item “PBT/BW Tracking” (on/off)
- Added SAF/NOTCH Tracking (on/off)
- Added MODE Tracking (on/off) Receiver mode, e.g. AM, FM, USB, etc.
- Added AGC Tracking (on/off)
AGC Mode, e.g. fast, slow, etc. will be transferred to sub,
NOT the AGC values for each, e.g. AGC Decay.
It is recommended that all SDT functions are turned off when using a CAT program to control both
main and sub settings. Otherwise unknown states and conditions will occur.
-
Ignore several buttons while transmitting, including:
- Antenna selection buttons (MAIN RX/TX and SUB RX: ANT 1, ANT 2, RX ANT).
- VFO A and VFO B selection buttons (VFO A and VFO B: TX, RX, SUB RX).
- MAIN-RX and SUB-RX selection buttons.
-
Modified SIDETONE adjustment slope/level to make the gain range more usable. The object is to
cover a larger range with the adjustment, but not have the adjusted value overload at varying user
conditions/setting requirements.
-
Adjusted the AGC Threshold setting to more accurately equal the value displayed in the menu. RF
Gain adjusts the AGC Threshold but will not fall below the value set up in the menu. The AGC
Threshold Menu value sets the minimum AGC Threshold - it may increase in practice due to
decreased RF Gain values. The S Meter will reflect the AGC activation point.
-
Smoother audio switching with QSK. Added a ramp to sub receiver audio so that it transitions into
transmit and out of transmit cleanly like the main receiver does.
-
Modified SPEECH PROCESSOR to adjust gain range, a slight adjustment only
-
Added Per-Band recall of MIC/PWR to front panel VFOA/B TX buttons, A>B, B>A, VFOA Enter,
VFOB Enter
-
Disabled power adjustment when PWR is OFF
-
Disabled VOX in FSK mode
-
Changed Default for FSK to Mark High
-
Corrected various display anomalies. Dots on main screen, version screen, black hash, some text
misalignments, “mS” vs “ms”, etc.
-
Corrected USER Recall of BW value. Was not recalling BW upon USER Recall.
-
Corrected various instances of receive audio popping.
-
Corrected roofing filter indication for MAIN when B>A forced a change in the MAIN’s roofing
filter.
-
Corrected bug in sub-rx MOX function, it wasn'
t muting correctly.
-
Resolved issue with reception of Binaural serial command.
-
Resolved issue with reception of Tuner Off serial command.
Ten-Tec Part Number 74474
Revision 1.0, 1-31-2012
Page 6 of 11
-
Fixed SWEEP display issue where a solid vertical bar was shown on the left of the sweep window.
Orion II Model 566 Specific Changes:
-
Corrected Preamp indicator on power up.
Orion Model 565 Specific Changes:
-
Resolved display issue upon receiving *TT0 serial command
-
Binaural output is increased over normal audio.
-
Binaural panoramic region narrowed and association to headphone per frequency reversed.
-
Improved sweep update rate and cursor action
-
Reduced BW/PBT adjustment jitter
-
Increased Line Level Out, Din Aux Out L/R outputs by 6dB
Ten-Tec Part Number 74474
Revision 1.0, 1-31-2012
Page 7 of 11
Installing the V3 Firmware:
The process to install the V3 firmware follows the same standard update process as with previous
versions. Follow the link “How to Update” as found on the Ten-Tec website at the downloads page for
the Orion(s) respectively.
The memory map for V3 firmware has changed substantially from what it was for V1 and V2 firmware.
Therefore it is highly recommended that you perform a RAM Clear and Master Reset after you have
programmed in V3 firmware into Orion(s) that were previously running V1 or V2 firmware.
The following outlines the proper procedures for RAM Clear/Master Reset:
RAM Clear.
During this process, you will see a “BATTERY FAILURE” message at the top of the radio’s display.
Ignore this message.
If you leave this station while performing this operation, then it will time out and continue on. It is
recommended that you perform this procedure when you can dedicate time to follow the steps to
completion. If you do have to leave while doing this, then simply start back over at Step 1.
1. Ensure that the Orion is powered OFF
2. Press and HOLD the VFO B LCK button that is located underneath the VFOB>M button. See the
picture at the end of this document for a graphic showing the location of the VFO B LCK button.
3. Power On the Orion, continuing to hold down the VFO B LCK button.
4. When the “Master Reset Complete” Appears at the bottom of the display, release the VFO B LCK
button.
5. In a few seconds, you will be prompted with a message “RX366 Installed?”
6. Select the appropriate response.
6.1. If you have an RX366 installed, then press the AN button to answer “YES”.
6.2. If you do NOT have an RX366 installed, then press the RECALL button to answer “NO”.
If you selected “YES”, and have an RX366 installed, you will notice that the startup screen will
state “RX366 Receiver installed” below the firmware versions.
7. Wait for the Orion to finish starting up for proper transceiver display showing 14.250 as the Main
frequency.
Once the Orion is back to normal operation mode perform the MASTER RESET sequence detailed on
the following page.
A MASTER RESET should always immediately follow a RAM Clear sequence.
Ten-Tec Part Number 74474
Revision 1.0, 1-31-2012
Page 8 of 11
MASTER RESET:
You should perform this procedure when you can dedicate time to follow the steps to completion. If
you leave this station while performing this operation, the process may time out and continue on. If the
radio times out, re-start the entire RAM Clear / MASTER RESET process all over again.
1. Ensure that the Orion is powered OFF
2. Press and HOLD the MAIN RX/TX button that is located at the far left of the controls, under the
“T-T ORION” logo.
3. Power On the Orion, continuing to hold down the MAIN RX/TX button.
4. When the message “Master Reset Complete” Appears at the bottom of the display, release the
MAIN RX/TX button.
5. In a few seconds, you will be prompted with a message “Clear User Memories?”
6. Select “YES” by pressing the AN button.
7. In a few seconds, you will be prompted with a message “Reset Optional Filters?”
8. Select “YES” by pressing the AN button.
9. In a few seconds, you will be prompted with a message “RX366 Installed?”
10. Select the appropriate response.
10.1. If you have an RX366 installed, then press the AN button to answer “YES”.
10.2. If you do NOT have an RX366 installed, then press the RECALL button to answer “NO”.
If you selected “YES”, and have an RX366 installed, you will notice that the startup screen will
state “RX366 Receiver installed” below the firmware versions.
11. Wait for the Orion to finish starting up for proper transceiver display showing 14.250 as the Main
frequency.
12. To verify that your radio is ready to use, power cycle the radio, waiting a few seconds between
power off and then on again.
If you have any problems with any of the above steps for either RAM Clear or Master Reset, contact
Ten-Tec Service for technical support.
Ten-Tec Part Number 74474
Revision 1.0, 1-31-2012
Page 9 of 11
Location of VFO B LCK button
Startup Screen showing that the
RX366 Receiver is Installed
Ten-Tec Part Number 74474
Revision 1.0, 1-31-2012
Page 10 of 11
Programmers Reference Additional Commands:
-
Added various Serial commands for the new features:
-
New Commands/queries for support of Hardware in the RX366
-
-
Added Serial control of the RX366’s 10dB Attenuator and 12dB Preamp.
-
*RSEn<CR> to set the PREAMP value
- where n = 1 for PREAMP ON (annunciated as “on” when “Sub-Rx” is selected)
- where n = 0 for PREAMP OFF (annunciated as “off” when “Sub-Rx” is selected)
-
?RSE<CR> to query the PREAMP setting
-
*RSTn<CR> to set the Attenuator setting
-
?RST<CR> to query the Attenuator setting
- where n = 1 for ATTN ON (annunciated as “10db” when “Sub-Rx” is selected)
- where n = 0 for ATTN OFF (annunciated as blank when “Sub-Rx” is selected)
- For the Sub Receiver Attenuator, the settings are 0/1 for off/on. It will accept 0,1,2,3
as options but will force any setting greater than 1 to be 1. That should permit
existing CAT programs to work without modification.
New Commands/queries for support of SAF.
-
Added Serial control to switch to/from SAF mode. (switching to SAF mode ALSO
engages SAF mode)
-
For the main receiver
- *RMNSn<CR> to switch to/from SAF mode AND engage/disengage SAF
- where n = 1 to switch to SAF mode AND engage SAF for the main receiver
- where n = 0 to disengage SAF and switch back to NOTCH mode
- ?RMNS<CR> to query the main receiver SAF setting
-
For the sub receiver
- *RSNSn<CR> to switch to/from SAF mode AND engage/disengage SAF
- where n = 1 to switch to SAF mode AND engage SAF for the sub receiver
- where n = 0 to disengage SAF and switch back to NOTCH mode
- ?RSNS<CR> to query the main receiver SAF setting
-
SAF uses the same values for NOTCH Center Frequency and Width parameters. So
no new commands are required to set the SAF Center Frequency and Width.
However, the control program needs to be aware of the SAF State and program the
rig appropriately.
-
Could bring added value to CAT programs to have selectable SAF/NOTCH
parameters per mode, whereby when the customer changes modes using the CAT
program, then the appropriate SAF or NOTCH values are also set per the customers
preference by the CAT program.
Ten-Tec Part Number 74474
Revision 1.0, 1-31-2012
Page 11 of 11