1
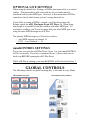
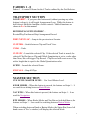
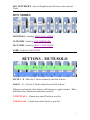
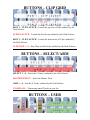
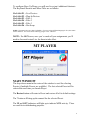
Preset: nLII-Plus v1.0.5
NOTE: There are 2 versions of this Preset.
nLII-Plus is the default version.
nLII-Plus[0db] is identical except that the Faders max out at 0db.
SETTINGS
GLOBAL CONTROLS
FADERS 1 - 8
TRANSPORT SECTION
MASTER SECTION
KNOB MODES
NAVIGATION BUTTONS
BTN MODES
BUTTONS – MUTE/SOLO
BUTTONS – CLIP GRID
BUTTONS – SELECT/ARM
BUTTONS – USER
USER ASSIGNMENTS
MT PLAYER
MAIN WINDOW
RIGHT-CLICK MENU
TROUBLESHOOTING
SUPPORT
SETTINGS
If you have trouble completing any of the settings listed here, please make
sure to refer to the Troubleshooting section.
MT PLAYER SETTINGS
The first time you use your nanoKONTROL in MT Player, you may be
prompted to setup the nanoKONTROL’s ports. For both prompts, you
should select your nanoKONTROL. However, if you bypass those prompts,
you can access the settings by right-clicking on MT Player and selecting
MIDI Settings.
1. From the Port Name menu, select “IN: nanoKONTROL 1
SLIDER/KNOB”.
2. From the MIDI In port menu, select your nanoKONTROL’s SLIDER
port and click OK.
3. Go back into MIDI Settings.
4. From the Port Name menu, select “OUT: nanoKONTROL 1
CTRL”.
5. From the MIDI Out port menu, select your nanoKONTROL’s CTRL
PORT and click OK.
6. Click the Restart button.
You can learn more about MT Player in the MT Player section.
LIVE SETTINGS
The following settings will be found in Preferences on the MIDI/Sync tab.
IMPORTANT NOTE: When you first install MT Player, Live will
automatically turn on its Track switches. Before completing the steps
below, turn off all the Track switches related to MT Player.
1. Turn off all of the switches/settings related to your nanoKONTROL.
2. Select nLII Plus as a Control Surface.
3. Select From MT Player 1 as the Input and To MT Player 1 as the
Output.
4. For Takeover Mode, select whichever setting is comfortable for you.
1
OPTIONAL LIVE SETTINGS
When using the default Live Settings, nLII-Plus functions solely as a control
surface. This means that it will work with any Live set and cannot be
interfered with by other MIDI gear. However, it also means that nLII-Plus’
controls are fixed, which means you can’t remap them in Live.
If you’d like to remap nLII-Plus’ controls, you’ll need to activate the
Remote switch for nLII_Plus Input (From MT Player 1). When doing
this though, it is possible to run into conflicts with other MIDI gear. To
avoid these conflicts, you’ll need to ensure that your other MIDI gear is not
using the same MIDI messages as nLII-Plus.
The primary MIDI messages you’ll need to avoid are:
- Any MIDI message on channel 16.
- CC#1 – 8 on Channels 1 – 10.
nanoKONTROL SETTINGS
Every time you open the nLII-Plus Preset, Scene 1 on your nanoKONTROL
will be overwritten. If you have customized Scene 1, please make sure to
back it up BEFORE opening the nLII-Plus Preset.
While nLII-Plus is running, your nanoKONTROL will be locked in Scene 1.
GLOBAL CONTROLS
The following controls are global meaning they’re the same in every Mode.
TRANSPORT SECTION
MASTER SECTION (STRIP 9)
2
FADERS 1 - 8
Faders 1 – 8 control Volume for the 8 Tracks outlined by the Grid Selector.
TRANSPORT SECTION
LOOP/SHIFT – If you press this button and (without pressing any other
buttons) release it, it will toggle Arrangement Loop. While this button is
held down it Shifts the function of other controls. Shifted functions are
shown in Red in this manual.
REWIND/PLAY/FFW/STOP/REC –
Rewind/Play/Fastforward/Stop/Arrangement Record.
PREV/NEXT LOC – Jump to the previous/next Locator.
CLIP/TRK – Switch between Clip and Track View.
UNDO – Undo.
CLIP SPC – Launch the selected Clip. If the selected Track is armed, the
selected Clip Slot has no Clip and Global Quantization is set to a value other
than None, this will trigger Clip Record. Clip Record will create a new Clip
with a length that is equal to the Global Quantization value.
SCENE – Launch the selected Scene.
STOP ALL – Stop all Clips.
MASTER SECTION
CUE LEVEL/MASTER LEVEL – Cue Level/Master Level.
KNOB MODES – When this button is pressed, the buttons on Strips 1 – 8
are used for switching between Knob Modes.
NAV BTNS – When this button is pressed, the buttons on Strips 1 – 8 are
used for Navigation.
BTN MODES – When Knobs Modes and Nav Btn are both held down, the
buttons on Strips 1 – 8 are used for switching between Button Modes.
When switching between Knob or Button Modes, the Status Bar (lower left
hand corner of Live’s window) will display the selected Mode.
3
KNOB MODES
PAN– In this Mode, Knobs 1 – 8 will control Pan for the 8 Tracks outlined
by the Grid Selector.
DEV– In this Mode, Knobs 1 – 8 will control Device parameters.
SEND A – H – In these 8 Modes, the Knobs will control Send A – H
respectively for the 8 Tracks outlined by the Grid Selector.
NOTE: Any of these Modes can be remapped without affecting the other
Modes.
NAVIGATION BUTTONS
TRACK LEFT/RIGHT – Move left/right between Tracks.
GRID UP/DOWN/LEFT/RIGHT – Move the Grid Selector in Live.
SCENE UP/DOWN – Move up/down between Scenes.
TEMPO UP/DOWN – Adjust Tempo in 1-BPM increments.
DEV LOCK – Lock/unlock Device control to/from the selected Device.
DEV BANK UP/DOWN – Move between banks of 8 parameters for the
selected Device (if the selected Device has more than 8 parameters). These
buttons will have no effect if you aren’t in Dev Mode.
DEV I/O – Turn the selected Device on/off.
4
DEV LEFT/RIGHT – Move left/right between Devices on the selected
Track.
BTN MODES
MUIE/SOLO– Switch to MUTE/SOLO MODE.
CLIP GRID– Switch to CLIP GRID MODE.
SLCT/ARM– Switch to SELECT/ARM MODE.
USER– Switch to USER MODE.
BUTTONS – MUTE/SOLO
MUTE 1 – 8 – Mute the 8 Tracks outlined by the Grid Selector.
SOLO 1 – 8 – Solo the 8 Tracks outlined by the Grid Selector.
When pressed quickly, these buttons will function as toggle switches. When
held down, they function as momentary switches.
UNMUTE ALL – Unmute any muted Tracks in your Set.
UNSOLO ALL – Unsolo any soloed Tracks in your Set.
5
BUTTONS – CLIP GRID
ROW 1 – CLIP LAUNCH – Launch the top row of Clips outlined by the
Grid Selector.
SCENE LAUNCH – Launch the first Scene outlined by the Grid Selector.
ROW 2 – CLIP LAUNCH – Launch the bottom row of Clips outlined by
the Grid Selector.
CLIP STOP 1 – 8 – Stop Clips on the Tracks outlined by the Grid Selector.
BUTTONS – SELECT/ARM
SELECT 1 – 8 – Select the 8 Tracks outlined by the Grid Selector.
MASTER SELECT – Select the Master Track.
ARM 1 – 8 – Arm the 8 Tracks outlined by the Grid Selector.
UNARM ALL – Unarm any armed Tracks in your Set.
BUTTONS – USER
6
UP/DOWN/LEFT/RIGHT – Arrow keystrokes. By holding down Shift,
these can be used for multi-selections.
ENTER/ESC – Enter/escape keystrokes.
LOAD CLIP – Load selected Clip(s) from browser onto selected Clip
Slot(s).
BRWS UP/DOWN – Move to the next/previous browser in Live 8 (these
buttons have no function in Live 9). This requires some additional setup as
explained in the next section.
BRWS I/O – Hide/Show the browser.
USER 1 – 8 – These Buttons are User Assignable to Live menu functions.
Each Button can be assigned a Default function and a Shifted function.
Please see the next section for more info.
USER ASSIGNMENTS
WINDOWS:
In order to use Brws Up/Down and/or User 1 – 8, you will need to download
and install Live Menu Keys:
http://beatwise.proboards.com/index.cgi?board=freesoft&action=display&thread=1131
Live Menu Keys will automatically configure Brws Up/Down for you. To
configure User 1 – 8, double-click the Live Menu Keys icon to open its
configuration window and click the Add HotKey button. Press one of the
User Buttons or Shift+one of the User Buttons to assign the HotKey. After
the HotKey, you’ll list the menu item the HotKey should trigger.
OS X:
You can configure Brws Up/Down and User Buttons 1 – 8 by using a utility
built into the OS.
To configure User Buttons 1 – 8, go to System Preferences – Keyboard &
Mouse and click on the Keyboard Shortcuts tab. Scroll down to Application
Keyboard Shortcuts and click the Plus button to add a new shortcut. The
Application for all the shortcuts should be Live.
Type the Menu Title exactly as it appears in Live’s menu. Assign the
Keyboard Shortcut by pressing one of the User Buttons or Shift+one the
User Buttons.
7
To configure Brws Up/Down, you will need to set up 6 additional shortcuts.
The Keyboard Shortcut and Menu Titles are as follows:
Ctrl+Alt+F1 = Live Devices
Ctrl+Alt+F2 = Plug-In Devices
Ctrl+Alt+F3 = Files 1
Ctrl+Alt+F4 = Files 2
Ctrl+Alt+F5 = Files 3
Ctrl+Alt+F6 = Hot-Swap
NOTE: The names above are shown in English. If you are using a different language in Live, the names
will be different. You can see these names by going to View – Browser.
NOTE: For OS X users, once you’ve made all your assignments, you’ll
need to close and restart Live for them to take effect.
MT PLAYER
MAIN WINDOW
The drop-down menu in the center of the window is used for selecting
Presets (if multiple Presets are available). The last selected Preset will be
selected the next time you launch Player.
The Restart button will restart a Preset and restore all of its default settings.
The ? button will bring up the manual for the selected Preset.
The IN and OUT indicators will light up to indicate MIDI activity. These
are used for troubleshooting purposes.
8
RIGHT-CLICK MENU
MIDI Settings will bring up the MIDI Port Chooser window.
Rescan MIDI devices will rescan MIDI devices on your system. This is
useful in situations where your nanoKONTROL is not detected properly.
Toggle Stats Display will show/hide event history. This is used for
troubleshooting purposes.
TROUBLESHOOTING
1. Why don’t I see nLII Plus listed under Live’s Control Surface drop-down
menu?
You are asked to manually transfer the nLII_Plus script during install
(instructions included in the Install Info pdf file). If you skipped that step or
need to retransfer the script for some other reason, you can find it along with
transfer instructions in:
Windows – My Documents\Bome’s Midi Translator\Player.
OS X – (your name)/Bome’s Midi Translator/Player.
2. I have multiple copies of MT Player ports listed, which should I use?
You should try to use the listings that start with “From” or “To”. For
example, you shouldn’t use “3-From MT Player 1”, you should use “From
MT Player 1”. In some cases, you will not have listings that start with
“From” or “To”.
3. I’ve completed all the settings steps, but the controls don’t work as
described in the manual.
.In some rare cases, the Scene transfer used by nLII-Plus will not work
correctly. In this case, you’d need to manually transfer the nLII-Plus Scene
to your nanoKONTROL using the Kontrol Editor.
1. Open the Kontrol Editor and navigate to nLII-Plus Scene*.
2. Select Communication – Write Scene Data.
9
*The location of the nLII-Plus Scene is in My Documents\Bome’s Midi
Translator\Player (Windows) or (your name)/Bome’s Midi Translator/Player
(OS X).
4. When I try to complete the MT Player Settings steps, I do not see an
option for a nanoKONTROL SLIDER/KNOB or CTRL PORT.
nLII-Plus is setup to work with the nanoKONTROL’s driver. It will not
work properly with the standard driver that gets installed when you initially
connect the nanoKONTROL to your machine.
To install the driver, you need to download and install the driver from
Korg.com.
For Windows users:
If you’ve already done the above and you’re still not seeing the
nanoKONTROL’s CTRL PORT, you may have too many MIDI devices
installed on your system. You can check this by using a utility that is
included with the driver you downloaded from Korg.
First, uninstall MT Player and then go to Start – Korg – Korg USB-MIDI
Driver Tools – Uninstall Korg USB-MIDI Device. That will generate a list
of all the MIDI devices on your system. If you see 9 or more listings there,
you’ll need to remove a few of those and then reinstall the
nanoKONTROL’s driver.
SUPPORT
Email:
[email protected]
Forum:
Beatwise Network
Videos:
Stray's YouTube Channel
Copyright 2013 nativeKONTROL. All rights reserved.
This document, as well as the software described in it, is provided under license and may be used or copied only in accordance with
the terms of this license. The content of this document is furnished for informational use only, is subject to change without notice, and
should not be construed as a commitment by nativeKONTROL. Every effort has been made to ensure that the information in this
document is accurate. nativeKONTROL assumes no responsibility or liability for any errors or inaccuracies that may appear in this
document.
All product and company names mentioned in this document, as well as the software it describes, are trademarks or registered
trademarks of their respective owners. This software is solely endorsed and supported by nativeKONTROL.
10