1
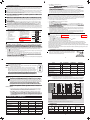
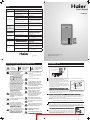
FAQ Phenomenon User's Manual Remedy No water supply or water pressure Check is too low No water Water use point is blocked or hot water valve is closed Check and clear 1 Hot water access close Check and open ES)&) 2 Temperature not set to desired Calibrate the heater according to the setting operation instructions in the manual 3 Heating time limit and setting temperature not obtain Calibrate the heater by referring to the operation instructions in the manual 4 Defective elements Contact with service department when 1 , 2 and 3 are excluded. Not heated to desired temperature 1 Whether the current function is set to the proper mode and temperature is set too low. Calibrate the heater according to the operation instructions in the manual water 2 Excessive water pressure Cold outlet water temperature of water Incapable of startup or display not lit Display E1 turned down Inconstant water pressure turned down or use with constant water pressure 1 No power to heater Check power socket 2 Defective elements Contact with service department when 1 is excluded. Faulty line Contact with service department Power on after disconnection when 1 SPEED SPEED SET TIMER TIMER SET Display E2 Contact with service department when 1 is excluded. 2 Defective elements 1 Room temperature lower than -20°C Display E3 when ambient temperature more than -19°C Contact with service department when 1 is excluded. 2 Defective sensor Please read this manual before usage. Retain it for future reference. 0040502425 V Safety warning (Read carefully before use) Installation • Use Meanings of icons Forbidden These are actions which are forbidden These are actions which must be Warning carried out These are matters for which attention CAUTION is required Installation Wall rack (Figure 1) for installation reference only. SPEED If the water heater emits an unusual Take care not to be scalded by hot water. Expansion smell or a burning smell, please and pipe for hot • Do not touch the valve hook disconnect the power supply water supply. CAUTION immediately and call the service center. temperature before • Please feel the water (Figure 2) This mark is the designation use. Use only when the temperature is for Pre-safe Expert of Haier ideal for you. Extended connection line Water Heater Company, which indicates the use of the company's patented Do not set at outdoor places. technology inside the product. It ensures you a safe bath while monitoring whether Forbidden your house ground wire is live or not all Do not install the water heater in the the time. If this mark is lit, it indicates your conditions in which ice could form. house ground wire was come live (poor Ice formation will cause the water grounding and live). In this case, please Forbidden container and piping to crack, leading immediately stop use and disconnect to scalds and water leakage. the power, and remember not to touch any electric applicance in your house. Do not connect or disconnect the power At the same time, immediately contact after-sales service and your property supply while your hands are wet. management company for professional Forbidden Check if the ammeter and the diameter of the wires are in Non-professional maintenance accordance with the rated current Warning of the water heater. If necessary, personnel shall not carry out please have it checked by an unauthorized repair, maintenance, Forbidden dismantling or re-construction of experienced electrician. the heater. Do not drink hot water from the heater or use it for similar purposes. Be sure to use independent socket Earthing Forbidden and earth it reliably. Do not spray water or steam onto the heater. In case the power cord of the Forbidden water heater is damaged, be sure Please take precautionary measures to have it replaced by after service during cold weather so as to prevent Warning technicians with special cord the heater from being frozen. Warning If you do not need to use the heater for a prolonged period, please cut Warning CAUTION in the heater in accordance with reliable wall. Do not install at places without sewage. the instructions in the chapter on cleaning and maintenance. Forbidden 1 TIMER SET Hot water outlet Hot water outlet valve Cold water Mixing outlet Valve valve Safety valve Cold water inlet Shower head Installation must be made by installers of or designated by our company after-service department. The water heater shall be wall-mounted. 1 Make 2 holes Φ 12mm, 65mm deep in wall with an Wall rack impact drill according to the drawing of the external dimensions (See Figure 4). 2 Take out all accessories in packaging liner, unpack one hook, sleeve the ring end of the connection lines Expansion among the accessories into the hook tightening end hook and assemble the hook well. (Figure 2) 3 Extended connection line right hole). 4 Lift the water heater and hang it with wall rack corresponding to the two hooks. Insert the connection spacer led from the rear shell wall rack of the heater into the connection terminal of the line on the hook (See Figure 2). appropriate locations on inlet and outlet pipes respectively. Find the location requiring hot water supply. Connect inlet pipe, outlet pipe and city water pipe respectively to the use point for hot water. Fill the tank with water to check whether there is any leakage. It must be reconnected if there are signs of water leakage. Warning: Do not release your grip unless the wall rack is securely hung on the hook. Otherwise the heater may fall and cause personal injury or property damage. Installing safety valve Connect the safety valve to the water inlet by following the direction of its arrow (the arrow should point towards the heater). The safety valve’s rated pressure is 0.80MPa and its connection is G1/2. Once power is connected and the water is being heated, the water inside the water tank will expand. In order to relieve the water pressure inside, a very (Figure 3) safety valve. The pressure-relief vent must be free of any blockages. Please connect the drain hose to the safety valve. Connect one end of the hose to the safety valve vent and the other end to the sewage drain. The hose can be cut short or extended as necessary. The hose Connect to drain hose shall be installed as inclined downward. 2 (Figure 1) for install reference only Hot water outlet valve Cold water Mi outlet V valve 4 Press SET key to calibrate the clock. During installation, adequate space must be reserved for future maintenance and repair (at least 300 mm). If the water heater is installed within decoration boards, the right board shall be removable to facilitate removing the plastic cover during maintenance. Tap water inlet pressure shall be no less than 0.05MPa and the maximum pressure shall not exceed 0.75MPa. Electric water heater shall be installed indoors with ambient temperature above 0°C. The pipes shall be collectively laid. Hot water outlet shall not be too far from use points. In case farer than 8 m, hot water pipe shall have a thermal insulation to minimize heat loss. load bearing walls or air brick walls must have corresponding protective measures like additional support, wall-through screws or back boards. tank or pipes leak, nearby or lower facilities shall not be damaged. The installation location shall avoid being above toilet bowl, bathtub, washbasin or doorframe, where will cause a suppressed or unsafe feeling to users. Do not confuse inlet and outlet water pipes. Safety valve shall be installed at designated position with no Use a test pencil to check whether the live line and null line are wrongly connected. Power may only be connections. The power supply should also conform to the heater’s requirements. To avoid danger caused by accidental reset of heating breaker, the power for the heater cannot be supplied by timer and other external switch devices or connected to circuit with frequent switching for facility use. In order to avoid unforeseen accidents, only install components Haier-provided . Do not switch or exchange parts yourself. If components are damaged, you must contact the company’s repair center and use the parts supplied by Haier. If to the user fails to follow the requirement above, Haier will not be responsible for any direct or indirect damages caused hereof. Introduction of control panel Actual temperature Set temperature Power Current time Current time/ temperature increase key 6 Power selection key 7 Time setting key 1 2 3 4 5 + , –to set the hour; Press the SET key again, + , –to set the minute; After setting, press SET Press the SET Installation warning 8 Heating Temp. icon Blinking, indicates heating is in process; temperature is maintained at set temperature once it stops blinking. 9 Preset stop-heating) 0 Preset bath, preset stop-heating setting key A 1 C urre nt Te mp. 2 H e a ting T e mp. 8 N orma l F a s t T urbo 3 On 4 5 6 7 SPEED kW 9 0 A T IM E R SET Real-time Heating Mode is water leakage at the respective joints before connecting power. Once power is connected, the panel will show full display for 1 second, accompanied by a buzzer sound. The heater will then enter into shutdown state as before. 1 Press key to switch on the heater Press key for the heater to interchange between standby state (with clock display only) and working state. 2 Press + , –keys to set the temperature to (35~75°C) The Heating Temp. value icon on the control panel will blink and changes correspondingly. Once the desired value is reached press SET the value blinks for 6 seconds without any further operation, the system will automatically enter next Under real-time heating mode, the heater will automatically heat the water or maintain the temperature near the set value. (If the set temperature is lower than 55°C, the heater will heat again once the temperature is lower than the set value by 5°C; If the set temperature is between 55°C and 75°C, the heater will heat again once the temperature is lower than the set value by 10°C.) Preset Bath Mode This product is equipped with preset bath function. Activate the preset bath function to set the preset bath time, power and temperature. If no operation is carried out for 2 minutes after that, the heater will enter into power saving mode (display on and current time only). It will also calculate the heating time, and heat the water to the preset temperature automatically before the preset time. 1 Carry out Steps 1~4 of the real-time heating mode 2 Press the TIMER key, the preset bath icon on displays. 3 Press SET key to set the preset time + , –to set the hour; Press the SET key again, Press the SET + , –to set the minute; After setting, press SET the value blinks for 6 seconds without any further operation, the system will automatically enter next Note: If the actual temperature doesn't reach the set temperature at the preset time, the heater will extend the heating time by 30 minutes automatically. After 30 minutes the heater will stop heating no mater the temperature reaches to the set temperature or not. If by the preset time the actual temperature is that of the set temperature, but the actual temperature drops by 5°C by the preset time, the heater will re-heat the water. Once the preset time is reached, it will stop heating whether or not the water reaches the set temperature. Preset Stop-heating Mode This product is also equipped with preset stop-heating mode, i.e. the heater will automatically stop-heating at the appointed time. 1 Carry out Steps 1~4 of the real-time heating mode displays 2 Press the TIMER key repeatedly, the preset stop-heating icon 3 Press the SET key to set the preset stop-heating time Press the SET key, how-to is the same as mode 3 of preset bath Preset bath and preset stop-heating can be set simultaneously. Once the settings are activated, water heater will automatically start heating the water to reach the preset temperature before the preset On time based on the current time and preset time. In the time between On and Off, water heater is on real-time heating mode (once the water temperature drops 5 degree than the preset temperature, heating will be started again). The water heater will automatically stop heating when reaches the Off time. Note: If the Off time is within the execution time of preset bath, then the Water heater will first stop heating for 1min, then continue the heating till ON time. Installation of remote control unit holder Use the correct screws in the accessories to secure the remote control unit holder onto a suitable position on the wall; and insert the remote control unit into the holder (see illustration below). 3 Press SPEED key repeatedly to select the heating power This product provides three power settings for your selection. Low (1kW), Medium (2kW), High (3kW). 3 4 Item Unit ES15V-P2 ES25V-P2 ES35V-P2 Waterproof grade / IPX4 IPX4 IPX4 Mixing factor % 13 5 4 MPa No less than 0.05MPa No less than 0.05MPa No less than 0.05MPa 64 68 64 14 21 41 3×1.5 3×1.5 3×1.5 Remote control unit panel Used to adjust the temperature value Explanation: The use of the buttons on the remote control unit is the same as that for the buttons on the control panel. Note: When using the remote control unit it is best to use it at close distance and at a perpendicular angle. When the battery in the remote control unit is completely exhausted, please remove the cover on its back using a coin to turn the knob in the direction as indicated, then remove the button battery inside and replace it with SPEED SET TIMER Tap water pressure Average temperature of hot water outlet Re-heating time (a temperature rise of 50oC) prevent explosion. They should be disposed of in accordance with regulations. o C min Diameter of power wire Cleaning and maintenance Warning: maintenance may cause severe injury or damage. Disconnect power supply before cleaning. Gently wipe with wet cloth dipped with a little of mild detergent. Do not use gasoline or other solvents. Finally dry with dry cloth. Keep water heater dry. Do not use cleansers containing grinding agent (e.g. toothpaste), acids, chemical elements and tank liner of water heater shall be cleaned once in three years. Take care not to damage protection layer on heating elements and tank liner inner surface. According to mm 2 Remarks: 1. The permitted error limit of net weight above is ±10%. 2. The values for mixing factor, average temperature of hot water outlet, re-heating time (a temperature rise of 50°C) are all measured under the maximum power condition. Dimensions (Figure 4) a maintenance is needed, please contact local service station. Friendly reminder: 1. In long-term out-of-use or maintenance of the heater, you can close the city water pipe valve and set the mixing valve to the highest water temperature rate after opening the safety valve handle. Move up the safety valve handle to drain the tank. C SPEED Front view Side view Cutaway view d Rear view TIMER SET switching on the water heater, exhausting gas possibly retained in the pipeline. In this case, Model ES15V-P2 ES25V-P2 ES35V-P2 in good condition. Technical data · Packing list Unit ES15V-P2 ES25V-P2 ES35V-P2 Rated voltage V 230 230 230 Rated frequency Hz 50 50 50 MPa 0.80 0.80 0.80 Power W 1000/2000/3000 1000/2000/3000 1000/2000/3000 Net weight kg 10 14 17 Rated temperature o C 75 75 75 L 15 25 35 Rated pressure Volume a 316mm 378mm 415mm b 291mm 362mm 398mm c 623mm 616mm 663mm A Hot water outlet B Cold water inlet C Tank F Thermometer tube G Wall-mounting bracket Parameters Item e b 5 d 152mm 152mm 152mm e 100mm 100mm 100mm D Heating element E Anode rod Remarks: The permitted error limit of above parameters is ±10%. Packing list Name Quantity Model ES15V-P2 Remote control, Electric Safety valve Expansion User's Connecting Accessories Remote control water Drain hose hook manual line (PCS) pack (Unit) unit holder (Set) heater (Set) (Unit) (PCS) (Copy) 1 1 2 1 1 1 1 ES25V-P2 1 1 2 1 1 1 1 ES35V-P2 1 1 2 1 1 1 1 6