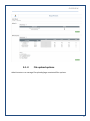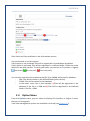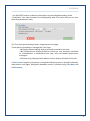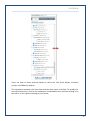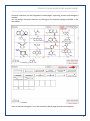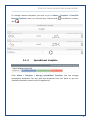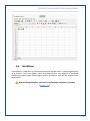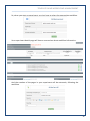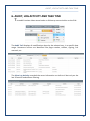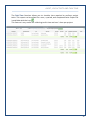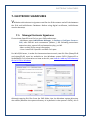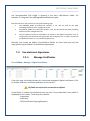
1
User Guide Electronic Lab Notebook (ELN) Version: October 2015 © 2015 by AgileBio. www.agilebio.com & www.labcollector.com Summary 1- INTRODUCTION ...................................................................................... 3 2- GETTING STARTED .................................................................................. 4 3- OVERVIEW .............................................................................................. 5 3-1. Admin Menu .................................................................................. 5 3-1-1. Permissions ....................................................................... 6 3-1-2. File upload options............................................................ 8 3-2. Option Menu .................................................................................. 9 3-3. Tree View ..................................................................................... 10 4- THE HEART OF OUR ELN ....................................................................... 13 4-1. The Text Editor ............................................................................. 13 4-2. The Book ...................................................................................... 15 4-3. The Experiment ............................................................................ 17 4-4. The Page....................................................................................... 19 4-4-1. Spreadsheet Data (Need JAVA Plugin) ............................. 22 4-4-2. Diagram Designer ........................................................... 23 5- TEMPLATES AND WORKFLOWS MANAGEMENT .................................. 28 5-1. Templates .................................................................................... 28 5-1-1. Create custom fields ....................................................... 28 5-1-2. Page template ................................................................ 29 5-1-3. Reaction template .......................................................... 30 5-1-4. Spreadsheet template ..................................................... 32 5-2. Workflows .................................................................................... 33 6- AUDIT, LOG ACTIVITY AND TASK TIME ................................................. 36 7- ELECTRONIC SIGNATURES .................................................................... 38 7-1. Manage Electronic Signatures ...................................................... 38 7-2. Use electronic Signatures ............................................................. 39 7-2-1. Manage Certificates........................................................ 39 7-2-2. Page validation and signing ............................................ 40 8- UPGRADING AND UPDATING ............................................................... 42 INTRODUCTION 1- INTRODUCTION Thank you for choosing one of AgileBio’s solutions for the management of your lab. The ELN add-on is a web-based solution allowing efficient management of all your experiments in the lab. Unlimited number of books, experiments and pages can be created. Powerful tools are included to produce added value notebook: Text/Table Interface Mass Doc/Picture/Molecules Import tools Chemical reaction/Diagram Designer Versioning Log Activity Electronic Signatures Task time reports Template/Workflow management Pdf/Print/Zip export The ELN provided by AgileBio is suitable for research projects, technical platform service activities and company projects. ELN add-on can be fully integrated with LabCollector, the LIMS we developed for life science research labs, Pharma and biotech industries. Indeed, you can link information from LabCollector to an experiment and a page. LabCollector is a copyrighted product from AgileBio . 3 GETTING STARTED 2- GETTING STARTED You can get ELN add-on simply by downloading from www.labcollector.com. LabCollector software has to be installed first as it contains the framework. LabCollector support documents for installation are available on our website. ELN add-on can be installed on any operating system (Windows, MacOS X and Linux). 1/Manual mode: Unzip and paste ELN add-on folder in the extra modules folder. For Windows it would look like: C:\Programs\AgileBio\LabCollector\www\lab\extra_modules\eln Open LabCollector, the ELN add-on module is now activated. Click on the module to finish the installation. 2/Automatic mode from LabCollector interface: You can also use LabCollector Menu Admin > Setup > Upload/Add Addons > Upload Addon ZIP > Add Addon Return to LabCollector, the ELN add-on module is now activated. Click on the module to finish the installation. The add-on will remain in a 30 days free trial mode until you save the final license Admin > Setup > License. To obtain a valid license, you have to copy and send the activation key to AgileBio. 4 OVERVIEW 3- OVERVIEW ELN’s main interface is composed of: A menu bar with 5 tabs: - Home - New Book/Project - Add Log Entry - Options - ADMIN A search menu by keyword or tag with filters: Book, Experiment and date. A Tree View to switch easily between books, experiments and pages. A viewer to display books, experiments and pages details. Note: a language selector is integrated to switch easily between English, French, German and Portuguese interfaces (see chapter 3-2). 3-1. Admin Menu Only users with an administrator profile can access to the Admin Menu in its entirety. 5 OVERVIEW From this menu, workflows, pages/chemical reactions/spreadsheet templates and custom fields can be managed to standardize and harmonize writing procedures of experiments (see chapter 5-). Managers can get an overview on the ELN activity using the Log Activity (last 50 entries), the audit tools and the task time reports. Filters by user and/or date range are available to execute more specific audits. For more details, see chapter 6-. Administrators can manage digital certificates, pages validation and signing from this menu. For more details on these functions, see chapter 7- of this user guide. 3-1-1. Permissions Through ADMIN> Manage > Advanced Permissions, administrators can manage users’ permissions: Basic selection corresponding to actual users’ permissions. Advanced selection: administrators can define PI for each group and specific user’s permissions. Basic selection opens two more tabs: 1/ Add Book/Project Rules, allowing administrator to select if user and staff can create new book. 6 OVERVIEW 2/ [All Books] Tab Access, allowing administrator to configure access to All Books. Advanced selection allows defining PI for each group, and permissions for all users. Per user, permissions are: All: All permissions C/EW: user can create and edit workflow C/ET: user can create and edit template ANB: user can add new books VAB: user can view all books 7 OVERVIEW 3-1-2. File upload options Administrators can manage file uploads/page associated files options. 8 OVERVIEW Sizes limits per file are defined in the information section. You can activate or not this option. If this option is not activated, files will be registered in the database by default. If this option is activated, files will be registered in a defined folder. Folder has to be defined in the path section. To verify your path, you can test it (Try button + legend: not tested, correct path, incorrect path). You can also customize the maximum size/file (0 to 100M) authorized in database: 0M: Files will be stored in the defined folder (path section). 100M: Files will be stored in the database In the other cases, like in the example, 1/Files will be registered in the database if the file is ≤ 50M and 2/Files will be registered in the defined folder if the file > 50M. 3-2. Option Menu From the Options menu, you can select to display ELN interface in English, French, German or Portuguese. Tree View management options are available in this tab (see chapter 3-3). 9 OVERVIEW Through this menu you can also access to tools to merge/compile two or more pages in print / pdf views (report arrangement). To select interesting pages, click on the Select Pages bouton and check pages. Then choose your printing method (PDF or print) through the Options menu: click on merge selected pages (print) or merge selected pages (PDF). 3-3. Tree View You can hide the tree view using or display the Tree View options using next to the search menu or from the Menu bar: Options > Tree Options. Several options are available to manage information displayed in the Tree View: - Hide closed pages - Display only created or modified pages - Select a time period 10 OVERVIEW - Use ASC/DESC button to display information by ascending/descending order - By default, Tree View elements are displayed by date of creation but you can sort them by alphabetical order. The Tree View panel displays books, experiments and pages. Three tabs are available to manage the Tree View: - My Book (default setting): display all books created by the user. - My Collaborations: display books for which the user has been identified as a collaborator. A collaborator can view, edit and modify experiments and pages. - All Books (only displayed with Admin status): display all books of the lab. A Quick search engine by keywords is integrated allowing users to quickly find books, experiments and pages. Navigation between results is possible using Find Next and Find Previous. 11 OVERVIEW Users can hide or show archived books to refine the Tree View display. Archived project are hidden by default. The separation between the Tree View and the main panel is flexible. To modify the tree view dimension, click on the separation line between both panels and drag it on the left or on the right according to your needs. 12 THE HEART OF OUR ELN 4- THE HEART OF OUR ELN 4-1. The Text Editor For description and content of main page, you have to use the ELN text editor. Don’t hesitate to use the user’s guide of the text editor, CKEditor, that you can open using button. If you want to insert pictures or use a text written in another text editor, our advice is to use the different paste buttons, the paste content applet, add an image and the link to LC Photobank. If you want to modify an image before insert it, you have to use the paste content applet, and chose the option: Send to MS paint. So you can add legends, text box, arrows… 13 THE HEART OF OUR ELN If users need to import tables, they can use the mouse right click but we don’t recommend it. It’s better to create a new one and fill results manually. Press the button on the toolbar. The Table Properties dialog window that will open lets you set configuration options that define table size, its display properties, or other advanced properties. Below is an overview of all Table Properties tab elements: Rows – the number of rows in the table (obligatory). Columns – the number of columns in the table (obligatory). Width – the width of the table in pixels or a percent value. Giving the width as a percent value lets you set the proportion of the editing area that the table will occupy. Height – the height of the table in pixels. Headers – the drop-down list that formats certain table cells as headers, which applies special formatting to them. You can apply header formatting to First Row, First Column or Both. Border size – the thickness of the table border in pixels. Alignment – the alignment of the table on the page. The following options are available: Left, Center, Right. Cell spacing – the space between individual cells as well as cells and table borders, in pixels. Cell padding – the space between the cell border and its contents, in pixels. Caption – the label of the table that is displayed on top of it. Summary – the summary of the table contents that is available for assistive devices like screen readers. 14 THE HEART OF OUR ELN Note: 1 pixel (px) is approximatively equal to 0.30 millimeter (mm). With the ELN Chemistry plugin , users can design chemical reaction which can be integrated in book pages, reporting, reused and changed if needed (see chapter 5-1-3). A backup of your changes will be accessible until you save or cancel your new experiment or page. You can also suppress this backup using the broom. 4-2. The Book Click on New Book/Project button in the main menu. You have to choose a name and add tags to help you with your search if you want (Enter to validate each tag). To validate, use the button Submit. 15 THE HEART OF OUR ELN One the book creation finished, you retrieve your information on the viewer. You can edit the book’s name, tags and use the field description if needed. Owner can now define several collaborators who will be able to view and modify the book. Use the link at right Manage user’s access to access to collaboration options. With Basic Permissions (Chapter 3-1-1) With Advanced Permissions (Chapter 3-1-1) To unlock options for users, tick the box Allow User Access, then choose your different options for Book, Experiment and Pages. You can also define who can sign pages. Your collaborators will see your book in the section My Collaborations. For each book, you have a menu on the top right. You can Add New Experiment (Chapter 4-3), Print Book, Export in PDF or Zip format (PDF + attached files), and access to the Book History. 16 THE HEART OF OUR ELN The Book History displays all book page versions. You can open and recover an old version by clicking on the book name. It is useful to identify page modifications and therefore it promotes traceability of lab work. The same versioning option is available at the experiment and page levels. Books are the only items that can be archived (Archive button). You can choose to archive them when they are not used or finished. This feature allows you to hide books in the tree view to ensure quicker navigation. If you want to find an archived book, simply check the Show archived projects box in the tree view. You can unarchive a book by selecting it and use the Unarchive button. 4-3. The Experiment Click on Add New Experiment button in the main menu. You have to choose a name and add tags to help you with your search if you want (Enter to validate each tag). You can also decide to use a workflow. To validate, use the button Submit. A workflow is useful when the lab executes routine experiments. A workflow is defined by a page number. Each page of the workflow can be a standard page or a predefined template. Workflow and template creation are described later in the document (see chapter 5-). 17 THE HEART OF OUR ELN Once the Experiment creation finished, you retrieve your information on the viewer. You can edit the experiment’s name, tags and use the field description if needed. Once on the home page, refresh your internet browser page to be able to see your new experiment page (Folder icon in the tree). For each experiment, you have a menu on the top right. You can Add New Page (Chapter 4-3), Print Experiment, Export in PDF or Zip format, and access to the Experiment History. Experiment can be moved from a book to another using the related button Move Experiment To (right bottom of the experiment details). Since you cannot delete experiment, we recommend you to create a book TRASH and move the experiment that you don’t want to keep inside. By default, the experiment page has two more sections: Task list LabCollector Data (Box/Microplate is only available in Pages) The task list can be edited to follow up experiment advancement. 18 THE HEART OF OUR ELN Each task is defined by a name, a date, duration and a ratio. A graphical view of tasks can be displayed using Gantt chart option . Tasks definition will allow you to edit task time and allocated resources reports for a project. For more information, (see chapter 6-). Users can also link LabCollector data to the experiment allowing a complete traceability of laboratory activities. 4-4. The Page Click on Add New Page button in the main menu. If no workflow is applied to the experiment, you can choose a page template in the list if needed. If a template is applied, the page is formatted using the predefined template allowing users to save time: just follow template instructions (see chapter 5-). Then, you have to choose a name and add tags to help you with your search if you want (Enter to validate each tag). The page can also be associated to an icon for quick identification in the Tree View. Several icons are available. Those icons have no special meaning. Just define with your team, relevant signification for each icon. It can be standard page, process, sequence analysis, calculations, etc. 19 THE HEART OF OUR ELN Once the Page creation finished, you retrieve your information on the viewer. You can edit the page’s name, tags and use the field content to describe your experiment. For each page, you have a menu on the top right. You can Delete the page, Print Page, Export in PDF or Zip format, and access to the Page History. Page deletion is possible only if the section Content has never been saved (version 1). You can view version number on the top left. This number change after each content page edition. Please note that user can’t edit a page if already open by another user (lock page on editing). All buttons turn grey. By default (without template), the ELN page has several sections: Box/Microplate LabCollector Data SpreadSheet Data (see section 4-4-1) Diagram Designer (see section 4-4-2) Associated Files 20 THE HEART OF OUR ELN To access to a box/microplate directly in your ELN, you can link a box using the corresponding section. Select your storage place, then your box. Once save, you can chose between box view and list view. In the section Associated Files, files can be attached to the page and its status version can be defined: definitive ( ), intermediate ( ) or discarded ( ) version. 21 THE HEART OF OUR ELN All page content modifications are allowed until the page is closed/signed. This option is very useful to be compliant with a QA management system. Refer to chapter 6- for more details. 4-4-1. Spreadsheet Data (Need JAVA Plugin) To edit a spreadsheet, click on the icon to insert tables. From this panel, you can: - Use a blank spreadsheet editor to create your own tables. - Create a spreadsheet template to be used in routine. - Load a spreadsheet template. Spreadsheet Templates can be edited and modified from the Admin Menu (see chapter 5-1-4). When the spreadsheet is opened, you can edit, modify tables and graphics to store your results. Users must save tables into the database otherwise information will be lost. 22 THE HEART OF OUR ELN Formulas are allowed but they must be written in English format (French isn’t recognized). Formulas are working with commas instead of dot in decimal numbers. Now, you can download your spreadsheet as an excel file by clicking on the Excel icon at right. Spreadsheet data are also integrated in the printable, PDF and zip versions. 4-4-2. Diagram Designer LabCollector ELN integrates a Diagram Designer. Click on this icon and Create to start a diagram. To print a paper version or see a diagram review, use the tab Other. Multiple elements can be added like arrows, tubes, etc. 23 THE HEART OF OUR ELN Images can also be added using Add Personal Item tab. Select the image of your choice, give it a name and choose the size. Items can be imported in three resolutions: - Small quality (40px * 40px) - Medium quality (160px * 160px) - Big quality (360px * 360px) You can also define rules to manage images usage. Panel dimensions can be modified using the Panel Editor. You can define panel width and height quickly using your mouse. You can also add a panel grid in the background facilitating elements alignments. Click on the See Grid icon to display the grid. 24 THE HEART OF OUR ELN Each element added appears in a grey box allowing users to manage box dimension easily. Note the box border and color aren’t displayed when you print a preview (paper version or pdf file report). The last tab Add New Molecule Item is optional (appears only if you have the plugin) and allows designing chemical structures and reactions. You can choose to import structures from LabCollector Chemical Structures module or to design new structures directly from the Diagram Designer. To import structure from LabCollector database (only Chemical Structures module), you must link the page to structures of interest using Link LabCollector Data to this Experiment (see chapter 4-3). When chemical structures are linked to the ELN page, the tab displays the list of available structures. Select one structure to add it directly in the panel. 25 THE HEART OF OUR ELN Users can also design their own chemical structures directly through the diagram designer using Add New Molecule function (using the open-source editor JChemPaint). A new window containing a molecule editor appears. You can now design any molecule needed for your experiment. This tool includes a molecule database with the most used ones (Templates). A periodic table is also integrated. When the molecule is designed, define a name and click on Submit button to display it in the 26 THE HEART OF OUR ELN panel. Molecules in the panel can be modified using Edit function in the molecule box (grey). 27 TEMPLATES AND WORKFLOWS MANAGEMENT 5- TEMPLATES AND WORKFLOWS MANAGEMENT To make AgileBio ELN friendly to use, template and workflow functions are integrated. These options allow users to save time and use standard procedures to increase productivity and quality of their work. 5-1. Templates 5-1-1. Create custom fields To customize ELN pages and ELN pages templates, users can create custom fields. Go to Admin > Template > Manage custom fields To add a field, choose a name and define the field type: text, checkbox, select list, date, link or a grid. Maximum length of a text field is flexible depending on required information. It is possible to define a custom field as mandatory. With this function, you will be sure that required information will be completed. To help your colleague to understand the data requirement, use the help text section. 28 TEMPLATES AND WORKFLOWS MANAGEMENT For select list and checkbox types, edit the values with icon. The grid field type allows creating a two-column table that you can fill with the values of your choice. 5-1-2. Page template On this page you can manage all your templates. Create a new template with Add Template button or view/edit an existing template selected in the list with the View / Edit buttons. On the same page, you have the versioning data for each template. The template is identified by a name and a description if needed. You can use the text editor to prefill your page. 29 TEMPLATES AND WORKFLOWS MANAGEMENT Select in the template options sections that you want to use in this template: SpreadSheet Data, Diagram Designer, LabCollector Data or Associated Files. Custom fields created in the previous step (see chapter 5-1-1) can be selected here. In the last section, you can configure access to this template. 5-1-3. Reaction template With the ELN Chemistry plugin in option , users can design chemical reaction by importing structures from LabCollector Chemical Structures module. 30 TEMPLATES AND WORKFLOWS MANAGEMENT Chemical reactions can be integrated in book pages, reporting, reused and changed if needed. You can design chemical reactions by clicking on the chemistry plugin available in the text editor. Once a reaction designed, it can be inserted in book page and save as template. 31 TEMPLATES AND WORKFLOWS MANAGEMENT To manage reaction template, you have to go in Admin > Template > View/Edit Reaction Template. Here, you can edit your reaction with with and delete a reaction . 5-1-4. Spreadsheet template From Admin > Template > Manage SpreadSheet Template, you can manage spreadsheet templates. You can add new templates from this panel or you can view/edit templates saved in the ELN application. 32 TEMPLATES AND WORKFLOWS MANAGEMENT 5-2. Workflows A workflow is a sequence of connected steps that can be used in a work organization or a process. From the Admin menu the administrator can add/edit a workflow combining several pages (blank pages and/or templates) that will be applied in an experiment. Before editing workflow, you need to define page templates if needed (chapter 5-1). 33 TEMPLATES AND WORKFLOWS MANAGEMENT Workflows are useful for routine experiments, helping standardize writing of experiment reports to increase quality of lab activities. A workflow is related to an experiment. For each workflow, you can predefine task list, choose the number of page in your workflow and select a template for each page. You can also decide if pages require admin validation or not. We recommend adding a couple of blank pages at the end of a workflow to avoid unexpected events even if length pages in the workflow are unlimited. So users will be able to add rectifications if signed pages contain errors or need additional information. 34 TEMPLATES AND WORKFLOWS MANAGEMENT So, when you start an experiment, you just have to select the appropriate workflow. Your experiment details page will have a new section about workflow information. And the creation of the pages in your experiment will be automatic, following the workflow. 35 AUDIT, LOG ACTIVITY AND TASK TIME 6- AUDIT, LOG ACTIVITY AND TASK TIME The audit function allows team leader to follow up users activities on the ELN. The Audit Trail displays all modifications done by the selected user, in a specific date range. Numerous actions are identified like page creation, edition, signing, link removal, etc. The View Log Activity recorded the same information as Audit trail but only on the last 50 entries and without filtering. 36 AUDIT, LOG ACTIVITY AND TASK TIME The Task Time function allows you to visualize time required to perform project tasks. This report can be edited for a user, a period, and completed tasks. Export file is available with the icon . This feature is very useful for collecting task’s time and user’s time per project. 37 ELECTRONIC SIGNATURES 7- ELECTRONIC SIGNATURES Validation with electronic signature certifies the ELN contents and all links between the ELN and LabCollector Database. Before using digital certificates, LabCollector need to be setup. 7-1. Manage Electronic Signatures First activate OpenSSL and Curl on your PHP preferences: - Windows: open LabCollector Manager, in Settings > Configure Servers > PHP, edit PHP.INI and uncomment (delete ;) the following extensions: extension=php_openssl.dll and extension=php_curl.dll. - Mac: contact us for more information - Linux: install PHP-OpenSSL and PHP-Curl rpms. For Win32/64 users, in order for these extensions to work, two DLL files (libeay32.dll and ssleay32.dll) must be available to the Windows system PATH (System32 or SysWOW64). For information on how to do this, see How do I add my PHP directory to the PATH on Windows. Although copying DLL files from the PHP folder into the Windows system directory also works (because the system directory is by default in the system's PATH), this is 38 ELECTRONIC SIGNATURES not recommended. PHP folder is located in the main LabCollector folder, for example: C:\Program Files (x86)\AgileBio\LabCollector\php. PHP will search for the openssl.cnf using the following logic: The OPENSSL_CONF environmental variable, if set, will be used as the path (including filename) of the configuration file. The SSLEAY_CONF environmental variable, if set, will be used as the path (including filename) of the configuration file. The file openssl.cnf will be assumed to be found in the default certificate area, as configured at the time that the openssl DLL was compiled. This is usually means that the default filename is c:\usr\local\ssl\openssl.cnf. Basically, just create the folder C:\usr\local\ssl (folder usr then local then ssl) and copy openssl.cnf provided in \LabCollector\php\extras. 7-2. Use electronic Signatures 7-2-1. Manage Certificates Go to ADMIN > Manage > Digital Certificates. From this page, the administrator can create and manage all digital certificates. Click on Create new user certificate and keys at the top left. All fields are required to create the certificate. A certificate is unique and related to only one user. Once submitted, user profile is displayed on the screen. Three keys are created: - Private Key - Public Key - CSR (Certification Signing Request) 39 ELECTRONIC SIGNATURES A signature image can easily be attached to the certificate. Just download it using icon. A certificate is valid during one year. It can be renewed by a simple click on RENIEW button. Authentication can be configured at this stage via Admin > Manage > Digital Certificates Options: Login Authentication: authentication with your LabCollector login Certificate authentication by password only: authentication with the password generated when you create your digital certificates. Certificate authentication by private key plus certificate password (as previous) 7-2-2. Page validation and signing Workflows are edited with two options: page validation/signing or not as it was describe before (Chapter 5-2). Go to Admin > Page > Page Validation & Signing. A list of all pages that need to be approved/closed is displayed. The administrator can approve pages only if it’s required by the workflow. The approval is indicated by a name and a date in the bottom of the page. When a page is validated, no changes are possible. 40 ELECTRONIC SIGNATURES If no validation is required, users can close their pages directly without admin validation. Once a page is closed, user can sign it to certify the page content. Then the page is signed by the administrator to complete the certification process of the document. Administrators that can sign are the same users define as PI in section Advanced Permissions. They can find a list of all pages to sign in Admin > Page > Page Signing. 41 UPGRADING AND UPDATING 8- UPGRADING AND UPDATING To update or upgrade the ELN Add-on module, just download it from our website (www.labcollector.com). Then, unzip the folder and paste files in the following folder: Programs\AgileBio\LabCollector\www\lab*\extra_modules\eln *The name of this folder is the laboratory nickname chosen during LabCollector installation. 42 http://www.labcollector.com AgileBio USA 1133 Broadway Suite 706 New York, NY 10010 USA Tel: (347) 368 1315 Fax: (800) 453 9128 http://www.agilebio.com [email protected] AgileBio Headquarters 75 rue de Lourmel 75015 Paris FRANCE Tel: 01 41 79 15 85 Fax: 01 72 70 40 22