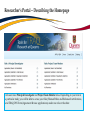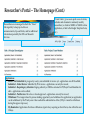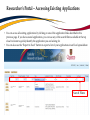
1
TRAQ DSS Form
Researchers - User Manual
January 2014
Introduction to TRAQ
• TRAQ (Tools for Research at Queen’s) is an electronic research management system
which replaced all internal certification paper applications (Human Ethics Certification
& Biohazards Certification), and soon will replace the legacy electronic award
application (Data Summary and Signature System – commonly referred to as DSS).
• Following the successful pilot implementation of Human Ethics in 2010, the Researcher
Portal in 2011, and Biohazard Certification in 2013, the TRAQ project introduced the
Awards Module in 2014. The project also includes a Financial Reporting Module
(scheduled for March 2014), as well as a CV/Annual Reporting Module (scheduled for
2015).
• For more details regarding TRAQ, please visit our website: http://www.queensu.ca/traq/.
All users should know how to safeguard their electronics (computers, smartphones, etc.)
and be familiar with the Queen’s University Computer User Code of Ethics as well as the
Freedom of Information and Protection of Privacy Act (FIPPA) at Queen’s.
Accessing the Researcher’s Portal
•
Queen’s faculty and staff should use their regular Queen’s NetID and strong password* to
log into the Researcher Portal through MyQueensU/SOLUS. (Once in MyQueensU, the
link to TRAQ is at the bottom of the screen, in the right-hand toolbar.)
•
The Researcher’s Portal is also available through the TRAQ website:
http://www.queensu.ca/traq/signon.html
*Information regarding managing your Queen’s NetID and strong password is available on the ITS website.
Accessing the Researcher’s Portal (Cont.)
•
Queen’s students and external users, trying to log in for the first time, will need to complete the
Self Registration Form before they can access the Researcher’s Portal. Once you have registered,
you will receive an automatic email with instructions on setting up your own password. From
then on, you will access the Researcher’s Portal through the Post-Registration Login Site.
•
When logging in through the Post Registration Login site, your username is the email address
provided at the time of registration.
Researcher’s Portal – Describing the Homepage
All users have Principal Investigator and Project Team Member roles. Depending on your role in
a particular study, you will be able to access your files (Human Ethics and Biohazard certifications,
and TRAQ DSS Form/Agreement Review applications) under one role or the other.
Researcher’s Portal – The Homepage (Cont.)
Reviewers and other users with signing authority (Department Heads/Faculty Deans/Hospital Research
Directors) will have additional roles on their homepage such as Department Signing Authority and/or
Reviewer.
6
Researcher’s Portal – The Homepage (Cont.)
Researchers are encouraged to check the “News”
link regularly to keep up-to-date on
announcements, tips and tricks, and for additional
information posted by the Office of Research
Services.
“Useful Links” gives users quick access to forms,
websites and documents commonly used by
researchers (i.e. links to SSHRC or NSERC online
application, or link to the Budget Template Form,
etc.)
Applications:
•
Saved – Not Submitted: In progress by user(s), not submitted for review yet - applications can still be edited;
•
Submitted – Under Review: Submitted by PI for review - applications can only be viewed;
•
Submitted – Requiring my Attention: Singing authority or ORS has returned to PI/Project Team Members for
edits - applications can be edited;
•
Submitted – Post Review: All active or closed approved – applications can only be viewed;
•
Withdrawn: PI no longer intend to pursue funding opportunity and withdraws the application (an application
can be withdrawn by the PI only once it has reached the administrative office (URS), it cannot be withdrawn
during the approval process);
•
My Reminders: Applications that have a Milestone (report due), requiring an Event Form, due within the next
30 days.
Researcher’s Portal – Accessing Existing Applications
• You can access all existing applications by clicking on one of the application links described in the
previous page. If you have several applications, you can use any of the search filters available at the top
of each column to quickly identify the application you are looking for.
• You can also use the “Export to Excel” button to export a list of your applications in an Excel spreadsheet.
Test – May 15,
2013
Researcher at
Queen’s
Search Filters
Test – April 21,
2012
Researcher at
Queen’s
Researcher’s Portal – Starting a New Application
Step 1:
Click on “APPLY NEW” to access the TRAQ
DSS Form/Agreement Review applications.
Researcher’s Portal – Selecting the Proper Form
•
•
For the Awards module, researchers have the choice between two forms: 1) Agreement
Review; 2) TRAQ DSS Form.
The Agreement Review form is to be used strictly for the agreement types listed in the
description below, and that do not involve incoming funds to the University. Please use the
TRAQ DSS Form for all other agreements, and grant applications.
Step 2:
Click on the hyperlinked form to
start application.
Important TRAQ Tips
• TRAQ does not have an automatic save feature. You should hit the “Save” button after
completing each tab. You will know that you have saved your changes when you see
the “Application Saved” message in green font at the top of your screen.
• Though TRAQ has no automatic save feature, it does have a time out feature! If you
need to step away from your computer, you should always hit “Save” and “Close” as
a precautionary measure. Failing to do so could result in information being lost and
the application being “locked”.
11
Project Info Tab
IMPORTANT: Please note that all fields
preceded by * are required. Failing to
complete these fields will prevent the
TRAQ DSS Form
user from submitting the form.
Title is a required field and must be completed
before the application can be submitted.
Do not enter the start & end dates. Dates will be entered by
URS/Research Accounting staff when notice of award is received.
Although Keywords are not required, researchers are encouraged
to use this field to describe their project. Keywords be selected
from the drop down menu or typed directly into the text box.
IMPORTANT: if your study has an international dimension
(international partners, international sponsors, etc.) please note
the name of the country in the Keywords textbox.
If your study requires Human Ethics, Biohazard,
and/or Animal Care Certification(s) you must link
your certifications to your application, or at the very
least make note of this requirement and of your
intent to apply. Please see details on following page.
Project Info Tab - Related Certifications
• If you do not have any active certifications yet, click on ‘Add New’ to indicate your intention of
applying for either Human Ethics/Biohazard Certification.
• If you have already submitted your application for required certifications, or already have active
certifications, click on ‘Search’ to being up a list of your pending/active certifications. Click on select
next to the certification(s) you need to link to your TRAQ DSS Form.
• Note that the renewal date of any related Human Ethics and/or Biohazard Certifications will appear on
the Project Info screen making it easier for researchers to remain current in their certifications.
Project Info Tab – Animal Care Certifications
• Since Animal Care is not one of the TRAQ modules (researchers apply for Animal Care through
TOPAZ), your Animal Care Certification cannot be directly linked to your TRAQ Awards file. However,
researchers are still expected to make note of any active, or pending, Animal Care Certification required
for their project.
• From the Project Info tab, click on ‘Add New’ under Related Certifications. Select “Animal Care” from
the ‘Certification Category’ dropdown menu, and note the status and TOPAZ file number of your
Animal Care Certification in the ‘Notes’ textbox.
• Research Administrators will be able to confirm the status of your Animal Care Certification directly in
TOPAZ, and change the status from pending to active.
Project Team Info Tab
•
•
The Principal Investigator Info screen is automatically filled out with the user’s information.
Please note: Only Queen’s faculty members can be assigned to the PI role on the TRAQ DSS
Form.
If you are a PI with multiple affiliations (crossappointments) please make sure that you select the
department/research centre where this study will be
taking place from the ‘Affiliation’ dropdown menu
to ensure that the application follows the proper
workflow and avoid any unnecessary delays.
Adding Project Team Members to Application
• From the Project Team Info tab, scroll down to “Other Project Member Info” and click “Add New”.
• Important: Do not enter this information manually always use “Search Profiles” - Click “Search
Profiles” to bring up the Investigator List and search for the person you need to add as a team
member.
Adding Project Team Members to Application (Cont.)
You can search the Investigator List
for the name of the person to be
assigned as team member. The list can
be searched in a variety of ways, i.e.
type the last name of the person in the
“Last Name” field, use the filter
beside it to select a search criteria
such as “Equal To” or “Contains”.
Adding Project Team Members to Application (Cont.)
• Once you’ve identified your team member – click on “select”. The project team member form will
be updated automatically.
• If you are unable to identify the person you are looking for from the Investigator List, please email
the TRAQ helpdesk ([email protected]). Your email should include the person’s:
•
•
•
•
•
First and last name
Title
Departmental affiliation
Institution/Organization (if external to Queen’s)
Email address
• You will be notified as soon as the person has been added to the Investigator List and will then be
able to add them to the project team.
Adding Project Team Members to Application (Cont.)
• From there, you may select the role of the team member from the “Role In Project” drop down
menu.
• You may add as many team members as required by clicking “Add New”, team members can also
be edited or deleted. Keep in mind that anyone who will need to have access to the application
should be added as team members.
• It is recommended that Research Administrators assign themselves to the Research Coordinator
role.
• Important: Although all team members will have access to view and edit the application, the P.I.
is the only member of the project team who can submit , or re-submit, the TRAQ DSS Form.
Transferring Principal Investigator Role
•
If you are completing this application on behalf of the P.I., you will need to transfer the P.I.
role from yourself to the actual P.I. prior to submitting the application. Important: DO NOT
change P.I.’s “Last Name” and “First Name” manually – always click “Change PI”
20
Transferring Principal Investigator Role (Cont.)
•
Clicking the “Change PI” button will take you to the investigators list. From there, you
would follow the same steps detailed in the previous slides to search for and select the P.I.
•
At this point, you will notice that the “Submit” button, previously located at the top of the
form, has disappeared. This happens because the P.I. is the only team member who can
submit, and re-submit, the application.
Before P.I. Transfer
?
After P.I. Transfer
IMPORTANT: Once you’ve transferred the role of P.I., the next step is to add yourself to the
application as a team member. This must be done before you close the application. Failing
to do so will result in you losing access to the application.
21
Project Sponsor Info Tab
• The Project Sponsor Info tab captures key project funding data such as funding source, and
requested cash, in-kind and overhead amounts. This data is imported into the database and will
be used for administrative and reporting purposes.
• In TRAQ, “Sponsor” refers to the funding agency. Click on “Add New” to document the agency
and program you are applying for.
Sponsor Info
• The fields in the green square will need to be completed by the researcher(s). The other fields will
either be filled automatically, or completed by an administrator.
Start here to select the agency
Sponsor Info – Selecting the Agency
• You can search the Agency List using any of the search options available to you – i.e. typing in the
agency name, the abbreviation (NSERC, SSHRC, etc.), or using one of the search filters. Once
you’ve identified the agency you are looking for, click ‘Select’. If you are unable to identify the
agency you are looking for, please email the TRAQ Helpdesk ([email protected]).
Sponsor Info Tab (Cont.)
Based on the agency you have selected, a list of
agency-specific programs will be automatically
generated in the “Program” dropdown menu. Select
the program you are applying for.
IMPORTANT: Programs preceded by an ‘X’ are no
longer active and should not be selected.
Enter the deadline date of the
competition you are applying for.
Sponsor Info – Funding Disbursement Info
• You now need to indicate the amount of funding you will be requesting from the agency by
completing a “funding disbursement” screen. Start by clicking on “Add New” at the bottom of the
Sponsor Info screen.
Enter the anticipated start date of
your project, the fiscal year data
field above will automatically
populate.
Enter the total amount of
requested cash (this amount
should include the overhead).
Important: Remember to click “Save” at the bottom
of the Funding Disbursement Info screen and then
“Save” on the Sponsor Info screen.
Project Sponsor Info Tab (Cont.)
• One of the many advantages of TRAQ is that it allows you to enter multiple sponsors
for the same study. To add additional sponsors, simply click on “Add New” and
repeat all the steps detailed from pp. 22-26.
TRAQ DSS Form
TRAQ DSS Form
•
The TRAQ DSS Form contains a number of sub-tabs, all of which contain required
questions.
When all required questions
have been answered in a sub-tab,
the asterisk beside the title of the
sub-tab disappears and the font
is no longer bold.
TRAQ DSS Form (Cont.)
•
If you are unsure how to answer a question, try clicking on for additional information may be
available as seen in the screenshot below! Clicking on
a second time will make the textbox
disappear.
TRAQ DSS Form – For Hospital Research Only
•
If your research is being conducted at one of the affiliated teaching hospitals (KGH, Providence Care,
Hotel Dieu), you must complete sub-tab 3 of the TRAQ DSS Form. Please see further instructions on
the Hospital Research sub-tab. The same instructions can also be viewed simply by hovering your
mouse over the sub-tab’s title.
Attachments Tab
•
•
Researchers should attach any document(s) identified on the Checklist sub-tab of the TRAQ DSS
Form, such as Research Proposal, Budget, or Budget Justification, etc. Users may upload multiple
attachments, provided that each is no larger than 5MB. Attachments may be word files,
spreadsheets, JPEG files, PDFs, etc.
Click on ‘Add Attachment’ to upload a document to your TRAQ DSS Form/Agreement Review
form.
Adding an Attachment (Cont.)
Select date by clicking on
calendar icon next to “Version
Date” field. The date should
represent the date that the
document was attached to the
application (current date). This
will allow the reviewer to
identify the most recent version
of any document that may have
been sent back for amendments
and compare the updated
document with the previous one.
Include a brief description of
the document.
Click on “Browse” to select
the document from your
computer.
Doc/Agreement: see next slide
Adding an Attachment (Cont.)
Select the type of
document from the
“Doc / Agreement” drop
down menu
Click “Add Attachment”
to complete the process
Approvals Tab - For Hospital Research Only
• If you answered ‘yes’ to question 1.6 on the TRAQ DSS Form and completed sub-tab 3 (Hospital
Research), you must complete the Approvals tab and checkmark any additional signing approval you
will require for this application. Please make sure you complete this step correctly to avoid any
delays in getting your application reviewed.
Logs Tab – Workflow Logs
•
The Logs tab is a useful tool that allows researchers and research administrators to track the
history of the application and communicate with one another.
•
The Workflow Logs tracks and time stamps approvals and messages. The Workflow Logs starts to
populate after the P.I. has submitted the application. Refer to the Workflow Log to review all
workflow history.
Logs Tab – Project Logs
•
The Project Logs tracks and time stamps every action taken on the application. Researchers are
encouraged to check the Project Logs regularly as it is a good way to ensure that your most recent
changes have been saved – text in blue font represents the most recent updates
Errors Tab
TRAQ DSS FORM
The Errors tab keeps a log of any required
questions that were left unanswered. If all
required questions have been answered, the
Errors tab disappears.
Save and Close
• At any point in the process, the applicant may “Save” and “Close” the application and complete it
at a later date. The information entered will be saved and the user can access it again through the
Researcher’s Portal under “Applications (Saved – Not Submitted)”.
TRAQ DSS FORM
• Important: Do not close that application by clicking the X at the top of your browser, doing so
will result in the application being “locked” preventing other team members from accessing it
Save and Close (Cont.)
• You will know that you are closing the file properly (i.e. using the “Close” button) when the
following dialog box pops up on your screen:
Click “OK” to save your
changes and close the file
TRAQ Tip! Though TRAQ has no automatic save feature, it does have a time out feature! If you need to
step away from your computer, you should always hit “Save” and “Close” as a precautionary
measure. Failing to do so could result in information being lost and the application being “locked”.
The user responsible for “locking” the application is able to “unlock” it by accessing it again and
exiting properly. All other team members, who find themselves “locked out” of the application, can
either contact the user who “locked” it or the TRAQ team for support (ext. 78426; email:
[email protected])
Submitting the TRAQ DSS Form
Start by clicking the “Submit” button at the top
of the screen to open the “Work Flow Action”
screen.
You may use the
‘Comments’ text box to
enter any additional
comments/information
you would like to include
with your application.
Click on one of the
two “Submit”
buttons located at
the top and the
bottom of the “Work
Flow Action” screen
to submit your
application for
review.
Need assistance/have a question?
Contact the TRAQ Helpdesk
(613) 533-6000, ext. 78426
Email: [email protected]
You may also use our webform
to submit an issue to our Online Support Centre.