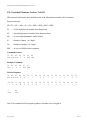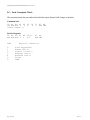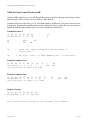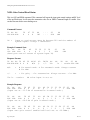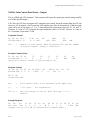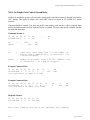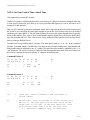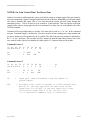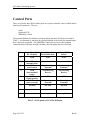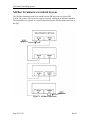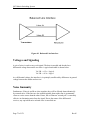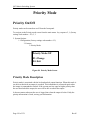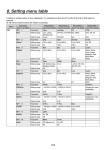
1
OPERATING MANUAL
QE3 MATRIX
SWITCHING SYSTEM
Quintech Electronics and Communications Inc.
250 Airport Road • Indiana, PA • 15701 • USA
Toll Free: 800.839.3658
Local & International: 724.349.1412
Fax: 724.349.1421
E-mail: [email protected]
Website: www.quintechelectronics.com
QE3 2500
QE3250032X32CAFFF000
Modular Hot-Swap Matrix Switching System
General Description:
The QE3250032X32CAFFF000 is a matrix switch and switching subsystem that provides a complete 32x32 matrix,
including hot-swappable cards, redundant power supplies, and redundant system controllers in a 6 RU chassis. The
modularity of the QE3250032X32CAFFF000 provides easy access to cards for seamless upgrades and maintenance via
the front panel without requiring cables to be disconnected or disrupting the signal paths of other cards in the system.
Specifications:
L-Band
IF
Operating Frequency:
950-2150 MHz
50-200 MHz
Gain Range (manual mode):
-12 dB to +18 dB in
0.5 dB steps
-12 dB to +18 dB in
0.5 dB steps
Impedance:
75 Ω
75 Ω
P1dB:
0 dBm
-1 dBm
OIP
+10 dBm
+9 dBm
RF Input Power:
-10 dBm to -70 dBm
-10 dBm to -70 dBm
RF Output Power:
-10 dBm
-10 dBm
Output AGC Level:
-10 dBm to -50 dBm
-10 dBm to -50 dBm
Frequency Response:
+ 1.5 dB
+ 1.5 dB
+ 0.5 dB over any
36 MHz channel
+ 0.5 dB over any
36 MHz channel
Isolation (input-to-input):
65 dB min.
65 dB min.
Isolation (output-to-output):
60 dB min.
60 dB min.
Isolation (input-to-output):
50 dB min.
50 dB min.
Input Return Loss:
14 dB
13 dB
Output Return Loss:
14 dB
10 dB
Noise Figure:
22 dB @ 0dB gain
26 dB @ 0 dB gain**
Configuration:
32 inputs / 32 outputs
RF Connectors:
Type F, 75 Ω
Power Requirements:
100-240 VAC autoranging, 50/60 Hz
Power Consumption:
328 W
Local Control:
Front panel keypad with LCD display
Remote Control:
RS-232, RS-422/485, SNMP, TELNET or TCP/IP
via customer-supplied PC
Software:
PC-compatible operating software and protocol (included with the
system)
Mechanical:
6 RU (10.5" H x 19" W x 25-1/4 " D) (including rear handles)
Weight:
57 lbs.
Certifications:
CE, NRTL/TUV, FCC Part 15
3
**Note: -20 dBm minimum input signal level is recommended from 50-200 MHz to achieve -50 dBc spurious noise ratio.
250 Airport Road • Indiana, PA 15701 • (800) 839-3658 • (724) 349-1412 • Fax: (724) 349-1421
http://www.quintechelectronics.com/ • [email protected]
© 2011Quintech Electronics and Communications Inc. All rights reserved. All product designs and specifications are subject to change without notice.
QE3250032X32CAFFF000 Rev G, CO# 15364 (Page 1 of 2)
250 Airport Road • Indiana, PA 15701 • (800) 839-3658 • (724) 349-1412 • Fax: (724) 349-1421
http://www.quintechelectronics.com/ • [email protected]
© 2011Quintech Electronics and Communications Inc. All rights reserved. All product designs and specifications are subject to change without notice.
QE3250032X32CAFFF000 Rev G, CO# 15364 (Page 2 of 2)
XRM/QE3/QRM/SRM/MRF/MRM/LTE Series Protocol Quintech XRM/QE3/SRM/MRF/MRM/QRM/LTE Series Protocol v2.15 – Release 07/08/09/10/11
Rev CL, 2/16/2011
This document specifies a common command protocol that can be used to control a Quintech matrix
controller from a computer. This protocol is for a full fan-out matrix.
Protocol 2.15 release 07 (2.15.07) is backward compatible with all previous 2.15 protocols.
Protocol 2.15 release 08 (2.15.08) is not backward compatible with 2.15 protocol release 07 but is
backward compatible with releases 06 and lower. Release 07 is for XRM products only. Release 08 is for
SRM products. SRM products do not have the same features as the XRM products, therefore Release 8 is
backwards compatible with 06 and lower releases.
Protocol 2.15 release 09 (2.15.09) is for QE3 products only.
Protocol 2.15 release 10 (2.15.10) is for QRM products only.
Protocol 2.15 release 11 (2.15.11) is for LTE products only.
Rev CL Page 1 of 157 XRM/QE3/QRM/SRM/MRF/MRM/LTE Series Protocol
Command Summary
This list gives the commands defined in Protocol 2.15
B
Backup. Various commands to set up the QRM/QE3/XRM Q-Sense feature.
C
Check Change Flag / Unit Status. Contains system change flags that indicate whether crosspoints,
messages, names, or access control settings have changed.
E
Ethernet. Various commands to set Ethernet parameters and control access.
F
Firmware version. Identifies the model, protocol and firmware version, and size of the matrix as set
on the controller.
I
Input. Command to read the access control setting of an input.
K
Keypad. Various commands to control access to the front panel keypad.
L
Lock a crosspoint.
M
Messages. Retrieve message log.
N
Name. Commands to manage naming of inputs, outputs, and other parameters.
O
Output query. Various commands to get information on the specified output.
P
Protected Mode command.
Q
Crosspoint queue.
R
Reset. Soft reset equivalent to a reboot or a hard reset back to factory defaults.
S
Set a crosspoint. Connect an input to an output. Protect and unprotect outputs.
U
Unlock a crosspoint.
X
XRM, QE3, and QRM commands. Various commands to support the XRM/QE3/QRM advanced
feature set.
Z
Access Control. Various commands to support control access and manage accounts.
Other commands are reserved for future use.
Page 2 of 157 Rev CL XRM/QE3/QRM/SRM/MRF/MRM/LTE Series Protocol Command Availability
The table gives the availability of various commands for different protocol releases.
Command
BB
BBC
BBR
BE
BER
BO
BOR
BR
BRO
BT
BTR
C
ED
EG
EI
ELD
ELE
ELP
EP
ES
F
FX
IS
KL
KS
KU
L
LC
M
NI
NO
NRI
NRO
NSI
NSO
NQ
O
P
OS
Q
RH
RS
S
SC
SP
SU
U
XA
XAS
XC
XF
XGA
XGAO
XGH
XGM
XGMO
Rev CL 2.15.00
X
X
2.15.01
2.15.02
X
X
X
X
X
X
X
X
X
X
X
X
X
2.15.03
2.15.04
2.15.05
2.15.06
X
X
X
X
X
X
X
X
X
X
X
X
X
X
X
X
X
X
X
X
X
X
X
X
X
X
X
X
X
X
X
X
X
X
X
X
X
X
X
X
X
X
X
X
X
X
X
X
X
X
X
X
X
X
X
X
X
X
X
X
X
X
X
X
X
X
X
X
X
X
X
X
X
X
X
X
X
X
X
X
X
X
X
X
X
X
X
X
X
X
2.15.07
2.15.09
2.15.10
X
X
X
X
X
X
X
X
X
X
X
X
X
X
X
X
X
X
X
X
X
X
X
X
X
X
X
X
X
X
X
X
X
X
X
X
X
X
X
X
X
X
X
X
X
X
X
X
X
X
X
X
X
X
X
X
X
X
X
X
X
X
X
X
X
X
X
X
X
X
X
X
X
X
X
X
X
X
X
X
X
X
X
X
X
X
X
X
X
X
X
X
X
X
2.15.08
X
X
X
X
X
X
X
X
X
X
X
X
X
X
X
X
X
X
X
X
X
X
X
X
X
X
X
X
X
X
X
X
X
X
X
X
X
X
X
2.15.11
X
X
X
X
X
X
X
X
X
X
X
X
X
X
X
X
X
X
X
X
X
X
X
X
X
X
X
X
X
X
X
X
X
X
X
X
X
X
X
X
X
X
X
X
X
X
X
X
X
X
X
X
X
X
X
X
X
X
X
X
X
X
X
X
X
X
X
X
X
X
X
X
X
X
X
Page 3 of 157 X
XRM/QE3/QRM/SRM/MRF/MRM/LTE Series Protocol
XGR
XGRO
XGS
XGTA
XGTD
XGTPA
XGTPD
XGZ
XP
XPI
XPS
XPT
XPV
XRB
XRC
XRI
XRO
XRW
XT
XWI
XWIS
ZA
ZAI
ZAO
ZC
ZG
ZI
ZL
ZO
ZP
ZU
ZX
X
X
X
X
X
X
X
X
X
X
X
X
X
X
X
X
X
X
X
X
X
X
X
X
X
X
X
X
X
X
X
X
X
X
X
X
X
X
X
X
X
X
X
X
X
X
X
X
X
X
X
X
X
X
X
X
X
X
X
X
X
X
X
X
X
X
X
X
X
X
X
X
X
X
X
X
X
X
X
X
X
X
X
X
X
X
X
X
X
X
X
X
X
X
X
X
X
Note 1: Some firmware versions implementing releases 2.15.01 – 2.15.03 allowed an “L” lock command
to change a locked output to a different input without first using the “U” unlock command to
remove the lock. In order to maintain compatibility over all 2.15 releases, this type of operation is
no longer supported.
Note 2: Some commands such as M and N were available earlier in custom firmware versions. Check the
command format to determine compatibility between an earlier custom command and the standard
command.
Note 3: Release 7 is currently only available on XRM products.
Note 4: Release 9 is currently only available on QE3 products.
Note 5: Release 10 is currently only available on QRM products.
Note 6: Release 11 is currently only available on LTE products.
Page 4 of 157 Rev CL XRM/QE3/QRM/SRM/MRF/MRM/LTE Series Protocol Firmware Releases
The following tables indicate the firmware releases to date along with which protocol release is
implemented.
Firmware
Date
Protocol
Field Update
Control Board
Capability
SRM
Serial
1433-F or later
Serial/Ethernet
“
“
“
Ethernet
1433-E only
Serial/Ethernet
1433-F or later
“
“
“
“
“
“
Notes
2.56
2.59
2.60
2.61
2.62
2.63
2.64
2.66
4/11/03
10/30/03
12/02/03
12/02/03
2/04/04
3/11/04
4/28/04
5/12/04
2.15.02
2.15.03
“
“
2.15.05
“
“
2.15.06
2.67
6/3/04
“
"
"
2.68
2.69
2.71
2.73
2.74
2.75
6/23/04
12/09/04
6/14/05
7/05/06
5/03/07
8/21/07
“
“
“
“
2.15.08
2.15.08
"
"
“
“
“
“
"
"
“
“
“
“
2.76
9/21/10
2.15.08
“
“
2.77
1/4/11
2.15.08
“
“
4.00
4.03
4.04
03/12/09
04/07/09
04/29/09
2.15.10
2.15.10
2.15.10
Ethernet
Ethernet
Ethernet
1661
1661
1661
4.05
06/11/09
2.15.10
Ethernet
1661
Added QRM specific commands
Added “M” cmd & alarm msgs
Added A-B switch backup alarm
Deleted XQA command
Added IS, XRW, XWIS support
06/09
2.15.10
Ethernet
1661
No Protocol Changes
07/29/09
2.15.10
Ethernet
1661
Added BB, BBR, BE, BER, BO,
BOR, BR, BT, and BTR for
Q-Sense. These commands replace
and render obsolete XBRO and
XBWO.
Support for serial firmware upgrade
Upgrade to 2.6x recommended
Support for LNB option
Support for access control.
Command ZG is not implemented.
8 Users, each user set to fixed GID
SNMP dynamic viewing and
main/remote moved under
configuration program model type
Fixes DHCP function
Fixes SNMP function
Includes 15 Second screen refresh
Support for BAE 32x2 system only
Added features
Added features. Input access
control, enhanced M&C LCD panel.
ZAI & ZAO commands.
Added features priority and
protected modes. Full SNNP
protocol control. Commands SP, SC,
SU, LC, IS, PM, and ZG. Short form
L, SP, and U commands. SNMP
event traps generated.
Multiple internal fixes and additions.
MAX size 464. Features remain
same.
QRM
4.06-4.10
4.11
Rev CL Page 5 of 157 XRM/QE3/QRM/SRM/MRF/MRM/LTE Series Protocol
Firmware
Date
7.00
10/25/05
2.15.07
7.01
11/07/05
2.15.07
Serial
1514-D or later
7.02
7.03
7.04
1/9/06
1/26/06
2.15.07
2.15.07
2.15.07
Serial
Serial
Serial
1514-D or later
1514-D or later
1514-D or later
7.05
4/25/06
2.15.07
Serial
1514-D or later
7.06
5/15/06
2.15.07
Serial
1514-D or later
7.07
6/12/06
2.15.07
Serial
1550-D or later
7.08
6/12/06
2.15.07
Serial
1514-D or later
7.09
8/21/06
2.15.07
Serial
1550-D or later
7.10
10/2/06
2.15.07
Serial/Ethernet
1550-D or later
7.11
10/12/06
2.15.07
Serial/Ethernet
1550-D or later
7.12
10/12/06
2.15.07
Serial/Ethernet
1550-D or later
7.13
10/26/06
2.15.07
Serial/Ethernet
1550-D or later
7.14
11/19/06
2.15.07
Serial/Ethernet
1550-D or later
7.15
7.16
12/19/06
12/20/06
2.15.07
2.15.07
Serial
Serial/Ethernet
1550-D or later
1550-D or later
7.17
02/07/07
2.15.07
Serial/Ethernet
1550-D or later
Page 6 of 157 Protocol
Field Update Control Board
Capability
XRM
Serial
1514-D or later
Notes
Support for XRM features and I/O
naming. . No remote UCM support.
Fixes messages command. Messages
are generated for all RF levels if
threshold is set larger than
-77dBm. Fixes RS-485 on control in
serial port . . No remote UCM support.
Internal Release
Internal Release
Uses “CAN” bus communication
between Processor and PIC. . No
remote UCM support.
Firmware supports only 32x64 size with
2 XRM units with 1514s and 1 XRD
unit. Internal XRM reading of RF dBm
values not supported. . No remote
UCM support.
Firmware supports only 32x32 size and
a remote UCM.
Firmware supports only 32x32 size.
System communications based on
interrupts, not polling as before. . No
remote UCM support.
Firmware supports only 32x32 size.
Increased timeout length between XRM
and remote UCM.
Supports hot swappable 1550 control
card. No support for XRB or XRC
commands.
Supports XRDs and
XROs for systems up to 512x512. No
remote UCM support.
Improved communications interface
with memory enhanced 1530 on/off
card. No remote UCM support.
Improved communications interface
with memory enhanced 1530 on/off
card. . No remote UCM support.
Improved communications interface
with memory enhanced 1530 on/off
card. . Limited remote UCM supported.
See note
Fixes accidental 1530 on/off card
memory re-initialization. Limited remote
UCM supported. See note.
Fixes incorrect backup memory writing.
Fan PRM read timing change. Support
for 512x512. Access control bug fix.
Internal Release
Fan speed read correction. Firmware
version and release not stored on XRM
memory. Correction now advances
version numbers after an upgrade.
Systems requiring multiple XRM units
now store and initialize individual XRM
unit inputs attenuation values. Support
for up to 512x512 size. Possible 256
XRM x 32inputs = 8192 input
attenuation values.
Rev CL XRM/QE3/QRM/SRM/MRF/MRM/LTE Series Protocol Firmware
Date
Protocol
Field Update
Capability
Control Board
7.18
03/01/07
2.15.07
XRM
Serial/Ethernet 1550-D or later
7.19
5/15/07
2.15.07
Serial/Ethernet
1550-D or later
2.15.07
Serial/Ethernet
1550-D or later
7.20
Notes
Enhanced SNMP trap IP address
storage. Improved memory allocation.
Addition of advanced diagnostic screen
for 32x32 systems.
Simtek memory changes for .32 inputs
and , 33 outputs. (XRM system inputs)
XRO route to zero changed to assume
route confirmed from XRM.
Simtek memory write routine modified
to support hardware. Simtek written
after keypad is released.
7.21
7/16/07
2.15.07
Serial/Ethernet
1550-D or later
7.22
7/18/07
2.15.07
Serial/Ethernet
1550-D or later
7.23
8/31/07
2.15.07
Serial/Ethernet
1550-D or later
7.24
11/13/07
2.15.07
Serial/Ethernet
1550-D or later
7.25
12/10/07
2.15.07
Serial/Ethernet
1550-D or later
7.26
1/22/08
2.15.07
Serial/Ethernet
1550-D or later
7.27
2/20/08
2.15.07
Serial/Ethernet
1550-D or later
7.28
07/14/08
2.15.07
Serial/Ethernet
1550-D or later
7.29
7.30
7.31
09/23/08
02/09/09
05/27/09
2.15.07
2.15.07
2.15.07
Serial/Ethernet
Serial/Ethernet
Serial/Ethernet
1550-D or later
1550-D or later
1550-D or later
7.32
07/14/09
2.15.07
Serial/Ethernet
1550-D or later
7.33
07/22/09
2.15.07
Serial/Ethernet
1550-D or later
Screens repair. Improved front panel
boot up diagnostics.
7.34
08/4/09
2.15.07
Serial/Ethernet
1550-D or later
Fix input attenuation and fan read
screens. Expand boot up LCD
comments.
Rev CL Firmware re-written to correct access
control bug for 7.09-7.14
Firmware now will boot in main mode in
a XRM remote 1RU UCM
Designed to support SRM/XRM
combination system. No support for
XWI, XRI, XRO, & XA. No front panel
for reading RF level set warning level
and attenuate inputs if front panel is set
to XRM/SRM system.
Fixes input access control for an
additional 1RU remote controller.
Adds support for XRO attenuation after
a crosspoint change.
Enhanced factory test mode. No
changes to customer features.
Add additional XRO attenuation for
greater factory flexibility in XRM system
testing. No changes to customer
features.
Add additional test modes for factory
acceptance tests. Autoroute minimum
dB level and Delta dB value now can
be set at front panel.
Initialization fixes.
Added Autoroute errors to front panel
Added self diagnostic test. Large
system fan PS, route data, temperature
reads All errors to front panel. Boot up
shows % data. Added IS, XGR, and
XRW support.
Minor enhancements to scrolling
screens.
Page 7 of 157 XRM/QE3/QRM/SRM/MRF/MRM/LTE Series Protocol
Firmware
Date
Protocol
7.35
08/26/09
2.15.07
XRM
Serial/Ethernet 1550-D or later
7.36
09/21/09
2.15.07
Serial/Ethernet
1550-D or later
7.37
7.38
7.39
10/05/09
10/07/09
10/07/09
2.15.07
2.15.07
2.15.07
Serial/Ethernet
Serial/Ethernet
Serial/Ethernet
1550-D or later
1550-D or later
1550-D or later
7.40
10/07/09
2.15.07
Serial only
1550-D or later
7.41
10/14/09
2.15.07
Serial/Ethernet
1550-D or later
7.42
10/15/09
2.15.07
Serial/Ethernet
1550-D or later
7.43
9/14/10
2.15.07
Serial/Ethernet
1550-D or later
7.44
10/21/10
2.15.07
Serial/Ethernet
1550-D or later
7.45
02/15/11
2.15.07
Serial/Ethernet
1550-D or later
Page 8 of 157 Field Update
Capability
Control Board
Notes
Improved front panel interface. Remote
UCM support fixed.
Fix to SRM/XRM systems. Alarm report
improvements
Fix to S XAS XA commands
Fixes Ethernet download
Fixes Bridge card test mode Will not
boot after download
Fixes boot up problem. Ethernet
upgrade not functional
Fixes boot up problem. Ethernet
upgrade functional
Fixes boot up problem. Ethernet
upgrade functional.
QSENSE, Priority lock and protection
mode. B command set. Event SNMP
traps. ZG command.
Corrective action for LC command and
access control operation. Correct ZI
and ZL commands. Add ZG keypad
screen.
Corrective action for fan read and GID
default values. XRI/O commands made
more user friendly.
Rev CL XRM/QE3/QRM/SRM/MRF/MRM/LTE Series Protocol Firmware
Rev CL Date
Protocol
9.01
9.03
3/05/09
3/18/09
2.15.09
2.15.09
Field Update
Control Board
Capability
QE3
Serial/Ethernet 1624-A
Serial/Ethernet 1665
9.04
3/18/09
2.15.09
Serial/Ethernet
1665
9.05
3/21/09
2.15.09
Serial/Ethernet
1665
9.06
6/17/09
2.15.09
Serial/Ethernet
1665
9.07
7/8/09
2.15.09
Serial/Ethernet
1665
9.08
10/6/09
2.15.09
Serial/Ethernet
1665
9.09
12/09/09
2.15.09
Serial/Ethernet
1665
9.10
9.11
9.12
12/22/09
12/22/09
05/06/10
2.15.09
2.15.09
2.15.09
Serial/Ethernet
Serial/Ethernet
Serial/Ethernet
1665
1665
1665
9.13
05/12/10
2.15.09
Serial/Ethernet
1665
9.14
05/12/10
2.15.09
Serial/Ethernet
1665
9.15
05/27/10
2.15.09
Serial/Ethernet
1665
9.16
9.17
06/17/10
Internal
release
2.15.09
2.15.09
Serial/Ethernet
Serial/Ethernet
1665
1665
9.18
87/8/10
2.15.09
Serial/Ethernet
1665
9.19
8/10/10
2.15.09
Serial/Ethernet
1665
9.20
8/31/10
2.15.09
Serial/Ethernet
1665
9.21
9/16/10
2.15.09
Serial/Ethernet
1665
Notes
QE3 Firmware
QE3 changed to single processor
with shared memory for main and
backup processor
Added additional boot up screen
information.
Changed boot procedure for
enhanced hardware boot.
Added support for SRM/QE3
systems.
Added leading zeros to F command
system size.
DOES NOT REPLACE 907.
Released to support 1 system. A
128x64 with 2 QE3s and 2 XROs.
Removed all front panel system
options except firmware and RF
warning levels. 908 does not
support any XG subset, XRI, or
XRO.
Setup XRD/XRO for QE3 systems
Adds QED on/off switch
Fixes input 100 boot up error.
Add 1RU remotes. Protection and
priority modes. Add LC,SP,SU,SC,
PM, ZG.
Fix 1RU remotes. Protection and
priority modes shared with remotes.
SNMP traps corrected.
Fix remote screens. Fix XGA/XGM
commands.
Add
front
panel
F2=Protect output
Add QED termination. Fix RF
polling of QI1-2.
SNMP protocol buffer
Modify SC, SP, & L commands, and
protect front panel function. Add
boot SNMP trap. Added 2 TCP/IP
message queues and 3 trap
addresses.
Fix power supply front panel poll
screen. Boot SNMP trap. Added
user ID. Alternate L, U, SP, SU
commands. Unit address in trap. All
SNMP taps sent from main.
Fix power supply front panel poll
screen. Remove beta version
switch.
Add QSENSE and QROUTE. Add
B commands.
Additions to front panel interface.
Page 9 of 157 XRM/QE3/QRM/SRM/MRF/MRM/LTE Series Protocol
Firmware
Date
Protocol
9.22
9/28/10
2.15.09
Field Update
Control Board
Capability
QE3
Serial/Ethernet 1665
9.23
10/21/10
2.15.09
Serial/Ethernet
1665
9.24
10/26/10
2.15.09
Serial/Ethernet
1665
9.25
11/11/10
2.15.09
Serial/Ethernet
1665
9.26
11/16/10
2.15.09
Serial/Ethernet
1665
9.27
11/18/10
2.15.09
Serial/Ethernet
1665
9.28
12/2/10
2.15.09
Serial/Ethernet
1665
9.29
12/9/10
2.15.09
Serial/Ethernet
1665
9.30
12/16/10
2.15.09
Serial/Ethernet
1665
9.31
12/21/10
2.15.09
Serial/Ethernet
1665
9.32
1/5/10
2.15.09
Serial/Ethernet
1665
9.33
2/16/10
2.15.09
Serial/Ethernet
1665
Notes
Additions to front panel boot up. Qroute alarms. SNMP objects input
and output tied to access control.
Output access control 1RU remote
update fix. Priority lock fix.
Fix ZI, ZL, LC commands. Add ZG
screen to KP/LCD. Modified access
control KP/LCD function to link to
GID not UID.
QEO attenuation enhancements
QEO attenuation enhancements
and debug tool removal
ZX telnet command restored
Adjust memory timing write. Change
NQ command.
Change boot procedure for AGC
value for QE3 inputs. Fix DHCP
lockup.
Change XGH memory saving
function. Redesign set group and
set user screen for 14 character
names.
Fix S command.
Modify SNMP response to S, U, SP,
SU, and L commands.
Add XGS. Enhance boot process.
320x320 support. QEO off switch.
Note: 7.XX and 9.XX firmware has limited support for the remote 1RU controller. Remotes do not
support advanced features such as reading RF levels, fan status, power supply status, temperature
read, and Qsense, Most advanced feature commands return error code ‘u’ for unavailable.
Page 10 of 157 Rev CL XRM/QE3/QRM/SRM/MRF/MRM/LTE Series Protocol Firmware
Rev CL Date
Protocol
8.00
2/23/06
2.15.06
Field Update
Control Board
Capability
Special Builds
Serial/Ethernet 1433-F or later
8.10
4/18/06
2.15.06
Serial/Ethernet
1433-F or later
8.20
11/30/06
2.15.06
Serial/Ethernet
1433-F or later
8.30
5/30/07
2.15.08
Serial/Ethernet
1433-F or later
8.40
07/01/10
2.15.11
Ethernet
1.03
09/23/10
2.15.08
1660
SRX
Serial/Ethernet 1433-F or later
Notes
Unique build for 2x24 substitution
switch.
Unique build for TXS/RXS fiber
optic redundancy switch. Used for
TXS215008FFC000-ASI
and
RXS215008FFC000-ASI.
Unique build for TXS/RXS fiber
optic redundancy switch. Used for
TXS00700BFC000
and
RXS007008BFC000.
Unique build for a RSS 550 RX/TX
Router
LTE firmware initial release
Add second TCP/IP support, SNMP
protocol buffer, LC, IS, ZG
commands, Input access control,
naming inputs and outputs, ALT L,
and U commands
Page 11 of 157 XRM/QE3/QRM/SRM/MRF/MRM/LTE Series Protocol
SNMP Traps
This document assumes the reader has a general working knowledge of SNMP functionality and SNMP
traps. SNMP traps are currently supported by the SRM, XRM, QE3, and QRM products.
These Quintech products can generate and send SNMP traps for various conditions or events. Generally
they are created and sent to inform about error conditions. Some traps however, can be generated for
normal events such as changing crosspoints or locking an output. All SNMP traps can be captured by a
monitoring system at the set SNMP trap IP address. There are numerous programs that capture and can
display, save, or even forward these traps to other mediums.
SNMP Trap Structure
Quintech SNMP traps contain additional information in a description field that indicates the location and
type of condition that generated the SNMP trap and may contain additional details about the condition.
The location is usually indicated by an address or number pointing to the exact source of the event. The
type of event is usually indicated by a description in a few words about the event.
SNMP Trap Descriptions
SNMP traps are all the same in general structure, but contain different text information related to the
condition. Quintech SNMP traps usually indicate two types of conditions: events or alarms.
Events:
SNMP traps indicating events can be turned on or off by turning on or off SNMP functionality. Events are
considered normal operational events and usually require no user intervention. Events include but are not
limited to: locking an output, unlocking an output, changing an output, and protecting an output.
Alarms:
SNMP traps indicating alarm conditions can not be turned off and are sent regardless whether SNMP is on
or off. Alarm traps usually indicate a condition that may require user intervention. Alarms include but are
not limited to: power supply failure, power supply or unit overheating, RF board offline, RF level warning,
auto re-route, and fan failure.
Page 12 of 157 Rev CL XRM/QE3/QRM/SRM/MRF/MRM/LTE Series Protocol XRM Re-route Alarm
This SNMP trap indicates an output to input path in an XRM unit has been automatically re-routed to
another path by the XRM unit.
Complete trap:
<Output XX @YYYZZ Rerouted>
Description structure:
<Output XX >
= XX indicates the specific output of the unit that
re-routed. Valid numbers are 1-32. This is not a
system output but specific to the unit indicating
the alarm.
<@YYY>
= Type of unit indicating the alarm. Typically XRM.
<ZZ>
= Address of the unit. This number is the same as
the two right rotary dials on the control board.
<Rerouted>
= Alarm description
Example Alarm:
<Output 23 @XRM00 Rerouted>
XRM at address 00 re-routed output 23
<Output 4 @XRM12 Rerouted>
XRM at address 12 re-routed output 4
Rev CL Page 13 of 157 XRM/QE3/QRM/SRM/MRF/MRM/LTE Series Protocol
QE3/XRM Input RF Level Alarm
This SNMP trap command indicates the RF level on an input has dropped below the customer set
threshold.
Complete trap:
<In XX RFLevel @YYYZZ Failure>
Description structure:
<In XX RFLevel >
= XX indicates the specific input of the unit that
dropped below the threshold.
<@YYY>
= Type of unit indicating the alarm.
<ZZ >
= Address of the unit. This number is the same as
the two right rotary dials on the control board.
<Failure>
= Alarm description
Example Alarm:
<In 12 RFLevel@XRD01 Failure>
Input 12 @ XRD at address 01 RF level dropped
<In 31 RFLevel@XRM12 Failure>
Input 31 @ XRM at address 12 RF level dropped
Page 14 of 157 Rev CL XRM/QE3/QRM/SRM/MRF/MRM/LTE Series Protocol XRM Temperature Alarm
This SNMP trap command indicates the temperature sensor on the control board has detected a higher than
normal operating temperature. This indicates a cooling problem that may require checking fans and
airflow.
Complete trap:
<Temp @ XXXYY Warning>
Description structure:
<Temp @ >
= Alarm description. Temperature abbreviated.
< XXX>
= Type of unit indicating the alarm.
<YY>
= Address of the unit. This number is the same as
the two right rotary dials on the control board.
<Warning>
= Alarm description
Example Alarm:
<Temp @ XRD01 Warning>
Temperature in unit XRD at address 01 is higher than normal
Rev CL Page 15 of 157 XRM/QE3/QRM/SRM/MRF/MRM/LTE Series Protocol
XRM Fan Speed Alarm
This SNMP trap command indicates the fan specified is running well below the normal expected RPM.
Fan may require servicing or cleaning.
Complete trap:
<FanX @ YYYZZ Warning>
Description structure:
<Fan>
= Alarm description. Cooling fan.
<X @ >
= Fan number. Fans are numbered from left to right
on the rear panel.
< YYY>
= Type of unit indicating the alarm.
<ZZ>
= Address of the unit. This number is the same as
the two right rotary dials on the control board.
<Warning>
= Alarm description
Example Alarm:
<Fan 2 @ XRD01 Warning>
Fan 2 on XRD at address 01 is running slower than normal.
Page 16 of 157 Rev CL XRM/QE3/QRM/SRM/MRF/MRM/LTE Series Protocol XRM Power Supply Alarm
This SNMP trap command indicates the power supply has a fault or failure condition. Additional
information can be found by using the power supply protocol command “XP”.
Complete trap:
<PSX @ YYYZZ Warning>
Description structure:
<PS>
= Alarm description. Power supply problem.
<X @ >
= Power supply number. PS 1 is on left. PS 2 is on right.
< YYY>
= Type of unit indicating the alarm.
<ZZ>
= Address of the unit. This number is the same as
the two right rotary dials on the control board.
<Warning>
= Alarm description
Example Alarm:
<PX 2 @ XRD01 Warning>
Power supply on right on XRD at address 01 has an error condition..
Rev CL Page 17 of 157 XRM/QE3/QRM/SRM/MRF/MRM/LTE Series Protocol
XRM Keypad/LCD Alarm
This SNMP trap command indicates the LCD and keypad have a fault condition.
Complete trap:
<KP/LCD@XXXYY Warning>
Description structure:
<KP/LCD@>
= Alarm description. LCD problem.
<XXX>
= Type of unit indicating the alarm.
<YY>
= Address of the unit. This number is the same as
the two right rotary dials on the control board.
<Warning>
= Alarm description
Example Alarm:
<KP/LCD@ XRM00 Warning>
The keypad/LCD has a fault condition.
Page 18 of 157 Rev CL XRM/QE3/QRM/SRM/MRF/MRM/LTE Series Protocol XRM RF Card Offline
This SNMP trap command indicates an RF card that was operating has stopped responding. Indicates a
failure or the card has been removed from the chassis. The XRM has 3 types of cards and this trap
indicates the type and location of the failure. Each XRM has 8 input cards, 8 output cards, and 4 bridge
cards. The input and output cards are numbered from right to left. The first input card is the one farthest to
the right. The XRM also has 4 bridge cards numbered from top to bottom.
Complete trap:
<Output card X @YYYZZ offline>
<Bridge card X @YYYZZ offline>
<Input card X @YYYZZ offline>
Description structure:
<Output card >
<Bridge card >
<Input card > = Cards type description
<X>
= Card number.
<YYY>
= Type of unit indicating the alarm.
<ZZ>
= Address of the unit. This number is the same as
the two right rotary dials on the control board.
<offline>
= Alarm description
Example Alarm:
<Output card 3 @ XRM00 offline>
Third from the right output cards has gone offline.
Rev CL Page 19 of 157 XRM/QE3/QRM/SRM/MRF/MRM/LTE Series Protocol
XRD/XRO RF Card Offline
This SNMP trap command indicates an RF card that was operating has stopped responding. Indicates a
failure or the card has been removed from the chassis. The XRD and XRO have 32 cards. The cards are
numbers starting at the top right with card number 1. Card number 2 is on the bottom rack on the right. The
top rack contains all odd numbered cards. The bottom rack contains all even numbered cards. Cards
always numbered from right to left.
Complete trap:
<Card XX @ YYYZZ offline>
Description structure:
<Card XX @ >
= Card number.
<YYY>
= Type of unit indicating the alarm.
<ZZ>
= Address of the unit. This number is the same as
the two right rotary dials on the control board.
<offline>
= Alarm description
Example Alarm:
<Card 1 @ XRO00 offline>
Card 1 top right upper card at XRO 00 has gone offline.
Page 20 of 157 Rev CL XRM/QE3/QRM/SRM/MRF/MRM/LTE Series Protocol XRM Auto-Reroute Fault Location
This SNMP trap command indicates an auto-route has occurred. This trap sends out the address, number
and type of the card that is determined to have caused the re-route.
Complete trap:
<Auto Re-route@ UUUVVI=W B=X O=Y:CheckInputCardZ:>
<Auto Re-route@ I=W B=X O=Y:CheckBridgeCardZ:>
<Auto Re-route@ I=W B=X O=Y:CheckOutputCardZ:>
Description structure:
<Auto Re-route@>= Alarm description
<I=W >
= Input card number W.
<B=X >
= Bridge card number X.
<O=Y >
= Output card number Y.
<Check(type)Card>
= Type of card indicating the alarm.
<Z>
= Address of the unit. This number is the same as
the two right rotary dials on the control board.
<offline>
= Alarm description
Example Alarm:
<Card 1 @ XRO00 offline>
Card 1 top right upper card at XRO 00 has gone offline.
Rev CL Page 21 of 157 XRM/QE3/QRM/SRM/MRF/MRM/LTE Series Protocol
XRM Input/Output RF level balance Alarm
This SNMP trap is only active when auto-routing is disabled. The command indicates that the RF level
difference between the output and connected input on an RF path has a difference greater than the
customer set difference. This condition will send 2 traps. One indicates the output and the second if
successful will report back the card where the failure is detected.
Complete trap1:
<Path Fault @WWWXXOutputYY>
Complete trap2:
<Output card Z of 8 >
<Input card Z of 8 >
<Bridge card Z of 4 >
Description structure:
<Path Fault @> = Alarm description
<WWW>
= Type of unit indicating the alarm.
<XX>
= Address of the unit. This number is the same as
the two right rotary dials on the control board.
<OutputYY>
= Unit output number 1-32.
<Z>
= Bridge/Output/Input card number.
Example Alarm:
< Path Fault @XRM00Output5 >
<Output card 2 of 8 >
Output 5 at XRM 00 has RF balance fault. Output card 2 is determines to be the cause of the fault.
Page 22 of 157 Rev CL XRM/QE3/QRM/SRM/MRF/MRM/LTE Series Protocol QE3 RF Card Offline
This SNMP trap command indicates an RF card that was operating has stopped responding. Indicates a
failure or the card has been removed from the chassis. The QE3 has 2 types of cards: Input and output
cards.
There are 8 input cards each supporting 8 inputs for possible total of 8 inptu cards, numbered freom right
to left. There are 8 output cards but each output cards supports 16 outputs. There are 2 banks of output
cards each bank supports the upper or lower 32 inputs. Four lower bank cards support outputs 1-64 but
only inputs 1-32. Four upper bank output cards support 64 outputs but only 33-64 inputs. This trap
indicates the type and location and output bank of the failure.
The QE3 also has a backup control card. If the control card goes offline it will send a trap also.
Complete trap:
<Out card WW-XX@YYYZZ Lower Bank Offline>
<Out card WW-XX@YYYZZ Upper Bank Offline>
<In card WW-XX@YYYZZ Offline>
<Control card @ XXXYY offline error.>
Rev CL Page 23 of 157 XRM/QE3/QRM/SRM/MRF/MRM/LTE Series Protocol
Description structure:
<Control card >
<Output card >
<Input card > = Cards type description
<WW-XX>
= Inputs or output range supported by indicated card.
<YYY>
= Type of unit indicating the alarm.
<ZZ>
= Address of the unit. This number is the same as
the two right rotary dials on the control board.
<Upper bank>
= 4 Output cards on right of unit
<Lower bank>
= 4 Output cards on left of unit
<offline>
= Alarm description
Example Alarm:
<Output card 3 @ QE300 Lower bank offline>
Lower bank output cards number 3 has gone offline.
Page 24 of 157 Rev CL XRM/QE3/QRM/SRM/MRF/MRM/LTE Series Protocol QE3 Power Supply AC Input Alarm
This SNMP trap command indicates the AC input to the supply is not plugged in.
Complete trap:
<PSX AC Input error @ YYYZZ>
Description structure:
<PSX>
= Power supply number. 1 on left, 2 on right.
<AC input error @> = Alarm description
< YYY>
= Type of unit indicating the alarm.
<ZZ>
= Address of the unit. This number is the same as
the two right rotary dials on the control board.
Rev CL Page 25 of 157 XRM/QE3/QRM/SRM/MRF/MRM/LTE Series Protocol
QE3 Power Supply DC Output Alarm
This SNMP trap command indicates the DC output of the supply is low or not functioning.
Complete trap:
<PSX DC out error @ YYYZZ>
Description structure:
<PSX>
= Power supply number. 1 on left, 2 on right.
<DC out error @ >
= Alarm description
< YYY>
= Type of unit indicating the alarm.
<ZZ>
= Address of the unit. This number is the same as
the two right rotary dials on the control board.
Page 26 of 157 Rev CL XRM/QE3/QRM/SRM/MRF/MRM/LTE Series Protocol QE3 Power Supply Temperature Alarm
This SNMP trap command indicates the power supply temperature is exceeding normal operating limits.
Complete trap:
<PSX Temp Warning @ YYYZZ>
Description structure:
<PSX>
= Power supply number. 1 on left, 2 on right.
<Temp Warning @>
= Alarm description
<YYY>
= Type of unit indicating the alarm.
<ZZ>
= Address of the unit. This number is the same as
the two right rotary dials on the control board.
Rev CL Page 27 of 157 XRM/QE3/QRM/SRM/MRF/MRM/LTE Series Protocol
QE3 Unit Temperature Alarm
This SNMP trap command indicates the ambient temperature detected on the control board is exceeding
normal operating limits.
Complete trap:
<CPU temperature @ YYYZZ>
Description structure:
<CPU temperature @> = Alarm description
< YYY>
= Type of unit indicating the alarm.
<ZZ>
= Address of the unit. This number is the same as
the two right rotary dials on the control board.
Page 28 of 157 Rev CL XRM/QE3/QRM/SRM/MRF/MRM/LTE Series Protocol QE3 Fan RPM Low Alarm
This SNMP trap command indicates the cooling fan on the rear panel is running slower than normal.
Complete trap:
<Fan X low rpm @ YYYZZ>
Description structure:
<Fan X>
= Fan number indicating a fault. Fans are numbered
from left to right when viewing the rear panel.
<low rpm @ >
= Alarm description
< YYY>
= Type of unit indicating the alarm.
<ZZ>
= Address of the unit. This number is the same as
the two right rotary dials on the control board.
Rev CL Page 29 of 157 XRM/QE3/QRM/SRM/MRF/MRM/LTE Series Protocol
QE3 Unit Requested Reload Alarm
This SNMP trap command indicates that a unit in the QE3 system has requested a reload of system
parameters from the system controller. This typically occurs during system start up and is usually not a
reason for concern. If the request occurs repeatedly then the error requires examination.
Complete trap:
<Reload Alarm @ YYYZZ>
Description structure:
< Reload Alarm @ > = Alarm description
< YYY>
= Type of unit indicating the alarm.
<ZZ>
= Address of the unit. This number is the same as
the two right rotary dials on the control board.
Page 30 of 157 Rev CL XRM/QE3/QRM/SRM/MRF/MRM/LTE Series Protocol QE3 Input/Output RF Level Balance Alarm
This SNMP trap indicates that the RF level difference between the output and connected input on an RF
path has a difference greater than the customer set difference.
Complete trap:
<Path Fault @WWWXXOutputYY>
Description structure:
<Path Fault @> = Alarm description
<WWW>
= Type of unit indicating the alarm.
<XX>
= Address of the unit. This number is the same as
the two right rotary dials on the control board.
<OutputYY>
= Unit output number 1-64.
Rev CL Page 31 of 157 XRM/QE3/QRM/SRM/MRF/MRM/LTE Series Protocol
BR Command Event
This SNMP trap indicates that the BR or BRO command has been successfully issued.
Complete trap:
<S out WWW in XXX from BR command>
<S out WWW in XXX from BRO command>
Description structure:
<BR>
= Event description. QSENSE restore input command.
<BRO>
= Event description. QSENSE restore output command.
<out WWW>
= Output number.
<in XXX>
= Input number.
Page 32 of 157 Rev CL XRM/QE3/QRM/SRM/MRF/MRM/LTE Series Protocol L Command Event
This event trap is generated on SRM, QE3, XRM, and SRM products. This SNMP trap indicates that the L
command has been successfully issued.
Complete trap:
<L out WWW in XXX from userY@ portZ address AA>
Description structure:
<L>
= Event description. Set Lock output command.
<out WWW>
= Output number.
<in XXX>
= Input number.
<from>
= more event description
<userY@>
= User that issued the command. User1 is the Admin,
up to user8. User 9 is no user logged in.
<portZ>
= Port of access. Local keypad=0, Remote port=1,
Control in port=2, Ethernet A=3, Ethernet B=4,
Telnet=5, SNMP=6.
<address AA>
= Serial address of 1RU remote or main controller
unit the command originated from.
Rev CL Page 33 of 157 XRM/QE3/QRM/SRM/MRF/MRM/LTE Series Protocol
S Command Event
This event trap is generated on SRM, QE3, XRM, and SRM products. This SNMP trap indicates that the S
command has been successfully issued.
Complete trap:
<S out WWW in XXX from userY@ portZ address AA >
QSENSE trap:
<S out WWW in XXX from QSENSE@ portZ address AA >
QSENSE restore command trap:
<S out WWW in XXX from BR command>
Description structure:
<S>
= Event description. Set output command.
<out WWW>
= Output number.
<in XXX>
= Input number.
<from>
= more event description
<userY@>
= User that issued the command. User1 is the Admin,
up to user8. User 9 is no user logged in.
<portZ>
= Port of access. Local keypad=0, Remote port=1,
Control in port=2, Ethernet A=3, Ethernet B=4,
Telnet=5, SNMP=6 QSENSE=7.
<address AA>
= Serial address of 1RU remote or main controller
unit the command originated from.
QSENSE
= Indicates the crosspoint was changed automatically
by the system in accordance with QSENSE settings.
Page 34 of 157 Rev CL XRM/QE3/QRM/SRM/MRF/MRM/LTE Series Protocol SP Command Event
This event trap is generated on SRM, QE3, XRM, and SRM products. This SNMP trap indicates that the
SP command has been successfully issued.
Complete trap:
<SP out WWW in XXX from userY@ portZ address AA >
Description structure:
<SP>
= Event description. Set Protect command.
<out WWW>
= Output number.
<in XXX>
= Input number.
<from>
= more event description
<userY@>
= User that issued the command. User1 is the Admin,
up to user8. User 9 is no user logged in.
<portZ>
= Port of access. Local keypad=0, Remote port=1,
Control in port=2, Ethernet A=3, Ethernet B=4,
Telnet=5, SNMP=6.
<address AA>
= Serial address of 1RU remote or main controller
unit the command originated from.
Rev CL Page 35 of 157 XRM/QE3/QRM/SRM/MRF/MRM/LTE Series Protocol
SU Command Event
This event trap is generated on SRM, QE3, XRM, and SRM products. This SNMP trap indicates that the
SU command has been successfully issued.
Complete trap:
<SU out WWW in XXX from userY@ portZ >
Description structure:
<SU>
= Event description. Set Un-Protect command.
<out WWW>
= Output number.
<in XXX>
= Input number.
<from>
= more event description
<userY@>
= User that issued the command. User1 is the Admin,
up to user8. User 9 is no user logged in.
<portZ>
= Port of access. Local keypad=0, Remote port=1,
Control in port=2, Ethernet A=3, Ethernet B=4,
Telnet=5, SNMP=6.
<address AA>
= Serial address of 1RU remote or main controller
unit the command originated from.
Page 36 of 157 Rev CL XRM/QE3/QRM/SRM/MRF/MRM/LTE Series Protocol U Command Event
This event trap is generated on SRM, QE3, XRM, and SRM products. This SNMP trap indicates that the U
command has been successfully issued.
Complete trap:
<U out WWW in XXX from userY@ portZ address AA >
Description structure:
<U>
= Event description. Unlock output command.
<out WWW>
= Output number.
<in XXX>
= Input number.
<from>
= more event description
<userY@>
= User that issued the command. User1 is the Admin,
up to user8. User 9 is no user logged in.
<portZ>
= Port of access. Local keypad=0, Remote port=1,
Control in port=2, Ethernet A=3, Ethernet B=4,
Telnet=5, SNMP=6.
<address AA>
= Serial address of 1RU remote or main controller
unit the command originated from.
Rev CL Page 37 of 157 XRM/QE3/QRM/SRM/MRF/MRM/LTE Series Protocol
Using QEC Commands
This document provides a list of commands which can be used to control a Quintech matrix. No hardware
flow control is supported. After a controlling program issues a command, it must wait until it receives a
response before issuing the next command.
QEC Telnet Console Command Structure
There are three interfaces to send commands to the matrix controller: a Telnet console, a QEC Ethernet
port, and a serial port. When sending commands over the serial or Ethernet ports, a STX/ETX bounded
command packet is used. This is described in the next section. The packet structure is not used with the
Telnet console interface. The same commands are used but no address, checksum, or ETX/STX packet
boundaries are required. For example, to issue the Firmware Version command “F”, you simply enter
command mode on the console, type F and hit the Enter key.
Page 38 of 157 Rev CL XRM/QE3/QRM/SRM/MRF/MRM/LTE Series Protocol QEC Protocol Message Structure
Commands packets can be sent over the Ethernet and serial ports (if available) and use a standard
STX/ETX protocol wrapper. Each packet includes a header byte, a two-byte address field, a command
byte, necessary data bytes, end byte, and a checksum byte. The bytes are transmitted using an 8-bit word,
with 1 stop bit and no parity. The general form for commands and messages is:
Header Address
Command
Data byte(s)
End
Checksum
Control Bytes
Control bytes are transmitted as hexadecimal values.
Command Header Byte = STX (0x02)
Command End Byte = ETX (0x03)
Response Header Byte = ACK (0x06) for accepted commands.
Response Header Byte = NAK (0x15) for rejected commands.
Response End Byte = ETX (0x03)
The Header Byte (STX) is also used to reset the command receive buffer. If this byte is received, it will be
accepted as the beginning of a new message. The previous message will be discarded. The only exception
to this is if the byte (0x02) is a checksum byte. When the buffer is reset, the checksum byte is also reset.
There is a 32-byte limit on command length.
Any command longer than this will automatically generate an error response if or when an ETX end byte
is received. If a new STX is received before an ETX, it will reset the command receive buffer and no error
message will be sent.
If a break in communication occurs while a message is being transmitted (i.e., before the unit receives the
ETX and CHK byte), the buffer will clear and the command will be lost (no response will be sent). This
condition will occur if there is a delay of about 200 milliseconds between bytes.
Address Field
The address field consists of two ASCII digits. The address for a control unit is normally set using the front
panel keypad. Each unit will only respond to a command with a matching address. This allows multiple
control units to be connected on a shared RS-422/485 control bus. The address can be set from 00 to FF on
units with front panel configuration.
Address FF is a serial broadcast address. Any unit will respond to a command with an address of FF
regardless of the actual serial address set for the unit. Commands being sent to units over Ethernet must
contain an address of FF for proper operation. If you use a serial address other than FF in your Ethernet
command packet, that serial address must match the serial address set for the target unit or the command
will be rejected even if the IP address is correct.
Rev CL Page 39 of 157 XRM/QE3/QRM/SRM/MRF/MRM/LTE Series Protocol
Command
The command is one or more ASCII characters from A to Z. A list of available commands is in the next
section.
Data Bytes
Each command has a fixed number of data bytes. A response to a command may have a variable number
of data bytes. In that case one of the data bytes will signify how many data bytes are contained in the
message.
Checksum
The checksum byte is a bit wise Exclusive OR (XOR) of all the bytes, inclusively, from the header to the
ETX. For example:
02h 30h 30h 51h 03h 50h
STX 0
0
Q ETX CHK
Page 40 of 157 Rev CL XRM/QE3/QRM/SRM/MRF/MRM/LTE Series Protocol Command Descriptions
BB: Set Q-Sense Backup Input
This command will set the Q-Sense backup input for the specified “primary” input. The QE3 will only
accept this command if both specified inputs are not currently active QSENSE inputs used elsewhere in the
system.
Command Format:
02
STX
IN
XX
ADR
=
BUI =
XX
ADR
42
B
42
B
XX
IN3
XX
IN2
XX
IN1
XX
BUI3
XX
BUI2
XX
BUI1
03
ETX
XX
CHK
Primary Input. Must be between 001 and the number of system
inputs. Always 3 characters.
Backup Input. Must be between 001 and the number of system
inputs. Always 3 characters.
Example Command Sent:
02
XX
XX
42
42
30
31
36
30
30
37
STX ADR
ADR
B
B
0
1
6
0
0
7
(Set Q-Sense backup input 7 for primary input 16.)
03
ETX
XX
CHK
Response Format:
06
ACK
Rev CL XX
ADR
XX
ADR
42
B
42
B
03
ETX
XX
CHK
Page 41 of 157 XRM/QE3/QRM/SRM/MRF/MRM/LTE Series Protocol
BBC: Turn Off Qsense Input Pair
This command will clear an input primary and backup pair. This command will accept a primary or
backup input number and clear both the primary and the backup association.
Command Format:
02
STX
IN
XX
ADR
=
XX
ADR
42
B
42
B
43 XX
C
IN3
XX
IN2
XX
IN1
03
ETX
XX
CHK
Primary or backup input number. Must be between 001 and the
number of system inputs. Always 3 characters.
Example Command Sent:
02
XX
XX
42
42
43
30
31 36 03
STX
ADR
ADR
B
B
C
0
1
6
ETX
(Clear Q-Sense backup input for system input 16)
XX
CHK
Response Format:
06
ACK
XX
ADR
Page 42 of 157 XX
ADR
42 42
B B
43
C
03
ETX
XX
CHK
Rev CL XRM/QE3/QRM/SRM/MRF/MRM/LTE Series Protocol BBR: Read Q-Sense Backup Input
This command will return the Q-Sense backup input which is configured for the specified “primary” input.
Command Format:
02
STX
IN
XX
ADR
=
XX
ADR
42
B
42
B
52 XX
R
IN3
XX
IN2
XX
IN1
03
ETX
XX
CHK
Primary Input to read status. Must be between 001 and the
number of system outputs. Always 3 characters.
Example Command Sent:
02
XX
XX
42
42
52
30
31
36
03
XX
STX
ADR
ADR
B
B
R
0
1
6
ETX
CHK
(Get Q-Sense backup input for system “primary” input 16)
Response Format:
06
ACK
XX
ADR
XX
ADR
42 42
B B
52
R
XX
IN3
XX
IN2
XX
IN1
XX
BUI3
XX
BUI2
XX
BUI1
03
ETX
XX
CHK
Example Response Sent:
06
XX
XX
42 42
52
30
31
36
30
30 37 3
ACK
ADR
ADR
B
B
R
0
1
6
0
0
7 ETX
(The Q-Sense backup input for primary input 16 is input 7.)
Rev CL XX
CHK
Page 43 of 157 XRM/QE3/QRM/SRM/MRF/MRM/LTE Series Protocol
BE: Set Q-Sense On/Off Reset Ability of Input
This command will set the Q-Sense on/off reset ability for the specified input.
Command Format:
02 XX XX 42 45 XX XX XX XX
STX ADR ADR B E IN3 IN2 IN1 ON/OFF
03
XX
ETX CHK
IN =
Primary Input. Must be between 001 and the number of system inputs.
Always 3 characters.
ON/OFF =
Reset status for input. Either 0 (reset off) or 1 (reset on).
Always 1 character.
Example Command Sent:
02
XX
XX
42 45 30 31 36 31 03
XX
STX ADR
ADR B
E
0
1
6
1
ETX
CHK
(Set the Q-Sense reset ability for input 16 to on.)
Response Format:
06
ACK
XX
ADR
Page 44 of 157 XX
ADR
42
B
45
E
03
ETX
XX
CHK
Rev CL XRM/QE3/QRM/SRM/MRF/MRM/LTE Series Protocol BER: Read Q-Sense On/Off Reset Ability of Input
This command will return the Q-Sense on/off reset ability for the specified input.
Command Format:
02
STX
IN
XX
ADR
=
XX
ADR
42
B
45
E
52
R
XX
IN3
XX
IN2
XX
IN1
03
ETX
XX
CHK
Primary Input to read status. Must be between 001 and the
number of system outputs. Always 3 characters.
Example Command Sent:
02 XX XX 42 45 52
30 31 36 03 XX
STX ADR ADR B
E
R
0 1
6
ETX CHK
(Get Q-Sense reset status for system input 16)
Response Format:
06 XX XX 42 45 52
ACK ADR ADR B E R
XX XX XX XX
IN3 IN2 IN1 ON/OFF
03
XX
ETX CHK
Alternate (QE3) Response Format:
06 XX XX 42 45 52 XX
ACK ADR ADR B E R ON/OFF
03
XX
ETX CHK
ON/OFF =
Reset status for input. Either 0 (reset off) or 1 (reset on).
Always 1 character.
Example Response Sent:
06 XX XX 42 45 52 30 31 36 31 03 XX
ACK ADR ADR B E
R
0
1 6
1 ETX CHK
(The Q-Sense reset ability for input 16 is on.)
Alternate Example Response Sent:
06 XX XX 42 45 52 31 03 XX
ACK ADR ADR B E
R
1 ETX CHK
(The Q-Sense reset ability for the sent input is on.)
Rev CL Page 45 of 157 XRM/QE3/QRM/SRM/MRF/MRM/LTE Series Protocol
BO: Set Q-Sense On/Off (Q-Sense Enabled/Disabled) for Input
This command will set the Q-Sense on/off (enabled/disabled) status for the specified input.
Command Format:
02 XX XX 42
STX ADR ADR B
4f
O
XX
IN3
XX
IN2
XX
IN1
31/30
ON/OFF
03
XX
ETX CHK
IN =
Primary Input. Must be between 001 and the number of system inputs.
Always 3 characters.
ON/OFF =
Q-sense on/off status for input. Either 0 (off/disabled) or 1
(on/enabled). Always 1 character.
Example Command Sent:
02 XX XX 42
STX ADR ADR B
4f
O
30
0
31
1
36
6
30 03 XX
0 ETX CHK
(Disable (turn off) Q-Sense for input 16.)
Response Format:
06
ACK
XX XX
ADR
Page 46 of 157 42
ADR
4f
B
03
O
XX
ETX
CHK
Rev CL XRM/QE3/QRM/SRM/MRF/MRM/LTE Series Protocol BOR: Read Q-Sense On/Off (Q-Sense Enabled/Disabled) Status for Input
This command will return the Q-Sense on/off (enabled/disabled) status for the specified input.
Command Format:
02
STX
IN
XX
ADR
=
XX
ADR
42
B
4f
O
52
R
XX
IN3
XX
IN2
XX
IN1
03
ETX
XX
CHK
Primary Input to read status. Must be between 001 and the
number of system outputs. Always 3 characters.
Example Command Sent:
02 XX XX 42 4f 52
30 31 36 03 XX
STX ADR ADR B
O
R
0 1
6
ETX CHK
(Get Q-Sense on/off status for system input 16)
Response Format:
06 XX XX 42 4f 52
ACK ADR ADR B O R
XX XX XX XX
IN3 IN2 IN1 ON/OFF
03
XX
ETX CHK
QE3 Response Format:
06 XX XX 42 4f 52
ACK ADR ADR B O R
XX
ON/OFF
03
XX
ETX CHK
Example Response Sent:
06 XX XX 42 4f 52 30 31 36 30 03 XX
ACK ADR ADR B O
R
0
1 6
0 ETX CHK
(Q-Sense is disabled for input 16)
QE3 Example Response Sent:
06 XX XX 42 4f 52 30 03 XX
ACK ADR ADR B O
R
0 ETX CHK
(Q-Sense is disabled for polled input)
Rev CL Page 47 of 157 XRM/QE3/QRM/SRM/MRF/MRM/LTE Series Protocol
BR: Restore Input Currently in Q-Sense
This command will attempt to restore the specified input if it is currently in Q-Sense (backup mode).
Note: a successful ACK does not indicate whether the restore operation on the input was successful or not.
It simply indicates that the command was accepted and the restore is being attempted.
Command Format:
02
XX
XX
42 52
STX
ADR ADR
B
R
IN =
Primary Input to
number of system
XX
XX
XX
03
XX
IN3
IN2
IN1
ETX
CHK
read status. Must be between 001 and the
outputs. Always 3 characters.
Example Command Sent:
02 XX XX
42
52
STX ADR ADR
B
R
(Restore input 16)
30
0
31
1
36
6
03
ETX
XX
CHK
Response Format:
06
ACK
XX
ADR
Page 48 of 157 XX
ADR
42
B
52
R
03
ETX
XX
CHK
Rev CL XRM/QE3/QRM/SRM/MRF/MRM/LTE Series Protocol BRO: Restore Output Currently Connected to Q-Sense Backup Input
This command is valid for the QE3 system QSENSE operation. This command will connect an output
back to the original primary QSENSE input. This command can be used if the QSENSE function has taken
action and changed the output to the backup input based on QSENSE settings.
Command Format:
02
XX
XX
42 52
XX
XX
XX
03
STX
ADR ADR
B
R
OUT3
OUT 2
OUT 1
ETX
OUT =
Output. Must be between 001 and the number of
system outputs. Always 3 characters.
XX
CHK
Example Command Sent:
02 XX XX
42
52
STX ADR ADR
B
R
(Restore output 16)
30
0
31
1
36
6
03
ETX
XX
CHK
Response Format:
06
ACK
Rev CL XX
ADR
XX
ADR
42
B
52
R
03
ETX
XX
CHK
Page 49 of 157 XRM/QE3/QRM/SRM/MRF/MRM/LTE Series Protocol
BT: Set Q-Sense Threshold Level for Input
This command will set the Q-Sense threshold level in dBm for the specified input. The threshold value
must be between -60 dBm and 0 dBm. QE3 only accepts values from -10 to -50 and -99. QE3 will accept a
value of -99 to turn off the threshold value essentially disabling the QSENSE feature for that input.
Command Format:
02
STX
XX
ADR
XX
ADR
42
B
2E
.
XX
tenths
E
xample Command Sent:
03
ETX
54
T
XX
IN3
XX
IN2
XX
IN1
40
@
2B/2D
+/-
XX
10s
XX
1s
XX
CHK
02 XX XX 42 54 30 31 36 40 2D 34 35 2E
35 03
XX
STX ADR ADR B T
0 1 6
@ 4
5 .
5 ETX CHK
(Set the Q-Sense threshold value for input 16 to -45.5 dBm)
Response Format:
06
ACK
XX
ADR
Page 50 of 157 XX
ADR
42
B
54
T
03
ETX
XX
CHK
Rev CL XRM/QE3/QRM/SRM/MRF/MRM/LTE Series Protocol BTR: Read Q-Sense Threshold for Input
This command will return the Q-Sense threshold level in dBm for the specified input. A QE3 may return 99 which means the input threshold has been turned off.
Command Format:
02
XX
XX
42
54 52
XX
XX
XX
03
XX
STX
ADR
ADR
B
T
R
IN3
IN2
IN1 ETX
CHK
IN =
Primary Input to read status. Must be between 001 and the
number of system outputs. Always 3 characters.
Example Command Sent:
02
XX
XX
42 54
52
30
31
36
03
STX
ADR
ADR
B
T
R
0
1
6
ETX
(Get Q-Sense threshold value for system input 16)
XX
CHK
Response Format:
06
ACK
XX
ADR
XX 42
ADR B
54
T
52
R
XX
IN3
XX
IN2
XX
IN1
40
@
2B/2D
+/-
XX
10s
XX
1s
2E XX 03 XX
. 10th ETX CHK
Alternate (QE3) Response Format:
06
ACK
XX
ADR
XX 42
ADR B
54
T
52
R
2B/2D
+/-
XX
10s
XX
1s
2E
.
XX
10th
03
ETX
XX
CHK
Example Response Sent:
06
XX XX 42 54 52 30 31 36 40
2D 34 35 2E 35
ACK ADR ADR B T R
0 1
6
@
4
5
.
5
(The Q-Sense threshold value for input 16 is -45.5 dBm)
XX XX
ETX CHK
Alternate (QE3) Example Response Sent:
06
XX XX 42 54 52 2D 34 35 2E 35
XX XX
ACK ADR ADR B T R 4
5
.
0
ETX CHK
(The Q-Sense threshold value for the polled input is -45.0 dBm)
Rev CL Page 51 of 157 XRM/QE3/QRM/SRM/MRF/MRM/LTE Series Protocol
C: Check Change Flag and Unit Status
Each control port for the system maintains a change flag and several change queues that allow changes
throughout the system to be tracked. The change flag contains an eight bit flag to indicate the various
changes. The flag bits are defined as follows:
Bit
Flag
Change Indication
Action Indicated
Cleared By:
Crosspoint
One of the following has changed:
Front panel access
control
change,
crosspont
lock,
unlock, or change,
L, U, S, or SP
command
Q command
Fault
condition
detected
M
Front panel set
group or access
control on/off or
ZG command
Q
0
-Crosspoint (input to output connection)
-Crosspoint lock status
-Access Control setting for input or output
The affected crosspoint is entered in to the
crosspoint queue.
1
Alarm
-An error or fault has been detected.
The associated message is entered in the message
queue.
2
Access Control
-Access Control has been turned on or off for the
port. Only the port where access control has
changed will show this bit set.
-A user’s group ID setting has changed.
3
Overflow
The crosspoint change queue has overflowed.
More than 8 L SP,
or S commands for
8 different outputs
Q
4
Name
-An input or output name has changed.
NSI, NSO, NI, NO
NQ
NSI, NSO, NI, NO
NQ
The affected input or output is entered in the name
queue.
5
Overflow
6
Reserved
7
Reserved
Page 52 of 157 The name change queue has overflowed.
None. Always set to “1”.
Rev CL XRM/QE3/QRM/SRM/MRF/MRM/LTE Series Protocol The C command is typically sent periodically to check if any changes have been made or if any alarms
have occurred. There are three different crosspoint, message, and name change queues for each control
port (serial, Ethernet, etc.). Each queue will store up to eight changes made anywhere in the system. Once
the queue overflows the contents are no longer valid and different actions will have to be taken to recover
the system state.
If any changes have occurred since the last Q command the crosspoint flag bit will be set. Changes include
a crosspoint change, Access Control setting, or crosspoint lock status change. If eight or fewer changes
have been made then all the affected crosspoints can be read from the crosspoint queue. If more than eight
changes occur before the queue is read and cleared the overflow flag will be set. If the queue has
overflowed then all crosspoints in the matrix will have to be queried. The Q command clears the queue and
both the crosspoint flag and the overflow flag.
The alarm bit indicates that an error or fault has been detected and an associated message indicating the
problem has been stored in the message queue. If the message queue is full, a new message will cause the
queue contents to be sent in an SNMP TRAP message to the set SNMP trap IP address. The message
queue is then cleared and the new message entered to the queue. The M command provides a log of
messages and clears the queue and the alarm flag. Messages not read via the M command or SNMP are
lost when the queue overflows. If the alarm condition is still present after the M command clears the queue
it will be re-entered to the queue.
The name flag indicates that an input or output name has been set or changed. The affected input or output
is put in the name queue. The NQ command will read the queue and clear the name flag. The NQ response
contains an overflow flag. If the name queue has overflowed then all input and output names should be
checked.
Rev CL Page 53 of 157 XRM/QE3/QRM/SRM/MRF/MRM/LTE Series Protocol
Command Format:
02 XX XX 43
STX ADR ADR C
03 XX
ETX CHK
Positive Responses:
06 XX XX 43
ACK ADR ADR C
80
80
03 XX
ETX CHK (No changes have occurred)
06 XX XX 43
ACK ADR ADR C
81
81
03 XX
ETX CHK (Crosspoint changes have occurred)
06 XX XX 43
ACK ADR ADR C
82
82
03 XX
ETX CHK (An alarm has occurred)
06 XX XX 43
ACK ADR ADR C
84
84
03 XX
ETX CHK (Access Control changes have occurred)
06 XX XX 43
ACK ADR ADR C
89
89
03 XX
ETX CHK (The crosspoint queue has overflowed)
06 XX XX 43
ACK ADR ADR C
90
90
03 XX
ETX CHK (A name has been changed)
06 XX XX 43
ACK ADR ADR C
83
83
03 XX
ETX CHK (Alarm & crosspoint changes have occurred)
06 XX XX 43
ACK ADR ADR C
85
85
03 XX
ETX CHK (Access control & crosspoint changes
have occurred)
06 XX XX 43
ACK ADR ADR C
91
91
03 XX
ETX CHK (Name & crosspoint changes have occurred)
06 XX XX 43
ACK ADR ADR C
8B
8B
03 XX
ETX CHK (The crosspoint queue has overflowed
plus an alarm)
06 XX XX 43
ACK ADR ADR C
9F
9F
03 XX
ETX CHK (Crosspoint, alarm, Access Control,
and name changes have occurred, plus
the crosspoint queue has overflowed)
Note: This command will be accepted regardless of whether a user is logged in.
Page 54 of 157 Rev CL XRM/QE3/QRM/SRM/MRF/MRM/LTE Series Protocol ED: Set DHCP On/Off
This command turns DHCP on or off.
Command Format:
02 XX XX 45
STX ADR ADR E
44
D
30
0
03 XX
ETX CHK
02 XX XX 45
STX ADR ADR E
44
D
31
1
03 XX
ETX CHK
02 XX XX 45 44
STX ADR ADR E
D
(Turn DHCP Off)
30
0
03 XX
ETX CHK
02 XX XX 45 44
STX ADR ADR E
D
(Turn DHCP on)
31
1
03 XX
ETX CHK
Example Command:
Positive Response:
06 XX XX 45 44
ACK ADR ADR E
D
03 XX
ETX CHK
Note: DHCP will immediately be set as on or off. If DHCP is turned on the unit will not ask for new IP
parameters from the DHCP server until the unit is reset or the power is cycled.
Rev CL Page 55 of 157 XRM/QE3/QRM/SRM/MRF/MRM/LTE Series Protocol
EG: Set Ethernet Default Gateway
This command sets the static default Ethernet gateway.
Command Format:
02 XX XX 45
STX ADR ADR E
47
G
XX
nn
XX
nn
XX
nn
XX
nn
XX
nn
XX
nn
XX
nn
03 XX
ETX CHK
47
G
30
0
31
1
30
0
XX
nn
XX
nn
2E
.
2E
.
XX
nn
XX
nn
XX
nn
2E
.
30
0
30
0
30
0
2E
.
Example Command:
02 46
STX F
46
F
45
E
2E
.
30 30 30 2E 30 30 31 03 2D
0
0
0
.
0
0
1 ETX CHK
(Set Gateway = 10.0.0.001)
Positive Response:
06 46
ACK F
46
F
45
E
47
G
03 07
ETX CHK
Note: The change will take place in ten seconds. If DHCP is enabled the static gateway value will not be
used until DHCP is turned off and the unit has been reset.
Page 56 of 157 Rev CL XRM/QE3/QRM/SRM/MRF/MRM/LTE Series Protocol EI: Set Ethernet IP Address
This command sets the static Ethernet IP Address.
Command Format:
02 XX XX 45
STX ADR ADR E
49
I
XX
nn
XX
nn
XX
nn
XX
nn
XX
nn
XX
nn
XX
nn
03 XX
ETX CHK
49
I
30
0
31
1
30
0
XX
nn
XX
nn
2E
.
2E
.
XX
nn
XX
nn
XX
nn
2E
.
30
0
30
0
30
0
2E
.
Example Command:
02 46
STX F
46
F
45
E
2E
.
30 30 30 2E 32 33 34 03 27
0
0
0
.
2
3
4 ETX CHK
(Set IP Address = 10.0.0.234)
Positive Response:
06 46
ACK F
46
F
45
E
49
I
03 09
ETX CHK
Note:
The change will take place in ten seconds. If DHCP is enabled the static IP address will not be used until
DHCP is turned off and the unit has been reset.
Rev CL Page 57 of 157 XRM/QE3/QRM/SRM/MRF/MRM/LTE Series Protocol
ELD: Ethernet Lock Disable
This command disables the Ethernet lock. If the lock has been enabled (using the ELE command),
command packets input from the QEC Ethernet port are received but ignored except for the ELD
command. This provides an additional level of control over the switch and the Ethernet port. The ELD
command is used to disable the lock and enable the processing of command packets.
The ELD command must contain a password value that matches the current password in order for the
Ethernet lock to be disabled. The default value for the password is “Quintech”. The value of the password
can be changed using the ELP command.
Command Format:
02 XX XX 45
STX ADR ADR E
4C
L
44
D
XX .... XX
[ PASSWORD ]
03 75
ETX CHK
Example Command:
02 46 46 45 4C 44 51 75 69
STX F
F
E
L
D
Q
u
i
(Disable Ethernet Command Lock)
6E
n
74
t
65
e
63
c
68
h
03 75
ETX CHK
Positive Response:
06 46
ACK F
46
F
45
E
4C
L
03 0C
ETX CHK
Note:
The password may be reset to the default “Quintech” from the front panel LCD and keypad.
An ELD command with an incorrect password value will return a NAK response.
The switch is shipped from the factory with the Ethernet lock disabled so it will accept and process
command packets. If the ELE command is never issued, the Ethernet lock will never be enabled and the
ELD, ELE, and ELP commands can be ignored.
This command has been superceded by the access control features available with Protocol 2.15 release 6. It
is included for backward compatibility.
Page 58 of 157 Rev CL XRM/QE3/QRM/SRM/MRF/MRM/LTE Series Protocol ELE: Ethernet Lock Enable
This command enables the QEC Ethernet command lock. When the lock is enabled, command packets
input from the Ethernet port are received but ignored except for the ELD command. The ELD command is
used to disable the lock and enable the processing of command packets.
Command Format:
02 XX XX 45
STX ADR ADR E
4C
L
45
E
03 XX
ETX CHK
Example Command:
02 46 46 45 4C 45 03 4D
STX F
F
E
L
E ETX CHK
(Enable Ethernet Command Lock)
Positive Response:
06 46
ACK F
46
F
45
E
4C
L
03 0C
ETX CHK
Note:
The switch is shipped from the factory with the Ethernet lock disabled so it will accept and process
command packets. If the ELE command is never issued, the Ethernet lock will never be enabled and the
ELD, ELE, and ELP commands can be ignored.
If the Ethernet lock is on, valid command packets sent over the Ethernet will return a NAK message with
the issued command, indicating that it was rejected because of the lock. Valid packets sent over the serial
port will still be accepted.
This command has been superceded by the access control features available with Protocol 2.15 release 6. It
is included for backward compatibility.
Rev CL Page 59 of 157 XRM/QE3/QRM/SRM/MRF/MRM/LTE Series Protocol
ELP: Set Ethernet Lock Password
This command sets a new QEC Ethernet Lock Password. The password is an alpha-numeric value from 1
to 10 characters. A null password (no password) is also allowed.
Command Format:
02 XX XX 45
STX ADR ADR E
4C
L
50
P
XX …
XX 03 XX
[Password] ETX CHK
Example Command:
02 46 46 45 4C 50 78
STX F
F
E
L
P
x
(Set password to “xyzzy”)
79
y
7A
z
7A
z
79
y
03 20
ETX CHK
02 46 46 45 4C 50 31 2B
STX F
F
E
L
P
1
+
(Set password to “1+RaLpH!2”)
52
R
61
a
4C
L
70
p
Example Command:
48
H
21
!
32
2
03 16
ETX CHK
Example Command:
02 46 46 45 4C 50 03 58
STX F
F
E
L
P ETX CHK
(Set password to no password)
Positive Response:
06 46
ACK F
46
F
45
E
4C
L
03 0C
ETX CHK
Note:
Although almost any hex value or ASCII character can be used in the password, users would be wise not
to use the hex values 00 – 1F or 7F – FF since these are not associated with keys on a standard keyboard.
They may also cause undesirable side effects. In particular hex 02 (STX) and 03 (ETX) are used to
delineate the command packet and should never be used in the password. If the password is set to some
unknown value, it can be reset to the default “Quintech” from the front panel LCD and keypad.
This command has been superceded by the access control features available with Protocol 2.15 release 6. It
is included for backward compatibility.
Page 60 of 157 Rev CL XRM/QE3/QRM/SRM/MRF/MRM/LTE Series Protocol EP: Set Ethernet Port
This command sets the QEC Ethernet port that is monitored for STX/ETX command packets. The default
port set at the factory is 9100. There is no need to change this unless it conflicts with another network
device.
Command Format:
02 XX XX 45
STX ADR ADR E
50
P
XX
nn
XX
nn
XX
nn
XX
nn
03 XX
ETX CHK
02 46 46 45 50
STX F
F
E
P
(Set Port = 9100)
39
9
31
1
30
0
30
0
03 1C
ETX CHK
Example Command:
Positive Response:
06 46
ACK F
46
F
45
E
50
P
03 10
ETX CHK
Note:
The change will take place after the current Ethernet session ends and the connection is released.
Rev CL Page 61 of 157 XRM/QE3/QRM/SRM/MRF/MRM/LTE Series Protocol
ES: Set Ethernet Subnet Mask
This command sets the static Ethernet Subnet Mask.
Command Format:
02 XX XX 45
STX ADR ADR E
53
S
XX
nn
XX
nn
XX
nn
XX
nn
XX
nn
XX
nn
XX
nn
03 XX
ETX CHK
53
S
32
2
35
5
35
5
XX
nn
XX
nn
2E
.
2E
.
XX
nn
XX
nn
XX
nn
2E
.
32
2
35
5
35
5
2E
.
Example Command:
02 46
STX F
46
F
45
E
2E
.
32 35 35 2E 30 30 30 03 3B
2
5
5
.
0
0
0 ETX CHK
(Set Netmask = 255.255.255.000)
Positive Response:
06 46
ACK F
46
F
45
E
53
S
03 13
ETX CHK
Note:
The change will take place after the current Ethernet session ends and the connection is released. If DHCP
is enabled this will not take effect until DHCP is turned off.
Page 62 of 157 Rev CL XRM/QE3/QRM/SRM/MRF/MRM/LTE Series Protocol F: Firmware Version / Unit ID
This command will return a message with the protocol and firmware versions, the series and model
number, and the size of the matrix. The fields will be returned as follows: “Firmware version” “Protocol
version” “Model Number”/ “Matrix Size”. For example, a 32x64 SRM would give a response of the form
“Fv2.69 Pv2.15 XRM2250/032X032”.
Command Format:
02 XX XX 46
STX ADR ADR F
03 XX
ETX CHK
Example Command:
02 46
STX F
46
F
46
F
03 47
ETX CHK
Positive Response:
06 XX XX 46
ACK ADR ADR F
76
v
37
7
2E
.
30
0
30
0
20
50
P
76
v
32
2
2E
.
31
1
35
5
…58 52
… X R
32
2
35
5
30
0
2F
/
30
0
33
3
32
2
58
X
30
0
33
3
32
2
3
XX
ETX CHK
4D
M
32
2
20…
…
Note: This command will be accepted regardless of whether a user is logged in.
Rev CL Page 63 of 157 XRM/QE3/QRM/SRM/MRF/MRM/LTE Series Protocol
FX: Extended Firmware Version / Unit ID
This command will return a more detailed version of the information returned by the F command.
Response structure:
FX:<FV>:<PV>:<M#>:<I#>:<O#>:<RES>:<RES>:<RES>:<RES>
FV
= A four digit firmware number in the format n.nn
PV
= An eight digit protocol number in the format nn.nn.nn
M#
= A seven digit alphanumeric model number
I#
= Number of inputs, 1 to 3 digits
O#
= Number of outputs, 1 to 3 digits
RES
= A reserved field for future expansion
Command Format:
02 XX XX 46
STX ADR ADR F
58
X
03 XX
ETX CHK
Example Command:
02 46
STX F
46
F
46
F
03 47
ETX CHK
Positive Response:
06 XX XX 46
ACK ADR ADR F
58
X
3A
:
37
7
2E
.
30
0
30
0
3A
:
32
2
2E
.
31
1
35
5
2E
.
30
0
37…
7…
…3A 58
… : X
52
R
32
2
32
2
35
5
30
0
3A
:
33
3
32
2
3A
:
33
3
32
2
3A
:
3A
:
3A
:
3A…
:…
…3
…ETX
XX
CHK
4D
M
Note: This command will be accepted regardless of whether a user is logged in.
Page 64 of 157 Rev CL XRM/QE3/QRM/SRM/MRF/MRM/LTE Series Protocol IS: Query Input State
This command queries for the access control parameters of the specified input.
The access control parameters are given by the last two characters in the response. They give numbers that
represent an access control bitmap table:
Bit
7
6
5
4
3
2
1
0
Group
8
7
6
5
4
3
2
1
Hex
Response character 1
Response character 2
If a particular bit is set, then that group is allowed to change a particular input with the L, S, and U
commands. If the bit is clear then the corresponding group is not allowed access.
Rev CL Character
Response 1: Groups allowed
access
Response 2: Groups allowed
access
0
none
none
1
5
1
2
6
2
3
5, 6
1, 2
4
7
3
5
5, 7
1, 3
6
6, 7
2, 3
7
5, 6, 7
1, 2, 3
8
8
4
9
5, 8
1, 4
A
6, 8
2, 4
B
5, 6, 8
1, 2, 4
C
7, 8
3, 4
D
5, 7, 8
1, 3, 4
E
6, 7, 8
2, 3, 4
F
5, 6, 7, 8
1, 2, 3, 4
Page 65 of 157 XRM/QE3/QRM/SRM/MRF/MRM/LTE Series Protocol
Example Command Sent:
02 XX XX 49 53 30 30 31
STX ADR ADR I
S
0
0
1
(Query the state of output 1)
03 XX
ETX CHK
Examples of Positive Responses:
06 XX XX 49 53 30 31 03 XX
ACK ADR ADR I
S
0
1 ETX CHK
(only users in group 1 are allowed access to the input)
06 XX XX 49 53 36 46 03 XX
ACK ADR ADR I
S
6
F ETX CHK
(users in group 1, 2, 3, 4, 6 and 7 are allowed access to the input)
Note: This command will be accepted regardless of whether a user is logged in.
Page 66 of 157 Rev CL XRM/QE3/QRM/SRM/MRF/MRM/LTE Series Protocol KL: Keypad Lock
This command locks the front panel keypad as a convenience feature to prevent accidental keystrokes. To
unlock the keypad use the KU command.
Command Sent:
02 XX XX 4B
STX ADR ADR K
4C
L
03 XX
ETX CHK
KLPositive Response:
06 XX XX 4B
ACK ADR ADR K
4C
L
03 XX
ETX CHK
Note: The front panel will display “Keypad Locked”. The keypad can be unlocked from the front panel by
entering the 3-digit password 857.
Note: To secure against unauthorized changes from the front panel keypad use Access Control features.
See the user’s manual and the “Z” commands for more information.
Rev CL Page 67 of 157 XRM/QE3/QRM/SRM/MRF/MRM/LTE Series Protocol
KS: Keypad State
This command gives the locked/unlocked state of the front panel keypad.
Command Sent:
02 XX XX 4B
STX ADR ADR K
53
S
03 XX
ETX CHK
Positive Responses:
06 XX XX 4B 53
ACK ADR ADR K
S
(keypad locked)
4C
L
03 XX
ETX CHK
06 XX XX 4B 53
ACK ADR ADR K
S
(keypad unlocked)
55
U
03 XX
ETX CHK
Note: This command will be accepted regardless of whether a user is logged in.
Page 68 of 157 Rev CL XRM/QE3/QRM/SRM/MRF/MRM/LTE Series Protocol KU: Keypad Unlock
This command unlocks the front panel keypad. The front panel keypad can be locked as a convenience
feature to prevent accidental keystrokes. Use the KL command to lock the keypad.
Command Sent:
02 XX XX 4B
STX ADR ADR K
55
U
03 XX
ETX CHK
55
U
03 XX
ETX CHK
Positive Response:
06 XX XX 4B
ACK ADR ADR K
Note: The front panel will display “Keypad Locked”. The keypad can be unlocked from the front panel by
entering the 3-digit password 857.
Note: To secure against unauthorized changes from the front panel keypad use Access Control features.
See the user’s manual and the “Z” commands for more information.
Rev CL Page 69 of 157 XRM/QE3/QRM/SRM/MRF/MRM/LTE Series Protocol
L: Lock Crosspoint
This command sets a crosspoint and then “locks” it so that output may not be rerouted to any other input
until it is unlocked using the “U” command.
Command Sent:
02 XX XX 4C 30 30 31 30
STX ADR ADR L
0
0
1
0
(Lock output 1 to input 5)
30
0
35
5
03 XX
ETX CHK
Positive Response:
06 XX XX 4C
ACK ADR ADR L
Page 70 of 157 03 XX
ETX CHK
Rev CL XRM/QE3/QRM/SRM/MRF/MRM/LTE Series Protocol Alternate L: Lock Crosspoint
This command locks the output to the currently connected input, so that output may not be rerouted to any
other input until it is unlocked.
Command Sent:
02 XX XX 4C 30 30 31 03 XX
STX ADR ADR L
0
0
1 ETX CHK
(Lock output 1 to currently connected input)
Positive Response:
06 XX XX 4C
ACK ADR ADR L
Rev CL 03 XX
ETX CHK
Page 71 of 157 XRM/QE3/QRM/SRM/MRF/MRM/LTE Series Protocol
LC: Lock Crosspoint Check
This command returns the port number that locked the output. Returns NAK if output is unlocked.
Command Sent:
02 XX XX 4C 46
STX ADR ADR L
C
(Check output 1)
30
0
30
0
31
1
03 XX
ETX CHK
Positive Response:
06 XX XX 4C
ACK ADR ADR L
PORT
0
1
2
3
4
5
6
Page 72 of 157 46
C
30-35
0-5
03 XX
ETX CHK
Physical connection
Local Keypad/LCD
Remote Port B
Control In Port C
Ethernet Port A
Ethernet Port B
Telnet
SNMP
Rev CL XRM/QE3/QRM/SRM/MRF/MRM/LTE Series Protocol M: Messages
This command will return the contents of the message queue. The message queue contains up to four alarm
or information messages concerning the health of the system. System monitoring is only implemented on
the XRM and QE3. The following events will cause a message to be put in the message queue:
1.
2.
3.
4.
5.
6.
7.
8.
Power supply error.
Cooling fan error.
Fault detected in RF signal path.
RF input level out of set bounds.
LCD not responding.
Requested re-route.
Cards offline.
Output/Input RF level balance alarm.
For the QRM, the following events will cause a message to be put ifcn the message queue:
1.
2.
3.
4.
5.
6.
7.
8.
Power supply failure.
Q-Sense (A-B switch) in effect.
Automatic Gain Control (AGC) value out of bounds.
RF input level out of set bounds.
QRM in Q-route.
Route failure (Failure on the new route established by Q-route).
Output’s Q-Sense (A-B switched) backup input RF level is low (out of bounds).
Cooling fan failure.
The M command response also contains an overflow flag. If the message queue is full, a new message will
cause the queue contents to be sent in an SNMP TRAP message to the set IP address. The message queue
is then cleared and the new message entered to the queue. Messages not read via the M command or
SNMP are lost when the queue overflows. When the M command is next executed, the response will have
the overflow flag set. Issuing an M command clears the message queue overflow flag and also resets the
alarm bit in the change flag. See the C command for more information.
The response to the M command contains the standard response header of an acknowledge, serial address,
and the command echo, followed by a flag bit and the message count. Messages are placed in the queue in
the order that they occur and are separated by a colon. Messages are variable in length. The maximum size
of the queue is 128 characters including separating colons between messages.
Each message contains an address. This address of a given module is determined by looking at the right 2
dials on the control board. The left 2 dials set up the type of module. The right 2 dial will match this
address in the error message. This is how you determine which module sent the error message.
Rev CL Page 73 of 157 XRM/QE3/QRM/SRM/MRF/MRM/LTE Series Protocol
Example Command Sent:
02 XX XX 4D 03 XX
STX ADR ADR M ETX CHK
(Query the message queue)
Example Positive Response:
06 XX XX 4D 30 30 3A 03 XX
ACK ADR ADR M
0
0 :
ETX CHK
(The queue did not overflow and there are no alarms or messages)
Example Positive Response:
06 XX XX 4D
ACK ADR ADR M
30
0
32
2
3A
:
50
P
53
S
32
2
40
@
58
X
52
R
44
D
30
0
33
3
46
F
61
a
69
i
6C
l
75
u
72
r
65
e
3A
:
49
I
6E
n
32
2
30
0
52
R
45
F
4C
L
65
e
65
e
6C
l
40
@
58
X
52
R
4D
M
30
0
30
0
57
W
61
a
72
r
6E
n
69
i
6E
n
67
g
76
v
03 XX
ETX CHK
(The queue did not overflow and there are two alarms/messages)
Power Supply # 2 at an XRD unit at address 003 has failed
The input RF minimum dBm level has been set and the monitored input level
has dropped below that set level. The error occurred at XRM unit at address
000 on input 20.
Note: This command will be accepted regardless of whether a user is logged in.
Page 74 of 157 Rev CL XRM/QE3/QRM/SRM/MRF/MRM/LTE Series Protocol Types of Messages Received:
Type 1 Power supply message:
06 XX XX 3A
ACK ADR ADR :
50
P
53
S
XX
NUM
40
@
46
F
75
u
72
r
65
e
03
ETX
61
a
58
X
52
R
XX
TYPE
XX
XADR
XX
XADR
69
i
6C
l
NUM
=
Power Supply number 1 or 2.
TYPE
=
M, O, or D to represent XRM unit, XRO output module
or XRD distribution module.
XADR
=
Address of individual unit in an XRM system. XRM is
000 to 255. An XRO and XRD unit is 000 to 015.
Failed =
Rev CL XX
CHK
Power supply is not operating. Power supply may have
failed, it may be unplugged, or it may be not
installed in the slot.
Page 75 of 157 XRM/QE3/QRM/SRM/MRF/MRM/LTE Series Protocol
Type 2 Fan message:
06 XX XX 3A
ACK ADR ADR :
46
F
61
a
6E
n
46
F
65
e
64
d
03
ETX
61
a
XX
NUM
40
@
58
X
52
R
XX
TYPE
XX
XADR
XX
XADR
69
i
6c
l
NUM
=
Fan number 1, 2, 3, or 4.
TYPE
=
M, O, or D to represent XRM unit, XRO output module
or XRD distribution module.
XADR
=
Address of individual unit in an XRM system. XRM is
000 to 255. An XRO and XRD unit is 000 to 015.
Failed =
Page 76 of 157 XX
CHK
Fan should be replaced. The fan is not rotating
at all or so slow that it cannot keep the
unit at optimum operating temperature.
Rev CL XRM/QE3/QRM/SRM/MRF/MRM/LTE Series Protocol Type 3 Temperature Message:
06 XX XX 3A
ACK ADR ADR :
54
T
65
e
6D
m
70
p
XX
XADR
57
W
61
a
72
r
6E
n
69
i
6E
n
UTYPE
=
M, O, or D to represent XRM unit, XRO output module
or XRD distribution module.
XADR
=
Address of individual unit in an XRM system. XRM is
000 to 255. An XRO and XRD unit is 000 to 015.
Warning =
Rev CL 40
@
67
g
58
X
3
EXT
52
R
XX
XX
UTYPE XADR
xx
CHK
The temperature inside the unit has exceeded 50 degrees
Celsius. Immediate servicing is required.
Page 77 of 157 XRM/QE3/QRM/SRM/MRF/MRM/LTE Series Protocol
Type 4 Keypad/LCD Message:
06 XX XX 3A
ACK ADR ADR :
4B
K
50
P
2F
/
4C
L
43
C
44
D
XX
XADD
57
W
61
a
72
r
6E
n
69
i
6E
n
67
g
3
EXT
XADR
=
Address of individual unit in an XRM system. XRM is
000 to 255. An XRO and XRD unit is 000 to 015.
UTYPE
=
M, O, or D to represent XRM unit, XRO output module
or XRD distribution module.
Warning =
Page 78 of 157 40
@
58
X
52
R
XX
XX
UTYPE XADD
xx
CHK
The keypad and LCD are not responding. This typically
indicates the cable that connects the front panel to
the unit has been disconnected.
Rev CL XRM/QE3/QRM/SRM/MRF/MRM/LTE Series Protocol Type 5 RF Unbalanced Level Message:
06 XX XX 3A
ACK ADR ADR :
65
e
6C
l
65
e
3
EXT
40
@
58
X
4F
O
52
R
75
u
74
t
XX
UTYPE
XX XX XX
NUM NUM NUM
XX
XADR
XX
XADR
52 46
R F
4C
L
65
e
76
v
46
F
61
a
69
i
6C
l
75
u
72
r
xx
CHK
NUM
=
Output number.
UTYPE
=
M, O, or D to represent XRM unit, XRO output module,
or XRD distribution module.
XADR
=
Address of individual unit in an XRM system. XRM is
000 to 255. An XRO and XRD unit is 000 to 015.
Failure =
Rev CL The XRM monitors all routed paths. The XRM examines
each output, and the connected input. If the RF level
at the output does not closely match the RF level at
the input then this message will be generated.
Page 79 of 157 XRM/QE3/QRM/SRM/MRF/MRM/LTE Series Protocol
Type 6 RF Input Threshold Level Message:
06 XX XX
XX
ACK ADR ADR CTYPE
65
e
6C
l
67
g
3
EXT
40
@
58
X
52
R
49
I
6E
n
XX
UTYPE
XX XX
NUM NUM
52 46
R F
4C
L
65
e
76
v
XX
XX
57
XADD XADD W
61
a
72
r
6E
n
69
i
6E
n
xx
CHK
NUM
=
Input number. This value is not preceded by zeros.
If the input number is 1 – 9 then only one
character is output. If the input number is
10 – 32 then two characters are output
XADR
=
Address of individual unit in an XRM system. XRM is
000 to 255. An XRO and XRD unit is 000 to 015.
UTYPE
=
M, O, or D to represent XRM unit, XRO output module
or XRD distribution module.
Warning =
Page 80 of 157 The XRM has the ability to monitor the RF levels
of each input and determine if the dBmlevel has
dropped below a set threshold value. This message
is generated if a dBm value has been set for an input
and the RF level has dropped below that set level.
Rev CL XRM/QE3/QRM/SRM/MRF/MRM/LTE Series Protocol N: Name I/O
NOTE: This command is included for backward compatibility. It is recommended that new users use the
NS command to change a name. This command limits the name to 4 characters. The NS command has a
variable name length from 0 to 7 characters and also accepts lower case letters.
This command sets a new name for an input or output. This name is displayed on the front panel LCD of
the matrix UCM for convenience when operating the unit manually. Each name is limited to only 4
characters. The only acceptable entries are ASCII SPACE (20h), 0-9 (30-39h), and A-Z (41-5A).
Command structure:
N<I/O><nnn><xxxx>
I/O
= I for input and O for output.
nnn
= Input or output number.
xxx
= 4 ASCII characters
Example Command Sent:
02 XX XX 4E 4F 30 30 31
03
STX ADR ADR N
O
0
0
1 R
C
(Assign output 1 the name ”RCV2”)
XX
V
2
ETX CHK
Positive Response:
06 XX XX 4E 4F 30 30 31
ACK ADR ADR N
O
0
0
1
(Output 1 is named “RCV2”)
03
ETX
XX
CHK
Note: This command will be accepted regardless of whether a user is logged in.
Rev CL Page 81 of 157 XRM/QE3/QRM/SRM/MRF/MRM/LTE Series Protocol
NR: Name Read
This command reads the convenience name for an input or output. This name is displayed on the front
panel LCD of the matrix UCM for convenience when operating the unit manually. Each name can be up to
seven characters long and can consist of any standard keyboard character. If the name is less than seven
characters the response is not padded.
Command structure:
NR<I/O><nnn>
I/O
= I for input and O for output.
nnn
= Input or output number.
Example Command Sent:
02 XX XX 4E 52 4F 30 31
STX ADR ADR N
R
O
0
1
(Read the name of output 16)
36
6
03 XX
ETX CHK
36
6
52
R
Positive Response:
06 XX XX 4E 52 4F 30 31
ACK ADR ADR N
R
O
0
1
(Output 16 is named “Recvr2”)
65
e
63
c
76
v
72
r
32
2
03 XX
ETX CHK
Note: This command will be accepted regardless of whether a user is logged in.
Page 82 of 157 Rev CL XRM/QE3/QRM/SRM/MRF/MRM/LTE Series Protocol NS: Name Set
This command sets a new name for an input or output. This name is displayed on the front panel LCD of
the matrix UCM for convenience when operating the unit manually. Any remote commands to set
crosspoints must still use input and output numbers.
Names can consist of any standard keyboard character when set using the N or NS command. Each name
can be up to seven characters long. Names can also be set manually from the front panel of the UCM but
are limited to using the characters a-z, A-Z, 0-9, and space since there is a simple keypad for entry.
Command structure:
NS<I/O><nnn><aaaaaaa>
I/O
= I for input and O for output.
nnn
= Input or output number.
Aaaaaaa
= Up to 7 alphanumeric characters.
Example Command Sent:
02 XX XX 4E 53 49 30 30 37 53
STX ADR ADR N
S
I
0
0
7
S
(Set the name of input 7 to Sat1V)
61
a
74
t
31
1
56
V
03 XX
ETX CHK
Positive Response:
06 XX XX 4E
ACK ADR ADR N
53
S
49
I
30
0
30
0
37
7
03 XX
ETX CHK
Note: An alternate version of the NS command will be accepted to maintain compatibility with a previous
custom version of the command. This version is the N command which is identical to the NS command
except that names are a fixed 4 characters long. The response is also different with only the “N” returned.
Rev CL Page 83 of 157 XRM/QE3/QRM/SRM/MRF/MRM/LTE Series Protocol
NQ: Name Change Queue
This command reads the name queue which holds up to eight input or output numbers that have had their
convenience names changed. Issuing the NQ command clears the name queue, the change count, and the
name bit in the C command change flag.
Command structure:
NQ
Response structure:
NQ<Status Flag><Change Count><I/O number><I/O number>…
Status Flag
= 1 for name queue overflow.
Change Count
= Number of name changes in queue.
I/O number
= An I or O to indicate input or output plus the associated 3 digit number.
Example Command Sent:
02 XX XX 4E
STX ADR ADR N
51
Q
03 XX
ETX CHK
Positive Response:
06 XX XX 4E 51 30 31 63 76 72
ACK ADR ADR N
Q
0
1
I
0
0
(No overflow, one change; input 2)
32
2
03 XX
ETX CHK
Positive Response:
06 XX XX 4E 51 31 31 63 76 72 32 03 XX
ACK ADR ADR N
Q
1
1
I
0
0
2 ETX CHK
(Name queue overflowed, more than 8 names have been changed since last
check, input 2 is the last known name changed )
Note: This command will be accepted regardless of whether a user is logged in.
Page 84 of 157 Rev CL XRM/QE3/QRM/SRM/MRF/MRM/LTE Series Protocol O: Query Output Channel
This command queries for the input connected to the specified output.
Example Command Sent:
02 XX XX 4F 30 30 31 03 XX
STX ADR ADR O
0
0
1 ETX CHK
(Query the status of output 1)
Example Positive Response:
06 XX XX 4F 30 30 32 03 XX
ACK ADR ADR O
0
0
2 ETX CHK
(Output 1 is connected to input 2)
Note: This command will be accepted regardless of whether a user is logged in.
Rev CL Page 85 of 157 XRM/QE3/QRM/SRM/MRF/MRM/LTE Series Protocol
OS: Query Output State
This command queries for the input connected to the specified output along with the locked/unlocked state
and access control parameters.
The access control parameters are given by the last two characters in the response. They give numbers that
represent an access control bitmap table:
Bit
7
6
5
4
3
2
1
0
Group
8
7
6
5
4
3
2
1
Hex
Response character 1
Response character 2
If a particular bit is set, then that group is allowed to change a particular output with the L, S, SP, and U
commands. If the bit is clear then the corresponding group is not allowed access to that output.
Character
Response 1: Groups allowed
access
Response 2: Groups allowed
access
0
none
none
1
5
1
2
6
2
3
5, 6
1, 2
4
7
3
5
5, 7
1, 3
6
6, 7
2, 3
7
5, 6, 7
1, 2, 3
8
8
4
9
5, 8
1, 4
A
6, 8
2, 4
B
5, 6, 8
1, 2, 4
C
7, 8
3, 4
D
5, 7, 8
1, 3, 4
E
6, 7, 8
2, 3, 4
F
5, 6, 7, 8
1, 2, 3, 4
Example Command Sent:
02 XX XX 4F 53 30 30 31
STX ADR ADR O
S
0
0
1
(Query the state of output 1)
03 XX
ETX CHK
Page 86 of 157 Rev CL XRM/QE3/QRM/SRM/MRF/MRM/LTE Series Protocol Examples of Positive Responses:
06 XX
ACK ADR
(Output
allowed
XX 4F 53 30 30 32 4C 30 31 03 XX
ADR O
S
0
0
2
L
0
1 ETX CHK
1 is connected to input 2, is locked, and only users in group 1 are
access to the output)
06 XX XX 4F 53 30 30 37 55 36 46 03 XX
ACK ADR ADR O
S
0
0
7
U
6
F ETX CHK
(Output 1 is connected to input 7, is unlocked, and users in group 1, 2, 3,
4, 6 and 7 are allowed access to the output)
Note: This command will be accepted regardless of whether a user is logged in.
Rev CL Page 87 of 157 XRM/QE3/QRM/SRM/MRF/MRM/LTE Series Protocol
PM: Priority Mode Read/Write
This command turns Priority Mode on or off or reads back priority status of the system. Priority mode
assigns user priority to the lock/unlock function. Any user can lock an output. If the priority mode is on,
the user that locked the output is recorded. The output can then only be unlocked by a user with equal or
higher priority than the user that locked the output.
Priority hierarchy is set and not adjustable. Users are listed below from highest priority to lowest priority.
user1 - highest priority
user2
user3
user4
user5
user6
user7
user8
user9 no user - lowest priority
Write Command Format:
02 XX XX 50
STX ADR ADR P
4D
M
30
0
03 XX
ETX CHK
02 XX XX 50
STX ADR ADR P
4D
M
31
1
03 XX
ETX CHK
Example Write Command:
02 XX XX 50 4D 30
STX ADR ADR P
M
0
(Turn priority Off)
03 XX
ETX CHK
02 XX XX 50 4D 31
STX ADR ADR P
M
1
(Turn priority on)
03 XX
ETX CHK
Positive Write Response:
06 XX XX 50 4D
ACK ADR ADR P
M
Page 88 of 157 03 XX
ETX CHK
Rev CL XRM/QE3/QRM/SRM/MRF/MRM/LTE Series Protocol Read Command Format:
02 XX XX 50
STX ADR ADR P
4D
M
03 XX
ETX CHK
02 XX XX 50
STX ADR ADR P
4D
M
XX
X
XX
X
XX
X
03 XX
ETX CHK
Example Read Command:
02 XX XX 50 4D 03 XX
STX ADR ADR P
M ETX CHK
(Read current system wide priority mode setting)
02 XX XX 50 4D 30 30 31 03 XX
STX ADR ADR P
M 0
0
1
ETX CHK
(Read user that locked output 01 while priority is on)
Positive Read Response:
06 XX XX 50 4D 30 03 XX
ACK ADR ADR P
M 0
ETX CHK
(Priority mode is off)
06 XX XX 50 4D 31
ACK ADR ADR P
M 1
(Priority mode is on)
03 XX
ETX CHK
06 XX XX 50 4D 31 03 XX
ACK ADR ADR P
M 7
ETX CHK
(user7 locked the output)
Rev CL Page 89 of 157 XRM/QE3/QRM/SRM/MRF/MRM/LTE Series Protocol
Q: Check Queue
This command will read the change queue. Each control port for the system maintains a change queue that
allows changes throughout the system to be tracked. The change queue contains up to 8 crosspoint changes
executed since the last Q command. This includes changes to the lock state of a crosspoint. All crosspoint
changes are put in the queue regardless of the source. If more than one change is executed for a given
output, only the last change will be stored in the queue.
The ASCII number after Q in the response is the number of changes that the queue contains and ranges
from 0 to 8. If no crosspoint changes are stored in the queue this number will be zero. If more than 8
changes occurred since the last Q command, this number will not be valid and bit 3 of the queue change
flag (see command C) will be set to signal that an overflow has occurred. After the queue is checked the
queue and the queue change flag are cleared, including the crosspoint, queue overflow, and access control
change bits.
Command Sent:
02 XX XX 51
STX ADR ADR Q
03 XX
ETX CHK
Example Positive Responses:
06 XX XX 51 30 03 XX
ACK ADR ADR Q
0 ETX CHK
(No changes have occurred)
06 XX XX 51 32 30 30 35 30 31 35 30 31 36 30 30 31 03 XX
ACK ADR ADR Q
2
0
0
5
0
1
5
0
1
6
0
0
1 ETX CHK
(Two changes have occurred: output 5 was connected to input 15, and output
16 was connected to input 1)
Note: This command will be accepted regardless of whether a user is logged in.
Page 90 of 157 Rev CL XRM/QE3/QRM/SRM/MRF/MRM/LTE Series Protocol RH: Hard Reset
This command resets all parameters to the factory specified defaults. Note that the matrix and module sizes
are reset as well as the output module size. If these are not correct, your matrix will no longer operate
correctly. Other parameters are also changed that might make it difficult to access the controller to
reconfigure the matrix.
WARNING! DO NOT USE this command unless you are absolutely sure you want the following
configuration:
DHCP:
Off
Default Static IP:
192.168.0.249
Default Static Netmask:
255.255.255.0
Default Static Gateway:
192.168.0.1
Telnet Port:
23
QEC Ethernet Port:
9100
Serial Port:
RS232, 9600 baud, 8N1
RS485 Terminations:
Off
Matrix Size:
32x32
Module Size:
32x32
XRO Size:
4
Example Command Sent:
02 XX XX 52
STX ADR ADR R
48
H
03 XX
ETX CHK
Example Positive Response:
06 XX XX 52
ACK ADR ADR R
Rev CL 48
H
03 XX
ETX CHK
Page 91 of 157 XRM/QE3/QRM/SRM/MRF/MRM/LTE Series Protocol
RS: Soft Reset
This command reboots the control program and is the equivalent of a power cycle.
Example Command Sent:
02 XX XX 52
STX ADR ADR R
53
S
03 XX
ETX CHK
Example Positive Response:
06 XX XX 52
ACK ADR ADR R
Page 92 of 157 53
S
03 XX
ETX CHK
Rev CL XRM/QE3/QRM/SRM/MRF/MRM/LTE Series Protocol S: Set Crosspoint
This command will connect one input to an output. The command byte is followed by three bytes giving
the output, then three bytes giving the input.
Example Command Sent:
02 XX XX 53 30 30 31 30
STX ADR ADR S
0
0
1
0
(Connect output 1 to input 2)
30
0
32
2
03 XX
ETX CHK
Positive Response:
06 XX XX 53
ACK ADR ADR S
Rev CL 03 XX
ETX CHK
Page 93 of 157 XRM/QE3/QRM/SRM/MRF/MRM/LTE Series Protocol
SC: Set Check Protected Mode
This command will check an output for the status of the protected mode. The command returns the
protected mode status, and if the output is in protected mode it will also return the port that put it in
protected mode. The output has to be unprotected before it can be changed. The output can only be
unprotected from the same port and same address it was protected from.
The reply will return 0 for off. If the output is protected the reply will return a 1 for on and the port
number. The serial address of the unit follow in the last two characters.
PORT
0
1
2
3
4
5
6
Physical connection
Local Keypad/LCD
Remote Port B
Control In Port C
Ethernet Port A
Ethernet Port B
Telnet
SNMP
The response also returns the serial address of the unit the output was protected from.
Example Command Sent:
02 XX XX 53 43
STX ADR ADR S
C
(Check output 1)
30
0
30
0
31
1
03 XX
ETX CHK
Positive Response:
06 XX XX 53 43 30 03 XX
ACK ADR ADR S C
0
ETX CHK
Output protected mode is off
Positive Response:
06 XX XX 53 43 31 31 46 44 03 XX
ACK ADR ADR S C
1
1
F
D
ETX CHK
Output protected mode is on and the output was protected by the
Remote in port from unit address FD
Positive Response:
06 XX XX 53 43 31 35 33 38 03 XX
ACK ADR ADR S C
1
5
3
8
ETX CHK
Output protected mode is on and the output was protected by
the Telnet port from unit address 38
Page 94 of 157 Rev CL XRM/QE3/QRM/SRM/MRF/MRM/LTE Series Protocol SP: Set Protect Mode
This command will connect the output and input and turn protected mode on for the specified output.
Example Command Sent:
02 XX XX 53 50 30 30 31 30 30 32 03 XX
STX ADR ADR S
P
0
0
1
0
0
2 ETX CHK
(Connect output 1 to input 2 and turn protected mode on for output 1)
Positive Response:
06 XX XX 53
ACK ADR ADR S
Rev CL 50
P
03 XX
ETX CHK
Page 95 of 157 XRM/QE3/QRM/SRM/MRF/MRM/LTE Series Protocol
Alternate SP: Set Protect Mode
This command will turn protected mode on for the specified output.
Example Command Sent:
02 XX XX 53 50 30 30 31
03
XX
STX ADR ADR S
P 0
0
1
ETX
CHK
(turn protected mode on for output 1)
Positive Response:
06 XX XX 53
ACK ADR ADR S
Page 96 of 157 50
P
03 XX
ETX CHK
Rev CL XRM/QE3/QRM/SRM/MRF/MRM/LTE Series Protocol SU: Set Unprotect Mode
This command will clear the protected mode status of the specified output.
NOTE: This command is only successful if the SU command for the specified output is sent from the same
port the original SP command was sent from to protect the specified output.
PORT
0
1
2
3
4
5
Physical connection
Local Keypad/LCD
Remote Port B
Control In Port C
Ethernet Port A
Ethernet Port B
Telnet
Example Command Sent:
02 XX XX 53 55 30
STX ADR ADR S
U 0
(Unprotect output 1)
30
0
31
1
03 XX
ETX CHK
Positive Response:
06 XX XX 53
ACK ADR ADR S
Rev CL 55
U
03 XX
ETX CHK
Page 97 of 157 XRM/QE3/QRM/SRM/MRF/MRM/LTE Series Protocol
U: Unlock Crosspoint
This command will unlock a locked crosspoint.
Command Sent:
02 XX XX 55 30 30 31 30
STX ADR ADR U
0
0
1
0
(Unlock output 1 to input 5)
30
0
35
5
03 XX
ETX CHK
Positive Response:
06 XX XX 55
ACK ADR ADR U
Page 98 of 157 03 XX
ETX CHK
Rev CL XRM/QE3/QRM/SRM/MRF/MRM/LTE Series Protocol Alternate U: Unlock Crosspoint
This command will unlock a locked crosspoint without having to specify the input it is currently locked.
Command Sent:
02 XX XX 55 30
STX ADR ADR U
0
(Unlock output 1)
30
0
31
1
03 XX
ETX
CHK
Positive Response:
06 XX XX 55
ACK ADR ADR U
Rev CL 03 XX
ETX CHK
Page 99 of 157 XRM/QE3/QRM/SRM/MRF/MRM/LTE Series Protocol
XA: Attenuate Input
This command will attenuate an input of a XRD or XRM unit in a XRM system. The attenuation of an
input is in 0.5dB steps from 0.0 dB attenuation up to a maximum of 15.5dB of attenuation. Check your
user’s manual to see if this feature is available on your system.
For QE3 systems refer to XG commands or XAS command.
Command Format:
02 XX XX
STX ADR ADR
XX
TENS
58
X
XX
ONES
MSDXADR =
41
A
XX
TENTHS
XX
MSADR
XX
ADR
XX
ETX
XX
ADR
XX
ADR
XX
INPUT
XX
INPUT
XX
CHK
Most significant digit of the address. This determines
what type of unit will respond in an XRM system.
MSADR = 0
MSADR = 2
XRM unit
XRD unit
XADR
=
Address of individual unit in an XRM system. Must be
between 000 and 015 for an XRD and range from 0 to 255
for an XRM unit.
INPUT
=
Input number of the individual unit you want to attenuate.
Must be between 01 and 32.
TENS ONES and TENTHS = Number of dB of attenuation from 00.0 to
15.5. The tens and ones value can range from 0 to
15. The tenths always have to be 5 or 0. Attenuation
is only in 0.5 increments so any other tenth value
will be rejected as an invalid data range. Any
value larger than 15.5 will also be rejected as
invalid data range.
Example Command:
02 XX XX 58 41 32 32 33 35 30 35 30 37 35 03
XX
STX ADR ADR X A
2
2
3
5
0
5
0
7
5
ETX CHK
(Attenuate XRD unit at address 235 or EBH Input #5 a total of 7.5 dB)
Page 100 of 157 Rev CL XRM/QE3/QRM/SRM/MRF/MRM/LTE Series Protocol Example Command:
02 XX XX 58 41 32 30 31 36 31 37 31 34 30 03
XX
STX ADR ADR X A
0
0
1
6
1
7
1
4
5
ETX CHK
(Attenuate XRM unit at address 196 or 0FH Input #17 a total of 14.5 dB)
Positive Response:
06 XX XX 58
ACK ADR ADR X
41
A
XX
ETX
XX
CHK
NOTE: Some firmware releases do not support this command. Refer to the firmware release notes at the
beginning of this document for details.
Rev CL Page 101 of 157 XRM/QE3/QRM/SRM/MRF/MRM/LTE Series Protocol
XAS: Attenuate Input (Simplified)
This command will attenuate an XRM system input. If the system has XRDs then the attenuation value is
applied to the that input. If the system input is on an XRM then the attenuation is applied at that input. The
attenuation of an input is in 0.5dB steps from 0.0 dB attenuation up to a maximum of 15.5dB of
attenuation for XRM systems
QE3 systems can be equipped with input attenuation or gain control depending on the system modules. If
the system has input distribution modules the system can attenuate the inputs and this is a valid command.
Otherwise use XG gain control commands.
Check your user’s manual to see if this feature is available on your system.
Command Format:
02 XX XX
STX ADR ADR
58
X
XX
TENS
XX
ONES
INPUT
=
41
A
2E
.
53
S
XX
IN
XX
IN
XX
TENTHS
XX
ETX
XX
CHK
XX
IN
40
@
System input number you want to attenuate. Must be
between 001 and number of system inputs. Always 3
characters.
TENS ONES = Number of dB of attenuation from 00.0 to 15.5.
and TENTHS The tens and ones value can range from 00 to 15. The
tenths always have to be 5 or 0. Attenuation is only
in 0.5 increments so any other tenth value will be
rejected as an invalid data range. Any value larger
than 15.5 will also be rejected as invalid data range.
Page 102 of 157 Rev CL XRM/QE3/QRM/SRM/MRF/MRM/LTE Series Protocol Positive Response:
06 XX XX 58
ACK ADR ADR X
41
A
53
S
XX
ETX
XX
CHK
Example Command:
02 XX XX 58 41 53 31 33 35 40 30 35 2E
STX ADR ADR X A
S
1
3
5
@
0
5
.
(Attenuate system input #135 a total of 5.5 dB)
35
5
03
ETX
XX
CHK
35
5
03
ETX
XX
CHK
Example Command:
02 XX XX 58 41 53 30 32 34 40 31 33 2E
STX ADR ADR X A
S
0
2
4
@
1
3
.
(Attenuate system input #24 a total of 13.5 dB)
NOTE: Some firmware releases do not support this command. Refer to the firmware release
notes at the beginning of this document for details.
Rev CL Page 103 of 157 XRM/QE3/QRM/SRM/MRF/MRM/LTE Series Protocol
XC: Check for Cards Installed
This command will report any cards not installed in an XRM or QE3 unit. This command applies to input,
bridge, and output cards on the XRM. This command applies to input and output cards on the QE3. XRD
and QED units only report missing input cards, XRO and QEO units only report missing output cards.
QE3 only has input and output cards. No bridge cards. XC command issued to a QE3 has no bridge card
response, only input and output card response.
XRM: The bridge card is a special case. Each bridge card has two separate addresses. The addressing is as
follows:
Bridge card 1 = cards 1 & 2
Bridge card 2 = cards 3 & 4
Bridge card 3 = cards 5 & 6
Bridge card 4 = cards 7 & 8
It is possible in a fault condition for only half of a bridge card to respond to a check command. If for
example no response is read from bridge card 3, then half of the second bridge card is not responding and
will be reported as not installed.
Command Format:
02 XX XX
STX ADR ADR
MSADR =
58
X
46
C
Page 104 of 157 XX
ADR
XX
ADR
03
ETX
XX
CHK
Most significant digit of the address. This determines what
type of unit will respond in a system.
MSADR
MSADR
MSADR
MSADR
MSADR
MSADR
ADR =
XX
XX
MSADR ADR
=
=
=
=
=
=
0
1
2
3
4
5
XRM
XRO
XRD
QED
QE3
QEO
Address of individual box in a system. This is the two
dials on the control board on the right on an XRM system,
or the bottom two dials on a QE3 system. The control
board address is in Hex format. Note the dials go from
0 to F. This address must be converted to decimal format
to use this command correctly.
Rev CL XRM/QE3/QRM/SRM/MRF/MRM/LTE Series Protocol EXAMPLE
Dials read left to right, or for QE3 from top to bottom
0 3 2 F. You are only concerned with the 2F on the
right. 2F Hex converts to 47 decimal. So you would use
047 in the ADR field to write to that unit.
Example Command Sent:
02 XX XX 58 43
34 30 35
34
03 XX
STX ADR ADR X
C
4
0
5
4
ETX CHK
(Report Cards installed on QE3 unit address 054) (dial reads 36)
Example Command Sent:
02 XX XX 58 43
30 30 32
36
03 XX
STX ADR ADR X
C
0
0
2
6
ETX CHK
(Report Cards installed on XRM unit address 026) (dial reads 1A)
XRD Response Format:
06
ACK
3
ETX
XX
ADR
XX
ADR
58
X
43
C
3A
:
49
I
XX
nn
2C
,
XX
nn
. . .
. . .
43
C
3A
:
49
O
XX
nn
2C
,
XX
nn
. . .
. . .
43
C
3A
:
49
I
XX
nn
2C
,
XX
nn
. . .
. . .
XX
nn
2C
,
XX
CHK
XRO Response Format:
06
ACK
3
ETX
XX
ADR
XX
ADR
58
X
XX
CHK
XRM Response Format:
06
ACK
3A
:
3
ETX
Rev CL XX
ADR
42
B
XX
ADR
XX
nn
58
X
2C
,
XX
nn
. . .
. . .
3A
:
4F
O
XX
nn . . .
XX
CHK
Page 105 of 157 XRM/QE3/QRM/SRM/MRF/MRM/LTE Series Protocol
XRM Response Example:
06
ACK
XX
ADR
XX
ADR
58
X
3A
30
33
2C
:
O
3
,
(Input card #5 not
Output cards #3 and
43
C
3A
:
49
I
35
5
3A
:
42
B
31
1
36
ETX
CHK
6
03
XX
responding, 1st half of bridge card 1 not responding,
# 6 not responding)
XRM Response Example:
06
XX
XX
58
43 3A
49
3A
ACK
ADR
ADR X
C
:
I
:
(All cards installed and responding)
42
B
3A
:
4F
O
3
ETX
XX
CHK
QED Response Format:
06
ACK
3
ETX
XX
ADR
XX
ADR
58
X
43
C
3A
:
49
I
XX
nn
2C
,
XX
nn
. . .
. . .
58
X
43
C
3A
:
49
O
XX
nn
2C
,
XX
nn
. . .
. . .
58
X
43
C
3A
:
49
I
XX
nn
2C
,
XX
nn
. . .
. . .
XX
CHK
QEO Response Format:
06
ACK
3
ETX
XX
ADR
XX
ADR
XX
CHK
QE3 Response Format:
06
ACK
3A
:
XX
ADR
4F
O
Page 106 of 157 XX
ADR
XX
nn
2C
,
XX
nn . . .
3
ETX
XX
CHK
Rev CL XRM/QE3/QRM/SRM/MRF/MRM/LTE Series Protocol QE3 Response Example:
06
ACK
XX
ADR
XX
ADR
58
X
43
C
3A
:
3A
30
33
2C
36
ETX
:
O
3
,
6
03
(Input card #4 and #8 not
responding)
49
I
34
4
2C
,
CHK
XX
responding,
38
8
Output
cards
#3
and
#
6
QE3 Response Example:
06
XX
XX
58
43 3A
42
3A
ACK
ADR
ADR X
C
:
I
:
(All cards installed and responding)
Rev CL 4F
O
3
XX
ETX
CHK
Page 107 of 157 not
XRM/QE3/QRM/SRM/MRF/MRM/LTE Series Protocol
XF: Check Fan
This command will report the speed and condition of an individual cooling fan in an XRM or QE3 system.
Command Format:
02 XX XX
STX ADR ADR
58 46
X F
XX
NUM
XX
MSADR
XX
ADR
XX
ADR
XX
ADR
03
ETX
XX
CHK
NUM =
Fan number 1 through 5. QRM units only have two fans.
If a fan 3 or 4 is polled that does not exist a
NAK “failed” condition will be returned.
MSADR =
Most significant digit of the address. This determines
what type of unit will respond in a system. This field
is not used for QRM.
MSADR
MSADR
MSADR
MSADR
MSADR
MSADR
=
=
=
=
=
=
0
1
2
3
4
5
XRM
XRO
XRD
QED
QE3
QEO
unit
unit
unit
unit
unit
unit
ADR =
Address of individual box in a system. This is the two
dials on the control board on the right on an XRM system,
or the bottom two dials on a QE3 system control
board. The control board address is in Hex format,
note the dials go from 0 to F. This address must be
converted to decimal format to use this command correctly.
This field is ignored for QRM.
EXAMPLE
Dials read left to right, or for QE3 from top to bottom
0 3 2 F. You are only concerned with the 2F on the
right. 2F Hex converts to 47 decimal. So you would use
047 in the ADR field to write to that unit.
Example Command Sent:
02 XX XX 58 46 31 30 30 34 37 03 XX
STX ADR ADR X
F
1
0
0
4
7 ETX CHK
(Report Fan 1 condition on XRM unit at address 47D or 2FH)
Example Command Sent:
02 XX XX 58 46 33 35 30 32 34 03 XX
STX ADR ADR X
F
3
5
0
2
4 ETX CHK
(Report Fan 3 condition on QEO unit at address 024D or 18H)
Page 108 of 157 Rev CL XRM/QE3/QRM/SRM/MRF/MRM/LTE Series Protocol Response Format:
06 XX XX 58
ACK ADR ADR X
52
R
50
P
4D
M
46
F
20
Space
XX XX XX XX
“condition”
46
F
61
a
6E 20
n
Space
61
a
74
t
20
Space
FanNumber
X
20
Space
RPM RPM RPM RPM
X
X
X
X
Condition = “Good”, or “Slow”, or “Fail”
Example Response:
06
ACK
XX
ADR
XX
ADR
4D
M
20
‘ ‘
47
G
58
X
6F
o
46
F
6F
o
20
‘ ‘
46
F
64 20
d ‘ ‘
61
a
61
a
6E
n
20
‘ ‘
74 20
t ‘ ‘
32
2
32
2
34
4
20
‘ ‘
37
7
52 50
R P
35 03 XX
5 ETX CHX
(XF Fan 2 RPM Good at 2475)
Rev CL Page 109 of 157 XRM/QE3/QRM/SRM/MRF/MRM/LTE Series Protocol
XGA: Set Gain Control to Automatic Mode
This is a QE3 command, not an XRM command. Gain control can be set to manual or automatic. This
command turns on automatic gain control for the specified input. By default when an input is set to auto
mode the manual gain control settings are turned off. An input can be set to automatic or manual gain
control, not both at the same time. This command has 2 formats. Both commands turn on the automatic
gain control for the input. One sets the input to the previous auto dB value stored in memory. The other
sets the value to the dB value given in the command. Valid values for auto gain control are between 10dBm and -60dBm, in .5dB intervals. EXAMPLE: -10.5 is valid -10.0 is valid -60.5 is not valid. Tenths
values if entered incorrectly will be set to .0 or .5 depending on the input value. Input .5 or higher set to .5.
.4 or lower will be set to .0. The values are variable in length. Leading zeros are not necessary. The values
must be separated by the @- symbols and the tenth value must be separated by the ‘.’ (period) symbol.
Command Format 1:
02 XX XX 58
STX ADR ADR X
47
G
41
A
XX
IN
. . . 03
. . . ETX
XX
CHK
Command Format 2:
02 XX XX 58
STX ADR ADR X
XX
03
tenths ETX
IN
=
47
G
41
A
XX
IN
. . .
. . .
40
@
2D
-
. . .
. . .
2E
.
XX
CHK
Input port. Must be between 1 and the number of
system inputs. Up to 4 characters accepted.
TENS ONES = Value in dB from -10 to -60. Any value larger than -10 or
smaller than -60dB will be rejected as invalid data range
TENTHS =
Rounded down to 0 or 5
Example Command Sent:
02 XX XX 58
STX ADR ADR X
46
G
41
A
31
1
38
8
40
@
2D
-
32
2
35
2E
35
03
XX
5
.
5
ETX
CHK
(Set auto gain control on for input 18. Set the dB level at -25.5dBm)
Response Format:
06 XX XX 58
ACK ADR ADR X
Page 110 of 157 46
G
41
A
03 XX
ETX CHK
Rev CL XRM/QE3/QRM/SRM/MRF/MRM/LTE Series Protocol XGAO: Set Gain Control to Automatic Mode - Output
QRM only. Gain control can be set to manual or automatic. This command turns on automatic gain
control for the specified output. By default when an output is set to auto mode the manual gain control
settings are turned off. An output can be set to automatic or manual gain control, not both at the same time.
This command has 2 formats. Both commands turn on the automatic gain control for the output. One sets
the output to the previous auto dB value. The other sets the value to the dB value given in the command.
Valid values for QRM auto gain control are between -60 dBm and 0 dBm. Tenths value must be either 0
or .5.
Command Format 1:
02 XX XX 58
STX ADR ADR X
47
G
41
A
4F
O
XX
OUT3
XX
OUT2
XX
OUT1
03
ETX
XX
CHK
47
41
4F
XX
XX
XX
40
2B/2D
XX
XX
G
A
O
OUT3
OUT2
OUT1
@
+/-
10s
1s
Command Format 2:
02
XX
XX
58
STX ADR ADR X
2E
.
XX
03
tenths ETX
OUT =
XX
CHK
Output. Must be between 001 and the number of system
outputs. Always 3 characters. Tenths must be either 0
or 5 (values valid in .5 increments)
Example Command Sent:
02
STX
XX
ADR
XX
ADR
58
X
46
G
41
A
4F 30
O
0
31
1
36
6
40
@
2D 30
- 0
35
2E
35
03
XX
5
.
5
ETX
CHK
(Set auto gain control on for output 16. Set the dB level at -5.5dBm)
Response Format:
06 XX XX 58
ACK ADR ADR X
Rev CL 46
G
41
A
4F
O
03 XX
ETX CHK
Page 111 of 157 XRM/QE3/QRM/SRM/MRF/MRM/LTE Series Protocol
XGH: Set Gain Control Hysteresis dB
Number of dB a signal has to rise or fall beyond the set user level before the gain control feature will act
upon the signal. Can be set from 0 to 60 seconds in 1/1000 intervals.
Command will accept value from 1 to 10. Command length is variable also. User does not need to enter
leading zeros. Input number and dB number must be separated by the @ symbol. The user must specify a
number for both the input and delay time. Zero is not acceptable for either value.
Command Format 1:
02 XX XX 58
STX ADR ADR X
47
G
XX
DB
. . .
. . .
XX03
ETX
IN
=
DB
=
48
H
XX
IN
. . .
. . .
40
@
XX
CHK
Input port. Must be between 1 and the number of
system inputs.
dB value. Value 1 to 10dB. Numbers only, no characters.
Example Command Sent:
02 XX XX 58 47 48 38
40
32
STX ADR ADR X
G
H 8
@
2
(Set hysteresis on input 8 to 2dB)
3
ETX
XX
CHK
Example Command Sent:
02 XX XX 58 47 48 33 35 40
31
STX ADR ADR X
G
H 3
5
@
1
(Set hysteresis on input 35 to 10dB)
30
0
3
ETX
XX
CHK
Response Format:
06 XX XX 58
ACK ADR ADR X
46
G
48
H
03 XX
ETX CHK
Note: Some firmware versions do not implement this command.
Page 112 of 157 Rev CL XRM/QE3/QRM/SRM/MRF/MRM/LTE Series Protocol XGM: Set Gain Control to Manual Mode
This is a QE3 command, not an XRM command. Gain control can be set to manual or automatic. This
command turns on manual gain control for the specified input. By default when an input is set to manual
mode the auto gain control settings are turned off. An input can be set to automatic or manual gain control,
not both at the same time. This command has 2 formats. Both commands turn on the manual gain control
for the input. One sets the input to the previous manual dB value. The other sets the value to the dB value
given in the command. Valid values for manual gain control are between +18dBm and -13.5dBm. Tenths
values if entered incorrectly will be set to .0 or .5 depending on the input value. Input .5 or higher set to .5.
.4 or lower will be set to .0. All 3 values are variable in length. Leading zeros are not necessary. The values
must be separated by the @-or @+ symbols and the tenth value must be separated by the ‘.’ (period)
symbol. Values outside the range of +18 to -13.5 will be rejected. EXAMPLE: -13.6 and +18.1 are invalid
values.
Manual gain control can be set to amplify or attenuate an input. Manual gain control has no feedback or
internal adjusting. The manual dB value is what is applied to the input regardless of signal strength.
Command Format 1:
02
XX XX 58 47
STX ADR ADR X
41
G
4D
M
XX
IN
. . . 03
. . . ETX
XX
CHK
Command Format 2:
02 XX XX 58
STX ADR ADR X
XX
1s
IN
2E
.
=
47
G
4D
M
XX
03
tenths ETX
XX
IN
. . .
. . .
40
@
2D\2B
-\+
XX
10s
XX
CHK
Input port. Must be between 001 and the number of system
inputs. 1 to 3 characters.
TENS ONES = Value in dB from -13 to +18. Any value larger
than +18 or smaller than -13dB will be rejected as
invalid data range. 1 to 3 characters.
TENTHS =
Rev CL Rounded down to 0 or down to 5. 1 to 2 characters.
Page 113 of 157 XRM/QE3/QRM/SRM/MRF/MRM/LTE Series Protocol
Example Command Sent:
02 XX XX 58
STX ADR ADR X
46
G
4D
M
31
1
38
8
40
@
2D
-
35
2E
35
03
XX
5
.
5
ETX
CHK
(Set manual gain control on for input 18. Set the dB level at -5.5dBm)
Example Command Sent:
02 XX XX 58
STX ADR ADR X
46
G
4D
M
38
8
40
@
2B
+
31
36
2E
30
03
XX
1
6
.
0
ETX
CHK
(Set manual gain control on for input 18. Set the dB level at +16.0dBm)
Response Format:
06 XX XX 58
ACK ADR ADR X
Page 114 of 157 46
G
4D
M
03 XX
ETX CHK
Rev CL XRM/QE3/QRM/SRM/MRF/MRM/LTE Series Protocol XGMO: Set Gain Control to Manual Mode - Output
QRM and LTE only. Gain control can be set to manual or automatic. This command turns on manual gain
control for the specified output. By default when an output is set to manual mode the auto gain control
settings are turned off.
Manual gain control can be set to amplify or attenuate an output. Manual gain control has no feedback or
internal adjusting. The manual dB value is what is applied to the output regardless of signal strength. This
command has 2 formats. Both commands turn on the manual gain control for the output. One sets the
output to the previous manual dB value. The other sets the value to the dB value given in the command.
QRM: An output can be set to automatic or manual gain control, not both at the same time. Valid values
for QRM manual gain control are between -30 dBm and +16 dB. For the QRM, the tenths value must be
either 0 or .5.
LTE: An output can only be set to manual gain control because the LTE does not support AGC (automatic
gain control). Valid values for LTE attenuation are between 0.00 dB and +31.75 dB. Because the LTE
accepts attenuation values in 0.25 dB increments, the tenths value must be either 0, 2, 5, or 7, and it is
interpreted as follows: 0 = .00, 2 = .25, 5 = .50, and 7 = .75. For example, if the value 13.7 is sent, the
LTE will set attenuation for the specified output at 13.75 dB.
Command Format 1:
02 XX XX 58
STX ADR ADR X
47
G
4D
M
4F
O
XX
OUT3
XX
OUT2
XX
OUT1
03
ETX
4D
M
4F XX
O OUT3
XX
OUT2
XX
OUT1
40
@
XX
CHK
Command Format 2:
02 XX XX 58
STX ADR ADR X
2E
.
47
G
XX
03
tenths ETX
OUT =
2B/2D XX
+/10s
XX
1s
XX
CHK
Output. Must be between 001 and the number of system
outputs. Always 3 characters. Tenths must be either 0 or 5
(values valid in .5 increments)
Example Command Sent:
02 XX XX 58
STX ADR ADR X
46
G
4D
M
4F
O
30 31
0
1
36
6
03
@
30
0
35
2E
35
03
XX
5
.
5
ETX
CHK
(Set auto gain control on for output 16. Set the dB level at 5.5dBm)
Response Format:
06 XX XX 58
ACK ADR ADR X
Rev CL 46
G
4D
M
4F
O
03 XX
ETX CHK
Page 115 of 157 XRM/QE3/QRM/SRM/MRF/MRM/LTE Series Protocol
XGR: Gain Control Read Status
This is a QE3 and XRM command. This command will report the input gain control settings and RF level
of the specified input. It will return the attenuation value for an XRM. Command length is variable. User
can but does not need to enter leading zeros.
Command Format:
02 XX XX
STX ADR ADR
IN
=
58
X
47
G
52
R
XX
IN3
. . .
. . .
03
ETX
XX
CHK
Input to read status. Must be between 001 and the number of
System inputs. Always 3 characters.
Example Command Sent:
02
XX
XX
58
46
52 30
31 38
03
STX ADR ADR
X
G
R
0
1
8
ETX
(Read gain control status of system input 18)
XX
CHK
Response Format:
06 XX XX 58
ACK ADR ADR X
46
G
20
R
4D/41
M/A
40
@
2B/2D XX
+/10s
XX
2E
XX
03 XX
1s . tenths ETX CHK
M/A
=
M for manual mode. A for automatic mode. Always returns
M for XRM
+/-
=
+ for gain, – for attenuation. Always returns – for XRM.
10s 1s . tenths =
dB value input is set at.
Example Response:
06
XX
XX
58 46
52
4D 40 2D 31 33 2E 35
ACK ADR
ADR X
G
R
M
@
1
3
.
5
(Input set at -13.5 dB of attenuation in manual mode.)
03
ETX
XX
CHX
06
XX
XX
58 46
52
4D 40 2B 31 33
ACK ADR
ADR X
G
R
M
@
+
1
8
(Input set at +18.0 dB of gain in manual mode.)
03
ETX
XX
CHX
06
XX
XX
58 46
52
4D 40 2D 31 33 2E 35 03
ACK ADR
ADR X
G
R
A
@
1
0
.
5
ETX
(Input auto gain control enabled and level set at -10.5dBm.)
XX
CHX
Page 116 of 157 2E
.
35
0
Rev CL XRM/QE3/QRM/SRM/MRF/MRM/LTE Series Protocol XGRO: Gain Control Read Status - Output
This is a QRM and LTE command. This command will report the output gain control settings and RF
level of the specified output.
LTE: Since the LTE does not support AGC (automatic gain control), the mode returned from the LTE will
always be ‘M’ for manual. Also, because the LTE supports gain values in increments of .25 dB, the tenths
value will be one of four digits: 0, 2, 5, or 7, which respectively represent the values .00, .25, .50, and .75.
Therefore, if a value of 13.2 is returned, the actual attenuation value is 13.25 dB. Likewise, if a value of
06.7 is returned, it represents 6.75 dB.
Command Format:
02 XX XX 58 47
STX ADR ADR X G
OUT
=
52 4F
R O
XX
OUT3
XX
XX03
OUT2 OUT1
XX
ETX
CHK
Output to read status. Must be between 001 and the number
of system outputs. Always 3 characters.
Example Command Sent:
02 XX XX 58 46
52
30
31
36
STX ADR ADR X
G
R
0
1
6
(Read gain control status of system output 16)
03
ETX
XX
CHK
Response Format:
06 XX XX 58
ACK ADR ADR X
46
G
20
R
4F 4D/41 40
O M/A
@
2B/2D XX
XX
2E
+/10s 1s
.
XX 03 XX
tenths ETX CHK
M/A
=
M for manual mode. A for automatic mode (QRM only).
+/-
=
+ for gain, – for attenuation
10s 1s =
dB value output is set at. Half dB steps. 0 or 5
tenths.
Example Response:
06
XX
XX
58 46
52 4F 4D
40 2D 31 33 2E 35 03 XX
ACK ADR
ADR X
G
R
O
M @
1
3
.
5 ETX CHX
(Output set at -13.5 dB of attenuation in manual mode. )
Rev CL Page 117 of 157 XRM/QE3/QRM/SRM/MRF/MRM/LTE Series Protocol
Example Response:
06
XX
XX
58 46
52
4F 4D
40 2B 31
ACK ADR
ADR X
G
R
O M
@
+
1
(Output set at +18.0 dB of gain in manual mode.)
33
8
2E
.
35
0
03
ETX
XX
CHX
06
XX
XX
58 46
52 4F 41
40 2D 31 33 2E 35 03
ACK ADR
ADR X
G
R
O
A
@
1
0
.
5
ETX
(Output auto gain control enabled and level set at -10.5dBm.)
XX
CHX
Example Response:
Page 118 of 157 Rev CL XRM/QE3/QRM/SRM/MRF/MRM/LTE Series Protocol XGS: Set Simple Gain Control Second Delay
Number of seconds the system will wait before acting upon a signal that requires a changed based on the
AGC settings. This applies to simple AGC mode only. Can be set from 0 to 255 seconds in 1 second
intervals.
Command length is variable. User does not need to enter leading zeros but they will be accepted. Input
number and delay number must be separated by the @ symbol. The user must specify a number for both
the input and delay time.
Command Format 1:
02 XX XX 58
STX ADR ADR X
47
G
53
S
XX
DELAY
. . .
XX03
. . .
ETX
IN
=
DELAY
=
XX
IN
. . .
. . .
40
@
XX
CHK
Input port. Must range from 1 to the number of
system inputs. Numbers only, no characters 1 to
3 digits accepted.
Number of secionds. Value 0 to 255. Numbers only,
no characters. 1 to 3 digits accepted.
Example Command Sent:
02 XX XX 58 47 48 38
40
32
STX ADR ADR X
G
H 8
@
2
(Set hysteresis on input 8 to 2dB)
3
ETX
XX
CHK
Example Command Sent:
02 XX XX 58 47 48 33 35 40
31
STX ADR ADR X
G
H 3
5
@
1
(Set hysteresis on input 35 to 10dB)
30
0
3
ETX
XX
CHK
Response Format:
06 XX XX 58
ACK ADR ADR X
46
G
48
H
03 XX
ETX CHK
Note: Some firmware versions do not implement this command.
Rev CL Page 119 of 157 XRM/QE3/QRM/SRM/MRF/MRM/LTE Series Protocol
XGTA: Set Gain Control Time: Attack Time
Only supported by certain QE3 systems.
Number of seconds or milliseconds the system waits between 0.5 dB power increases during the time that
a weak signal is boosted to get it back up to a user pre-defined dB signal level. Can be set from 0 to 60
seconds in 1/1000 intervals.
This is a QE3 automatic gain control command. Attack time is when the input RF level has decreased and
the system is now increasing the input signal strength to get the RF level back up to the user pre-defined
automatic gain control dB level. The gain control feature can increase this signal strength slowly or quickly
based on this number. If the value is set to a small number then the signal level will increase quickly back
up to the pre-defined R level. If the value is set to a large number then the signal level will increase slowly
back up to the pre-defined R level.
Command will accept milliseconds or seconds. User must specify with an “s” or “ms” in the command
structure. Command length is variable also. User does not need to enter leading zeros. Input number and
delay number must be separated by the ‘@’ symbol. The end of the delay number is indicated by the “s” or
“ms” characters. The user must specify a number for both the input and attack time. If the user wants to set
this value to zero then the user must specify “0” character in the attack time.
Command Format 1:
02 XX XX 58
STX ADR ADR X
47
G
54
T
XX
AT
73
s
XX03
ETX
. . .
. . .
41
A
XX
IN
. . .
. . .
40
@
. . .
. . .
40
@
XX
CHK
Command Format 2:
02 XX XX 58
STX ADR ADR X
47
G
54
T
41
A
XX
AT
. . .
. . .
6D
m
73
s
03
ETX
IN
=
AT
Page 120 of 157 =
XX
IN
XX
CHK
Input port. Must be between 1 and the number of
system inputs.
Attack time. Value in seconds or 1/1000 seconds wait
period. If the user specifies ms then valid values
range from 0 to 60,000. If the user specifies then
valid values range from 0 to 60. Can vary from
1 to 5 characters. Numbers only, no characters.
Rev CL XRM/QE3/QRM/SRM/MRF/MRM/LTE Series Protocol Example Command Sent:
02 XX XX 58 47 54
41 38
40
32 6D 73
3
XX
STX ADR ADR X
G
T
A
8
@
2
m
s
ETX
CHK
(Set auto gain control delay time on input 8 to 2/1000 of a second)
Example Command Sent:
02 XX XX 58 47 54
41 38
40
32
73
3
XX
STX ADR ADR X
G
T
A
8
@
2
s
ETX
CHK
(Set auto gain control delay time on input 8 to 2 seconds)
Example Command Sent:
02 XX XX 58
STX ADR ADR X
47
G
54
T
41
A
34
4
33
3
40
@
36 35 30 30
6D
73
3
XX
6
5
0
0
m
s
ETX
CHK
(Set auto gain control delay time on input 43 to 6500 milliseconds
or the equivalent of 6.5 seconds)
Response Format:
06 XX XX 58
ACK ADR ADR X
46
G
54
T
41
A
03 XX
ETX CHK
Note: Some firmware versions do not implement this command.
Rev CL Page 121 of 157 XRM/QE3/QRM/SRM/MRF/MRM/LTE Series Protocol
XGTD: Set Gain Control Time: Decay Time
Number of seconds or milliseconds the system waits between 0.5 dB power decreases during the time that
a high power signal is attenuated to get it back down to a user pre-defined dB signal level. Can be set from
0 to 60 seconds in 1/1000 intervals.
This is a QE3 automatic gain control command. Decay time is when the input RF level has increased and
the system is now decreasing the input signal strength to get the RF level back down to the user predefined automatic gain control dB level. The gain control feature can decrease this signal strength slowly
or quickly based on this number. If the value is set to a small number then the signal level will decrease
quickly back down to the pre-defined RF level. If the value is set to a large number then the signal level
will decrease slowly back down to the pre-defined R level.
Command will accept milliseconds or seconds. User must specify with an “ms” or “s” in the command
structure. Command length is variable also. User does not need to enter leading zeros. Input number and
decay number must be separated by the ‘@’ symbol. The end of the decay number is indicated by the “s”
or “ms” characters. The user must specify a number for both the input and decay time. If the user wants to
set this value to zero then the user must specify “0” character in the decay time.
Command Format 1:
02 XX XX 58
STX ADR ADR X
47
G
54
T
XX
DT
73
s
XX03
ETX
. . .
. . .
44
D
XX
IN
. . .
. . .
40
@
. . .
. . .
40
@
XX
CHK
Command Format 2:
02 XX XX 58
STX ADR ADR X
47
G
54
T
44
D
XX
DT
. . .
. . .
6D
m
73
s
03
ETX
IN
=
DT
Page 122 of 157 =
XX
IN
XX
CHK
Input port. Must be between 1 and the number of
system inputs.
Decay time. Value in seconds or 1/1000 seconds wait
period. If the user specifies ms then valid values
range from 0 to 60,000. If the user specifies s then
valid values range from 0 to 60. Can vary from
1 to 5 characters. Numbers only, no characters.
Rev CL XRM/QE3/QRM/SRM/MRF/MRM/LTE Series Protocol Example Command Sent:
02 XX XX 58 47 54 44 38
40
32
6D 73
3
XX
STX ADR ADR X
G
T D
8
@
2
m
s
ETX
CHK
(Set auto gain control decay time on input 8 to 2/1000 of a second)
Example Command Sent:
02 XX XX 58 47 54 44 38
40
32
73
3
XX
STX ADR ADR X
G
T
D
8
@
2
s
ETX
CHK
(Set auto gain control decay time on input 8 to 2 seconds)
Example Command Sent:
02 XX XX 58
STX ADR ADR X
47
G
54
T
44
D
54
T
34
4
38
3
40
@
36 35 30 30
6D
73
3
XX
6
5
0
0
m
s
ETX
CHK
(Set auto gain control decay time on input 43 to 6500 milliseconds
or the equivalent of 6.5 seconds)
Response Format:
06 XX XX 58
ACK ADR ADR X
46
G
54
T
44
D
03 XX
ETX CHK
Note: Some firmware versions do not implement this command.
Rev CL Page 123 of 157 XRM/QE3/QRM/SRM/MRF/MRM/LTE Series Protocol
XGTPA: Set Gain Control Time: Pre-Attack Time
Number of seconds or milliseconds the system waits before acting on an input signal if the gain control is
set to start increasing signal strength. If an input signal decreases below the user defined dB level, the gain
control will want to increase that signal power. This is a set time interval the system will wait before
starting that power increase process. Can be set from 0 to 60 seconds in 1/1000 intervals. This only applies
to the gain control feature when a weak signal needs to be increased. For delay time for weak signals refer
to the XGPDT command
Command will accept milliseconds or seconds. User must specify with an “s” or “ms” in the command
structure. Command length is variable also. User does not need to enter leading zeros. Input number and
delay number must be separated by the @ symbol. The end of the delay number is indicated by the “s” or
“ms” characters. The user must specify a number for both the input and pre-attack time. If the user wants
to set this value to zero then the user must specify “0” character in the pre-attack time.
Command Format 1:
02 XX XX 58
STX ADR ADR X
47
G
54
T
XX
PAT
73
s
XX03
ETX
. . .
. . .
50
P
41
A
XX
IN
. . .
. . .
40
@
. . .
. . .
40
@
XX
CHK
Command Format 2:
02 XX XX 58
STX ADR ADR X
47
G
50
P
41
A
XX
PAT
. . .
. . .
6D
m
73
s
03
ETX
IN
=
PAT
Page 124 of 157 =
54
T
XX
IN
XX
CHK
Input port. Must be between 1 and the number of
system inputs.
Pre-attack time. Value in seconds or 1/1000 seconds wait
period. If the user specifies ms then valid values
range from 0 to 60,000. If the user specifies s then
valid values range from 0 to 60. Can vary from
1 to 5 characters. Numbers only, no characters.
Rev CL XRM/QE3/QRM/SRM/MRF/MRM/LTE Series Protocol Example Command Sent:
02 XX XX 58 47
54 50 41 38
40
32 6D 73
3
XX
STX ADR ADR X
G
T
P A
8
@
2 m
s
ETX
CHK
(Set auto gain control Pre-attack time on input 8 to 2/1000 of a second)
Example Command Sent:
02 XX XX 58 47 54 50 41
38
40
32
73
3
XX
STX ADR ADR X
G T
P
A
8
@
2
s
ETX
CHK
(Set auto gain control Pre-attack time on input 8 to 2 seconds)
Example Command Sent:
02 XX XX 58
STX ADR ADR X
47
G
54
T
50
P
41
A
34
4
38
3
40
@
36 35 30 30
6D
73
3
XX
6
5
0
0
m
s
ETX
CHK
(Set auto gain control Pre-attack time on input 43 to 6500 milliseconds
or the equivalent of 6.5 seconds)
Response Format:
06 XX XX 58
ACK ADR ADR X
46
G
54
T
50
P
41
A
03 XX
ETX CHK
Note: Some firmware versions do not implement this command.
Rev CL Page 125 of 157 XRM/QE3/QRM/SRM/MRF/MRM/LTE Series Protocol
XGTPD: Set Gain Control Time: Pre-Decay Time
Number of seconds or milliseconds the system waits before acting on an input signal if the gain control is
set to start attenuating a signal. If an input signal increases above the user defined dB level, the gain control
will want to attenuate that signal. This is a set time interval the system will wait before starting that
attenuation process. Can be set from 0 to 60 seconds in 1/1000 intervals. This only applies to the gain
control feature when a strong signal needs to be attenuated. For delay time for weak signals refer to the
XGTPA command
Command will accept milliseconds or seconds. User must specify with an “s” or “ms” in the command
structure. Command length is variable also. User does not need to enter leading zeros. Input number and
pre-decay number must be separated by the @ symbol. The end of the pre-decay number is indicated by
the “s” or “ms” characters. The user must specify a number for both the input and pre-decay time. If the
user wants to set this value to zero then the user must specify “0” character in the pre-decay time.
Command Format 1:
02 XX XX 58
STX ADR ADR X
47
G
54
T
XX
PDT
73
s
XX03
ETX
. . .
. . .
50
P
44
D
XX
IN
. . .
. . .
40
@
. . .
. . .
40
@
XX
CHK
Command Format 2:
02 XX XX 58
STX ADR ADR X
47
G
54
T
50
P
XX
PDT
. . .
. . .
6D
m
73
s
03
ETX
IN
=
PDT
Page 126 of 157 =
44
D
XX
IN
XX
CHK
Input port. Must be between 1 and the number of
system inputs.
Pre-decay time. Value in seconds or 1/1000 seconds wait
period. If the user specifies ms then valid values
range from 0 to 60,000. If the user specifies s then
valid values range from 0 to 60. Can vary from
1 to 5 characters. Numbers only, no characters.
Rev CL XRM/QE3/QRM/SRM/MRF/MRM/LTE Series Protocol Example Command Sent:
02 XX XX 58 47
54 50 44 38
40 32
6D 73
3
XX
STX ADR ADR X
G
T
P
D
8
@
2
m
s
ETX
CHK
(Set auto gain control pre-decay time on input 8 to 2/1000 of a second)
Example Command Sent:
02 XX XX 58 47 54 50 44 38
40
32
73
3
XX
STX ADR ADR X
G
T P
D
8
@
2
s
ETX
CHK
(Set auto gain control pre-decay time on input 8 to 2 seconds)
Example Command Sent:
02 XX XX 58
STX ADR ADR X
47
G
54
T
50
P
44
D
34 38
4
3
40
@
36 35 30 30
6D
73
3
XX
6
5
0
0
m
s
ETX
CHK
(Set auto gain control pre-decay time on input 43 to 6500 milliseconds
or the equivalent of 6.5 seconds)
Response Format:
06 XX XX 58
ACK ADR ADR X
46
G
54
T
50
P
44
D
03 XX
ETX CHK
Note: Some firmware versions do not implement this command.
Rev CL Page 127 of 157 XRM/QE3/QRM/SRM/MRF/MRM/LTE Series Protocol
XGZ: Set Gain Control for Zero Input
It is possible for the signal strength of an input to drop to a strength level that can’t be read by the gain
control hardware. This is referred to as zero input. If an input set on automatic gain control is at zero input,
this value is applied to the gain control hardware until the signal comes back and is acted upon by the gain
control feature.
This value can be set to the same range when gain control is in the manual mode. Current values range
from -13.5dB of attenuation up to +18dB of gain. Command length is variable. dB and input numbers must
be separated by the @ symbol. Tens and tenths place need to separated by the “.” symbol. Command must
contain the @ and period and a valid number for both parameters.
Command Format 1:
02 XX XX 58
STX ADR ADR X
2E
.
XX
03
tenths ETX
IN
=
dB
47
G
5A
Z
XX
IN3
. . .
. . .
40
@
2D\2B
-\+
XX
dB
. . .
. . .
XX
CHK
Input port. Must be between 1 and the number of system
inputs.
=
tenths =
positive or gain values range from 0 to 18.
Negative or attenuation values range from 0 to
13.5
Valid tenths values are 0 and 5 only. Half dB steps
only.
Example Command Sent:
02 XX XX 58 46 5A
31 30
38 40 2B 35 2E 35 3
STX ADR ADR X
G
Z
1
0
8
@
+
5 .
5
ETX
(Set zero gain control value on input 108 to +5.5dB gain)
XX
CHK
Example Command Sent:
02 XX XX 58 46 5A
33 40 2D
31
32
2E 30
3
XX
STX ADR ADR X
G
Z
3 @
1
2
.
0
ETX CHK
(Set zero gain control value on input 3 to 12.0dB attenuation)
Response Format:
06 XX XX 58
ACK ADR ADR X
46
G
4D
Z
03 XX
ETX CHK
Note: Some firmware versions do not implement this command.
Page 128 of 157 Rev CL XRM/QE3/QRM/SRM/MRF/MRM/LTE Series Protocol XP: Check Power Supply and LCD Status
This command will report the condition of the power supplies and LCD in an XRM system. If a degrade or
failure condition is indicated the power supply requires servicing or is unplugged. The power supply
current capacity will begin to degrade at temperatures over 50 degrees Celsius. The degrade signal will be
asserted when the power supply temperature reaches 40 degrees Celsius.
Command Format:
02 XX XX
STX ADR ADR
MSDXADR =
58
X
50
P
XX
ADR
XX
ADR
XX
ADR
03
ETX
XX
CHK
Most significant digit of the XRM address. This determines
what type of unit will respond in an XRM system.
MSADR
MSADR
MSADR
MSADR
MSADR
ADR =
XX
MSADR
=
=
=
=
=
0
1
2
3
5
XRM
XRO
XRD
QED
QEO
unit
unit
unit
unit
unit
Address of individual box in an XRM system. Must be
between 000 and 255.
Response Format:
06 XX XX 58
ACK ADR ADR X
XX
LED2
XX
LCD
50
P
XX
PS1-Degrade
03
ETX
XX
CHK
0
0
0
0
0
0
0
no Degrade,
no Failure,
no Degrade,
no Failure,
LED on
LED on
LCD OK
PS1-Degrade
PS1-Fail
PS2-Degrade
PS2-Fail
PS1-LED
PS2-LED
LCD
=
=
=
=
=
=
=
XX
XX
PS1-Fail PS2-Degrade
1
1
1
1
1
1
1
=
=
=
=
=
=
=
Danger condition
Failure on Power
Danger condition
Failure on Power
LED off
LED off
Not responding
XX
PS2-Fail
XX
LED1
on power supply 1
supply 1
on power supply 2
supply 2
Example Command:
02 XX XX 58 50 31 32 33 35 03
XX
STX ADR ADR X P
1
2
3
5
ETX CHK
(Check status of power supplies and LCD on XRO unit at address 235)
Example Response:
06 XX XX 58 50 30 30 31 30 30 30 30 03
XX
ACK ADR ADR X P
0
0
1
0
0
0
0
ETX CHK
(Power supply 2 running in degrade mode. Power supply 1 normal, LCD OK)
Rev CL Page 129 of 157 XRM/QE3/QRM/SRM/MRF/MRM/LTE Series Protocol
XPI: QE3 Check Power Supply Current
This command will report the current in amps output of a power supply in a QE3 system.
Command Format:
02 XX XX
STX ADR ADR
NUM
=
MSADR =
58 50
X P
49
I
XX
XX
NUM MSADR
XX
ADR
XX
ADR
03
ETX
XX
CHK
Power supply number. 1 or 2.
Most significant digit of the QE3 address. This determines
what type of unit will respond in an QE3 system.
MSADR = 4
ADR =
XX
ADR
QE3 unit
Address of individual box in a QE3 system. Must be between
000 and 255.
Response Format:
06 XX XX 58
ACK ADR ADR X
73
s
ETX
03
50
P
49
I
XX
10s
XX
1s
2D
.
XX
tenths
41
A
6D
m
70
p
CHK
XX
Example Command:
02 XX XX 58 50 49 32 35 30 30 36 03
XX
STX ADR ADR X P
I
2
4
0
0
6
ETX CHK
(Check current of power supply # 2 on QE3 unit at address 6)
Example Response:
06 XX XX 58 50 56 30 31 2D 33 41 6D 70 73
ACK ADR ADR X P
I
0
1
.
3
A
m
p s
(Power supply reports current is 1.3 amps output)
Page 130 of 157 03
ETX
XX
CHK
Rev CL XRM/QE3/QRM/SRM/MRF/MRM/LTE Series Protocol XPS: QE3 Check Status bits of a Power Supply
This command will report the 5 status bits of a QE3 power supply in a QE3 system.
Command Format:
02 XX XX
STX ADR ADR
NUM
MSADR =
=
58 50
X P
53
S
XX
ADR
XX
ADR
XX
ADR
03
ETX
XX
CHK
Power supply number. 1 or 2.
Most significant digit of the QE3 address. This determines
what type of unit will respond in a QE3 system.
MSADR = 4
ADR =
XX
XX
NUM MSADR
QE3 unit
Address of individual box in a QE3 system. Must be between
000 and 255.
Response Format:
06 XX XX 58
ACK ADR ADR X
NUM1
NUM2
NUM3
NUM4
NUM5
50
P
53
S
XX
NUM1
XX
NUM2
AC input
DC output
Temperature
Over temperature shutdown
Fan failure
XX
NUM3
XXF
NUM4
0=Good
0=Good
0=Good
0=Good
0=Good
1
1
1
1
1
XX
NUM5
ETX
03
CHK
XX
Fault
Fault
Fault
Fault
Fault
Example Command:
02 XX XX 58 50 54 31 33 30 30 37 03
XX
STX ADR ADR X P
S
1
3
0
0
7
ETX CHK
(Check status bits of power supply 1 on QED unit at address 7)
Example Response:
06 XX XX 58 50 54 30 31 30 30 30
ACK ADR ADR X P
S
0
1
0
0
0
(Power supply reports DC output failure)
03
ETX
XX
CHK
In the event that the power supply is not plugged in all bits will
return a fault condition.
Rev CL Page 131 of 157 XRM/QE3/QRM/SRM/MRF/MRM/LTE Series Protocol
XPT: QE3 Check Power Supply Temperature
This command will report the internal temperature of the power supply in a QE3 system.
Command Format:
02 XX XX
STX ADR ADR
NUM
=
MSDXADR =
58 50
X P
54
T
XX
XX
MSADR ADR
XX
ADR
XX
ADR
03
ETX
XX
CHK
Power supply number. 1 or 2.
Most significant digit of the QE3 address. This determines
what type of unit will respond in an QE3 system.
MSADR = 4
ADR =
XX
NUM
QE3 unit
Address of individual box in a QE3 system. Must be between
000 and 255.
Response Format:
06 XX XX 58
ACK ADR ADR X
50
P
XX
1s
CHK
XX
46
F
ETX
03
54
T
XX
10s
XX
1s
43
C
20
‘ ‘
6F
o
72
r
XX
10s
Example Command:
02 XX XX 58 50 54 31 33 30 30 37 03
XX
STX ADR ADR X P
T
1
3
0
0
7
ETX CHK
(Check temperature of power supply 1 on QED unit at address 7)
Example Response:
06 XX XX 58 50 54 32 39 43 20 6F 72 20 38 34 46 03
ACK ADR ADR X P
T
2
9
C
o
r
8
4
F
ETX
(Power supply reports temperature 29 Celsius or 84 Fahrenheit)
Page 132 of 157 XX
CHK
Rev CL XRM/QE3/QRM/SRM/MRF/MRM/LTE Series Protocol XPV: QE3 Check Power Supply Voltage
This command will report the voltage output a power supply in a QE3 system.
Command Format:
02 XX XX
STX ADR ADR
NUM
=
MSADR =
58 50
X P
56
V
XX
NUM
XX
MSADR
XX
XX
ADR ADR
XX
ADR
03
ETX
XX
CHK
Power supply number. 1 or 2.
Most significant digit of the QE3 address. This determines
what type of unit will respond in a QE3 system.
MSADR = 4
ADR =
QE3 unit
Address of individual box in a QE3 system. Must be between
000 and 255.
Response Format:
06 XX XX 58
ACK ADR ADR X
50
P
6C
l
73
s
74
t
56
V
ETX
03
XX
10s
XX
1s
2D
.
XX
tenths
56
V
6F
o
CHK
XX
Example Command:
02 XX XX 58 50 56 31 34 30 30 39 03
XX
STX ADR ADR X P
V
1
4
0
0
9
ETX CHK
(Check Vout of power supply 1 on QE3 unit at address 9)
Example Response:
06 XX XX 58 50 56 32 34 2D 31 56 6F 6C 74 73
ACK ADR ADR X P
V
2
4
.
1
V
o
l
t
s
(Power supply 1 reports voltage is 24.1 volts output)
Rev CL 03
ETX
XX
CHK
Page 133 of 157 XRM/QE3/QRM/SRM/MRF/MRM/LTE Series Protocol
XRB: RF Signal Level Check at PC Board Level
This command will report the RF level (in dBm) at internal and external points in a XRM system. This
command was included to aid in diagnostics of an RF path failure. RF level sensing is currently available
on:
XRD inputs
XRO outputs
XRM inputs
XRM outputs
Command Format:
02
STX
XX
CNUM0
XX
ADR
XX
ADR
XX
CNUM1
MSDXADR =
XX
I/O
58
X
XX
NUM0
52
R
42
B
XX
MSDXADR
XX
NUM1
3
XX
ETX CHK
XX
XADR
XX
XADR
XX
XADR
XX
I/O/B
Most significant digit of the XRM address. This determines
what type of unit will respond in an XRM system.
MSDXADR = 0
MSDXADR = 1
MSDXADR = 2
XRM unit
XRO unit
XRD unit
XADR
=
Address of individual unit in an XRM system. Must be
between 000 and 255 for an XRM. Must be between 000 and
015 for an XRO and XRD unit.
CARD
=
This can be an “I” or “O”. Stands for Input card or
Output card.
CNUM0
=
This is the card number to be read. Currently this value
will be 0 because current systems only have 8 maximum
cards. This value is included for future system expansion.
CNUM1
=
This is the card number to be read. Currently 1 - 8 for
the input, output , or bridge cards.
Page 134 of 157 Rev CL XRM/QE3/QRM/SRM/MRF/MRM/LTE Series Protocol I/O
=
This can be “I” for input or “O” for output of the selected
card.
NUM0
=
This is the card input or output number. 10s place.
Currently this value is always 0. It is included for
future system design.
NUM1
=
This is the card input or output number.
Response Format:
06 XX XX 58
ACK ADR ADR X
52
R
42
B
XX XX
XX
+/- TENS ONES
2E
.
XX
03 XX
1/10 ETX CHK
Example Command:
02 XX XX 58 52 42 31 32 33 35 42 30 32
49 34 03
XX
STX ADR ADR X R
B
0
2
3
5
I
0 2
I
4
ETX CHK
(Check RF level on XRM unit at address 235 input card #2 Input #4)
Example Response:
06 XX XX 58 52 42 2D 31
ACK ADR ADR X R
B
1
(RF level read = -12.6 dBm)
32
2
2E
.
36
6
03
ETX
XX
CHK
NOTE: Some firmware releases do not support this command. Refer to the firmware release notes at the
beginning of this document for details.
Rev CL Page 135 of 157 XRM/QE3/QRM/SRM/MRF/MRM/LTE Series Protocol
XRC: RF Crosspoint Signal Level Check
This command will report the RF level (in dBm) along an entire path through a XRM matrix system. The
XRD and XRO fields will report no signal for matrices consisting of a single XRM.
Command format:
XRC<output nnn>
Response structure:
XRC:<XRD input +/-nn.n>:<XRM input +/- nn.n>:<XRM output +/- nn.n>:<XRO output +/-nn.n>
Example Command:
02 XX XX 58 52 43 30 30 35 03 XX
STX ADR ADR X
R
C
0
0
5
ETX CHK
(Check RF level on matrix output 5
Example Response:
06 XX XX 58
ACK ADR ADR X
52
R
43
C
3A
:
3A
:
2D
-
31
1
32
2
2E
.
36
6
3A
:
2E
.
32
2
3A
:
2D
-
3A 2D 31 33 2E 30 3A 2D 31 32 2E
:
1
3
.
0
:
1
2
.
(XRD input RF level read = -11.2 dBm)
(XRM input RF level read = -12.6 dBm)
(XRM output RF level read = -13.0 dBm)
(XRO output RF level read = -12.5 dBm)
35
5
3A
:
03
ETX
2D 31 31 2E 30 3A 3A 03
XX
1
1
.
0
:
:
ETX CHK
(No XRD)
(XRM input RF level read = -12.6 dBm)
(XRM output RF level read = -11.0 dBm)
(No XRO)
Example Response:
06 XX XX 58
ACK ADR ADR X
52
R
43
C
3A
:
2D
-
31
1
31
1
31
1
32
2
2E
.
36
6
XX
CHK
NOTE: Some firmware releases do not support this command. Refer to the firmware release notes
at the beginning of this document for details.
Page 136 of 157 Rev CL XRM/QE3/QRM/SRM/MRF/MRM/LTE Series Protocol XRI: RF Input Signal Level Check
This command will report the RF level (in dBm) at a particular XRM, QE3, or QRM matrix system input.
This will give the RF level at the XRM/QE3/QRM input for matrices consisting of a single
XRM/QE3/QRM, or the XRD/QED for larger matrices. Old format required leading zeros. Current
version is variable in length from 1 to 3 characters. No leading zeros required.
Command Format:
02 XX XX
STX ADR ADR
n
=
58 52
X R
49
I
XX
n
. . . . 03 XX
. . . . ETX CHK
Input number of matrix.
Response Format:
06 XX XX 58
ACK ADR ADR X
52
R
49
I
XX XX
XX
+/- TENS ONES
2E
.
XX
03 XX
1/10 ETX CHK
Example Command:
02 XX XX 58 52 49 30 30 35 03 XX
STX ADR ADR X
R
I
0
0
5
ETX CHK
(Check RF level on matrix input 5)
Example Response:
06 XX XX 58 52 49 2D 31
ACK ADR ADR X R
I
1
(RF level read = -12.6 dBm)
32
2
2E
.
36
6
03
ETX
XX
CHK
NOTE:Some firmware releases do not support this command. Refer to the firmware release notes
at the beginning of this document for details.
Rev CL Page 137 of 157 XRM/QE3/QRM/SRM/MRF/MRM/LTE Series Protocol
XRO: RF Output Signal Level Check
This command will report the RF level (in dBm) at a particular XRM/QRM matrix system output. This
will give the RF level at the XRM/QRM output for matrices consisting of a single XRM/QRM, or the
XRO for larger matrices. Old format required leading zeros. Current version is variable in length from 1 to
3 characters. No leading zeros required.
Command Format:
02 XX XX
STX ADR ADR
n
=
58 52
X R
4F
O
XX
n
. . . .
. . . .
03 XX
ETX CHK
Output number of matrix.
Response Format:
06 XX XX 58
ACK ADR ADR X
52
R
4F
O
XX XX
XX
+/- TENS ONES
2E
.
XX
03 XX
1/10 ETX CHK
Example Command:
02 XX XX 58 52 4F 31 31 32 03 XX
STX ADR ADR X
R
O
1
1
2
ETX CHK
(Check RF level on matrix output 112)
Example Response:
06 XX XX 58 52 4F 2D 31
ACK ADR ADR X R
O
1
(RF level read = -12.6 dBm)
32
2
2E
.
36
6
03
ETX
XX
CHK
NOTE:Some firmware releases do not support this command. Refer to the firmware release notes
at the beginning of this document for details.
Page 138 of 157 Rev CL XRM/QE3/QRM/SRM/MRF/MRM/LTE Series Protocol XRW: Read Input Warning Threshold Levels
This command will report the warning threshold set level of a given input. This command works on XRM,
QE3, and QRM systems. This command will report the set RF threshold warning level (in dBm) at a
particular XRM, QE3, or QRM matrix system input. Return of -99.0 means monitoring is turned off for
that particular system input.
Command Format:
02 XX XX
STX ADR ADR
NUM
=
58 52
X R
57
W
XX
NUM
XX
NUM
XX
NUM
03
ETX
XX
CHK
Valid input numbers from 001 to 999.
Response Format:
06 XX XX 58
ACK ADR ADR X
52
R
57
W
2B/2D
-/+
XX
XX
TENS ONES
2E
.
XX
03 XX
1/10 ETX CHK
Example Command:
02 XX XX 58 52 57 30 31 32 03 XX
STX ADR ADR X
R
W
0
1
2
ETX CHK
(Check RF warning level on matrix input 12)
Example Response:
06 XX XX 58 52 57 2D 31 32 2E 36
ACK ADR ADR X R
W
1
2
.
0
Warning level set at input = -12.0 dBm)
03
ETX
XX
CHK
06 XX XX 58 52 57 2D 31 32 2E 36 03
ACK ADR ADR X R
W
9
9
.
0
ETX
Monitoring is turned off for that input )
XX
CHK
Example Response:
NOTE:Some firmware releases do not support this command. Refer to the firmware release notes
at the beginning of this document for details.
Rev CL Page 139 of 157 XRM/QE3/QRM/SRM/MRF/MRM/LTE Series Protocol
XWI: Set RF Input Signal Warning Level
RF signal monitoring is done on the XRM system inputs. This level can be set differently for every input.
The signal is compared to this level and if the signal level is below this threshold level then a message is
generated and placed in the message queue and an SNMP trap will also be generated. This trap is sent to
the assigned trap IP address. This command will set the RF dBm level that will generate this error
message. Note that the XRD and XRM inputs can be attenuated. This warning level is compared
directly at the system inputs before any attenuation is applied to the signal. (see XA command)
This command only works for system inputs. Any attempt to attenuate an XRM input on a system with
XRDs will fail.
This command will only accept values from -10 to -50 dBm and -99. To turn RF monitoring on set the
level from0125 -10 to -50. To turn monitoring off set the level to -99 dBm.
For the QRM, this command will only accept values from 0 to -60 dBm and -99. To turn RF monitoring
on, set the level to any value from 0 to -60 dBm. To turn monitoring off set the level to -99 dBm.
Command Format:
02
STX
XX
ADR
XX
ONES
XX
ADR
58
X
XX
XX
03
dBTENS dBONES ETX
MSDADR =
49
I
XX
MSADR
XX
ADR
XX
ADR
XX
ADR
XX
TENS
XX
CHK
Most significant digit of the XRM address. This determines
what type of unit will respond in an XRM system.
MSADR = 0
MSADR = 2
ADR
57
W
XRM unit
XRD unit
=
Address of individual unit in an XRM system. Must be
between 000 and 255 for an XRM. Must be between 000 and
015 for an XRD unit.
TENS/ONES
The input or output number. Must range from 1 to 32 for
XR systems and 1-64 for QE systems .
dBTENS/dBONES
Page 140 of 157 The dBm value that the signal is compared to. Range
from -10 to -50 and -99 turns monitoring off. Other
values will be rejected as out of range
Rev CL XRM/QE3/QRM/SRM/MRF/MRM/LTE Series Protocol Response Format:
06 XX XX 58
ACK ADR ADR X
57
W
49
I
03 XX
ETX CHK
Example Command:
02 XX XX 58 52 49 31 30 30 33 30 35 34 30 03 XX
STX ADR ADR X
W
I
1
0
0
3
1
5
4
0
ETX CHK
(Set RF dB threshold level for XRO at address 003 input 15 to -40dBm)
NOTE:Some firmware releases do not support this command. Refer to the firmware release notes
at the beginning of this document for details.
Rev CL Page 141 of 157 XRM/QE3/QRM/SRM/MRF/MRM/LTE Series Protocol
XWIS: Set RF Input Signal Warning Level (Simplified)
RF signal monitoring is done on the XRM and QE3 system inputs. This simplified version of the XWI
command is input based rather than address based. This warning level can be set differently for every
system input. Comparison of the input signal is monitored at the XRM inputs. Simple for a 32x32 system.
If the system has XRDs user should note that when this level is set for a system input, the monitoring will
be done on every XRM that the XRD distributes that input to.
The signal is compared to this warning level and if the signal level is below this level then a message is
generated and placed in the message queue and an SNMP trap will also be generated. This trap is sent to
the assigned trap IP address. This command will set the RF dBm level that will generate this error
message. Note that the XRD, XRM, QE3, and QED inputs can be attenuated. This warning level is
compared directly at the system inputs before any attenuation is applied to the signal. (see XA or XG
commands)
For the XRM, this command will only accept values from -10 to -50 dBm and -99. To turn RF monitoring
on set the level from -10 to -50. To turn monitoring off set the level to -99 dBm.
For the QRM, this command will only accept values from 0 to -60 dBm and -99. To turn RF monitoring
on, set the level to any value from 0 to -60. To turn monitoring off set the level to -99 dBm.
Command Format:
02
STX
XX
ADR
XX
ADR
58
X
XX
XX
03
dBTENS dBONES ETX
IN
=
dBTENS/dBONES
57
W
49
I
53
XX
S
IN1
XX
IN2
XX
IN3
40
@
2D
-
XX
CHK
System input.
The dBm value that the signal is compared to. Range
from -10 to -50 and -99 turns monitoring off. Other
values will be rejected as out of range
Response Format:
06 XX XX 58
ACK ADR ADR X
57
W
49
I
03
XX
ETX CHK
Example Command:
02 XX XX 58 57 49 53 32 31 33 40 2D 34 30 03 XX
STX ADR ADR X
W
I
S
2
1
3
@
4
0
ETX CHK
(Set RF dB threshold level at input 213 set to -40dBm)
NOTE: Some firmware releases do not support this command. Refer to the firmware release notes
at the beginning of this document for details.
Page 142 of 157 Rev CL XRM/QE3/QRM/SRM/MRF/MRM/LTE Series Protocol XT: Check CPU Temperature
This command will report the temperature of the local control CPU card in the module with the specified
address. The temperature is reported in degrees Celsius. This command is useful for making sure that the
module is receiving adequate cooling. If the temperature begins to raise it can indicate that the air intake
filters are becoming blocked with dust and need to be cleaned.
Command Format:
02 XX XX
STX ADR ADR
MSADR =
58
X
54
T
XX
ADR
XX
ADR
XX
ADR
03
ETX
XX
CHK
Most significant digit of the address. This determines
what type of unit will respond in an XRM system.
MSADR
MSADR
MSADR
MSADR
MSADR
MSADR
ADR =
XX
MSADR
=
=
=
=
=
=
0
1
2
3
4
5
XRM
XRO
XRD
QED
QE3
QEO
unit
unit
unit
unit
unit
unit
Address of individual box in a system. Must be between 000
and 255 for an XRM. Must be between 000 and 015 for an XRD
or XRO.
Response Format:
06 XX XX 58
ACK ADR ADR X
54
T
XX
+/-
XX
100’S
XX
10’S
XX
1’S
43
C
03
ETX
XX
CHK
Example Command:
02 XX XX
58
54 32
30
31
32
03
STX ADR ADR
X
T
2
0
1
2
ETX
(Check temperature of XRD unit at addresses 012)
XX
CHK
Example Response:
06
XX
XX
58
54 2B
30 35 36
43
03
ACK ADR
ADR
X
T
+
0
4
1
C
ETX
(temperature on CPU card reads 41 degrees Celsius)
XX
CHK
NOTE: Some firmware releases do not support this command. Refer to the firmware release notes
at the beginning of this document for details.
Rev CL Page 143 of 157 XRM/QE3/QRM/SRM/MRF/MRM/LTE Series Protocol
ZA: Set Group Access for Output
This command can only be executed by the Admin.
This command sets the privilege for a group to change an output.
Command structure:
ZA:<GID>:<access>:<output>
GID
= Group ID. Can be 1-8, with 1 being Admin.
Access
= Access Control. 1 = Allow, 0 = Deny.
Output
= Matrix output number. Can be 1 to the size of the matrix.
If access is allowed for that output, then any user in that group can issue
an L, S, or U command for that output.
Example Command Sent:
02 XX XX 5A 41 3A 32 3A 30 3A
STX ADR ADR Z
A
:
2
:
0
:
(Deny group 2 access to output 5)
30
0
30
0
35
5
03 XX
ETX CHK
Positive Response:
06 XX XX A5
ACK ADR ADR Z
Page 144 of 157 41
A
03 XX
ETX CHK
Rev CL XRM/QE3/QRM/SRM/MRF/MRM/LTE Series Protocol ZAI: Set Group Access for Input
This command can only be executed by the Admin.
This command sets the privilege for a group to change an input.
Command structure:
ZAI:<GID>:<access>:<input>
GID
= Group ID. Can be 1-8, with 1 being Admin.
Access
= Access Control. 1 = Allow, 0 = Deny.
Input
= Matrix input number. Can be 1 to the size of the matrix.
If access is allowed for that input, then any user in that group can issue an L, S, or U command for that
input.
Example Command Sent:
02 XX XX 5A 41 49 3A 32 3A
STX ADR ADR Z
A I
:
2
:
(Deny group 2 access to input 5)
30
0
3A
:
30
0
30
0
35
5
03 XX
ETX CHK
Positive Response:
06 XX XX A5
ACK ADR ADR Z
Rev CL 41
A
03 XX
ETX CHK
Page 145 of 157 XRM/QE3/QRM/SRM/MRF/MRM/LTE Series Protocol
ZAO: Set Group Access for Output
This command can only be executed by the Admin.
This command sets the privilege for a group to change an output.
Command structure:
ZAO:<GID>:<access>:<output>
GID
= Group ID. Can be 1-8, with 1 being Admin.
Access
= Access Control. 1 = Allow, 0 = Deny.
Output
= Matrix output number. Can be 1 to the size of the matrix.
If access is allowed for that output, then any user in that group can issue an L, S, or U command for that
output.
Example Command Sent:
02 XX XX 5A 41 4F 3A 32 3A 30
STX ADR ADR Z
A O
:
2
:
0
(Deny group 2 access to output 5)
3A
:
30
0
30
0
35
5
03 XX
ETX CHK
Positive Response:
06 XX XX A5
ACK ADR ADR Z
41
A
03 XX
ETX CHK
This is the same command as ZA. It was added when input access control was added so both input and
output commands had the same format. ZA has been kept for backward compatibility.
Page 146 of 157 Rev CL XRM/QE3/QRM/SRM/MRF/MRM/LTE Series Protocol ZC: Current User
This returns the user ID, group ID, and username of the current logged in user.
Example Command Sent:
02 XX XX 5A
STX ADR ADR Z
43
C
03 XX
ETX CHK
Example Response:
06 XX XX 5A 43 3A 31 3A 31 3A
ACK ADR ADR Z
C
:
1
:
1
:
(User 1, group 1, username = Admin)
Rev CL 41
A
64
d
6d
m
69
i
6E
n
03 XX
ETX CHK
Page 147 of 157 XRM/QE3/QRM/SRM/MRF/MRM/LTE Series Protocol
ZG: Set User Group
This command can only be executed by the Admin.
This command sets a new group for a user.
Command structure:
ZG:<username/UID>:<GID>
Username/UID = The username or User ID.
GID
= Group ID.
The username must start with a character, not a number.
Example Command Sent:
02 XX XX 5A 47 3A 41 64 6d 69 6E
STX ADR ADR Z
G
:
A
d
m
i
n
(Set the Admin user to be in group 1)
3A
:
31
1
03 XX
ETX CHK
Example Command Sent:
02 XX XX 5A 47 3A 31 3A 31 03 XX
STX ADR ADR Z
G
:
1
:
1 ETX CHK
(Set the Admin user to be in group 1)
Positive Response:
06 XX XX A5
ACK ADR ADR Z
47
G
03 XX
ETX CHK
Note: This command will set a flag in the Change “C” command response.
Note: Some firmware versions do not implement this command. For those firmware releases, the group
ID is set to be the same as the user ID and can’t be changed. For example, User 1 (UID = 1 = Admin)
is in group 1, UID 2 is in group 2, and so on.
Page 148 of 157 Rev CL XRM/QE3/QRM/SRM/MRF/MRM/LTE Series Protocol ZI: Login
This command is used to login to a particular control port. (A different user may be logged in to each
available command port on a controller.) The command is sent with the username and password. The user
ID and group ID are returned in response to a successful login.
Example Command Sent:
02 XX XX 5A
STX ADR ADR Z
49
I
3A
:
41
A
64
d
6d
m
69
i
6E
n
06 XX XX 5A 49
ACK ADR ADR Z
I
(User 1, group 1)
3A
:
31
1
3A
:
31
1
03 XX
ETX CHK
3A
:
31
1
03 XX
ETX CHK
Example Response:
Rev CL Page 149 of 157 XRM/QE3/QRM/SRM/MRF/MRM/LTE Series Protocol
ZL: List user by User ID (UID)
This command can only be executed by the Admin.
This command shows the current group ID, username, and password for a given user ID (UID).
Command:
ZL:<UID>
Response structure:
ZL:<GID>:<username>:<password>
Example Command Sent:
02 XX XX 5A
STX ADR ADR Z
4C
L
3A
:
31
1
03 XX
ETX CHK
Example Response:
06 XX XX 5A 4C 3A 31 3A 41 64 6d 69 6E 3A 31 03 XX
ACK ADR ADR Z
L
:
1
:
A
d
m
i
n
:
1 ETX CHK
(User ID 1 is in group 1, has a username of Admin and password = 1)
Page 150 of 157 Rev CL XRM/QE3/QRM/SRM/MRF/MRM/LTE Series Protocol ZO: Logoff System
This command will logoff the current user.
Example Command Sent:
02 XX XX 5A
STX ADR ADR Z
4F
O
03 XX
ETX CHK
4F
O
03 XX
ETX CHK
Positive Response:
06 XX XX A5
ACK ADR ADR Z
Rev CL Page 151 of 157 XRM/QE3/QRM/SRM/MRF/MRM/LTE Series Protocol
ZP: Set User Password
This command can only be executed by the Admin.
This command sets a new password for a user.
Command structure:
ZP:<username/UID>:<password>
Username
= The username that will be assigned a new password.
UID
= User ID. Alternatively the user ID can be specified.
Password
= Up to 14 alphanumeric characters.
Example Command Sent:
02 XX XX 5A 50 3A 41 64 6d
STX ADR ADR Z
P
:
A
d
m
(Set the Admin password to 2Ab)
69
i
6E
n
3A
:
32
2
41
A
62
b
03 XX
ETX CHK
41
A
62
b
03 XX
ETX CHK
Example Command Sent:
02 XX XX 5A 50 3A 31 3A 32
STX ADR ADR Z
P
:
1
:
2
(Set the Admin password to 2Ab)
Positive Response:
06 XX XX A5
ACK ADR ADR Z
Page 152 of 157 50
P
03 XX
ETX CHK
Rev CL XRM/QE3/QRM/SRM/MRF/MRM/LTE Series Protocol ZU: Set Username
This command can only be executed by the Admin.
This command sets a new username for a user.
Command structure:
ZP:<username/UID>:<new username>
Username
= The username that will be assigned a new password.
UID
= User ID. Alternatively the user ID can be specified.
New Username
= Up to 14 alphanumeric characters.
The username must start with a character, not a number.
Example Command Sent:
02 XX XX 5A 55 3A 41 64 6d
STX ADR ADR Z
U
:
A
d
m
(Set the Admin username to U1)
69
i
6E
n
3A
:
31
1
03 XX
ETX CHK
55
U
31
1
03 XX
ETX CHK
Example Command Sent:
02 XX XX 5A 55 3A 31 3A 55
STX ADR ADR Z
U
:
1
:
U
(Set the Admin username to U1)
Positive Response:
06 XX XX A5
ACK ADR ADR Z
Rev CL 55
U
03 XX
ETX CHK
Page 153 of 157 XRM/QE3/QRM/SRM/MRF/MRM/LTE Series Protocol
ZX: Show Access Control On/Off
This command shows the current port number and whether access control is on or off for the port.
Command:
ZX:<PID>
where PID = Port ID.
Response structure:
ZX:<PID>:<access on/off>
Port IDs:
0:
Current port (whatever port is receiving the command)
1:
Local (Keypad)
2:
Quintech UCM (Remote Panel)
3:
PC Control In (Serial)
4:
QEC Ethernet Port Socket A
5:
QEC Ethernet Port Socket B
6:
Telnet Ethernet Console Window
7:
SNMP
Port IDs 4 and 5 track each other and the setting will be the same for both.
Example Command Sent:
02 XX XX 5A
STX ADR ADR Z
58
X
3A
:
31
0
03 XX
ETX CHK
Example Response:
06 XX XX 5A 58 3A 34 3A 31 03 XX
ACK ADR ADR Z
X
:
4
:
1 ETX CHK
(The current port is 4 = QEC port and access control is on.)
Page 154 of 157 Rev CL XRM/QE3/QRM/SRM/MRF/MRM/LTE Series Protocol Negative Responses:
Occasionally, the matrix will be unable to carry out a command due to various reasons. The NAK
reply set is provided to help determine where the error occurred. A NAK reply will be sent after the
matrix has received the CHK byte.
x: Checksum Incorrect
This reply is sent when the checksum sent by the computer controller is different from the one calculated
by the matrix controller. This message would indicate data has been corrupted during transmission.
Negative response sent:
15 XX XX 78
NAK ADR ADR x
03 XX
ETX CHK
c: Command Unrecognized
This type of error message occurs when the matrix receives an unspecified command. The unit will
respond as specified below.
Negative response sent:
15 XX XX 63
NAK ADR ADR c
03 XX
ETX CHK
u: Command Unavailable
This type of error message occurs when the matrix receives command that is not implemented or can’t
be done on a particular system or at a particular time. The unit will respond as specified below.
Negative response sent:
15 XX XX 75
NAK ADR ADR u
Rev CL 03 XX
ETX CHK
Page 155 of 157 XRM/QE3/QRM/SRM/MRF/MRM/LTE Series Protocol
i: Improper Data
This reply is sent if an improper number of data bytes are contained in the protocol wrapper. For example,
if an “S” command is sent with only an output number and no input number. This error will also be sent
for any command that contains too many or too few bytes, even if the command does not have any data
bytes.
Negative response sent:
15 XX XX 69
NAK ADR ADR i
03 XX
ETX CHK
d: Data out of Range
This message will be sent if the data bytes sent are outside the parameters of your matrix. If the SRM
is polled for the status of output 17 and you only have 16 outputs, you will receive this message.
Negative response sent:
15 XX XX 64
NAK ADR ADR d
03 XX
ETX CHK
f: XRM Command Failed
This message will be sent if there was no response or an unexpected response from the XRM system.
If the XRM system receives a correctly formatted valid command but was unable to execute the
command, you will receive this message.
Negative response sent:
15 XX XX 66
NAK ADR ADR f
Page 156 of 157 03 XX
ETX CHK
Rev CL XRM/QE3/QRM/SRM/MRF/MRM/LTE Series Protocol Serial Interface
A new command can be sent to the matrix as soon as a response to the previous command is received.
If a break in communication occurs while a message is being transmitted the input buffer will
automatically clear and no error response will be given.
Serial Parameters:
Baud Rate:
Data Bits:
Stop Bits:
Parity:
Protocol:
Flow Control:
9600
8
1
None
STX/ETX
None. The program sending commands must wait until a response is received from the
matrix controller before sending another command.
SRM “Control In” Serial Pinouts:
RS-232
1 – GND
2 - TXD
3 – RXD
4 – DTR
5 – GND
6 – DSR
7 – RTS
8 – CTS
9 – Not Used
RS-422/485
1 - GND
2 - Not Used
3 – Non-Inverting Transmit (+)
4 – Non-Inverting Receive (+)
5 - GND
6 – Inverting Transmit (-)
7 - Not Used
8 - Not Used
9 – Inverting Receive (-)
Note on the RS-232 port:
No null modem or crossover cable is needed on the serial port.
Note on RS-485 mode:
RS-485 is compatible with RS-422. RS-485 allows multiple devices on a single shared serial bus. The
matrix unit uses a 4-wire RS-485 interface.
Rev CL Page 157 of 157 QE3 Matrix Switching System
QE3 Introduction
The Quintech QE3 RF matrix switch is the most advanced matrix switch available from
Quintech Electronics and Communications Inc. It features a compact, highly scalable
design that covers the L-Band (950-2150MHz) operating frequency ranges. Hotswappable component cards enable fast and easy replacement (less than 30 seconds)
without requiring special tools or re-cabling. There are two control cards for operational
control redundancy. Included with the QE3 is an impressive array of control and
monitoring options which provides redundant power and cooling, ease of maintenance,
and enables you to quickly upgrade the system or add features in the field to maximize
your investment.
Some of the features included in the QE3 Matrix Switch are:
•
Hot swappable component cards with integrated RF monitoring and autoresetting current protection. All hot-swappable component cards can be
replaced without disconnecting any cables.
•
Dual hot swappable control modules.
•
Programmable AGC (Automatic Gain Control) and attenuation on all inputs
for signal strength balancing and optimum performance.
•
Redundant auto-ranging hot-swappable power supplies with over-temperature,
over-voltage, and output short protection.
•
Long-life cooling fans.
•
Monitoring of RF levels, power supply condition, fan condition, internal
temperature, and various other system parameters.
•
Easy maintenance and upgrades in the field.
•
Local control via front panel keypad and LCD.
•
Remote control via RS232, RS422, RS485, Ethernet TCP/IP, Telnet, and
SNMP.
•
Secure partitioning of matrix control between multiple users to prevent
unauthorized changes.
•
Field upgrades of control firmware via serial or Ethernet to add features and
enhance existing capabilities.
•
64x64 matrix size in just 6 RU (10.5” or 267mm high).
•
Large matrix systems (up to 1024x1024 or larger) by combining multiple QE3
modules with QED and QEO expansion modules.
QE3 Matrix Switching System
QE3 Introduction .............................................. 3
Quintech: A Company Introduction ................ 1
Who we are ................................................................................................ 1
Our Mission ............................................................................................................ 1
Our Products ............................................................................................. 1
Just Some of our Customers ................................................................................... 2
System Overview ............................................... 3
The Quintech System Advantage ............................................................ 3
System Features ........................................................................................ 3
Self Monitoring ....................................................................................................... 3
Q-SENSE ................................................................................................................ 4
Power Supply Monitoring ............................................................................. 4
QE3 Fan Condition Monitoring .................................................................... 4
Power Supply Fan Condition Monitoring ..................................................... 4
Internal Air Temperature Monitoring ........................................................... 4
Power Supply Temperature Monitoring ........................................................ 5
Input RF Warning Level Threshold Monitoring ........................................... 5
LCD Status Monitoring ................................................................................. 5
Error Reporting ....................................................................................................... 5
Gain Control............................................................................................................ 5
Automatic Gain Control ................................................................................ 6
Manual Gain Control ..................................................................................... 6
Alarm Condition Notification ................................................................................. 6
Alarm Message Queue ............................................................................................ 6
SNMP Traps............................................................................................................ 7
Input and Output RF Level Read ............................................................................ 7
User Permissions ..................................................................................................... 7
Access Control ........................................................................................................ 8
Circuit Elements of a QE3 Module ......................................................................... 8
Unity Gain ............................................................................................................... 8
System Upgrades .................................................................................................... 9
System Sizes ........................................................................................................... 9
Rev K
i
QE3 Matrix Switching System
Modules ...................................................................................................... 9
Module Inter-Connections ...................................................................................... 9
Types of Modules ................................................................................................. 10
Controller Module – UCM .......................................................................... 10
Input Distribution Module – QED .............................................................. 10
Matrix Switch Module – QE3 ..................................................................... 10
Output Switch Module – QEO .................................................................... 10
Acronyms ................................................................................................. 11
System Modules Description .......................... 12
Controller Module .................................................................................. 12
Redundant Control Architecture ........................................................................... 12
Controller Ports ..................................................................................................... 12
Controller Appearance .......................................................................................... 13
Basic QE3 Architecture.......................................................................... 14
Input and Output Cards ............................................................................... 15
Input and Output Card LEDs ...................................................................... 15
Input and Output Card Hot Swapping ......................................................... 15
Controller Cards .................................................................................................... 15
Controller Cards Address ............................................................................ 15
Active and Standby Controller .................................................................... 16
Watchdog Timer .......................................................................................... 16
Controller Card Switch Setting ................................................................... 16
Controller Card Hot Swapping .................................................................... 17
Power Supplies ............................................................................................ 18
Input Distribution Module – QED ........................................................ 19
QED Function and Appearance ............................................................................ 19
QED Sizes ............................................................................................................. 19
Output Switch Module - QEO ............................................................... 20
QEO Function and Appearance ............................................................................ 20
QEO Sizes ............................................................................................................. 20
Connections and Port Descriptions ................ 21
AC Power ................................................................................................. 21
Redundancy........................................................................................................... 21
LNB Power Supplies............................................................................................. 21
AC Connections .................................................................................................... 21
Voltages ................................................................................................................ 22
ii
Rev K
QE3 Matrix Switching System
RF Signals ................................................................................................ 22
RF Connections (Inter-Module) ............................................................................ 22
RF Connectors ...................................................................................................... 23
Replacement Cables .............................................................................................. 23
Control Ports ........................................................................................... 24
Serial 1 and Serial 2 Ports ..................................................................................... 25
Serial Port Connectors ................................................................................. 25
Serial Cable ................................................................................................. 25
Serial Communication Settings ................................................................... 25
RS-232 .................................................................................................. 25
RS-232 Advantages/Disadvantages ..................................................... 26
RS-422 .................................................................................................. 26
RS-422 Advantages/Disadvantages ..................................................... 26
RS-485 .................................................................................................. 26
XR Bus Ports ........................................................................................... 27
Daisy Chaining...................................................................................................... 27
XR Bus Connections ............................................................................................. 27
XR Bus Terminators ............................................................................................. 27
XR Bus Terminators for 64x64 System ................................................................ 28
Quintech UCM Ports .............................................................................. 29
Daisy Chaining ............................................................................................ 29
Quintech UCM Port Crossover Adapter ..................................................... 30
Ethernet Port ........................................................................................... 32
Ethernet Connections ............................................................................................ 32
Ethernet Cable Pinout.................................................................................. 32
Ethernet Command Protocol ................................................................................. 32
TCP/IP ......................................................................................................... 32
Telnet ........................................................................................................... 33
SNMP .......................................................................................................... 33
SNMP Additional Features .................................................................. 33
Front Panel Interface ..................................... 34
Main Menu .............................................................................................. 34
Front Panel Hierarchy and Page References ....................................... 35
Rev K
iii
QE3 Matrix Switching System
Communications Setup .......................................................................... 38
Interface Options Menu ........................................................................................ 38
Serial Mode .......................................................................................... 39
Serial Address ...................................................................................... 39
Reset Password .................................................................................... 40
DHCP On/Off ....................................................................................... 42
Ethernet Address .................................................................................. 43
Serial Termination ............................................................................... 44
Crosspoint Connections .................................. 45
Monitor a Connection............................................................................. 45
Changing a Connection .......................................................................... 46
Locking and Unlocking Connections .................................................... 48
Turning off an Output ............................................................................ 48
System Information Menu .............................. 49
Scrolling ................................................................................................... 49
Firmware Version ................................................................................... 50
QE3 System Labels ................................................................................. 50
Input Warning Level .............................................................................. 53
Set RF dBm Warning Level .................................................................................. 53
Fan Speed................................................................................................. 54
Power Supply Status ............................................................................... 54
Internal Temperature............................................................................. 55
Get Input RF Level ................................................................................. 56
Get Output RF Level .............................................................................. 58
Read Output RF dBm Signal Level ...................................................................... 59
Accuracy of dBm Values ...................................................................................... 60
QE3 System Test ..................................................................................... 60
System Size ........................................................................................................... 61
Error Reporting ..................................................................................................... 61
System Errors.......................................................................................... 62
iv
Rev K
QE3 Matrix Switching System
Gain Control............................................................................................ 63
Manual Gain Control ............................................................................................ 63
Manual Gain Control Limitations ............................................................... 65
Automatic Gain Control ........................................................................................ 65
Simple Mode ............................................................................................... 66
Simple AGC Setup ................................................................................ 66
Advanced Mode .......................................................................................... 67
Advanced AGC Setup ........................................................................... 68
Automatic Gain Control Limitations........................................................... 69
Q-SENSE ................................................................................................. 70
RS-485 ............................................................. 71
Why an RS-485 Section? ........................................................................ 71
RS-485 Basics .......................................................................................... 71
Balanced vs. Unbalanced ...................................................................................... 71
Voltages and Signaling ......................................................................................... 72
Noise Immunity .................................................................................................... 72
Number of Devices ............................................................................................... 73
Master/Slave ......................................................................................................... 73
4-Wire and 2-Wire Systems .................................................................................. 73
RS-485 Pinout ....................................................................................................... 73
Cable Lengths ....................................................................................................... 73
Signal Reflection ................................................................................................... 74
Receiver/Transmitter Termination ........................................................................ 74
Biasing Resistors................................................................................................... 74
Which ports are RS-485? ....................................................................... 75
Summary.................................................................................................. 75
Front Panel RS-485 Termination .......................................................................... 75
Which Controllers in My System Should be RS-485 Terminated? ...................... 76
RS-485 Port Termination ............................................................................ 76
RS-485 Serial Control In Port Termination ................................................ 76
Main vs. Remote Mode ................................... 79
Differences between Main and Remotes............................................... 79
Rev K
v
QE3 Matrix Switching System
Control Mode .......................................................................................... 79
Checking Control Mode ........................................................................................ 80
Setting the Control Mode ...................................................................................... 80
System Commands from the Main Controller ...................................................... 81
System Commands from the Remote Controller(s) .............................................. 81
Set Address ........................................................................................................... 81
Initializing Remotes .............................................................................................. 81
Remotes Initialization Procedure ................................................................ 82
What Mode Should This Controller Be In? ......................................... 85
Factory Configuration Settings ...................... 86
System Options Menu ............................................................................ 86
Configuration Menu .............................................................................................. 88
Factory Settings Code Number ............................................................................. 89
System Setup Menu ..................................................................................... 90
Matrix Size ........................................................................................... 91
Model ................................................................................................... 92
Module Sizes ........................................................................................ 93
I/O Names ............................................................................................ 99
Load Firmware .................................................................................................... 100
Exiting Download Mode ........................................................................... 101
Firmware Upgrade Kit .............................................................................. 101
Firmware Download Instructions .............................................................. 101
Firmware Download Preparation ..................................................... 101
QE3 Internal Memory ........................................................................ 101
QE3 with Internal Memory ................................................................ 101
QE3 Without Internal Memory........................................................... 102
Firmware Default Settings ................................................................. 102
Ethernet or Serial Port Download?............................................................ 103
Why Download Firmware? ....................................................................... 103
Why Is Downloading Failing? .................................................................. 103
Serial Port Download Method Solutions ........................................... 103
Ethernet Download Method Solutions ............................................... 104
Features Menu..................................................................................................... 106
Set Control Mode ...................................................................................... 107
Set Priority Mode ...................................................................................... 108
Port Access Control Enable/Disable ................................................................... 109
Options Menu ............................................................................................ 110
SNMP Menu ....................................................................................... 111
QE3 Setup .......................................................................................... 114
vi
Rev K
QE3 Matrix Switching System
Q-SENSE ...................................................... 117
Q-SENSE Description .......................................................................... 117
Q-SENSE Priority ............................................................................................... 117
Q-SENSE RF Threshold Level ........................................................................... 117
Q-SENSE Setup .................................................................................................. 117
Q-SENSE On/Off................................................................................................ 118
Q-SENSE Action ................................................................................................ 118
Marked Outputs .................................................................................................. 118
Restore Function ................................................................................................. 119
Restore Function Limitations .............................................................................. 119
Q-SENSE Front Panel Operation ....................................................... 119
On/Off ................................................................................................................. 120
Q-SENSE Input Pair Setup ................................................................................. 121
Q-SENSE Threshold ........................................................................................... 123
Q-SENSE Manual Restore .................................................................................. 124
Priority Mode ................................................ 126
Priority On/Off...................................................................................... 126
Priority Mode Description .................................................................................. 126
Front Panel Priority Display ............................................................................... 127
User’s Priority ........................................................................................... 127
Default Names and Priority In Order ........................................................ 128
Priority Mode On/Off Clear Memory ....................................................... 128
Priority Example ....................................................................................... 128
Output Protection.......................................... 129
Protected Outputs Description ............................................................ 129
Protected vs. Locked ........................................................................................... 129
Commands .......................................................................................................... 129
Ports Specific ...................................................................................................... 130
Address Specific ................................................................................................. 130
Front Panel Protected Output Display ................................................................ 130
Unprotect Output ................................................................................................ 131
Rev K
vii
QE3 Matrix Switching System
Naming Inputs and Outputs ......................... 132
I/O Names Options Menu .................................................................... 132
Set Input Names .................................................................................................. 133
Set Output Names ............................................................................................... 134
Assigning Names Using Protocol Commands .................................... 135
Command Advantage.......................................................................................... 135
Default Names ....................................................................................... 136
Access Control............................................... 137
Access Control Overview ..................................................................... 137
System Access ........................................................................................ 138
Port Access Control Enable/Disable ................................................................... 139
Access Control Menu ............................................................................ 140
Keypad Access Control....................................................................................... 140
Keypad Lock ............................................................................................. 141
Unlock Keypad .......................................................................................... 142
Unlock Keypad Code.......................................................................... 142
Logging In and Logging Out .............................................................................. 142
Login /Logout ............................................................................................ 143
Password Entry .................................................................................. 143
Logout ................................................................................................ 144
User Accounts........................................................................................ 145
Access Control Setup Menu................................................................................ 145
Defining User Names and Passwords ....................................................... 146
Set User .............................................................................................. 146
Defining Group Permissions ..................................................................... 148
Set Access ........................................................................................... 148
Setting User Access ............................................................................ 149
Crosspoint Control Access ................................................................. 150
Output Access Control ....................................................................... 150
Input Access Control .......................................................................... 150
Defining User Groups ............................................................................... 151
Set Access ........................................................................................... 152
Firmware Specifics ............................................................................... 153
Factory Defaults for Access Control ................................................... 153
viii
Rev K
QE3 Matrix Switching System
Admin Account ..................................................................................... 154
Admin Default Username ................................................................................... 154
Admin Default Login Password.......................................................................... 154
Admin User Name and Password Warning ........................................................ 154
MATRIX CONTROL SOFTWARE ............. 155
Setting up the Communication Parameters ....................................... 155
Ethernet vs. Serial Communications ................................................................... 155
Monitoring .......................................................................................................... 155
General Parameters ............................................................................................. 157
Testing the Communications ..................................................................... 157
Creating and Managing Configurations ............................................ 157
Controlling the QE3 ............................................................................. 158
Changing a Crosspoint ........................................................................................ 158
Cancel Crosspoint Changes ....................................................................... 158
Change Impending Inputs ......................................................................... 158
Locking Cross points .......................................................................................... 159
Unlocking Cross points ....................................................................................... 159
Locking and Unlocking the Keypad ................................................................... 159
Controlling Monitoring ....................................................................................... 159
Online/Offline ........................................................................................... 160
Options ................................................................................................... 160
Load last configuration on startup ...................................................................... 160
Debug mode ........................................................................................................ 160
Display raw command data in log ...................................................................... 160
Display raw response data in log ........................................................................ 161
Log size ............................................................................................................... 161
Default to only show errors in the log ................................................................ 161
Save only errors in the log .................................................................................. 161
Use matrix controller names ............................................................................... 161
Login/Logout ......................................................................................... 162
Matrix Customization .......................................................................... 162
Customizing Input and Output Names ................................................................ 162
Write Names ....................................................................................................... 162
Read Names ........................................................................................................ 162
Manage Users ........................................................................................ 163
Manage Groups ..................................................................................... 163
Input Permission ................................................................................................. 163
Rev K
ix
QE3 Matrix Switching System
Scripts .................................................................................................... 163
Writing Data to the QE3 ..................................................................................... 164
Reading Data from the QE3 ................................................................................ 164
Script Naming Extension .................................................................................... 164
Editing Scripts..................................................................................................... 164
Command Structure ............................................................................................ 165
Scripts Examples ....................................................................................... 165
Failed Commands ...................................................................................... 165
Event Log ............................................................................................... 166
Troubleshooting ............................................ 167
Quintech Technical Support ................................................................ 167
Before I contact Quintech ................................................................................... 167
Have Information Ready ........................................................................... 167
Warranty Information ................................................................................ 168
Problems and Solutions ........................................................................ 168
x
Rev K
QE3 Matrix Switching System
Table 1. QE3 Switching System Module ....................................................................... 10
Figure 1. Front Panel of QE3 w/ Integrated Controller ............................................. 13
Figure 2. QE3 Architecture (Front View).................................................................... 14
Table 2. Serial /Quintech UCM Pin Definition ........................................................... 24
Figure 3. XR Bus Connections ...................................................................................... 28
Figure 4. Quintech UCM Connections ......................................................................... 31
Table 3. Ethernet Cable Pinout .................................................................................... 32
Figure 5. Main Menu ..................................................................................................... 34
Figure 6. Interface Options Menu ................................................................................ 38
Figure 7. Serial Mode .................................................................................................... 39
Figure 8. Serial Address ................................................................................................ 40
Figure 9. Reset Password .............................................................................................. 40
Figure 10. Ethernet Port................................................................................................ 41
Figure 11. DHCP ............................................................................................................ 42
Figure 12. IP Settings ..................................................................................................... 43
Figure 13. Serial Termination....................................................................................... 44
Figure 14. Connection Status wo/Permissions............................................................. 45
Figure 14. Connection Status wo/Permissions............................................................. 45
Figure 15. Connection Status w/Permissions............................................................... 46
Figure 16. Change Connection...................................................................................... 47
Figure 17. System Information Menu .......................................................................... 49
Figure 18. Firmware Version ........................................................................................ 50
Figure 19. Label Prompt 1 ............................................................................................ 51
Figure 20. Label Prompt 2 ............................................................................................ 51
Figure 21. Label Prompt 3 ............................................................................................ 51
Figure 22. Label Prompt 4 ............................................................................................ 52
Figure 23. Label Prompt 5 ............................................................................................ 52
Figure 24. Label Prompt 6 ............................................................................................ 52
Figure 25. Monitoring Off ............................................................................................. 53
Figure 26. Set RF Warning Level Menu ...................................................................... 53
Figure 27. Get Fan Speed Screen.................................................................................. 54
Figure 28. Power Supplies Status ................................................................................. 54
Figure 29. Internal Temperature.................................................................................. 55
Figure 30. Get Input RF Levels Menu ......................................................................... 56
Figure 31. Get Input RF Level ...................................................................................... 56
Figure 32. Display Input RF Level ............................................................................... 57
Figure 33. RF Signal not detected ................................................................................ 57
Figure 34. RF Board not detected ................................................................................ 58
Figure 35. Get Output RF Levels Menu ...................................................................... 58
Figure 36. Report Output RF Levels Menu................................................................. 59
Figure 37. RF Signal not detected ................................................................................ 59
Figure 38. RF Board not detected ................................................................................ 60
Figure 39. QE3 System Test Menu ............................................................................... 60
Figure 40. System Errors .............................................................................................. 62
Figure 41. Ignore System Errors .................................................................................. 62
Rev K
xi
QE3 Matrix Switching System
Figure 42. Enter Gain Control...................................................................................... 63
Figure 43. Manual Gain Control .................................................................................. 64
Figure 44. Set-Up Manual Gain Control ...................................................................... 64
Figure 45. AGC Mode.................................................................................................... 65
Figure 46. AGC Mode Select......................................................................................... 67
Figure 47. Q-SENSE Menu ........................................................................................... 70
Figure 48. Balanced Line Interface .............................................................................. 72
Figure 49. Serial Termination....................................................................................... 75
Figure 50 Quintech UCM Termination ....................................................................... 77
Figure 51. Serial Control In RS485 Connection/Termination Examples ................. 78
Figure 52. Control Mode ............................................................................................... 80
Figure 53. Display Control Mode/Init Remotes Menu ............................................... 82
Figure 54. Remote Initialization ................................................................................... 85
Figure 55. System Options Menu ................................................................................. 87
Figure 56. Configuration Menu Pass-code .................................................................. 88
Figure 57. Configuration Menu .................................................................................... 89
Figure 58. System Setup ................................................................................................ 90
Figure 59. Matrix Size ................................................................................................... 91
Figure 60. Model Number/Type ................................................................................... 92
Figure 61. Module Sizes ................................................................................................. 93
Figure 62. SRM Module Size ........................................................................................ 94
Figure 63. SRO Module Size ......................................................................................... 95
Figure 64. QE3/XRM/SRM Systems ............................................................................ 96
Figure 65. QE3/SRM System ........................................................................................ 97
Figure 66. QE3/SRM Setup ........................................................................................... 97
Figure 67. QE3/XRM System........................................................................................ 98
Figure 68. QE3/XRM Setup .......................................................................................... 98
Figure 69. QED Setup .................................................................................................... 99
Figure 70. Set I/O Names............................................................................................... 99
Figure 71. Load Firmware .......................................................................................... 100
Figure 72. Download Firmware .................................................................................. 100
Figure 73. Features Menu ........................................................................................... 106
Figure 74. Control Mode Setup .................................................................................. 107
Figure 75. Priority Mode Screen ................................................................................ 108
Figure 76. Options Menu ............................................................................................. 110
Figure 77. SNMP Menu ............................................................................................... 111
Figure 78. SNMP On/Off ............................................................................................. 112
Figure 79. Set SNMP Trap IP ..................................................................................... 113
Figure 80. Select IP ress............................................................................................... 113
Figure 81. QE3 Setup ................................................................................................... 114
Figure 82. Enable Errors ............................................................................................. 114
Figure 83. QEO Attenuation ....................................................................................... 115
Figure 84. Set QEO Input Attenuation ...................................................................... 116
Figure 85. Q-SENSE Setup Screen ............................................................................. 119
Figure 88. Primary/Backup Setup ............................................................................... 121
Figure 89. Select Primary Input .................................................................................. 121
xii
Rev K
QE3 Matrix Switching System
Figure 90. Select Backup Input.................................................................................... 122
Figure 91. Q-SENSE Pair Displayed ........................................................................... 122
Figure 92. Threshold Select.......................................................................................... 123
Figure 93. Threshold Display Off ................................................................................ 123
Figure 94. Threshold Display On ................................................................................ 124
Figure 95. Restore Output ............................................................................................ 124
Figure 96. No Outputs Detected .................................................................................. 125
Figure 97. Priority Mode Screen ................................................................................ 126
Figure 98. Locked with Priority .................................................................................. 127
Figure 99. Locked without Priority ............................................................................. 127
Figure 100. M&C .......................................................................................................... 129
Figure 101. Front Panel Protected Output Display .................................................. 130
Figure 102. Protected ................................................................................................... 131
Figure 103. I/O Names Menu ...................................................................................... 132
Figure 104. Select Input to Assign Name ................................................................... 133
Figure 105. Write Name for Selected Input............................................................... 133
Figure 106. Select Output to Assign Name ................................................................ 134
Figure 107. Write Name for Selected Output ............................................................ 135
Figure 108. Port Access Control Enable/Disable ...................................................... 139
Figure 109. Access Control Menu............................................................................... 140
Figure 110. Lock Keypad ............................................................................................ 141
Figure 111. Keypad Locked ........................................................................................ 141
Figure 112. Unlock Keypad ......................................................................................... 142
Figure 113. Login /Logout ........................................................................................... 143
Figure 114. Password Entry ........................................................................................ 143
Figure 115. Logout ....................................................................................................... 144
Figure 116. Access Control.......................................................................................... 145
Figure 117. Select User ................................................................................................ 146
Figure 118. Select Name/Password ............................................................................. 147
Figure 119. Change User Name/Password................................................................. 147
Figure 120. Select User ................................................................................................ 148
Figure 121. Set Output Access .................................................................................... 149
Figure 122. Set Input Access ....................................................................................... 150
Figure 123. Select User ................................................................................................ 152
Figure 124. Select User ................................................................................................ 152
Table 4. Access Control Defaults ................................................................................ 153
Figure 125. Communication Setting Window ........................................................... 156
Rev K
xiii
QE3 Matrix Switching System
Quintech: A Company Introduction
Who we are
Incorporated in Indiana Pennsylvania in 1989, Quintech Electronics and Communications
Inc. was based on a foundation of proprietary technology and over 120 years of combined
technical expertise in terrestrial microwave, CATV, and satellite communications. From
its inception, Quintech has emphasized the development of customer-driven new product
solutions in order to facilitate the convergence of the telephone, broadcast, satellite and
cable/hfc industries.
Our Mission
Quintech Electronics and Communications, Inc. produce reliable state of the art RF and
microwave electronic systems. We strive to exceed the expectations of our worldwide
customers, as they are the sole driver for our corporate existence. Quality objectives are
achieved through employee expertise, attention to detail, and an on going commitment to
continual improvement.
Our Products
Quintech RF matrix switch products automate RF signal routing. Large numbers of
signals from radar or satellite antennas, communications systems, cable networks, etc.,
can be instantly switched between various receiving or transmitting systems to meet
changing demands. A Quintech-based signal distribution and management system
provides increased reliability, redundancy, automation and agile reconfiguration
capabilities along with space, weight and cost savings through the efficient sharing of
resources. Our products reduce system malfunction due to equipment failure, human
error, or lack of automation.
Rev K
Page 1 of 176
QE3 Matrix Switching System
Just Some of our Customers
Our customers include AT&T, Raytheon, NBC, CNN, CCTV, PCCW, Lucent, Boeing,
British Telecom, ESPN, Time Warner, United States Department of Defense, Lockheed
Martin, Harris Corp. and you.
Page 2 of 176
Rev K
QE3 Matrix Switching System
System Overview
The QE3 matrix switch is a collection of one or more electronic modules working
together to enable you to control the switching of multiple broadband RF coaxial lines.
Switching A/V or RF signals between multiple inputs and outputs can now be done easily
and instantaneously at the switch using a keypad or remotely from a PC with the use of
Quintech’s supplied software or third party control software.
The Quintech System Advantage
The QE3 matrix switch provides a complete 64x64 matrix, including hot swappable
component cards, redundant power supplies, and integrated redundant system controllers
in a 6 RU chassis. Multiple QE3 matrix system modules can be used to create
configurations up to 1024x1024 or larger. The unit provides easy access to cards for
seamless upgrades and maintenance via the front panel, without requiring cables to be
disconnected or without disrupting the signal paths of other cards in the system.
System Features
QE3 systems are equipped with many standard features that make the system highly
configurable. Each system also has many features which allow the QE3 to be monitored
for numerous conditions including power supply condition, fan condition, internal air
temperature, routed RF path report, RF dBm level reads at system inputs and outputs,
alarm messages, input and output names, input attenuation, number of cards installed or
removed, and LCD/keypad status.
Self Monitoring
The QE3 continually monitors the temperature, fans condition, power supplies,
lcd/keypad, and input/output path RF levels.
Rev K
Page 3 of 176
QE3 Matrix Switching System
Q-SENSE
Quintech is proud to introduce Q-SENSE, which provides you with increased flexibility
in meeting your RF routing needs. Q-SENSE enables you to configure a switching
threshold power and backup input for any input. If the measured input power drops
below the threshold, Q-SENSE reroutes all outputs connected to that primary input to the
backup input. The QE3 offers multiple options for the recovery from a failed input.
Upon receiving a restore command, the system will restore all primary input connections
if the output status has not changed after the Q-SENSE function executed.
Power Supply Monitoring
All power supplies in a QE3 system are continually monitored. If the power supply is
unplugged, fails or has a fault condition, an error message will be generated. That
message will include the power supply number and the location of the power supply in
the system.
QE3 Fan Condition Monitoring
All fans in a QE3 system are continually monitored. If the fan RPM drops below a set
RPM value, an error message will be generated. That message will include the fan
number and the location of the fan in the system.
Power Supply Fan Condition Monitoring
All fans in a QE3 power supplies system are continually monitored. If one of the dual
power supply fans fails, an error message will be generated. That message will include
the location of the fan in the system.
Internal Air Temperature Monitoring
The internal temperature of each QE3 module is continually monitored. If the internal
temperature rises above 50 degrees Celsius an error message is generated. The message
will indicate which unit in the system is running hot.
Page 4 of 176
Rev K
QE3 Matrix Switching System
Power Supply Temperature Monitoring
The internal temperature of each QE3 power supply is continually monitored. If the
internal temperature rises above 75 degrees Celsius an error message is generated. The
message will indicate which power supply and the specific unit address in the system is
running hot.
Input RF Warning Level Threshold Monitoring
This feature can be turned on or off. An RF dBm monitoring level can be individually set
for every input in a system. If this feature is enabled for an input, the RF level of each
input is continually monitored. If the input level drops below the specified threshold, a
warning message will be generated.
LCD Status Monitoring
If the LCD/keypad is unplugged, an LCD/keypad error message is generated.
Error Reporting
When the QE3 system detects an error, a detailed error message is generated. This
message contains specific information about the type of error, where the error occurred,
and additional information such as input number, output number, card type, card number,
unit label or address, or power supply number.
This message by default will be placed in the message queue and be sent out in an SNMP
trap. The message can also be routed to the front panel. This front panel feature can be
turned on or off. If enabled, the error message will remain on the front panel until a user
presses a key to clear it. The message also remains in the message queue until read by a
user, or until other messages fill up the message queue and flush out the oldest message.
Gain Control
The QE3 provides gain control functionality which can be used to attenuate or amplify
input signals.
Gain control has two separate modes: manual and automatic. An input can utilize
automatic gain control, manual gain control, or have its gain control turned off. Each
system input has a separate manual and automatic gain control dBm value.
Rev K
Page 5 of 176
QE3 Matrix Switching System
Automatic Gain Control
Automatic gain control actively attenuates or amplifies a signal based upon the current
input signal strength. Each input has an automatic gain control dBm value. If the input
RF level is above the automatic dBm value, the QE3 will attenuate the input signal down
to the set dBm level. If the input signal is below the set automatic dBm level, the input
signal is amplified to the set dBm level. This feature can be either disabled or enabled for
each input.
Manual Gain Control
Manual gain control assigns a set attenuation or amplification value to an input.
Independent of input signal strength, the set dB value is added or subtracted from the
input signal before the signal passes through the QE3 system.
Alarm Condition Notification
If an error condition occurs in the QE3, the QE3 generates an error message. The
message indicates where the error occurred and any other specific information about the
alarm. The alarm will be sent out in an SNMP trap. The alarm is also placed in the
message queue. Refer to the protocol document for details. The alarm message can also
be routed to the front panel if that feature is so enabled.
Alarm Message Queue
The alarm queue contains up to 4 current error messages that have not been read out of
the queue. The messages are unique for every possible error condition. For example, if
Input 17 on QED unit # 2 drops below the set threshold, that specific information will be
included in the message. When the message is read out of the queue, the queue is
emptied.
Page 6 of 176
Rev K
QE3 Matrix Switching System
SNMP Traps
If an error condition exists, an SNMP trap is generated. If more than 4 error conditions
exist, the entire message queue is loaded into the trap and sent to a user defined SNMP IP
address. The trap queue is then emptied and the next error message is placed in the
message queue.
Input and Output RF Level Read
The input and output RF level can be read at any time either from the front panel or by
issuing a protocol command.
User Permissions
Every QE3 matrix switching system provides the ability to administer user access control
by allowing an administrator to set up user accounts with names, passwords, and
permissions. These accounts limit the system settings and cross points that individual
users can change. After an account is configured, the user logs into the system, the
settings in their account determine what they can and cannot do.
The primary benefit of the access control feature is the protection that clients are afforded
from unintentional or accidental RF connection changes.
Rev K
Page 7 of 176
QE3 Matrix Switching System
Access Control
The QE3 matrix system features port-level access control. Each control module in our
system has one or more access ports that are available for user interface. They include a
front panel keypad, Ethernet port, Telnet port, Control In port, and Remote port. Users
can control the system from any one of these access ports.
If access control is enabled for a port, a user must first login with a user name and
password before any system changes can be made. For example, with different access
control settings, a user could change the system settings from a serial port but be required
to login with permissions from the keypad or Ethernet port. This feature enables or
disables the login and permissions requirements before a user can make changes to the
system.
Circuit Elements of a QE3 Module
The circuit elements for selectively connecting the inputs to any one of the outputs,
incorporates a switching module. This module is comprised of input cards, output cards,
controller cards and a common backplane. Electrical branching elements such as solid
state switches, splitters/combiners, and couplers allow the connection of any input to each
output. All of these components are arranged to form connecting paths between the inputs
and each of the outputs on each card. They are designed such that each path has an equal
number of electrical branching elements and a substantially equal total length of electrical
paths. This assures that insertion loss and the impedance are nominally the same over
each of the switching paths through the matrix and eliminates most of the internal
connectors or interface cables between switching modules.
Unity Gain
The system is designed to optimize gain flatness over the entire operating band by
passing the signal at the same level and flatness through any path. The excellent RF
performance of these switching matrices is achieved through proprietary technology
developed by Quintech (U.S. Patents 4,935,709 and 5,481,073). No matter how many
inputs or output you may have, and how you have your cross points configured, the
system retains good impedance match and unity gain throughout the entire system.
Page 8 of 176
Rev K
QE3 Matrix Switching System
System Upgrades
You can upgrade your system to increase the number of inputs and outputs available.you.
A QE3Matrix Switch can be configured in a wide variety of I/O combinations ranging
from 8x16 up to 1024x1024. Contact us at Quintech and we can help you with your
growing communication needs.
System Sizes
The number of modules and size of your system depends on the amount of inputs and
outputs that are originally designed into your system. A small switching matrix may
consist of one module with everything integrated into that module, while a large
switching matrix may contain several modules all working together to achieve
configurable and effortless RF signal switching.
Modules
We refer to the main building blocks of a matrix system as modules. Every QE3
switching system is made up of one or more modules. A module refers to an enclosed
unit that is mounted on the rack as part of the entire system. Your system is simply one or
more modules connected, communicating, and working together. All modules have a
unique function and all have their own power supplies. The LEDs on the front panel of
the modules indicate the status of the power supplies.
Module Inter-Connections
Modules “talk” to each other through XR Bus cables connected to XR Bus ports on the
rear panels of the modules. These connections are made when the system is set up and, in
most cases, never needs to be changed. However, there are a few exceptions such as
changing serial port control or upgrading the system. These specific situations are
covered later in the manual.
The RF signals that are being switched are also connected to the rear of the modules. The
RF connections between the modules are determined during the design of your system.
They remain the same unless you are changing your matrix requirements and upgrade the
system. The connections have been set up specifically for your system design. You can
always change the connections going into and out of the matrix system, but the
connections between the system modules are set for your specific configuration and must
remain constant.
Rev K
Page 9 of 176
QE3 Matrix Switching System
Types of Modules
A QE3 matrix switching system may use four types of modules. Your system may or may
not contain each type of module. The type and number of modules used to build your
system, and how they are connected together, depends on your particular configuration.
The module types and their general functions are listed in the following table.
Receives user commands and
controls other modules.
Controller Module – UCM
Input Distribution Module – QED
Matrix Switch Module – QE3
Output Switch Module – QEO
Accepts RF signal system inputs
and outputs them to Matrix
Switching Modules.
Accepts RF signals from the
Input Distribution Modules and
sends them to an Output Switch
Module.
Accepts RF signals from the
Matrix Switch Modules and
routes them to the appropriate
system output(s).
Table 1. QE3 Switching System Module
Page 10 of 176
Rev K
QE3 Matrix Switching System
Acronyms
Quintech uses several acronyms in this manual to refer to the QE3 system components.
To avoid confusion, the acronyms and their definitions are listed below.
QE3 SYSTEM – Also referred to as the matrix system or switching system. This
references the entire system as a whole.
QE3 – Referred to as the matrix switch module. This module accepts RF signals from the
input distribution module (QED) and sends them to an output switch module (QEO). This
is the main switching module of the system.
UCM - Universal Controller Module Also referred to as a remote unit. This 1RU module
is a system add on for QE3 systems. This module will receive commands and send them
to the main QE3 controller.
QED - Referred to as the input distribution module. This module accepts RF signal
system inputs and outputs them to matrix switching modules (QE3).
QEO - Also referred to as the output switch module. This module accepts signals from
the matrix switch module (QE3) and routes them to the appropriate system output.
LCD – Liquid Crystal Display. Refers to the front panel display of the main controller
module (UCM).
RF – Radio Frequency. General term for the range of frequencies switched in our
systems.
LNB - Low Noise Block. Refers to the amplifier located at the focal point of a satellite
dish antenna. It amplifies the very weak received satellite signal then converts the
received signal to a lower frequency.
Rev K
Page 11 of 176
QE3 Matrix Switching System
System Modules Description
Controller Module
Each matrix system is supplied with at least one controller module. The controller
module is typically integrated into one of the QE3 switching modules and interfaces with
the entire switching system.
The controller allows you to setup and use the system to fit your particular requirements,
maintain user accounts for a multiple user environment, and monitor and modify the RF
connections. This can all be done from the controller's front panel keypad interface or
computer connection. In addition, the controller has several ports on the rear panel to
facilitate control from a PC and communication with other system modules.
Redundant Control Architecture
The QE3 contains redundant control cards. There is an active control card and a standby
control card. Only one controller is operational at a time. By default, if both controllers
are operational, controller A is the main controller and controller B is in backup. If the
active controller fails or is physically removed, the standby controller boots up and takes
control of the QE3 system. Each control card has its own Ethernet and serial port. Both
control cards share the single front panel LCD and keypad.
Controller Ports
The serial ports are labeled "Serial 1 and Serial 2”. These ports are used for computer
control. They are typically connected directly to a PC if the system is being controlled
remotely with a serial connection.
There are two XR Bus ports. One is labeled “XR Bus In” and the other is labeled “XR
Bus Out”. These ports are used to control other modules in the QE3 system. If your
system contains more than one module, these ports will be used to daisy-chain the
modules together. XR Bus ports are not Ethernet ports. They are only used for QE3
system communications.
The ports that supports TCP/IP communications are labeled “NET 1” and “NET 2”. Net1
is connected to controller A. NET2 is connected to controller B.
Page 12 of 176
Rev K
QE3 Matrix Switching System
The port labeled “Quintech UCM” has two uses. It can be used as an RS-485
communications port. It can also be used to communicate with additional 1RU
controllers.
The port labeled “SRM/SRO Control” is for non-QE3 system equipment. The new QE3
systems can be integrated into non-QE3 existing system. This is the port used to control
your non-QE3 Quintech communications equipment.
Controller Appearance
The controller may exist as a stand-alone 1 RU unit or it may be integrated within the
QE3 module as shown below.
Figure 1. Front Panel of QE3 w/ Integrated Controller
The placement of the control unit in relation to the other matrix switch modules in the
system rack will depend upon the size of the switching system.
Rev K
Page 13 of 176
QE3 Matrix Switching System
Basic QE3 Architecture
Fully populated, a QE3 module contains a variety of card types and modules. The figure
below illustrates the type of cards that are installed and their position(s) within the QE3
chassis. Figure 2. QE3 Architecture (Front View)
Typically, a QE3 contains:
8 - Output cards
8 - Input cards
2 - Hot-swappable power supply modules
1 - QE3 memory card
1 - Display card (installed only in QE3s containing integrated controllers)
2 - Hot-swappable controller cards
1 - Power supply on/off card
Page 14 of 176
Rev K
QE3 Matrix Switching System
Input and Output Cards
A bank of eight output cards are located between two banks of four input cards. Input
and output cards are not interchangeable. They can only be installed in their respective
slots. At least one input card and one output card must be installed.
Input and Output Card LEDs
Each input card and output card contains two LEDs. On both input and output cards, the
top LED indicates that the card is powered. On an output card, the bottom LED indicates
that at least one route has been established to/from that card. On an input card, it indicates
that at least 1 output card is currently connected to that input card.
Input and Output Card Hot Swapping
Both input and output cards are hot-swappable. When an input card is removed, all of the
output cards connected to that input card are temporarily disabled. When a new input
card is inserted, the routes between the cards are re-established. When an output card is
removed, only the output ports contained on that particular card are temporarily disabled.
All other output ports associated with the same input card remain active.
Controller Cards
The controller cards are installed at the far left of the QE3 module behind the panel on
which the Quintech logo appears.
Controller Cards Address
On the front panel of the controller card are four rotary switches. The rotary switch on
the top regulates how the control board boots up. The three rotary switches below that
are used to specify the QE3 module’s address. Each QE3 module has a unique 3-digit
address. This address must match the switch settings on the three rotary switches at the
bottom of the controller card. When replacing the controller card, check the controller
card that is being removed and set the new controller card to the same switch settings as
the one that is being replaced.
Rev K
Page 15 of 176
QE3 Matrix Switching System
Active and Standby Controller
The control card on the left is, by default, the active operational controller. It is labeled
Control A on the front panel. On the front panel, the green LED represents the active
controller, while the orange LED represents the standby controller.
Either controller can be the active controller depending on which controller boots up first.
By default if both are operational at start up, this will be control A. If the QE3 is powered
up with the left control A board removed, the control B board will boot up as the active
controller. If control A is inserted after control B is booted, control A will remain the
standby controller.
Controller A is connected to the rear panel ports labeled NET1 and Serial 1.
Controller B is connected to the rear panel ports labeled NET2 and Serial 2.
These ports do not operate simultaneously. Only one control board is functioning at a
time. The standby controller takes over in the event of an active controller failure.
If the front panel LED for a control card is off, it indicates that no control card is installed
or that the card has failed. If a control card has failed, the LED on the front of the control
card will turn red.
Watchdog Timer
The standby controller constantly polls the active controller hardware. If the control card
processor stops working, the standby takes over control of the system. No changes occur
during this transition.
Controller Card Switch Setting
The top rotary switch on the controller card controls the boot up method. In most
instances, the switch should be left in position 0. With the switch in this position, the
controller card will download all system parameters from the QE3. System operation
will then resume without having to reboot or power cycle the QE3 system. If the switch
is in position 1, the controller board will boot from the memory on the control board.
This is not recommended because the system parameters on the controller board will not
match the current settings of the QE3 system, thus causing the system parameters to be
reset to their factory default settings.
Page 16 of 176
Rev K
QE3 Matrix Switching System
Controller Card Hot Swapping
The controller board is hot swappable. QE3 system parameters remain unchanged and
RF paths are not interrupted when a new controller card is inserted to replace a
malfunctioning controller card. All system variables are backed up in the QE3 system. If
a new control board is inserted, the system parameters are downloaded from the QE3
onto the control board.
The backed up parameters include:
Input attenuation values
Gain control values
RF cross point connections
IP address
Gateway address
Subnet address
TCP/IP port number
Ethernet lock password
Model type
Model number
Number of inputs
Number of outputs
SNMP on/off
SNMP trap IP address
DHCP on/off
UCM port termination on/off
Control in port termination on/off
Serial mode
Serial address
Load access control on/off
Remote port access control on/off
Control in port access control on/off
TCP/IP port access control on/off
Telnet access control on/off
SRM input module size (SRM/SRO control port data)
SRM output module size (SRM/SRO control port data)
SRO input row size (SRM/SRO control port data)
Rev K
Page 17 of 176
QE3 Matrix Switching System
Control mode (main/remote)
Input names
Output names
User names
User passwords
Output permissions for all users and all outputs
Instant RF threshold warning levels for all inputs
Output routed/not routed data
Output locked/not locked data
Power Supply Modules
Power Supplies
The two power supplies in the upper left are redundant and the QE3 module can run on
one power supply if one should fail. Either power supply can be hot-swapped
individually and replaced without affecting the QE3's operation.
Page 18 of 176
Rev K
QE3 Matrix Switching System
Input Distribution Module – QED
The QED is the first stage of signal processing for a multi-module QE3 system. Your RF
signals enter the QE3 system through the QED(s), then distributes the RF signals out to
the QE3 modules in your system.
QED Function and Appearance
The QED takes your RF inputs and creates as many multiples as is required by your
system’s design. The row of inputs on the top of the QED is where your RF inputs are
attached.
QED Sizes
The quantity of QEDs required depends on the size of the matrix system being
implemented. The main consideration is the number of times the input signal needs to be
replicated. The capacity of a QED can be increased by simply adding additional
expansion cards.
For systems where the number of inputs or outputs is larger than 64, an attached appendix
describes how to interconnect the RF cables between the QED(s) and the other matrix
modules. Interconnect all matrix modules as outlined. All unused outputs of the QED
should be grounded using terminations that match the system impedance.
Rev K
Page 19 of 176
QE3 Matrix Switching System
Output Switch Module - QEO
The QEO is the final stage of RF signal processing within the matrix system. The Output
Switch Module (QEO) receives RF signals from the QE3 and routes them to the
appropriate system output(s).
QEO Function and Appearance
The internal structure and physical dimensions of the QEO will vary, depending on your
system’s configuration.
QEO Sizes
The quantity of QEOs required and the number of cards installed in them depends upon
the size of the QE3 system being implemented. For each output, there are multiple inputs.
An attached appendix describes how to interconnect the RF cables between the QEO(s)
and other QE3 modules for systems with more than 64 inputs and/or outputs.
Page 20 of 176
Rev K
QE3 Matrix Switching System
Connections and Port Descriptions
AC Power
Redundancy
All modules in the matrix system are equipped with integrated redundant power supplies
and/or dual AC inlets. This provides redundancy so that if one power supply fails, the
module continues to operate properly.
For DC redundancy, both AC inlets must be activated. For true AC redundancy, separate
AC sources must be applied. The power supplies are internally separate. As such, a
module can be powered from two different voltage sources operating at two different
voltages, as long as the voltage and frequency of the source is within proper tolerances.
(See “Voltages”)
LNB Power Supplies
Note that the main power supplies DO NOT supply LNB power. Separate LNB power
supplies are available for purchase from Quintech (RPS series of products).
AC Connections
AC power cords are not included with your system when shipped. They must be
purchased separately, either from Quintech or from another supplier. If you decide to use
an AC power cord that has not been supplied by Quintech, make sure that it has a
grounding plug. Grounded power cords are preferred because they help isolate AC noise
from the RF signals.
Quintech power cords are 18 AWG gauge, which is the minimum size recommended for
QE3 operation.
Rev K
Page 21 of 176
QE3 Matrix Switching System
Voltages
The internal power supplies used in Quintech matrix switching systems are auto-ranging.
This means that an acceptable range AC source can be connected to the unit and it will
automatically accommodate the new source voltage. QE3 power supplies can operate
from 90 VAC to 264 VAC at 47 Hz to 63 Hz.
All modules have one LED per power supply on the front panel to indicate the status of
the power supply. This allows you to detect any partial failures and service them to
prevent a system failure. If any of the LED’s are extinguished and the power switch is
on, consult the troubleshooting guide immediately. QE3 power supplies can be polled for
their conditionwhich enables the QE3 modules to continually monitor their own power
supplies.
RF Signals
RF Connections (Inter-Module)
Each system is interconnected differently. Your system requirements determine which
modules are required. Your system requirements also dictate how those modules should
be interconnected to get the desired number of inputs and outputs. The order and location
of modules within the rack(s) have been predetermined and tested. Refer to Appendix A
and B for details on your system’s RF interconnections wiring.
Although all systems are connected differently, there are some traits that are common to
all RF inter-module connections. RF cables don’t hold up well to repeated stress. Don’t
bend or stress the connectors, and don’t bend, pull, or stress the RF cables after
installation. If a module has to be removed for any reason, disconnect all connectors
from the unit prior to removal. The replacement module must be installed in the same
position as the one that was removed.
RF connections between the modules should remain constant. Changes should only
occur if a system change or upgrade is purchased. Any changes to the inter-module
connections should not be attempted without Quintech’s assistance.
Page 22 of 176
Rev K
QE3 Matrix Switching System
RF Connectors
75 Ohm BNC type connectors are standard on most QE3 units. However, 75 and 50
Ohm “F” type connectors, 50 Ohm SMA connectors, and 75 and 50-Ohm “N” type
connectors are also available. Other connectors may be available by special request.
The RF connections only need to be finger tightened for proper termination. If desired,
the connectors can be tightened slightly with a wrench to ensure complete contact.
NOTE: Do not force a cable connector onto the rear panel RF connectors. If the RF
connectors are over tightened with a wrench, the connector may break internally with no
visible signs of breakage on the outside of the connector.
If a connector does not seem to mate properly, recheck the type of cable and connector
you are using. If you are still having difficulties contact Quintech for assistance.
Replacement Cables
All RF interconnection cables are supplied by Quintech. The use of third party cables is
not recommended for system inter-connections. All system cables have been tested and
verified for mechanical and electrical integrity before being shipped with the systems.
We do not guarantee optimum performance of our equipment with non-Quintech cables
for inter-module connections. Contact Quintech for cable replacements or for additional
RF cables.
Rev K
Page 23 of 176
QE3 Matrix Switching System
Control Ports
There are typically three DB-9 control ports on a system controller, each of which utilizes
female style connectors. They are:
Serial
Quintech UCM
SRM/SRO Control
The pinout definitions for both the serial port and the Quintech UCM port are listed in
Table 2. As illustrated by the table, the pinout definition of the Serial port depends upon
how it has been configured. The SRM/SRO Control port is reserved for Quintech
communications with other non-QE3 modules; thus, the pinout has not been listed.
Pin
1
2
Control In – Serial Control In – Serial
RS 232 mode
RS-422/485 mode
GND
GND
Quintech UCM
In/Out
GND
7
TXD
(transmit data)
RXD
(receive data)
DTR
(data terminal
ready)
GND
(signal ground)
DSR
(data set ready)
not used
8
not used
not used
not used
9
not used
Inverting Receive
Inverting Receive
3
4
5
6
not used
not used
Non-Inverting
Transmit
Non-Inverting
Receive
Non-Inverting
Transmit
Non-Inverting
Receive
GND
GND
Inverting
Transmit
not used
Inverting
Transmit
not used
Table 2. Serial /Quintech UCM Pin Definition
Page 24 of 176
Rev K
QE3 Matrix Switching System
Serial 1 and Serial 2 Ports
The Serial 1 and Serial 2 ports are where serial data from a PC is accepted for
communications control of the matrix. Serial control can be established using any Serial
port, including those on connected remote controllers.
Serial 1 is connected to controller A. Serial 2 is connected to controller B. The serial
ports are typically connected to a PC serial port if control of the switch is to occur from a
personal computer connection. All operations of the matrix can be controlled from the
serial ports. These connectors are configurable and can operate in one of three separate
modes. The ports can communicate in the RS-232, RS-422, and
RS-485 serial interface standards.
Serial Port Connectors
The serial ports are standard DB-9 female serial connectors. The pin definitions depend
on how the serial ports are configured. They are shown in Table 2.
Serial Cable
Each serial connector is shared for both RS-232 and RS-422/485 interfaces. A NULL
MODEM or crossover cable is not required on these ports. The ports will not work using
a null modem adapter or null modem cable. Use only a straight through one to one cable.
Serial Communication Settings
The serial port parameters are the same regardless of whether you are using RS-232, RS422 or RS-485. The parameters are fixed at 9600 baud, 8 data bits, no parity, and 1 stop
bit (8N1). The command protocol for controlling the switch is provided in Appendix D.
RS-232
RS-232 was designed for communication of local devices. It supports one transmitter,
one receiver, and uses single ended signals over unbalanced, unterminated wires. Single
ended means the signal is sent over one wire with respect to a single ground source.
Unterminated means the signal lines do not have impedance matching at the line ends.
This interface is useful for point-to-point communication at slow speeds and over short
lengths of cable. Most PCs come equipped with one or more RS-232 serial ports.
Rev K
Page 25 of 176
QE3 Matrix Switching System
RS-232 Advantages/Disadvantages
RS-232 is easy to implement and has a long history of standardization and industry
acceptandce. However, due to the nature of RS-232, the signals are susceptible to noise
and grounding problems which sets a limit to cable lengths. If using RS-232, Quintech
recommends that the cable length be limited to 20 meters or approximately 60 feet.
RS-232 facillitates only point-to-point communications, thus only two devices will
typically communicate with each other over the RS-232 standard.
RS-422
In RS-422 communications, a pair of twisted wires is used to carry a signal. The data is
encoded and decoded as a differential voltage between the two lines. In principle, as a
voltage, in principle the interface is unaffected by differences in ground voltage between
sender and receiver.
RS-422 Advantages/Disadvantages
RS-422 differential signals over twisted pair wires are less affected by noise. They can
therefore communicate at faster rates and across longer distances. Unlike RS-232,
RS-422 connectors are not standardized. Refer to Table 2 for the RS-422 interface
pinouts. Although RS-422 is better than RS-232, it still is limited to one master and up to
ten receivers on the bus. Recommended maximum length is 4000 feet. The Quintech
RS-422 standard is limited to 10 receivers.
RS-485
The QE3 can be configured to communicate in RS-485 standard.
Page 26 of 176
Rev K
QE3 Matrix Switching System
XR Bus Ports
The XR Bus ports on the rear of the modules enable the main controller to communicate
with the QEDs, QEOs and QE3s . The QEOs and QE3s communicate with each other via
the XR Bus In and XR Bus Out ports. XR Bus connectors are not Ethernet TCP/IP
ports.
Daisy Chaining
XR Bus Control ports are always daisy chained together. Daisy chaining refers to the
wiring scheme in which, for example, module A is wired to module B, module B is wired
to module C, module C to module D etc. The output port of the first module and the input
port of the last module is terminated.
XR Bus Connections
The XR Bus In port is where the QED, QE3 and QEO modules look for instructions. XR
Bus In ports are always connected to the XR Bus Out port of another module. It may be
connected to a QED, QE3, or QEO, depending on your system configuration. The
control connections of each system is different. Your specific port connections are
outlined in “Control Interconnection”.
A typical control port system connection is shown in Figure 9.
NOTE: If the system is a stand alone 64x64 system, the XR Bus starts and stops with the
same QE3. Even with single module systems, the XR Bus still needs terminated; thus,
both XR Bus terminators need to both be installed. The system will not route or operate
correctly without the terminators installed.
XR Bus Terminators
There are two XR Bus terminators shipped with every system. These terminators are
placed at the ends of the daisy chain. For a multiple unit system the terminator would go
on the first QE3 XR Bus in port and the last unit in the chain on the unused XR Bus out
port. The terminators are labeled “XRBUS terminator”. These terminators are not
interchangeable with other non-Quintech Ethernet type terminators.
Rev K
Page 27 of 176
QE3 Matrix Switching System
XR Bus Terminators for 64x64 System
The XR Bus terminators need to be installed on the XR bus ports on a 64x64 6RU
system. The system will not route or operate correctly without the terminators installed.
The terminators are required on a 64x64 system because the XR Bus begins and ends at
the QE3.
Figure 3. XR Bus Connections
Page 28 of 176
Rev K
QE3 Matrix Switching System
Quintech UCM Ports
An integrated controller has one “Quintech UCM” port. A 1RU stand-alone controller
will have two Quintech UCM ports labeled “Quintech UCM In” and “Quintech UCM
Out”. These ports have two separate functions. They can be used for communications
with remote controllers or you can use them as one additional RS-485 ports for
controlling the system. Regardless of how you intend to use them, they can only be used
for one purpose at a time. The ports cannot support a remote controller and an RS-485
connection at the same time.
Daisy Chaining
Quintech UCM ports are usually daisy chained together. Daisy chaining refers to the
wiring scheme in which, for example, module A is wired to module B, module B is wired
to module C, module C to module D etc. The last device is terminated or left open. This
is how multiple controller modules can be connected together in a system.
The main controller “Quintech UCM” connector is wired to the first remote “Quintech
UCM In” connector with a supplied Quintech adapter in line. The first remote controller
“Quintech UCM Out” connector is wired to the second remote controller “Quintech
UCM In” connector with a straight through cable. The second remote controller
“Quintech UCM Out” connector is wired to the third remote controller “Quintech UCM
In” connector with a straight through cable. The connections continue in this style until
the last remaining remote controller is left with an unused “Quintech UCM Out”
connector.
Rev K
Page 29 of 176
QE3 Matrix Switching System
Quintech UCM Port Crossover Adapter
NOTE: A supplied cross over adapter or a crossover cable must be used between the
main controller module and the first remote controller of the daisy chain. A cable
adapter is supplied with the purchase of an additional controller that will be used as a
remote unit. The adapter is used between the main controller and the first remote
controller.
If more than one remote is connected to the system, additional adapters are not required.
Use only a straight through one to one cable between the additional remotes.
Pins 3, 4, 6, and 9 on the main side connect to pins 4, 3, 9 and 6 on the supplied adapter.
The pinout of the adapter is shown below.
Main controller
Remote out
Pin number
Remote controller
Remote In
Pin number
1----------------------------NC
2----------------------------NC
3----------------------------4
4----------------------------3
5----------------------------NC
6----------------------------9
7----------------------------NC
8----------------------------NC
9----------------------------6
This adapter is custom built by Quintech and cannot be purchased from another vendor.
Note that this is NOT a NULL MODEM adapter. The adapter can only be used in one
location: between the main controller and the first remote controller in the daisy chain.
Page 30 of 176
Rev K
QE3 Matrix Switching System
Figure 4. Quintech UCM Connections
Rev K
Page 31 of 176
QE3 Matrix Switching System
Ethernet Port
Each QE3 system has the ability to communicate over Ethernet. Your QE3 may be
equipped with a 10BaseT or 100BaseT Ethernet port depending on the options ordered.
The Ethernet port supports a Telnet interface, TCP/IP and SNMP. All commands are
sent to the configured IP address and port. The command protocol for controlling the
switch is provided in Appendix D.
Ethernet Connections
For Ethernet connections, connect the controller to a network port or router via the
Ethernet port using a standard cable. You can also connect directly to the computer’s
network port, but this requires a crossover cable. Standard and crossover Ethernet cable
pinouts are provided below.
Ethernet Cable Pinout
Crossover Cable
Standard Cable
RJ-45
RJ-45
RJ-45
RJ-45
Pin 1 Tx +
Pin 3 Rx +
Pin 1 Tx +
Pin 1 Rx +
Pin 2 Tx Pin 6 Rx Pin 2 Tx Pin 2 Rx Pin 3 Rx +
Pin 1 Tx +
Pin 3 Rx +
Pin 3 Tx +
Pin 6 Rx Pin 2 Tx Pin 6 Rx Pin 6 Tx Table 3. Ethernet Cable Pinout
Ethernet Command Protocol
TCP/IP
The same command protocol is used for control over Ethernet TCP/IP and the serial port.
Since the same command formats are used, the command packet will contain a serial
address. This address must match the serial address of the QE3 or the packet will be
rejected, even though the address is unnecessary when the command is sent over TCP/IP.
Page 32 of 176
Rev K
QE3 Matrix Switching System
To avoid any problems, commands sent over TCP/IP should use the broadcast address
“FF” hexadecimal.
Telnet
A Telnet console window is provided for configuring and controlling the matrix. A
command mode is provided where the same protocol commands can be issued but no
serial address or packet headers are required. See Appendix D for more information.
SNMP
SNMP or Simple Network Management Protocol is now implemented on the QE3
system. It is part of the Transmission Control Protocol/Internet Protocol (TCP/IP)
protocol suite. The Simple Network Management Protocol (SNMP) is an application layer
protocol that facilitates the exchange of management information between network
devices.
SNMP works by sending messages, called protocol data units (PDUs), to different parts
of a network. SNMP-compliant devices, called agents, store data about themselves in
Management Information Bases and return this data to the SNMP requesters.
To use the protocol, it must be enabled from the front keypad first. Currently, the default
is on.
SNMP Additional Features
The QE3 polls the input RF levels and the system status. If an alarm condition develops,
a message and SNMP trap are generated specific to the alarm condition. If more than 4
alarm conditions are noted before the message queue is read out, the QE3 will send out
these messages in an SNMP trap containing alarm messages. The trap will be sent to the
SNMP assigned IP address. The message buffer will then be emptied and the current
message will be added to the now empty queue.
QE3 SNMP Traps
The QE3 can send additional traps to indicate crosspoint changes and other system
changes. These traps contain information such as where the change originated, and
specifics about the type of change. If access control is enabled, the user logged in is also
reported.
Rev K
Page 33 of 176
QE3 Matrix Switching System
Front Panel Interface
The front panel keypad and screen are used to set various operating parameters and to
monitor and control the QE3 matrix switch. Depending on the tasks being performed,
various sub-menu screens will appear. The display utilizes a refresh mechanism which
redisplays the screen about every 5 seconds.
Main Menu
The Main Menu has four choices, “Monitor & Control”, “System Options”, “Access
Control”, and "System Information".
When in any other menu, pressing F4 repeatedly will exit you out of a screen back to the
previous screen. Pressing F4 repeatedly will return you to the Main Menu. There is one
exception; the download firmware screen can only be exited by downloading firmware or
power cycling the controller. This Main Menu is the top of the front panel hierarchy.
1. Monitor and Control
2. System Options
3. Access Control
4. System Information
Figure 5. Main Menu
Page 34 of 176
Rev K
QE3 Matrix Switching System
Front Panel Hierarchy and Page References
The entire front panel hierarchy is listed below. The page number that refers to a
particular menu item is listed here for your convenience. Some options are only available
if logged in as the Admin. Other options are only available if the system is a combination
SRM/QE3 system. Access control for the local (keypad/LCD) has to be turned on to
view the access control setup menus.
1. Monitor & Control .........................................................................................................45
2. System Options Menu ....................................................................................................82
2.1. Configuration Menu ........................................................................................84
Entry into the configuration menu requires a factory code. The code is 732. Refer to
“Factory Settings Code Number” for more information on this code. Most settings under
this menu are critical to system functionality. Care should be taken any time this menu is
accessed.
2.1.1. System Setup Menu .........................................................................85
2.1.1.1. Matrix Size ........................................................................86
2.1.1.2. Model ................................................................................87
2.1.1.3. Module Sizes Menu ..........................................................88
2.1.1.3.1. SRM Module Size ...............................................89
2.1.1.3.2. SRO Module Size ................................................90
2.1.1.3.3. Combination QE3/XRM/SRM ............................89
2.1.1.3.3.1. QE3/SRM System ...............................92
2.1.1.3.3.2. QE3/SRM Setup..................................92
2.1.1.3.3.3. QE3/XRM System ..............................93
2.1.1.3.3.4. QE3/XRM Setup .................................93
2.1.1.3.4. QED Setup ...........................................................94
Rev K
Page 35 of 176
QE3 Matrix Switching System
2.1.1.4 I/O Names Menu………………………………....… ......132
2.1.1.4.1. Set Input Names ...............................................133
2.1.1.4.2. Set Output Names ............................................134
2.1.2. Load Firmware…………………………………………….… ......100
2.1.3. Features Menu………………………….…………………..... ......106
2.1.3.1. Set Control Mode…………………….………….... .......107
2.1.3.2. Options Menu..................................................................103
2.1.3.2.1. LNB Power (not available) ................................21
2.1.3.2.2. SNMP Menu ....................................................111
2.1.3.2.2.1. SNMP On/Off ...................................112
2.1.3.2.2.2. Set SNMP Trap IP…….…......... ......113
2.1.3.2.3. XRO Attenuation .............................................104
2.1.3.2.4 QE3 Setup .........................................................112
2.1.3.2.41. Can Bus Errors ...................................108
2.1.3.2.4.2. Card Calibration ................................108
2.1.3.2.4.2. QEO Attenuation ..............................109
2.1.3.3. Set Priority Mode ............................................................111
The rest of the front panel hierarchy does not require the “732” factory settings code
number to make changes to the system.
2.2. Interface Options Menu .................................................................................38
2.2.1. Set Address ......................................................................................40
2.2.2. Set Serial Mode ................................................................................39
2.2.3. Serial Termination ...........................................................................44
2.2.4. Static IP Configuration ....................................................................43
2.2.5. DHCP On/Off ..................................................................................42
2.2.6. QEC Port # .......................................................................................41
2.2.7. Reset Password ................................................................................40
Page 36 of 176
Rev K
QE3 Matrix Switching System
2.3. Control Mode/Init Remotes Menu ..................................................................80
2.3.1. Display Control Mode......................................................................80
2.3.2. Remotes Initialization ......................................................................85
3. Access Control Menu…………………………………………………………… ......140
3.1. Keypad Lock .................................................................................................125
3.2. Login/Logout ................................................................................................127
3.3. Access Control Setup Menu..........................................................................145
3.3.1. Set Users ........................................................................................146
3.3.2. Set Access ......................................................................................148
3.3.3. Set Groups......................................................................................148
4. System Information Menu .............................................................................................49
4.1. Firmware Version ...........................................................................................50
4.2. Input Warning Level .......................................................................................53
4.3. Fan Speed ........................................................................................................54
4.4. Power Supply Status .......................................................................................54
4.5. Internal Temperature .......................................................................................55
4.6. Get Input RF Level ........................................................................................56
4.7. Get Output RF Level ......................................................................................58
4.8. QE3 System Test.............................................................................................59
4.9. Gain Control....................................................................................................63
4.10. Automatic Gain Control................................................................................63
4.11. AGC Delay Time ..........................................................................................63
Rev K
Page 37 of 176
QE3 Matrix Switching System
Communications Setup
If the controller module is to be controlled by a port connection in addition to the keypad,
the communication parameters must be set up first.
Interface Options Menu
Option 2 of the System Options Menu will load the Interface Options Menu.
To invoke the Interface Options Menu from the main menu: key sequence 2, 2.
2. System Options
2. Interface Options
1. Configuration
2. Interface Options
3. Remote Control
F4=Exit
Figure 6. Interface Options Menu
Press 2 to enter the Interface Options Menu
From this menu, you will be able to initiate the configuration of seven different
communication parameters. Use the up and down arrows to scroll thru the various
communications parameters. When the desired parameter is displayed in the upper left
corner, press F1 to select it. Press F4 to back out to the System Options Menu.
Page 38 of 176
Rev K
QE3 Matrix Switching System
Serial Mode
The Serial Mode parameter enables you to specify whether an RS-232, RS-485, or
RS-422 serial interface will be used to communicate with the Serial or Quintech UCM
serial communications port. Select the appropriate protocol using the up/down arrows and
back out by pressing F4.
Serial Mode
↑↓ Change Options
F1=Select
F4=Exit
Figure 7. Serial Mode
Serial Address
The Serial Address parameter allows you to set a 2-byte hexadecimal address for the
controller. This address is used for two purposes. If the system contains more than one
controller, this address is used by the controller to communicate properly through the
remote ports to other controllers. This address is also used by the Quintech software to
communicate properly to the serial port. Set the address for the controller and then when
setting up the parameters for serial communications in the Quintech software, set the
address to the same address as the controller.
To change the address, use the up and down arrows until the desired address is displayed,
then press F1 to select the new address. No change is made until the F1 key is pressed.
The address range is from 00H to FEH. Do not use FFH as an address. Press F4
repeatedly to back out to the main menu again.
Rev K
Page 39 of 176
QE3 Matrix Switching System
Current Address 0
New address ↑↓ 0
F1=Enter
F4=Exit
Figure 8. Serial Address
NOTE: If you have remotes in the system make sure the main controller address
and all remote controllers have different addresses.
Valid Addresses
Addresses can be set from 00 to FE hexadecimal. The unit only responds to commands
sent over the serial bus that contain a matching address. The only exception is the address
“FF” which is a broadcast address. All units will respond to a command containing FF as
the address regardless of its current address. For this reason, FF should not normally be
used as a unit address.
Reset Password
The Reset Password parameter enables you to reset the QEC port access password to the
Quintech-specified default. Press F4 to exit or F1 to reset the password to “Quintech”.
Resert Password
to “Quintech”
F1=Enter
F4=Exit
Figure 9. Reset Password
Page 40 of 176
Rev K
QE3 Matrix Switching System
Why Reset the Password?
The password can be set with the ELP command from a communication port on the
controller. You can find more information about this in the Quintech protocol document
found in Appendix D.
The ELP command allows you to use almost any ASCII hex values to set the password.
You can even use ASCII hex values that are not found on a standard keyboard. If the
password is accidentally programmed with a Hex value that can’t be typed in from a
keyboard then the password needs to be reset. The default value when reset is Quintech.
Set QEC Port #
The Set Qec Port # parameter allows you to configure the port number for QEC port
access. Contact your network administrator for the correct values to use for this
parameter. Use the scroll keys to scroll the port number up or down until the desired port
is displayed or explicitly type in the port number. Press F4 to exit or F1 to change the
port number.
Current Port
New Port ↑↓
F1=Enter
F4=Exit
9100
9100
Figure 10. Ethernet Port
What is a Qec Port Number?
A port number represents an endpoint or "channel" for network communications. Port
numbers allow different applications on the same computer to utilize network resources
without interfering with each other. Port numbers most commonly appear in network
programming, particularly socket programming.
Rev K
Page 41 of 176
QE3 Matrix Switching System
Qec Port Number Default Setting
The default setting of the Qec port is 9100. This number was selected because it is a port
number that is not widely used or registered by IANA (Internet Assigned Numbers
Authority). Most applications use much lower numbers like 1000 or less.
Why Change the Qec Port Number?
In almost all cases, there is not a conflict and the port number will be left at the default of
9100. In case your network happens to be using port 9100 for some reason, you can
change Quintech’s port number to some other value to avoid communication conflicts.
DHCP On/Off
The DHCP On/Off parameter allows you to enable or disable DHCP service. This will
cause the controller to look for a DHCP server to assign an address for network
communications after boot up. Pressing F1 turns DHCP on/off.
1. DHCP: On
F1=Change
F4=Exit
Figure 11. DHCP
Should DHCP be On or Off?
When set to ON, the IP address of the QE3 system is dynamically assigned by the DHCP
server. Note that the IP address assigned in this manner will override any IP address that
may have been specified via the Static IP configuration screen. When set to OFF, the
static IP address that is specified in the IP configuration screen will be used. Contact your
network administrator to confirm the correct setting of DHCP service.
Page 42 of 176
Rev K
QE3 Matrix Switching System
Ethernet Address
The Ethernet Address parameter allows you to set the static IP address, gateway and
mask for the controller. Contact your network administrator for the correct values to use
for these parameters.
IP : 10. 0. 0. 50
Msk :255.255.255. 0
GW :192.168. 0. 1
F1=Enter F4=Exit
Figure 12. IP Settings
The information displayed in the IP field depends upon the DHCP setting. Whether or not
you can change the configuration also depends upon the DHCP setting. Changes are only
made after pressing F1. F4 will back you out without making changes to the settings.
IP Configuration with DHCP Off
If DHCP is off, the currently configured static IP information will be displayed. When
DHCP is off, the IP address, the gateway, and mask can be changed.
IP Configuration with DHCP On
If DHCP is on and the controller has successfully been assigned an address from the
DHCP server, that current information is displayed on the screen. If DHCP is on but for
some reason a DHCP server could not be found for addressing, the static configuration
will be displayed. In this case, you can change the IP configuration, even if DHCP is on.
Rev K
Page 43 of 176
QE3 Matrix Switching System
Serial Termination
The Serial Termination parameter enables you to specify how the control port and the
remote ports are terminated. This setup is only necessary if you are using RS-485
communications on one or more of the ports. If you are not using RS-485
communications, these settings should be turned off. There is an entire section of this
manual that explains the details of RS-485 termination.
1. Control In : Off
2. Quintech UCM : On
F1=On F2=Off
F4=Exit
Figure 13. Serial Termination
Page 44 of 176
Rev K
QE3 Matrix Switching System
Crosspoint Connections
The following information describes how to monitor and change all RF connections
through the keypad interface.
Monitor a Connection
Select option 1 “Monitor and Control” in the main menu. The screen may have more
options available if you are logged in with permissions or access control is disabled. For
more information on permissions, refer to “Access Control”.
Out 1
In 1
Output 1 Æ Input 1
No Output Access
F4=Exit Status ↑↓
Figure 14. Connection Status wo/Permissions
Current QE3 design supports input access control as well as output access control. After
the output is selected, the user must have allow permission for the input as well. If the
user does not have access to ther current input the screen will appear with the no input
access message.
Out 1
In 1
Output 1 Æ Input 1
No Input Access
F4=Exit Status ↑↓
Figure 15. Connection Status wo/Permissions
Rev K
Page 45 of 176
QE3 Matrix Switching System
If the user is logged on with permissions or access control for the local keypad setting is
off then you have permission to change the output.
Out 1
Output 1 Æ
F1=Change
F4=Exit
In 1
Input 1
F2-L/U
Status ↑↓
Figure 16. Connection Status w/Permissions
To view the status of a particular output channel, type in the output number or use the
scroll (↑↓) keys to scroll up or down respectively. When a valid output channel is
entered, the channel input will be displayed approximately two seconds after the last digit
is entered. Do not precede numbers by leading zeros.
The “out 1” and “in 1” captions in the upper left quadrant is the associated name of
those inputs and outputs. This screen shows factory default names but they can be named
with any name using a standard character set from a common keyboard. Refer to the N
commands for further details.
Changing a Connection
This function is available if the user is logged on with permissions, or if access control
for the local keypad setting is off. These permissions are discussed in the “Access
Control” section of the manual. Pressing F1 will allow the user to change the input
connected to the currently displayed output.
The Change Connection screen is displayed when F1 is pressed on the Connection
Status screen. It allows you to change the input connected to the currently selected
output.
Page 46 of 176
Rev K
QE3 Matrix Switching System
Out 1
In 1
Output 1 → Input 1
F1=Enter F2=Protect
Change ↑↓ F4=Exit
Figure 17. Change Connection
The menu heading will change from showing the assigned names to “Change” and the
cursor will move to the right side of the display just after “Input”. Select the new input
by either typing it in or scrolling through the available inputs with the arrow keys. Press
F1 to enter the change. No connection will be made until you press F1. To exit back to
the main menu without making any changes, press F4.
Rev K
Page 47 of 176
QE3 Matrix Switching System
Locking and Unlocking Connections
This function is available if the user is logged on with permissions, or if access control
for the local keypad setting is off. Pressing F2 while the Connection Status screen is
displayed locks/unlocks the connection status of the currently displayed output. The
display is not currently able to display the locked or unlocked condition of the output. If
the display shows the F1 and F2 options but the output cannot be changed, the output is
locked. Simply press F2 to unlock the output and then proceed to change the output
connection.
The F2 button operates as a toggle. Pressing it once locks the connection as currently
specified. Pressing it again disables the lock thereby allowing changes to be made. The
F1 button has no effect upon the output’s connection status while the lock is enabled.
The connection must be unlocked before any changes to the connection can be made.
This feature was added for additional protection against accidental cross point connection
changes.
Turning off an Output
To turn off an output, simply connect the output to input 0. Connecting to input 0
effectively turns off the output.
Page 48 of 176
Rev K
QE3 Matrix Switching System
System Information Menu
Additional information about the system is available from the System Information menu.
Pressing 4 in the main menu displays the System Information Menu.
Get Firmware Version
↑↓ Change Options
F1=Select
F4=Exit
Figure 18. System Information Menu
Scrolling
Pressing the up or down arrow keys scrolls through the available options in the menu.
Not all options are available to all system configurations
Get Firmware Version
Input Warning Level
Fan Speed
Power Supply Status
Internal Temperature
Get Input RF Level
Get Output RF Level
System Errors
Output Attenuation
AGC Mode
Gain Control
Simple AGC Setup
Advanced AGC Setup
QE3 System Test
QSENSE setup
Rev K
Page 49 of 176
QE3 Matrix Switching System
Firmware Version
Option one will flash the same screen that appears during power up. The displayed
information includes:
Model Type
Model Number
Configured system size
Protocol Version
To display the firmware version, use the up and down scroll arrows to scroll through the
various options. Stop scrolling when “Get Firmware Version” is displayed. To display
specific firmware version information, press F1. The Firmware Version screen will be
displayed. This screen is displayed for 5 seconds before automatically reverting back to
the System Information Menu.
QE3 2500 64x64
Protocol Ver: 2.15
Firmware Ver: 9.XX
Figure 19. Firmware Version
QE3 System Labels
If the system has more than 64 inputs or 64 outputs, certain menus may prompt you for a
label. This label is stamped on the rear panel at the factory and represents the placement
of the module in the system. If your system is only a single 64x64 module, the label is
QA1.
If the system has multiple modules refer to the rear panel for the correct label. Switch
modules are label QA1 QA2 QB1 QB2 etc. Input modules are labeled QI1-1 QI2-1 etc.
Output modules are labeled QO1-1, QO2-1 etc.
The screens will prompt you for a label.
Page 50 of 176
Rev K
QE3 Matrix Switching System
Each unit in a
system has a unique
character label.
F1=continue
Figure 20. Label Prompt 1
Label starts with Q,
then a letter, then
a number.
F1=continue
Figure 21. Label Prompt 2
Input and Output
modules have an
additional character.
F1=continue
Figure 22. Label Prompt 3
Rev K
Page 51 of 176
QE3 Matrix Switching System
This character is a -1
or -2
F1=continue
Figure 23. Label Prompt 4
Enter the label of
the QED/QE3/QEO
unit you want to poll.
F1=continue
Figure 24. Label Prompt 5
F1=done, F2=Æ
F3=Å , F4=Exit
Label=QA1
Figure 25. Label Prompt 6
Enter the label identifier. This tells the controller which module in the system you want
information about. F2 and F3 moves the cursor left and right. Up or down arrows select
the next character in a pre-determined list of characters available. An invalid label or a
label that is not compatible with the current system size will be rejected.
Page 52 of 176
Rev K
QE3 Matrix Switching System
Input Warning Level
Input Warning Level sets warning threshold levels for input alarm conditions. RF
warning level can be set from -10 to -50dBm. This is the total power at the input before
any QE3 attenuation is applied. If this value is set and the total power on that input drops
below the set threshold, an SNMP trap will be sent and a message will be added to the
message queue.
Input 1
RF Monitoring Off
F1=Select F4=Exit
↑↓ Scroll or Enter #
Figure 26. Monitoring Off
Scroll up or down to select the system input for whichyou want to set an RF warning
level, then press F1 to select.
Set RF dBm Warning Level
Type in a number from -10 to -50. The threshold is not accepted until the F1 key is
pressed. This screen can be exited without any changes by pressing the F4 key. F2 will
turn RF monitoring off for that input.
Input 1 = Off
New Value =
F1=Enter
F2=Off
↑↓ Scroll
F4=Exit
Figure 27. Set RF Warning Level Menu
Rev K
Page 53 of 176
QE3 Matrix Switching System
Fan Speed
Get Fan Speed reports the RPM of all fans in a module. Press F1 to get the fan speeds.
Fan Speed in RPM
1=2750 2=2850
3=2800 4=2825
5=2875
F4=Exit
Figure 28. Get Fan Speed Screen
Power Supply Status
Power Supply Status reads information available from the power supplies. Press F1 to
retrieve the power supply status.
The power supplies status reports back the current, voltage, temperature and any fault
condition found.
P1 V=24 I= 1.7 T=89
P2 V=24 I= 0.2 T=89
PS1 =No fault
PS2 = No Fault F4=Exit
Figure 29. Power Supplies Status
Don’t be concerned with the numbers. This is mainly for factory diagnostics. If the third
and fourth lines state “no fault”, the power supplies are operating within specifications.
Any problem found will be printed on the third and fourth lines of the screen.
Page 54 of 176
Rev K
QE3 Matrix Switching System
Internal Temperature
Internal Temperature reads the temperature on the control board. This is an ambient
temperature read and has no status associated with it. If there is an extreme difference
between the room temperature and the internal temperature, check the rear fans, power
supply tray fans, and check the front panel filter for dust build up.
Internal Temperature
= 38C or 100F
F4=Exit
Figure 30. Internal Temperature
Rev K
Page 55 of 176
QE3 Matrix Switching System
Get Input RF Level
Get Input RF Level reports the total input power of a specified input.
Get Input RF Level
↑↓ Change Options
F1 = Select
F4=Exit
Figure 31. Get Input RF Levels Menu
Read Input RF dBm Signal Level.
In 1
Input 1
Scroll ↑↓ or Enter #
F1 = Select F4=Exit
Figure 32. Get Input RF Level
Page 56 of 176
Rev K
QE3 Matrix Switching System
If the QE3 system has more than 64 outputs but is not equipped with QED input modules,
this command will not be available.
In 1
Input 1 -48.0dB
Scroll ↑↓ or Enter #
F1 = Select F4=Exit
Figure 33. Display Input RF Level
Scroll through the inputs to get the desired number. You can also explicitly enter the
number using the keypad. Press F1 to make QE3 sample the input and retrieves a dBm
value. The value is displayed on the screen. This feature is included to assist in
determining where a system fault is located.
If the command fails to read a valid value, a message screen will be displayed. It there is
no RF signal on that input the following screen will be displayed. It will also detect and
report if that particular input or XRD card is offline.
In 1
No signal
Input 1
detected
Scroll ↑↓ or Enter #
F1 = Select F4=Exit
Figure 34. RF Signal not detected
Rev K
Page 57 of 176
QE3 Matrix Switching System
RF Board Offline
F4=Exit
Figure 35. RF Board not detected
Get Output RF Level
Get Output RF Level reports the total output power of a specified output.
Get Output RF Level
↑↓ Change Options
F1 = Select
F4=Exit
Figure 36. Get Output RF Levels Menu
Page 58 of 176
Rev K
QE3 Matrix Switching System
Read Output RF dBm Signal Level
Out 1
Output 1 -35dBm
Scroll ↑↓ or Enter #
F1 = Select F4=Exit
Figure 37. Report Output RF Levels Menu
Scroll through the outputs to get the desired number. You can also explicitly enter the
number on the keypad. Press F1 to make the QE3 sample the output and retrieve a dBm
value. The value is displayed on the screen. This feature is included to assist in
determining where a system fault is located.
If the command fails to read a valid value, a message screen will be displayed. It there is
no RF signal on that input, the following screen will be displayed. It will also detect and
report if that particular input or XRD card is offline.
Out 1
No signal
Output 1 detected
Scroll ↑↓ or Enter #
F1 = Select F4=Exit
Figure 38. RF Signal not detected
Rev K
Page 59 of 176
QE3 Matrix Switching System
RF Board Offline
F4=Exit
Figure 39. RF Board not detected
Accuracy of dBm Values
The dBm values returned from a read is only accurate from -10dBm down to -50dBm.
This feature has been included to assist in determining where a system fault is located. It
is not intended to replace a spectrum analysis of the RF signal.
QE3 System Test
QE3 system test is a diagnostic test used to find communications errors in the system and
identify non-responsive boards. The test is based on the system setup and tests all boards
and communication links in a system.
QE3 System Test
↑↓ Change Options
F1=Select
F4=Exit
Figure 40. QE3 System Test Menu
Page 60 of 176
Rev K
QE3 Matrix Switching System
System Size
The System Size test is based on the number of system inputs and outputs in a standard
QE3 configuration. If the system is a 6RU 64x64 or smaller, only that unit’s boards will
be tested. If the system is a standard configuration, (128x128) the system test is
performed upon 4 input and output modules each and 4 QE3 switching modules. Every
board in all 12 of the modules will be tested.
Error Reporting
If the test finds a non-responsive board, it pauses and displays the error on the front
panel. The error lists the module label, followed by the card’s type, followed by the
card’s location.
Error found at input
module QI1-1.
Input card 1 never
responded to poll.
Error found at output
module QO2-2.
Output card 5 never
responded to poll.
System error found
at module QA2.
Input card 5
offline.
Pressing the F4 key exits the test without continuing. Pressing any other key continues
the test.
Rev K
Page 61 of 176
QE3 Matrix Switching System
System Errors
The System Error option assists with the integration of non-Quintech hardware into a
Quintech system. When set to YES, any command failures will be ignored. Quintech
recommends leaving this parameter set to NO so all errors will be reported.
System Errors On/Off
↑↓ Change Options
F1=Select
F4=Exit
Figure 41. System Errors
Press F1 to select the System Errors option.
Ignore System
Errors?: No
F1=Change
F4=Exit
Figure 42. Ignore System Errors
Press F1 to toggle the option ON or OFF.
Page 62 of 176
Rev K
QE3 Matrix Switching System
Gain Control
Every QE3 system has been equipped with input gain control which can be set either
manually or automatically. In manual mode, a simple user-specified gain or attenuation
value is consistently applied to the input(s) regardless of the input’s current RF level. In
automatic mode, the QE3 tracks the input(s) and automatically applies gain or attenuation
to maintain the user-specified RF level.
Press F1 to set up input gain control.
Gain Control
↑↓ Change Options
F1 = Select
F4=Exit
Figure 43. Enter Gain Control
If the QE3 system has more than 64 outputs but is not equipped with QED input modules,
this feature will not be available.
Manual Gain Control
Manual gain control consistently applies a set amplification or attenuation value to all
input signals equally. Input signal strength has no effect on manual gain control. The
attenuation or amplification value is set and that value is added or subtracted from the
input signal level consistently.
Rev K
Page 63 of 176
QE3 Matrix Switching System
Notice the top line reads Gain Control Manual. This means the currently selected input is
already in manual mode and set at 0.0 dBm. This value basically turns off the gain
control function.
Gain Control Manual
Input 1 = -0.0dBm
Enter # or Scroll ↑↓
F1 = Select F4=Exit
Figure 44. Manual Gain Control
Select an input then press F1 to set up manual gain control value.
Input 1 = -0.0dBm
Enter +18 to -13.5 dB
F1=Enter F2=M/A (M)
Scroll ↑↓ F4=Exit
Figure 45. Set-Up Manual Gain Control
Here input 1 is selected. Arrow up or down to set the input gain or attenuation value. F4
will exit without any changes. F2 will toggle the input between automatic and manual
gain control modes.
Page 64 of 176
Rev K
QE3 Matrix Switching System
Manual Gain Control Limitations
Manual gain control is limited to +18dB of gain or -13dB of attenuation per input.
Press F2 to switch this input to automatic mode. Adding too much gain to an input can
cause degradation of the signal. Gain compression of a signal can occur if the input signal
is at a high level and the manual gain is set high as well.
Automatic Gain Control
When operating under automatic gain control, the QE3 tracks the input(s) and
automatically applies gain or attenuation, where needed, to maintain the user-specified
RF level. Automatic Gain Control can be categorized as Simple or Advanced. Simple
mode uses a simple timer that adjusts the input level at regular intervals; whereas,
advanced mode utilizes multiple timers that determine how the system will react to the
user RF level changes at the input(s). The system can be set to use Simple or Advanced
mode at the AGC Mode screen which is in the System Information Menu.
AGC mode
↑↓ Change Options
F1 = Select
F4=Exit
Figure 46. AGC Mode
Select F1 to enter the AGC mode screen where you can choose between Simple and
Advanced modes.
Rev K
Page 65 of 176
QE3 Matrix Switching System
Simple Mode
Simple mode uses a simple timer that adjusts the input level at regular intervals. The
adjustment is made every time the simple AGC timer expires and is made in a single
instance, regardless of how large or small the change is. The timer is then reset and the
process is repeated.
Simple AGC Setup
Simple AGC has three parameters per input that can be setup: Delay, Hysteresis, and
Zero Input dB Level.
Simple AGC Delay
Simple AGC Delay is a timer (0-255s) that determines the amount of time the system
waits between input RF sampling and adjustment. Once the RF is adjusted, the timer is
reset and the process repeats.
Simple AGC Hysteresis
Hysteresis is the maximum level change (in dB) that the input level is allowed to vary
before the delay timer can be triggered.
Simple AGC Zero Input dB Level
The Zero Input dB Level is sthe default level setting applied if the input signal drops
below -60 dBm with automatic gain control enabled. This can prevent a large undershoot
or overshoot of the signal when the RF has been removed and then quickly returns.
Page 66 of 176
Rev K
QE3 Matrix Switching System
Advanced Mode
Advanced AGC mode utilizes multiple timers that determine how the system will react to
user RF level changes at the input(s). Different timers can set the input reaction times
and how fast or slow the RF level will be adjusted to match the set input.
Current AGC mode: 1
M1 is Advanced AGC
M2 is Simple AGC
F1=Change F4=Exit
Figure 47. AGC Mode Select
The current system setting is at the top of the screen. Pressing F1 will reconfigure all
system inputs to the other mode.
Changing a system requires configuring all inputs. This process may take a few seconds.
A message will temporarily be displayed while the system is busy.
Reconfiguring system
Please wait.
Rev K
Page 67 of 176
QE3 Matrix Switching System
Advanced AGC Setup
Advanced AGC utilizes multiple timers and has six parameters per input that can be
configured: Hysteresis, Zero Input dB Level, PreAttack Delay Time, PreDecay Delay
Time, Attack Delay Time, Decay Delay Time.
Advanced AGC Hysteresis
Hysteresis is the maximum level change (in dB) that the Input Level is allowed to vary
before either the PreAttack or PreDecay timer can be triggered.
Advanced AGC Zero Input dB Level
Zero Input dB Level is the defaultlevel setting applied if the input signal drops below -60
dBm with automatic gain control on. This can prevent a large undershoot or overshoot of
the signal when the RF has been removed and then quickly returns. The Zero Input dB
Level remains in effect until either the PreAttack Delay or PreDecay Delay expires the
first time.
Advanced AGC PreAttack Delay Time
PreAttack Delay Time is the amount of time the input signal must remain aabove the set
point before any reduction in gain will occur. In order to start the PreAttack timer, the
level increase must exceed the hysteresis value and remain above the set point plus the
hysteresis until the PreAttack timer expires. The Attack phase starts when this condition
is met.
Advanced AGC PreDecay Delay Time
PreDecay Delay Time is the amount of time the input signal must remain below the set
point before any increase in gain will occur. In order to start the PreDecay timer, the
level decrease must exceed the hysteresis value and remain below the set point minus the
hysteresis value until the PreDecay timer expires. The Delay phase starts when this
condition is met.
Page 68 of 176
Rev K
QE3 Matrix Switching System
Advanced AGC Attack Delay Time
The Attack Delay Time is the amount of time required for the AGC to decrease the input
signal level to the desired setpoint level. The change occurs in .5 dB increments divided
by the total Attack Delay Time.
Advanced AGC Decay Delay Time
The Decay Delay Time is the amount of time required for the AGC to increase the input
signal level to the desired set point level. The change occurs in .5 dB increments divided
by the total Decay Delay Time.
NOTE: Specifications such as P1dB, OIP3, and noise figure are affected by gain
changes, so the user must be aware of the input level at the QE3 as well as the level
setting to prevent signal distortion.
Automatic Gain Control Limitations
The QE3 system has a limit to the amount of gain or attenuation it can apply to a signal to
get the level to the user requested dBm level. The QE3 can add 18dB of gain, or 13.5 dB
of attenuation to an input signal.
For example, say the automatic gain control dBm level for input 1 is set at -40dBm. The
input signal could be up to -26.5dB and the signal would still be attenuated down to
-40dBm. If the input signal was set to -26dBm, then the attenuation is past its limit and
the signal will start tracking the input signal. The input would then be -39.5 dBm.
Gain can also cause signal degradation if the signal is at maximum input strength and the
input is set to manual gain. Amplification of a strong signal will cause signal degrading
and distortion. Quintech recommends a signal strength plus gain value added do not
exceed -10dBm.
Rev K
Page 69 of 176
QE3 Matrix Switching System
Q-SENSE
The Q-SENSE option sets up the QE3 Q-sense feature. For details on the Q-SENSE
feature refer to the “Q-SENSE” section.
Q-SENSE Setup
↑↓ Change Options
F1=Select
F4=Exit
Figure 48. Q-SENSE Menu
Page 70 of 176
Rev K
QE3 Matrix Switching System
RS-485
Why an RS-485 Section?
In the past, there have been questions as to how to handle certain RS-485
communications setups with Quintech systems. This section was written to eliminate
confusion about the Quintech RS-485 communications, specifically termination. This
section discusses the major points of RS-485 communications, including specific details
such as signaling, cabling, pinout, and termination settings.
RS-485 Basics
In order to discuss RS-485, let’s review the basics of RS-232 for comparison. RS-232 in
simplest terms is a three-wire interface: one transmit, one receive, and one common
ground. This is called an unbalanced signal.
It’s a simple protocol but because signaling is in reference to a common ground, the
speed and cable lengths are severely limited. RS-232 is typically only a few feet and
usually limited to less than 20,000 bits per second. Rather slow for today’s standards.
Balanced vs. Unbalanced
The RS-485 standard uses balanced differential signals. In balanced signaling, there are
two lines. One signal carries the true signal and the other carries the same signal except
that it is 180 degrees out of phase. The receiver then reads the difference between the two
signals. A ground wire exists, but it has nothing to do with how the receiver determines
the logic level of the signal.
Rev K
Page 71 of 176
QE3 Matrix Switching System
Figure 49. Balanced Line Interface
Voltages and Signaling
A pair of wires is used to carry each signal. The data is encoded and decoded as a
differential voltage between the two lines. A typical truth table is shown below.
VA-VB < -0.2v = Logic 0
VA-VB > +0.2v= Logic 1
As a differential voltage, the interface is, in principle, unaffected by differences in ground
voltage between the sender and receiver.
Noise Immunity
Furthermore, if lines A and B are close together, they will be affected almost identically
by external noise. If the lines are also twisted together, then neither line is permanently
closer to a noise source than the other. Hence, the well known "twisted pair" is extremely
effective in eliminating noise from the signal. Due to the nature of the differential
receiver, any equivalent noise on both wires is cancelled out.
Page 72 of 176
Rev K
QE3 Matrix Switching System
Number of Devices
The RS-485 standard allows 32 devices on one bus, whereas RS-232 is typically only a
one to one connection. Quintech allows one main controller and up to 31 remote
controllers.
Master/Slave
Most RS-485 systems use Master/Slave architecture, where each slave module has its
unique address and responds only to packets addressed to that module. These packets are
generated by the master controller, which periodically polls all connected slave units.
This is how Quintech controller modules communicate with each other. Each controller
on the RS-485 bus has a unique assigned address. Only communications sent to the
assigned address will cause a response by the remotes on the bus. This is why it is
important to assign each controller in your system a unique address.
4-Wire and 2-Wire Systems
RS-485 has a 2-wire and a 4-wire standard. Quintech uses the 4-wire standard which
allows the master controller to send data out one pair of wires and the slaves send data
back to the master on the other twisted pair.
RS-485 Pinout
The Quintech UCM port is a dedicated RS-485 port. The Serial Control In port can also
be configured for RS-485 communications. The pin definitions are listed in Table 2.
Cable Lengths
Quintech recommends the same cable length as the RS-485 standard. The RS-485 cable
length can be up to 4000 feet between nodes.
Rev K
Page 73 of 176
QE3 Matrix Switching System
Signal Reflection
As data speeds and cable lengths go up, the problem of signal reflections becomes
important. Lines must be properly terminated by a resistor that makes the cable look
electrically like it is infinitely long. An infinitely long cable, of course, can have no
reflected signals because the far end is infinitely far away. When this reflection occurs it
propagates from one end of the wires to the other end and back repeatedly. Therefore, to
add something to fix this reflection you only need to take care of the end of the cable, not
any nodes in between the ends. From the remote port description, it was explained that
the remote ports are identical and can be interchanged. When remotes are daisy chained
together, the controllers between the first and last unit in the chain do not need to have
termination resistors.
Receiver/Transmitter Termination
RS-485 termination is required to eliminate signal reflection as discussed earlier. There is
a twisted pair for sending data from the controller to the slaves and there is another
twisted pair for the slaves to transmit to the master. Therefore, in a four wire RS-485 bus,
you only need to terminate the receivers. Quintech RS-485 termination is only applied to
the internal receivers and not the transmitters.
Biasing Resistors
When an RS-485 network is in an idle state, all nodes are in the receive mode and the
transmitters are tri-stated. When this happens, the state of the line is undefined. Bias
resistors are nothing more than a pull up resistor on line B and pull down resistor on line
A to guarantee logic high when the bus is idle. When RS-485 termination is turned on,
these two resistors and the termination resistor are connected to the RS-485 receiver.
Page 74 of 176
Rev K
QE3 Matrix Switching System
Which ports are RS-485?
The Remote ports are dedicated, identical, and connected RS-485 ports. They can be used
for control of remote controller units or as another input port to control the system. The
Control In port is RS-485, only if the mode is set to RS-485. The Control Out port is a
dedicated Quintech communications port used only for Quintech equipment. The remote
and the Control In buses are two separate communication busses and must be terminated
as such.
Summary
So now, we understand from the previous sections that Quintech RS-485 communications
only needs to terminate the ends of the cables and we only need to terminate the
receivers. Internally, the controller adds a termination resistor and two bias resistors when
termination is turned on.
Front Panel RS-485 Termination
To invoke the RS-485 Termination screen from the main menu: key sequence 2, 2.
2. System Options
2. Interface Options
Scroll to "Serial Termination" and press F1 to select
Control In : Off
Remote Ports : On
F1=On F2=Off
F4=Exit
Figure 50. Serial Termination
Rev K
Page 75 of 176
QE3 Matrix Switching System
Which Controllers in My System Should be RS-485
Terminated?
RS-485 Port Termination
From our discussion, you should now know that only the first and last controllers in the
daisy chain should have remote termination turned on. If there is only one controller and
there is no RS-485 bus, leave remote termination off. If there are only two controllers,
both should be set with remote termination on.
If there are any more than two controllers, only the first and last controllers in the remote
daisy chain will be RS-485 remote terminated.
RS-485 Serial Control In Port Termination
The Serial Control In port can be configured for RS-485 communications. If the port is
configured for RS-232 or RS-422 communications, termination should be off. If the port
is configured for RS-485 communications and it is the last unit on the RS-485 bus,
control termination should be on. If the controller is not the last unit on the bus, the
control termination should be off. See Figure 48 for a graphical example. If you are not
using RS-485 in the control port, leave this setting off.
Page 76 of 176
Rev K
QE3 Matrix Switching System
Figure 51 Quintech UCM Termination
Rev K
Page 77 of 176
QE3 Matrix Switching System
Figure 52. Serial Control In RS485 Connection/Termination Examples
Page 78 of 176
Rev K
QE3 Matrix Switching System
Main vs. Remote Mode
All Quintech switching systems come with at least one controller which may exist as a
stand-alone unit or may be integrated into a QE3 unit. The main controller is the interface
where system commands are accepted and sent to the system. It is the module that
controls the system.
Every QE3 system can also be upgraded to include extra 1RU controllers called remotes.
Any system can be upgraded to include as many as 31 remote controllers.
Differences between Main and Remotes
The primary difference that exists between main and remote controllers is the way in
which internal communication occurs between them.
Once remotes are connected properly and are communicating with the main controller,
there is no visible difference between a remote controller and the main controller. Both
accept commands and control the system in the same way. To the user, the remote will
appear the same as the main controller except for the serial address and the control mode
setting.
The main and remote controllers are connected together via the Quintech UCM ports and
remote ports on the 1RU controllers.
Since they communicate using RS-485, a remote controller can be located up to 4000 feet
away from the main system. This provides additional control of the QE3 system,. Since
you can now locate additional remotes in another room or even in another building.
Control Mode
Up to 32 Quintech controllers may be connected together. The first controller that is
connected to the system must be designated as the main controller while all the others (up
to 31) function in remote mode.
Rev K
Page 79 of 176
QE3 Matrix Switching System
Checking Control Mode
If needed, you can check the mode setting of a controller from the front panel.
To invoke the Display Control Mode screen from the main menu: key sequence 2, 3, 1.
2. System Options
3. Remote Control
1. Control Mode
Mode: Main
F4=Exit
Figure 53. Control Mode
The Control Mode screen only displays the mode of the controller. The mode can’t be
changed from this screen.
Setting the Control Mode
The controllers that came with your system have already been properly configured as
main and remote controllers and were marked as such in the packaging. A controller's
mode can be checked and even changed from the front panel. Changing the mode should
never be necessary except for a few rare cases such as system upgrades or firmware
upgrades .
Changing the control mode is a critical setting and is therefore included under the
Configuration Menu, which is protected by the factory settings code number screen. To
change the control mode refer to “Set Control Mode” in the “Factory Configuration
Settings” chapter.
Page 80 of 176
Rev K
QE3 Matrix Switching System
System Commands from the Main Controller
From a user standpoint, the main controller operates the same as remotes: controlling the
system and changing crosspoint connections. The only diference between a remote and a
main is that it is set as main controller and has a different serial address than all other
remotes. The only reason one controller must be main and all addresses must be different
is so that Quintech’s communications can operate correctly. The main controller can
accept a system reset command.
System Commands from the Remote Controller(s)
Any switch changes that are made thru a remote controller will update all other
controllers and make the system crosspoints change instantly. This does not include
factory-configured settings like matrix and module sizes.
Set Address
Each controller in the system must have a unique serial address assigned to it for proper
operation. If this is not done, the main controller and remotes will not be able to
communicate.
Initializing Remotes
The Initializing Remotes function sends the switch settings of the main controller to all
remote control panels. The initialization sequence takes a few seconds and should be
started from the main controller. The main controller will display “Initializing Remotes”
and will check for remotes at addresses between 00H and FEH. This display will be
shown on the main controller for a few seconds, but will not be shown on the other units.
The Initializing Remotes function should be run after the system is first set up or if the
information in any remote does not match the main controller for any reason. If any
factory-specified parameters such as matrix size are changed, each remote must have
those parameters set from the front panel. Initialization only recognizes other remotes,
establishes communications, and sets up the cross point connections.
Rev K
Page 81 of 176
QE3 Matrix Switching System
Remotes Initialization Procedure
Option 2 in the Display Control Mode/Init Remotes Menu initializes all remotes in the
system. This function should be executed after the system is initially configured or if the
information in a remote doesn’t match the main controller for any reason. To back out of
the screen to the System Options Menu, press F4.
To navigate to the Display Control Mode/Init Remotes Menu from the main menu: key
sequence 2, 3.
2. System Options
3. Remote Control
1. Control Mode
2. Init Remotes
F4=Exit
Figure 54. Display Control Mode/Init Remotes Menu
If you are having difficulty getting remotes to communicate, refer to the Adding
Additional Remotes section.
Page 82 of 176
Rev K
QE3 Matrix Switching System
Adding Additional Remotes
After additional remotes are added to the system configuration, the system must be
reinitialized. To add additional remotes, perform the following sequence of steps:
NOTE: Do not attempt to set any crosspoint connections until this procedure is complete.
1. Power down all controllers in the system.
2. Connect the main controller and all remote controllers together. (Refer to the Quintech
UCM Termination illustration as a guide)
(don’t forget the Quintech crossover adapter between the main and first remote!!)
3. Power up the main controller
Record the Protocol version and Firmware version that appears on LCD during bootup or
press “1.System Options” followed by “1. Firmware version” and this information will
display for 5 seconds.
Protocol version
__________________________________
Firmware version
__________________________________
4. Record the serial address of the main controller under the Interface Options menu
Serial address
__________________________________
(If this address is changed at any time you must re-initialize the system from main
controller)
Rev K
Page 83 of 176
QE3 Matrix Switching System
5. Record the matrix sizes under the configuration menu
Matrix size # inputs
__________________________________
Matrix size # outputs
__________________________________
6. Record the QE3 module sizes under the configuration menu
QE3 Module size # inputs
__________________________________
QE3 Module size # outputs
__________________________________
7. Record the QEO module size under the configuration menu
QEO size # input rows
__________________________________
8. Set “main” as the control mode
9. Set the remote port termination to ON
10. Power down the main controller
11. Power up the first remote
Make sure the Protocol and Firmware versions match the numbers recorded in step 3. If
the numbers don’t match, contact Quintech to determine whether the different versions
are compatible.
12. Set the serial address to an address between 00H – FEH
The chosen address must be different from main address (step 4) and any other
remote address
13. Set “remote” as the control mode
14. Set remote port termination corectly
15. Make sure the size settings on remote match the numbers recorded in steps 5, 6, and 7
16. Power down the remote
17. Repeat steps 11 through 16 for each additional remote in the system.
Page 84 of 176
Rev K
QE3 Matrix Switching System
Power should now be off for all controllers.
18. Power up the first remote. Wait until it boots up and main screen appears
20. Power up second remote. Wait until it boots up and main screen appears
21. Continue the power up procedure in this manner until all remotes are powered up and
display the main menu
22. Power up the main controller last
Watch the main controller screen carfully during boot up. If setup was performed
correctly, the main controller will display a screen similar to this:
Initializing 0x04
Data 128 100%
Figure 55. Remote Initialization
The data number will cycle from 0 to 128 and the percent will go from 0 to 100. The
main controller will also show an addition screen like this for every remote connected to
it. If you have a remote that the main controller did not cycle through, you have a cable or
set up problem. Consult the troubleshooting guide, then contact Quintech for technical
support.
The main controller automatically searches for remotes every time it is turned on. It
detects all remotes that have been properly connected and configured, including the
newly added ones. It will also download the crosspoint settings to all the remotes.
What Mode Should This Controller Be In?
First rule of thumb to remember: There is always only one main controller. If your
system contains more than one controller and you configure more than one of those
controllers as a main controller, your system will not work properly.
To check the controller's mode, refer to “Checking Control Mode”. If you need to
change the mode of the controller, refer to “Set Control Mode”.
Rev K
Page 85 of 176
QE3 Matrix Switching System
Factory Configuration Settings
System Options Menu
The System Options Menu is a critical part of the system hierarchy. From this menu,
you can select options to make your system function differently or not function at
all. Here is a list of functions available in the System Options Menu:
Change the number of inputs
Change the number of outputs
Change the Model number
Setup SRM/XRM/QE3 systems
Assign alpha-numeric names to inputs
Assign alpha-numeric names to outputs
Load new firmware
Set the control mode
Initialize remote controllers
Set up SNMP protocol
Set up can bus error reporting
Enable/disable access control for 5 ports
Set up Ethernet communication
Set up serial port communications
The serial and Ethernet software settings are non critical to system functionality. These
settings are determined by how you are communicating with the controller. Refer to
“Communications Setup”.
Page 86 of 176
Rev K
QE3 Matrix Switching System
Option 2 of the Main Menu displays the System Options Menu.
2. System Options
1. Configuration
2. Interface Options
3. Remote Control
F4=Exit
Figure 56. System Options Menu
From this menu, you can elect to change the system configuration, change the
communications setup, or set up communications with an optional 1RU controller. The
remote control refers to setting up an additional 1RU controller not typically sold with a
QE3 system. The main controller is always integrated into one of the 6RU QE3 units.
The remote control will set up an additional 1RU “remote” controller.
Rev K
Page 87 of 176
QE3 Matrix Switching System
Configuration Menu
Warning: The settings under the configuration menu are included in case of a system
upgrade or servicing. Most settings included under the configuration menu are set at the
factory and should never be changed.
Exceptions to this may be:
Setting up SNMP protocol
Naming Inputs and Outputs
Changing Priority mode
Changing access control for a port
Option 1 of the System Options Menu displays the Configuration Menu Pass-code
screen.
To invoke the Configuration Menu Pass-code screen from the main menu: key
sequence 2, 1
2. System Options
1. Configuration
Enter code to change
factory settings
F1=Enter F4= Exit
Figure 57. Configuration Menu Pass-code
Page 88 of 176
Rev K
QE3 Matrix Switching System
Factory Settings Code Number
A code has been introduced into the front panel hierarchy in order to prevent accidental
changes to the system settings. If valid changes do need to be made to the system, the
code to get into the configuration menu is 732.
This is not a security password. That is what access control is for. This number is to
remind the user that they are entering into a critical area of the menu hierarchy. If these
values are improperly changed, the system will cease to operate!
To get past the password screen, simply enter the key sequence 7, 3, 2, F1. That will load
the Configuration Menu screen.
1. System Setup
2. Load Firmware
3. Features
F4=Exit
Figure 58. Configuration Menu
The options under the Configuration Menu are where all critical system settings can be
modified.
Rev K
Page 89 of 176
QE3 Matrix Switching System
System Setup Menu
Option 1 in the Configuration Menu displays the System Setup Menu. The system
configuration defines the number of matrix inputs and outputs, the model number, and
the number of module inputs and outputs. The configuration settings are set at the
factory and should not be changed unless the system has been expanded with additional
modules. Altering the configuration improperly will prevent the matrix from operating
correctly. We included these features to make Quintech factory upgrades quick and easy
to implement.
To navigate to the System Setup Menu screen from the main menu: key sequence 2, 1,
(factory settings code number + F1), 1
2. System Options
1. Configuration (factory settings code number + F1)
1. System Setup
1. Matrix Size
2. Model
3. Module Sizes
4. I/O Names F4=Exit
Figure 59. System Setup
Page 90 of 176
Rev K
QE3 Matrix Switching System
Matrix Size
Option 1 of the System Setup Menu displays the Matrix Size screen. This option allows
the specified size of the matrix to be changed when multiple Quintech switch modules are
used to form a larger matrix switching system. For standard QE3 systems (i.e., single
enclosure systems), the matrix size is equal to the number of inputs and outputs built into
the QE3 unit. This setting should never be changed unless the configuration of the matrix
has been changed.
To navigate to the Matrix Size screen from the main menu: key sequence 2, 1, (factory
settings code number + F1), 1, 1
2. System Options
1. Configuration (factory settings code number + F1)
1. System Setup
1. Matrix Size
# of inputs : 64
# of outputs : 64
F1=Enter
F4=Exit
Figure 60. Matrix Size
Rev K
Page 91 of 176
QE3 Matrix Switching System
Model
Option 2 of the System Setup menu displays the Model Number/Type screen. This
option is included as part of the system’s firmware identification in accordance with the
protocol outlined in Appendix D. The control system is not affected by the model
number or type. System expansion requires no change of the model number.
To invoke the Model Number/Type screen from the main menu: key sequence 2, 1,
(factory settings code number + F1), 1, 2
2. System Options
1. Configuration (factory settings code number + F1)
1. System Setup
2. Model
ModelType : QE3
Model Num: 2500
F1=Type
F2=Model F4=Exit
Figure 61. Model Number/Type
Page 92 of 176
Rev K
QE3 Matrix Switching System
Module Sizes
These settings are to support the connection of Quintech legacy equipment to the
SRM/SRO Control port and for custom QE3 system setup.
Option 3 in the System Setup menu displays the Module Sizes Menu. This menu allows
you to select option 1 – SRM Size or option 2 – SRO size. From this menu, press 1 to
specify the number of inputs and outputs per SRM switching module. Press 2 to specify
the number of input rows per SRO.
Note that option 4 only appears for systems that have more than 64 inputs.
To navigate to the Module Sizes Menu from the main menu: key sequence 2, 1, (factory
settings code number + F1), 1, 3
2. System Options
1. Configuration (factory settings code number + F1)
1. System Setup
2. Module Sizes
1. SRM Module Size
2. SRO Module Size
3. QE3/XRM/SRM
4. QED Setup F4=Exit
Figure 62. Module Sizes
Rev K
Page 93 of 176
QE3 Matrix Switching System
SRM Module Size
Option 1 of the Module Size Menu will load the SRM Module Size Screen. This setting
should never be changed unless the internal hardware of the SRM module has been
changed.
To navigate to the SRM Module Size screen from the main menu: key sequence 2, 1,
(factory settings code number + F1), 1, 3, 1
2. System Options
1. Configuration (factory settings code number + F1)
1. System Setup
3. Module Sizes
1. SRM Module Size
Input /SRM : 16
Output/SRM : 16
F1 = Enter F4=Exit
Figure 63. SRM Module Size
Page 94 of 176
Rev K
QE3 Matrix Switching System
SRO Module Size
Option 2 in the Module Size Menu displays the SRO Module Size screen. The number of
input rows for each SRO output module is specified via this screen. Enter the numbers
“4”, “8”, or “16” to specify 4, 8, or 16 input rows respectively. A matrix with 1 to 64
inputs requires an SRO with 4 input rows, 65-128 inputs require 8 input rows, and 129256 inputs require 16 input rows. Some customers prefer to purchase an SRO larger than
required to allow for future expansion.
To navigate to the SRO Module Size screen from the main menu: key sequence 2, 1,
(factory settings code number + F1), 1, 3, 2
2. System Options
1. Configuration (factory settings code number + F1)
1. System Setup
3. Module Sizes
2. SRO Module sizes
Input Rows/Sro: 4
F1 = Enter F4=Exit
Figure 64. SRO Module Size
Rev K
Page 95 of 176
QE3 Matrix Switching System
Combination QE3/XRM/SRM Systems
QE3 systems can be combined with either XRM or SRM systems for expansion purposes.
Option 3 in the Module Size Menu displays the QE3/XRM/SRM Systems screen which
will enable you to combine a QE3 system with an existing XRM or SRM system.
To navigate to the QE3/XRM/SRM Systems screen from the main menu: key sequence
2, 1, (factory settings code number + F1), 1, 3, 2
2. System Options
1. Configuration (factory settings code number + F1)
1. System Setup
3. Module Sizes
3. QE3/XRM/SRM
1. SRM On/Off
2. SRM Size
3. XRM On/OFF
4. XRM Size F4=Exit
Figure 65. QE3/XRM/SRM Systems
QE3/SRM Setup
Selecting Option 1 from the QE3/XRM/SRM Systems screen displays the QE3/SRM
System screen through which you can specify whether any SRM units are being used in
combination with the QE3 system. Press F1 to toggle between yes and no. Press F4 to
exit.
Page 96 of 176
Rev K
QE3 Matrix Switching System
System has SRMs? No
F1=Change
F4=Exit
Figure 66. QE3/SRM System
Selecting Option 2 from the QE3/XRM/SRM Systems screen sets up the original size of
the SRM system. Since the QE3 system is being added to an original SRM systems, the
QE3 operating system needs to know which inputs and outputs are SRM and which are
QE3. This screen sets up the SRM inputs and outputs. Enter the original SRM system
size.
# of SRM Inputs: 0
# of SRM Outputs: 0
F1=Enter
F4=Exit
Figure 67. QE3/SRM Setup
QE3/XRM Setup
Selecting Option 3 from the QE3/XRM/SRM Systems screen displays the QE3/XRM
System screen through which you can specify whether any XRM units are being used in
combination with the QE3 system. Press F1 to toggle between yes and no. Press F4 to
exit.
Rev K
Page 97 of 176
QE3 Matrix Switching System
System has XRMs? No
F1=Change
F4=Exit
Figure 68. QE3/XRM System
Selecting Option 4 from the QE3/XRM/SRM Systems screen sets up the original size of
the XRM system. Since the QE3 system is being added to an original XRM systems, the
QE3 operating system needs to know which inputs and outputs are XRM and which are
QE3. This screen sets up the XRM inputs and outputs. Enter the original XRM system
size.
# of XRM Inputs: 0
# of XRM Outputs: 0
F1=Enter
F4=Exit
Figure 69. QE3/XRM Setup
Option 3 of the QE3/SRM Expanded Setup screen sets up the QE3 system modules. A
QE3 system can contain XRD distribution modules and QEO output modules. The
operating system needs to know the system configuration and where in a system the
inputs and outputs are located. This is asking if the system includes QED modules. If the
system has more than 64 outputs but is not equipped with QED input modules then this
setting needs to be set to no. This type of system is equipped with customer supplied
input splitters and all input features such as attenuation and gain control are disabled.
Page 98 of 176
Rev K
QE3 Matrix Switching System
QEDs
Option 4 of the Module Sizes Menu displays the QED Setup screen which enables you
to specify whether the system includes QED modules. If the system has more than 64
inputs but is not equipped with QED input modules, then this setting needs to be set to
no. This type of system is equipped with customer supplied input splitters and all input
features such as attenuation and gain control are disabled.
1. QEDs present? No
F1=Change
F4=Exit
Figure 70. QED Setup
I/O Names
Option 4 of the System Setup screen allows the user to assign names to the inputs and
outputs. These names will then be displayed above the corresponding input and output in
the Monitor and Control screen.
1. Set Input Names
2. Set Output Names
3. Reset To Default
F4=Exit
Figure 71. Set I/O Names
Rev K
Page 99 of 176
QE3 Matrix Switching System
Load Firmware
Contact Quintech technical assistance for any firmware downloads. Depending on the
system and date of manufacturing the process may or may not require system offline time
and resetting of system parameters. QE3 systems manufactur ed after September 2006
have been manufactured with internal QE3 upgrade memory. These QE3s can be
upgraded without any interruption of crosspoint or changing of system parameters.
Option 2 in the Configuration Menu displays the Load Firmware screen. The Load
Firmware screen, enables you to upgrade the internal firmware level of the controller.
To invoke the Load Firmware screen from the main menu: key sequence 2, 1, (factory
settings code number + F1), 2
2. System Options
1. Configuration (factory settings code number + F1)
2. Load Firmware
Press F1 to set
“Control In” as
Firmware Download
F4=Exit
Figure 72. Load Firmware
Pressing F1 will put the controller in a special firmware download mode. Only press F1 if
you have the firmware ready for download.
Download firmware
then power cycle to exit
upgrade mode
Figure 73. Download Firmware
Page 100 of 176
Rev K
QE3 Matrix Switching System
Exiting Download Mode
If you “accidentally” put the QE3 in download mode, you can power cycle the unit or
pull out and reinsert the control board. Removing the control board will not interrupt the
crosspoints. The control board will reboot without interrupting any crosspoints or
changing any system parameters.
Firmware Upgrade Kit
A firmware upgrade kit only comes from Quintech service personnel. A firmware
upgrade kit will come as a zipped set of files that will contain all the files needed to
download new firmware to your QE3. Instructions on how to do this procedure will be
included in the zip file. Upgrade kits include files to download from the Ethernet port or
the serial port.
Firmware Download Instructions
The instructions to download firmware are included in an upgrade kit. There are
instructions for an Ethernet download and separate instructions for a serial port
download.
Firmware Download Preparation
QE3 systems manufactured after September 2006 have internal QE3 memory that allows
firmware upgrades without system parameter modification. Previous QE3 models will
change system parameters back to factory default after a firmware upgrade.
QE3 Internal Memory
QE3s manufactured after September 2006 are manufactured with QE3 internal memory.
This internal memory stores all QE3 system parameters to allow for control board hotswap.
QE3 with Internal Memory
An QE3 with internal memory can be upgraded without interrupting crosspoints or
changing any system parameters.
Rev K
Page 101 of 176
QE3 Matrix Switching System
QE3 Without Internal Memory
Write down the settings for your system before you start the download process. Record
all the settings under the configuration menu and the Interface Options menu. These
setings will be overwritten during a firmware download. You will also have to recreate
any user acounts, user names, and passwords. Input – Output connections will also go
back to factory defaults as well.
A firmware download is not something that can be done in the background while the
switch is operating. A firmware download will overwrite all settings in the system. After
a successsful firmware download the system settings will be set to Quintech defaults.
These defaults are listed in the protocol document but listed here again for your
convenience.
Firmware Default Settings
DHCP Off…………………………….……..Off
Static IP…………………………………...…010.000.000.050
Static Netmask………………………………255.255.255.000
Static Gateway…………………………..…. 192.168.000.001
Telnet Port………………………………..… 23
QEC Ethernet Port………………..…………9100
Serial Port……………………………..…….RS-232 9600 baud 8N1
RS-485 Terminations…………………….… Off
Matrix Size………………………………… 64x64
Module Size….….…….…………………… 64x64
SRO Size………..….………….…..…………4
The crosspoint connections will also revert back to 1 to 1 connections. Input 1 connected
to output 1, input 2 connected to output 2, etc.
Page 102 of 176
Rev K
QE3 Matrix Switching System
Ethernet or Serial Port Download?
If the firmware is downloaded from the Ethernet port the controller will reboot itself after
completing the download. If the download is done via serial port the power must be
cycled manually after the download is complete. Both methods will upgrade the fimware
they just use different ports and methods. If for some reason your firmware is corrupted
or your Ethernet connection is not working, you can still upgrade the firmware through
the serial port. The ethernet download is the faster and easier method.
Why Download Firmware?
New firmware is continually being developed to enhance the system features, make the
system easier to use or simply add a new feature that a customer requested. These
firmware upgrades when available are not ususally nesseccary but may enable you to
have more features previously not implemented on your firmware version.
If you feel you might need to upgrade your firmware, contact Quintech for the latest
available firmware version for your system.
Why Is Downloading Failing?
Some Quintech customers have encountered problems while downloading new firmware.
Listed here are some of the most common solutions to problems associated with a
firmware download.
Serial Port Download Method Solutions
1. Use a one to one straight through serial port cable. Do not use a null modem cable or
adapter.
Test the cable with an Ohmmeter to make sure each pin is connected to the same pin on
both ends. Pin 1 connected to only pin 1, pin 2 connected to only pin 2, ect. Test all nine
pins. If there are pins that are not connected, the download will not work.
3. Before starting the download, the controller has to be in firmware download mode.
Rev K
Page 103 of 176
QE3 Matrix Switching System
4. If using RS-232, check that you are connected to the Control In or PC Control port
5. Copy the unzipped upgrade kit and run the applications from your root C or D drive. A
directory path with more than 104 characters causes problems with some PC operating
systems.
6. Make sure the COM port number in the rabbit field utility matches the com port
number you are connected to on your PC.
7. Try bumping down the baud rate to 57600 in the RFU utility.
8. Make sure the RFU utility is pointing to the correct files:
Cold Loader =
Pilot BIOS
=
Flash table
=
coldload.bin
pilot.bin
flash.ini
9. Make sure the serial port mode is configured in RS-232 mode.
Ethernet Download Method Solutions
1. If for some reason the firmware and/or Ethernet connection is no longer working you
must download through the serial port.
2. The controller does not have to be in firmware download mode to upgrade the
firmware via the Ethernet port.
3. If connecting directly to a PC network card, use a cross over CAT5 Ethernet cable.
4. If you are connecting to a hub or switch, use a 1 to 1 straight through CAT5 Ethernet
cable.
5. Check the cable for pinched or broken conductors. This is more common than you
think. The pin outs for both cable types are in Table 3. Ethernet Cable Pinout.
6. Check the IP address, gateway and subnet mask of your PC.
An easy solution is to turn on DHCP and power cycle the controller. This will allow your
Ethernet DHCP server to assign the three addresses to the controller.
Page 104 of 176
Rev K
QE3 Matrix Switching System
These 3 addresses consist of 4 sets of numbers. These individual numbers range from 0 to
255. They are addresses that allow the PC to find the controller on the network. If the
mask or gateway for the PC doesn't match the controller mask and gateway you may be
able to see the controller on the network but a firmware download will not work. Make
sure the first three sets of numbers match the gateway.
Make sure the IP address of the unit has the first three sets of numbers as the gateway and
IP of the PC.
To find the IP gateway and mask numbers:
Windows 95/98:
Open a dos window
Type winipcfg
A window will be displayed that shows your PC’s configuration.
Windows NT/Me/2000/XP
Select Start > Run. Type command into the dialog box, then click OK.
In the resulting command line window, type ipconfig /all.
The IP address, Subnet mask, and default gateway will be listed.
6. Copy the unzipped upgrade kit to your root C or D drive. A directory path with more
than 104 characters causes problems with some PC operating systems.
Rev K
Page 105 of 176
QE3 Matrix Switching System
Features Menu
Option 3 in the Configuration Menu displays the Features Menu. The Features Menu
enables you to configure optional mode of operation for a controller module. These
options include the Controller Mode, LNB Power (if equipped), SNMP Protocol enabled,
and whether access control is in effect or disabled for various control ports.
To navigate to the Features Menu screen from the main menu: key sequence 2, 1,
(factory settings code number + F1), 3
2. System Options
1. Configuration (factory settings code number + F1)
3. Features
1. Control Mode
2. Priority Mode
3. Access Control
4. Options
F4=Exit
Figure 74. Features Menu
Note: The Access Control option only appears in the Features Menu when you are
logged into the controller as Admin and access control for local is enabled. For a
description of Access Control see the “Access Control” section.
Page 106 of 176
Rev K
QE3 Matrix Switching System
Set Control Mode
Option 1 of the Features Menu displays the Set Control Mode screen. This setting need
may only need to be changed if you upgrade to more than one controller in the system.
For a detailed description of main and remote modes, refer to “Main vs. Remote Mode”.
To invoke the Set Control Mode screen from the main menu: key sequence 2, 1,
(factory settings code number + F1) 3, 1
2. System Options
1. Configuration (factory settings code number + F1)
3. Features
1. Control Mode
Mode: Main
F1=Change
Figure 75. Control Mode Setup
F1 toggles the mode between main to remote. Set it to the proper mode and exit with F4.
If you have only one controller with an LCD and keypad, this setting has to be set to
main. Remote mode is for an additional 1RU UCM controller.
Rev K
Page 107 of 176
QE3 Matrix Switching System
Set Priority Mode
Option 3 in the Features Menu invokes the Options Menu. From this menu, you can
select to enable/disable Priority Mode. For a detailed description of Priority Mode, refer
to “Priority Mode”.
To navigate to the Priority Mode screen from the main menu: key sequence 2, 1,
(factory settings code number + F1) 3, 3
2. System Options
1. Configuration (factory settings code number + F1)
3. Features
2. Priority Mode
Priority Mode:Off
F1=Change
F4=Exit
Figure 76. Priority Mode Screen
Pressing F1 toggles Priority Mode on and off. Set it to the proper mode and then exit by
pressing F4.
Page 108 of 176
Rev K
QE3 Matrix Switching System
Port Access Control Enable/Disable
This option is discussed in detail in the “Access Control” section of this manual.
Option 3 of the Features Menu displays the Access Control screen. Through this
screen, you can designate whether the access control system is on or off (i.e., in effect or
disabled) for various control ports.
Note: The Access Control option only appears in the Features Menu when you are
logged in as the administrator. This is true regardless of whether access control has
been enabled for local control.
Rev K
Page 109 of 176
QE3 Matrix Switching System
Options Menu
Option 2 in the Features Menu invokes the Options Menu screen. From this menu, you
can select to enable/disable the SNMP protocol.
To navigate to the Options Menu from the main menu: key sequence 2, 1, (factory
settings code number + F1) 3, 4
2. System Options
1. Configuration (factory settings code number + F1)
3. Features
4. Options
1. SNMP
2. QE3 Setup
F4=Exit
Figure 77. Options Menu
Page 110 of 176
Rev K
QE3 Matrix Switching System
SNMP Menu
Option 2 in the Options Menu invokes the SNMP Menu. From this menu, you can
enable/disable the SNMP protocol and set the TRAP IP address. For details on SNMP,
refer to “SNMP”.
To invoke the SNMP Menu from the main menu: key sequence 2, 1, (factory settings
code number + F1) 3, 2, 2
2. System Options
1. Configuration (factory settings code number + F1)
3. Features
4. Options
1. SNMP
1. On/Off
2. Set Trap IP
F4=Exit
Figure 78. SNMP Menu
Rev K
Page 111 of 176
QE3 Matrix Switching System
SNMP On/Off
Option 1 in the SNMP Menu displays the SNMP On/Off screen.
To invoke the SNMP On/Off screen from the main menu: key sequence 2, 1, (factory
settings code number + F1) 3, 2, 2, 1
2. System Options
1. Configuration (factory settings code number + F1)
3. Features
4. Options
1. SNMP
1. On/Off
SNMP: Off
F1=Change
F4=Exit
Figure 79. SNMP On/Off
Press F1 to toggle SNMP protocol on and off. F4 exits to the previous menu. For details
on SNMP refer to “SNMP”.
Page 112 of 176
Rev K
QE3 Matrix Switching System
Set SNMP Trap IP
Option 2 in the SNMP Menu invokes the Set SNMP Trap IP screen (refer to “SNMP”).
To navigate to the SNMP Trap IP screen from the main menu: key sequence 2, (factory
settings code number + F1) 3, 2, 2, 2.
2. System Options
1. Configuration (factory settings code number + F1)
3. Features
4. Options
1. SNMP
2. Set Trap IP
IP: 10.0.0.50
F1=Enter F4=Exit
Figure 80. Set SNMP Trap IP
Some versions of the QE3 firmware can send additional traps to up to 4 different IP
addresses.
IP: 10.0.0.50
↑↓ Scroll multiple IP
F1=Select IP address to
change
F4=Exit
Figure 81. Select IP Address
Rev K
Page 113 of 176
QE3 Matrix Switching System
Scroll through the available 4 IP addresses and press F1 to select one. Eneter the new IP
address and press1 to add the new IP address to the trap address list.
QE3 Setup
This screen may have a fourth option to set up can bus error reporting. The can bus is the
main link between all the hardware and the main controller. If the hardware experiences a
problem it will be reported across the can bus. These are the errors that are always placed
in the message queue. Now you have the option of displaying these errors on the front
panel as well.
All can bus errors are placed into the message queue and also sent out in SNMP traps
Refer to the protocol document.
1. XR Bus Errors
2. Card Calibration
3. QEO Attenuation
F4=Exit
Figure 82. QE3 Setup
Error currently reported to the front panel are: card offline, power supply offline,
temperature warning, fan failed, and output/input dB difference. The panel will display
which type of box had the failure. What the address of the failure is, what type of card
failed, and what card number failed.
Do you want XR bus
errors displayed on
this LCD panel?:Yes
F1=Change F4= Exit
Figure 83. Enable Errors
Page 114 of 176
Rev K
QE3 Matrix Switching System
Select yes and the can bus alarms will be displayed on the front panel. The error message
will remain displayed until a user presses any key on the keyboard.
Card calibration is for setting up initial hardware at Quintech. Users are advised
not to enter this menu.
QEO Input Attenuation
QEO’s currently support input attenuation. QEO Input attenuation is a set value of
attenuation that is to be applied to the current QEO input. QEO inputs are attenuated per
box (i.e., all inputs in that QEO receive the same attenuation value) and can be attenuated
from 0.0 dB to 15.5 dB. It does not change regardless of the input signal strength.
Option 3 in the QEC Setup menu invokes the QEO Attenuation screen. To invoke the
QEO Attenuation screen from the main menu: key sequence 2, 1, (factory settings code
number + F1), 3, 4, 4, 3.
2. System Options
1. Configuration (factory settings code number + F1)
3. Features
4. Options
4. QE3 Setup
3. QEO Attenuation
QEO attenuation set
at 0.0dB
F1=Change
F4=Exit
Figure 84. QEO Attenuation
Rev K
Page 115 of 176
QE3 Matrix Switching System
By default, the QEO Attenuation screen displays the current QEO attenuation setting. To
change the current attenuation setting, press F1. Arrow up or down to select the new
value of input attenuation. Nothing is set until you press F1.
Current Value = 0.0
New Value =
0.0
↑↓ Scroll or Enter #
F1=Enter F4=Exit
Figure 85. Set QEO Input Attenuation
Page 116 of 176
Rev K
QE3 Matrix Switching System
Q-SENSE
Q-SENSE Description
QE3 Q-SENSE is a redundant input feature. Q-SENSE can be set up so that in the event
of a RF level failure on a primary input, the system will automatically switch to the
backup input.
Q-SENSE Priority
The Q-SENSE function has priority over all other access control and system settings.
This includes input access control, output access control, locked output, priority locked
outputs, and protected outputs. The function will execute and change crosspoints
regardless of the status of the input or outputs.
Q-SENSE RF Threshold Level
The RF failure threshold level is a user settable value. If the RF level on the primary
input drops below this set threshold, the Q-SENSE backup input is switched to all outputs
currently connected to the primary input.
This RF level threshold point can be set individually for every system input. This RF
level only is applicable to a primary input for a Q-SENSE input pair. The backup input
level threshold point can be set up but it will not be used. If the backup input is later reconfigured as a primary input, the set RF level will then apply.
Q-SENSE Setup
The Q-SENSE function can be set up from the front panel or protocol commands.
Q-SENSE inputs can use any system input numbers except input zero. Additional
Q-SENSE input pairs can be continually added until there are no more inputs being used
as a backup or primary already. Since there is only two inputs per Q-SENSE pair, then
the maximum number of Q-SENSE pairs for a system is the number of system inputs
divided by 2. For example: A 64x64 QE3 can support up to 32 Q-SENSE input pairs.
Rev K
Page 117 of 176
QE3 Matrix Switching System
A Q-SENSE primary or backup input is handled no different than any other input in
system functions during normal operations. Regardless of the Q-SENSE setup, an input is
handled the same as any other system input. It can be connected to any valid output if
other QE3 features allow the connection.
Q-SENSE On/Off
The Q-SENSE feature can also be enabled or disabled individually per input. This on/off
setting, like the set threshold point only applies to the primary input. The on/off setting
for the backup input is not examined before a Q-SENSE action is taken. The action will
only be executed if the primary input Q-SENSE switch is on.
Q-SENSE Action
The only action taken by the Q-SENSE feature is in the event that the primary input RF
level drops below the user defined threshold level. If the primary input is Q-SENSE
enabled and the RF threshold properly set, then the Q-SENSE function is executed by the
system for that Q-SENSE input pair.
At that time all outputs that are currently connected to the primary input are switched
automatically to the backup input. This action only applies to that particular Q-SENSE
configured input pair. No Q-SENSE pair will be acted upon unless it’s primary input had
a failure.
Marked Outputs
Any output that has been switched to a backup input by the Q-SENSE feature is
internally saved to memory. This information will remain until the user restores the
primary input by a restore command from the front panel or protocol command, or the
user changes the status of the output. This saved Q-SENSE information is deleted if the
output status is changed. This includes protect, unprotect, lock, unlock, and set from any
port including the front panel.
Page 118 of 176
Rev K
QE3 Matrix Switching System
Restore Function
Outputs that have been switched by the Q-SENSE function are marked and saved. These
outputs can then be automatically restored to the original primary input. This can be done
from the Q-SENSE restore command or the front panel restore screen. This restore
command is accepted regardless of the RF level at either Q-SENSE input. It is left to the
user to correct the problem that caused the RF loss before the Q-SENSE input is
reastored.
Restore Function Limitations
The restore function can only restore an output if the last action on the output was the
Q-SENSE function execution. If the output status is changed then the Q-SENSE
information is deleted. Any output that has it’s status changed can no longer be
automatically switched by the restore function. Status change includes set, protect,
unprotect, lock, and unlock.
Q-SENSE Front Panel Operation
Q-SENSE functions can be set up from the front panel or protocol commands. The
Q-SENSE functions are under the system information menu
Q-SENSE Setup
↑↓ Change Options
F1=Select
F4=Exit
Figure 86. Q-SENSE Setup Screen
Press F1 to enter the Q-SENSE setup options. Once in the Q-SENSE menu you can scroll
through the available Q-SENSE setup options.
Rev K
Page 119 of 176
QE3 Matrix Switching System
On/Off
The Q-SENSE function can be enabled or disabled per system input.
Q-SENSE On/off per
input
↑↓ Change Options
F1=Select
F4=Exit
Figure 87. Q-SENSE on/off
Turning on or off the Q-SENSE function on an input will not exclusively enable the
Q-SENSE function on that input. The input also has to be set up as a primary input and
the threshold RF level has to be set in order for the Q-SENSE function to be enabled
properly.
Input 32
Q-SENSE:Off
↑↓ Scroll or Enter #
F1=Change
F4=Exit
Figure 88. Q-SENSE on/off
Toggle up or down or enter the input number and the current Q-SENSE status is
displayed. F1 toggles the function on or off for the input.
Page 120 of 176
Rev K
QE3 Matrix Switching System
Q-SENSE Input Pair Setup
The input pair has to be selected. Q-SENSE requires a primary input and a backup input
to be specified. Once the numbers are specified the 2 inputs cannot be used with any
other Q-SENSE inputs. The Q-SENSE function can support multiple Q-SENSE pairs but
the Q-SENSE pair always consists of only one primary and one backup input.
Select Primary/
Backup Input Pairs
↑↓ Change Options
F1=Select
F4=Exit
Figure 89. Primary/Backup Setup
Enter F1 to set up one or more Q-SENSE input pairs. If an input is unused by the
Q-SENSE function the display will look like the following:
Input 6
No backup selected
F1=Select
F4=Exit
↑↓ Scroll or Enter #
Figure 90. Select Primary Input
Press F1 will select the current input as primary.
Rev K
Page 121 of 176
QE3 Matrix Switching System
In 6:Backup none
New backup:Input 14
F1=Enter F4=Exit
↑↓ Scroll or Enter #
Figure 91. Select Backup Input
Now scroll or enter the input you want to select as backup. F1 will select the input as
backup. This screen still displays that input 6 has not been assigned a backup input yet.
Input 6: Primary
Input 14: Backup
F1=Off F4=Exit
↑↓ Scroll or Enter #
Figure 92. Q-SENSE Pair Displayed
The new screen displays the new primary and backup pair. At this screen F1 will now
clear the status of both the primary and backup input and return the inputs to unused by
Q-SENSE status.
Page 122 of 176
Rev K
QE3 Matrix Switching System
Q-SENSE Threshold
Set Q-SENSE RF Level
Threshold
↑↓ Change options
F1=Select F4=Exit
Figure 93. Threshold Select
F1 will enter the threshold setup function. If an input RF level is not already set the input
will display “off”.
Input 5 = Off
↑↓ Scroll or Enter #
F1=Select F4=Exit
Figure 94. Threshold Display Off
Rev K
Page 123 of 176
QE3 Matrix Switching System
Otherwise the current Threshold is displayed.
Input 4 = -12dBm
↑↓ Scroll or Enter #
F1=Select F4=Exit
Figure 95. Threshold Display On
F1 selects the input then scroll up or down or enter the desired RF level. No value is
entered until the F1 key is pressed. F4 exits the screen with no changes made. Valid
numbers are between -10 and -50.
Q-SENSE Manual Restore
If an output has been changed by the Q-SENSE function to the backup input, the restore
function may be able to restore the output to the primary input. If the output status has
been altered after the Q-SENSE action, this restore command will not be available for
that output.
Output 9 = Backup in 2
Primary input = 1
F1=Restore primary
F2=Skip out F4=Exit
Figure 96. Restore Output
This screen shows an example that output 9 has been automatically switched to input 2.
Output 9 was originally connected to primary input 1. Pressing F1 will connect output 9
to input 1. F2 will skip the output and look for more outputs that have been switched to
the Q-SENSE backup input by the Q-SENSE function.
Page 124 of 176
Rev K
QE3 Matrix Switching System
This function will continually look for outputs that can be restored. F4 will exit the menu
or if there are no longer any output that can be found that information will be displayed.
If there are no outputs that the restore command can change, the screen will indicate this
status.
No outputs detected
that were switched to
backup input by QSENSE
F4=Exit
Figure 97. No Outputs Detected
Rev K
Page 125 of 176
QE3 Matrix Switching System
Priority Mode
Priority On/Off
Priority mode can be turned on or off from the front panel.
To navigate to the Priority mode screen from the main menu: key sequence 2, 1, (factory
settings code number + F1) 3, 3.
2. System Options
1. Configuration (factory settings code number + F1)
3. Features
3. Priority Mode
Priority Mode:Off
F1=Change
F4=Exit
Figure 98. Priority Mode Screen
Priority Mode Description
Priority mode is associated with the lock and unlock output functions. When this mode is
on, the user that locks an output is recorded. This information is referenced again when
the output is commanded to unlock. If the current user has equal or higher priority than
the user that locked the output, the user will be able to unlock the output.
It does not matter what port the user is logged into when the output is locked. Only the
priority information is saved, not any port information.
Page 126 of 176
Rev K
QE3 Matrix Switching System
Front Panel Priority Display
If an output has been locked by a user while the priority mode is on, the status of the
output is indicated by the front panel. If the current user has equal or higher priority, the
screen looks like an ordinary output that is locked.
Name
Out
Locked
name
in
F2=L/U
F4=Exit
Figure 99. Locked with Priority
I f the user logged in has lower priority than the user that locked the output, the word
“Priority” will be displayed and the user will not be able to change or unlock the output
Name
Out
Locked
name
in
Priority
F4=Exit
Figure 100. Locked without Priority
User’s Priority
There are 8 available users for the priority function. Each user has a different priority.
These are set and not adjustable.
Rev K
Page 127 of 176
QE3 Matrix Switching System
Default Names and Priority In Order
Admin
User2
User3
User4
User5
User6
User7
User8
No user logged in
-
Highest priority
-
Lowest priority
Priority Mode On/Off Clear Memory
Priority mode can be set and read from the front panel or from a protocol command.
Refer to the PM command. When this mode is turned on, every output that is locked is
associated with the user who locked it. This information is stored until the output is
successfully unlocked. At that point, the user information is cleared.
All output locked priority information is cleared after the system is power cycled, or
whenever the priority mode is turned off.
Priority Example
Priority mode is turned on.
User5 is logs into the Telnet port.
User5 locks output 1
User6 logs into TCP port
User6 fails to unlock output 1
(User 6 can not unlock output 1 because user5 has higher priority than user6)
User3 logs into control in port
User 3 unlocks output1
(User3 can unlock the output because user3 is higher priority than user5)
Page 128 of 176
Rev K
QE3 Matrix Switching System
Output Protection
Protected Outputs Description
Protection is another way to prevent an output from being changed by an unauthorized
user. If an output is protected it cannot be changed until the protection status has been
removed. The protected status is removed by making the output unprotected. This can be
done from a protocol command or from the front panel. An unprotected output is just like
all other regular outputs. Protection feature is port specific. An output can only be unprotected from the same port it was protected from.
Protected vs. Locked
A protected output cannot be locked. A locked output cannot be protected. An output
cannot be locked and protected at the same time. A locked output cannot be changed until
it is unlocked. A protected output cannot be changed until it is un-protected
Commands
An output can only be protected or unprotected from a protocol command or from the
front panel. Refer to the SP, SU, and SC commands in the protocol document. An output
can also be protected from the input select screen, as shown below.
Out 1
Output 1
F1=Enter
Change ↑↓
In 1
Input 1
F2=Protect
F4=Exit
Figure 101. M&C
Rev K
Page 129 of 176
QE3 Matrix Switching System
Ports Specific
The protected mode is port specific. A command to protect an output must be cleared by
un-protecting it from the same port.
0 Local keypad/LCD
1 Remote Port B
2 Control In Port C
3 Ethernet Port A
4 Ethernet Port B
5 Telnet
6 SNMP
Address Specific
The protected mode is also serial address specific. This normally only applies to users
that are using additional 1RU remote controllers in their system. If a user protects an
output from a remote 1RU controller front panel, that output can only be unprotected
from that same 1RU controller front panel. Same applies to the other 1RU ports as well.
Front Panel Protected Output Display
An output if protected will display protected on the front panel
Out 1
Output 1
Status ↑↓
In 1
Input 1
Protected
F4=Exit
Figure 102. Front Panel Protected Output Display
Page 130 of 176
Rev K
QE3 Matrix Switching System
Unprotect Output
An output can also be un-protected from the front panel. In this instance, the F3=Un-P
option will be available on the Monitor and Control screen, as shown below. If the F3
option is not present then the output was protected from some other port or unit address.
Out 1
In 1
Output 1 -> Input 1
F3=Un-P
Protected
Status ↑↓
F4=Exit
Figure 103. Protected
Rev K
Page 131 of 176
QE3 Matrix Switching System
Naming Inputs and Outputs
I/O Names Options Menu
The I/O Names option is found under the configuration setup. Option 4 of the System
Setup Menu displays the I/O Names Menu screen.
To navigate to the I/O Names Menu screen from the main menu: key sequence 2, 1,
(factory settings code number + F1) 1, 4.
2. System Options
1. Configuration (factory settings code number + F1)
1. System Setup
4. I/O Names
1. Set Input Names
2. Set Output Names
3. Reset to Default
F4=Exit
Figure 104. I/O Names Menu
Page 132 of 176
Rev K
QE3 Matrix Switching System
Set Input Names
Option 1 of the I/O Names Menu displays the Set Input Names screen.
To invoke the Select Input Names screen from the main menu: key sequence 2, 1,
(factory settings code number + F1) 1, 4, 1.
2. System Options
1. Configuration (factory settings code number + F1)
1. System Setup
4. I/O Names
1. Set Input Names
Input ↑↓
1:in 1
F1 Select
F4=Exit
Figure 105. Select Input to Assign Name
Scroll through the inputs and when the desired input to be named is on the screen press
F1 to select it. This brings up a screen to write a name and assign it to the selected input.
The cursor moves to the bottom left at the first character in the current input’s name.
Input
1 :SattV51
F1=Done , F2= →
F3=← , F4=Exit
Figure 106. Write Name for Selected Input
Rev K
Page 133 of 176
QE3 Matrix Switching System
Use the scroll keys to select a letter or number. Scrolling will bring up lower case letters,
upper case letters, the numbers 0-9 and the “space” character. Use F2 and F3 to move the
cursor. The length is 7 characters and if less characters are desired, fill in the unwanted
characters with the “space” character. When scrolling, it appears between the 9 and
capital A. Press F1 to accept the new name or at any time press F4 to exit the screen. No
name is assigned until the F1 key is pressed.
Set Output Names
Option 2 of the I/O Names Menu displays the Set Output Names screen.
To navigate to the Select Output Names screen from the main menu: key sequence 2, 1,
(factory settings code number + F1) 1, 4, 1.
2. System Options
1. Configuration (factory settings code number + F1)
1. System Setup
4. I/O Names
2. Set Output Names
Output ↑↓
1:out 1
F1=Select
F4=Exit
Figure 107. Select Output to Assign Name
Scroll through the outputs and when the desired output to be named is on the screen press
F1 to select it. This brings up a screen to write a name and assign it to the selected output.
The cursor moves to the bottom left at the first character in the current output’s name.
Page 134 of 176
Rev K
QE3 Matrix Switching System
Output
1 :SattV51
F1=Done , F2= →
F3=← , F4=Exit
Figure 108. Write Name for Selected Output
Use the scroll keys to select a letter or number. Scrolling will bring up lower case letters,
upper case letters, the numbers 0-9 and the “space” character. Use F2 and F3 to move the
cursor. The length is 7 characters and if fewer characters are desired, fill in the unwanted
characters with the “space” character. When scrolling, it appears between the 9 and
capital A. Press F1 to accept the new name or at any time press F4 to exit the screen. No
name is assigned until the F1 key is pressed.
Assigning Names Using Protocol Commands
Names can be assigned from the front panel. Names can also be assigned using naming
read and write commands included in the protocol. Refer to the attached protocol
document for further details.
Command Advantage
Assigning a name from the keypad is limited to the alphabet and numbers 0-9. Using the
protocol command to read and write a name allows the user to assign all the available
characters on a standard keyboard. These usable characters are in the ASCII range of
20Hex up to 126Hex.
Rev K
Page 135 of 176
QE3 Matrix Switching System
Default Names
Option 3 in the I/O names menu will reset all names back to factory default. The default
names for inputs and outputs is 7 characters containing the word “in” or “out”, then
spaces, and then the number of the input or output. Default names are always 7
characters.
i.e.
input # 1 default name:
input # 15 default name:
input # 3 default name:
input # 23 default name:
Page 136 of 176
“in 1”
“in 15”
“out 3”
“out 23”
Rev K
QE3 Matrix Switching System
Access Control
Quintech systems can limit a person’s access to the system in several ways. Our
mechanism is the factory code that is required to gain access to the configuration menu,
the second is a lockable keypad, and the third is the enabling of access control and
creation of user accounts to assign permissions.
Access control on a Quintech matrix allows a matrix system to be partitioned between
multiple users or groups. It also prevents the accidental changing of a cross point by an
unauthorized user. The access control features described in this section are available on
Quintech matrix controllers that are executing protocol 2.15 releases 6 and later. This
corresponds to all QE3 firmware releases.
The access control operation is based on the implementation of user accounts and
privilege groups. A user must login with a valid username and password in order to gain
access to the matrix system. In addition, each user account is assigned to a privilege
group. The ability of a group to change an input-output connection is set for each
individual output. These features implement access control on both the control port and
at the level of an individual cross point.
Access Control Overview
Access control was created for customers who had problems with unauthorized changes
being made to their switch settings. If this is not a problem, you can disable access
control in any combination on all five ports. If access control is disabled on a
communications port, anyone using that port has the ability to change any setting or cross
point connection on the QE3 system.
If access control is enabled on a port, a user must login with an assigned name and
assigned password. They will then be pre-assigned permissions. The user logs into an
account that the Admin has previously set up. This account, in turn, assigns output
permissions to the user.
Thus, if access control is enabled for a port, a user can only change an output if they have
permission from the Admin to change that specified output. The ability of a user to
change an input-output connection (cross point) is set for each individual output. These
features implement access control on both the control port and at the level of an
individual cross point.
Rev K
Page 137 of 176
QE3 Matrix Switching System
System Access
A Quintech matrix is controlled through a standard control module. This is typically a
separate 1U (1.75”) high module but it may be built in to a matrix switch module as well.
The controller accepts control commands from external sources that tell it how to switch
the matrix or configure various system options. A standard controller has five control
ports that will accept commands:
Local:
Front panel keypad and LCD.
Remote:
The “Remote In” connector. This is typically where other controllers are
connected when they are configured to operate as remote control panels. If
remotes are not going to be used in the system, this port can typically be
used as an auxiliary serial port. It is configured as an RS-485 port and
accepts 9600-baud 8N1 (8 data bits, no parity, 1 stop bit) data. Command
data is sent as an STX/ETX bounded packet with checksum as defined in
the protocol document.
Control In:
The “PC Control” connector. This is typically where a control computer or
PC is connected. The port can be configured as an RS-232, RS-422, or
RS-485 port and accepts 9600-baud 8N1 data. Command data is sent as an
STX/ETX bounded packet with checksum as defined in the protocol
document.
QEC Port:
Ethernet. The exact Ethernet port is user defined with the default Ethernet
port set at 9100. It accepts the same command packet that is used on the
serial port. This makes it easy for a single driver to be used for both serial
and Ethernet connections.
Telnet:
Telnet console window. This provides an ASCII interface with a cursor for
keyboard entry of commands.
The system is highly flexible and the access control feature can be configured to be on or
off for each of the 5 possible control ports on an individual controller. This also holds
true for a system with a main controller and multiple remote controllers. The control port
access control must be set separately for the main unit and each of the remotes.
Page 138 of 176
Rev K
QE3 Matrix Switching System
Port Access Control Enable/Disable
Option 3 in the Features Menu displays the Port Access Control Enable/Disable screen.
Through this screen, you can designate whether the access control system is on or off
(i.e., in effect or disabled) for various control ports.
Note: The Access Control option only appears in the Features Menu when you are
logged in as the administrator and access control is on for the local (keypad/LCD)
port.
To navigate to the Port Access control Enable/Disable screen from the main menu: key
sequence 2, 1, (factory settings code number + F1), 3, 3
2. System Options
1. Configuration (factory settings code number + F1)
3. Features
2. Access Control
Local: On
F1=On/Off Change ↑↓
F4=Exit
Figure 109. Port Access Control Enable/Disable
The ports for which access control can be enabled or disabled are as follows:
Local
Keypad
Remote
Remote Port
Ctrl-In
PC Control In
QEC PortA Ethernet Port
QEC PortB Ethernet Port
Telnet
Telnet Console
Use the up and down scroll arrows to display the port for which access control will be
configured, then press the F1 key to toggle access control on or off for that port. Press F4
to return to the Features Menu.
Rev K
Page 139 of 176
QE3 Matrix Switching System
Once access control is enabled for a port, it will only accept passive monitoring
commands unless a valid user logs in to that port. These commands allow for passive
monitoring of the matrix but do not allow changes to be made: C, F, KS, O, OS, and Q.
Other protocol commands will return with a “command unavailable” (NAK u) response.
See the protocol document for more information.
Access Control Menu
Option 3 in the Main Menu displays the Access Control Menu screen. From this menu,
you can configure various types of access controls. Pressing 1 displays the Keypad Lock
Screen that allows you to lock or unlock access to the front panel keypad. Pressing 2
displays the Login/Logout screen that controls access to certain capabilities, based upon
the particular user access group to which a user belongs. A third option, “Setup”, will
only appear when you are logged into the controller as “Admin”. It enables the
administrator to define and configure the access capabilities for various users. Pressing
F4 returns you to the Main Menu.
1. Keypad Lock
2. Login/Logout
3. Setup
F4=Exit
Figure 110. Access Control Menu
Keypad Access Control
The simplest method of access control is locking the keypad. This can be done to prevent
someone from bumping into the UCM keypad and accidentally changing a setting. When
the keypad is locked, only the exact key sequence of 857 will allow the user back into the
system from the keypad. Note that the keypad lock does not disable port access in any
way.
Page 140 of 176
Rev K
QE3 Matrix Switching System
Keypad Lock
Option 1 in the Access control menu will load the lock keypad screen.
To navigate to the Lock keypad screen from the main menu: key sequence 3, 1
3. Access Control
1. Keypad Lock
F1=Lock Keypad
F4=Exit
Figure 111. Lock Keypad
From the Keypad Lock Screen, press F1 to lock the keypad or press F4 to return to the
Access control screen.
When enabled, the phrase “Keypad Locked” will be displayed on the screen to indicate
that the lock is in effect.
Keypad Locked
Figure 112. Keypad Locked
Rev K
Page 141 of 176
QE3 Matrix Switching System
Unlock Keypad
To remove the keypad lock, press any key on the keypad. The Unlock Keypad Screen
will be displayed.
Enter code to unlock
keypad
F1=Enter
F4=Exit
>
Figure 113. Unlock Keypad
Unlock Keypad Code
Enter the numeric sequence “857”. After a few seconds, you will be returned to the
Keypad Lock Screen. The numeric sequence equates to the letters “UKP” on a telephone
keypad. This acronym stands for Unlock Key Pad. Entering an invalid code or pressing
the F4 key will redisplay the Keypad Locked message.
Logging In and Logging Out
A user is automatically logged out when the controller module is reset, or if the Ethernet
socket is closed or broken.
Once access control is enabled for a port, a user must log into that port before issuing any
commands except those that are allowed with no login. For the computer interface ports
PC Control In, Remote, and Ethernet, the ZI protocol command is used to login. For the
Ethernet Telnet console window, any standard Telnet program may be used to bring up a
text window with a login prompt.
Page 142 of 176
Rev K
QE3 Matrix Switching System
Login /Logout
To invoke the Login /Logout screen from the main menu: key sequence 3, 2.
3. Access Control
2. Login/Logout
User ↑↓
1:Admin
F1=Select
F4=Exit
Figure 114. Login /Logout
In the Login /Logout Screen 1:Admin (or the current Admin username) should be
displayed. The user ID (UID) is always displayed in front of the username since all
usernames including Admin may be customized. Use the scroll keys to scroll through the
available usernames. Once the desired username is shown push F1 to select the user to
log in as.
Password Entry
Once you have selected the desired username, the screen will change to the Password
Entry screen.
Admin
F1=Done , F2=Æ
F3= Å , F4=Exit
Figure 115. Password Entry
Rev K
Page 143 of 176
QE3 Matrix Switching System
A password is built one character at a time. You can enter a number directly from the
keypad or use the scroll keys to bring up an alphanumeric character. Once you have the
correct character, push F2 to enter it and move forward to the next character position.
After all characters in the password have been entered, push F1 to attempt the login. If
the password is incorrect, the message “incorrect login” will be displayed and the
password will be cleared to allow for another attempt.
Logout
Once the user is logged in, re-displaying the Login/Logout screen will display the current
user and provide the option to logout. The Logout Screen will be displayed. To logout,
press F1. Control will be returned to the Access Control screen.
Current user:
Admin
F1-Logout
F4=Exit
Figure 116. Logout
Page 144 of 176
Rev K
QE3 Matrix Switching System
User Accounts
Option 3 Setup of the Access Control menu allows you to setup user accounts. User
accounts consist of a fixed user ID, an assigned group ID, and a variable username and
password.
User accounts can be managed remotely using the ZA, ZG, ZL, ZP, and ZU commands.
See the protocol document for more information. They can also be managed from the
front panel keypad.
Access Control Setup Menu
Note that you must be logged in as Admin and local access control has to be enabled
to be able to access this menu.
In order to define a user’s name, password, or permissions you need to access the Setup
screen. From this screen, you can select to modify user names and passwords or set
output permissions.
To navigate to the Setup screen from the main menu: key sequence 3, 2.
3. Access Control
3. Setup
1. Set Users
2. Set Access
3.Set Groups
F4=Exit
Figure 117. Access Control
From this screen, you can select to modify user names and passwords or set output
permissions.
Rev K
Page 145 of 176
QE3 Matrix Switching System
Defining User Names and Passwords
Usernames and passwords are defined using the Set User screen.
Set User
To define or modify a user name or their password, choose “Set Users” in the Setup
Menu. The User Selection screen will be displayed.
To navigate to the User Selection screen from the main menu: key sequence 3, 3, 1.
3. Access Control
3. Setup
1. Set Users
User ↑↓
2:user2
F1=Select
F4=Exit
Figure 118. Select User
In the User Selection screen, the user’s Group ID is shown followed by current
username. You can use the scroll keys to scroll through the available users.
Use the up and down arrow keys to select the user whose name or password you wish to
modify. As a default, the user names “Admin” and “user2” through “user8” have
already been defined when using the access control feature for the first time.
Depending on the firmware release, the group for a particular UID may be fixed or there
may be a menu where the group ID can be set.
Once the correct user is selected, press F1 to enter the Select Name/Password screen.
Page 146 of 176
Rev K
QE3 Matrix Switching System
User: User2
Pass: 2
F1=Set Name
F2=Set Pass F4=Exit
Figure 119. Select Name/Password
To change the user name, press F1. To change the password, press F2. This will display
either the Change User Name or the Change Password screen. They are both identical
except for the cursor location.
User:Admin
Pass:1
F1=Done , F2=Æ
F3= Å , F4=Exit
Figure 120. Change User Name/Password
Use the F2 and F3 keys to position the cursor at a particular character position, then use
the up and down arrow keys to scroll through a list of alphanumeric characters. Repeat
this process as often as necessary until the desired name or password has been entered.
Then press F1 to save it and return to the Set Name/Password Screen. Pressing F4 will
exit without making any changes.
Rev K
Page 147 of 176
QE3 Matrix Switching System
Valid Passwords and Length
A user name can consist of up to 14 alphanumeric characters and must begin with a letter.
A password can also consist of up to 14 alphanumeric characters and can begin with any
alphanumeric character. Usernames are not allowed to start with a number. Once the user
name and password has been specified, press F1 to enter the information, press F4 to
return to the user selection screen where you can choose another user whose name or
password you want to change. From the User Selection Screen, press F4 to return to the
Setup Menu.
Defining Group Permissions
Permission for each output or input for each group is assigned through the Set Access
menu option.
Set Access
The Set Access menu option in the setup directory is where Admin sets permissions for
the groups.
To navigate to the Set Access screen from the main menu: key sequence 3, 3, 2.
3. Access Control
3. Setup
2. Set Access
User ↑↓
2:user2
F1=Select
F4=Exit
Figure 121. Select User
Page 148 of 176
Rev K
QE3 Matrix Switching System
Setting User Access
If users have a fixed assignment to a group, the associated user name will also be
displayed after the group number.
Use the up and down arrow keys to display the group whose access capabilities you wish
to modify, then press F1 to select that group. The Set Access Screen will be displayed.
Admin
Output: 1 = Allow
F1=Change
F2=Out/In
Figure 122. Set Output Access
The Set Access Screen allows you to grant or deny a particular group access to each of
the output ports. Use the up and down scroll arrows to display a particular output port or
control port, then press the F1 key to display “Allow” or “Deny” for that output. Repeat
the process as often as necessary until the proper access has been set up for each group
for each output.
After the proper access has configured, press F4 to return to the group selection screen
whereby you can choose another group for whom you want to set access. From the
Group Selection Screen, press F4 to return to the Setup Menu.
Rev K
Page 149 of 176
QE3 Matrix Switching System
Crosspoint Control Access
The ability to change an individual cross point is controlled by the settings for a
particular group. There are 8 privilege groups with an associated group ID (GID) from 1
to 8. Each valid user is assigned to a specific privilege group. By appropriately setting the
control rights for the groups, a matrix can be partitioned into several sub-matrices with
separate or overlapping domains.
The control privilege for a group is set one of two ways. The ZA command can be used
by the Admin (UID 1) to allow or deny control of an output to a group. See the protocol
document for more information. Output control can also be set from the keypad.
In the Set Access screen the group ID (GID) is shown and the scroll keys are used to
scroll through the available groups. Once F1 is used to select the desired group, the
screen switches to show an output along with the current access control setting, Allow or
Deny. The current setting can be toggled by pushing F1.
Output Access Control
All QE3 firmware has output access control which can allow or deny a user access to any
output.
Input Access Control
QE3 firmware has output and input access control. An F2 option will be at the top right
of the screen.
Admin
Input: 1 = Allow
F1=Change
F2=Out/In
Figure 123. Set Input Access
Page 150 of 176
Rev K
QE3 Matrix Switching System
Pressing F2 will toggle between output and input access control. If access control is
turned on for a port the user must log in. The user must also be assigned “Allow”
permission for an output in order to change the output. With input access control the user
logged in must have “Allow” permission for an output and an input in order to make a
cross point change.
EXAMPLE: If a user has “Allow” permission for all the outputs but “Deny” for all
inputs, the user can not make any cross point changes. The user needs “Allow”
permission for the output and the input before a cross point change can be made.
EXAMPLE: A user is given “Allow” permission to change all outputs and “Allow
permission for input 1 and 2. The user can log in and change any output, but can only
connect the outputs to input 1 or 2.
The access to control a particular output or input is set individually for each group. That
allows flexible partitioning of access to the matrix outputs. For example, you could set
the following group access:
Group 1: outputs 1, 2, 3, 4
Group 2: outputs 5, 6, 7, 8
Group 3: outputs 1, 2, 3, 4, 5, 6, 7, 8
Group 4: outputs 1, 3, 5, 7, 9, 11, 13, 15
Group 5: outputs 9, 10, 11, 12, 16
…and so on.
Determining Group Access
The current output access settings for a group can be found in two ways. The first is to
login as Admin on the keypad and view the current setting in the Set Access screen. The
second is to use the OS or IS command on one the control ports. The OS or IS command
will show whether or not the cross point is locked, and the current group access settings
for that port. See the protocol document for more information.
Defining User Groups
Each user can be assigned to 1 of 8 groups. These groups are set with input and output
permissions through the Set Access menu option.
Rev K
Page 151 of 176
QE3 Matrix Switching System
Set Access
The Set Groups menu option in the setup directory is where Admin sets permissions for
the groups.
To navigate to the Set Groups screen from the main menu: key sequence 3, 3, 3.
3. Access Control
3. Setup
2. Set Groups
User ↑↓
2:user2
F1=Select
F4=Exit
Figure 124. Select User
First select the user.
User: Admin: 1
New group ID: 2
F1=Enter ↑↓Scroll
F4=Exit
Figure 125. Select User
Once the user is selected you can scroll through the group IDs and press F1 to re-assign
the user to a new Group ID.
Page 152 of 176
Rev K
QE3 Matrix Switching System
Firmware Specifics
Command ZG is implemented on firmware versions 9.12 and higher. The number of
users is currently limited to 8, with user Group IDs from 1 to 8. A user’s Group ID can
be changed using the ZG command or the front panel. Refer to the protocol document
for more information.
In the Set Access Screen, an associated username is shown after the GID since users are
assigned to groups based on their user ID (UID). Future firmware releases may or may
not show this depending on whether multiple users can be assigned to the same group.
The default settings are listed in Table 4.
Factory Defaults for Access Control
Rev K
UID
Username
Password
Group
1
2
3
4
5
6
7
8
Admin
1
1
User2
2
2
User3
3
3
User4
4
4
User5
5
5
User6
6
6
User7
7
7
User8
8
8
Table 4. Access Control Defaults
Output
Control
All
None
None
None
None
None
None
None
Page 153 of 176
QE3 Matrix Switching System
Admin Account
The Admin is the main controller of the system. He is the one who hands out and sets up
all other users’ permissions.
Admin Default Username
The default password for the Admin is “Admin”. The Admin can change this user name
to any valid password after first logging in as the Admin.
Admin Default Login Password
The default password for the Admin is “1”. The Admin can change this password to any
valid password after first logging in as the Admin.
Admin User Name and Password Warning
Current versions of the software have no reset for the Admin username or
password. If the Admin name or password is programmed and then forgotten, there are
only two solutions. Reload the firmware or reset the internal board to factory defaults.
These solutions require either qualified Quintech technical service personnel or Quintech
technical support assistance.
Page 154 of 176
Rev K
QE3 Matrix Switching System
MATRIX CONTROL SOFTWARE
This tutorial describes Quintech’s Matrix Control Program. The Matrix Control Software
makes it easy for you to configure and manage multiple QE3 systems. It does this
through the use of system configurations which store multiple settings and options.
Using the software, multiple configurations can be created and saved for the same QE3 or
different QE3s. The Matrix Control Program is available free of charge and can be
found on the Quintech website.
Setting up the Communication Parameters
Open the program and click the setup button. This will open the Communication Settings
window.
Ethernet vs. Serial Communications
The initial task in setting up the communications parameters involves specifying whether
Ethernet or serial communications will be used. If you choose Ethernet, you will be
prompted to set the Ethernet address and port. The default port is 9100. It should not need
changed unless port 9100 is not allowed on your network. If a new port will be specified,
make sure that it matches the port setting of the matrix controller. The default port value
of the matrix controller is also 9100.
If you choose Serial, you will be prompted to set the serial control address and local
COM port. The local COM port is whatever serial port on your PC you are using to
connect to the matrix. Be sure that the specified serial address matches the serial address
setting of the matrix controller. The default is 00.
Monitoring
The Matrix Control Program can be set up to monitor the QE3 for any changes made at
any other port including the matrix front panel. The Monitoring On/Off checkbox
controls whether monitoring is used or not. Checking the checkbox enables monitoring.
Clearing the checkbox disables it. By default, monitoring is enabled. Located below the
monitoring checkbox are fields where you can set a monitoring interval. The monitoring
interval is the frequency at which the control program polls the matrix to determine if
changes have been made. The default interval is 15 seconds, but you may wish to
increase this in order to minimize traffic across your network.
Rev K
Page 155 of 176
QE3 Matrix Switching System
The minimum interval that can be specified is 5 seconds, but this interval should not be
used in most cases unless a dedicated serial connection is being used to control the
matrix, and it is a small matrix.
Figure 126. Communication Setting Window
Page 156 of 176
Rev K
QE3 Matrix Switching System
General Parameters
Two general parameters can be set for the Matrix Control Program. The first identifies
whether the Ethernet connection should stay open between the transmissions of control
commands to the matrix. If this feature is disabled, the control program will open and
close the Ethernet port for each command. This may add substantial overhead if you are
monitoring the switch. The second general parameter that can be set is the Read Timeout.
The Read Timeout parameter identifies how long the control program will wait for a
response after sending a command. If you are controlling the switch over the Internet or
on a heavily utilized network, you may need to increase this time to ensure that the
matrix response is correctly received.
Testing the Communications
Once all of the communication parameters are set, click the Test button at the bottom of
the Communication Settings window. The program will attempt to communicate with the
matrix using the parameters as set. If it is successful, you will receive a pop-up window
displaying some of the matrix settings. Click OK to close the pop-up window and then
click OK on the Communication Settings window to start normal operation.
Creating and Managing Configurations
Configurations are for multiple systems. Configurations only save communications
parameters. They are not intended to change crosspoints. To write one or more
crosspoints at a time, refer to scripts.
Once the communications parameters are set up and a connection is made to the switch,
the user can save those communications settings in a configuration file. Multiple
configurations can be used to connect to several different systems without having to reset
all communications parameters every time the user connects to a different switch.
Open the Create Configuration window by choosing “New Configuration” under the File
menu. Enter the name that will be used to describe your system and click the CREATE
button. The Create Configuration window will automatically close after your
configuration has been created. You can save your configuration at any time. You can
also load, delete, and copy your configuration using the other options in the File menu.
Rev K
Page 157 of 176
QE3 Matrix Switching System
Controlling the QE3
After successful communications has been established, you are ready to control the QE3
using the point and click interface.
Changing a Crosspoint
To change a crosspoint, click on the output name displayed in the main window. The
Change Crosspoint window will be displayed. In this window, all available inputs are
displayed. Choose an input by clicking on it. The chosen input will be displayed in the
Pending Input box. Your pending change will be shown in the main window in the
Pending Inputs and/or Pending Status column. You can set up multiple pending changes
at the same time before committing the changes. Click “apply” to change the impending
inputs to make the crosspoint change(s).
Cancel Crosspoint Changes
At any time before the apply button is clicked, the user can hit the CLEAR button to clear
the impending inputs and start over.
Change Impending Inputs
You can change an impending input by clicking the output and selecting a different input.
You can cancel one output’s pending input without changing or canceling any other
pending inputs. Select the output and then select the input that it is currently connected
to it. This will erase the pending input.
Page 158 of 176
Rev K
QE3 Matrix Switching System
Locking Cross points
If necessary, an output can be locked. Locked outputs cannot be changed until they are
unlocked. To lock an output, click on the output to open the Change Crosspoint window.
Click on the unchanged button and it will switch to locked pending status. Click on the
OK button to accept the change. The pending lock column will show “lock”. You can
still cancel the action by clicking the CANCEL button. To lock the output, click the
APPLY button. The small square icon next to the output will show a small padlock to
indicate the locked status..
Unlocking Cross points
A locked cross point cannot be changed until it has been unlocked. Click on the locked
output to display the Change Crosspoint window and make the desired change. Click the
enter button to execute the Unlock command and unlock the crosspoints.
Locking and Unlocking the Keypad
On the main window is a screen for locking and unlocking the QE3 front panel keypad.
The primary purpose of this lock is to prevent unintentional changes. If desired, you can
override the keypad lock from the matrix keypad by entering the 3-digit code “857”. If
the front panel is unlocked and monitoring is enabled, the status of the keypad lock will
be updated within the specified monitoring interval.
Controlling Monitoring
Monitoring the current status of the QE3 can be enabled or disabled using the
START/STOP button on the main window. When monitoring is enabled, the data
transfer activity box in the lower left corner of the main window will flash green each
time the QE3 is polled for information.
Rev K
Page 159 of 176
QE3 Matrix Switching System
Online/Offline
The Online/Offline button is useful when you want to change your communication
settings without closing the program. While communicating with the QE3, the
Online/Offline button will display “Go Offline”. Clicking the button will stop
communications with the MRF and close any Ethernet connections. While offline, the
button will display “Go Online”. Clicking the button will re-establish communications
with the QE3.
Options
Various global and configuration options can be specified via the Options menu which is
under the Tools menu. The Options window can be displayed by choosing “Options” in
the Tools menu. Configuration options are stored in saved configurations. Global
options are not.
Load last configuration on startup
This option automatically loads the last configuration that was used when the program is
restarted. Default: On.
Debug mode
Setting this option forces the program to wait the entire specified Read Timeout period
before issuing another command. This option should normally be off and is only useful
when trying to debug a faulty connection.
Display raw command data in log
Setting this option displays the command(s) sent to the QE3 in hexadecimal format. This
feature is useful when trying to debug a faulty connection and should normally be
disabled.
Page 160 of 176
Rev K
QE3 Matrix Switching System
Display raw response data in log
Setting this option displays the response(s) sent by the matrix in hexadecimal format.
This feature is useful when trying to debug a faulty connection and should normally be
disabled.
Log size
This option specifies the maximum number of lines that can be held in the
command/response log file. The logfile is stored in memory, so you must limit the log
size to prevent it from using up all available memory. If you have problems with your PC
running out of memory, set this option to a lower number. Default: 1000 lines.
Default to only show errors in the log
When this option is set, the command/response log will only show errors by default. All
commands/responses will be logged, but only the errors will be shown.
Save only errors in the log
When this option is set, only command/response errors will be saved in the log.
Use matrix controller names
When this option is set, the program will read the input and output names from the matrix
during boot up. The QE3 stores its input and output names in memory. These names can
be read back by the program and are also displayed on the front panel Monitor and
Control screen.
When this option is unchecked, the program will load up the last names used in the
program.
Rev K
Page 161 of 176
QE3 Matrix Switching System
Login/Logout
If access control is turned on for the port defined in the communications setup, the output
and input names will appear in red.
The user will have to log in with a username and password that will have permissions in
order to change or lock an output. Once logged in, the outputs with permission will
appear in black.
For detailed access control information, refer to the Access Control section.
Matrix Customization
Customizing Input and Output Names
If desired, you can specify your own matrix input and output names. You can enter these
names and write these names to the matrix or read the names from the QE3. These
names are displayed in the Monitor and Control screen on the front panel, as well as the
program screen in the outputs and current inputs columns. OK confirms new names and
clear will clear any new names not yet written to the QE3. Click CANCEL to exit
without assigning any pending new names. Clicking OK will close the window only if
there are no pending names to be written.
Write Names
Enter new names and click “write” to download new names to the QE3.
Read Names
Click read to read previously assigned names from the QE3.
Page 162 of 176
Rev K
QE3 Matrix Switching System
Manage Users
Only available if logged in as Admin:1. This allows you to change usernames and
passwords. OK confirms and writes any changes to the QE3, then closes the window.
CANCEL closes the window and cancels any pending changes. RESET cancels all
changes and sets names and passwords back to what the program read in when the
window was open. REFRESH re-rereads usernames and passwords from the QE3.
APPLY writes all pending names and passwords to the switch and keeps the window
open.
Manage Groups
Only available if logged in as Admin:1. This allows changes to users’ allow or deny
permissions for all outputs. Group 1 is the Admin, Group 2 is user2, etc. A checkmark
indicates that the user has permission to change that output. Output permissions can also
be changed from protocol commands or the front panel. All three require Admin
privileges.
Input Permission
QE3 firmware provides both input and output access control. Output access control can
be set up in the group administration window. Input access control can be set up from
protocol commands and the front panel.
Scripts
The run script option allows multiple protocol commands to be sent to the QE3. Scripts
can define anything from multiple crosspoint setups input and output naming schemes.
Any QE3-compatible commands in the QE3 protocol document can be used in a script
file.
Rev K
Page 163 of 176
QE3 Matrix Switching System
Writing Data to the QE3
Only success or failure feedback is provided when scripts are executed. An
acknowledgement will confirm whether any value written to the QE3 was successful. A
script can write anything that a protocol command can write including crosspoints,
names, attenuation data, warning levels, etc.
Reading Data from the QE3
A command that asks for data to be returned from the QE3 may be successful, but the
control program provides no way for the script data (e.g. fan speed, temperature, etc.) to
be returned from the QE3.
Script Naming Extension
Scripts can be named as desired. The file extension for a script file is “.scr”, which
happens to be the same extension that Windows uses to define screen saver files. Thus,
double clicking on a script file name that has the .scr suffix will likely cause an error
because Windows will think that it is a screen saver file.
Editing Scripts
The easiest way to write and edit scripts is to rename the file suffix to “.txt”. Once the
ffile suffix has been renamed, open it with a text editor, make the desired modifications,
and then resave the file using the “.scr” suffix.
Page 164 of 176
Rev K
QE3 Matrix Switching System
Command Structure
A script does not require the STX/ETX, address, or CHK bytes.
Scripts Examples
Scripts should be created using a simple text editor such as windows notepad. MS-Word
and other programs will save additional formatting data that will not be understood
during script execution. For example, the following script connects outputs 1, 2, and 32
to inputs 4, 5, and 6 respectively.
S001004
S002005
S032006
Copy these script commands into windows notepad. Delete the last line feed character by
placing the cursor after the 6 and press the DELETE key. Extra characters, even spaces
and line feeds, will cause the command to fail. Save the file as “QE3-1.scr”. Make sure
to change the Save As… type to “All Files”, then type in the name and extension and
click the SAVE button.
Open the program and connect to the QE3. From the tool menu, open “Run script”.
Setup the execution parameters. Use the no delay between commands and run only once
defaults.
Click SET FILE and navigate to where the QE3-1.scr was saved. Once open, the three
commands will be in the open window with empty boxes. The script is ready to run.
Click the START button. The three boxes should have a green check mark indicating
success for all three commands. A failed command will show a red X.
Failed Commands
Since the script’s only feedback is a pass or fail, a failure may require additional
investigation. Check that the inputs and outputs are valid. You can’t set output 32 if the
system only has 16 outputs. Check if the output is locked. Make sure the data used in
the command is valid. Check for correct command structure.
Rev K
Page 165 of 176
QE3 Matrix Switching System
Event Log
The Matrix Control Program contains a command and log file which can be used to
monitor communication activity between the control program and the QE3. This does
not record scripts or script responses. To view the log, choose “Event Log” in the Tools
menu. Each command should have a response and a green check mark indicating
success.
Page 166 of 176
Rev K
QE3 Matrix Switching System
Troubleshooting
Quintech Technical Support
We are available for your questions and to assist you. Contact us through e-mail or call us
directly toll free. Whether your system is 6 month old or 6 years old, we strive to help our
customers any way we can.
Before I contact Quintech
There are several pieces of information that many times help us answer technical
questions in minutes rather than hours or longer. Please have with you the following
information when calling Quintech or include this information in an e-mail question.
1. Model
2. Matrix size
3. Protocol version
4. Firmware version
All this information is available at the front panel. It is under the “System Information”
“Get Firmware Version” menu. It is also displayed when you apply power to the
controller.
Have Information Ready
If you call or write in with a technical question and you have this information available
let us know.
Rev K
Page 167 of 176
QE3 Matrix Switching System
Warranty Information
If your unit may need warranty service, having the following information ready makes a
repair process easier and faster to start and complete.
Serial number - Marked S/N on rear panel
Approximate date of purchase
Company dealer or representative the system was purchased from or if was purchased
factory direct.
Problems and Solutions
This section has been written to help eliminate operator error. It does not describe how to
repair damaged equipment. If there is more than one solution the most common solution
is listed first and least common solution last.
If you have a problem that is not addressed in this troubleshooting guide, or you need
technical assistance, please contact us. Contact information is listed at the end of the
troubleshooting guide.
Page 168 of 176
Rev K
QE3 Matrix Switching System
General Problems
The signal is lost when the
power is turned off.
Several options referred to
in the manual are not
coming up on the display.
The LCD is blank except
for a row of dim blocks.
The QE3 is an active switch which requires power to
maintain the crosspoint connections. If power is turned off
the signal no longer passes through.
In order to see all the options you must be logged in as
Admin and the access control for local has to be on also.
1. Firmware may have been corrupted. Contact Quintech
for new firmware and download instructions.
2. LCD or cable has failed. Contact Quintech for service.
The unit does not remember Contact Quintech for service.
the previous switch
settings/switch size after
power has been removed
and restored.
Front Panel displays
You are in firmware download mode. The only solution is
“download firmware” and it to download firmware or cycle power.
won’t do anything.
1. Cycling power will not corrupt or change any settings.
2. Downloading firmware may overwrite the entire system
and set all values back to Quintech defaults. Refer to the
“Load Firmware” section.
There is a lot of crosstalk
It may be necessary to “balance” your signal levels.
between the signals.
Leveling the signals (attenuating stronger signals,
amplifying weaker signals) ensures that all signals will be
passing at approximately the same level and will help to
minimize any crosstalk.
The keypad is locked
Press 857
I am a qualified technician
A warranty covers all units. Quintech or a representative of
and would like to try to fix
Quintech should make any repairs. Removing any part of
a problem myself.
the chassis will void the warranty. Additionally,
attempting to repair a unit could be dangerous.
Rev K
Page 169 of 176
QE3 Matrix Switching System
Front Panel LEDs
The front panel LED is not
lit.
This indicates the unit is not receiving power.
1. Check to see if the power switch is in ON.
2. Make sure that the AC cables are properly connected.
3. Check the fuse located just above the power cord (if
equipped).
4. Verify with a volt meter that the AC source is available.
If the problem isn’t with the AC supply, contact Quintech
for service.
One of the LEDs is not lit
on a module with integral
dual supplies and/or dual
AC inlets.
Make sure the unit is turned on. Verify with a volt meter
that the AC source is available. If the problem isn’t with
the AC supply, contact Quintech for service.
LNB Power
I’m not getting any DC
power out from the input.
Page 170 of 176
QE3s are not equipped with LNB supplies
Rev K
QE3 Matrix Switching System
Problems with Cross Point Connections
No signal is passing at all.
The connection is shown as
being made but no switch
occurred.
1. First, be certain that all coaxial cables are properly
connected, and that all control cables are connected and in
good working conditioning. Refer to the appendix for your
system connections.
2. Make sure that the main controller unit is set to “Main”
control mode. Type in the desired path again.
3. Type in a different path to verify that the units are
switching. For example, if you cannot route Input 7 to
Output 7, try routing Input 8 to Output 7. Try this for
several different inputs.
4. If the units are switching, verify that the signal you
requested is actually there (the matrix switching system is
DC blocked and will not allow receivers to power LNBs).
It is useful to monitor the system with some type of
analyzer.
5. Make sure that the matrix size is set correctly. The
actual matrix size will only switch up to the set matrix
size. Alternately, if the controller is set larger, it will show
matrix crosspoints that are not physically available.
The option to change or
lock/unlock a cross point is
only available on some
outputs.
The signal is passing at a
low level.
The monitor and control
menu lists the wrong
number of inputs and or
outputs for my system.
Rev K
You are logged in as a user with assigned permissions. The
Admin has assigned permissions to your account. Your
account allows you to change only those outputs the
Admin gave your account permission to change.
Using appropriate equipment, check the signal level. If it
is below specifications, contact the factory.
Someone incorrectly changed settings under the
configuration menu. Refer to “Factory Configuration
Settings” and contact Quintech for technical assistance.
Page 171 of 176
QE3 Matrix Switching System
Only some of the cross
points will switch.
Make sure that no one has modified the factory settings for
the matrix configuration. For example, if the QE3 size has
been erroneously set to 1x1, then only output 1 can be
controlled. You can tell if the number of outputs is
correctly set by going to the Monitor & Control Screen and
scrolling through the outputs. Likewise, you can check the
set number of inputs by going to the Change Connection
screen and scrolling through the available inputs. Contact
Quintech if the settings do not match the matrix
configuration.
Serial Port Problems
The controller will not
respond to protocol
commands on the Control
In or PC Control serial port.
1. Make sure that you are NOT using a null modem cable
or null modem adapter. Use a straight through 1 to 1 pin
cable
2. If using RS-232, check that the serial cable from the
computer is connected to the Control In DB-9 connector
port on the back panel. Not the Control Out or a Remote
port.
3. Make sure that the address in the commands being sent
matches the serial address set for the controller.
4. Make sure that the COM port you are using on the
computer matches the COM port the matrix control
software is set at.
5. Check that the serial interface mode (RS-232 or RS485/422 is correct.
6. If using RS-422/485 make sure the termination settings
are correct.
7 Make sure the data protocol is 8 bit 1 stop bit no parity
and 9600bps.
Page 172 of 176
Rev K
QE3 Matrix Switching System
Ethernet Problems
The QE3 unit will not
connect using Telnet.
Controller won’t accept any
SNMP protocol commands.
I can’t change anything in
the IP configuration.
The controller keeps
booting up to an IP address
that is not the same as the
one I had entered in the IP
configuration.
The controller will not
respond to protocol
commands on the Ethernet
Port.
1. Make sure that another Telnet session is not currently
open. Only one Telnet session at a time is allowed.
2. Make sure you are trying with the correct IP address.
Check that SNMP is enabled. Refer to “SNMP”.
Turn off DHCP When DHCP is on the IP configuration
displays the DHCP configuration assigned to the unit, not
the static IP configuration.
Turn off DHCP The DHCP is assigning an address to the
unit. To use the static IP configuration turn off DHCP.
1. Make sure that the serial address in the commands being
sent is either set as “FF” or matches the serial address set
for the controller.
2. Make sure that the controller IP address matches the
target address used by the control computer.
3. Make sure that the mask and/or gateway are correctly set
for your network.
4. If the controller is connected directly to the network port
of another computer, make sure that a crossover cable is
being used.
5. If the controller is connected to a router or switch, make
sure that a standard cable is being used, that the router
detects the connection to the controller, and that the router
is connected to the same network as the control computer.
6. Make sure the Ethernet lock has not been enabled using
the ELE command.
7. Make sure that the control computer is sending the
commands to port 9100.
8. Check with the administrator that no other program is
using port 9100 for Ethernet communications
Rev K
Page 173 of 176
QE3 Matrix Switching System
Remote Not Working
Remote Controller is not
working correctly or at all
95% of all problems with remotes are cable issues.
1. Make sure you are using the supplied Quintech adapter
in line between the main unit and the first remote.
Forgetting this adapter is usually the cause of a
communications error.
The adapter connects pins 3 to 4, 4 to 3, 6 to 9, and 9 to 6.
NOTE: This is not a NULL MODEM adapter pinout. If
you don’t have this adapter, you can call us and order
another or simply make a cable that crosses these
connections. If you have the adapter then use the adapter
and a straight through 1 to 1 cable between the main
controller and the first remote.
2. Use the Quintech crossover adapter between the main
and first remote only. All other remote connections use
straight through cables.
3. Make sure the cable is 1 to 1 straight through cable.
Test the cable with an Ohmmeter to be sure all pins are
connected from end to end. Some manufacturers will only
connect pins 2, 3, and 5. This type of cable will work for
most RS-232 applications but a Quintech remote will not
operate without all the pins connected.
4. Make sure the RS-485 termination settings are correct.
5. Make sure that the address of the main and remotes are
different. If you have more than one remote, those
addresses have to be different as well.
6. Check that any address isn’t set to FFH.
7. Make sure the main and remotes are connected via the
remote ports and not the control ports.
8. Re-initialize the remote.
Page 174 of 176
Rev K
QE3 Matrix Switching System
Passwords and Permissions
I forgot my password.
1. Default passwords are listed in Table 4.
2. If the Admin has re-assigned names and passwords
contact that person for your username and password.
I am typing in my password
but it won’t let me login.
3. If you are the Admin and you don’t know your
password, contact Quintech for technical assistance.
1. Passwords are case sensitive. If the admin gave you a
password of “PasSMe” then the P,S,and M need to be
capital letters when you type it in.
2. The Admin has reassigned or changed your password
I have permissions but I
still can’t change an output
connection.
I can’t turn on/off access
control
I can’t modify the user
accounts or permissions
The system won’t allow me
to make cross point
changes.
3. The unit has been given a hard reset which sets all
accounts to default permissions, names, and passwords.
Defaults are listed in Table 4.
Check if the output is Locked. Unlock the output first
before you change the connection.
Login as Admin first. Only the Admin can turn on/off
access control for a port.
Only the Admin can modify accounts. Login as the Admin.
1. Log in using your assigned username and password. If
the Admin has denied you access to some or all outputs
then you can’t change those outputs without the Admin
changing your account first.
2. Login as Admin
My password to unlock the
Ethernet port using the
ELD command is not
working.
Rev K
3. Turn off access control for the port you are using.
(requires Admin login)
Reset the password to “Quintech” from the front panel.
Page 175 of 176
QE3 Matrix Switching System
For additional information or technical support
please contact Quintech.
Toll Free: (800) 839-3658
Fax: (724) 349-1412
Email: [email protected]
Website: http://www.quintechelectronics.com
Page 176 of 176
Rev K
QE3 Matrix Switching System
100BaseT ............................................ 32
10BaseT .............................................. 32
2 Byte Hexadecimal Address .............. 39
4-Wire and 2-Wire Systems ................ 73
AC Connections .................................. 21
AC Inlets ............................................. 21
AC Power ............................................ 21
AC Connections .............................. 21
Power LEDs .................................... 22
Redundancy..................................... 21
Voltages .......................................... 22
AC Power Cords ................................. 21
AC Redundancy .................................. 21
Access Control .......................... 106, 138
Access Control Defaults ............... 154
Access Control Menu .................... 141
Access Control Overview ............. 138
Access Control Setup Menu.......... 146
Admin Account ............................. 155
Change Password Screen .............. 148
Change User Name Screen ........... 148
Configuration Menu Pass-Code
Screen .......................................... 88
Crosspoint Control Access............ 151
Defining Group Output Permissions
........................................... 149, 152
Defining User Names and Passwords
................................................... 147
Factory Defaults for Access Control
................................................... 154
Factory Settings Code Number ....... 89
Group ID ....................................... 151
How to Set Group Privileges ........ 151
Keypad Access Control................. 141
Lock Keypad Screen ..................... 142
Locking and Unlocking Connections
..................................................... 48
Password ....................................... 138
Password Entry Screen ................. 144
Port Access Control Enable/Disable
Screen ........................................ 140
Port-Level Access Control ................ 8
Privilege Groups ................... 138, 151
Resetting the QEC Port Access
Password ..................................... 40
Rev K
Set Access Screen ......... 149, 150, 153
Set QEC Port # Screen .................... 41
Setting User Access ...................... 150
System Access .............................. 139
Turning Off an Output .................... 48
Unlock Keypad Code .................... 143
Unlock Keypad Screen ................. 143
User Accounts ....................... 138, 146
User Permissions ............................... 7
Username ...................................... 138
Valid Passwords and Length ......... 149
Access Control Defaults ................... 154
Access Control Menu ........................ 141
Access Control Overview ................. 138
Access Control Setup Menu.............. 146
Accidental Crosspoint Changes .. 48, 138
Accounts
Admin Account ............................. 155
User Accounts ............................... 146
Valid Passwords and Length ......... 149
Accuracy of dBm Values .................... 60
Acronyms ............................................ 11
LCD................................................. 11
LNB................................................. 11
QE3 ................................................. 11
QE3 System .................................... 11
QED ................................................ 11
QEO ................................................ 11
RF.................................................... 11
UCM ............................................... 11
Adapters
Quintech UCM Port Crossover
Adapter........................................ 30
Adding Additional Remotes ............... 83
Address
Broadcast Address .......................... 33
Ethernet Address ............................. 43
Ethernet Address Screen ................. 43
Setting the Serial Address ............... 39
Valid Serial Addresses .................... 40
Admin Account ................................. 155
Admin Default Login Password........ 155
Agents ................................................. 33
Air Temperature Monitoring............. 4, 5
Alarm Condition Notification ............... 6
i-1
QE3 Matrix Switching System
Alarm Message Queue .......................... 6
Alarms
Alarm Condition Notification ........... 6
Alarm Message Queue ...................... 6
Set dBm Warning Level.................. 53
Set Input RF Warning Level ........... 53
Appearance ......................................... 13
Architecture
Input and Output Cards ................... 15
Power Supplies................................ 18
Assigning Names Using Protocol
Commands .................................... 136
Auto-Ranging ...................................... 22
Balanced Line Interface ...................... 72
Balanced Signaling ............................. 71
Biasing Resistors................................. 74
Broadcast Address .............................. 33
Bus
XR Bus Connections ....................... 27
XR Bus Ports................................... 27
Cable Lengths ..................................... 73
Cables
Replacement Cables ........................ 23
Card Types
Input and Output Cards ................... 15
Power Supplies................................ 18
Change Connection Screen ................. 47
Change Password Screen .................. 148
Change User Name Screen ............... 148
Changing a Crosspoint ...................... 159
Changing Connections ........................ 46
Checking Control Mode ...................... 80
Circuit Elements.................................... 8
Command Packet ................................ 32
Communication Settings
RS-232 ............................................ 25
RS-232 Advantages/Disadvantages 26
RS-422 ............................................ 26
RS-422 Advantages/Disadvantages 26
RS-485 ............................................ 26
Computer Control ............................... 12
Configuration
Access Control Setup Menu.......... 146
Configuration Menu ........................ 89
Configuration Menu Pass-Code
Screen .......................................... 88
i-2
Configuration Settings .................... 86
Features Menu ............................... 106
I/O Names Menu ........... 120, 127, 133
Load Firmware Screen .................. 100
Model Number/Type Screen ........... 92
Module Sizes Menu ........................ 93
Port Access Control Enable/Disable
Screen ........................................ 140
Set Control Mode Screen .............. 107
Set Input Names Screen ................ 134
Set Output Names Screen ............. 135
SNMP Menu ................................. 111
SRM Module Size Screen ............... 94
SRO Module Size Screen.......... 95, 96
System Options Menu ..................... 87
System Setup Menu ........................ 90
Configuration Menu ...................... 88, 89
Configuration Menu Pass-Code Screen
......................................................... 88
Configuration Settings
Factory Configuration Settings ....... 86
Connection Status Screen ................... 45
Connections......................................... 21
AC Connections .............................. 21
Adding Additional Remotes ........... 83
Change Connection Screen ............. 47
Changing Connections .................... 46
Connection Status Screen ............... 45
Crosspoint Connections .................. 45
Ethernet Connections ...................... 32
Inter-Module Connections .............. 22
Locking and Unlocking Connections
..................................................... 48
Module Interconnections .................. 9
Monitoring Connections ................. 46
Quintech UCM Port Crossover
Adapter........................................ 30
Remote Initialization Screen ........... 85
Serial / Quintech UCM Pin Definition
..................................................... 24
Turning Off an Output .................... 48
XR Bus Connections ....................... 27
Connectors
Quintech UCM Port ........................ 29
RF Connectors ................................ 23
Turning Off an Output .................... 48
Rev K
QE3 Matrix Switching System
Console
Telnet Console ................................ 33
Control In .......................................... 139
RS-485 Serial Control In Port
Termination ................................. 76
Control Mode ...................... 79, 106, 107
Checking Control Mode .................. 80
Display Control Mode Screen......... 80
Display Control Mode/Init Remotes
Menu ........................................... 82
Set Control Mode Screen .............. 107
Setting the Control Mode ................ 80
Control Ports ......................... 24, 44, 139
Control In ...................................... 139
Ethernet Connections ...................... 32
Ethernet Port ................................... 32
Local ............................................. 139
Qec Port ........................................ 139
Quintech UCM Port ........................ 29
Remote .......................................... 139
RS-485 Serial Control In Port
Termination ................................. 76
Serial / Quintech UCM Pin Definition
..................................................... 24
Telnet ............................................ 139
XR Bus Connections ....................... 27
XR Bus Ports................................... 27
Controller
Appearance ..................................... 13
Controller Module........................... 12
Function .......................................... 12
Integrated Controller Front Panel ... 13
Ports ................................................ 12
Setting the Control Mode ................ 80
System Commands from the Main
Controller .................................... 81
System Commands from the Remote
Controller(s) ................................ 81
Controller Module............................... 12
Controlling Monitoring ..................... 160
Controlling the Matrix ...................... 159
Creating and Managing Configurations
....................................................... 158
Crossover
Quintech UCM Port Crossover
Adapter........................................ 30
Rev K
Crosspoint Connections ...................... 45
Crosspoint Control Access................ 151
Crosspoints
Changing Connections .................... 46
Crosspoint Connections .................. 45
Crosspoint Control Access............ 151
Locking and Unlocking Connections
..................................................... 48
Monitoring Connections ................. 46
Protection Against Accidental
Crosspoint Connection Changes . 48
Customizing Input and Output Names
....................................................... 163
Daisy Chaining.............................. 27, 29
Data Encoding Scheme ....................... 72
DB-9
Quintech UCM Port ........................ 29
Default Names .................................. 137
Defining Group Output Permissions 149,
152
Defining the Matrix Model ................. 90
Defining the Number of Matrix Inputs
and Outputs ..................................... 90
Defining the Number of Module
Inputs/Outputs ................................. 90
Defining User Names and Passwords 147
Determining Group Access ............... 152
DHCP
DHCP On/Off ................................. 42
DHCP On/Off Screen ..................... 42
Disabling DHCP ............................. 42
Enabling DHCP .............................. 42
IP Configuration with DHCP Off ... 43
IP Configuration with DHCP On .... 43
DHCP On/Off ..................................... 42
DHCP On/Off Screen ..................... 42
DHCP On/Off Screen ......................... 42
DHCP Server ...................................... 42
Differences Between Main and Remotes
......................................................... 79
Disabling DHCP ................................. 42
Display Control Mode Screen............. 80
Display Control Mode/Init Remotes
Menu ............................................... 82
Distribution Module
XRD Module Rear Panel ................ 13
i-3
QE3 Matrix Switching System
Dynamically Assigned IP Address ..... 42
Eliminating Signal Reflection ............. 74
Enable/Disable SNMP Protocol 111, 112
Enabling DHCP .................................. 42
Enter Attenuation Value Screen.......... 89
Ethernet
Ethernet Address ............................. 43
Ethernet Address Screen ................. 43
Ethernet Cable Pinout ..................... 32
Ethernet Command Protocol ........... 32
Ethernet Connections ...................... 32
Ethernet Port ................................... 32
TCP/IP............................................. 32
TCP/IP Serial Address .................... 32
Ethernet Address ................................. 43
Ethernet Address Screen ..................... 43
Ethernet Cable Pinout ......................... 32
Ethernet Command Protocol ............... 32
Ethernet Configuration
Ethernet Address ............................. 43
Ethernet Address Screen ................. 43
IP Configuration with DHCP Off ... 43
IP Configuration with DHCP On .... 43
TCP/IP............................................. 32
Ethernet Connections .......................... 32
Ethernet Download Method .............. 104
Ethernet Port ....................................... 32
Ethernet Problems ............................. 174
Ethernet vs. Serial Communications . 156
Event Log .......................................... 167
Factory Configuration Settings ........... 86
Factory Defaults for Access Control. 154
Factory Settings Code Number ........... 89
Fan Condition Monitoring .................... 4
Fans
Fan Condition Monitoring ................ 4
Get Fan Speed ................................. 54
Features ................................................. 3
Alarm Condition Notification ........... 6
Alarm Message Queue ...................... 6
Circuit Elements................................ 8
Fan Condition Monitoring ................ 4
Features Menu............................... 106
Input and Output RF Level Read ...... 7
Internal Air Temperature Monitoring
................................................... 4, 5
i-4
LCD Status Monitoring..................... 5
Port-Level Access Control ................ 8
Power Supply Monitoring ................. 4
RF Level Monitoring .................... 5, 6
Self-Monitoring................................. 3
SNMP Traps...................................... 7
Unity Gain ......................................... 8
User Permissions ............................... 7
Features Menu ................................... 106
Firmware
Ethernet Download Method .......... 104
Firmware Default Settings ............ 102
Firmware Download Instructions . 101
Firmware Download Preparation .. 101
Firmware Upgrade Kit .................. 101
Firmware Version ........................... 49
Load Firmware .............................. 100
Load Firmware Screen .................. 100
Serial Port Download Method ...... 103
Firmware Default Settings ................ 102
Firmware Download Instructions ..... 101
Firmware Download Preparation ...... 101
Firmware Upgrade Kit ...................... 101
Firmware Version ............................... 49
Firmware Version Screen ................... 50
Four Types of Modules ....................... 10
Front Panel
Factory Settings Code Number ....... 89
Front Panel Basics........................... 34
Front Panel Hierarchy ..................... 35
Front Panel Interface ....................... 34
Screen Refresh ................................ 34
Front Panel Basics............................... 34
Front Panel Hierarchy ......................... 35
Front Panel Interface ........................... 34
Front Panel LEDs .............................. 171
Front Panel RS-485 Termination ........ 75
Gain Flatness ......................................... 8
General Parameters ........................... 158
General Problems .............................. 170
Get Fan Speed ..................................... 54
Get Input RF Level ............................. 56
Get Internal Temperature .................... 55
Get Output RF Level..................... 58, 63
Get Output RF Levels Menu ... 58, 59, 63
Get Power Supply Status .................... 54
Rev K
QE3 Matrix Switching System
Get Temperature Screen ..................... 55
Grounding ........................................... 21
Group Access .................................... 152
Group ID ........................................... 151
Group Output Permissions ........ 149, 152
Hexadecimal Address ......................... 39
Hierarchy
Front Panel Hierarchy ..................... 35
How to Set Group Privileges ............ 151
I/O Cards
Input and Output Cards ................... 15
I/O Names ......... 120, 127, 131, 132, 133
I/O Names Menu ............... 120, 127, 133
Impedance Match .................................. 8
Initialization
Initializing Remotes ........................ 81
Remote Initialization Screen ........... 85
Remotes Initialization Procedure .... 82
When to Execute ............................. 81
Initializing Remotes ............................ 81
Input and Output Cards ....................... 15
Input and Output RF Level Read .......... 7
Input Cards .......................................... 15
Input Distribution
XRD Module Rear Panel ................ 13
Input RF Level Monitoring ............... 5, 6
Integrated Controller Front Panel ....... 13
Integrated Redundant Power Supplies 21
Interface Options ................................. 44
DHCP On/Off ................................. 42
DHCP On/Off Screen ..................... 42
Ethernet Address ............................. 43
Ethernet Address Screen ................. 43
Interface Options Menu .................. 38
Reset Password Screen ................... 40
RS-485 Termination Screen ............ 75
Serial Address ................................. 39
Serial Mode ..................................... 39
Serial Mode Screen ......................... 39
Serial Termination Screen............... 44
Set QEC Port # ................................ 41
Set QEC Port # Screen .................... 41
Interface Options Menu ...................... 38
Inter-Module Connections .................. 22
Internal Air Temperature Monitoring 4, 5
Internal Temperature ........................... 55
Rev K
IP Configuration with DHCP Off ....... 43
IP Configuration with DHCP On ........ 43
Isolating AC Noise .............................. 21
Keypad
Keypad Access Control................. 141
Lock Keypad Screen ..................... 142
Unlock Keypad Code .................... 143
Unlock Keypad Screen ................. 143
Keypad Access Control..................... 141
LCD..................................................... 11
LCD Status Monitoring..................... 5
LCD Status Monitoring......................... 5
LEDs
Power LEDs .................................... 22
LNB..................................................... 11
LNB Power Supplies....................... 21
LNB Power ....................................... 171
LNB Power Supplies........................... 21
Load Firmware .................................. 100
Load Firmware Screen ...................... 100
Local ................................................. 139
Lock Keypad Screen ......................... 142
Locking and Unlocking Connections.. 48
Locking and Unlocking the Keypad . 160
Login
Admin Default Login Password.... 155
Main Menu .......................................... 34
Main vs. Remote Mode ....................... 79
Main/Remote
Control Mode .................................. 79
Differences Between Main and
Remotes....................................... 79
Initializing Remotes ........................ 81
Main vs. Remote Mode ................... 79
Set Control Mode Screen .............. 107
System Commands from the Main
Controller .................................... 81
System Commands from the Remote
Controller(s) ................................ 81
Master/Slave ....................................... 73
Matrix Control
Control Mode .................................. 79
Differences Between Main and
Remotes....................................... 79
Initializing Remotes ........................ 81
Load Firmware Screen .................. 100
i-5
QE3 Matrix Switching System
Setting the Control Mode ................ 80
Matrix Control Software ................... 156
Changing a Crosspoint .................. 159
Controlling Monitoring ................. 160
Controlling the Matrix .................. 159
Creating and Managing
Configurations........................... 158
Customizing Input and Output Names
................................................... 163
Ethernet vs. Serial Communications
................................................... 156
Event Log ...................................... 167
General Parameters ....................... 158
Locking and Unlocking the Keypad
................................................... 160
Matrix Customization ................... 163
Monitoring .................................... 156
Online/Offline ............................... 161
Options .......................................... 161
Setting Up the Communication
Parameters ................................. 156
Testing the Communications ........ 158
Unlocking Crosspoints .................. 160
Matrix Customization ....................... 163
Matrix Inputs/Outputs ......................... 90
Matrix Model ...................................... 90
Matrix Size .................................... 91, 99
Maximum Cable Lengths.................... 73
Maximum Number of Devices............ 73
Menus
Access Control Menu .................... 141
Access Control Setup Menu.......... 146
Configuration Menu ........................ 89
Display Control Mode/Init Remotes
Menu ........................................... 82
Features Menu............................... 106
Front Panel Hierarchy ..................... 35
Get Output RF Levels Menu58, 59, 63
I/O Names Menu ........... 120, 127, 133
Interface Options Menu .................. 38
Main Menu ...................................... 34
Options Menu Screen ............ 108, 110
Select Input to Set Threshold Menu 53
SNMP Menu ................................. 111
System Information Menu .............. 49
System Options Menu ..................... 87
i-6
System Setup Menu ........................ 90
Model ............................................ 90, 92
Model Number/Type Screen ............... 92
Module Inputs/Outputs ....................... 90
Module Interconnections ...................... 9
Module Sizes ....................................... 93
Module Sizes Menu ............................ 93
Modules................................................. 9
Controller Module........................... 12
Definition Of ..................................... 9
Descriptions .................................... 12
Module Interconnections .................. 9
Module Sizes Menu ........................ 93
SRM Module Size Screen ............... 94
SRO Module Size Screen.......... 95, 96
Switching System Modules............. 10
System Setup Menu ........................ 90
Types of Modules ........................... 10
Monitor a Connection ......................... 45
Monitoring ........................................ 156
Alarm Condition Notification ........... 6
Alarm Message Queue ...................... 6
Connection Status Screen ............... 45
Fan Condition Monitoring ................ 4
Input and Output RF Level Read ...... 7
Internal Air Temperature Monitoring
................................................... 4, 5
LCD Status Monitoring..................... 5
Monitoring Connections ................. 46
Power Supply Monitoring ................. 4
RF Level Monitoring .................... 5, 6
Self-Monitoring................................. 3
Monitoring Connections ..................... 46
Names ............................................... 137
Assigning Names Using Protocol
Commands ................................ 136
I/O Names Menu ........... 120, 127, 133
Set Input Names Screen ................ 134
Set Output Names Screen ............. 135
Naming Inputs and Outputs ..... 120, 127,
131, 132, 133
Noise Immunity .................................. 72
Number of Devices ............................. 73
Online/Offline ................................... 161
Options ...................................... 106, 161
Interface Options Menu .................. 38
Rev K
QE3 Matrix Switching System
Options Menu Screen ............ 108, 110
SNMP Menu ................................. 111
System Options Menu ..................... 87
Options Menu Screen ................ 108, 110
Output Cards ....................................... 15
Packets
Command Packet ............................ 32
Parameters ........................................... 44
DHCP On/Off ................................. 42
Ethernet Address ............................. 43
Serial Address ................................. 39
Serial Mode ..................................... 39
Set QEC Port # ................................ 41
Setting Operating Panels ................. 34
Partitioning a Matrix System Between
Multiple Users or Groups.............. 138
Password ........................................... 138
Password Entry Screen ..................... 144
Password Structure............................ 145
Passwords
Admin Default Login Password.... 155
Change Password Screen .............. 148
Configuration Menu Pass-Code
Screen .......................................... 88
Defining User Names and Passwords
................................................... 147
Factory Settings Code Number ....... 89
Password Entry Screen ................. 144
Password Structure........................ 145
Reset Password Screen ................... 40
Resetting the QEC Port Access
Password ..................................... 40
Valid Passwords and Length ......... 149
Passwords and Permissions............... 176
PC Control
Ethernet Command Protocol ........... 32
Ethernet Connections ...................... 32
Ethernet Port ................................... 32
Quintech UCM Port ........................ 29
Serial Address ................................. 39
Serial Mode ..................................... 39
Telnet .............................................. 33
XR Bus Connections ....................... 27
XR Bus Ports................................... 27
PDUs ................................................... 33
Permissions
Rev K
Defining Group Output Permissions
........................................... 149, 152
User Permissions ............................... 7
Pinouts
Control Ports ................................... 24
Ethernet Cable Pinout ..................... 32
Serial / Quintech UCM Pin Definition
..................................................... 24
Port Access Control Enable/Disable
Screen ............................................ 140
Port Descriptions ................................. 21
Port Termination
Front Panel RS-485 Termination .... 75
RS-485 Port Termination ................ 76
RS-485 Serial Control In Port
Termination ................................. 76
RS-485 Termination Screen ............ 75
Serial Termination .......................... 44
Serial Termination Screen............... 44
Port-Level Access Control .................... 8
Ports .............................................. 12, 44
Control Ports ................................... 24
Ethernet Connections ...................... 32
Ethernet Port ................................... 32
Port Access Control Enable/Disable
Screen ........................................ 140
Quintech UCM Port ........................ 29
Quintech UCM Port Crossover
Adapter........................................ 30
RS-485 Port Termination ................ 76
RS-485 Serial Control In Port
Termination ................................. 76
Serial / Quintech UCM Pin Definition
..................................................... 24
Set QEC Port # ................................ 41
Turning Off an Output .................... 48
Which Ports Are RS-485 ?.............. 75
XR Bus Connections ....................... 27
XR Bus Ports................................... 27
Power
AC Connections .............................. 21
AC Power ........................................ 21
AC Redundancy .............................. 21
DC Redundancy .............................. 21
Redundancy..................................... 21
Voltages .......................................... 22
i-7
QE3 Matrix Switching System
Power Cords ........................................ 21
Power LEDs ........................................ 22
Power Supplies.............................. 18, 21
Get Power Supply Status ................ 54
LNB Power Supplies....................... 21
Power LEDs .................................... 22
Power Supply Monitoring ................. 4
Report Power Supply Status ........... 54
Voltages .......................................... 22
Power Supply Cards
Power Supplies................................ 18
Power Supply Monitoring ..................... 4
Preventing Accidental Crosspoint
Changes ......................................... 138
Privilege Groups ....................... 138, 151
Problems and Solutions..................... 169
Ethernet Problems ......................... 174
Front Panel LEDs .......................... 171
General Problems .......................... 170
LNB Power ................................... 171
Passwords and Permissions........... 176
Problems with Crosspoint
Connections............................... 172
Remote Not Working .................... 175
Serial Port Problems ..................... 173
Problems with Crosspoint Connections
....................................................... 172
Protection Against Accidental
Crosspoint Connection Changes ..... 48
Protocol
Ethernet Command Protocol ........... 32
RS-232 ............................................ 25
RS-232 Advantages/Disadvantages 26
RS-422 ............................................ 26
RS-422 Advantages/Disadvantages 26
RS-485 ............................................ 26
SNMP.............................................. 33
SNMP Menu ................................. 111
TCP/IP............................................. 32
Protocol Data Units (PDUs)................ 33
QE3 ..................................................... 11
QE3 Matrix System
Types of Modules ........................... 10
QE3 System ........................................ 11
Qec Port ............................................ 139
QEC Port Access
i-8
Port Access Control Enable/Disable
Screen ........................................ 140
Reset Password Screen ................... 40
Resetting the QEC Port Access
Password ..................................... 40
Set QEC Port # ................................ 41
Set QEC Port # Screen .................... 41
QEC Port Number
QEC Port Number Default Setting . 42
What Is a QEC Port Number ? ........ 41
Why Change the QEC Port Number ?
..................................................... 42
QEC Port Number Default Setting ..... 42
QED .................................................... 11
QEO .................................................... 11
Quintech UCM
Daisy Chaining................................ 29
Quintech UCM Port ............................ 29
Quintech UCM Port Crossover Adapter
......................................................... 30
Read Input RF dBm Signal Level ....... 56
Read Output RF dBm Signal Level ... 59,
63
Receiver/Transmitter Termination ...... 74
Redundancy......................................... 21
AC Redundancy .............................. 21
DC Redundancy .............................. 21
Redundant Power Supplies ................. 21
Refresh Mechanism ............................ 34
Remote .............................................. 139
Remote Addressing
Adding Additional Remotes ........... 83
Remote Initialization Screen ........... 85
Setting the Serial Address ............... 39
Remote Control
Adding Additional Remotes ........... 83
Display Control Mode Screen......... 80
Display Control Mode/Init Remotes
Menu ........................................... 82
System Commands from the Remote
Controller(s) ................................ 81
Remote Initialization Screen ............... 85
Remote Not Working ........................ 175
Remote Ports ....................................... 44
Remote Initialization Screen ........... 85
RS-485 Port Termination ................ 76
Rev K
QE3 Matrix Switching System
Remotes
Remotes Initialization Procedure .... 82
When to Execute ............................. 81
Remotes Initialization
Adding Additional Remotes ........... 83
Display Control Mode/Init Remotes
Menu ........................................... 82
Initializing Remotes ........................ 81
Remote Initialization Screen ........... 85
Remotes Initialization Procedure ........ 82
Replacement Cables ............................ 23
Report Power Supplies Status Screen . 54
Report Power Supply Status ............... 54
Reset Password Screen ....................... 40
Resetting the QEC Port Access
Password ......................................... 40
Resistors
Biasing Resistors............................. 74
RF........................................................ 11
Input and Output RF Level Read ...... 7
RF dBm Level ............................... 5, 6
RF Level Monitoring .................... 5, 6
RF Connectors .................................... 23
RF dBm Level ................................... 5, 6
RF Level Read ...................................... 7
RF Signals
Accuracy of dBm Values ................ 60
Changing Connections .................... 46
Get Input RF Level ......................... 56
Get Output RF Level................. 58, 63
Inter-Module Connections .............. 22
Locking and Unlocking Connections
..................................................... 48
Monitoring Connections ................. 46
Read Input RF dBm Signal Level ... 56
Read Output RF dBm Signal Level 59,
63
Set Input RF Warning Level ........... 53
Turning Off an Output .................... 48
RS-232 ................................................ 25
RS-232 Advantages/Disadvantages 26
Serial / Quintech UCM Pin Definition
..................................................... 24
RS-232 Advantages/Disadvantages .... 26
RS-422 ................................................ 26
RS-422 Advantages/Disadvantages 26
Rev K
Serial / Quintech UCM Pin Definition
..................................................... 24
RS-422 Advantages/Disadvantages .... 26
RS-485 .......................................... 26, 71
4-Wire and 2-Wire Systems ............ 73
Balanced Line Interface .................. 72
Balanced Signaling ......................... 71
Cable Lengths ................................. 73
Data Encoding Scheme ................... 72
Front Panel RS-485 Termination .... 75
Master/Slave ................................... 73
Maximum Cable Lengths................ 73
Maximum Number of Devices........ 73
Noise Immunity .............................. 72
Receiver/Transmitter Termination .. 74
RS-485 Basics ................................. 71
RS-485 Pinout ................................. 73
RS-485 Port Termination ................ 76
RS-485 Serial Control In Port
Termination ................................. 76
RS-485 Termination Screen ............ 75
Serial / Quintech UCM Pin Definition
..................................................... 24
Serial Termination .......................... 44
Signal Reflection............................. 74
Unbalanced Signal .......................... 71
Unbalanced Signaling ..................... 71
Which Ports Are RS-485 ?.............. 75
RS-485 Basics ..................................... 71
RS-485 Pinout ..................................... 73
RS-485 Port Termination .................... 76
RS-485 Serial Control In Port
Termination ..................................... 76
RS-485 Termination Screen ................ 75
Screen Refresh .................................... 34
Screens
Change Connection Screen ............. 47
Change Password Screen .............. 148
Change User Name Screen ........... 148
Configuration Menu Pass-Code
Screen .......................................... 88
Connection Status Screen ............... 45
DHCP On/Off Screen ..................... 42
Display Control Mode Screen......... 80
Enter Attenuation Value Screen...... 89
Ethernet Address Screen ................. 43
i-9
QE3 Matrix Switching System
Firmware Version Screen ............... 50
Get Temperature Screen ................. 55
Load Firmware Screen .................. 100
Lock Keypad Screen ..................... 142
Model Number/Type Screen ........... 92
Password Entry Screen ................. 144
Port Access Control Enable/Disable
Screen ........................................ 140
Remote Initialization Screen ........... 85
Report Power Supplies Status Screen
..................................................... 54
Reset Password Screen ................... 40
RS-485 Termination Screen ............ 75
Serial Mode Screen ......................... 39
Set Access Screen ......... 149, 150, 153
Set Control Mode Screen .............. 107
Set Input Names Screen ................ 134
Set Output Names Screen ............. 135
Set QEC Port # Screen .................... 41
Set SNMP Trap IP ........................ 113
SNMP On/Off Screen ................... 112
SRM Module Size Screen ............... 94
SRO Module Size Screen.......... 95, 96
Unlock Keypad Screen ................. 143
Select Input to Set Threshold Menu.... 53
Self-Monitoring..................................... 3
Serial / Quintech UCM Pin Definition 24
Serial Address ............................... 32, 39
Setting the Serial Address ............... 39
TCP/IP Serial Address .................... 32
Valid Serial Addresses .................... 40
Serial Control
Adding Additional Remotes ........... 83
Quintech UCM Port ........................ 29
Quintech UCM Port Crossover
Adapter........................................ 30
RS-232 ............................................ 25
RS-232 Advantages/Disadvantages 26
RS-422 ............................................ 26
RS-422 Advantages/Disadvantages 26
RS-485 ............................................ 26
Serial Address ................................. 39
Serial Mode ..................................... 39
Setting the Serial Address ............... 39
Valid Serial Addresses .................... 40
Serial Interface
i-10
Quintech UCM Port ........................ 29
RS-232 ............................................ 25
RS-232 Advantages/Disadvantages 26
RS-422 ............................................ 26
RS-422 Advantages/Disadvantages 26
RS-485 ............................................ 26
Serial Address ................................. 39
Serial Mode ..................................... 39
Serial Mode ......................................... 39
Serial Mode Screen ............................. 39
Serial Port Download Method .......... 103
Serial Port Problems ......................... 173
Serial Termination .............................. 44
Serial Termination Screen................... 44
Set Access Screen ............. 149, 150, 153
Set Control Mode Screen .................. 107
Set dBm Warning Level...................... 53
Set Input Names ................................ 134
Set Input Names Screen .................... 134
Set Input RF Warning Level ............... 53
Set Output Names ............................. 135
Set Output Names Screen ................. 135
Set QEC Port # .................................... 41
Set QEC Port # Screen ........................ 41
Set SNMP Trap IP ............................ 113
Setting Operating Panels ..................... 34
Setting the Control Mode .................... 80
Setting the Serial Address ................... 39
Setting Up the Communication
Parameters ..................................... 156
Setting User Access .......................... 150
Settings
RS-232 ............................................ 25
RS-422 ............................................ 26
RS-485 ............................................ 26
Shielding ............................................. 21
Signal Reflection................................. 74
Eliminating Signal Reflection ......... 74
SNMP.......................................... 33, 111
Agents ............................................. 33
Set SNMP Trap IP ........................ 113
SNMP Additional Features ............. 33
SNMP Menu ................................. 111
SNMP On/Off Screen ................... 112
SNMP Traps...................................... 7
SNMP Additional Features ................. 33
Rev K
QE3 Matrix Switching System
SNMP Menu ..................................... 111
SNMP On/Off ................................... 112
SNMP On/Off Screen ....................... 112
SNMP Protocol Enable/Disable 111, 112
SNMP Traps.......................................... 7
SRM Module Size ............................... 94
SRM Module Size Screen ................... 94
SRO Module Size ......................... 95, 96
SRO Module Size Screen.............. 95, 96
Standard Control Ports ...................... 139
Static IP Configuration
Ethernet Address Screen ................. 43
IP Configuration with DHCP Off ... 43
IP Configuration with DHCP On .... 43
Switching System Modules................. 10
System Access .................................. 139
System Commands
System Commands from the Main
Controller .................................... 81
System Commands from the Remote
Controller(s) ................................ 81
System Commands from the Main
Controller ........................................ 81
System Commands from the Remote
Controller(s) .................................... 81
System Controller
Appearance ..................................... 13
Controller Module........................... 12
Function .......................................... 12
Integrated Controller Front Panel ... 13
Ports ................................................ 12
Setting the Control Mode ................ 80
System Commands from the Main
Controller .................................... 81
System Commands from the Remote
Controller(s) ................................ 81
System Features
Alarm Condition Notification ........... 6
Alarm Message Queue ...................... 6
Circuit Elements................................ 8
Fan Condition Monitoring ................ 4
Input and Output RF Level Read ...... 7
Internal Air Temperature Monitoring
................................................... 4, 5
LCD Status Monitoring..................... 5
Port-Level Access Control ................ 8
Rev K
Power Supply Monitoring ................. 4
RF Level Monitoring .................... 5, 6
Self-Monitoring................................. 3
SNMP Traps...................................... 7
Unity Gain ......................................... 8
User Permissions ............................... 7
System Information ............................. 49
Firmware Version ........................... 49
Get Fan Speed ................................. 54
Get Input RF Level ......................... 56
Get Internal Temperature ................ 55
Get Output RF Level................. 58, 63
Get Power Supply Status ................ 54
Read Input RF dBm Signal Level ... 56
Read Output RF dBm Signal Level 59,
63
Report Power Supply Status ........... 54
Set dBm Warning Level.................. 53
Set Input RF Warning Level ........... 53
System Information Menu .............. 49
System Information Menu .................. 49
System Options ................................... 44
Configuration Menu ........................ 89
Configuration Menu Pass-Code
Screen .......................................... 88
DHCP On/Off ................................. 42
DHCP On/Off Screen ..................... 42
Display Control Mode Screen......... 80
Ethernet Address ............................. 43
Ethernet Address Screen ................. 43
Factory Settings Code Number ....... 89
Features Menu ............................... 106
I/O Names Menu ........... 120, 127, 133
Interface Options Menu .................. 38
Load Firmware Screen .................. 100
Model Number/Type Screen ........... 92
Module Sizes Menu ........................ 93
Port Access Control Enable/Disable
Screen ........................................ 140
Reset Password Screen ................... 40
RS-485 Termination Screen ............ 75
Serial Address ................................. 39
Serial Mode ..................................... 39
Serial Mode Screen ......................... 39
Serial Termination Screen............... 44
Set Control Mode Screen .............. 107
i-11
QE3 Matrix Switching System
Set Input Names Screen ................ 134
Set Output Names Screen ............. 135
Set QEC Port # ................................ 41
Set QEC Port # Screen .................... 41
SNMP Menu ................................. 111
SRM Module Size Screen ............... 94
SRO Module Size Screen.......... 95, 96
System Options Menu ..................... 87
System Options Menu ......................... 87
System Overview
Differences Between Main and
Remotes....................................... 79
Features ............................................. 3
Modules............................................. 9
Types of Modules ........................... 10
System Setup
I/O Names Menu ........... 120, 127, 133
Load Firmware Screen .................. 100
Model Number/Type Screen ........... 92
Module Sizes Menu ........................ 93
Set Input Names Screen ................ 134
Set Output Names Screen ............. 135
SRM Module Size Screen ............... 94
System Setup Menu ............................ 90
System Sizes ......................................... 9
System Upgrades .................................. 9
TCP/IP................................................. 32
Broadcast Address .......................... 33
Command Packet ............................ 32
Ethernet Address Screen ................. 43
IP Configuration with DHCP Off ... 43
IP Configuration with DHCP On .... 43
Set SNMP Trap IP ........................ 113
SNMP.............................................. 33
TCP/IP Serial Address .................... 32
TCP/IP Serial Address ........................ 32
Telnet .......................................... 33, 139
Telnet Console ................................ 33
Telnet Console .................................... 33
Temperature
Get Internal Temperature ................ 55
Internal Air Temperature Monitoring
................................................... 4, 5
Internal Temperature ....................... 55
Termination
Front Panel RS-485 Termination .... 75
i-12
RS-485 Port Termination ................ 76
RS-485 Serial Control In Port
Termination ................................. 76
RS-485 Termination Screen ............ 75
Serial Termination .......................... 44
Serial Termination Screen............... 44
Testing the Communications ............ 158
Traps
Set SNMP Trap IP ........................ 113
SNMP Traps...................................... 7
Troubleshooting ................................ 168
Ethernet Problems ......................... 174
Front Panel LEDs .......................... 171
General Problems .......................... 170
LNB Power ................................... 171
Passwords and Permissions........... 176
Problems and Solutions................. 169
Problems with Crosspoint
Connections............................... 172
Remote Not Working .................... 175
Serial Port Problems ..................... 173
Turning Off an Output ........................ 48
Types of Modules ............................... 10
UCM ................................................... 11
Quintech UCM Port ........................ 29
Unbalanced Signal .............................. 71
Unbalanced Signaling ......................... 71
Unity Gain ............................................. 8
Unlock Keypad Code ........................ 143
Unlock Keypad Screen ..................... 143
Unlocking Crosspoints ...................... 160
Upgrades
Firmware Upgrade Kit .................. 101
Load Firmware Screen .................. 100
System Sizes ..................................... 9
System Upgrades .............................. 9
User Access....................................... 150
User Accounts ........................... 138, 146
User Names
Change User Name Screen ........... 148
Defining User Names and Passwords
................................................... 147
User Permissions ................................... 7
Username .......................................... 138
Valid Passwords and Length ............. 149
Valid Serial Addresses ........................ 40
Rev K
QE3 Matrix Switching System
Viewing the Status of a Particular
Output Channel ............................... 46
Voltages .............................................. 22
Voltages and Signaling ....................... 72
Warranty Information ....................... 168
What Is a QEC Port Number ? ............ 41
Why Change the QEC Port Number ? 42
XR Bus
Daisy Chaining................................ 27
XR Bus Connections ....................... 27
XR Bus Ports................................... 27
XR Bus Connections ........................... 27
XR Bus Ports....................................... 27
XRD
XRD Module Rear Panel ................ 13
XRD Module Rear Panel .................... 13
Rev K
XRM Architecture
Input and Output Cards ................... 15
Power Supplies................................ 18
XRM Matrix System
AC Connections .............................. 21
Configuration Settings .................... 86
Differences Between Main and
Remotes....................................... 79
Features ............................................. 3
Model Number/Type Screen ........... 92
Module Sizes Menu ........................ 93
Modules............................................. 9
SRM Module Size Screen ............... 94
SRO Module Size Screen.......... 95, 96
System Sizes ..................................... 9
Voltages .......................................... 22
i-13
QE3 Series Matrix Switching System
Date Received: ___________________________
Date Installed: _______________________
Serial Number: ___________________________
NOTES:
______________________________________________________________________________
______________________________________________________________________________
______________________________________________________________________________
______________________________________________________________________________
______________________________________________________________________________
______________________________________________________________________________
______________________________________________________________________________
______________________________________________________________________________
______________________________________________________________________________
______________________________________________________________________________
______________________________________________________________________________
______________________________________________________________________________
______________________________________________________________________________
______________________________________________________________________________
______________________________________________________________________________
______________________________________________________________________________
______________________________________________________________________________
______________________________________________________________________________
______________________________________________________________________________
______________________________________________________________________________
______________________________________________________________________________
______________________________________________________________________________
______________________________________________________________________________
______________________________________________________________________________
______________________________________________________________________________
______________________________________________________________________________