1
®
I
N T
E R
N
A T
_ O
LOS ANG EL ES'_CALIFO
Thermoelectric
N
RNtA,
L
USA
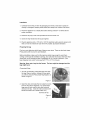
Beer Dispenser
VT-BD
User Manual
Table of Contents
.
Important
safety information
4.
Instructions
5.
What comes in the box (parts list)
6.
Installation
instuctions
(pressurized
Installation
instructions
(standard
Connecting
the CO2 assembly
.
9.
Operation
10.
Removal
prior to operation
keg)
/ Setting the Temperature
and Cleanng
11-12 Terms and Conditions
Replacement
keg)
/ Warranty
Cartridges
This appliance is delivered to you with three 16-gram CO2 Cartridges which will enable you to use approximately 3 of the 5Liter size beer kegs
To order new cartridges which can be mailed directly to your
home please call (800) 777-8466.
WARNING:
CO2
Cartridges contain compressed gas. Do not
puncture, squeeze, or modify the cartridge in any way. Keep
away from sources of heat, and children. Failure to use this
product as it was originally intended could result in bodily injury
and or death.
Important
Safety Information
To avoid the risk of electrical shock,
property damage, personal injury or death:
The power cord must be p_ugged into a 3-p_ong grounding4ype wa_lreceptacte, g_ounded
in accordance with the NationaJ Electrical Code, ANSI/NFPA 70 - latest edition and Ioca_
codes and ordinances,
it is the persona_ responsibiJity
installed
by a qualified
of the _nsumer
to have a proper
3=prong wall receptacle
electrician.
GROUND|NG TYPE
WALL REI ;EPTACLE
DO NOT, UNDER ANY CIRCUMSTANCES, REMOVE
THE POWER CORD GROUNDING PRONG,
A separate
should
adequately
be available
fused and grounded
circuit
for this appliance.
Do not remove any grounding wires from individual
components while servicing, unless the component
is to be removed and replaced, /tis extremely
important to replace al! grounding wires when
components are replaced
POWER SUPPLYCORD
WiTH 3-PRONG
GROUNDINGPLUG
ELECTRIC SHOCK HAZARD
Disconnect e_tric
supply from appliance before servicing,
Repiace all panels before operating,
Failure to do so could result in death or electrical shock
"
,'
DO NOT USE A GROUND FAULT INTERRUPTER (GFI).
A DEDICATED 15 AMP CIRCUIT IS HIGHLY RECOMMENDED.
3
Read the following
instructions
this appliance
prior to operating
• Do not use the appliance if the power supply cord is damaged. Should
this be the case, it must be replaced by a qualified person so that any
potential shock hazard is avoided
• Prior to any connection, check that the indicated operating voltage corrosponds to the voltage at the outlet.
• This appliance is not designed for children. Never allow unattended children to use this appliance.
• Prior to any cleaning, and in general when the appliance is not in use
make sure that it is not plugged in
• Make sure that your beer dispenser is set on a flat surface, protected
from the sun and avoid any other heat source.
• The appliance should be operated at room temperature, between 54°F
and 80°F.
• Do not attempt to move the appliance while it is full so as to protect it
from falling over.
• When unplugging the unit always pull the plug and never the cord.
• Never lift the appliance by the power supply cord or the dispensing tap.
• Keep the power supply cord away from heat sources, not intended for
use in the garage.
• Do not try to repair, adjust or replace this appliances components by
yourself. Should it not operate correctly, contact your dealer's customer
support.
• This appliance is designed for household use only and not for profes
sional use. Do not use for purposes other than that which it was designed for.
• Do not immerse the appliance or its power supply cord in water or any
other liquid
• Do not cover the appliance or place anything on it.
• Do not insert any object into the ventilation spaces.
• Only use the CO2 Cartridges provided for this appliance.
• Cartridges contain pressurized COg. Keep them away from heat, in a dry
and cool place.
• Do not throw away empty CO2 Cartridges into a fire.
• Prior to operating the beer dispenser, clean it using the instructions in
this manual.
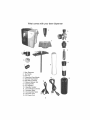
What comes with your beer dispenser
1
2
10
11
4
5
12
1 Beer Dispenser
2. Tap Handle
3. Drip Tray
4. Pressurized Keg Adapter
5. Standard Keg Adapter
6. Keg Seals (2 peices)
7. Pressure Release Tool
8. Cleaning Bottle
9. CO2 Regulator
10. Regulator Adaptor
11. 002 Cartridge (3 peices)
12. Cartridge Holder
13. 002 Assembly Stand
14. DC Power Cord
15. AC Power Cord
15
14
13
Installation
1. Carefully remove the unit from its packaging and check to see that no parts are
missing or damaged. (keeping small plastic parts away from children at all times)
2. Place the dispenser on a steady flat surface leaving at least 4" on either side for
proper ventilation.
3. Place the drip tray in the notch provided on the front of the unit.
4. Screw the Tap Handle into the tap and tighten.
5. Plug the appliance into a 110VAC or 12V DC electrical outlet using the proper cord
Note: Unit is not intended for use with 50 Hz outlets. (European Standard)
Preparing the keg
First you must determine which type of keg you are using. There are two basic types,
Pressurized (with CO2 built in) and Standard.
Before installation make sure that the keg has rested long enough to avoid foam
coming out through the ventilation opening, also cold beer will produce less foam than
warm beer, so pre-chilling the beer in refrigerator for 6-12 hours is advised. (Your
beer dispenser can cool a 5-Litre keg from 77°F to 41°F in 9 hours.)
Warning: Never put a keg into the freezer.
keg might burst.
The beer might be damaged and the
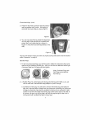
Pressurized Kegs
1. You will not need any of the parts that come with
the keg (Tap and nozzle) Instead of those parts
you will be using the Pressurized Keg Adapter, as
shown in figure 1.
Figure 1
2. Open the door and locate the two tubes that come
from the front of the dispenser. For pressurized
kegs you will only need the tube that connects
directly to the tap. tt has the male connector (the
female connector has a white button on it)
Connects to Tap
Figure 2
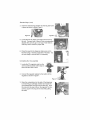
Pressurized Kegs (cont)
3. Press the Tap-Hose connector into the pressurized keg adaptor until it locks. Pull lightly on
connector to ensure that you have a tight fit.
Figure 3
4. You can now place the keg inside the dispenser.
Turn the keg so that the tube is not folded and
proper flow is not obstructed as is shown in
Figure 4. (the other hose will hang freely on the
side)
Figure 4
You are now ready to enjoy your beer, for proper pouring instructions read the section
called "Operation" on page 9.
Standard Kegs
1. For all non-pressurized kegs you will first want to follow the instructions that came
with the keg for releasing excess gas. Then you will want to determine which type
of plug your keg has. the types are listed below
Note: Combined Plugs and
Vent Plugs Look identical
from the top.
Rubber Plug
Combined or Vent Plug
2. a: Rubber Plug. You will simply push the plug into the keg until it falls in, you can
use the tube end of the Standard Keg Adapter to push it through.
b: Combined or Ventplug. You will want to remove the entire plug and replace it
with one of the keg seals included with your dispenser. Depending on which type
of plug you have you may need to use pliers to remove it, you will want to take
caution not to bend the metal around the plug as this could cause an air leak. tt
is common for part or all of the plug to fall into the keg during this step, this is
normal and it will not affect the flavor of your beer.
Standard Kegs (cont)
3. Insert the standard keg adapter into the keg and lock it
in place as shown in figure 5 and 6.
Figure 5
Figure 6
5. Locate the the two tubes comming from the front of
the unit. Connect both of them to their corrosponding
adapter (they will only go in one way). Push them in
until they click to ensure a proper seal.
6. Place the keg into the dispenser taking care not to
fold the tubing or restrict proper flow of the beer. You
are now ready to connect the C02 assembly.
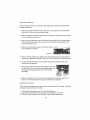
Connecting the C02 assembly
1. Locate the C02 regulator and turn the
valve counterclockwise until it stops to
ensure tht the valve is shut.
2. Connect the regulator adapter to the bottom of the
regulator as shown in figure 7.
Figure 7
3. Open the compartment on the side of the dispenser
to reveal the gas cartridge chamber and locate the
unconnected tube coming from the beer keg. Push
this tube into the open hole on the regulator. (to disconnect, push in the ring on the end while pulling
the tube)
Connecting
the002
assembly
(cont)
4. Place a new 002 Cartridge into the cartridge holder and screw it firmly to the regulator adaptor, you may hear a sound once the cartridge is pierced. Once attached
do not unscrew the cartridge until all the pressure has been released (see Removal
and Cleaning on page 10)
5. At this point the system should be completely connected, you should now slowly
turn the regulator clockwise to pressurize the system. The dial on the gauge will
rise gradually, stop when it reaches 0.5 bar.
6. With the pressure correctly set you can now place
the whole CO2 assembly on the assembly stand
and put it in the dispenser with the gauge facing
the clear window.
7. Slide the CO2 compartment door into place and
now you will be ready to enjoy your beer.
Operation
• Always use clean glasses rinsed with very cold water at the time of serving. Impurities prevent the foam from forming on the glass.
• Hold the glass under the dispensing tap, making sure that the nozzle is not in contact with the glass.
• Pull the dispensing tap handle towards you while holding the glass at an angle.
The quantity of foam depends on the glass angle. Set the glass upright as the
beer level goes up.
• Push the tap handle forward when the foam reaches the glass brim. This will stop
the beer from flowing.
Setting the temperature
Use the up and down arrow buttons to set the desired temperature
Note: The dispenser has a range between 38 ° F and 54 ° F
the third button allows you to turn on an off the display to conserve
energy when it is not being used.
Removal
andCleaning
When
thekegisempty,
itisadvisable
tothoroughly
cleanthebeerdispenser
before
loading
another
keg.
1. Openthecartridge
chamber
andturnthevalveontheregulator
counterclockwise
toshutitoff.(ifyouareusinga standard
keg)
2. Place
acontainer
underthedispensing
tapanddrainbypullingthehandle
towards
youuntilnothing
moreflowsout.
3. Openthekegcompartment
dooranddisconnect
thehose(s)
fromthekegadaptor.
Theconnectors
arereleased
bypushing
inthewhitebutton,
whilepullingonthe
connector
(notthehose)
4. Empty
theremaining
gasusingthepressure
release
toolasindicated
inFigure
8.
Figure
8
5. Remove
thekegadapter
bypushing
inthecatch(standard
keg)orsqueezing
the
release
tabs(pressurized
keg)andpullingupuntiltheadapter
hascleared
thekeg.
6. Tocleanthekeg,firstfillthecleaning
bottlehalfway
withlukewarm
wateranda
smallamount
ofdetergent.
7.Attachbothhoses
tothestandard
kegadapter,
andinsert
intothebottle.Note: if you are using a pressurized keg,
the pressurized keg adapter will have to be washed
separately.
8. Open the regulator valve and run the cleaning solution through the system for 5
seconds, then repeat steps 6-8 using only water with no detergent.
Replacing the cartridge
Three 16 gram cartridges are provided for approximately
cartridge is empty, replace it as follows:
three 5-Litre kegs. When the
1. Shut the pressure gauge valve. (turn it counterclockwise)
2. Unscrew the cartridge holder and replace the cartridge with a new one.
3. Open the pressure gauge valve and set it to the required temperature.
10
Vinotemp International ("Seller") and the person or entity that acquires these goods from Seller
("Purchaser") hereby fully agree to the following terms and conditions of the sale: Shipping fees
are the responsibility of the Purchaser whether freight prepaid or freight collect. Seller assumes
no responsibility for the goods sold to the Purchaser once the goods have left the Selier's premises, including, but not limited to, late delivery by the moving carrier, or for events caused by any
difficulty carrier incurs in attempting to fit the goods into the Purchaser's place of business or residence due to the size of the goods or otherwise. Purchaser assumes all responsibility for delivery,
payment of freight, access, measurement, installation, hook-up, wiring, moving and storage of
the goods. The transportation of all goods is subject to the terms and conditions which the moving
carrier imposes on Purchaser including, but not limited to, additional charges imposed per flight
of stairs, andlor additional charges resulting from the carrier's inability to safely and/or adequately
use the building elevator to lift the goods to an upper floor. Any claim for damages incurred during
shipment by the carrier of the goods are insured and handled directly with the carrier. Any damages due to manufacture defects will be handled directly with Vinotemp International, subject to
the limited warranty.
All sales are final, and unless authorized in writing by the Seller, Purchaser may not return the
goods, under any circumstance. If Purchaser refuses to accept the goods, under any circumstance, the Purchaser is liable for the return and cost of freight both ways, and if Seller does take
back the goods, there will be a restocking charge that is 35% of the purchase price of the goods.
Custom Cabinet and Racking are non returnable. Purchaser must notify Seller of non-conforming goods within four days of delivery, after which time all goods are deemed accepted, tf an order
has been placed and production has started, cancellation of your order will be a 15% charge.
If Purchaser tenders payment with a check that has insufficient funds (NSF), or stops payment on
a check or credit card for any reason, Purchaser agrees to pay for all costs associated with the
Seller's connection or litigation of such a claim, including without limitation extra damages, court
costs and attorneys' fees. Finance charges begin the date of invoice. Collection fees plus NSF
fee of 505 will be added to your invoice, which you agree to promptly pay. Title to the goods does
not pass until payment is received in full by Seller and Seller retains a security interest in the
goods until they are paid for in full.
LIMITED WARRANTY: Seller warrants that the goods will be free of defects in materials and
workmanship as follows: Furniture style (wood) wine units: all cooling unit parts for a period of 5
(five) years; cabinetry and labor (uninstalled) for a period of 12 (twelve) months from date of sale,
removal and re-installation of unit is not included in warranted labor. For the metal cabinet wine
units: parts and labor for cooling system and cabinetry for a period of 12 (twelve) months from
date of sale, removal and re-installation of unit is not included in warranted labor. For a scratch
and dent or refurbished unit, warranty is 3 months from your dated invoice (parts for function only,
not cosmetic). Thermoelectric Units: 90 (ninety) days from the date of sale. (This includes Wine
Coolers, Beer Dispensers and Refrigerators. Cigar Humidors and Racking Systems are not warranted. Split Systems and installed products are parts only for 1 year, no labor. There is no warranty on parts purchased separately. Purchaser's exclusive remedy is limited, at Seller's option;
to repair or replace defective part[s] with either new or factory reconditioned part[s]. Purchaser is
11
responsible for shipping the unit pre-paid to designated facility and Seller will pay return shipping
charges in the continental United States for items repaired under warranty with in 12 (twelve)
months from date of sale. Since the natural variation in texture, density, grain, color, tone and
shade of wood is unavoidable; Seller does not guarantee the texture, color, tone or shade of the
wood: nor does seller guarantee the colorfastness of wood or against peeling, chipping, cracking
or scratching. Note: Unfinished wood is subject to warping; all wood surfaces must be sealed
before placing cellar into service. Improper placement of the unit will void the warranty. This limited warranty does not cover damage due to such things as accident, misuse, abuse, mishandling, neglect, acts of God, fires, earthquakes, floods, high winds, government, war, riot or labor
trouble, strikes, lockouts, delay of carrier, unauthorized repair, or any other cause beyond the
control of the Seller, whether similar or dissimilar to the foregoing. Seller is not responsible for any
damages caused to Seller's property resulting from the good. This limited warranty applies only
inside the Continental US. (Alaska, Puerto Rico and Hawaii are not warranted)
Purchaser understands and acknowledges that the goods sold here are wine cellars, cigar humidors, and/or other similar units which house wine or cigars. Purchaser assumes all risk of using
these units, including risk of spoilage, humidity variations, temperature variations, leaks, fire,
water damage, mold, mildew, dryness and similar and any other perils that might occur.
Seller is not responsible for incidental or consequential damages, and there no warranties, expressed or implied, which extend beyond the Limited Warranty described above. The implied
warranties of merchantability and of fitness for a particular purpose are hereby expressly disclaimed. Some states do not allow the exclusion of incidental or consequential damages, or a
waiver of the implied warranties of fitness and!or merchantability, so the above limitations may
not apply to you. This warranty gives you specific legal rights and you may also have other rights
which vary from state to state.
In the event of any dispute between Seller and Purchaser arising out of or relating to these terms
and conditions or to the goods sold generally, Purchaser must first file a written claim with Seller
within ten days of the occurrence giving rise to the claim and wait an additional thirty days for a response before initiating any legal action. The sale and all terms are subject to California law. Any
legal proceeding arising out of or relating to these terms and conditions or to the goods sold generally shall be brought solely and exclusively in the County of Los Angeles. In no event may Purchaser initiate any legal proceeding more than six months after the occurrence of the event giving
rise to the dispute.
The above terms and conditions are the only ones governing this transaction and Seller makes
no oral representations of any kind. These Terms and Conditions can only be modified in writing,
signed by both Purchaser and Seller. 04-07
Vinotemp International
17621 S. Susana Rd.
Rancho Dominguez Ca 90221
www.vinotemp.com
LISTED
12