1
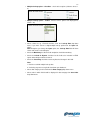
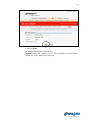
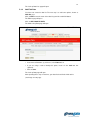
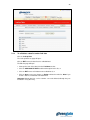
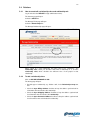
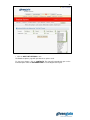
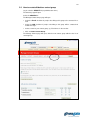
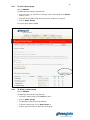
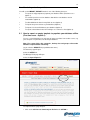
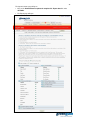
1
GivenGain Suite - a Service of GivenGain International Ltd
USER MANUAL
Report Database
VERSION 3.9
LAST REVISION 19 FEBRUARY 2007
www.givengain.com
© 2007 GivenGain International Ltd. All Rights Reserved. GivenGain, eTribuo Suite and the GivenGain and eTribuo
Suite logos are registered trademarks of GivenGain International Ltd. Designated trademarks and brands are the
property of their respective owners. Notice of Liability: The information in this manual is distributed on an “as is” basis.
All information provided in this document is provided in good faith. The authors and publishers of this manual are not
responsible for loss, or purported loss, due to any contents of this publication.
2
3
GivenGain Database (Beta)
Index
1 Learning Objectives....................................................................................4
2 Introduction .................................................................................................5
2.1
2.2
2.3
2.4
Features Include:
How The Givengain Report Database Works
Data Security
Integration
5
5
5
5
Terminology:
Step-By-Step
8
9
3
4
Menu Layout................................................................................................7
Setting Up Your Givengain Report Database For The First Time ...........8
5
General Setup Instructions ......................................................................12
6
How To Import And Export Data..............................................................31
7
Important Tips When Populating Your Ms Excel Spreadsheet:............43
8
Adding A Contact To Your Givengain Report Database........................45
9
Finding A Contact In Your Givengain Report Database ........................48
4.1
4.2
5.1
5.2
5.3
5.4
5.5
5.6
How To Add/Edit/Delete A Field
How To Add/Edit/Delete A Data Category
How To Add/Edit/Delete Look-Up Data (Data Lists And Field Data)
Relations
How To Use Options To Set The Preferred Fields On The Contacts Page
How To Create/Edit/Delete A Contact Group
12
17
20
23
27
29
6.1
How To Export An Empty Template To Populate Your Database Offline (First-Time
Users – Option 1)
31
6.2
How To Customise Previous-Version Database Data With The New Database
Version Functionalities (Option 2)
33
6.3
How To Edit/Add/Delete The Data In Many Fields At Once (Option 2)
35
6.4
How To Import Many New Contacts To Your Database (Option 2)
37
6.5
To Import A List Of New Field Data To Your Database (Option 2)
39
6.6
To Export Selected Data For Decision Making Or As A Reference Sheet (Option 2)
41
6.7
Importing Your Ms Excel File (Option 3).
41
7.1
Two-Digit Country Codes To Be Used When Populating A Spreadsheet To Import
To Your Database.
44
8.1
8.2
How To Add An Individual
How To Add An Organisation
45
46
How To Find A Contact Alphabetically
How To Find A Contact By Entering Text
48
48
10.1
10.2
10.3
10.4
10.5
10.6
10.7
How To Apply A Created Relationship To Contacts
How To Subscribe/Unsubscribe A Contact To/From A Contact Group
How To Edit/Add/Delete A Contact's Details
How To Archive, Temporarily Store Or Make Active A Contact In Your Database
How To Add An Image To A Contact's Details
How To Add A Note To A Contact's Details, Or Edit/Delete It
To Read/Edit/Delete A Note
50
52
52
53
54
56
57
11.1
11.2
11.3
How To Send An E-Mail Message To A Contact
How To Send A Mobile Message (SMS) To A Contact
How To Use Skype To Communicate With A Contact
59
60
62
12.1
12.2
12.3
Notes On Filters:
How To Set Up Filters Before Running A Query
How To Run A Query
63
63
64
13.1
13.2
How To View/Export A Quick Report
How To Edit/Delete A Quick Report
68
68
9.1
9.2
10 Managing And Editing Your Contacts.....................................................50
11 Communicating With A Contact ..............................................................59
12 Using The Advanced Search Function ...................................................63
13 Quick Reports ...........................................................................................68
14 Checklist ....................................................................................................70
4
1 Learning objectives
After working through this manual, you should be able to:
•
Understand the requirements of a modern database
•
Know how the GivenGain Report database works and integrates with the rest of the
GivenGain Suite
•
Know how to set up your database (data categories, fields, groups, look-up data and
relationships)
•
Know how to add a record to your database
•
Know how to import data
•
Know how to export data
•
Know how to do Advanced Searches and save Quick Reports
•
Know how to manipulate exported data in spreadsheets
5
2
Introduction
GivenGain Report database is an advanced online database that captures and stores donor
and payment data in one central place. You can now immediately address donor needs,
continuously update information, communicate messages to stakeholders for greater
satisfaction, and improve donor loyalty and retention. The powerful donor management
database has no limit as to the number of contacts you may add. You can create, view or
update contact details, all integrated with donation data and donor-initiated changes.
2.1 Features include:
• No software to install.
• All services are run at GivenGain's data centres and are available through a standard
web browser.
• Multiple administrators - you can add separate administrators with database rights.
• Real-time data entry: No need for duplicate versions.
• Powerful database with no limits as to the number of records you may add.
• Easily create and manage an unlimited number of contact and reporting groups to sort
and display your data in as many ways as you can imagine.
• Create and customise your own fields, categories, groups.
• Personalise your database by adding the contact’s image on his/her page.
• View saved reports that you've created using an advanced search, or export all your
data
• All reports can be displayed online 24/7 or downloaded in MS Excel format.
• Advanced filtering options allows you to query the database, get multiple report views,
export data, and create groups and reports.
• Easy-to-use data template (MS Excel) to import data into your online database.
• Automatic integration with GivenGain Communicate allows for effortless
communication to multiple recipient groups.
2.2 How the GivenGain Report database works
GivenGain Report saves time and money by making it easy to organise and share donor
data. Because it's web-based, no one is ever out of the loop. It provides one central place
for all your information — with anytime, anywhere access for your entire staff. GivenGain
Report is totally Web-based, so there’s no need to pay for servers, server software or
annual software upgrades.
2.3 Data security
You have complete control over who can view, modify, or add information to your
database. In addition, you can limit access through custom permissions. GivenGain
employs industry-standard, 128-bit Secure Socket Layers (SSL) protocol to ensure your
information is neither intercepted nor corrupted during transmission over the Internet. In
addition, GivenGain uses encryption technology to help protect your data when stored on
disk. See also: Security and Backups.
2.4 Integration
Although many organisations attempt to integrate various back-end services and
processes in order to become more efficient, the GivenGain provides them with instant
control and real-time access. GivenGain presents an all-in-one solution. The GivenGain
Suite harnesses the power of advanced technologies by automating complex, critical
processes like real-time web publishing, multicurrency donation processing, and donor
relationship management, letting charities improve operations, drive new donations, and
increase revenue.
6
Some charities attempt to integrate services by piecing together a website with a Paypal
link or a Yahoo account, and by connecting their donation processing service with an offthe-shelf donor database and / or expensive donor relationship management system.
This process requires technical skill, financial resources, and time. GivenGain provides a
one-stop service: Publish, Communicate, Transact, Report and Fundraise - completely
integrated in one central place.
7
3
Menu Layout
The menu layout of the GivenGain Report database is as follows:
Under SETUP you will see the following links:
Overview
Here you will find a short description of what you can expect to find on the page of each
database feature. For a more in-depth look and explanation, consult the GivenGain User
Manual.
Contacts
Here you can look for a contact in your database or add a new one to it. View, edit, or delete a
contact's details, or view their entire online donation history. Apply relationships between
contacts for a better perspective of contact interaction. Your contacts include all online donors
and subscribers to your newsletters etc.
Advanced search
Make use of multiple dynamic search filters to extract any data you require from your database.
Run queries while constantly refining the filtering process for improved results. Generate reports
for decision-making and save them as quick reports or contact groups. Reports can also be
downloaded in Excel format or printed in HTML format.
Quick reports
View all saved quick reports as created by you in the Advanced Search section. Run quick
reports to view the latest list of contacts who qualify with the filter settings of that quick report.
Quick reports can also be renamed, deleted or downloaded.
Contact groups
Create, rename or delete contact groups that contacts can subscribe to. View created contact
groups here. You can specify how subscribers to these contact groups should be contacted –
through e-mails, mobile messages (SMSs) or both.
Setup
Create unlimited data categories, fields and design the layout that matches your individual
requirements. Here you can create relationships to be applied between contacts. Import data to
your GivenGain Report database or export selected data in MS Excel format to your computer.
8
4
Setting up your GivenGain Report database for the first time
A brief explanation of terms used, for first time users. (Read this part first and then follow the
steps below in setting up your database!)
4.1 Terminology:
Data Categories
A data category is a header that groups different sections or “fields” together. Examples
of data categories are “Personal Information” or “Address Details”. Create a data
category to suit your database, requirements and style. The number of data categories
you can create is unlimited.
Look-up Data
Some fields (eg. Gender) need to have two or more options (eg. Male, Female). These
options are grouped in something known as look-up data, and should be created first.
Afterwards, when creating/editing a field, the look-up data can be applied and displayed
in a number of different options. Look-up data consists of different data lists, such as
“Gender selection” or “Favourite cuisine”, which in turn consist of field data, such as
“Male” and “Female”, or “Chinese food”, “Japanese food” and “South African food”.
Fields
A field allows you to divide the entire database into smaller parts and categorise the
details of a database contact (eg. Age, Gender, Telephone Number). Create fields to suit
your database, requirements and style. The number of fields you can create is unlimited.
The more fields you create, the more powerful your database becomes!
Contact Groups
Contacts (Individuals and/or companies) can be grouped together to form a contact
group. These groups are useful when sending an e-mail to only certain contacts in your
database, or newsletters to all contacts who have subscribed to them. Examples of
contact groups are “Newsletter subscribers” or “Donors”. Create a contact group to suit
your database, requirements and style. The number of contact groups you can create is
unlimited.
Relationships
You will have a much better understanding of how the different contacts in your database
are connected and involved with one another if you assign relationship roles to them. A
contact can have multiple relationships with different contacts. This function is also very
useful, since it allows you to synchronise addresses of people in a relationship.
9
4.2 Step-by-step
STEP 1: Start the first time setup
Log in and select the REPORT link (top administrator menu).
The Individual Contacts page will open.
Select the SETUP link.
The Database Initial Setup page will open.
10
Click on Continue.
The Database Set up page will open.
The fields will be divided into 6 data categories:
• Personal Details.
• Contact Details.
• Personal Information.
• Billing Address Details.
• Shipping Address Details.
• Company Details.
Step 2: Sort out your data categories to suit your organisation
The existing data categories are set up for general use, but you will probably want to
change its name or create another data category. See How to add/edit/delete a data
category for more detailed instructions.
Step 3: Sort out your look-up data to suit your organisation
There is no look-up data set up at the moment. This needs to be completed if you wish
for some fields to have more than one option. See How to add/edit/delete look-up data
for more detailed instructions.
Step 4: Sort out your fields to suit your organisation
OK, your data categories and look-up data are ready. Now you probably want to add
more fields, edit existing ones, change their names, move them to another data category
or delete those you don’t think are applicable. Remember that you can choose between
fields for individuals and fields for organisations. See How to add/edit/delete a field for
more detailed instructions.
11
Step 5: Sort out your contact groups to suit your organisation
Some people in your “old” database are probably donors, newsletter subscribers, or both,
so it is important to create those contact groups first on the GivenGain Report database.
You can add more groups, edit existing ones, delete some, and choose whether it should
be an e-mail group, an mobile message group, or both. See How to add/edit/delete
contact groups for more detailed instructions.
Step 6: Import existing data to the GivenGain Report database
Now comes the fun part. You are going to export a MS Excel spreadsheet from the
GivenGain Report database to your computer. This spreadsheet will contain all the fields
and look-up data you have just prepared. On the spreadsheet you will then insert all the
data you have (probably from another MS Excel spreadsheet, or from paper, if you are
using a really prehistoric system), and upload the spreadsheet to the GivenGain Report
database. If everything is correct, your database is now ready for use. If there are any
errors, we will let you know too, and show you how to fix those. See How to Import and
Export Data for more detailed instructions.
Remember to collect all your “old” spreadsheets from everyone in your office and
combine them into the MS Excel spreadsheet you exported from the GivenGain Report
database!
Step 7: Sort out your relationships to be used within your organisation, and apply
them to contacts!
With your Report database now fully set up and populated with all your contacts the next
step is to give yourself a better idea of who fits in where, who is married to whom, etc.
This is done by using the Relationships function. First create some different relationship
roles, and then apply them to different contacts. See How to create/edit a relationship
class and relationship role and How to apply a created relationship to contacts for
more detailed instructions.
12
5
General setup instructions
5.1 How to add/edit/delete a field
Log in and select the REPORT link (top administrator menu).
The Contacts page will open.
Select the SETUP link.
The Manage Fields page will open on the Field Setup: Individual option by default.
Click on View Fields for Individuals to add an individual’s contact data to your
database.
Click on View Fields for Organisations to add an organisation’s contact data to your
database.
Click on ADD FIELD.
The Add Field page will open.
(See next page for image)
13
• Enter field label, eg. “Chosen favourite cuisine” in the Label text box.
• Select if field is for individual contact, company contact, or both, from the Contact
Type drop-down menu.
• Select the type of data the field will hold from the Type of data field drop-down menu.
• Phone/Fax Number for any set of digits that could include letters (also used for ID
numbers).
• Numbers for digits-only information, eg. “23” in the “Age” field.
• Date for date-only information, eg. for a “Date of Birth” field .
• Notes for text longer than 50 characters.
• Text for text not more than 50 characters.
• Select the type of standard field from the Standard Field drop-down menu.
• None if not applicable.
• Email Address for a primary e-mail address field (Only one such Standard Field
can exist).
• Last Name for a last name field (Only one such Standard Field can exist).
• First Name for a first name field (Only one such Standard Field can exist).
• Country Name for a country name field.
14
• Organisation Name for an organisation name field (Only one such Standard Field
can exist).
• Salutation for a salutation field (Only one such Standard Field can exist).
• Mobile phone for a mobile/cellphone field (Only one such Standard Field can
exist).
• Skype for a Skype field (Only one such Standard Field can exist).
• Select in which format the field will be displayed from Input (Suggested layout
displayed in the Layout textbox).
• Text - text box (Number of characters for text area: Width = 50).
• Date - Popup Calendar – calendar showing date as YYYY-MM-DD (Width = 12).
• Notes Area - larger text box (Width = 50, Rows = 10).
• Single look-up option – Drop-Down List - choose from a hidden list (Rows = 10).
• Single look-up option - Radio Button - click a button (Columns Across = 2).
15
• Multiple look-up option – Checkbox - check various options (Columns Across =
2).
• Multiple look-up option – Listbox - Choose various options from displayed list
(Rows = 10).
• Select a data list, eg. “Favourite Cuisine”, from the Look-up Data drop-down
menu, if you have chosen a single/multiple look-up option from the Input field
above.
Note: Everytime you change the Input option, the Look-up Data field will show
“None” and must be selected again.
• Check the Mandatory checkbox if field completion should be mandatory.
• Check the Include in Reports checkbox for this field to be included in HTML
reports when doing an advanced search.
• Check the Versioning checkbox to track any historical changes in this field.
Note:
1. Can’t be used with multiple look-up data.
2. Versioning any unnecessary fields slow down your database!
• Select data category for this field from the Data Category drop-down menu
• Select order in which field should be displayed in data category from Sort Order
drop-down menu.
16
Your field should look something like this:
• Click on Save.
17
5.2 How to add/edit/delete a data category
Log in and select the REPORT link (top administrator menu).
The Contacts page will open.
Select the SETUP link.
The Manage Fields page will open.
Select the Data Category link.
The Manage Data Categories page will open.
5.2.1
Add a Data Category
Click on ADD DATA CATEGORY.
The Add Data Category page will open.
18
• Enter name of data category, eg. “Everything else” in the Data Category text box.
• Select if data category is for individual contact, company contact, or both, from the
Contact Type drop-down menu.
• Select order of data category displayed from the Sort Order drop-down menu (0 is
ranked highest).
• Check the Include in Reports checkbox for this data category to be included in
reports.
• Click on Save.
The Manage Data Categories page will open.
5.2.2
To edit a data category
Click on Data Category.
The Manage Data Categories page will open.
Click on EDIT next to the data category to be edited.
The Edit Data Category page will open.
• Edit the data category as required and click on Save.
The Manage Data Categories page will open.
5.2.3
To delete a data category
Click on Data Category.
The Manage Data Categories page will open.
Click on EDIT next to the data category to be deleted.
The Edit Data Category page will open.
19
• Click on Delete.
The Manage Data Categories page will open.
Important: Default data categories, such as “Personal Details” can not be deleted,
although they can be edited in every other way.
20
5.3 How to add/edit/delete look-up data (data lists and field data)
Note: If you have a lot of field data, eg. 100 different schools, it is better to create only the
data list online, export it to a MS Excel spreadsheet, populate all the field data on that
worksheet and upload it again. This will save you lots of time!
Log in and select the REPORT link (top administrator menu).
The Contacts page will open.
Select the SETUP link.
The Manage Fields page will open.
Select the Look-up Data link.
The Look-up Data Lists will open.
5.3.1
Add a Data List
Click on ADD LIST.
The Add Data List page will open.
• Enter name of data list, eg. “Favourite Cuisine”” in the List Name text box. The
purpose of the data list is to assign a specific set of look-up field data to specific
look-up data.
• Click on Save.
21
The Look-up Data Lists page will open.
5.3.2
Add Field Data
You have now created a data list. The next step is to add some options, known as
field data, to it.
Click on EDIT next to the name of the data list you wish to add field data to.
The Edit List page will open.
Click on ADD LOOK-UP DATA.
The Add Look-up Data page will open.
• Insert name of field data, eg. “Chinese”, in the Data text box.
• If you are using a code to identify this option, insert it in the Code text box
(optional).
• Click on Save.
The Look-up Data page will open.
After repeating these steps a few times, your data list should look similar to this:
(See image on next page)
22
5.3.3
To edit/delete a data list and/or field data
Click on Look-up Data.
The Look-up Data Lists page will open.
Click on EDIT next to the data list to be edited/deleted.
The Edit List page will open.
• Change the name of the data list in the List Name text box.
• Click on ADD LOOK-UP DATA to add another option for this list, or
• Click on EDIT next to a field data name to edit/delete it, or
• Click on Save to save your changes, or Delete to delete the entire list. Note: If you
delete a data list, all field data is deleted with it.
Important: Default data lists, such as “Gender” can not be deleted, although they can
be edited in every other way.
23
5.4 Relations
5.4.1
How to create/edit a relationship class and relationship role
Log in and select the REPORT link (top administrator menu).
The Contacts page will open.
Select the SETUP link.
The Manage Fields page will open.
Select the Relationships link.
The Manage Relationships page will open.
When setting up a new relationship, two parts have to be completed – the
relationship class, which just describes what kind of relationship it is, and the
relationship roles, which describes the different roles of the people in that
relationship.
5.4.2
To add a relationship class
Click on ADD RELATIONSHIP CLASS.
The Group page will open.
• Describe type of relationship, eg. “Kitchen staff”, in the Relationship Group text
box.
• Check the Sync Billing Address checkbox to keep the address synchronised for
all members who are linked to this relationship.
• Check the Sync Shipping Address checkbox to keep the address synchronised
for all members who are linked to this relationship.
• Check the Sync Alternative Address checkbox to keep the address synchronised
for all. members who are linked to this relationship.
24
• Click on Save.
The Group page will open.
5.4.3
To add a relationship role
Click on the Relationship Roles link.
The Manage Relationships page will open.
Click on ADD RELATIONSHIP ROLE.
The Add Relationship Type page will open.
• Insert the role that will exist, eg. “Chef” in the Relationship Role textbox.
• Select the class, eg “Kitchen staff”, from the Relationship Class drop-down menu.
• Click on Save.
(See next page for image.)
25
The Manage Relationships page will open.
Note: Repeat this step a few times until you have created all the roles that will exist in
the relationship. Your screen should then look something like this:
Note: To apply a created relationship to contacts, see Managing and Editing your
Contacts.
26
5.4.4
To edit/delete a relationship class
Note: A relationship class can only be deleted if it has no relationship roles assigned
to it.
Click on the Relationships Classes link.
The Manage Relationships page will open.
Click on EDIT next to the relationship class to be edited.
The Edit Relationship Type page will open.
• Edit the relationship as required.
• Click on Save, or Delete to delete this class.
The Roles page will open.
5.4.5
To edit/delete a relationship role
Click on the Relationships Roles link.
The Manage Relationships page will open.
Click on EDIT next to the relationship role to be edited.
The Edit Relationship Type page will open.
• Edit the relationship role as required.
• Click on Save, or Delete to delete this role.
The Manage Relationships page will open.
27
5.5 How to use Options to set the preferred fields on the Contacts page
Log in and select the REPORT link (top administrator menu).
The Contacts page will open.
If you have not set any fields to be displayed on the Contacts page, your screen will look
like this, with only Last Name (or as you have renamed it) as a field:
Select the SETUP link.
The Manage Fields page will open.
Select the Options link.
The Database Options page will open.
To set fields for Individuals:
• Choose the preferred fields you wish to have displayed from the 4 drop-down menus.
• Note: The “Surname” field is already displayed, so it doesn’t have to be selected here.
To set fields for Organisations:
• Choose the preferred fields you wish to have displayed from the 4 drop-down menus.
• Note: The “Company name” field is already displayed, so it doesn’t have to be
selected here.
28
• Click on SAVE LIST OPTIONS to save.
The Database Options page will open with these options saved.
To view your changes, click on CONTACTS. The page will automatically open on the
Individual option. Click on ORGANISATIONS to see the Organisation layout.
29
5.6 How to create/edit/delete a contact group
Log in select the REPORT link (top administrator menu).
The Contacts page will open.
Select the GROUPS link.
The Manage Contact Groups page will open.
• Select the E-mail checkbox for people subscribing to this group to be contacted via email.
• Select the SMS checkbox if people subscribing to this group will be contacted via
mobile messages.
• Select a name for your contact group, eg. “Food lovers” in the text box.
• Click on Create Contact Group.
The Manage Contact page will open, with the new contact group added to the list of
contact groups.
30
5.6.1
To edit a contact group
Click on GROUPS.
The Manage Contact Groups page will open.
• Enter new name, eg. “Food lovers newsletter” of this contact group in the Rename
textbox; or/and
• Change E-mail or SMS settings in their respective checkboxes, if required.
• Click on Update Groups!
The contact group will be updated.
5.6.2
To delete a contact group
Click on GROUPS.
The Manage Contact Groups page will open.
• To delete a contact group, tick the Delete checkbox.
• Click on Update Groups!
• The Manage Contact Groups page will open.
• To delete contact group, click on Delete Groups; or
• Go back if you do not wish to delete this contact group.
31
6
How to import and export data
You will use the IMPORT | EXPORT function in one of the following instances:
•
To export an empty template to populate your database offline (First-time users –
Option 1)
•
To customise previous-version database data with the new database version
functionalities (Option 2)
•
To edit/add/delete the data in many fields at once (Option 2)
•
To import many new contacts to your database (Option 2)
•
To import a list of new field data to your database (Option 2)
•
To export selected data for decision making or as a reference sheet (Option 2)
6.1 How to export an empty template to populate your database offline
(First-time users – Option 1)
You are a new GivenGain user and want to import your data from another source, eg.
your computer or a printed list, into the Report database.
Note: First create fields, data categories, look-up data and groups online under
SETUP as required before continuing!
Log in select the REPORT link (top administrator menu).
The Contacts page will open.
Select the SETUP link.
The Manage Fields page will open.
Select the Import Export link.
The Import Contacts page will open.
• Click on the Click here to download your file link under OPTION 1.
32
• The Export page will open.
• Click on
next to a data category to show/hide Data Category contents.
• Check the Check/Uncheck all box.
33
• Check the Export Lookup-data box.
• Do not check the Export Contact Data box.
• Click on the Export button.
• A Microsoft Excel document download window will open.
• Save the empty MS Excel spreadsheet on your computer.
• Open the MS Excel file. It will display all fields, look-up data and contact groups as
selected.
• Now populate the empty MS Excel spreadsheet with your data from another MS
Excel spreadsheet, printed list etc. (See Important tips when populating your MS
Excel spreadsheet for more detailed instructions).
When you have populated the spreadsheet, save the file somewhere on your computer.
Then upload the file as described under Importing your MS Excel file (Option 3).
6.2 How to customise previous-version database data with the new
database version functionalities (Option 2)
You have been a client of GivenGain for a while and was using the previous version of
the Report database. Now you have been activated for the new database, and need to
customise it with all the new functionalites, before adding more contacts to your
database.
Note: First create, rename and edit fields, data categories, look-up data and groups
online under SETUP as required before continuing!
Log in select the REPORT link (top administrator menu).
The Contacts page will open.
Select the SETUP link.
The Manage Fields page will open.
Select the Import Export link.
The Import Contacts page will open.
34
Click on the Download and complete the template file / Export data link under
OPTION 2.
• The Export page will open.
35
• Click on
next to a data category to show/hide Data Category contents.
• Check the Check / Uncheck all box.
• Check the Export Lookup-data box.
• Check the Export Contact Data box.
• Click on the Export button.
• A MS Excel document download window will open.
• Save the MS Excel spreadsheet on your computer.
• Open the MS Excel file. It will display all fields, look-up data, contact groups and
contact data as selected.
• Now edit the MS Excel spreadsheet data by inserting new data in fields, moving data
from other fields, etc. (See Important tips when populating your MS Excel
spreadsheet for more detailed instructions).
When you have completed editing the MS Excel spreadsheet, save it somewhere on your
computer.
Then upload the file as described under Importing your MS Excel file (Option 3).
6.3 How to edit/add/delete the data in many fields at once (Option 2)
Your Report database is populated correctly, but you wish to make many changes in your
database, and to many contacts’ data. Editing many contacts one by one online will take
too much time, so use this option to make the process as quick as possible.
Note: First create, rename and edit fields, data categories, look-up data and groups
online under SETUP as required before continuing!
Log in select the REPORT link (top administrator menu).
The Contacts page will open.
Select the SETUP link.
The Manage Fields page will open.
Select the Import Export link.
36
The Import Contacts page will open.
• Click on the Download and complete the template file / Export data link under
OPTION 2.
• The Export page will open.
37
• Click on
next to a data category to show/hide Data Category contents.
• Check the box next to the name of each data category you wish to export.
• Uncheck the box next to each field you do not wish to export.
• Check the Export Lookup-data box.
• Check the Export Contact Data box.
• Click on the Export button.
• A MS Excel document download window will open.
• Save the MS Excel spreadsheet on your computer.
• Open the MS Excel file. It will display all fields, look-up data, contact groups and
contact data as selected.
• Now edit the MS Excel spreadsheet data by inserting new data in fields, moving data
from other fields, etc. (See Important tips when populating your MS Excel
spreadsheet for more detailed instructions).
When you have completed editing the MS Excel spreadsheet, save it somewhere on your
computer.
Then upload the file as described under Importing your MS Excel file (Option 3).
6.4 How to import many new contacts to your database (Option 2)
Your Report database is operational, but you want to add many new contacts to your
database from another source, eg. a printed list or from another MS Execl sheet. You
could add the contacts one by one online, but that will take hours. Using the method
described below will ensure that the process is completed as quickly as possible.
Note: First ensure that your fields, data categories, look-up data and groups are
created, edited, and renamed online under SETUP as required before continuing!
Log in select the REPORT link (top administrator menu).
The Contacts page will open.
Select the SETUP link.
The Manage Fields page will open.
Select the Import Export link.
38
The Import Contacts page will open.
• Click on the Download and complete the template file / Export data link under
OPTION 2.
• The Export page will open.
39
• Click on
next to a data category to show/hide Data Category contents.
• Check the box next to the name of each data category you wish to export.
• Uncheck the box next to each field you do not wish to export.
• Check the Export Lookup-data box.
• Ensure that the Export Contact Data box is unchecked.
• Click on the Export button.
• A MS Excel document download window will open.
• Save the MS Excel spreadsheet on your computer.
• Open the MS Excel file. It will display all fields, look-up data, contact groups and
contact data as selected.
• Now edit the MS Excel spreadsheet data by inserting new data in fields, moving data
from other fields, etc. (See Important tips when populating your MS Excel
spreadsheet for more detailed instructions).
When you have completed editing the MS Excel spreadsheet, save it somewhere on your
computer.
Then upload the file as described under Importing your MS Excel file (Option 3).
6.5 To import a list of new field data to your database (Option 2)
You want to add more field data to your database. This can be done online by adding a
field role and list one by one, but it will take forever if you want to import many options
under field data, eg. names of 50 schools to be displayed from a drop-down menu. So,
use the method below to save you time that can be used elsewhere!
Note: First ensure that your look-up data lists are created online under SETUP as
required before continuing!
Log in select the REPORT link (top administrator menu).
The Contacts page will open.
Select the SETUP link.
The Manage Fields page will open.
Select the Import Export link.
40
The Import Contacts page will open.
• Click on the Download and complete the template file / Export data link under
OPTION 2.
• The Export page will open.
41
• Ensure the Check / Uncheck all box is unchecked.
• Check the Export Lookup-data box.
• Click on the Export button.
• A MS Excel document download window will open.
• Save the MS Excel spreadsheet on your computer.
• Open the MS Excel file. It will display all look-up data that exists online.
• Now edit the MS Excel spreadsheet data by inserting new data in fields, moving data
from other fields, etc. (See Important tips when populating your MS Excel
spreadsheet for more detailed instructions).
When you have completed editing the MS Excel spreadsheet, save it somewhere on your
computer.
Then upload the file as described under Importing your MS Excel file (Option 3).
6.6 To export selected data for decision making or as a reference sheet
(Option 2)
Use the steps as described under How to edit/add/delete the data in many fields at
once (Option 2), or use the Advanced Search function to export a report in MS Excel
that displays very specific data.
6.7 Importing your MS Excel file (Option 3).
Log in select the REPORT link (top administrator menu).
The Contacts page will open.
Select the SETUP link.
The Manage Fields page will open.
Select the Import Export link.
• Go back to the Import Contacts page.
• To upload the completed template file:
• Click on the Browse... button.
• Select the saved file from the File Upload window.
• Click on the Upload File button to upload the complete template file.
42
• The Import Confirmation page will open
• Your data will now be verified, and upon completion, an e-mail will be sent to you.
• Click on Import Export to see the status of the uploading process.
• It will be necessary to refresh the page regularly to see whether the certification
process has been completed. A “Successful” status means that no errors exist
and that your data is ready for use.
• If status displays as “Completed”, your data is not correct. Click on “View error
report” to see the errors. Then go back to your MS Excel spreadsheet that you
have saved on your computer, correct the errors, and repeat the uploading and
verification process until all errors have been eliminated.
43
7
Important tips when populating your MS Excel spreadsheet:
• ID: Donation ID assigned by GivenGain. Look in the donor report for this ID. This field cannot
be blank if you want to update/delete a record. If it is a new contact on the GivenGain
system leave this field empty.
• Action: For new contact, or to update contact details, insert UPDATE. To archive contact’s
details, type ARCHIVE. To put it into a tempory section, insert TEMP. To delete this contact
from the database, insert DELETE.
• Last Name: Contact’s last name e.g. "Bond".
• Headings with look-up data, like “Gender”: Ensure that field data, eg. “Male”, (see
Column G above) is typed exactly the way it was in the look-up data worksheet (see Gender
worksheet below).
• E-mail address: Ensure that there are no spaces before or after e-mail addresses.
• Telephone numbers: Type in international format e.g. “+27 12 348-2700”.
• Cell phone numbers: If there is a leading zero (0) remove it. Enter the entire mobile phone
number. Include the international country code at the beginning of the number (e.g. UK = 44,
South Africa = 27). Do NOT enter symbols like: ( ), -, or + . Do not leave any blank spaces.
Examples: UK: 441234567891; Europe: 33607123456; Asia: 65791912345; South Africa:
27839876543.
• Date of birth or any date field: Use the format YYYY-MM-DD, eg. “1965-7-13”.
• Country: Use the 2-letter country codes, eg. “ZA” for South Africa. See the next page for
every country’s two-letter codes.
44
7.1 Two-digit country codes to be used when populating a spreadsheet
to import to your database.
Afghanistan - AF
Albania - AL
Algeria - DZ
American Samoa - AS
Andorra - AD
Angola - AO
Anguilla - AI
Antarctica - AQ
Antigua And Barbuda
- AG
Argentina - AR
Armenia - AM
Aruba - AW
Australia - AU
Austria - AT
Azerbaijan - AZ
Bahamas - BS
Bahrain - BH
Bangladesh - BD
Barbados - BB
Belarus - BY
Belgium - BE
Belize - BZ
Benin - BJ
Bermuda - BM
Bhutan - BT
Bolivia - BO
Bosnia And
Herzegowina - BA
Botswana - BW
Bouvet Island - BV
Brazil - BR
British Indian Ocean
Territory - IO
Brunei Darussalam BN
Bulgaria - BG
Burkina Faso - BF
Burundi - BI
Cambodia - KH
Cameroon - CM
Canada - CA
Cape Verde - CV
Cayman Islands - KY
Central African
Republic - CF
Chad - TD
Chile - CL
China - CN
Christmas Island - CX
Cocos (Keeling)
Islands - CC
Colombia - CO
Comoros - KM
CONGO, Democratic
Republic of (Was
Zaire) - CD
CONGO, People's
Republic of - CG
Cook Islands - CK
Costa Rica - CR
Cote D'ivoire - CI
CROATIA (Local
Name: Hrvatska) HR
Cuba - CU
Cyprus - CY
Czech Republic - CZ
Denmark - DK
Djibouti - DJ
Dominica - DM
Dominican Republic DO
East Timor - TL
Ecuador - EC
Egypt - EG
El Salvador - SV
Equatorial Guinea GQ
Eritrea - ER
Estonia - EE
Ethiopia - ET
Falkland Islands
(Malvinas) - FK
Faroe Islands - FO
Fiji - FJ
Finland - FI
France - FR
France, Metropolitan FX
French Guiana - GF
French Polynesia - PF
French Southern
Territories - TF
Gabon - GA
Gambia - GM
Georgia - GE
Germany - DE
Ghana - GH
Gibraltar - GI
Greece - GR
Greenland - GL
Grenada - GD
Guadeloupe - GP
Guam - GU
Guatemala - GT
Guinea - GN
Guinea - Bissau - GW
Guyana - GY
Haiti - HT
Heard And Mcdonald
Islands - HM
Honduras - HN
Hong Kong - HK
Hungary - HU
Iceland - IS
India - IN
Indonesia - ID
Iran - IR
Iraq - IQ
Ireland - IE
Israel - IL
Italy - IT
Jamaica - JM
Japan - JP
Jordan - JO
Kazakhstan - KZ
Kenya - KE
Kiribati - KI
Korea, Democratic
People's Republic KP
Korea, Republic Of KR
Kuwait - KW
Kyrgyzstan - KG
Lao People's
Democratic Republic
- LA
Latvia - LV
Lebanon - LB
Lesotho - LS
Liberia - LR
Libyan Arab
Jamahiriya - LY
Liechtenstein - LI
Lithuania - LT
Luxembourg - LU
Macau - MO
Macedonia, The
Former Yugoslav
Republic Of - MK
Madagascar - MG
Malawi - MW
Malaysia - MY
Maldives - MV
Mali - ML
Malta - MT
Marshall Islands - MH
Martinique - MQ
Mauritania - MR
Mauritius - MU
Mayotte - YT
Mexico - MX
Micronesia, Federated
States of - FM
Moldova, Republic Of
- MD
Monaco - MC
Mongolia - MN
Montserrat - MS
Morocco - MA
Mozambique - MZ
Myanmar - MM
Namibia - NA
Nauru - NR
Nepal - NP
Netherlands - NL
Netherlands Antilles AN
New Caledonia - NC
New Zealand - NZ
Nicaragua - NI
Niger - NE
Nigeria - NG
Niue - NU
Norfolk Island - NF
Northern Mariana
Islands - MP
Norway - NO
Oman - OM
Pakistan - PK
Palau - PW
Palestinian Territory,
Occupied - PS
Panama - PA
Papua New Guinea PG
Paraguay - PY
Peru - PE
Philippines - PH
Pitcairn - PN
Poland - PL
Portugal - PT
Puerto Rico - PR
Qatar - QA
Reunion - RE
Romania - RO
Russian Federation RU
Rwanda - RW
Saint Kitts And Nevis KN
Saint Lucia - LC
Saint Vincent and the
Grenadines - VC
Samoa - WS
San Marino - SM
Sao Tome And
Principe - ST
Saudi Arabia - SA
Senegal - SN
Seychelles - SC
Sierra Leone - SL
Singapore - SG
Slovakia (Slovak
Republic) - SK
Slovenia - SI
Solomon Islands - SB
Somalia - SO
South Africa - ZA
South Georgia and
the South Sandwich
Islands - GS
Spain - ES
Sri Lanka - LK
St. Helena - SH
St. Pierre And
Miquelon - PM
Sudan - SD
Suriname - SR
Svalbard and Jan
Mayen Islands - SJ
Swaziland - SZ
Sweden - SE
Switzerland - CH
Syrian Arab Republic
- SY
Taiwan - TW
Tajikistan - TJ
Tanzania, United
Republic of - TZ
Thailand - TH
Togo - TG
Tokelau - TK
Tonga - TO
Trinidad And Tobago TT
Tunisia - TN
Turkey - TR
Turkmenistan - TM
Turks And Caicos
Islands - TC
Tuvalu - TV
Uganda - UG
Ukraine - UA
United Arab Emirates
- AE
United Kingdom – UK,
sometimes GB
United States - US
United States Minor
Outlying Islands UM
Uruguay - UY
Uzbekistan - UZ
Vanuatu - VU
Vatican City State
(Holy See) - VA
Venezuela - VE
Vietnam - VN
Virgin Islands (British)
- VG
Virgin Islands (U.S.) VI
Wallis And Futuna
Islands - WF
Western Sahara - EH
Yemen - YE
Yugoslavia - YU
Zambia - ZM
Zimbabwe – ZW
45
8
Adding a Contact to your GivenGain Report database
The following steps are for when new contacts are added to the GivenGain Report database on
an individual basis. For adding multiple contacts to the GivenGain Report database at once, eg.
when receiving a database of 45 new contacts, see Importing Data to your GivenGain Report
database.
8.1 How to add an individual
Log in and select the REPORT link (top administrator menu).
The Contacts page will open.
Select the ADD INDIVIDUAL link on the page.
The Add Contact page will open.
Click on
next to a data category, eg. “Personal Details”, to expand or close it.
Complete an individual’s contact details in the following ways, where required:
• Enter text in a field box.
• Click on a drop-down menu to select the option of your choice.
• Click on a radio button to select a mutually exclusive option.
• Check a checkbox to select one or multiple options.
• Click on an option from a listbox.
• Click on a date field to select the date from a popup calendar.
• Enter a note or message in a message box.
• Select the Update Contact details option from the drop-down menu at the top or
bottom of the screen, and click on Submit.
Note: In order to ensure that each individual remains 100% unique in the GivenGain
system, the following data cannot be used by two different contacts:
• Cell phone number
• E-mail address
• Bank account number / VISA / MasterCard number
(See image on next page)
46
The Contact Details page will open.
Note: You will be required to enter information in all fields that have been checked
“Mandatory” when the field was set up originally. If those fields are not completed, the
page will reload. A message in red at the top of the page will appear, eg. “Please supply
the First name”. After completing the required fields, select the Update Contact details
option from the drop-down menu at the top or bottom of the screen, and click on Submit.
To add or remove the Mandatory setting from a field, click on EDIT next to the field on the
Manage Fields page and de-select Mandatory.
To edit details of this individual, click see Managing and Editing your Contacts.
8.2 How to add an organisation
Log in and select the REPORT link (top administrator menu).
The Contacts page will open.
Select the ADD ORGANISATION link on the page.
The Add Contact page will open.
Complete an organisation's contact details in the following ways, where required:
• Enter text in a field box.
• Click on a drop-down menu to select the option of your choice.
• Click on a radio button to select a mutually exclusive option.
47
• Check a checkbox to select one or multiple options.
• Click on an option from a listbox.
• Click on a date field to select the date from a popup calendar.
• Enter a note or message in a message box.
• Select the Update Contact details option from the drop-down menu at the top or
bottom of the screen, and click on Submit.
.
The Contact Details page will open.
To edit details of this organisation, see Managing and Editing your Contacts.
Note: You will be required to enter information in all fields that have been checked
“Mandatory” when the field was set up originally. If those fields are not completed, the
page will reload. A message in red at the top of the page will appear, eg. “Please supply
the First name”. After completing the required fields, select the Update Contact details
option from the drop-down menu at the top or bottom of the screen, and click on Submit.
To add or remove the Mandatory setting from a field, click on EDIT next to the field on the
Manage Fields page and de-select Mandatory.
Note: In order to ensure that each individual or organisation remains 100% unique in the
GivenGain system, the following data cannot be used by two different contacts:
• Cell phone number
• E-mail address
• Bank account number / VISA / MasterCard number
48
9
Finding a Contact in your GivenGain Report Database
Any individual or company in your GivenGain Report database can be located immediately by
using the search function on the Contacts page. This can be done in 2 ways: by searching
alphabetically or by entering text into the search box.
9.1 How to find a contact alphabetically
Log in select the REPORT link (top administrator menu).
The Contacts page will open on the INDIVIDUALS option by default. To find an
organisation, click on ORGANISATIONS before continuing.
Note: The database will show you all active contacts by default. To find archived or
temporarily stored contacts, click on the ARCHIVE or TEMPORARY link next to MAIN.
• Click on a capital letter eg. “S” for finding all last names starting with “S” listed
alphabetically.
The Contacts page will open, with “S” displayed in a red square.
• Click on a chosen contact.
The Contact Details page will open with all details of the contact.
9.2 How to find a contact by entering text
Log in select the REPORT link (top administrator menu).
The Contacts page will open.
Note: The database will show you all active contacts by default. To find archived or
temporarily stored contacts, click on the ARCHIVE or TEMPORARY link next to MAIN.
In the Search textbox, enter any of the following:
• the contact's name, or part thereof.
• the contact's surname, or part thereof.
• the contact's e-mail address, or part thereof.
• the contact’s cell phone number, or part thereof.
• Click on Search.
49
The Found Contacts page will open.
• Click on a chosen contact.
The Contact Details page will open with all details of the contact.
Note: The advantage of searching for a contact in this manner is that all contacts who
qualify for the criteria entered in the search box will be displayed. This is particularly
helpful when the exact spelling of a contact's name or surname is not known, or when
you wish to find similar contacts, eg. all contacts with the e-mail address “@yahoo.com”.
50
10
Managing and Editing your Contacts
An individual or organisation in your database can be managed in the following ways:
•
A relationship can be applied to 2 contacts.
•
A contact can be subscribed to/unsubscribed from a contact group.
•
A contact's details can be edited, added or deleted.
•
A contact can be archived, temporarily stored, made active.
•
An image can be added to the contact's profile.
•
An e-mail can be sent to the contact.
•
A mobile message (SMS) can be sent to the contact.
•
A note can be added to the contact's details.
•
The donation history of the contact can be viewed and/or deleted.
10.1 How to apply a created relationship to contacts
Important: A relationship can ONLY be applied if a relationship class and relationship
roles have been created previously. For more information on creating a relationship, see
How to create a relationship class and relationship role.
Log in select the REPORT link (top administrator menu).
The Contacts page will open.
Note: The database will show you all active contacts by default. To find archived or
temporarily stored contacts, click on the ARCHIVE or TEMPORARY link next to MAIN.
Find contact A of the relationship (See Finding a Contact in your GivenGain Report
Database) and click on the chosen contact to open the Contact Details page.
Click on
next to Relationships.
The Select Contact for Relationship page will open.
• Enter the name, surname or e-mail address of contact B of the relationship in the
search box (Important: Locate contact B ONLY by entering text in search box, not by
alphabetical method).
• Click on Search.
51
The Select Contact for Relationship page will open.
• Click on the contact which will be contact B of the relationship.
The Apply Relationship: Final Step page will open.
• Assign the relationship to a specific group, eg. “9th floor” in the Create a new Group
textbox, in order to distinguish it from other similar relationships.
• Select the relationship class applicable to this relationship, eg. “Kitchen staff”, from the
Relationship Class drop-down menu.
• Assign an applicable relationship role to each party from the drop-down menus.
• Click on SAVE.
52
The Manage Contact page will open.
10.2 How to subscribe/unsubscribe a contact to/from a contact group
Log in and select the REPORT link (top administrator menu).
The Contacts page will open.
Note: The database will show you all active contacts by default. To find archived or
temporarily stored contacts, click on the ARCHIVE or TEMPORARY link next to MAIN.
Select the contact you wish to subscribe to a group and click on the chosen contact to
open the Contact Details page. (See Finding a Contact in your Database).
Click on
you.
next to Contact Groups to expand a list of groups, as created previously by
• To subscribe to a group, check the applicable box next to its group name.
• To unsubscribe from a group, de-select checked box next to its group name.
• Click on UPDATE GROUPS.
The Manage Contact page will open.
10.3 How to edit/add/delete a contact's details
Log in and select the REPORT link (top administrator menu).
The Contacts page will open.
Note: The database will show you all active contacts by default. To find archived or
temporarily stored contacts, click on the ARCHIVE or TEMPORARY link next to MAIN.
Select the contact whose details you wish to edit and click on the chosen contact to open
the Contact Details page. (See Finding a Contact in your Database).
The Contact Details page will open.
Click on the Edit Contact Details link.
53
The Edit Contact page will open.
• Edit or add details as required, select Update Contact details from the drop-down
menu and click on Submit.
• The Contact Details page will open.
or
• Select Delete Contact from the drop-down menu and click on Submit to remove this
contact from the database.
• The Confirm Delete Contact page will open.
• Click on Delete Contact or go back if you do not wish to delete this contact.
10.4 How to archive, temporarily store or make active a contact in your
database
Log in and select the REPORT link (top administrator menu).
The Contacts page will open.
Note: The database will show you all active contacts by default. To find archived or
temporarily stored contacts, click on the ARCHIVE or TEMPORARY link next to MAIN.
54
Select the contact whose details you wish to edit and click on the chosen contact to open
the Contact Details page. (See Finding a Contact in your Database).
The Contact Details page will open.
Click on the Edit Contact Details link.
The Edit Contact page will open.
• To archive this contact, select Inactive | Archive Contact from the drop-down menu
and click on Submit. Use this option when the contact is not actively part of your
active database anymore, but you wish to keep the information and history of the
contact.
• To store this contact temporarily, select Temporarily Store Contact details from the
drop-down menu and click on Submit. Use this option when the contact is not actively
part of your active database anymore, but may become active again in the future.
• To make this contact active again, select Active | Main Contact from the drop-down
menu and click on Submit. Use this option when the contact was archived or stored
temporarily, and you wish to return the contact to the main database.
10.5 How to add an image to a contact's details
Log in and select the REPORT link (top administrator menu).
The Contacts page will open.
Note: The database will show you all active contacts by default. To find archived or
temporarily stored contacts, click on the ARCHIVE or TEMPORARY link next to MAIN.
Select the contact to whom you wish to add an image and click on the chosen contact to
open the Contact Details page. (See Finding a Contact in your Database).
Click on the UPDATE PHOTO link.
The Update Contact Photo page will open.
55
• Click on Browse to select an image from your computer.
• Click on Upload Now to upload image.
The Crop Contact Image page will open.
• Drag the square markers (at the corners and between corners of the picture) to
create the specific size and area you wish to crop.
• Once you have selected an area, you can also move it around by putting your cursor
in the centre of the selection and dragging it in any direction.
• When moving a square marker, you will its corresponding value change under the
Crop inspector area. X = distance from the left-hand side, Y = distance from the top.
Inserting a value in any textbox and clicking anywhere else on the page will change
the selected area to reflect the new parameters (optional).
• Click on Crop when you are satisfied with your selection.
The Contact Details page will open.
You will see the photo displayed like this:
56
10.6 How to add a note to a contact's details, or edit/delete it
Log in and select the REPORT link (top administrator menu).
The Contacts page will open.
Note: The database will show you all active contacts by default. To find archived or
temporarily stored contacts, click on the ARCHIVE or TEMPORARY link next to MAIN.
Select the contact to whose details you wish to add a note and click on the chosen
contact to open the Contact Details page. (See Finding a Contact in your Database).
Click on Add Note.
The Add Contact Note page will open.
• Enter a subject for the note in the Subject textbox.
• Enter text in the Enter Note text box.
• Check the box(es) of the applicable administrators who are allowed to view this note in
the Administrators View box.
57
• Click on Save.
The Contact Details page will open, and the note will appear under Communication
History.
10.7 To read/edit/delete a note
Open the Contact Details page of the contact.
Click on
next to Communication History to view all existing notes.
To read the note, click on the link next to EDIT to open a small note window.
58
Click on the red arrow to close the window again.
To edit or delete the note, click on EDIT.
The Edit Note page will open.
• Edit the note as required and click on Save, or
• Click on Delete to delete this note.
Note: If you edit and save an existing note, it will appear below the original one
under COMMUNICATION HISTORY.
59
11
Communicating with a contact
11.1 How to send an e-mail message to a contact
E-mails can be sent in 2 ways: e-mails to a specific contact and bulk e-mails to
subscribed contact groups. E-mails to a specific contact are normally used for personal
communication, when making a specific enquiry, or to obtain more contact details. Bulk emails are normally used when sending newsletters or sharing general information with all
subscribed contacts. See GivenGain Communicate for sending bulk e-mails.
Log in and select the REPORT link (top administrator menu).
The Contacts page will open.
Note: The database will show you all active contacts by default. To find archived or
temporarily stored contacts, click on the ARCHIVE or TEMPORARY link next to MAIN.
Select the contact to whom you wish to send an e-mail and click on the chosen contact to
open the Contact Details page. (See Finding a Contact in your Database).
Ensure that an e-mail address has been inserted under the Contact Details header.
Click on the Email Message link under the Communicate with Contact header.
The Compose Email page will open.
• Ensure your name is present in the From Name textbox.
• Insert subject text in Subject textbox.
• Insert message text in Message Body textbox.
• Click on Preview when done.
The Verify your message page will open.
Check all details.
• Click on Edit to edit message if required; or
• Click on Send the message to send your e-mail.
The Contact Details page will open.
(See image on next page)
60
11.2 How to send a mobile message (SMS) to a contact
Mobile messages can be sent in 2 ways: single mobile messages (SMSs) to an individual
and bulk mobile messages (SMSs) to contact groups. Single mobile messages are
normally used for personal communication, when making a specific enquiry, or to remind
an individual or company about something concerning only them. Bulk mobile messages
are normally used when informing or reminding all subscribed contacts about a matter.
See GivenGain Communicate for sending bulk mobile messages and more information
on the cost and purchasing of SMS credits.
Log in and select the REPORT link (top administrator menu).
The Contacts page will open.
Note: The database will show you all active contacts by default. To find archived or
temporarily stored contacts, click on the ARCHIVE or TEMPORARY link next to MAIN.
Select the contact to whom you wish to send a mobile message (SMS) and click on the
chosen contact to open the Contact Details page. (See Finding a Contact in your
Database).
Ensure that a mobile number has been inserted under the Contact Details header.
61
Click on the Mobile Message link under the Communicate with Contact header.
The Compose SMS page will open.
• Enter message text in the Enter Message Text textbox.
• Ensure the mobile number is correct as present in the Mobile textbox.
• Click on Verify message when done.
• The Verify your message page will open.
• Check all details.
• Click on Edit to edit message if required; or
• Click on Send the message! to send your mobile message (SMS)
The Contact Details page will open.
62
11.3 How to use Skype to communicate with a contact
What is Skype?
Skype is a free communication tool that you can download from the web at
www.skype.com. It allows you to make free calls from your computer to other Skype
users on their computer, and cheap calls to phones and mobiles across the world. The
sound quality is great and it can be used for video conferencing as well.
Note: In order to talk to a contact using Skype on the GivenGain Suite, you will need
•
a headset and microphone
•
internet access
•
the Skype software installed on your computer
Log in and select the REPORT link (top administrator menu).
The Contacts page will open.
Note: The database will show you all active contacts by default. To find archived or
temporarily stored contacts, click on the ARCHIVE or TEMPORARY link next to MAIN.
Select the contact whom you wish to Skype and click on the chosen contact to open the
Contact Details page. (See Finding a Contact in your Database).
Ensure that a Skype name has been inserted under the Contact Details header. (See
http://www.skype.com/intl/en/allfeatures/skypename/ for more details about this)
Click on the Skype Me link under the Communicate with Contact header.
The Skype program will initiate and a call will be made to the contact. A screen similar to
this will display:
63
12
Using the Advanced Search function
The advanced search function is an extremely powerful tool that can supply the administrator
with any data desired. By applying any number of filters, the search can be refined almost
indefinitely. Run a query and save the results as a contact list or quick report, or add another
filter for a more in-depth look.
12.1 Notes on filters:
• Filters can be set up in any order, according to your specific needs.
• Refine query results by continually adding filters.
• The same filter can be used numerous times by selecting it again from the Select a
Filter drop-down menu
• The top filter is always the first filter, the one below it the second filter, and so forth. As
this will radically impact the results of a query, it is advisable to plan your search
thoroughly beforehand.
• Filters can be moved up by clicking on MOVE UP next to each created filter.
• Filters can be removed from a query by clicking on REMOVE next to a created filter.
• Once prepared, the set of filters will not be reset when navigating away from the
Advanced Search page or when logging out.
• A new set of filters can be prepared by first clicking on REMOVE next to all previous
filters.
12.2
How to set up filters before running a query
Log in and select the REPORT link (top administrator menu).
The Contacts page will open.
Select the ADVANCED SEARCH link.
The Advanced Search page will open.
• Select filter to use from the Select a Filter drop-down menu.
• When selecting the Contact Data Field filter:
• Choose a field from the Select Field drop-down menu.
• Click on ADD FILTER.
• When selecting the Contributions filter:
• Select a project from the Project drop-down menu.
• Set search rules from the Donation Amount drop-down menu, and insert amount
in the text box, or leave empty to search all.
• Select donation currency from the Donation Currency drop-down menu.
• Select identity status of donor from Donor Status drop-down menu.
• Select frequency of donation from the Frequency drop-down menu.
• Click on ADD FILTER.
• When selecting the Contribution History filter:
• Select which project was donated to previously from the Projects Donated dropdown menu.
• Set search rules from the Donation Amount drop-down menu, and insert amount
in the text box, or leave empty to search all.
• Select donation currency from the Donation Currency drop-down menu.
• Set donation history period from the Donation Period calendar popup boxes.
64
• Select donation processed status from the Processed status drop-down menu.
• Select donation transfer status from the Transfer status drop-down menu.
• Click on ADD FILTER.
• When selecting the Communication History filter:
• Enter text to search for in the Search for text box.
• Select which communication medium was used from the Communicated via dropdown menu.
• Set communication history period from the Communication Period calendar
popup boxes.
• Click on ADD FILTER.
• When selecting the Contact Groups filter:
• Select the required contact group(s) by checking the appropriate check box(es).
• Click on ADD FILTER.
12.3 How to run a query
Log in and select the REPORT link (top administrator menu).
The Contacts page will open.
Click on ADVANCED REPORTS.
• The Advanced Search page will open.
• Set up filters as required (See How to set up filters before running a query).
• Click on Run Query.
65
• The number of results will be displayed.
• Click on Select a Filter to refine the results by adding another filter; or
• Manage query results by viewing it as a contact list:
• Click on the View Contact List radio button.
• Click on View Contact List here.
• The Search Results page will open.
• All contacts who qualified for the query will be displayed.
66
• Manage query results by exporting it as a report:
• Click on the Export radio button.
• Select to create report as HTML file or Excel document from radio button.
• Check required checkboxes to be included in the report.
• Click on Generate Report
• The Report Output page will open if HTML option was selected; or
• An Excel file download window will open if Excel document option was selected.
• Manage query results by saving it:
• Click on the Save radio button.
67
• Check the New Contact Group checkbox if query results should be a new contact
group, and name it in the text box (Note: A contact group is static, and will remain
unchanged when new
contacts are added or a new query is run).
• Check the Quick Report checkbox if query results should be a quick report, and
name is in the text box (Note: A quick report is dynamic, and will updated itself
everytime a new contact is added, or a new query is run).
• Click on Save Report.
• The Advanced Search page will open.
68
13
Quick Reports
View all saved reports that you've created previously by using the advanced search function.
13.1 How to view/export a quick report
Log in and select the REPORT link (top administrator menu).
The Contacts page will open.
Select the QUICK REPORTS link.
The Quick Reports page will open.
• For an up-to-date report, choose a saved report and click on the View Filter icon, or
• To view the list of contacts in the report, click on the Show List icon, and the Run
Filter page will open showing all contacts in the report.
• If choosing the View Filter option, the Advanced Search page will open.
• Click on the Export radio button to export the report as a HTML file or as an Excel
document.
• If choosing the Export option, check required checkboxes to be included in the report.
• Click on Generate Report.
• The Report Output page will open if HTML option was selected; or
• An Excel file download window will open if Excel document option was selected.
13.2 How to edit/delete a quick report
Log in and select the REPORT link (top administrator menu).
The Contacts page will open.
Select the QUICK REPORTS link.
The Quick Reports page will open.
• Edit saved quick report by renaming it in the Rename text box.
• Click on Update Queries!
• The Quick Reports page will open;
69
or
• Delete saved quick report by checking the Delete checkbox.
• Click on Update Queries!
• The Quick Reports page will open.
• Click on Delete Report to delete this quick report, or go back if required.
• The Quick Reports page will open if Delete Report was clicked on.
70
14
Checklist
Yes
1. Understand the requirements of a modern database
2. Know how the GivenGain Report database works and
integrates with the rest of the GivenGain Suite
3. Know how to set up your database (data categories, fields,
groups, look-up data and relationships)
4. Know how to add a record to your database
5. Know how to import data
6. Know how to export data
7. Know how to do Advanced Searches and save Quick
Reports
8. Know how to manipulate exported data in spreadsheets
No
Uncertain