1
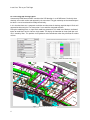
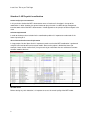
CR4224 - BIM at the Heart of the MEP Subcontractor
Business
Damien Legrand – BIM Solutions Centre
Sophie Montenot – BYME Engineering Hub (Singapore)
Class Description
Dive into the heart of an MEP subcontractor business and experience the challenges and requirements
associated with a BIM delivery process. See how they develop their internal strategies and processes to
optimize the delivery process. Topics include implementing new workflows; bringing the engineers to the
centre of the model; developing new methods to exchange information to facilitate the commissioning and
procurement phases; and enabling a high level of coordination and QA for the duration of the project
Key Learning Objectives
At the end of this class, you will be able to:
•
•
•
•
Analyze project requirements and develop a project BIM strategy accordingly
Implement new workflows using the model as a core source of information
Create a new range of deliverables to support internal and external processes
Measure and monitor the overall efficiency of the process
About the Speakers
Damien Legrand
Damien is a BIM business development consultant and owner of BIM Solutions Centre Ltd. He graduated
(MEng) and worked as a bridge engineer in France before moving to the ANZ region. He has now
specialized in BIM technology for the last six years and provided consulting services for a great range of
industry professionals (architects, engineers and contractors).
[email protected]
Sophie Montenot
Sophie Montenot is the MEP BIM Manager at BYME Engineering Hub Singapore, a subsidiary of
Bouygues Construction Group. She graduated with a Master's degree in Engineering with honors and
has worked as a mechanical engineer in France and China. Over the past two years she has developed a
BIM department within BYME and has been involved in large scale projects in Doha and Singapore.
[email protected]
Insert Class Title as per Title Page
Introduction
With the constant development of BIM technologies over the past few years, we have seen a number of
subcontractors become involved. With different requirements than designers and/or builders, this paper
showcases some of the uses of the technology made by a multidiscipline MEP subcontractor working on
a large scale project in Singapore.
BYME (member of Bouygues Construction Group)
Byme has been established in HK 20 years ago. B.Y.M.E stands for Bouygues, a global leader in
construction, Yang, a local company and Mechanical and Electrical. BYME is experienced in all M&E
trades including Electrical, Mechanical, Ventilation & Air-conditioning, Fire Services, Plumbing &
Drainage, Building Management Systems and ELV Systems as well.
BYME’s BIM experience by Sophie Montenot (MEP BIM Manager)
“It’s only 2 years since our Engineering Hub based in Singapore decided to take the big step in BIM. Our
first experience was on one of the biggest projects ever handled by our company: Qatar Petroleum
District in Doha. Only 9 towers, an hotel, a prayer hall, an Energy Center etc... Some few millions square
meters to model in 3D! A big challenge for us beginners in the BIM world!
From that experience we have learnt a lot: how to manage our projects using BIM, how to implement a
team and how to convince your management! We are now working on the Singapore Sports Hub where
we have implemented a couple of processes to facilitate the exchange of information. The whole project
is done in REVIT (structure, archi and MEP).”
Problematic
With the development of BIM technologies in recent years, the real challenge is for MEP subcontractors
to use the new tools in an aim of producing a better and more coordinated set of drawings for the
production team. This will save time, resources and reworking on site. While this may look simple on
paper, in reality it is a very intricate exercise.
First the MEP contractor needs to develop a series of internal process around the use of BIM technology
to maximise the design optimisation and prepare the shop drawing for the production team.
Secondly it needs to establish a number of relationships with the other parties involved in the project to
ensure that the information required in step 1 is passed to him in a coordinated and timely manner,
It is the complex combination of these two components that will impact on the overall benefit of using BIM
technology.
To illustrate the above problematic, the following document will take a close look at 4 project situations.
For each of these we will examine at the technological solution developed and explore how the project
environment impacted upon these solutions.
2
Insert Class Title as per Title Page
Context and project
The Singapore Sports hub
55,000 seat stadium for athletics, football, rugby,
and cricket
3,000 seat multi-purpose indoor arena, 6,000 seat
aquatic center
40,000m2 Retail Mall, 2-storey Office building, 4Storey Car Park, Sports Museum, Sports Library,
and Water Sports Centre
Integrated MRT station and many hectares of
publicly accessible landscaping providing
community sports and leisure activities
Fig 1.
The Singapore Sports Hub
The role of the MEP sub contractor on this project
In this case the MEP subcontractor has 3 teams working on the project:
•
•
•
The design team is in charge of working with the MEP consultant to optimise the design from a
construction point of view. The result of this is a set of shop drawings and schedule of equipment
that is then passed on to the production team.
The procurement team works closely with the production team and the design team in order to
buy the required equipment for the project.
The production team is responsible for installing or to work with specialised subcontractors in
fabricating and installing services.
The MEP subcontractor is also in charge of the coordination of the services openings (CBW) with the
main contractor
Situation 1: What deliverables for what purpose?
Context and project circumstances
As described above the design team is in constant communication with the production team, the
procumbent team and the general contractor.
The contract specifies a number of formats for the project deliverables such as ACAD shop drawings,
ACAD combined services drawing, Revit models, calculation notes and schedules of equipment.
However it seems that maintaining a set of deliverable for its life cycle in one particular format is costly
and time consuming. It is also a source of errors as some the information on the drawings is disconnected
from the live BIM model.
Therefore it is important to develop other mechanisms for exchange of information with other parties.
3
Insert Class Title as per Title Page
Ex 1 Generating CSD drawing in Revit
Contractually BYME owes the MEP consultant the CSD drawings in an ACAD format. Practically these
drawings are used for review and approval by the consultant. They get marked up and commented upon
but there is no real need to edit or modify them directly.
In this situation there was a compromise with the consultant that all drawings would be kept in Revit until
approved and that only the “For Construction” issue would be converted to ACAD.
During the modelling phase, a single Revit model was generated. This model uses Worksets to allow all
trades to model their services into one single model. The display of information on views (both plan and
3D) is control by filters. This provides visual guidance to the coordinators when they eliminate the various
clashes.
Fig 2.
Workset settings
Fig 3.
Fig 4.
4
Extract of the stadium MEP model
Filters and colour coding
Insert Class Title as per Title Page
At the end of the coordination, a plan view of the model is generated. This layout will be the base of the
CSD drawings. The drawings then get annotated with tags and main dimensions. A few sections are also
produced in parallel to go with the main floor plan.
At this stage Autodesk Revit reaches its limitations. There are a number of visual problems that we
cannot directly solve into the main view. The workaround developed takes 3 steps
Step 1 Finalise the plan view
•
•
Apply the CSD view template to control
the displays of all elements,
Note: the view display setting is a hidden
line to show the dash line of services
underneath
Fig 5.
Extract of the CSD floor plan view
Step 2 Create the centre line overlay
Duplicate the Main CSD view
Turn off the visibility of all objects except pipes
•
Change the detail level to “coarse”
Overwrite the pipe settings to centreline
Fig 6.
Pipe centre line isolated in a separate view
Step 3 Create the assembly on the drawing sheet
Fig 7.
5
Example of Revit drawing combining several views on
the same sheet
Insert Class Title as per Title Page
This process is quite efficient because it allows the drawing to be revised quickly. It makes even more
sense in a project of this size with more than 168 CSD drawings for the stadium alone.
Ex 2 Converting a CSD drawing to ACAD
The conversion to ACAD is a delicate exercise. It has definitely improved over time with the newer version
of Revit but it still has issues.
The main issue comes from the ACAD layer standard with which the drawing must comply.
Fig 8.
Extract of the BYME ACAD layering system
Therefore the solution is to use a colour coding system in Revit. One unique colour in Revit will
correspond to one ACAD layer. To perform manually, this process is extremely heavy and time
consuming for a very small added value. To be able to reassign all objects to their correct layer in ACAD,
the same view needs to be exported 7 times with different settings
a.
b.
c.
d.
Export model objects (equipment + touting systems
Export Centre lines for Pipes
Export hidden lines for services shown under
Export the annotations (4 times) to spate the tags from a trade to another)
Only then it is possible to separate all objects and reassign the appropriate layer.
The Revit API can come to the rescue with the ability to automatically generate a number of views and
apply some specific view templates before exporting these views individually to ACAD.
Fig 10.
Fig 9.
6
Export to ACAD macro interface
Indicidual views exported automatically
Insert Class Title as per Title Page
An AutoCAD macro then recombines the drawings and reassigns the object to their correct layer.
Summary
Even with a strong technical solution at hand it still requires good project management and
communication skills to benefit fully from this BIM process. So don’t be afraid to talk to the third parties
you are working with. It is frequently a case of everyone benefiting but too often it is assumed impossible
because it was not in the contract.
Ex 3 Other Revit deliverables
FRAMING MODEL REFERENCE
ARCHI MODEL REFERENCE
SPORTS HUB SINGAPORE
REF01-20110812
3D CONFLICT IDENTIFICATION
ZONE
SUB-ZONE
LEVEL
GRIDLINES
IMPACTED TRADES (ST, AR, MEP)
NST
NS1
1
Case A: N13-N14
Architectural
Case B: N14-N16
S1_NST_00_L2_Above_Framing_RVT_REV04
A2_NST_00_Lower Levels_RVT_REV03
(DSP-TRANSMIT-000696)
(DSP-TRANSMIT-000660)
A. Warm Up Room (Grid N13-N14)
Fig 11.
7
Example of an RFI form
Insert Class Title as per Title Page
Situation 2: MEP spatial coordination
Context and project circumstances
In this particular situation the MEP subcontractor covers all trade and is therefore in charge of the
coordination. In other situations the general contractor plays that role via a MED design management
team that works with all the MEP subcontractors. In both approaches the principle and the end goal is the
same
Solutions implemented
In order to develop a robust solution for the coordination problem it is important to understand all the
factors impacting on it.
The architectural and structural information
In large projects like the Sports Hub it is important to make sure that the MEP coordination is performed
using the latest architectural and structural models. Because the project is divided into zones (for
example 4 zones for the stadium itself) it may mean that you need more than one architectural and one
structural model at the time
Fig 12.
Revit Model document control matrix
The MEP model
Before starting any clash detection, it is important to assess the overall quality of the MEP model.
8
Insert Class Title as per Title Page
Fig 13.
Example of a precoordination test report
The Clash detection and resolution
The clash detection is performed in two steps:
Step 1: clash detection in Navisworks performed for the entire model. A clash report is generated and
used by the coordinators as a guide.
Fig 14.
9
Navisworks clash summary
Fig 15.
Extract of the Navisworks clash report
Insert Class Title as per Title Page
Step 2: detailed clash detection directly in the Revit model. Note the interference check tool is not used.
The check is performed visually with the help of sections and colour coding.
Generally the number of clashes is counted in thousands. If we were to resolve every single clash it
would take a considerable amount of time. Therefore it is important to set some priorities in the resolution
of clashes.
Situation 3: Services Opening (CBW)
Context and project circumstances
The problem of services openings and their coordination with the structure and architecture is always an
important part of the project coordination. On one side the MEP designers are relying on the structural
engineer and the architect to get approval or rejection on its opening requests, this decision being made
from a design feasibility point of view. On the other side the construction program is constantly requesting
the position and size of these openings to keep site activities on schedule. Stuck in-between the MEP
designer needs a robust way to manage this flow of information between all these parties.
Solution implemented
To address this issue we developed an opening object with a certain number of parameters that enabled
us to identify its origin and track its progress throughout the validation process.
The opening family is a faced based
componenf.
Note the parameters in the data section.
These parameters are used to track the
status of the opening during the validation
process.
Then we implemented the request /
validation workflow. Even if we were not
able to guarantee that all openings were
validated before the construction started
at least we could capture the status of all
openings and communicate them to the
site teams.
Fig 16.
CBW family (Flag)
Fig 17.
CBW parameters
As part of the preparation for a services opening coordination meeting, the coordination team collected
information from all parties, the openings model from the MEP subcontractors, and the latest architectural
and structural models. They then generated the combined model with the schedule of all the requested
openings to be discussed during the meeting.
10
Insert Class Title as per Title Page
Fig 18.
CBW, Archtectural and Structural Models
Fig 19.
Combined model and CBW schedule
During the coordination meeting we were not able to capture the live information digitally. We had to
revert to a manual way to collect answers and decisions made on the openings request. The final result of
the meeting was a marked up set of drawings which for each opening told us if it had been rejected,
approved or not considered. The opening model then got updated accordingly.
Fig 21.
Fig 20.
CBW table marked up during coordination meeting
CBW table updated and colour coded in the CBW
Revit model before issue
Note the colour coding system used to quickly visualise the newly defined opening status. The same
colour coding was applied automatically to the object in the model.
Fig 22.
Updated status of the CBW requests
The opening model was then returned to the MEP subcontractor and at the same time to the concrete
shop drawing contractor. The process was repeated weekly.
In theory the process was working well. However we encountered some problems due mainly to a lack
communication between parties. Some people experiencing project pressure thought that they had no
11
Insert Class Title as per Title Page
option other than to revert to more traditional ways of dealing with this (i.e. overlaying ACAD drawing).
This happened even after we fully documented the procedures. This created a significant risk to the
integrity of the process as we began to have different flows of information running in parallel.
This situation was a good example of a time where technically we were able to provide a robust solution
to the identified issue but where we nearly failed due to an additional factor, that of a lack of
communication.
Situation 4: Review of Model Contents
Context and project circumstances
While the model is being developed, it is important that the information contained in the model is reviewed
and validated. In a traditional process an engineer will wait for the 2d drawings to be produced and then
mark it up. However, this process is too heavy to manage and too time consuming. Therefore it is
important to enable the review of the model content before the final drawing is produced. The main
difficulty is that the reviewers (engineers and trade managers) are not always familiar with the BIM
technology and software.
With the classic output such as the DWFx, Navisworks or even 3D pdfs reviewers can visually check the
model.
But when it comes to querying the engineering values of the different systems it becomes a little more
difficult.
In this case we are looking at checking the pressure drop in AC systems. Once again the API offers great
help with the ability to quickly generate on demand reports that can be reviewed on screen or quickly
turned into pdfs.
Viewing the pressure drop of a single element
This function allows the user to query one by one the
pressure drop value in the part of a system.
12
Select an object
On the addin tab, select External tools and
pressure drop macro
Read the pressure drop value on screen
Insert Class Title as per Title Page
Update multiple elements pressure drop tag
In order to show the pressure drop value in a calculation
note report, we need to copy the pressure drop value to
the comment parameter.
Select Multiple object part of an air system
Read the validation message
Tagging the pressure drop in a plan view
As the list of deliverables is quite large and delivery
dates span across a significant period of time, you can
generate partial planning for a desired period of time.
Go to a mechanical plan view and crop it to the
system you are currently working on.
In the annotate tab, select
Select one by one the element of the system and
arrange your tags in the view
Fig 23.
Pressure Drop macro user manual
Conclusion
In summary it is very important to remember that the technology has not been designed to resolve
problems by itself. The most productive way to maximise the return on investment is to be able to tighten
your internal BIM process with some operational project processes.
This is not an easy task and it varies from project to project.
From a strictly MEP point of view, it is true to say that Revit is not perfectly adapted to what we do. It has
its benefits and its disadvantages. Yet sometimes small in-house developments can eliminate some key
problems or automate lengthy tasks.
Overall it is a constant challenge to make the best use of the technology in the ever changing and
evolving project environment.
13