1
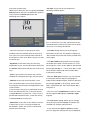
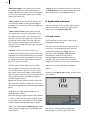
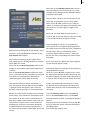
User manual
Deluxe-Titler 3D
for SMART EDIT
Legal notices
To avoid making mistakes during operation, we recommend that you carefully follow the instructions provided
in this manual.
We have taken a great deal of care whilst programming and checking this software.
Nevertheless, since it is not possible to guarantee totally error-free software applications in all environments
and at any time, we unfortunately cannot rule out the possibility that some errors may have crept in.
MacroSystem Digital Video AG and its dealers therefore do not guarantee fault-free use of the product or
complete flawlessness of the product.
We will remedy any errors in the program and supply the affected customers with the new software free of
charge, if possible.
Warranty claims for defects shall expire in 24 months in the case of newly manufactured items. This shall not
apply insofar as the law prescribes otherwise and in cases involving injury to life, limb or health, in the case of
intentional or grossly negligent violation of duty on the part of the supplier and in the case of malicious silence
with regard to a defect.
The customer shall report defects to the supplier immediately in writing. Claims for reimbursement of
expenses for error tracing shall be honoured only after prior consultation with MacroSystem Digital Video AG
management staff.
Any other claims asserted by the customer for any expense(s) required for the purpose of subsequent
performance, in particular transport, travelling, work and material costs shall be excluded. However, this shall
not apply to claims for reasons other than newly determined software defects.
Warranty claims shall not apply in the case of only insignificant deviation from the agreed quality, for only
insignificant impairment of the usefulness, in the case of natural wear or damage which may occur after
passage of the risk due to improper or careless handling, excessive use, unsuitable operating materials or
which have occurred due to other special external influences not provided for in accordance with the terms of
the agreement. In the event that improper modifications or repair work is performed by the customer or any
third party, then any warranty claims for defects shall also be null and void for these and other consequences.
We do not, however, accept any liability for loss of data/time or any consequential damages that may occur
as a result, particularly because we have no influence over correct software installation and operation by the
customer. MacroSystem Digital Video AG and its dealers therefore cannot be held liable for any defects or
unintentional damage in connection with the installation or use of the Deluxe-Titler 3D software.
Claims by the customer to compensation in damages and/or reimbursement of expenses shall thus be
excluded, in particular because of violation of contractual obligations and due to unlawful acts. However, this
shall not apply insofar as peremptory liability is involved, e.g. in accordance with product liability law, in cases
of intention, gross negligence, because of injury to life, limb or health or because of violation of substantial
contract obligations. However, any claims to damages for violation of substantial contract obligations shall be
limited to conventional foreseeable damage insofar as intention or gross negligence is not involved or liability
due to injury to life, limb or health. A shift of the burden of proof to the disadvantage of the customer shall not
be connected with the above regulations.
Neither MacroSystem Digital Video AG nor its dealers are responsible for any damages resulting either directly
or indirectly through the use of the software or the operating instructions. This is particularly the cause for
profit loss and reimbursement of expense.
Any implied guarantee is totally out of the question, including guarantee of suitability of the software or
operating instructions for a particular purpose.
Please therefore ensure that you backup your video footage before using the device. We recommend that you
do not delete the video footage and that you create a backup on DV tape beforehand.
Since it is possible that changes have been made to the software after the manual was printed, the functions
shown and described in this manual might differ from the software.
Contents
Page
1. General information.......................................................................................... 5
2. The program Deluxe-Titler 3D.......................................................................... 5
3. Installation / Starting the program................................................................... 6
4. Operation ........................................................................................................... 6
4.1 Enter Text............................................................................................... 6
4.2 3D style .................................................................................................. 8
4.3 Fixed motion ......................................................................................... 9
4.4 Free motion ........................................................................................... 10
4.4.1 Edit key point Menu........................................................................... 11
5. Application examples ....................................................................................... 12
5.1 Fixed motion ......................................................................................... 12
5.2 Free motion ........................................................................................... 14
1. General information
Thank you for buying Deluxe-Titler 3D from your
dealer.
We appreciate your confidence in us and hope
that this product will meet your expectations.
These instructions will explain the operation of
the Deluxe-Titler 3D.
We shall be happy to help you with questions
and suggestions for improvements.
For this purpose please contact us at the
following addresses:
Address
MacroSystem Digital Video AG
Postfach 020240
58290 Wetter
Germany
(Germany)
Monday -Thursday from 10.00 to 17.00 hours
Friday 10.00 to 16.00 hours
+49 (0)2335/960-112
(North America)
Monday - Friday 9a.m. - 5p.m. (Mountain Standard Time)
303-801-1010
Outside of these times you can email or fax us.
Messages received in this way are handled during business hours.
E-Mail Support
[email protected]
(Germany)
[email protected] (North America)
[email protected] (N.A.)
[email protected] (N .A.)
Fax Support
+49 (0)2335/960-110
303-801-1058
MacroSystem US
5485 Conestoga Court
Boulder, Colorado
USA
80301
Phone
0 +49 (0)2335/960-0
303-440-5311
Phone Support
If you have special technical questions, you can
call our technical support hotline:
(Germany)
(North America)
Please have the serial number of your machine
or your customer number ready whenever you
contact us.
(Germany)
(North America)
2. The program Deluxe-Titler 3D
E-Mail
[email protected]
[email protected]
(Germany)
(North America)
Fax
0 +49 (0)2335/960-100
303-440-5322
(Germany)
(North America)
Up-to-date information on MacroSystem products and our sales department can be found on
the Internet.
Please visit our Website:
http://www.macrosystem.de (Germany)
http://www.macrosystem.us (North America)
Deluxe Titler 3D is a title extension for your
system that you can use to create sophisticated
three-dimensional texts which can move around
freely in space. You can create impressive loop
the loops, make letters fly towards the viewer
and create other rotational effects. The text
design is based on the font packages installed
on your system and allows you to make changes
to many new settings such as light sources and
3D effect intensity. The path that the text moves
along can be modified quickly and by changing
just a few parameters using the preset Fixed
Motion mode or you can customize it completely
yourself using the Free Motion mode.
Deluxe Titler 3D has its own text input function
that is separate from the text input function that
comes with SMART EDIT.
You can of course also connect an external
keyboard to enter your text such as the
separately available Power Key option that is
compatible with SMART EDIT.
3. Installation / Starting the
program
In order to install the Deluxe Titler 3D software,
you will need at least version 2.5 of the SMART
EDIT system software. Leave your system
switched on and, in the System settings menu,
press the Install product button to open the
corresponding window. If you are installing
from a SmartMedia card, insert it into the
drive. When you insert the card, make sure the
gold-colored contacts are facing downwards
and the beveled corner is at the front left, i.e.
pointing towards the device. If the Deluxe Titler
3D software is supplied on a CD/DVD and your
system is equipped with a DVD drive and the
DVD-Arabesk software, you should open the
drive tray and insert the CD/DVD into the DVD
burner. If you are installing from a CD/DVD,
you might hear clearly audible sounds coming
from the drive – this indicates that the system is
reading the CD/DVD. In a moment you will see
the Deluxe Titler 3D software listed in the Install
product window. Select it from the list and click
on Activate.
After a short time a numerical keypad appears.
You can use it to enter the license code that you
purchased from your dealer. A message will
then inform you that the installation process
has completed. You can now take out the
SmartMedia card or CD/DVD.
If you wan to install Deluxe Titler 3D as a demo
version, select it from the list and click on
Activate.
If you are using version 2.5 or higher of the
SMART EDIT software, click on Cancel in the
numerical code window that subsequently
appears.
If you are using version 3.1 or higher of the
SMART EDIT software, click on the Demo button
in the numerical code window.
You will notice that the word Demo has
appeared after the program name. Confirm with
Ok and then take out the SmartMedia card or
CD/DVD.
Deluxe Titler 3D is now installed as a demo
version.
This demo version allows you to use all the
functions, however, the word “Demo” will be
displayed over the effect after the calculations
have been completed.
You will now see the Deluxe Titler 3D program
sorted alphabetically in the list of title effects in
the Titling menu.
Insert the desired video scene (or a blank scene)
into the storyboard, select Deluxe Titler 3D
and click on Insert so that the effect is placed
over the scene. Afterwards, make the changes
that you want to the Titler settings in the effect
options that are described in the next chapter.
Changes can only be made properly to all the
settings if the title effect has been inserted into
the storyboard.
4. Operation
This chapter will explain how to operate Deluxe
Titler 3D using the various buttons and controls.
If you have selected Deluxe Titler 3D from the
title effects you will see several effect options on
the right-hand side.
4.1 Enter text
Since Deluxe Titler 3D does not use the usual
function provided by the SMART EDIT titler for
entering text, you will see the program‘s own
text input function here.
(With Deluxe Titler 3D, you can ignore the Enter/
edit text button that you see below the options).
If you click on the Enter text button the
following menu opens:
• 2D style: If you click on this button the
following window opens:
This is where you can make adjustments to the
two-dimensional view of the entire line in which
the cursor is currently positioned.
• You will see the text in the top part of the
window. If the text extends past the text input
area, you can use the vertical slider control or
the arrows to scroll up or down so you can read
the entire text.
• Keyboard: In the lower area you will see a
keyboard that you are already familiar with from
the SMART EDIT titler. Enter the text in the usual
way.
• Font: If you click on this button, the familiar
window for setting the font type and size opens.
• Add line: If you click on this button a new
line is inserted at the current cursor position.
Pressing the return key on the keyboard has the
same function.
If, for example, the cursor is positioned in front
of the first word of the line, a new line will be
inserted above the current line – if the cursor is
positioned somewhere else, a new line will be
inserted below the current line.
• Delete line: If you click on this button, the line
in which the cursor is currently located will
be deleted. Caution, this action is performed
without prior warning!
- The Italic setting allows you to change the
italicization of the text. The options range from
-60° (slanted fully to the left) to 60° (slanted fully
to the right).
- The Char width setting allows you to change
the width of the letters and characters in a line.
To change the value, set the slider to the desired
percentage (50-200 %) – values over 100 % make
the characters wider and values below 100 %
make them narrower.
- With the Char space function, you can expand
or compress the line without changing the
width of the individual letters. Enter the desired
percentage (50-200 %) of spacing. Values over
100 % expand the line and values below 100 %
compress it.
- You can use the Justification function to make
the line appear left aligned, centered or right
aligned.
- The Line space setting allows you to change
the spacing in percent (50-200 %) between the
selected line and the one beneath it.
- If you activate the Style to all lines function,
you can apply the settings that you changed for
8
a line in this window to all the other lines. Click
on the box so that a checkmark appears and the
function is activated.
- If you activate the Font to all lines function, the
font of the selected line is copied to all the other
lines.
- The Archives function allows you to save the
settings that you have changed in the 2D style
window in the usual way or load the settings
that you have saved previously.
- By pressing the OK button you can close the 2D
style window and accept all the changes to the
settings that you have made here. By pressing
the Cancel button, you can close the window
without applying any of the settings changes.
• Archives: This is where you can save the
settings that you changed in the text input
window in the usual way and then load them
again later.
Furthermore, the archive contains predefined
settings.
• OK: If you click on this button you will close the
text input window and apply all the settings that
you changed previously.
• Cancel: If you click on this button you will close
the text input window without applying any of
the settings that you changed previously.
4.2 3D style
If you click on the 3D style effect option, a
window opens in which you can change the
appearance of the three-dimensional text that
you entered previously. You can use it to modify
the appearance of the entire text but not the
appearance of individual letters or lines.
• Preview window: In this window the letters
“Abc” show you the current design of your text.
This display will change as soon as you make
changes to the settings.
Furthermore, the letters can rotate (see
Animation button) so that you can see the threedimensional appearance better.
The font shown in this preview, however, does
not necessarily correspond with the font you
defined previously in the text input window.
• Letter color/texture: You can apply a color or
texture to the letters here. Clicking on this button
opens the already familiar image pool.
• 3D: This slider allows you to adjust the
intensity/strength of the three-dimensional effect
from 0-500. At a value of 0, the letters will not
appear three-dimensional.
• 3D color/texture: You can apply a color or
texture to the 3D elongation here. Clicking on
this button opens the already familiar image
pool.
• Front left / front right / back center light: To
enhance appearances and make the letters look
even more three-dimensional, you can activate
virtual light sources here. Click on the desired
9
box so that a checkmark appears and the
function is activated.
letters. The possible setting depends on the
length of the effect.
• Animation: To activate this function and make
the preview in the top right appear animated,
click on the box and set a checkmark. If you
deactivate this function, the preview stops and
remains in its last position.
• Archives: This function allows you to archive
and load designs so that you can switch quickly
to different display formats and access finished
designs.
Furthermore, the archive contains predefined
designs.
• Bevel size: This is where you can select the size
of the beveled edge by using the slider control
to set a value between 0 and 150. At a value of 0,
the beveled edge around the letters is no longer
visible.
• Bevel shape: This is where you can select the
shape of the beveled edge around the letters.
The following options are available:
• Ok: If you click on Ok, the 3D style menu closes
and the settings you have changed here are
accepted.
• Cancel: If you click on this button you will close
the 3D style menu without applying any of the
settings that you changed previously.
---: The letters have no beveled edges.
4.3 Fixed motion
45°: The letters have a beveled edge of 45°
angled towards the back.
-45°: The letters have a beveled edge of 45°
angled towards the front.
The Fixed motion effect option allows you to
select a predefined motion effect for the title that
you have designed so far. If you prefer to define
a motion path yourself, select the Free motion
effect option instead (see Chapter 4.4).
30°: The letters have a beveled edge of 30°
angled towards the back.
After you click on Fixed motion, the following
window opens:
Intrude: The beveled edge faces towards the
front so the letters look as though they have
been pressed in towards the back at right
angles.
Extrude: The beveled edge faces towards the
back so the letters look as though they are
protruding towards the front at right angles.
Spikes: The letters have a beveled edge of 45°
at both ends of their third dimension (depth
dimension).
Middle spike: The letters have a beveled edge of
45° in the middle of their third dimension (depth
dimension).
• Letter shift: This is where you set the time
delay for the fade-in sequence of the individual
• IN motion: This selection button allows you to
define the type of fade-in effect.
You can choose between various types of
motion or you can switch off motion altogether
(“---”) so that the text remains stationary in the
middle position.
10
• IN time: You can assign a duration to the fadein effect (IN motion) here.
• MID motion: In the middle of the effect, the text
can either perform an additional movement or
remain stationary.
• MID time: You can assign a duration to the MID
motion here.
• OUT motion: This selection button allows you
to define the type of fade-out effect.
You can choose between various types of
motion or you can switch off motion altogether
(“---”) so that the text remains stationary in the
middle position.
• OUT time: You can assign a duration to the
fade-out effect (OUT motion) here.
Please make sure that the sum total of IN, MID
and OUT times does not exceed the total effect
of time.
• Archives: This function allows you to archive
and load the motion effects so that you can
access them quickly.
In the background you will see the first frame of
your video scene with the text that you entered
previously superimposed on it.
If you have started the program for the first
time and have not loaded a preset yet or have
not created one in the Fixed motion menu item,
you will initially only see one (green) point
representing the position of your text. This is the
starting point.
If you have already inserted several points, the
path will additionally include a finishing point
• Ok: If you click on Ok, the Motion window
closes and the settings you have changed here
are accepted.
and several normal points.
• Cancel: If you click on this button you will close
the Motion window without applying any of the
settings that you changed previously.
In the menu foreground at the bottom edge
of the screen you will see a toolbar with the
following buttons:
4.4 Free motion
You can freely define the motion of the text
using the Free motion effect option. The text will
then move along the path that you have defined.
If you click on the Free motion button, the
following menu opens:
If you click on this button, the toolbar minimizes
and only displays this button and the one
beneath it thus ensuring you have a clear view
of your video scene and the drawn path of the
title.
11
If you click on this button, you can move the
toolbar to the opposite edge of the screen to
uncover any areas that might have been hidden.
• Slider control/arrows: If your title already has
a path defined and is made up of several points
(i.e. you have added additional points using
the Insert key point function), you can select
the points using the slider control or the < and
> buttons. You can of course also activate the
points by clicking on them directly if they are
located in the visible area of the screen.
An inactive point is yellow and turns green after
you click on it once. If you click on the green
point again it will turn blue and you can move it
with the trackball pointer. If you click again, the
point will be set at its new position.
Point color
Function
yellow
normal point
green
active point
blue
Point being moved
• Import fixed motion: If you click on this button
you can load the settings from the fixed motion
menu (see Chapter 4.3) and then edit them here.
• Archives: After you have created a path in this
menu, you can save it here so that you can load
it again later and continue editing it.
Furthermore, the archive also contains
predefined designs.
Chapter 4.4.1 that follows.
• Path: You can use this selection button to
select whether the entire path should be angular
or curved.
• Preview: This selection button provides you
with three options relating to the preview of
your video scene. The available text display
options are: not at all, low quality or good
quality. Depending on the setting you choose
and the device model you are using, the
processing of the motion effect might become
somewhat slower.
• Ok: If you click on Ok, the Free motion menu
closes and the path you have defined here as
applied.
• Cancel: If you click on this button you will close
the Free motion menu without applying any of
the settings that you changed previously.
4.4.1 Edit key point Menu
After you have clicked on the Edit key point
button in the Free motion menu, the following
menu appears and allows you to change the
position of the text in space:
• Insert key point: If you click on this button, a
point is inserted between the currently active
(green) point and the point after, if there is one.
(If the currently active point is the finishing
point, the new point will be added after it).
The newly inserted point will then be active
(green) and the one that was previously active
will turn yellow.
• Delete key point: If you click on this button, the
currently active (green) point will be deleted.
• Edit key point: If you click on this button, a
menu will appear that you can read about in
In the background you will see your video scene
again with the title that you have created so far.
There is a toolbar in the foreground that has the
following functions:
12
• Minimize toolbar: If you click on this button,
the toolbar minimizes and only displays this
button and the one beneath it thus ensuring you
have a clear view of your video scene and the
drawn path of the title.
• Cancel: If you click on this button you will close
the Edit key point menu without applying any of
the settings that you changed previously.
• Move toolbar: If you click on this button, you
can move the toolbar to the opposite edge of
the screen to uncover any areas that might have
been hidden.
5. Application examples
• Slider control/arrows: Since your title now
has several points, you can select them using
the slider control or the < and > buttons. This
function is particularly important if a point lies
outside the visible screen area (e.g. after you
have used the zoom function, see Z control)
and you can no longer seize the point using the
trackball pointer.
• Position: If you click on this function, the
currently active (green) point will be seized thus
making it to turn blue and allowing you to move
it. You can also do this, by the way, by clicking
on a green point once more with the trackball
pointer so that it turns blue.
• Z: This slider control allows you to change
the perspective or the distance to the viewer
in three-dimensional space. That is to say, the
text moves closer to the viewer and therefore
appears larger (positive value) or the text moves
away from the viewer and therefore appears
smaller (negative value).
Before you use this function, please make sure
you select the position at which you want the
text to be changed by first activating the relevant
point.
The two examples in this chapter will help you
learn how to create an attractive title for your
video scenes using Deluxe Titler 3D.
5.1 Fixed motion
In this example you will create a title using a
predefined motion setting.
Insert the scene for which you want to create
a title (e.g. a 10 second long scene) into the
storyboard and open the Titling menu. In
this menu, look for Deluxe Titler 3D in the
alphabetically sorted list and select it.
Click on Insert and set the effect time to a
suitable value, e.g. so that it runs the entire
length of the scene (i.e. in this case 10 seconds).
Now let us turn our attention to the effect
options:
Click on the top Enter text function so that a new
menu opens.
• H, P, B: These slider controls allow you to
rotate the text in space.
Since the settings range for these slider controls
is -720° to +720°, the text will be rotated several
times if high values are selected. One complete
rotation will be achieved with -360° or +360°.
• Ok: If you click on Ok, the Edit key point menu
closes and the settings you have changed here
are accepted.
You will see a monochrome background
displaying the „3D Text“ title on two lines
13
(provided that you have not made any changes
already).
To delete this default text, position the trackball
pointer after the last letter and click on the
left trackball button. You will see that the red
insertion cursor appears there. Press the delete
function on the keyboard repeatedly until the
text has been removed completely.
Then, click on the Font button so that the
already familiar font type and size selection
menu appears. Use it to set your desired font.
Afterwards enter the text “My first 3D title” so
that it breaks across two lines.
Then click on the 2D style button if you want to
make corrections to the Char width, Char space
and Line space.
Next, set the intensity of the three-dimensional
effect by moving the 3D control to a medium
setting, e.g. 200.
Please make sure the Animation button is
activated so that you can view the settings that
you change in an animated preview.
Leave the Justification setting of the text to
Centre but set the Italic setting to a value of 15°.
Finally, activate the Style to all lines function so
that a checkmark appears in the box and, after
confirming with Ok, the settings are applied to
both lines.
You are now at the text input window again
where, if necessary, you can archive the text you
have just formatted.
Afterwards, close the menu by pressing the Ok
button.
Now click on the 3-D style effect option to make
changes to the three-dimensional settings.
First use the Letter color/texture button to open
the image pool and select a pleasant pattern or
color for your title, e.g. a dark green.
Now set a color or a pattern for the threedimensional effect by opening the image pool
with the 3D color/texture button and selecting a
red pattern, for instance.
If necessary, activate the Front left light button
and deactivate the other two light sources
so that the green letters appear darker in the
animated preview the further they move away
from the viewer.
Then set the Bevel size to 35 for the beveled
edge around the letters (in this case red) and set
the Bevel shape to a value of 45.
Archive the settings that you have changed in
this menu and then click on Ok to return to the
effect options.
Finally, you can now define the motion path of
your titler.
14
Click on the Fixed motion button so that a new
window opens.
Insert a suitable scene into the storyboard,
open the Titling menu, select Deluxe Titler 3D
and insert it. Please also take note of the effect
length!
Afterwards, click on the Enter text effect option
and delete the text that is already present.
Then use the Font button to open the
corresponding window, select the desired font
type and set the size to 100.
Next, enter your name so that it breaks across
two lines.
Use the IN motion button to set the Left -->
Centre option so that the text “flies” from the
left to the centre of the picture.
Then use the IN time slider control to assign a
duration to this fade-in effect, for example, 3
seconds.
Click on the 2D style button and make further
changes to the settings for the text’s twodimensional appearance. For example, you can
set the Justification setting to Center and the
Italic setting to 5°.
For the MID motion setting, select a Rotation so
that the text rotates in the middle of the picture.
In this example we recommend a duration of 2
seconds for the MID time option.
Next, also change the OUT motion setting.
Select the Center --> Bottom function so that the
text moves downwards after one rotation and
“flies” out of the picture.
We recommend a duration of three seconds for
the OUT time.
Now that you have configured all the settings,
archive them if necessary and close the menu
by pressing Ok so that you return to the Titling
menu.
Here you can view the title you created in the
preview and then make the system calculate the
title effect.
5.2 Free motion
In this example you can create your own path
for your text.
Next, close the 2D style window and the Enter
text menu using the Ok button and click on the
3D style effect option.
Use the Text color/texture button to select
yellow for the text and use the 3D color/texture
button to select black for the three-dimensional
effect.
Please make sure that the Animation function is
activated!
Next, set a value of 100 for the 3D option and
activate all three light sources.
Set a value of 50 for the Bevel size and select the
Middle Spike option for the Bevel shape.
15
Now click on the Edit key point button so that a
new menu opens. This is where you can make
changes to the settings for the individual points
along the motion path.
Use the slider control or the arrows next to it to
select the second point so that it turns green.
Then use the Z slider control to set a value of
-150 so as to reduce the distance of the text from
the viewer (i.e. the text appears larger at this
position).
Next, and use the Z slider control to enter a
value of 150 so that the distance from the viewer
is increased and the text appears smaller.
After changing the values, it is possible that
After you have configured the 3D settings, close
the menu using the Ok button and click on the
Free motion effect option.
You see the first picture of your video scene
and a green point is displayed above it (starting
point) with your name.
Now, click on the Insert key point button on the
toolbar so that another point (finishing point) is
inserted.
Kick on the Insert key point function five more
times so that five normal waypoints are inserted.
The points are connected by a dashed line
representing the motion path of the text.
some points will no longer be displayed within
the visible screen area but will have „wandered“
off the screen. You can select these points
using the slider control or arrows – when you
do this, the area surrounding the screen will be
displayed.
Set a value again of -150 for the sixth waypoint
so that the text appears larger.
Afterwards adjust the settings for the rotation in
three-dimensional space.
To do so, use the H slider control to set a value
of -100° so that the text rotates horizontally. For
the fifth waypoint, use the P slider control to set
a value of 150° so that the text rotates vertically.
You will notice that six points are yellow, i.e.
they are inactive. The last point that you added
is now the active one (green) and is also the
position at which your text is currently located.
Finally, use the B slider control to set a value
of -360° for the finishing point so that the text
rotates once about its axis counterclockwise at
this point.
Before you make further changes to the settings
of the points, you should first spread them over
the screen. To do this, select a yellow point so
that it turns green and becomes active. You can
now click on it again so that it turns blue thus
allowing you to move it around by rolling the
trackball. Position all the points one by one in
the same way to create a motion path across the
screen.
Close the Edit key point menu using Ok and
now, in the Free motion menu, use the Path
selection button to select a curved path (bottom
option).
After you have also closed this menu using Ok,
you can make the system calculate the effect in
the Titling menu.
The results will surprise you!
16
17
242-12/05