1
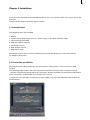
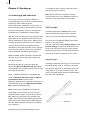
User manual
Casablanca Liberty
Table of contents
Chapter 1: Introduction ...........................................................................................................
1.1 Congratulations!..............................................................................................
1.2 The system.......................................................................................................
1.3 Important notes ...............................................................................................
3
3
3
4
Chapter 2: Installation ............................................................................................................. 5
2.1 Included items ................................................................................................. 5
2.2 Connection possibilities.................................................................................. 5
Chapter 3: Starting up ............................................................................................................. 8
3.1 Powering up and calibration .......................................................................... 8
3.2 First steps......................................................................................................... 8
3.3 Smart Edit system software ........................................................................... 9
3.4 Hard-drive note................................................................................................ 9
3.5 LCD monitor note ............................................................................................ 9
3.6 Smart Edit installation .................................................................................... 9
3.7 Smart Edit update ........................................................................................... 9
3.8 Recovering the pre-installed software........................................................... 10
3
Chapter 1: Introduction
Up-to-date information on MacroSystem products and our sales department can be found on
the Internet.
Please visit our Website:
http://www.macrosystem.de (Germany)
http://www.macrosystem.us (North America)
1.1 Congratulations!
Congratulations on the purchase of your
Casablanca Liberty! Congratulations on the
purchase of your new system! We thank you
for the confidence and trust you have shown
us, and we hope that this laptop will meet your
expectations.
This manual will help you with any connection
and installation issues.
Feel free to contact us to ask further questions or
to give us suggestions.
Whenever you contact us, please have your
customer number or the serial number of your
system device at hand so that we can help you
more quickly.
Address :
MacroSystem Digital Video AG
Postfach 020240
58290 Wetter
Germany
MacroSystem US
5485 Conestoga Court
Boulder, Colorado
USA
80301
Phone Support
If you have special technical questions, you can
call our technical support hotline:
(North America)
Monday - Friday 9a.m. - 5p.m. (Mountain Standard Time)
303-801-1010
When calling, please have the serial number of
your device at hand.
Outside of these times you can email or fax us.
Messages received in this way are handled during business hours.
E-Mail Support
[email protected]
(Germany)
[email protected] (North America)
[email protected] (N.A.)
[email protected] (N .A.)
Fax Support
+49 (0)2335/960-110
303-801-1058
(Germany)
(North America)
1.2 The system
Phone
0 +49 (0)2335/960-0
303-440-5311
(Germany)
(North America)
E-Mail
[email protected]
[email protected]
(Germany)
(North America)
Fax
0 +49 (0)2335/960-100
303-440-5322
(Germany)
(North America)
Casablanca Liberty is an ultimately compact,
portable Casablanca system for powerful and
intuitive DV and HDV video editing. Work with
video like you have never imagined before.
The device is ideal for travelling, editors operating from different workplaces and even videographers. It is the ideal secondary unit.
Casablanca Liberty is not merely a simple laptop, it is rather a Tablet PC with a rotating, touch
sensitive display.
The Smart Edit system software is entirely operated using the included Stylus pen by touching
4
the surface of the display - fast and absolutely
comfortable.
Casablanca Liberty is two devices in one in fact.
The Dual Boot technology allows you to select
either Windows XP (similarly operated using the
Stylus) or Smart Edit before start-up. So at the
same time, you are holding a powerful PC with
Intel Core Duo processor technology.
This manual covers details of the product
hardware. For specific instructions on using
the software, make sure to read the included
documentation called `User Manual SMART
EDIT´.
The Smart Edit manual refers to interfacing with
the software via a trackball. As such a trackball
is not included with the Casablanca Liberty,
you should use the device using the integrated
touchpad or the included stylus pen – the
functionality is the same. More information on
this can be found in chapter 3.2 or the Toshiba
manual.
Of course, you can also purchase a trackball
separately and use it via the USB port.
1.3 Important notes
The conformity document, hazard warnings
and technical data can be found in the Toshiba
manual. Please read this information carefully to
avoid problems.
Warranty:
Should your notebook be subject to technical
problems, please first make certain that it is not
a hardware defect.
In case of a defective hardware, Toshiba
customer support will assist you. The required
documents are all included within the unit‘s
packaging.
If you are unable to describe the problem
exactly, hand the device to your dealer.
To make the most of the worldwide support and
warranty, make sure to register the Liberty with
Toshiba after buying.
5
Chapter 2: Installation
Once you have unpacked and connected the Liberty, you must merely switch it on to try it out for the
first time.
Please read the single instruction steps carefully!
2.1 Included items
The following items are included:
1. Device
2. Toshiba extras (Stylus pen, manuals, power supply, mains lead, Recovery DVD)
3. CD containing Smart Edit
4. DVD with add-on software
5. Smart Edit manual
6. DVD-Arabesk manual
7. Registration card
Should any of these items not be included, please contact the dealer you have purchased the
Casablanca Liberty from.
2.2 Connection possibilities
Now connect your video equipment. You will require a source player, in most cases your DVD
camera.
The following pages explain the most important connections found on your Casablanca Liberty
– the ones supported by Smart Edit. Any connections, buttons and LEDs not specifically explained in
these instructions are described in the Toshiba user manual.
In some cases, the functions and pictures of your model may vary inconsiderably from the ones in
this document.
6
Front connections
(1) Microphone jack
This is a 3.5 mm microphone mini-jack, which is used to connect a mono microphone with a
threefold conducting mic plug.
(2) Headphone jack
Used for connecting a 3.5 mm mini-jack for a stereo headphone.
(3) Volume control
Turn the wheel to the right ton increase the volume level of the stereo speakers or stereo
headphones. Turning the wheel to the left reduces the volume.
(4) LCD Lock
Press this button to unlock the LCD monitor and then carefully pull it up.
If you wish to close it again, press the monitor down and close the latch (you will hear it click).
Connections on the left side
(5) USB
There are two USB ports.
(6) DV In/Out
This `DV´ port serves as an input and output for MiniDV/DV-recorders/cameras, D8 cameras and
offers the best in quality so that you can load and store your video footage.
7
Connections on the right side
(7) Stylus pen
The stylus pen is tucked away inside a holder and is used to operate the monitor. Whenever you
want to replace the stylus back into the holder, make sure that the clip is facing up and the pen is
inserted with the tip first. Then, gently press the stylus into the holder until it snaps in.
To remove the stylus, press the black, rounded end of the pen so that it jumps out a little. Now pull
out the pen.
(8) CD/DVD drive
The CD/DVD drive is used to install CDs or DVDs and also burn media. When the Liberty is on, you
can press the switch on the right side of the drive tray to open it.
Insert a CD/DVD and close the tray again by pressing the same switch again.
Connections on the back
(9) Network adapter
The network adapter is used to connect the notebook with a network cable (Ethernet).
(10) USB
There are three USB ports that can be used to connect a trackball or a card reader.
(11) VGA port
The VGA port is used to connect to an external VGA monitor screen. Such a monitor may be larger
than the built-in one and offer different screen resolutions.
8
Chapter 3: Starting up
is available at every startup, irrelevant of the
operating system used last.
3.1 Powering up and calibration
Note: Please note that Casablanca Liberty
automatically starts up in Windows mode if a
selection is not made within 30 seconds!
First, make sure that Casablanca Liberty is
connected to the mains and or that the battery is
charged up with sufficient power.
Now, position the notebook in front of you so
that the Toshiba logo is upside down. Press the
LCD lock, then flip the screen up and position
the device on a comfortable viewing angle.
Tip: You have the ability to turn the monitor and
flip it down on the keyboard so that you have a
kind of VGA tablet in front of you. Make sure to
read the respective information in the Toshiba
manual. Also note that the keyboard of the
notebook is no longer reachable in this position.
If you want to enter text, you must use the onscreen keyboard (see Smart Edit manual).
Slide the Power switch (located just under the
monitor, on the left) to the right to power up
Casablanca Liberty.
Powering the Liberty up the first time will
display the Microsoft Windows XP logo. Make
sure to follow the onscreen prompts and answer
the required questions.
Next, a selection between the two operating
systems Windows XP Professional and MacroSystem Smart Edit must be made.
Select the desired entry using the arrow keys on
the keyboard, in this case MacroSystem Smart
Edit, and press the Return key.
Note: If you use the notebook as a tablet PC
(VGA tablet), you will have no access to the
keyboard while using it. To activate the Smart
Edit software, move the Cross function stick
(right, next to Power) up or down to select one
of the menu items. Select Smart Edit and press
the stick down (towards the device) to confirm
your selection.
Selecting one of the two operating systems
3.2 First steps
In order to operate the SMART EDIT screen
interface efficiently and precisely using the
stylus, you must take note of the following:
First of all you can decide whether the screen
pointer is actually shown.
The box next to the Option Mouse pointer in the
System settings may be activated (with a tick),
so that you will always see the screen pointer
wherever the pen tip is located. Deactivate the
function to disable the pointer on the screen.
Using the stylus
In order to work with the stylus, you must touch
the tablet gently using it. ´Clicking´ is done by
pressing the stylus tip on the tablet. To cancel
using the pen, or to exit a specific menu, the
stylus must float gently above the tablet before
you press the side button.
9
3.3 Smart Edit system software
To learn how to operate Smart Edit, please read
the included Smart Edit manual. The manual
contains all functions of the software and leads
you through numerous tutorials to help learning.
3.4 Hard-drive note
Casablanca Liberty features an internal harddrive which can be replaced (see Toshiba user or
online manual).
First, you must install Microsoft Windows on the
new hard-drive. Make sure that not the entire
hard-drive is used for this operating system.
Next, install the Smart Edit system software
with the aid of the included CD (see chapter 3.6).
3.5 LCD monitor note
The LCD monitor is excellent for displaying
sharp, easy-on-the-eyes menus and video
footage.
Go to the Screen menu via the System Settings
and select the desired VGA mode. There are two
VGA variants – we recommend setting VGA 2
(1024 x 768, 60 Hz).
When using the LCD monitor, there are some
limitations. None of them are relevant to the
quality of the edited film. Here are some tips for
using the VGA mode the best way:
• As the refresh rate of the VGA monitor does
not match the 50 or 60 Hz TV-system (PAL/
NTSC), playback of the footage on the VGA
screen may be slightly jerky. This does not have
an affect on the final DV output to the recorder/
camera or finished DVD.
• Unlike video modes, VGA works with full
frames (non-interlace). Moving objects (such
as camera pans or driving by cars) my lead to
so-called comb-effects so that edges are not
displayed sharply (a kind of bleeing out effect).
This drawback is of course only visible on a VGA
monitor but not in the final video.
To counter this, go to the System Settings and
use the Screen button to enter the options for
VGA play and change it to `Field´.
• Display on a VGA monitor is subject to colour
saturation and contrast being very weak. The
finished video watched on a TV screen does
not have this effect and is correct. Try to avoid
increasing saturation or the contrast as this may
lead to colours `bleeding out´ or distortion that
were not visible on the VGA screen beforehand.
Sharpness too is displayed differently in VGA
compared to the final video.
• On the VGA screen, in various menus (for
example Trimming or Splitting), the entire
video picture is displayed along with the whole
overscan area. This area may contain picture
data faults that are later no longer visible on a
TV screen. We recommend that you do not use
the outer edges of the screen for titling as the
letters may later not be visible. Make sure to
control your result on a TV set before finishing
your project.
3.6 Smart Edit installation
If you wish to install the system using Smart Edit
anew (often called `full installation´), insert the
required CD.
Start from the CD, confirm with the `J´ key
and wait for the remainder of the installation
process. This may take some minutes.
3.7 Smart Edit update
If you wish to update your Smart Edit system
software (as opposed to a `full installation´,
insert the CD and boot the system from it.
10
3.8 Recovering the pre-installed
software
To recover the software to the same state it was
shipped in (for example, if the hard-drive can’t
be started or if you wish to change the partition
sizes), follow these steps:
Please note that the hard-drive is re-formatted
in this fashion, so that all data stored on it is lost
irrecoverably (both Windows and Smart Edit
data)!
Insert the Product Recovery DVD-Rom into the
tray and power down the Liberty.
Now, power it up again so that it starts from the
DVD. You will now be informed that the system
is being loaded. This can take a few minutes.
Next, you will be asked to select a language.
Following this, a new window will appear. Press
the Settings button to define the partition size/s.
We recommend at least 15 GB for Windows XP.
The remaining capacity is used for Smart Edit.
Then, press Continue in the subsequent windows.
When finished, remove the Recovery DVD from
the tray and insert the Smart Edit System CD.
Start from this CD, so that a new installation of
Smart Edit can begin.
Finally, remove the CD again and the system will
reboot automatically under Windows. Take care
of the first installation in Windows and re-start
the notebook.
After the restart, you will once again see the
selection for Windows XP and Smart Edit. Well
done!
If you now wish to start Smart Edit, select the
operating system but do not confirm it yet! First,
insert the Liberty Unlock CD into the disc tray
and start the system.
You now have to unlock the Smart Edit software.
By using this CD for the first start-up, you are
unlocking the Smart Edit interface from the
demo mode.
After the start procedure, remove the CD again.
The necessary data has been copied to the harddrive.
11
298-10/06