1
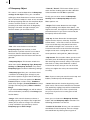
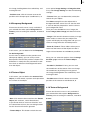
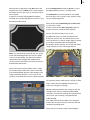
User manual
Candy Factory
for SMART EDIT
Contents
Page
1. General information.......................................................................................... 5
2. The Candy Factory program............................................................................. 5
3. Installation / Starting up ................................................................................... 6
4. Operation ........................................................................................................... 6
4.1 Bevel ...................................................................................................... 8
4.2 Light ....................................................................................................... 9
4.3 Glow....................................................................................................... 9
4.4 Shadow.................................................................................................. 10
4.5 Materials Object.................................................................................... 11
4.6 Material Background ............................................................................ 11
4.7 Bumpmap Object.................................................................................. 12
4.8 Bumpmap Background ........................................................................ 13
4.9 Texture Object ....................................................................................... 13
4.10 Texture Background............................................................................ 13
5. Tutorials ............................................................................................................. 14
5.1 Using a predefined mask ..................................................................... 14
5.2 Title effects ............................................................................................ 16
5.3 Text background for a vacation film.................................................... 18
1. General information
Congratulations on purchasing the Candy
Factory software product.
We would like to express our gratitude and hope
that the software meets your expectations.
This manual explains how to operate the Candy
Factory program.
For further going questions and suggestions,
don‘t hesitate to contact us.
Please use the following address. Makes sure to
have your unit‘s serial number or your customer
number at hand whenever you contact us.
address
MacroSystem Digital Video AG
Postbox 020240
58290 Wetter
Germany
Users from the United States please contact
MacroSystem US
5485 Conestoga Court
Boulder, Colorado 80301
Phone
0 +49 (0)2335/960-0 (Germany)
303-440-5311 (North America)
eMail
[email protected] (Germany)
[email protected] (North America)
fax
0 +49 (0)2335/960-100 (Germany)
303-440-5322 (North America)
Current product information and sales related
details can be found on our web site:
http://www.macrosystem.com
If you have technical queries, you can reach us
using the following Technical Hotline telephone
number:
(North America)
Monday - Friday 9a.m. - 5p.m. (Mountain Standard Time)
303-801-1010
Outside of these times you can email or fax us.
Messages received in this way are handled during business hours.
E-Mail Support
[email protected] (Germany)
[email protected] (North America)
[email protected] (N.A.)
[email protected] (N .A.)
Fax Support
+49 (0)2335/960-110 (Germany)
303-801-1058 (North America)
2. The Candy Factory program
Candy Factory is a software program, which
graphically improves texts, logos and symbols.
It offers countless means to do so, such as
3D look, structures, patterns, glow, light or
shadows. Candy Factory already comes with
loads of ready-to-use projects, which will
give you fast access to results; the program
also allows for making flexible and individual
changes.
Once you have installed Candy Factory, you will
see the program listed in the Transition Effects
list.
In order to start work with Candy Factory, you
will need two scenes in the Storyboard – just like
with all other Transition Effects. The first (left)
scene represents the background and would
usually be a normal video scene, which may
also be static. The second (right) scene must be
black/white. It serves as a `mask´, which may
be a previously created text, a picture, logo or
a drawing made with Akaba - New Concept.
The object or text may move. This mask is then
processed by Candy Factory and placed on the
video. White areas will be displayed as an object
in the foreground; black areas will be replaced
by the video of the left scene.
Moreover, you’ll find countless new masks and
images in the ImagePool, which can be used
to process scenes with various pictures or
symbols.
3. Installation / starting up
To install the Candy Factory software, you will
require the Pro Pack (this may already be preinstalled on your system). The reason for this is
that Candy Factory relies on the ability to create
scenes.
Should the Pro Pack not be installed on your
Casablanca device, you will only be able to use
Candy Factory in a limited fashion. Specifically,
this means that you will only be able to use the
black/white masks provided in the ImagePool
or with scenes generated with Akaba – New
Concept. Self-made titles would not be available
for editing.
Leave the unit running and enter the System
Settings. Click on Install Product so that the
installation screen is displayed.
If you are using a Smart Media card for
installing, insert it into the drive, making
sure that the gold contacts are located on the
underside and the rounded left/front corner
points in the direction of the drive.
If your Candy Factory software is on CD/DVD,
and if your system is equipped with a DVD drive
and the DVD-Arabesk software, open the tray
and insert the CD/DVD.
Activate.
After a while, a number keypad will appear
on screen, which you must use to enter the
unlocking code received from your dealer.
Finally, you will be notified that the installation
is completed and you may remove the Smart
Media card or CD/DVD from the drive.
If you whish to install Candy Factory as a demo,
select it from the list and press Activate.
If you are editing with Smart Edit 2.5, press
Cancel in the number key block appearing next.
Smart Edit 3.1 or higher users must press the
Demo button instead.
You will see that the word `Demo´ will now be
displayed right after the program name. Confirm
with `Ok´ and remove the Smart Media or CD/
DVD from the drive.
Candy Factory is now installed in demo mode.
Such a demo product allows you to fully use the
software, however, the final effect will contain
the wording `Demo´ positioned over the video
footage.
You should now be able to locate the Candy
Factory effect in the Transition Effects menu – in
the list of effects (the list is stored in alphabetical
order).
4. Operation
On the next pages, we will explain how to
operate Candy Factory and its user interface.
This part of the manual serves as a reference for
the single program areas and buttons.
If you are unsure about a certain function or
menu, browse this part of the manual to get
more information.
Preparation
After a short while (during installation from
CD/DVD, drive noise may be experienced – this
is an indication that the system is reading
the data from the CD/DVD), it will display the
Install Product screen. The list will contain the
Candy Factory. Select it from the list and press
As Candy Factory is used to edit and improve
titles, images, logos, and drawings and to create
masks, you should first find a suitable scene to
start with.
There several possibilities: You can generate a
mask using one of the included pattern effects,
you can create a short text or title in white on a
black page, an image made with Akaba – New
Concept, or you can process a video scene with
an Image Processing effect (such as Colour to
Grey or Colour Reduction). Make sure that your
image contains no greyscales and use a clear
white to achieve the best results with Candy
Factory.
Additionally, if you are working with Smart Edit
4 or later, Candy Factory comes with predefined
titles found in the titling screen Archives. Load
the Candy Factory title and you will get a text
with pure white and black colours. We can use
this title to work on several projects and will
always start from the same starting basis.
Add any scene to the Storyboard and then (i.e.
to the right) the mask.
Make sure that the scenes have the same length
so that the effect ranges across the entire scene.
(If you want to have the effect at the end of the
scene, the first scene will need to be longer.)
Enter the Transition Effects screen and select the
Candy Factory operator. It is found alphabetically
in the list.
Add the effect and check if the effect length is
the same as both scenes.
be displayed with effects.
If you go for the Texture, the black are of the title
scene, candy Factory will replace the black are
with a pattern that you chose from the software,
with any settings you may have made.
• The button DeInterlace is used to stabilize the
video footage. DeInterlacing is the process of
adding two video fields to a combined video
frame.
For example, if you have a moving text scene
(scrolling title), it may end up jittering in Candy
Factory. In such a case, set DeInterlace to On, so
that both fields are shown simultaneously for a
stable picture.
Setting DeInterlace to Off may lead to a jagged
edges (aliasing) – in particular on VGA screens.
Rendering in Candy Factory will take longer
when DeInterlacing is set to On, so make sure to
use Off when using static images.
Now we will take a look at the effect options
found on the right of the effect list.
• The button Calculating refers to the right scene
(mask) and gives tow options: If you are using a
static black/white scene, e.g. static text, choose
Still scene to achieve faster rendering results.
For a moving black/white scene (e.g. a scrolling
title or a PiP animation), the option Moving
scene should be chosen.
In this case, rendering takes longer, but you will
get an excellent quality result than with Static
scene.
Effect Options
These settings should be made before you start
the program so that you do not forget them.
• Click Start program to begin work with Candy
Factory. The screen will change to a new menu.
Menu structure
• The button Background can be switched to
Scene or Texture. If you select Scene, the black
area of your title scene shall be replaced by the
video board you placed in the Storyboard (the
first scene). As a result, only the white object
(say the logo or text) will be visible on top of the
video.
Of course, the object won‘t just be white; it will
The first thing you will see is your video scene,
with the applied white part of your mask.
(If you do not see the text or object, there may
be two reasons for this: Please check if your text/
object can be found underneath the menu panel.
Do this by moving the slider to the opposing
side of the screen. If you can‘t find it, it may
be because it will appear during the course of
8
the scene. Move the time slider located in the
top right of the panel to the right to change the
position in time.)
Candy Factory preset parameters at any time.
The parameters are the original program
settings when the software was started.
The white area is now probably no longer white.
Instead, the software will apply the pre-defined
settings so that the text, image or mask is
surrounded by light effects.
At the bottom right of the page, there are four
menu symbols:
Show Information (software version), Reduce
the control panel, Move the control panel
and Return to the Transitions menu. It is not
possible to exit Candy Factory using the right
(cancel) trackball button. This prevents you from
unintentionally cancelling your work.
This video scene representation is an all-time
available preview which is updated as soon as
the settings are changed.
Tip: We recommend to simply try all of the
settings in the menu. You will probably be able
to get a better understanding of the way in
which they are applied, despite the descriptions
and explanations. Simply try to see what kind of
effect they have on your video footage.
The large preview image in the software allows
you to see the result all the time.
4.1 Bevel
Select the symbol to enter the Bevel menu. This
is where you can set the way in which the title,
logos or pattern will look by altering the height
or edge form.
This basically creates a 3D appearance.
The lower part of the screen contains a control
panel. The left area contains symbols to select
the different menu points. The single functions
are each explained on the next pages.
The right area hold a slider used for navigating
to any point in time of the video scene/pattern.
You can use it to see how your chosen
parameters have been applied to later stages in
the scene. This is particularly useful when your
object is moving, for example a scrolling title.
A frame-perfect navigation is achieved using the
Time code to the right of the slider. It displays
the current frame.
Note: You can only see the time period that
matches the range for effect you have chosen in
the Transition Effects menu previously!
Further down, there is the Archives button, used
– as always – to save your creations and reload
the later on. Additionally, Candy factory has a
large number of effects included, which you can
access. Of course, the effect you choose can be
changed later by altering the parameters and
making your individual effects.
The Default button is used to return to the
• Bevel: The Bevel button toggles between two
menu points Extent and Slope.
Select Extent to get more setting options:
• Width: Set the width of the slope. You can set
the parameter from 0 to 30.
• Height: This slider sets the height of the slope.
Parameter ranges from 0 to 30.
• Smooth: This option creates a softer diagonal
edges. The available setting value ranges from 0
to 30.
• Invert mask: Activate this by marking it (click
into it) to switch around the black objects of the
mask scene with the white areas, so that the
video scene (or pattern) is seen in the white area
and the parameters alter the background.
You can then select the Slope function in Bevel
9
to get new options. Setting the Slope can further
adjust the 3D look of the effect. Additionally, a
white transition between light and shadow is
generated.
Options for Slope depend heavily on the
parameters you made for Width. A smaller width
reveals less Slope.
• Slope top: You can set a value between 0 and
10 to increase the Slope above.
• Slope bottom: You can set a value between 0
and 10 to increase the Slope below.
• Carve: This setting switches the look of the
area created. When deactivated (dash), nothing
changes. If activated (tick), areas that previously
looked like they stood out, are turned around.
Thus, they look like they had been carved in.
This function is easily grasped when using largearea masks or letters with their own surface.
• Distance: Decide how far away the light source
is from the object using this function. If the light
source is very close to the object (small value),
the object will be brightly lit. All areas further
away shall fade away in the dark. If you increase
the distance, you will achieve a more diffuse
light, likely to be more useful in conjunction with
larger objects.
• Position reset: One click here resets the
position of the light source to the screen centre
(X = 0, Y = 0).
4.3 Glow
• Box: Click onto this box to activate the Glow
function. A tick activates it, a dash means it’s
deactivated. Glow is a type of aura, as if the
object were illuminated from behind.
If you do not wish to use Glow, and have
deactivated it, all the functions for this feature
will be ghosted.
4.2 Light
Press this button to enter the Light menu. Here,
you can choose a light source to position in front
of your video scene. You can decide from where
your object is lit.
• Glow: The Glow button activates two further
menu options: Size and Intensity and Colour
Settings.
First, select Size and Intensity to make the
following options:
• Set position: Click on this button to position
the light source.
The control panel is faded out and you can use
the screen pointer to move the light source to
any position of the screen. You can also see
the co-ordinates on the edge of the screen.
Once you find the right position, press the left
trackball button to confirm the position.
• Position: Here, you can monitor the X and Y
coordinates of your light source. The position
coordinates will not be displayed in the video
material.
• Size: This determines the size of the glow
effect. It ranges from a value of 0 to 30. The
glow effect will reach further out from the object
borders is set to a higher value.
• Intensity: This slider allows you to set the
intensity of the glow from 0 to 100. A higher
value increases the intensity. Such a higher
intensity allows you to better differentiate
between the two possible colours (see above).
Set the slider to 0 to switch of the glow entirely.
If you do so, there will be no need to make
further settings for Glow as they all depend on
10
the intensity parameter.
• Fall off: You can determine the amount of
decay for the glow, i.e. how the glow fades out
further away from the object. Values between
0 and 100 are possible. A smaller value means
that that the glow hardly fades out and remains
equally bright. A higher value decays the glow
effect the longer the distance from the object.
• Diffuse: Activate the Diffuse parameter with
a tick, or deactivate it with a dash. In most
cases, you should deactivate this function.
Once activated, the glow effect will decrease
considerably. Merely in some parts, namely
in the background, the glow will remain well
visible. On large surface, rounded edges, it will
hardly be visible.
Finally, you can select the Colour Settings just
below the Glow button. The following options
will be available:
• Central colour: With this function, you can set
the central colour for the glow respective to
the area near the edge of the object. Click onto
the colour field to open the Casablanca-typical
Colour Box for picking a colour. We recommend
warm, bright colours.
• Edge colour: Click onto this button to activate
the Colour Box. Use it to define the colour of
the glow, respective to the weaker, further away
areas.
Note: If you click directly into your video footage
to position the shadow differently, you will
automatically change the positions of your light
source.
• Box: Click into the box to activate (tick) or
deactivate (dash) the Shadow function.
If you do not wish to use the Shadow function,
and deactivate it, the buttons for further Shadow
menus will be deactivated.
• Intensity: Here, you can determine a value
between 0 and 100 for intensity of the shadow.
A higher value means a more dark shadow. A
value of 0 switches the shadow off altogether
and negates the need for further parameters. A
value of 100 makes the shadow almost totally
opaque.
• Smooth: This slider determines whether the
shadow is smoothed out or has hard edges.
The parameter ranges from 0 to 30. A low value
creates a hard-edged shadow, a higher value
therefore means that the shadow has gently
faded, almost frayed edges. The choice of
shadow type depends very much on the object
or letter size, the position, light source, distance
and of course on your individual taste.
To be able to differentiate the colours more
easily, an Intensity of more than 80 is required.
A lower value Intensity allows the Edge Colour
to dominate.
• Distance: This slider changes the distance
of the object to the shadow. The possible
parameters range from 0 to 100. A higher value
results in a larger shadow, which reaches far
into the background scene.
4.4 Shadow
• Colour: A click onto this colour field opens the
Colour Box. Although the most frequent colour
for a shadow is indeed black, this function
allows you to select a different colour.
This menu allows you to create the shadow. If
you can‘t see a shadow, check if your object is
indeed made of a clear white. Also make sure
that the light source is not at coordinates 0 , 0.
You can do this in the menu for Light (Positions
X and Y).
11
4.5 Materials Object
In this menu, you can determine the material for
the object. In other words, you are adding the
look of the surface.
This function does not affect the structure or
the surface itself, but merely the material itself.
Imagine that you are working on a picture of a
tiger. With this function, you would be changing
the `pattern´ rather than the actual fur.
image will then be the material type for your
object.
Next, you can select the Colour Setting from the
Materials Object options. The following colour
options are available using the Colour Box:
• Colour: This will be the main, base colour of
your object.
• Specular Colour: This colour has an influence
on areas directly lit by the light source. As these
parts are usually brighter, the second colour
should be far brighter than the base colour (or
maybe even white), so that -- depending on the
object -- the surface becomes a nice glossy look.
• Materials Object: With this object, two more
menu points are available: Shading and Colour
Settings. Choose Shading for a start, to get the
following options:
• Shading: This is an important selection of
shading types for your object.
The None option results in no Shading at all
and thus no three dimensional look. The object
appears to have a very clean smooth surface.
Following this, you can merely select a Colour
from Colour Settings; the other buttons no
longer have a function in that case.
If you choose Normal, a normal kind of Shading
will be used. Further options are possible. If you
select Metal, the object will appear to have a
metallic surface, whereas if you select Video, the
object will be filled out with your video scene.
The option for Select Image allows you to
choose a picture from the Image Pool to be the
shading type (see button Select Image).
• Glossiness: This slider allows you to set the
glossiness of the material via a percentage
value.
• Image: This button is only active if you have
selected Select Image in the Shading options.
Click onto this button to see the Image Pool. You
can now choose a picture as you always do. This
• Ambient Colour: This colour affects the more
dark areas, not directly lit by the light source. It
should usually be dark or even black. A brighter
colour tone will create an effect similar to a
second, weaker light source held up against the
first light source.
4.6 Materials Background
Please note that this menu is only active if you
have opted for a Background as a Texture, rather
than a Scene prior to starting the software!
In this menu, you can determine the material for
the background.
As this menu is similar to the previous menu,
you can easily use the descriptions found in the
previous chapter. The difference is merely that
the parameters made here have an effect on the
background rather than the object. You are in
fact working on the black background of your
black/white scene and the video scene is ignored
for now.
12
4.7 Bumpmap Object
This menu is used to determine the Bumpmap
settings for the object. Thus, you can define
relief type, three dimensional surface structures.
This is where the object is more or less rounded
off. Bumpmapping refers to the complete object
surface. It hence results in a structure and
plasticity that works well when lit diagonally.
Staying in line with our tiger example, this
function allows you to create the fur.
• Box: Click onto the box to activate the
Bumpmap Object (tick activate, a dash
deactivates). If you do not wish to use these
functions and thus deactivate this box, the
remaining buttons for this feature will remain
ghosted.
• Bumpmap Object: This button unlocks the
three menu points Bumpmap Type, Bumpmap
Settings and Bumpmap Position. First, select
Bumpmap Type to make the following settings:
• Bumpmap type: Here, you can choose from
a selection of shading types. Simply try out
the various options to get a feel for what you
are looking for. There are options for Normal,
Fractal (complex, various sizes), Turbulence
• Zoom X / Zoom Y: This button allows you to
zoom into the shading type to make it blockier.
Values between 25 and 400 are possible.
Finally, you can also access the Bumpmap
Settings with the Bumpmap Object button.
More options are:
• Height: This button determines the height.
Imagine looking at the object from above -- the
higher the value, the larger the shading effect or
the embossment. If you set the value to 0, the
Bumpmap will not be visible.
• Clip top: A three-dimension bumpmapped
object consists of parts at the top and parts
further down -- much like a chain of mountains.
If you cut off the tops, they would seem flat
and would no longer have a structure as such.
A value of 255 means that the entire bumpmap
height can be seen. Cutting down the value
corresponds to cutting off the „Mountain top“.
• Clip bottom: This function allows you to cut off
the lower parts of the Bumpmap effect, almost
like removing the mountain valleys. These parts
then look as if they were filled with a colour.
A value of 0 means that you can see all of the
valleys, the higher the value, the more will be
cut away.
Note: If you cut away too much from the top and
bottom, the Bumpmap will disappear!
(with sharp changes), Fractal/Turbulence (sharp
changes and varying sizes), Video and Select
image.
If you choose Select image, you will be able to
access the button just below, called Image (see
further down).
• Invert: Activate this function by placing a tick
(click into it). The structure will then be inverted.
The previously raging parts will be inverted into
the object and vice versa. This is particularly
easy to see if you have cut away parts of the
bumpmap.
• Image: Click onto this button to choose a
shading type for your object. The Image Pool
allows you to select an image. This function
is only available if you previously set the
Bumpmap type to Select image.
Next, you can choose the Bumpmap Position
button with the Bumpmap Object function. The
following parameters can be set:
• Position X / Position Y: here, you can read the
coordinates of the bumpmap. You can change
the coordinates by clicking into any part of
13
the image, holding down the trackball key and
moving the ball.
• Position reset: Click this button to reset the
position of the bumpmap to coordinates 0 , 0.
4.8 Bumpmap Background
Please note that this menu is only available if
you selected the effect option Background for
Texture, prior to starting the software, instead of
Scene.
menu points Image Setting and Image Position.
First, select Image Setting to make the following
settings:
• Texture: Here, you can determine (select) the
texture for your object.
The Video setting fills out the object with a
background video scene. You can see that with
a value of 100, the proportions are the same as
you background scene.
Once you have decided to use an image, the
button Image (Select image) will become active.
• Image: Click onto this button to select an image
to be used as a texture for your object. The
system will display the Image Pool and you can
select an image from the available pictures.
In this menu, you can determine the Bumpmap
for the Background.
As this menu is identical to the previous one
(Bumpmap Object), you can easily use the
descriptions found in the previous chapter. The
difference is merely that the parameters made
here have an effect on the background rather
than the object.
4.9 Texture Object
In this menu, you can define the texture of the
Object, in other words, a pattern to be placed on
the surface of the object.
• Zoom X / Zoom Y: These sliders allow you to
zoom into the texture of the object to make it
larger. Values between 25 and 400 are possible.
Next, you can select the options from the Image
Position gadget next to the Texture Object
button:
• Position X / Position Y: here, you can read
the coordinates of the texture. You can change
the coordinates by clicking into any part of
the image, holding down the trackball key and
moving the ball.
• Position reset: Click this button to reset the
position of the texture to coordinates 0, 0.
4.10 Texture Background
• Box: Click onto the box to activate the Texture
Object (tick activates, a dash deactivates).
If you do not wish to use these functions and
thus deactivate this box, the remaining buttons
for this feature will remain ghosted.
• Texture Object: This button unlocks the two
Please note that this menu is only available if
you selected the effect option Background for
Texture, prior to starting the software, instead of
Scene!
14
In this menu, you are defining the texture of the
background.
As this menu is identical to the previous
one (Texture Object), you can easily use the
descriptions found in the previous chapter. The
difference is merely that the parameters made
here have an effect on the background rather
than the object.
tutorials a few times in succession. It will help
you to get a good grasp of Candy Factory. Later,
you can try to replace some of our suggested
settings with your own parameters – in no
time at all, will you see that small changes can
result in countless variations. Such changes can
dramatically alter the result.
5.1 Using a predefined mask
5. Tutorials
In this chapter, you will learn to use Candy
Factory to improve titles, images and masks.
The tutorials serve to give you an idea of how
to use the countless buttons and their functions.
We recommend that you read through these
tutorials and try to create some of these
examples yourself.
The settings for the results of the three tutorials
can also be found in the Candy Factory Archives.
Use scenes suggested in the tutorials, start Candy Factory, click onto the Archives button and
load the respective entry (Archive 5.1, Archive
5.2 or Archive 5.3).
As candy factory comes with a wealth of settings
and options, you should try to slowly work your
way into the program. This first tutorial is a
good start.
You will learn to place a border around a video
scene without doing much of the work yourself.
Let Candy Factory do some of the work for you!
You require a video scene with a length of at
least 5 seconds, showing someone in close-up.
The person should try not to move too much
and the person’s face should at best not change
position. Select the scene from the Edit screen
and add it to the Storyboard.
In the first tutorial `Using a predefined mask´,
you will learn about the program’s user interface
and how to make some settings.
This tutorial is quite detailed, so that you can
easily find your way around the software and
recognise the buttons and functions more easily.
The second turtorial “title effects” delves more
into the depths of the different functions and the
countless settings.
The third turotrial “Text background for a vacation film” requires that you already know your
way around the software somewhat; thus it is
slightly more complex.
The settings that we recommend are of course
only a few of many possible set ups. We urge
you to follow our recommendations so that you
can see how the different options have an effect
on your work. This is the best possible way of
explaining things.
It is obviously a good idea to have a go at the
Now you can create the mask. Go to `New´ and
select the Pattern operator.
Select the effect option Select Pattern so that
the Image Pool appears.
Now go to Product, choose Candy Factory, and
select Masks under Type. Choose a nice border,
maybe a picture frame or a heart.
Make sure that the box next to Colour has a
dash, meaning that it is deactivated. Leave Mode
set to Positive.
15
Now exit the Image Pool using OK and set the
length of the mask in New to the same length as
the video scene. In this case, it should be set to
five seconds.
Create the mask by clicking OK and add the
finished result to the Storyboard so that it is just
behind the video scene.
Set the Background function to Scene, as your
background (the person) is a video scene.
The DeInterlace function should be set to Off,
because the mask is mostly static and this helps
to save rendering power.
Now set the switch Rendering for to Still scene,
as the mask is static.
Finally, click onto the Start program button to
access the actual Candy factory software.
At first, you will see the person as the
background scene has been placed over the
black part of the mask. The white parts /in this
case, the frame) is now no longer white, instead,
it has been improved with the predefined
parameters of the settings. The mask now looks
ready and even carries some light effects.
Note: It is important that you do not mix up the
mask and the background! The mask is white,
in this case the border. The black area will be
replaced by your background (video) scene,
i.e. the person. The black parts of the mask will
therefore be filtered out.
Now, enter the Transition Effects menu, select
the Candy Factory effect from the list and add
it to the Storyboard. Set the effect length to the
longest possible duration, in this case to five
seconds, and select the necessary effect options:
This preview of the video scene is always visible
and is automatically updated whenever you
make any changes of settings.
Tip: We recommend that you simply try out the
settings in the menus. Despite the described
functions, some of the settings will only become
clear if you see how they are applied to the
video footage.
The large preview of the video in the program
allows you to see the result at all times without
rendering anything extra.
Now, the real fun with Candy Factory begins!
16
If you have been experimenting with Candy
Factory before, the colours and patterns may
reflect the parameters you set up earlier.
Make sure that the preset parameters are back.
To do this, press the Default button and confirm
the requester with Yes.
You will see that the frame now glows in yellow.
If you wish to return to the Transition Effect
menu, you can‘t do that via the right trackball
button. Instead, use the Menu symbol found in
the bottom right corner of the interface panel.
Let the project be created (rendered) in the
transition Effect menu and voila!
Let us now take a look at the single parameters.
This example is only meant to explain some
specific functions, so please enter the menu for
Bevel.
Set the Bevel selection button to the function for
Extent.
Increase the value for Width to 12 so that the
edges of the frame become somewhat softer.
Leave the Height at value 100.
Then, set the Smooth slider to 12 to get softer
edges.
The function Invert Mask must remain inactive,
as this would result in the video being placed
inside the frame, rather than the space inside!
5.2 Title effects
For this tutorial, there are no further settings.
The default settings for the menus Light, Glow
and Shadow need not be changed. Select the
menu Material Object in order to do some
changes on the material, i.e. the frame.
Select the button for Materials Object and
choose the Shading setting.
Then, in Shading, choose Metal, and leave the
Glossiness level at 100%. The selected material
gets a visible 3-D type look.
The two following menus Bumpmap Object and
Texture Object can be ignored.
Now that you have made the required settings,
save. To do this, click onto Archives and press
Save. The next screen Save File will show you
previously saved files.
Enter a title for your new project, for example
the name of the filmed person.
Click Ok twice to confirm the name and then to
save the file to the Archives. You can return to
this file anytime and access it from now.
Note: For this example, you will require the
Scene function of Smart Edit. If your machine
does not run the Pro Pack, or if you have not
purchased it separately, you will have to skip
this tutorial please. Please ask your dealer if
you are unsure. Some MacroSystem editors are
shipped with this function per default.
In this tutorial, we will be creating the intro
sequence for your vacation video. For this, you
will need a 5 seconds long scene (minimum)
that must be added to the Storyboard.
The colour is not important, as the content of the
scene is irrelevant. Next, generate a black scene
of 5 seconds, add it to the Storyboard and insert
a titling effect, namely the Scrolling Title.
Make sure that the effect is on for the whole
scene length.
Enter the text generator menu, select the
Archives and load the text called Candy Factory.
This is to ensure that your text is of a pure white.
Delete the text, choose a font of your choice and
size and enter a suitable text such as `Summer
Vacation 2006´.
17
Once the effect has been created, create a scene
using the Scene-button, and add this new scene
directly behind the single coloured scene and
delete the black scene containing the text effect.
Then, go to the Transition Effect menu, select
Candy Factory from the effect list and press
Insert.
Set the effect length to 5 seconds as well.
Now use the effect option to set the Background
to Texture. You will not require the content of
the first scene.
Tip: If you know that you will be working
with the Setting Background = Texture, you
can simply add the text scene twice to the
Storyboard, as the content of the first scene is
not relevant. In this fashion, you do not need to
create another scene and also do not need to
monitor the length.
Set DeInterlace to On, as the scrolling title is
moving and this will help to avoid jittering.
Further, set Calculating to Moving Scene, as we
are working with a scrolling title.
Now click onto the button Start program to
begin work with Candy Factory.
You will see an interface panel, where you must
press the button Default in order to use the
software‘s default settings. Confirm the next
requester with Yes.
You will see that the single coloured (orange)
scene has been replaced by the default
parameters of the program, and that the scene
now seems grey with a bright circle in the
centre, caused by a light source.
You can‘t yet see the text hovering above the
scene, s at this point in time of the scene, it must
first scroll into view.
Set the slider found to the top right to the
time code of 000.02:20 to see the text. You will
notice that it is no longer white. Instead, the
parameters of the software have made it appear
gold/yellow.
We will now start working on the text with
Candy Factory!
Leave the preset settings in the Bevel menu as
they are and go to the menu Light instead.
Change the position of the light source by
clicking on the Set position button. The interface
panel will disappear and you can use the
trackball to move the on-screen pointer to the
desired screen position.
For this example, we have gone for a light
source positioned at the following coordinates:
X = 60 and Y -60. While positioning the source,
you can monitor the coordinates inside the small
information panel near the top of the screen.
Once you have found the right position, press
the left trackball button to confirm and the user
interface will return.
Next, click onto the slider for Distance value and
move it to 140. This puts the light source further
away from the title.
18
Now enter the menu for Glow and activate this
function by placing a tick in the box. The title will
now be surrounded by a kind of aura.
Under Size and Intensity, place a tick in the box
for Diffuse. You will notice that the glowing aura
around the title has become finer.
Set the Size to a value of 20 and leave the
Intensity value at 100.
Tip: If you wish to have a video scene instead of
the red background, replace the first of the two
scene with a video. The video scene should be
at least five seconds long so that the text can be
seen for the complete period of time.
Before starting, set the option Background to
Scene. Now start Candy Factory again and you
will no longer see the red background, instead
the effect will feature your chosen video scene.
Colour settings can be left as they are.
5.3 Text background for a vacation film
Now enter the menu for Shadow. This function
should already be active. Set Intensity to 70 to
weaken the shadow a little.
The value for Smooth should be left as it is.
Click onto the button for Distance and move the
slider to the right. You will see that the shadow
is moving further down and left – the higher
the value. You have defined this yourself with
the light source a little earlier. Set the value for
Distance to 45 and leave the colour as black.
Some final adjustments: Go to Material
Background and set the toggle button to
Colour Settings. Select a nice red colour for
the top colour tone. This will replace the grey
background.
Ignore the remaining menus, which should have
their functions deactivated already.
Save the setting made in this tutorial and exit
the program via the menu symbol at the bottom
left of the panel.
Create the effect and you are ready!
For this tutorial, you will require the add-on
software Xpress-Maps 1.
We will go about creating a text background for
a vacation video, for example in North America.
Click onto the button New in the Edit screen and
select the effect XPress-Maps 1.
Click onto this button Select Map and choose
the option Masks under Type. This will result in
a black/white display. Select the mask USA.
Set the Mode to Negative. This will achieve
better results. But more about that later. Confirm
your selection with OK.
Next, deactivate the display of Cities, Names
and Borders. All relevant boxes should have a
dash.
Set the effect length to 5 seconds and create the
scene by pressing OK.
You will see a scene in the Edit Bin, with a black/
white representation of Northern America.
19
Additionally, you will require a 5 second long
static image from your video. For this example,
we have decided to use a picture from DVD
Arabesk.
Click onto the button New, select the effect
Pattern and press Select Pattern.
Choose Images from the Type fold-down switch
in DVD Arabesk Product. Take the second to last
image (Capitol).
Make sure to set the Mode to Positive.
Finally, confirm with OK, set the effect length to
5 seconds and create the scene by closing the
screen with OK.
To get an idea of the later result, go to Texture
Background (below right) and activate it (place a
tick in the box). As the default setting is already
set to Video for Texture, you will immediately
see your video scene (Capitol) inside the
continent.
Add the DVD Arabesk image (Capitol) to the
Storyboard, and then add the USA map.
Go to the Transition Effects and add the Candy
Factory in between both scenes. The length
of the effect should be – you guessed it – 5
seconds.
Now take a look at the effect options: The
Background should be set to Texture (the video
scene is later going to be displayed in a different
way). The option DeInterlace should be switched
to Off and under Calculating, select Still scene.
Click onto the Start program button.
After Candy Factory has been started, you will
first see the continent shown in grey colour
tones and surrounded by a yellow area (the
oceans).
Note: If you don‘t set the USA map to Negative,
the video will not appear in the continent, but
instead on the area representing the oceans. If
you accidentally chose Positive, go to the Bevel
menu and select Invert Mask to fix it.
The current light source is probably creating a
kind of glare, go to the Light menu and change
the Distance of the light source to 230. The light
position can be adjusted later if necessary.
You can now move on to add a structure to the
continent. Go to the Bumpmap background
menu and activate this function via the box.
20
To achieve a minor structure feel, select the
option for Select Image under Bumpmap Type.
Use the button Image via the Image Pool.
There, under Product, then Candy Factory, set
the option Polychromatic under Type. Select
the image Blue Rock (3rd row, 4th column) and
confirm with OK.
At the moment, you will not see much of
the video scene yet. So go to the option for
Bumpmap Settings and change the Height by
setting a value of 40.
You can now address the yellow colour in the
effect and replace it with an image of water for
instance.
Go to Texture Object and activate it. Set Texture
to Select Image and use the Image button to
access the Image Pool. Make sure to have Candy
Factory and Polychromatic selected and choose
the image of Blue Water (3rd row, 6th column).
Display should be set to positive and not
negative. Confirm the selection.
As you can‘t see much of your selected image
yet, go to Material Object and set Shading to
Video. You should now see the image.
Note: If you have used a different scene than
suggested in this tutorial, note that a dark scene
may lead to the structure of the water not really
being visible. In that case, set the Shading to
Select Image in Material Object. If the Blue
Water is not selected automatically, select it
using Image.
Now let‘s move on to the details. Go to the
Light menu and change the position of the light
source using the Set Position and Distance
buttons. Set the parameters as you wish.
Next, go to the Shadow menu and change
the settings so that the image is treated to a
plasticity of kinds in contrast to the background.
For example, set the Intensity to 65, Smooth to
9 and Distance to 54.
Finally, save the settings so that you can retrieve
them any time and continue working using your
previous parameters.
Quit Candy Factory and create the effect.
Further going tutorial: To expand on this
previous tutorial, create a new scene from
the effect realised above and add it to the
Storyboard, followed by the original video scene
(Xpress-Maps mask USA), In between the two
scenes, add the Transition effect Crossfade,
length of 2 seconds.
Enter the Titling menu and add the effect Fading
Pages to the Candy Factory scene. Enter the text
`USA 2006´ or similar.
The effect time range should now be 3 seconds,
as the last two seconds are used up by the
transition effect. Therefore, change the effect
length using the Range button to 5 seconds,
using the OUT approach. Create the scene. You
will now have a newly created USA map with
a title (as a static scene), cross fading into your
video. The film can now begin.
21
22
23
311-02/07