1
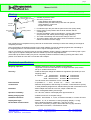
SATEX
- Manual
SA 250
Platform Scales
certified for trade
Weegtechniek
holland b.v.
Patroonsweg 23-27
3892 DA Zeewolde - Holland
Tel. +31 36 522 20 30
Fax. +31 36 522 20 60
Email
[email protected]
Website www.weegtechniek.nl
pag. 0
Manual SA 250
PCG/C SA 250 Manual 27-03-07
INDEX
Page
General.......…………………………………………………………
Application, Weight and Measures Certification…………………
Safety…..…………………………………………………………….
Maintenance.………………………………………………………..
Start up…….. ………………………………………………………
Technical specifications….…………………………………………
Display: keys and display symbols...…..……..………………….
Switching on…………………………………………………………
Set zero………………………………………………………………
Tare…...………………………………………………………………
Check weighing……...………………………………………………
Counting parts..………………………………………………………
Hi-Lo check weighing……………………………………………….
Hold function….…..…………………………………………………
Printing / sending data...……………………………………………
1
1
1
1
2
2
3
4
4
4
5
5
5
6
7
USER MODE
Automatic zero (zero track)…………………………………………
Automatic switch off (auto off).......……………………………….
Back light display……………...…………………………………….
Initial zero setting…………………………………………………….
Display speed………………………………………………………..
Printer / RS 232 data output…..……………………………………
Disable double printing……………………………………………..
Extra line feeds ……………………………………………………..
Baud rate…………………………………………………………….
Hi-Lo setting : on/off , “beeps”…………………………………….
8
8
9
9
9
10
10
10
11
11
CALIBRATION MODE
Divisions…………..…………………………………………………
Lock up weight value……………………………………………….
Choice calibration procedure………………………………………
One Point calibration...…………………………………………….
Multi Points calibration……………………………………………..
RS output, Data communication………………………………….
12
13
13
14
15, 16
17
Loadcell connection.……………………………………………….
17
Malfunctions and error codes……………………………………… 18
WEEGTECHNIEK HOLLAND B.V.
Patroonsweg 23-27
3892 DA ZEEWOLDE The Netherlands
Website www.weegtechniek.nl
Email
info@ weegtechniek.nl
Tel + 31 36 522 20 30
Fax + 31 36 522 20 60
pag. 1
Manual SA 250
PCG/C SA 250 Manual 27-03-07
General
Thank you for purchasing this SATEX precision balance !
This scale is equipped with reliable technology and has user friendly operational software.
You will use it many times and it will prove itself to be an easy, speedy and accurate tool.
If any questions raise that are not described in this manual, please address yourselves to your SATEX supplier,
have a look at our website : www.satex.nl or send your questions per email to : [email protected]
Application, Weight and Measures certified
The SA 250 platform scale balance is designed for accurate and legal weighing, for counting of articles and
for check weighing and filling with settable weight setpoints with LED indicators in the front panel.
The scale is designed for use in dry, inside conditions. The weigh platform is equipped with an IP 65 waterand dust tight HBM off centre loadcell..
Take care of a stable position of the scale. Place it in accurate level position with the help of the 4 leveling feet
and the level indicator down below the pole. Important : all 4 of the feet should carry the scale equally.
The CE (OIML R76 1992 class III) Certificate of this scale is valid in all European countries.
It is permitted to use the scale, if stamped individually, for weighing for trade purposes. However there is no
difference between the accuracy of a stamped or not stamped scale. Even if the scale has been purchased
without the legal stamping, it may be stamped later on, if the scale still is in good condition.
Safety
Please read this manual thoroughly before start using the scale.
The supplier does not accept any responsibility if the guidelines of this manual are not observed.
Before any work is done on the scale, power connections from the mains adaptor and the internal battery should
be interrupted. Warranty is void if the scale is opened anyhow.
Breaking of the seal of a stamped scale is a criminal act and causes the complete disapproval of the scale.
The instrument fulfils the requirements laid down in the EG regulations 89/336/EWG and 73/23/EWG for
electromagnetic compatibility and the Council Directive 90/384/EEC for not automatic weighing machines. Exceeding
of the maximum values, laid down in these regulations, must be avoided.
Electrostatic discharges may cause fatal damage to the scale and should be avoided
at all times. I.e. a proper earth connection of the scale and the place of erection is required in such cases.
The mains adaptor has no special protection against humidity and water and should not come into contact with it.
In case this has happened, or the adaptor shows any external damage, the adaptor should not be used any longer.
The built in lead battery should, if it has to be replaced, be disposed off as small chemical waste, not to be added to
normal waste.
Maintenance
Except from regular cleaning with a slightly humid cloth and a not aggressive detergent, further maintenance
is not required. The stainless steel platform plate may be removed to clean the inside of the weigh platform.
However it makes sense to check the scale’s weighing accuracy with regular intervals, using accurate calibration
weights.
Stamped scales are sealed, but a not stamped scale may be adjusted by the user itself using accurate Class M1
weights.
WEEGTECHNIEK HOLLAND B.V.
Patroonsweg 23-27
3892 DA ZEEWOLDE The Netherlands
Website www.weegtechniek.nl
Email
info@ weegtechniek.nl
Tel
Fax
+31 36 522 20 30
+31 36 522 20 60
pag. 2
Manual SA 250
PCG/C SA 250 Manual 27-03-07
Start up
RS connector
Mains adaptor and
platform cable connector
Turnable
console
Indicator
Pole
Level indicator
Pole foot
Weigh platform
Carefully unpack the scale.
Check the presence of:
- weigh platform with digital indicator
- stainless steel pole with locking bolts and bolt spanner
- mains adaptor in carton box
- English user manual
Fix indicator upon the pole and the pole into the foot (lockup bolts)
Put the scale in level position with the level indicator and the
4 leveling feet
Connect the platform cable to the indicator, connect mains adapter
and press the “ON” switch (with an empty weigh platform!)
The scale automatically sets zero and is ready for use now
The built in battery allows the scale to work for maximum 75 hours
without connection to mains supply.
Due to differences in temperature it may last until 10 minutes after switching on before the reading of the weight is
completely accurate.
Place the articles to be weighed carefully on the weigh platform. Prevent for bumping against and overloading of
the weighing platform. The loadcell down under it may be damaged seriously.
Check, if necessary, the accuracy with an accurate calibration weight. Using the calibration procedure (page 13) the
scale may be re-adjusted. Stamped scales are sealed to prevent for illegal adjustments
At first start up the built in battery may be not completely loaded. Re-load the battery by leaving the scale in OFF
position for at least 16 hours with a connected mains adaptor.
Technical specifications
Weighing capacities
: Capacity and division are user settable via the software.
Legal trade version has 3000 divisions, the High Resolution (HR) version
has up to 15000 scale divisions.
Accuracy
: Fulfils the European Weight and Measures regulations (EN 45501) for new
weighing scales:
at a load of:
0 - 500 divisions : deviation < ½ scale division
500 - 2000 divisions : deviation < 1 scale division
2000 - 3000 divisions : deviation < 1½ scale division
The HR version has a deviation of max. 2 divisions.
Environmental
: in operation: 0° … + 40°C, in stock: -10° … + 55°C,
Construction
: Stainless steel platform, ABS housing of indicator, coated aluminum (34 SA)
or steel (46/66 SA) weigh frames, stainless steel pole with cast aluminum foot
Excitation
: Mains adaptor 230 VAC 50 Hz 60 mA, output 9 VDC 500 mA,
built in rechargeable battery and charger.
Operation on battery
: 75 / 28 hours, without / with display back light switched on.
Battery charging time
: At least 20 hours for a complete charge.
Automatic switch off
: Settable: auto off after 5, 10, 20, 30 minutes standstill, or no auto off active.
Display back light
: Settable: on, off, or automatic on during weighing (display > 0,0 kg).
RS 232 data communication
: 2400 / 9600 Bd (settable), 8 data bits, 1 stop bit, no parity,
CR and LF, fixed string 13 bytes, decimal dot and a kg sign included,
9-pole male D-connector, 4 transmission modes.
WEEGTECHNIEK HOLLAND B.V.
Patroonsweg 23-27
3892 DA ZEEWOLDE The Netherlands
Website www.weegtechniek.nl
Email
info@ weegtechniek.nl
Tel
Fax
max. 85% RH.
+31 36 522 20 30
+31 36 522 20 60
pag. 3
Manual SA 250
PCG/C SA 250 Manual 27-03-07
Display: keys and display symbols
Front panel
Indications:
Keys:
Switch on scale
Led orange/yellow : battery is charging
Led yellow/green : charging completed
Switch off scale
Weight is above the settled up-limit
Weight is in between the up- and down-limit
Switch on parts counting function
Weight is below the settled down-limit
Set zero of the gross weight value,
range + en - 2 % of the scale capacity
Indication of :
- maximum scale capacity
- legal minimum weighing range
- value scale divisions (e)
Display symbols:
Tare = set zero over the complete
scale capacity
Reading is exact zero, within 0,2 scale division
Hi-Lo function, input weight limits
Reading has achieved a complete standstill
(if the function is selected only)
NET
Toggle from weighing Æ weighing with
lock up Æ Hi-Lo Æ parts counting and back
Cursor operation “left” move
If the sign up here is on, the reading is the
net weight value: a tare value has been subtracted
Scale is in parts counting mode
Printing / data transmission
Cursor operation “up” move
The Hi-Lo function is in operation
F1 of F2
The lock up function is in operation
Operating a key causes a short “beep” sound as a confirmation.
If a selected function cannot be executed a longer “beep” sounds as a warning.
WEEGTECHNIEK HOLLAND B.V.
Patroonsweg 23-27
3892 DA ZEEWOLDE The Netherlands
Website www.weegtechniek.nl
Email
info@ weegtechniek.nl
Tel
Fax
+31 36 522 20 30
+31 36 522 20 60
pag. 4
Manual SA 250
PCG/C SA 250 Manual 27-03-07
Start up
At start up with the
key the display shows briefly: “Lod . . .” (Loading)
NET
During start up the display shows 3 x all the segments of the figures and
the decimal dots, running from left to right and the kg sign.
NET
Next turn the display shows the program number : PSP-n1
NET
After that the scale will automatically set zero, as soon as the reading has
come to an exact standstill. Only after exact standstill the symbol
is
shown, followed by the symbol
and the display reading will be zero.
NET
After maximum 10 minutes warming up time the measuring system is stabilized
and the scale is ready to be used.
Set zero
If the display, with an empty weigh platform, does not show a zero reading,
press key
.
NET
The zero setting range is limited up to + and - 2% of the scale capacity.
Outside this range, zero setting will not be executed.
If more than 2% zero setting is required, switch the scale off and on again. The
zero setting range is than + and - 10%.
NET
Small deviations from zero (< ½ scale division), are automatically
compensated, so the empty scale will always stay at zero reading. This
procedure is called zero tracking.
The addition of very small weights (< ½ scale division) starting from zero
reading, may cause faulty weight presentation, caused by the zero tracking.
In that case the zero tracking may be switched off via the User Menu (page 8).
Tare
(taring is zero setting, possible over the complete scale capacity)
Place empty container on the platform and tare to zero with key
After standstill the weight reading sets zero.
The symbol at : NET shows that a taring has been operated: display
reading now is the net weight.
NET
Taring may be repeated up to the maximum scale capacity.
The tare may be deleted by pressing key
WEEGTECHNIEK HOLLAND B.V.
Patroonsweg 23-27
3892 DA ZEEWOLDE The Netherlands
Website www.weegtechniek.nl
Email
info@ weegtechniek.nl
with an empty platform.
Tel
Fax
+31 36 522 20 30
+31 36 522 20 60
pag. 5
Manual SA 250
PCG/C SA 250 Manual 27-03-07
Check weighing
NET
(in weighing mode only)
Add the article with the correct weight on the platform and press key
.
The reading sets zero. The symbol at : NET shows up.
Replace the article for the item to be checked and read the deviation in + or -.
This tare may be deleted by pressing key
with an empty platform.
Counting parts
1. Count by hand a number of articles: 10, 20, 50,100 of 200 pieces.
The less weight of an article, the more pieces have to be used in order to
achieve an accurate counting.
2. Take care of an accurate zero reading:
and standstill:
.
Add the pre counted articles in one operation upon the platform.
NET
NET
NET
3. Press keys
. The available quantities show up on the display
as running numbers. Press key
again at the moment the correct
quantity appears on the display.
4. Now the scale counts the number of articles, the display shows the number
of articles.
The arrow at
indicates that the parts counting mode is in operation.
5. With key
may be switched (i.e.) from the counting mode to the
weighing mode, and back. The weight of the article is not deleted by this.
If an other article has to be counted, go back to the weighing mode with key
and start at point 1. again.
Note : in this program negative counting (after taring) is not possible
Hi-Lo check weighing
(in weighing mode only, if selected in the USER mode)
The Hi-Lo function offers the feature to do a very quick check on the weight of
series of articles, or to fill constant quantities, within the settable weight ranges.
Two weight values may be entered. These values will be used as upper and
lower limits, indicating that a measured weight value is:
- HI = weight too high
- OK = correct weight
- LO = weight too low
The three LED’s left next to the display indicate the weighing result in red,
green or yellow. Long or short “beep” sounds may be connected to the HI, OK
and LO functions via the User Mode (page 11).
Setting of the weight values is done with key
, see next page
On the condition that weight values have been entered, pressing key
starts and stops the HI-LO function, as well as the counting function.
WEEGTECHNIEK HOLLAND B.V.
Patroonsweg 23-27
3892 DA ZEEWOLDE The Netherlands
Website www.weegtechniek.nl
Email
info@ weegtechniek.nl
Tel
Fax
+31 36 522 20 30
+31 36 522 20 60
pag. 6
Manual SA 250
PCG/C SA 250 Manual 27-03-07
Setting the weight limits
Hi-Lo weighing continued
HI
NET
1. Press key
. The
symbol and the red LED at HI show up.
The present value of the upper limit is shown. The last figure is flashing
and may be changed now with the cursor key
.
With key
the next figure may be turned on and so on.
LO 2. Press key
again. The yellow LED at Lo will light up.
The present value of the upper limit is shown.
Continue procedure as with the entering of the upper limit value.
NET
3. By pressing key
mode.
again, display reading will return to the weighing
A check of the present weight values only may be done by simply pressing
key
three times.
Hold mode
(in weighing mode only, and the function has to be selected in CAL mode)
This Lock-up function is permanently switched off at legal stamped scales.
F1
NET
F2
NET
The weight value of a weighing may be locked up temporarily.
This may be done in two different way’s: (setting in CAL menu):
F1 - The weight value will be locked up as soon as the reading comes to a
exact standstill, until the scale display returns to zero and comes to
a standstill at zero.
F2 - The weight value will be locked up as soon as a standstill within 1, 2 or 3
scale divisions is determined. However if the real weight value changes
for at least 1,2 or 3 scale divisions, the lock up will be set free .
On the condition that the Hold function has been selected in the Calibration
Menu, the function may be switched on and off by pressing key
.
The display shows in the left corner above, which of the hold functions is in
operation with the symbols: F1 or F2.
WEEGTECHNIEK HOLLAND B.V.
Patroonsweg 23-27
3892 DA ZEEWOLDE The Netherlands
Website www.weegtechniek.nl
Email
info@ weegtechniek.nl
Tel +31 36 522 20 30
Fax +31 36 522 20 60
pag. 7
Manual SA 250
PCG/C SA 250 Manual 27-03-07
Printing / sending data
Four functions of the procedure of data transmission may be selected
in the User Menu:
0. Switched off
1. 1 x printing (or transmission to a PC) after pressing key
NET
Transmission is executed if:
- the reading has standstill at pressing the key (
symbol is on)
- the reading has had a standstill at 0, after the last transmission
- the reading is > 0
After pressing key
a short “beep” sounds to confirm the transmission.
A longer “beep” indicates that no transmission will be executed, since there is
no standstill of the weight value, or the reading has not been stable at zero
before (not active in the Hi-Lo mode).
2. automatic 1 x printing (or transmission) after each weighing
Transmission is executed if:
- the reading has come to a standstill (
symbol is on)
- the reading has had a standstill at 0, after the last transmission
- the reading is > 0
- the reading is in the weighing mode
3. continuous transmission
Print of weight:
30.240 kg
28.750 kg
7.890 kg
In the weighing mode only. Transmission speed is about 10 Hz.
Attention: gross negative values are transmitted too.
At loads above the maximum scale capacity the transmission stops.
In this mode the selected extra empty printing lines, before and after the actual
data, are not transmitted.
Printing examples
Print of counting / weighing (HR version):
G
N
T
QTY
PCW
20.196 kg
20.196 kg
0.000 kg
403 PCS
50.0699 g
G
= gross
N
= net
T
= tare
QTY … PCS = quantity … pieces
PCW
= piece weight in grams
The empty spaces above and below the printed lines may be selected
(max. 9 empty lines) in the User Mode.
G
5.041 kg
N
4.344 kg
T
0.697 kg
QTY
856 PCS
PCW 5.07199 g
WEEGTECHNIEK HOLLAND B.V.
Patroonsweg 23-27
3892 DA ZEEWOLDE The Netherlands
Website www.weegtechniek.nl
Email
info@ weegtechniek.nl
Tel
Fax
+31 36 522 20 30
+31 36 522 20 60
pag. 8
Manual SA 250
PCG/C SA 250 Manual 27-03-07
USER mode,
how to operate
The User Mode is selected by pressing key
starting the scale with key
.
continuously and then
As soon as the display shows: CAL , release the
The hatched frames
show the default
settings.
key.
Press key
to step to the first and the next menu lines.
After operating key
in one of the menu lines, the present values of that
line will be entered, followed by automatic stepping to the next line.
After this, at each line position in the menu, the User Mode may be shut down
by pressing key
, memorizing all the data that has been entered via key
With key
the available settings of each line may be selected.
The User mode is always accessible for the user and may be edited.
MENU
USER mode
Automatic Zero
(Auto 0, keeps the reading with an empty platform on zero)
The automatic zero setting may be switched off, or selected to be in operation
around + or - ½ scale division from the gross zero weight value.
With key
½ division
the available choices are shown.
With key
the selected function may be entered , followed by automatic
stepping to the next menu line.
Automatic switch off
The Auto off function switches off the scale automatically after . . minutes
standstill (not in programming modes). This saves the battery’s capacity.
0
1
2
3
4
= auto off switched
= 5 minutes
= 10 minutes
= 20 minutes
= 30 minutes
With key
the available time delays are shown.
With key
the selected value may be entered , followed by automatic
stepping to the next menu line.
WEEGTECHNIEK HOLLAND B.V.
Patroonsweg 23-27
3892 DA ZEEWOLDE The Netherlands
Website www.weegtechniek.nl
Email
info@ weegtechniek.nl
Tel +31 36 522 20 30
Fax +31 36 522 20 60
pag. 9
Manual SA 250
PCG/C SA 250 Manual 27-03-07
Back light display
The back lightning of the display may be selected as:
0
1
2
= always off
= always on
= automatically switching on if weight > 0,0 kg
With key
the available choices are shown.
With key
the selected function may be entered , followed by automatic
stepping to the next menu line.
Initial zero setting
After switching on the scale will automatically:
0
1
= set zero based upon the last time the scale was set to zero with
= set zero based upon the actual situation, after standstill
With key
the available choices are shown.
With key
the selected function may be entered , followed by automatic
stepping to the next menu line.
Display speed
The speed of refreshment of the display reading is settable. Under unstable
conditions a lower refreshment speed may give better readability of the weight
values.
0
= standard, 10 Hz
1
= low speed, 5 Hz.
2
= lowest speed 2 Hz.
With key
the available choices are shown.
With key
the selected function may be entered , followed by automatic
stepping to the next menu line.
WEEGTECHNIEK HOLLAND B.V.
Patroonsweg 23-27
3892 DA ZEEWOLDE The Netherlands
Website www.weegtechniek.nl
Email
info@ weegtechniek.nl
Tel
Fax
+31 36 522 20 30
+31 36 522 20 60
pag. 10
Manual SA 250
PCG/C SA 250 Manual 27-03-07
Printer / RS 232 data output
Four different functions of the RS 232 data output are available:
0
= switched off
1
= 1 x transmission after key operation at standstill
2
= automatic 1 x transmission each time the scales comes to a standstill
after return to zero and standstill at zero and the display reading is
not at zero
3
= continuous transmission with ca. 10 Hz
Choices 2 and 3 are not available for the counting and lock up modes.
With key
the available choices are shown.
With key
the selected function may be entered , followed by automatic
stepping to the next menu line.
Disable double printing
switched off
+/- 1 d
(added medio 2007)
Twice printing of the same weighing could be undesirable and may be
disabled by setting the condition that a second printing is allowed only if the
reading has been returned one time to 0 kg.
This “0 value” may be setted at + and - 1, 2 or 5 scale divisions (d)
around the actual zero.
At setting at 0, double printing / data transmission is not disabled.
+/- 2 d
With key
+/- 5 d
Extra empty lines
the available choices are shown.
With key
the selected function may be entered , followed by automatic
stepping to the next menu line.
(Line Feeds - For)
In order to place the printed lines on a printed label on the required hight, max.
9 empty lines may be inserted in front of the actual data lines.
The shown number corresponds with the number of empty lines (line feeds).
With key
the available numbers are shown.
With key
the selected number may be entered , followed by automatic
stepping to the next menu line.
Extra empty lines
(Line Feeds - After)
In order to create more space after the printed lines, 9 empty lines may be
inserted after the actual data lines.
The shown number corresponds with the number of empty lines (line feeds).
With key
the available numbers are shown.
With key
the selected number may be entered , followed by automatic
stepping to the next menu line.
WEEGTECHNIEK HOLLAND B.V.
Patroonsweg 23-27
3892 DA ZEEWOLDE The Netherlands
Website www.weegtechniek.nl
Email
info@ weegtechniek.nl
Tel +31 36 522 20 30
Fax +31 36 522 20 60
pag. 11
Manual SA 250
PCG/C SA 250 Manual 27-03-07
Baud rate
Two Baud rates are selectable: 9600 Bd and 2400 Bd
With key
the available choices are shown.
With key
the selected speed may be entered , followed by automatic
stepping to the next menu line.
Hi-Lo setting
On / off
De Hi-Lo function may be switched on or off :
0
= off
1
= on
With key
the available choices are shown.
With key
the selected choice may be entered , followed by automatic
stepping to the next menu line.
Hi-Lo setting
“Beeps” at: Hi
Short or longer “beeps” may sound if the weight is “above upper limit”.
At display reading 0,0 kg the beeps will be switched off.
0
= no beeps
1
= short beeps (be.be.be.be…)
2
= long beeps (beee..beee..beee…)
With key
the available choices are shown.
With key
the selected choice may be entered , followed by automatic
stepping to the next menu line.
Hi-Lo setting
“Beeps” at: Lo
Short or longer “beeps” may sound if the weight is “below low limit”.
At display reading 0,0 kg the beeps will be switched off.
0
= no beeps
1
= short beeps (be.be.be.be…)
2
= long beeps (beee..beee..beee…)
With key
the available choices are shown.
With key
the selected choice may be entered , followed by automatic
stepping to the next menu line.
Hi-Lo setting
“Beeps” at: OK
Short or longer “beeps” may sound if the weight is “correct” .
At display reading 0,0 kg the beeps will be switched off.
0
= no beeps
1
= short beeps (be.be.be.be…)
2
= long beeps (beee..beee..beee…)
With key
the available choices are shown.
With key
the selected choice may be entered , followed by automatic
stepping to the next menu line.
WEEGTECHNIEK HOLLAND B.V.
Patroonsweg 23-27
3892 DA ZEEWOLDE The Netherlands
Website www.weegtechniek.nl
Email
info@ weegtechniek.nl
Tel +31 36 522 20 30
Fax +31 36 522 20 60
pag. 12
Manual SA 250
PCG/C SA 250 Manual 27-03-07
CALIBRATION mode
how to operate
The User Mode is selected by pressing key
starting the scale with key
.
As soon as the display shows: CAL , release the
The hatched frames
show the default
settings.
Press key
continuously and then
key.
to step to the first and the next menu lines.
After operating key
in one of the menu lines, the present values of that
line will be entered, followed by automatic stepping to the next line.
Use key
to edit a parameter in a menu line
The menu may be closed with key
that have been entered with key
, all (edited) data will be memorized
However: once an weight adjusting procedure has been started, it has to be
completed to its full extend. If this is not done, the weighing results will be
incorrect and not reliable.
The User mode is not accessible in legal stamped scales.
MENU CALIBRATON mode
(not accessible in legal stamped scales and on request)
Attention !
The calibration mode in legal stamped scales is under EC rules not accessible. The breaking of the legal seals only
makes this access possible. Breaking the seals of housing and platform terminates the warranty, besides that it is a
legal crime that may cause severe financial fines.
Scale divisions
18 different scale divisions (d) are selectable:
0.001
0.002
0.005
0.01
0.02
0.05
0.1
0.2
0.5
1
2
5
0.010
0.020
0.050
10
20
50
With key
the available choices are shown.
With key
the selected choice may be entered , followed by automatic
stepping to the next menu line.
If the scale has to be adjusted only, skip this function by pressing key
WEEGTECHNIEK HOLLAND B.V.
Patroonsweg 23-27
3892 DA ZEEWOLDE The Netherlands
Website www.weegtechniek.nl
Email
info@ weegtechniek.nl
Tel +31 36 522 20 30
Fax +31 36 522 20 60
.
pag. 13
Manual SA 250
PCG/C SA 250 Manual 27-03-07
Hold function
Lock up function, is always disabled at legal stamped scales.
The lock up function has 3 programs available:
0 - switched off
1 - The weight value will be locked up as soon as the reading comes to a
exact standstill, until the scale display returns to zero and comes to
a standstill at zero.
2 - The weight value will be locked up as soon as a standstill within 1, 2 or 3
scale divisions is determined. However if the real weight value changes
for at least 1,2 or 3 scale divisions, the lock up will be set free .
If program 2 is selected, this will offer the opportunity to select the number of
divisions that will be used to determine the rate of motion that will start up and
hold on the locking of the weight reading:
0
1
2
= within 1 scale division
= within 2 scale divisions
= within 3 scale divisions
With key
the available choices are shown.
With key
the selected choice may be entered , followed by automatic
stepping to the next menu line.
Choice of the weight adjusting procedures
There are 2 procedures available to adjust the weight reading:
0
= single point adjustment with one free to choose weight value *)
1
= multi points adjustment with 3 free to choose weight values, with this
method a not linearity of the scale may be compensated **)
With key
the required program may be selected.
With key
the selected choice may be entered , followed by automatic
stepping to the next menu line: CAL, according to the selected choice this will
be the one point or multi points adjustment procedure.
*) With the one point procedure the best results are achieved by choosing a
reference weight value of about 2/3 of the scale capacity.
**) With the multi points procedure the best results are achieved by choosing
reference weight values of about 1/6, 2/3 and 3/3 of the scale capacity.
WEEGTECHNIEK HOLLAND B.V.
Patroonsweg 23-27
3892 DA ZEEWOLDE The Netherlands
Website www.weegtechniek.nl
Email
info@ weegtechniek.nl
Tel +31 36 522 20 30
Fax +31 36 522 20 60
pag. 14
Manual SA 250
PCG/C SA 250 Manual 27-03-07
One point adjustment :
Procedure with one reference weight
1. Press key
READING OF
ZERO VALUE
to step to the next menu line: zero adjustment.
The actual zero value can be read now in points of the A/D converter.
The value should be in between: 5.000 and 50.000 .
If this is not so, adjust with switch 1 on the main print board.
2. Set the reading to zero with key
. If only the zero has to be adjusted,
the procedure may be terminated from here by pressing key
READING OF
WEIGHT VALUE
3. Put an accurate weight (value free to choose) in the middle of the weigh
platform. The display reading should be now in between 50.000 and
250.000 points. If this number is higher or lower an accurate adjustment
is not to possible.
4. Press key
The display now asks for the value of the weight that has been put
upon the scale.
The display shows : SP 1 , the figure at the right flashes and may be edited
now with key
With key
the next figure is made editable, and so on.
SP 1
SP 1
to enter the measured weight signal.
Ï
WEIGHT VALUE
5. Key in the complete weight value and enter with key
.
The display will show CAL during the entering procedure and will step
forward to the next menu line.
The display now asks for the value of the maximum scale capacity.
The display shows: SP 2 , the figure at the right flashes and may be edited
now with key
.
SP 2
With key
the next figure is made editable, and so on.
6. Key in the complete weight value of the maximum scale capacity.
SP 2
MAX. SCALE
CAPACITY
During normal operation of the scale the weight reading will switch off and
show “overload” at loadings above this weight value + 9 divisions.
7. Press key
to enter the value of the maximum weighing capacity.
The display shows CAL during the entering procedure.
The adjustment procedure will now be finished and the scale will
automatically return to the normal weighing mode.
8. Remove the weight from the weigh platform.
NET
WEEGTECHNIEK HOLLAND B.V.
Patroonsweg 23-27
3892 DA ZEEWOLDE The Netherlands
9. Switch the scale off and on again. All keys will be accessible now.
The scale is ready to be used.
Website www.weegtechniek.nl
Email
info@ weegtechniek.nl
Tel +31 36 522 20 30
Fax +31 36 522 20 60
pag. 15
Manual SA 250
PCG/C SA 250 Manual 27-03-07
Multi points adjustment: Procedure with 3 reference weights
READING OF
ZERO VALUE
1. Press key
to step to the next menu line: zero adjustment.
The actual zero value can be read now in points of the A/D converter.
The value should be in between: 5.000 and 50.000 .
If this is not so, adjust with switch 1 on the main print board.
2. Set the reading to zero with key
. If only the zero has to be adjusted,
the procedure may be terminated from here by pressing key
3. Press key
to step to the next menu line : 1e point of adjustment.
After a short: LN.1 the display reading sets zero.
4. Put an accurate weight (value free to choose) on the weigh platform.
Previously used calibration weight value may be shown now.
A possible deviation from this previous adjustment now can be read.
5. Press key
to enter the measured weight signal.
F1
6. Enter the value of this weight with the keys
(increase) and
The symbol F1 indicates this first point of adjustment.
(switch left)
F1
7. Press key
to enter the value of the weight.
After a short: LN.2 the program steps to the 2e point of adjustment.
The (adjusted) value of the present load may be read now.
8. Add weights for the 2e point of adjustment upon the scale.
9. Press key
F2
to enter the measured weight signal.
10. Enter the value of this weight with the keys
(increase) and
The symbol F2 indicates this second point of adjustment.
(switch left)
F2
11. Press key
to enter the value of the weight.
After a short: LN.3 the program steps to the 3e point of adjustment.
The (adjusted) value of the present load may be read now.
WEEGTECHNIEK HOLLAND B.V.
Patroonsweg 23-27
3892 DA ZEEWOLDE The Netherlands
Website www.weegtechniek.nl
Email
info@ weegtechniek.nl
Tel +31 36 522 20 30
Fax +31 36 522 20 60
pag. 16
Manual SA 250
PCG/C SA 250 Manual 27-03-07
12. Add weights for the 3e point of adjustment upon the scale.
(This is not necessarily the max. weighing capacity)
13. Press key
to enter the measured weight signal.
14. Enter the value of this weight with the keys
(increase) and
The symbol F3 indicates this second point of adjustment.
F3
(switch left)
F3
15. Press key
to enter the value of the weight.
16. The display now asks for the value of the maximum scale capacity.
The display shows: SP 2 , the figure at the right flashes and may be edited
now with key
.
SP 2
With key
the next figure is made editable, and so on.
During normal operation of the scale the weight reading will switch off and
show “overload” at loadings above this weight value + 9 divisions.
SP 2
17. Press key
to enter the value of the maximum weighing capacity.
The display shows CAL during the entering procedure.
The adjustment procedure will now be finished and the scale will
automatically return to the normal weighing mode.
8. Remove the weight from the weigh platform.
19. Switch the scale off and on again. All keys will be accessible now.
The scale is ready to be used.
NET
WEEGTECHNIEK HOLLAND B.V.
Patroonsweg 23-27
3892 DA ZEEWOLDE The Netherlands
Website www.weegtechniek.nl
Email
info@ weegtechniek.nl
Tel
Fax
+31 36 522 20 30
+31 36 522 20 60
pag. 17
Manual SA 250
PCG/C SA 250 Manual 27-03-07
RS 232 output
Table 1
1
Data communication
Byte Format
lsb
Baud rate
Parity
Data bits
Codes
msb
0 1 2 3 4 5 6 7
0
start
(selectable)
stop
a
x
b
c
k and g
Table 2 Weight transmission only
1 string, format 13 bytes
nr. 1
2
3
4
5
6
7
8
9 10 11 12 13
a
x
x
x
b
x
x
x
c
k
g CR LF
= either a blank, or a minus sign
= blanks and/or weight figures
= decimal dot *)
= blank
= weight unit: kilo gram
*) In weight figures with 2 or 1 figure behind the decimal
the decimal dot is in position 6 or 7.
Weight figures without a decimal are transmitted without a
decimal dot too.
Table 3 Weight and counting transmission
5 strings, format 14 - 16 bytes
nr. 1
2400 / 9600
none
8
CR and LF
2
3
4
5
6
7
8
9 10 11 12 13 14 15 16
G a
x
x
x
b
x
x
x
a
k
g CR LF
N a
x
x
x
b
x
x
x
a
k
g CR LF
T a
x
x
x
b
x
x
x
a
k
g CR LF
Q T Y a
x
x
x
x
x
x
a
P
C
P C S a
x
b
x
x
x
x
x
a
g CR LF
G
N
T
QTY
PCS
S CR LF
g
Pin configuration RS 232
connector (inside indicator,
solder side)
= Gross weight
= Net weight
= Tare weight
= Quantity of counted pieces
= Weight of one single piece. The position of the
decimal dot is here dependent on the
presentation of the figure itself.
= weight unit: gram
Connector DB-09 Male:
Pin 1, 3, 4, 6, 7, 8, 9
Pin 2
Pin 5
NC
TXD
GND
Pin configuration RS 232
cable connector (solder side)
Loadcell connection
Pin configuration loadcell connector,
solder side (inside indicator):
Connector DB-09 Female:
Functions
Excitation +
Loadcell cable
colors *)
blue
D-connector
on indicator
pin 1
Cable internal
inside indicator
red
Print
connection
E+
Ground
yellow
pin 3
--
--
Excitation -
black
pin 4
yellow
Signal +
white
pin 6
white
ES+
Signal -
red
pin 8
Sense +
green
pin 2
Sblack
shortcut with pin 1
Sense -
grey
pin 5
shortcut with pin 4
Pin configuration loadcell cable
connector, solder side
*) These are the standard wire colors. Other colors may be applied. In that case
the loadcell has to be checked by measuring the resistances per wire group:
Exc + en - (420 Ω), Sense + and - (420 Ω) , Signal + and - (350 Ω).
WEEGTECHNIEK HOLLAND B.V.
Patroonsweg 23-27
3892 DA ZEEWOLDE The Netherlands
Website www.weegtechniek.nl
Email
info@ weegtechniek.nl
Tel +31 36 522 20 30
Fax +31 36 522 20 60
pag. 18
Manual SA 250
PCG/C SA 250 Manual 27-03-07
Malfunctions and error codes
Lod . . . stays on display. At switching on the weight signal is too low.
Check the correct position of the weigh platform and possible damage of the
connecting cable and connector.
The loadcell could be damaged.
Execute a new one point adjustment procedure until the point 2 (zero setting).
The scale has been switched on, but zero setting is not possible since the
weight signal is higher or lower as 10% of the scale capacity.
Remove the load on the weigh platform. Check cable and connector.
Execute a new one point adjustment procedure until point 2 (zero setting).
The scale refuses zero setting.
The weight signal is outside the zero setting range(+ and - 2% scale capacity).
Tare function will operate correctly. Switch the scale off and on again so a
new zero (+ and - 10% scale capacity) may be settled.
Reading is gross negative. Set zero and set tare not possible.
The scale has been switched on with a load on the platform and has set zero
with this load. Thereafter, the load has been removed and now the reading is
gross negative. Switch the scale off and on again with an empty platform.
The load on the platform is higher as the maximum scale capacity: overload.
Remove the load from the weigh platform. Check cable and connector.
The loadcell could be damaged.
The weight signal is far too negative. Check the correct position of the weigh
platform and clean the interior of the platform. Check for damage of the cable
and connector. The loadcell could be damaged.
Execute a new adjustment procedure.
Power supply excitation is too low, battery is empty.
Recharge the battery.
The Hi-Lo function cannot be selected with key F .
- No weight values has been entered in the Hi-Lo mode.
Enter upper and down limit weight values with the key Hi-Lo.
- The Hi-Lo function is disabled in the USER mode.
The Lock up function cannot be selected with key F .
- The Lock up function is disabled in the Calibration mode.
No data transmission or printing follows after operating the printer key.
- The transmission function is disabled in the USER mode
- Scale reading is at zero
- Scale reading has not been on zero with standstill after the last transmission.
WEEGTECHNIEK HOLLAND B.V.
Patroonsweg 23-27
3892 DA ZEEWOLDE The Netherlands
Website www.weegtechniek.nl
Email
info@ weegtechniek.nl
Tel
Fax
+31 36 522 20 30
+31 36 522 20 60