1
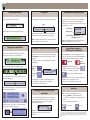
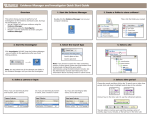
Quick Reference - Controls
Log On Controls
Viewing Live Video
The first time you log on, you go directly to the Live Mode
display; otherwise, you return to the display mode that was
open the last time you logged off.
Enter username, enter password (provided
by your system administrator).
Select keyboard language.
Common Controls
Change to Live Mode, change to
Search Mode, log out.
In Live Mode, use the camera selector to change to another
camera view. If you have more than one video window open,
you must first select the window you want to change.
Change to another camera.
Resize video to actual size or fit to window.
Text overlay is enabled** or disabled.
When enabled, right-click to change text color.
Note: Only the enabled analog cameras are displayed.
If the recorder is connected to an ESM, then only the cameras
for which you have access are displayed.
Text size for text overlay is enabled or disabled.
When enabled, click to change text size.
Live Video Controls
Change the camera view layout.
Hide the controls*.
Changing Views
Search Controls
Use the view buttons to choose the number of camera views
that appear.
Display 4 Views
Display 16 Views
Move to start, move to end of video. Move
to the current time, minus 30 seconds.
Pause video playback, play video,
scan video backward and forward
(playback X2) in five second jumps.
Scan video backward and forward
using a shuttle control.
Display 1 View
Display 9 Views
Note: The 4208 LC NVR displays up to 9 views. You only see the
16 view icon display for the 4316 LC NVR, which supports the
Set the start or end time to the
time and date of the displayed video.
Clear the time selector.
Add the video to the Clip Manager, add the current
image (in JPEG format) to the Clip Manager.
Next Steps
Play the video or display the image
stored in the Clip Manager.
Copy selected Clip Manager video or image
to a memory stick or a CD writer.
After you are done viewing live video, you can:
?
Change to Search Mode to locate video stored on the
recorder’s hard drives. For more information, see the other
side of this guide.
Change to Search Mode
4000 LC Series Quick Start Guide
Delete memory stick contents
before copying, cancel copy.
Include the Evidence Reviewer on the USB memory
stick or writable CD***.
* Click anywhere on the display to show the controls.
** The enable/disable text overlay button is only available when the selected camera is configured as
the primary camera for text capture (transaction or receipt data). For more information, see the
Administrator Console User Manual or online help.
*** See “Including the Evidence Reviewer with the Copied Video” on the other side of this guide.
This Quick Start Guide for the 4000 LC Series NVRs
provides the steps you need to view live video, to
search for video stored on the recorder’s hard
drives, and to copy video to a USB memory stick
or writable CD.
The graphical user interface provides the
following key features/benefits:
·
Convenient local logon for live viewing and
searching
·
Control using USB mouse and VGA display
·
Quick copying of evidence to a local USB
memory stick or CD writer connected to the
recorder’s USB port
Note: If you have not yet connected a USB-compliant mouse
and a monitor to the recorder, please see the addendum
accompanying the unit’s installation guide.
Playing Video
Searching Archived Video
Select a camera using the camera selector.
Use the playback or shuttle controls to adjust the play position.
Pause
Viewing Estimated Storage Capacity and
The available space on the USB memory stick or writable CD
updates when you save items from the Clip Manager. For
memory sticks, you can delete the current contents before the
selected items are copied.
Total Capacity
The time and date of the current playback position are
Available Space
Click and drag the shuttle control knob to the left or the right.
The farther from the center, the faster the scan. Letting go
Note: The shuttle control knob returns to center when released
if pause is selected on the playback control.
Setting the Start and End Time
Select a segment of time in the top left panel and use the
arrows to move the video to a moment of interest.
Then, use the playback controls to adjust the position.
Or, use the shuttle control to scan through video at up to 30
times the playback speed.
Use the start/end time buttons to set the time and date of the
video that is currently displayed.
Adding Video or an Image to the Clip Manager
Delete All Items From the Memory
Stick Before the Save
Note: Either a floppy disk or CD icon displays, depending on
which type of writable USB device is connected.
Copying Video or Images to a
USB Memory Stick or Writable CD
After you have set the video start and end time, click the Add
to Clip Manager button to add the selected video to the Clip
Manager .
To add the current image to the Clip Manager, click the Save
Image button.
Click the Copy button to write the selected items (video or
image) to a USB memory stick or writable CD. The Copy button
icon matches the type of writable USB device connected.
Add to Clip
Manager
(video)
The Copy button is disabled if there is not
enough space for the copy, a CD is inserted that
is not blank, or no USB device is connected.
Save Image
(image)
Selected video clips or images in the Clip Manager can be
copied directly to a USB memory stick, or a CD writer
connected to the recorder’s USB port.
Copy to
Writable CD
Copy to USB
Click to cancel a copy that is in progress.
Important: Wait 45 seconds before removing a USB memory
stick that was just connected to the recorder
or before re-connecting one that was just removed.
Next Steps
Including the Evidence Reviewer with the
Copied Video
When you are finished searching for video, you can:
?
Change to Live Mode to view live video from the
If you want to start a new search, you can clear the start/end
times displayed in the time selector panel.
You can include the Evidence Reviewer on the USB memory
stick or writable CD. The Evidence Reviewer is a playback tool
that lets third-party investigators or law enforcement
authorities view video clips.
recorder. For more information, see the other side of this
guide.
?
Log out of the graphical user interface.
Change to Live
Note: If your administrator has not added the
Evidence Reviewer to the recorder, this option
is disabled.
Log out
© 2010. A March Networks Company. All rights reserved. 24236 Rev. 1.0. Information in this document is subject to
change without notice. MARCH NETWORKS, VideoSphere, Shadow Archive, and the MARCH NETWORKS and
VideoSphere logos are trademarks of March Networks Corporation. All other trademarks are the property of their
respective owners.