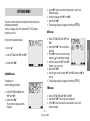
1
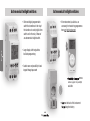
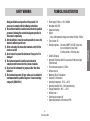
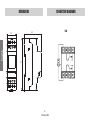
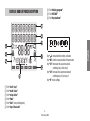
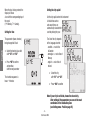
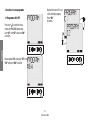
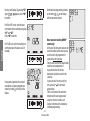
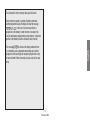
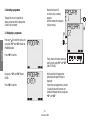
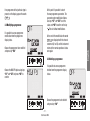
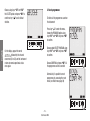
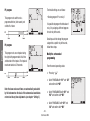
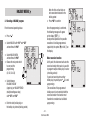
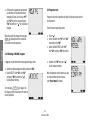
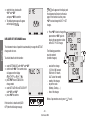
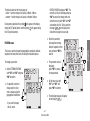
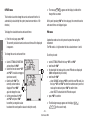
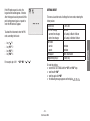
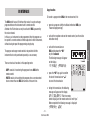
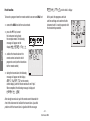
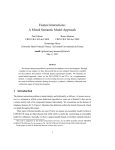
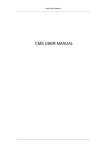
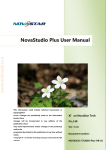
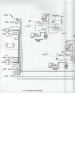
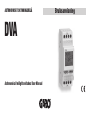
ASTRONOMISKT SKYMNINGSRELÄ
DVA
Astronomical twilight switches: User Manual
Bruksanvisning
■ Safety warnings
■ Technical characteristics
■Dimensions
■ Connection diagrams
■ Display and keypad description
■Installation
Setting the language
Setting the date format
Setting the date
Setting the time
Setting the coordinates/city capital ■ Daily / Weekly programming (Relay 1)
Events ON/OFF
IMPULSE event
HOLIDAY events
Programming priority
1. Creation of a new programme
1.1 Programmes ON / OFF
2. Checking a programme
2.1 Displaying a programme
2.2 Modifying a programme
2.3 Deleting a programme
3. Reset programmes
■ Astronomical Programming (Relay 2)
P1 program
P2 program
page3
page3
page4
page4
page5
page6
page
7
page
7
page
7
page
8
page
8
page10
page
10
page
10
page
10
page
11
page
12
page
12
page
16
page
16
page
17
page
17
page
18
page19
page
19
page
19
P3 program
P4 program
P5 program
P6 program
Change NIGHT C2
Modify the astronomical programming
■ Holiday menu
2.1 C
reating a HOLIDAY program
2.2 Checking a HOLIDAY program
2.2.1 Displaying a HOLIDAY program
2.2.2 Changing a HOLIDAY program
2.2.3 Deleting a HOLIDAY program
2.3 Programs reset
■ Settings menu
LANGUAGE menu
DATE menu
TIME menu
DAYL SAVE CET / DST CHANGE menu
POSITION menu
OFFSET menu
PIN menu
SETTING RESET
■ Hour meter menu
■ Reset menu
■ IR Interface
Copy function
Paste function
■ Battery replacement
■ Reference standards
-1User manual DVA
page
19
page
19
page
20
page
20
page
20
page
20
page22
page
22
page
23
page
23
page
23
page
24
page
24
page25
page
25
page
25
page
25
page
26
page
27
page
28
page
28
page
29
page30
page30
page31
page
31
page
32
page33
page33
English
Index
Astronomical twilight switches
Astronomical twilight switches
English
• Electronic digital programmable
switch that combines in the relay 1
the function of a weekly digital time
switch and in the relay 2 those of
an astronomical twilight switch.
• IR remote control (available as an
accessory) for transferring programmes
from and to the instrument
• Large display with text guide to
facilitate programming
• Seable cover and possibility to lock
keypad through password
• Possibility of a programmes
archive (up to 126) always
available
• Cover on the back of the instrument
for replacing the battery
-2User manual DVA
TECHNICAL CHARACTERISTICS
During installation and operation of the product, it is
necessary to comply with the following instructions:
1)The instrument must be installed and activated by qualified
personnel, following the connection diagrams provided in
this manual scrupulously.
2)After installation, it must be made impossible to access the
terminals without specific tools
3) Before accessing the connection terminals, verify that the
leads are not live
4)Do not connect or power the instrument if any part of it is
damaged
5) The instrument must be installed and activated in
compliance with current electric systems standards.
6)Do not use the instrument for purposes other than those
indicated
7) The instrument executes 1B type actions and is suitable for
environments with a pollution degree of 2 and overvoltage
category III (EN 60730-1)
• Power supply: 230Vac ± 10% 50/60Hz
• Absorption: 8VA (2W)
• Replaceable battery
• Output:
- 2 relay with monostable change-over contact 16(10)A / 250Vac
• Type of action: 1B
• Storable programs: - 30 events ON/OFF or PULSE (relay1 only)
- 6 pre-set programs (relay2 only)
- 4 holiday periods + 20 holiday days
• Backlit LCD display
• Integrated IR interface with 0.5m capacity with direct sun light
(2m when dark)
• IR transmission frequency: 31.25kHz
• Software class: A
• Mounting: DIN rail to backplane
• Container: 2 DIN modules
• Operating temperature: -20°C ÷ +40°C
• Operating humidity: 20% ÷ 90% noncondensing
• Storage temperature -10°C ÷ +70°C
• Pollution level: 2
• Rated impulse voltage: 4kV
• Degree of protection: at the terminals IP20
-3User manual DVA
English
SAFETY WARNINGS
DIMENSIONS
65
DVA
65
87
35
87
English
35
CONNECTION DIAGRAMS
-4User manual DVA
Field “holiday program”
Field “CET/DST”
Field “key functions”
C1
R
C2
Ok
Key “ ”: menu/esc/check battery activation
Key “Ok”: confirm value/activation IR transmission
Key “C1”: decreases the value/menu back/
switching relay 1/lock relay 1
Key “C2”: increases the value/menu forward
switching relay 2/ lock relay 2
Key “R”: resets settings
Field “text1 / day”
Field “text2 / date”
Field “relay status”
Field “time”
Field “lock” (relay switching lock)
Field “day of the week”
-5User manual DVA
English
DISPLAY AND KEYPAD DESCRIPTION
• Use a pointed object to press the “R” key to reset it. The display
segments will turn on for a few seconds, then the instrument will
switch to IR reception mode.
INSTALLATION
• The instrument is supplied with the battery not installed to prevent
useless consumption. Remove the battery from its package and
insert it in the housing on the back of the instrument so that the
(+) pole is visible as shown in the “Battery replacement”
box. Then secure the cover, turning it clockwise.
Note: in the case of a mains power failure, IR reception is not
activated.
R
C2
Ok
English
C1
• Press the “ ” key to exit the IR reception mode (if you want to
transfer programs from the remote control, see the “IR Interface”
page 31)
• At this point, the parameters required for correct instrument
operation can be entered:
- language, date format, date, time and the city where the
instrument is installed.
• Connect the load and the power supply as illustrated in the “Connection diagrams” chapter.
-6User manual DVA
Setting the language
Setting the date format
➢ Select
the language
with
C1
“C1” and “C2”.
➢ Confirm
with “Ok”.
C1
R
C1
R
C1
C2
Ok
R
C2
C2
Ok
R
C2
It is possible to select between
the dd-mm-aa and
yy-mm-dd formats.
Ok
R
C2
Ok
➢ Select the format with
“C1” and “C2”.
➢ Confirm with “Ok”.
Ok
C1
C1
R
C2
Ok
English
3 languages
are available:
Swedish, Norwegian,
English.
Setting the date
The parameter
(year, month, day)
being changed will flash.
➢ Select the desired value
with “C1” and “C2”.
➢ Press “Ok” to confirm
and continue
with the next parameter
The insertion sequence is
year Ò month Ò day
-7User manual DVA
C1
R
C2
C1
R
Ok
C2
Ok
Setting the city capital
When the day is being entered, the
display will show
a bar with the corresponding day of
the week
(1Ò Monday, 7Ò Sunday).
Set the city capital where the instrument
is installed so sunrise
and sunset times are
automatically calculated for
each day during the year.
Setting the time
English
The parameter (hours, minutes)
being changed will flash.
➢ Select the desired value with
with “C1” and “C2”.
➢ Press “Ok” to confirm
and continue
with the next parameter
C1
R
C2
Ok
The list of the city depends
of the language selected:
- swedish -> main cities
of Sweden
- norwegian -> main cities of
Norway
- english -> main cities of
Ireland.
➢ Select the city
with “C1” and “C2”.
The insertion sequence is
hours Ò minutes
➢ Press “Ok” to confirm
Note: if your city is not listed, choose the closest city.
After setting all the parameters you can set the exact
coordinates of the installation place
(see Setting menu - Position page 25)
-8User manual DVA
At this point, the instrument will switch
to the normal operating status (main
page). The display will show the date,
time, relay status, day of the week (in
letters on the top row, in numbers at the
bottom) and the CET / DST symbol.
Switching on/off manually
Main page
Press the “C1” (“C2”) key briefly to switch
the output relay 1 (relay 2).
The status that is reached will be maintained until the next program event.
Switch lock
Activating the lock function, all switches
are ignored. The relay remains in the
status in which it was found when the lock
was set.
➢ Press and hold “C1” (“C2”) for 3
seconds to activate/deactivate the relay
1 (relay 2)
If the function is active, the
appear.
-9User manual DVA
symbol will
English
Note: if the instrument is not powered
by the mains, instead of the day the
following message will appear on the top
.
row
In this condition backlighting is not active
and the relay will remain off.
MANUAL OPERATION
DAILY / WEEKLY PROGRAMMING (Relay 1)
English
Events ON/OFF
ON and OFF events consist of switching the relay to the on or off
position.
They may be daily (every day at the same time), weekly (one or more
days during the week, each week) monthly (one day a month, every
month), yearly (one day a year, every year).
HOLIDAY events
A holiday event allows you to enter individual days or holiday periods
during which all the set programmes shall not be carried out and the
relay shall be in the off position.
Holiday events always start at 00:00 on the starting day and end at
23:59 on the last day of the holiday.
Holiday events are interrupted in the case of manual operations on
output.
IMPULSE event
An impulse event can be an on or off type and may last for a maximum
of 59 seconds:
ON
OFF
At the end of the on impulse the relay will always be in the off status; at
the end of an off impulse the relay will always be in the on status.
An impulsive event can be interrupted following a manual operation or
IR transmission activation.
- 10 User manual DVA
Programming priority
In automatic function mode the instrument behaves as foreseen by the
entered programmes. Should there be conflict between programmes
(different events starting at the same moment) the instrument will only
run the one with the highest priority, according to the following table
(1 maximum priority, 5 minimum):
Weekly
Daily
Holiday
1
-
Impulse
2
3
ON or OFF
4
5
Programmed events which starting during an event already in progress
(holiday) are ignored.
In the case of non-instantaneous (holiday, impulse) the device always
completed the started programme before managing the next.
Exceptions to this are cases in which:
- a holiday event occurs while executing a non-instantaneous
programme
- there is a change to manual operation while executing a noninstantaneous programme. In this case all the programmes running are
interrupted and if there is a lock or random on the channel, execution
of all programmes is disabled until manual procedure is deactivated
- IR transmission is activated while executing the programme
- 11 User manual DVA
English
Event
Programmes that are active when one of these exceptions occurs are
interrupted and will not be restored. When execution is interrupted, the
relays still maintain status unless entering a holiday day (or period) or if
IR transmission is activated (relay set to off).
1. Creation of a new programme
Choose the channel C1 to set
a Daily or Weekly program.
Press “Ok”
to confirm.
1.1 Programmes ON / OFF
Press key “ ” to enter the menu,
choose the PROGRAM option using
keys “C1” and “C2” and press “Ok”
to confirm.
English
C1
C1
R
C2
C1
R
C2
Ok
Ok
Choose option NEW using keys “C1” and
“C2” and press “Ok” to confirm.
C1
C1
R
C2
Ok
- 12 User manual DVA
R
C2
Ok
R
C2
Ok
DAILY,
WEEKLY.
Press “Ok”
to confirm.
C1
C1
R
C2
Ok
R
C2
Ok
Choose between
ON,
OFF,
PULSE
event.
For PULSE event
choose between
ON or OFF event.
Press “Ok”
to confirm.
C1
R
C2
C1
C2
Ok
R
C2
C1
C1
Ok
Insert the date using keys
“C1” and “C2”.
(not required for daily
events)
For weekly events it is
possible to set more than
one day of the week. By
pressing key “Ok” you
select/deselect the day in
question while using key
“C2” you scroll through
- 13 User manual DVA
R
R
C2
C1
R
Ok
Ok
C2
English
Using keys “C1” and “C2”
choose
the frequency of the event
from:
Ok
C1
R
C2
Ok
the days until Sunday. By pressing “C2”
appears: press “Ok”
again,
to confirm.
C1
R
C2
Ok
English
For ON or OFF events, enter the hours
and minutes for the switching using keys
“C1” and “C2”.
Press “Ok” to confirm.
For PULSE event, enter the starting time
and the duration of the pulse (max 59
seconds).
C1
R
C2
Ok
C1
R
C2
Ok
During normal operation, the eventual
execution of an impulse programme is
shown by symbol on field (8) of the
display.
Confirmation of programming is shown
on the display
by the words
with the concerned channel.
Note: recursive function (ON/OFF
events only)
At this point the instrument activates the
recursive function which allows several
on-off events to be programmed in
succession on the same day.
Thereby once an activation (deactivation)
event has been programmed, it
is possible to enter the time of a
deactivation (activation) event for the
same day.
If you do not wish to enter an off (on)
time, press key “ ” to terminate
programming.
There is no control of the correlation
between on/off events programmed
using the recursive function: such
function is therefore to be intended as
facilitated programming.
- 14 User manual DVA
The instrument's internal memory allows up to 30 events.
Once maximum capacity is reached, attempts to memorise
another programme causes the display to show the message
. In this case it is necessary to delete a
programme in the memory in order to enter a new one( in the
case of contemporary programming on two channels, at least one
position in the memory must be available for each channel).
English
is shown on the display whenever there
The message
is an attempt to save a programme overwriting a pre-existent
programme of the same type (for example trying to enter a daily
off event at 08:00 if there is already a daily on event at the same
time).
- 15 User manual DVA
2. Checking a programme
Through this menu it is possible to
display, amend or delete a programme
saved in the instrument.
Choose the channel C1
to check a daily or weekly
program.
And then choose the frequency
(daily or weekly)
C1
2.1 Displaying a programme
English
Press key “ ” to enter the menu, and
using keys “C1” and “C2” choose the
PROGRAM option.
Press “Ok” to confirm.
Using keys “C1” and “C2” choose
CHECK
Press “Ok” to confirm.
C1
R
C2
Finally, choose the type of event you
wish to check using “C1” and “C2”
(ON-OFF, PULSE).
At this point the first programme
pertaining to the specified type is
displayed.
If more than one programme is present,
it is possible to scroll forwards and
backwards through them by using keys
“C1” and “C2”
- 16 User manual DVA
Ok
C1
R
C2
Ok
R
C2
Ok
If no programme of that particular type is
present, on the display appear the words
.
At this point it is possible to insert
the new programme parameters. The
parameter under modification flashes.
Use keys “C1” and “C2” to set the
values and “Ok” to confirm or the key
“ ” to exit without modifications.
2.2 Modifying a programme
It is possible to access programme
modification from the programme
display status.
Choose the programme to be modified
and press key “Ok”
C1
R
C2
Ok
English
At the end of the modification the words
are displayed with the channel
concerned (C1 or C2) and the instrument
returns to the normal operational status
once again.
2.3 Deleting a programme
It is possible to access programme
deletion from the programme display
status.
Choose the MODIFY option using keys
“C1” and “C2” and press “Ok” to
confirm.
C1
R
C2
Ok
Choose the programme to be deleted
and press key “Ok”
- 17 User manual DVA
C1
R
C2
Ok
Choose, using keys “C1” and “C2”
the DELETE option and press “Ok” to
confirm or key “ ” to exit without
deletion.
3. Reset programmes
To delete all the programmes saved on
the instrument:
English
C1
On the display appear the words
followed by the channel
concerned (C1 or C2) and the instrument
returns to normal operational status
once again.
R
C2
Ok
Press key “ ” to enter the menu,
choose the PROGRAM option using
keys “C1” and “C2” and press “Ok”
to confirm.
Choose option RESET PROGRAM using
keys “C1” and “C2” and press “Ok”
to confirm.
Choose CONFIRM and press “Ok”. All
the programmes will be cancelled.
C1
R
C2
Ok
C1
R
C2
Ok
Alternatively it is possible to reset
programmes by accessing the reset
menu (see Reset menu page 30)
- 18 User manual DVA
P3 program
ASTRONOMICAL PROGRAMMING (Relay 2)
The instrument is equipped with 6 pre-set programs that allow you to
program the instrument’s night behaviour.
P1 program
ON
OFF
P3
This program sets
switch on at sunset
and switch off at dawn.
Sunset
P3 OFF
P3 ON
Sunrise
Sunrise
ON
OFF
English
P4 program
P1
Sunset
This program sets switch on at sunset
and switch off at dawn, with a night-time
interruption in which the relay is temporarily
in the off position.
This program sets switch on at sunset
and switch off during the night, at a
programmable time (before dawn).
P2 program
Sunset
ON
P2
Sunset
Sunrise
ON
OFF
P4
This program keeps the relay in the off
position throughout the night.
OFF
- 19 User manual DVA
P4 OFF
Sunrise
P5 program
The default settings are as follows:
This program sets switch on at a
programmable time (after sunset) and
switch off at dawn.
• Running program P1 on relay 2
ON
OFF
P5
Sunset
P5 ON
Sunrise
Should you wish to change the program
assigned to a specific day of the week,
follow these steps.
English
P6 program
This program sets an on impulse during
the night with programmable initial time
and duration of the impulse. The impulse’s
maximum duration is 59 seconds.
ON
P6
Sunset
P6 ON P6 OFF
Sunrise
It is possible to program the behaviour of
relay 2, by assigning a different program
for each day of the week.
OFF
Note: the dawn and sunset times are automatically calculated
by the instrument on the basis of the astronomical coordinates
entered and of any time adjustments (see chapter “Settings”).
Modify the astronomical
programming
From the normal operating status:
➢ Press key “ ”
➢ Select PROGRAM with “C1” and “C2”
and confirm with “Ok”
➢ Select PROGRAM NEW with “C1” and
“C2” and confirm with “Ok”
➢ Select PROGRAM C2 with “C1” and
“C2” and confirm with “Ok”
- 20 User manual DVA
Note: the display of the P3
program is divided into two
screen shots, the first one
showing the switch off time
and the second time the
switch back on time.
To go from one screen to
the other, press keys “C1”
and “C2”.
C1
C1
R
C2
Ok
R
C2
Ok
➢ Press “Ok” to confirm. The display will
and the
show the words
instrument shall enter normal
operation.
At this point, the instrument offers the
ability to copy programming done for all
other days of the week.
➢ Press “Ok” to enter into modification
➢ The display shows the currently set
program, flashing: press “C1” and
➢ Press “Ok” to assign the selected
program to other days of the week or
“ ” to return to the choice of the day
of the week
- 21 User manual DVA
C1
R
C2
Ok
English
“C2” to choose which program (P1…
P6) to set and confirm with “Ok”
➢ Enter the parameters relative to the
selected program:
P1: no parameter
P2: no parameter
P3: night switch off time, night switch
on time
P4: night switch off time
P5: night switch on time
P6: initial time of the impulse, duration
of impulse
➢ The display shows the set program for
the first night of the week (in the P1
example in the night between
days 1 and 2, i.e. between Monday
and Tuesday). Press “C1” and “C2”
to cycle through the nights of the week
and display which program is set for
each night
Note: the first and last date are
to be considered included in the
holiday period
➢ Press “Ok” to confirm
HOLIDAY MENU
2.1 Creating a HOLIDAY program
Once the programming is confirmed,
the following message will appear
.
on the display
During normal operation, the possible
execution of a holiday programme is
signalled by the symbol in field (7) on
the display.
From the normal operating status:
➢ Press “ ”
English
➢ Select HOLIDAY with “C1” and “C2”
and confirm with “Ok”
➢ Select HOLIDAY NEW
and confirm with “Ok”
➢ Choose the relay onto which
to carry out the
programming
(C1, C2, C1+C2)
C1
C1
R
C2
➢ Select between
HOLIDAY ONE DAY
(single day) or HOLIDAY PERIOD
(multiple contiguous days)
with “C1” and “C2”
➢ Enter the date (holiday day) or
the holiday day interval (holiday period).
Ok
R
C2
Ok
Note: recursive function
At this point, the instrument activates the
recursive function that makes is possible
to program multiple holiday days in series
(or holiday periods).
If you do not want to enter another
holiday day (or period) press “ ” to end
programming.
The correlation of the programmed
holiday events is not controlled with the
recursive function: the function must
therefore be considered as facilitated
programming.
- 22 User manual DVA
appears on the display if you try to enter a
The message
holiday period that overlaps with a period that was already entered,
or if the last holiday date is before the start date.
2.2 Checking a HOLIDAY program
This menu can be used to display, modify or delete a holiday program
saved in the instrument.
2.2.1 Displaying a HOLIDAY program
From the normal operating status:
➢ Press “ ” to access the menu, select
HOLIDAY and press “Ok” to confirm
➢ Select HOLIDAY CHECK and press
“Ok” to confirm
➢ Choose the relay onto which
to visualize the program
holiday with “C1” and “C2”
➢ Select between
HOLIDAY ONE DAY
and HOLIDAY PERIOD
and press “Ok”
to confirm
C1
C1
R
C2
R
C2
Ok
In case of HOLIDAY ONE DAY it is possible scrool the programs using
“C1” and “C2” keys. In case of HOLIDAY PERIOD the instrument shows
the start day of the first holiday period, press “C2” to visualize the end
of the period.
At this point, pressing “Ok” it is possibile access to options of modify,
delete or next holiday period.
2.2.2 Changing a HOLIDAY program
A program can be changed from the program display status.
➢ Select the holiday program to change and press “Ok”
➢ Select MODIFY with “C1” and “C2”
and press “Ok” to confirm
- 23 User manual DVA
Ok
English
The instrument’s memory makes it possible to store up to 4 holiday
periods + 20 holiday days.
Once the maximum capacity is reached, an attempt to store an
additional program will cause the following message to be displayed
. In this case, a program stored in the memory
must be deleted before entering a new one.
English
➢ At this point, new program parameters
can be entered. The parameter being
changed will flash. Use the keys “C1”
and “C2” to set the values and press
“Ok” to confirm or “ ” to exit without
changes.
2.3 Programs reset
When done with the change, the message
is displayed and the instrument
will return to normal operation.
➢ Press “ ”
➢ Select HOLIDAY with “C1” and “C2”
and confirm with “Ok”
➢ Select HOLIDAY RESET with “C1”
and “C2” and press “Ok” to confirm
2.2.3 Deleting a HOLIDAY program
A program can be deleted from the program display status.
➢ Select the holiday program to delete and press “Ok”
➢ Select DELETE with “C1” and “C2”
and press “Ok” to confirm or “ ”
to exit without deleting.
Program reset make it possibile to delete all holiday events saved in
the instrument.
From the normal operating status:
➢ Confirm with “Ok” or press “ ”
to exit without resetting
Note: the program reset function can also
be accessed from the Reset menu
(see “Reset menu”) chapter.
will appear on
The message
the display and the instrument will return to
normal operation.
- 24 User manual DVA
This menu is used to display and change the instrument’s general
configuration parameters.
These are: language, date, time, automatic CET / DST, position,
correction, pin reset.
From the normal operating status:
➢ press “ ”
➢ select SETTINGS with “C1” and “C2”
➢ confirm with “Ok”.
LANGUAGE menu
The options are:
Swedish, Norwegian, English.
➢ select SETTINGS LANGUAGE with
“C1” and “C2”
➢ confirm with “Ok”.
The currently set language will be
displayed.
➢ press “Ok” twice to access the change mode or “ ” to exit
without changing
➢ select the language with “C1” and “C2”
➢ confirm with “Ok”.
.
➢ The following message will appear on the display
DATE menu
➢ Select SETTINGS DATE with “C1” and
“C2”
➢ confirm with “Ok”. The current date is
displayed.
➢ Press “Ok” twice to access the change
mode or “ ” to exit without changing
➢ select the format with “C1” and “C2”
(dd-mm-yy or yy-mm-dd)
➢ confirm with “Ok”
➢ enter the year, month, day with “C1” and “C2” and press “Ok” to
confirm
.
➢ The following message will appear on the display
TIME menu
➢ Select SETTINGS TIME with “C1” and “C2”
➢ confirm with “Ok”. The current time is displayed
➢ Press “Ok” twice to access the change mode or “ ” to exit
without changing
- 25 User manual DVA
English
SETTINGS MENU
➢ enter the time, minutes with
“C1” and “C2”
and press “Ok” to confirm
➢ The following message will appear
.
on the display
will appear on the display and
the instrument will return to the main
page; if the function is active, press
“C2” to view/change the DST Ò CET
change.
English
DAYL SAVE CET / DST CHANGE menu
The instrument makes it possible to automatically manage the CET/DST
change and vice vers.
To activate/deactivate the function:
➢ select SETTINGS DST with “C1” and “C2”
➢ confirm with “Ok”. The current status
will appear on the display
or
)
(
➢ press “Ok” twice to access the
change mode
➢ select SET AUTO ON or SET AUTO OFF
with “C1” and “C2”
➢ press “Ok” to confirm.
If the function is deactivated (AUTO
OFF) then the following message
➢ Press “Ok” twice to change the
parameters or “C2” again to
display the parameters relative
to the DST Ò CET change
The following parameters
must be entered
(for both changes):
C1
C1
R
C2
Ok
- week of the change
(1ST first, 2ND second,
3RD third, 4TH fourth,
LAST last of the month)
- month of the change
- day of the week
(Monday, Tuesday,…)
- time of the change
C1
R
C2
Ok
When all parameters are set, press “ ” to exit.
- 26 User manual DVA
R
C2
Ok
will appear on the display
During normal operation, the symbol
will appear during
during the CET period (winter) and the symbol
the DST period (summer).
➢ Select the parameter
to change from among
latitude, longitude or time
zone and press “Ok” to
confirm
POSITION menu
This menu is used to change the geographical coordinates (latitude,
longitude, time zone) that were set during the installation phase.
To change a parameter:
➢ The parameter value is
displayed:
press “Ok” to access C1
the change mode
➢ Select SETTINGS POSITION
with “C1” and “C2” and press
“Ok” to confirm
➢ It is possible to select to
change only the city or
make a change using the
geographical coordinates:
- if you want to change
the city, select
C1
C1
R
C2
Ok
R
C2
Ok
➢ Set the new value with
“C1” and “C2” and
press “Ok” to confirm.
C1
C1
R
C2
C1
R
➢ The following message will appear
.
on the display
- 27 User manual DVA
R
Ok
C2
Ok
C2
Ok
R
C2
English
CAPITAL POSITION and press “Ok”. The
currently set city will be displayed: press
“Ok” to access the change mode and
select the new city with “C1” and “C2”
and confirm with “Ok”. At this point the
will be displayed to
message
indicate the change that was made.
The default values for the time change are:
- winter Ò summer change: last Sunday in March, 2:00 am
- summer Ò winter change: last Sunday in October 3:00 am
Ok
OFFSET menu
appears on the display to indicate the
➢ The message
change that was made
English
This function is used to change the sunrise and sunset time that is
automatically calculated by the system (maximum correction ±120
minutes).
At this point, pressing “Ok” on the main page, the corrected sunrise
and sunset times are displayed again.
To display the calculated sunrise and sunset times:
PIN menu
➢ From the main page, press “Ok”.
The currently calculated sunrise and sunset times will be displayed
in sequence.
A protection code can be set to prevent anyone from using the
instrument.
The PIN code is a 4 digit number that has values between 1 and 4.
To change the sunrise and sunset time:
To set the pin code:
➢ Select SETTINGS CORRECTION
and confirm with “Ok”
➢ Select the time to correct “C1”
C1
and “C2” l’orario da correggere
(sunrise or sunset)
➢ Confirm with “Ok”. The
currently set correction is
displayed. Press “Ok”
C1 R C2 Ok
again to change the value.
➢ Set the correction with “C1”
and “C2” and press “Ok”
to confirm (use negative values
to advance the event, positive values to delay the event).
➢ select SETTINGS PIN with the keys “C1” and “C2”
➢ confirm with “Ok”
➢ the four digits that make up the current PIN code are displayed
(0000 corresponds to pin inactive)
➢ confirm with “Ok”
− select CHANGE and press “Ok” to enter the new PIN code. Use
the keys “C1” and “C2” to enter the numbers one by one that
make up the code and press “Ok” to confirm them
− select RESET to deactivate the PIN code request
➢ press “Ok” to confirm.
R
C2
Ok
➢ The following message appears on the display
in the case of reset).
(
- 28 User manual DVA
To unlock the instrument, enter the PIN
code, according to this rule:
-
key “ ”: 1
key “C1”: 2
key “C2”: 3
key “Ok”: 4
For example, pin: 3411 “C2” “Ok” “ ” “ ”
SETTINGS RESET
This menu is used to reset all settings that were made, restoring the
factory values:
Date format
CET / DST change
- summer time change
- winter time change
Correction
- sunrise
- sunset
PIN request
Programming relay 2
yy--mm--dd
automatic
Last Sunday in March 2:00 am
Last Sunday in October 3:00 am
0 minutes
0 minutes
0000 - deactivated
P1 every day
To reset the settings
➢ select RESET SETTINGS with the “C1” and “C2” keys
➢ confirm with “Ok”
➢ confirm again with “Ok”
➢ the following message appears on the display
- 29 User manual DVA
English
If the PIN code request is active, the
keypad will be locked approx. 3 minutes
after the keypad was last pressed. At this
point, when pressed again, a request to
enter the PIN code will appear.
.
HOUR METER MENU
The hour meter function indicates the total time in which the output
remained in the on status.
The hour meter range is between 0 and 99999 hours, when the
maximum limit is reached, it is automatically reset.
English
To display the hour meter value:
from the main page, press “ ”
select HOUR CNT with “C1” and “C2”
press “Ok” to confirm
choose with “C1” and “C2” the
output concerned
➢ press “Ok”. The total use is displayed
➢ press “Ok” again to access the hour
meter reset option. Press “Ok” again
to confirm or “ ” to exit without
resetting.
appears on
➢ The message
the display to indicate the change that
was made.
➢
➢
➢
➢
RESET MENU
The instrument’s default status can be reset with the reset function.
There are 5 different resets available:
- reset settings: deletes all settings that were made
- reset HOLIDAY: deletes all holisay programs
- reset programmes: deletes all saved programs
- reset hour meter: resets the operating time hour meter
- reset all: reset settings + reset programs + reset hour meter
To perform the reset:
➢ press “ ” to access the menu
➢ select RESET with the keys “C1” and “C2” and press “Ok”
➢ use the keys “C1” and “C2” to select one of the above listed resets
and press “Ok”
➢ press “Ok” to confirm.
To perform a complete instrument reset, restoring the factory settings,
use a sharp instrument to press the “R” key. This deletes all the
settings that were made and restores the default conditions.
- 30 User manual DVA
Copy function
IR INTERFACE
To transfer a program from DVA to the remote control, first:
➢ generate a program with the traditional method onl DVA (see
“Automatic programming”)
➢ activate the reception mode on the remote control (see the relative
instruction sheet)
There are two basic functions in this operating mode:
➢ activate the transmission on
DVA, holding down the “Ok”
key for 3 seconds
The following message will appear
on the display
- COPY: consists in transferring the programs from a DVA to the
remote control
- PASTE: consists in transferring the programs from a remote control
to one or more than one DVA instruments at the same time.
➢ press the “Ok” key again to confirm
the start of transmission or “ ”
to cancel the transmission
The program exchange remote control is not provided with the
instrument but can be purchased separately as an accessory.
C1
R
➢ during the transmission, the following
message will appear on the display
(
on the remote
control display) and the remote control will emit “bips”.
When completed, the following message is displayed
.
- 31 User manual DVA
C2
Ok
3 seconds
English
The DVA model have an IR interface that makes it easy to exchange
programs between the instrument and its remote control.
Attention: the IR interface can only be activated if DVA is powered by
the mains network.
In this way, an instrument can be programmed, then the program can
be copied to a remote control and then duplicated in other instruments,
without having to repeat the programming step by step.
Paste function
on the clock’s display.
To transfer a program from the remote control to one or more DVA, first:
➢ connect the DVA clock to the mains network
English
➢ press the “R” key to reset
the instrument and activate
the reception mode. The following
message will appear on the
display
C1
R
C2
At this point, the programs and date
and time settings are transferred to the
instrument and it is ready to operate with
the transferred parameters.
Ok
➢ activate the transmission on the
remote control and select which
program to send (see the instructions
for the remote control)
➢ during the transmission, the following
message will appear on the display
(
on the remote
control display) and the remote control will emit “bips”.
When completed, the following message is displayed
.
Note: during transmission, point the remote control towards the
front of the instrument to facilitate the transmission. A possible
problem with the transmission is signalled with the message
- 32 User manual DVA
BATTERY REPLACEMENT
REFERENCE STANDARDS
The battery charge level can be checked:
- automatically by the instrument once a week
- manually, hold down the “ ” key on the main page for 3 seconds.
If the battery charge level is lower than the specific threshold,
the following message will appear on the first row of the display
. In this case, replace the battery as soon as possible.
Compliance with Community Directives
2006/95/EC (low voltage)
2004/108/EC (E.M.C.)
is declared in reference to the harmonized standard:
• EN 60730-2-7
English
To replace the battery:
- disconnect the power supply
- remove the cover from the battery compartment, turning it
anticlockwise
- replace the battery and replace the cover, turning it clockwise
- connect the power supply
In order to retain the programming and settings, the time that passes
between removing the old battery and inserting the new one must not
exceed 60 seconds.
Use CR-2032 batteries only.
Throw away the run down batteries in
compliance with current regulations on the
disposal of harmful waste.
- 33 User manual DVA
V3IS00801-010
GARO AB
Box 203 • 335 25 GNOSJÖ
Tel 0370 33 28 00 • Fax 0370 33 28 50
E-post: [email protected] • Internetadress: www.garo.se