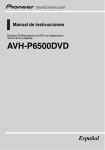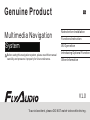
1
Genuine Product Multimedia Navigation System Notes before Installation Functions Instruction AV Operation Before using this navigation system, please read this manual carefully and preserve it properly for future reference. Introducing Optional Function Other Information V1.0 To avoid accident, please DO NOT watch video while driving . Safety Info Please read through this User’s Manual Before using this navigation system, please be sure to read through and fully understand the following safety information, so as to enjoy the advanced functions. Please preserve this User’s Manual for future reference . l For safety reason, some functions of the system may be disabled while driving, unless you stop the car or use stopping brake. l Please DO NOT wear ear phone while driving . Ensure Safe Driving l Ensure obeying safety driving regulations and current traffic rules. l The blue and white wire at power connector is for detecting the status of car stopping. It must be connected with the power of car stopping switch. Improper connection or use of this wire may be law-breaking, and may endanger your personal safety . l Operating this navigation system (and the optional car reversing camera) may distract your attention of driving the car safely . l To avoid car accident and possible breaking l If you need to watch the monitor to conduct to applicable law, please DO NOT use the navigation system for any other purpose other than navigation while driving. Likewise, the rearview monitor shouldn’t be used while blocking the vision of the driver . any system operation, please park the car at a safety place, and take the parking brake, before making necessary adjustment. l DO NOT set the volume of the navigation system too high, as you may not be aware of the traffic condition and SOS signal outside . l When using the monitor connected to rear monitor output, the rearview monitor ii Announcement output of this system is for connecting to monitor, so as the passengers in rear seats watch program and conduct relevant operation while driving. otherwise, electric shock may happen, it may also cause damage to the system, smoke and overheat etc. SafetyAnnouncement Warning: l The navigation function of this product (and the optional car reversing camera) serves as your assistance while driving. It doesn’t mean that you could distract attention, absent-minded or lose judgment while driving. The accident it caused is irrelevant with our company. l The intellectual right of the digital map written into TF card belongs to the supplier. Map supplier is responsible for the content of it. l Please DO NOT install or fix your navigation system on your own. Danger could happen when this navigation system is installed or fixed by the personnel without receiving electronic device and automobile parts training, and you may be under the risk of electric shock or other dangers. Please DO NOT watch program and conduct relevant operation while driving. l Watching video and conducting relevant Announcement operation while driving is prohibited by the laws in some countries. For your and other person’s safety, please DO NOT do it while driving. l DO NOT contact this system with liquid, This User’s Manual mainly introduces the function, purpose and operation of the vehicle AV system product. This manual serves as an operation guideline for users, rather than maintenance service evidence. If iii Announcement there is any alteration of design and specification as the constant improvement of product, we won’t deliver separated notice. The product is subject to the material object. For details, please inquiry the dealers. The pictures in the manual are for reference l only. The error of your understanding is irrelevant with our company. The registered trademarks and product l names are held by the companies they belong to. The information in the manual could be l altered without making announcement. Our company reserves the ultimate right of explanation of the information provided. If this product couldn’t work normally, l please inquiry to the customer services department of the manufacturer. l Without prior written license by our company, any part of this material can’t be copied, altered, dispatched or used in any other way. iV Index Functions and AV operation Before using the system Notes before installation Welcome System installation 1. Installation key points 2. Mainframe installation 3.GPS antenna installation Preparation before use 1. Power on/off 2. Installation steps 3.Special notices 4.Insert and take out Disc Touch screen operation Main menu Disc playback Sound effect setup Tune and balance Listen to radio Operating iPod Operating MP3 player Navigation system Operating Bluetooth telephone functions Operating Bluetooth music function Operating function configuration 1 2 2 2 3 3 5 5 5 6 7 10 10 11 15 16 18 20 22 23 26 27 28 Front Panel Functions Front panel diagram Front panel parts 8 9 Optional functions Rear seats entertaining operation Watching TV program TPMS setup V 34 34 35 Index Specification Appendix Disc type for playback Use the monitor correctly 1. Notice of use 2. About LCD monitor 3. About maintenance Use of the Disc player 1. Notice of operating Disc player 2. About maintenance 3. Notice of preservation 4.About the environment of playing Disc When with failure Common Problem DVD Video CD/MP3Disc Terms definition 1.CD/MP3 Disc 2.DVD Video Universal GPS Amplifier and audio parts DVD player parts FM parts AM parts Monitor parts GPS antenna Dimension 37 38 38 38 38 39 39 39 39 40 40 41 43 44 45 45 46 Quick Installation Guide Vi 47 47 47 47 48 48 48 48 49 Before using the system Notice before installation Product manufacture doesn’t recommend you to install or maintenance this navigation system on your own, as you may be under electric shock or other dangers. Please entrust all about the installation and maintenance to the official licensed staff. Warning: Following dangerous installation positions or approaches are forbidden. l When the vehicle comes to a sudden stop, driver or passenger may be injured. l Driver’s vision or vehicle operation may be hindered. For example, front ground of driving seat, or where close to steering wheel and gear lever. l Driver’s ability of safe driving may be influenced. The product is forbidden to be installed on l meter panel, car gate or column, as well 1 as the front or where close to the opening area of vehicle air bag. Please refer to your vehicle user’s manual to understand such opening area. Caution : l If hole drilling or other alteration is needed while installing, please consult with the dealer nearby. When opening hole on panel, please make l sure with rear space. Please DO NOT damage fuel cable, brake cable, electrical components, communication cable or power cable. l When using screw, please make sure it is not contacted with any electric wire. Vibration may damage electric wire or the insulated skin, causing short circuit or damage to other vehicles. l For ensuring correct installation, please use the standard parts to install in complied with the regulations. If using any non-standard part, the internal Before using the system component of the product may be damaged or loosen, resulting product damage. l If GPS antenna lead wraps steering column or gear lever, it is extremely dangerous. Please make the installation won’t hinder driving. l Please make sure all leads won’t be hooked by car door or sliding mechanism of the seats, for avoiding short circuit. l To prevent from electromagnetic interference, please put other cables or leads away from the FM, AM antenna and their leads, GPS antenna and its lead. You should arrange the above-mentioned leads separated each other. DO NOT bind up the leads or cross them, otherwise, electromagnetic interference may be intensified, leading to incorrect positioning or error display. l After finishing navigation system installation, examine and confirm other devices of the vehicles are correctly connected. Welcome Thank you for using our multimedia vehicle navigation system, we sincerely provide with excellent quality and superb experience to you. System Installation 1,Installation key points This product is used for vehicles with 12V l storage battery and negative ground end. Before installation, please check out the voltage in storage battery. To avoid system short circuit, it is l recommended to dismantle the negative wire of the battery. DO NOT directly connect this product to l storage battery by over passing fuse. DO NOT directly connect the power cable l of this product to the power cable of other electric appliances. 2 Before using the system cleanse the adhering area. After cleansing, tear down the back paper, place the GPS antenna at a proper place, and press it tight with strength. Dismantle the side panel, take the cable through storage box, to the mainframe at central control platform. Please bind up the cable with the original cables. 2,Mainframe installation Connect the GPS antenna port with the Firstly take out the original mainframe. l mainframe. Dismantle the bracket and screws, and then l preserve them. Use connection cable to finish connection. Lastly, put the mainframe in place, and use l the original installing screws to fasten the mainframe. Caution: Don’t damage or stain the panel. Caution: l Please make sure all devices are installed at safe places. If user’s vehicle is installed with other devices, please make sure such installation won’t interfere with its function. l Before installation, please read through all instructions. It is advised to ask auto Hi-Fi professional dealer to install this machine. 3,GPS antenna installation Before using binding tape to fasten the GPS antenna, please be sure to use proper 3 Before using the system GPS Antenna Choose to install antenna in car 4 Before using the system Preparation before use Warning: For safety reason, the machine is designed for not being able to conduct complicated operations like destination setup while driving. Please pull over the vehicle at a safe place, take stopping brake, and conduct operation. Driver shouldn’t conduct such operation while driving. 2,Installation steps l Check if the installation accessories are complete. l Please dismantle the original Hi-Fi. l Fasten the positioning bolt and positioning rubber cap onto the mainframe of the navigation system. (Some machines models are not equipped with positioning bolt and positioning rubber cap, so it’s no need to install). l Use the accessory special converting 1,Power on/off Turn on the ACC of the vehicle to on or start the engine, this machine will be automatically powered on and started. Starting picture appears on the monitor. A few seconds later, the following prompting box appears: Press (AGREE) button to access to the screen last time turning off, turn OFF ACC (turn off engine) to shut down power, the machine will auto save current page—to which would be auto accessed when next time booting. 5 Before using the system cable to quickly install as per the system connection diagram in the guideline. Connect the original Hi-Fi cable, peripheralauxiliary devices and mainframe, connect automobile ACC key switch, turn on machine power to have a trial run. If the machine can’t be turned on, please firstly check out the wiring, until the solution is found. If the machine can normally work,shut down ACC and turn off the vehicle. l Install the correctly wired mainframe into the original Hi-Fi position, and make sure the installation stable. l To prevent from accidental damage, please DO NOT plug the parts when power is on. l Please verify the vehicle model is matching with one of the standard models in the vehicle conversion line of the navigation system. l Please check out the connection of auto wiring with Hi-Fi cable in navigation system. l Before power on, please confirm all parts of the system are correctly connected. Please verify the standard (+) pole (yellow) and ground wire (black) in converting cable in navigation system accessories are not short circuit. Connect the power cable to other wire may damage the machine or vehicle. l DO NOT directly connect the power cable of this product to the power cable of other electric appliances. 3,Special notice l Be careful of not damaging automobile wiring. l To ensure normal playback of CD/DVD, the horizontal angle of installation should be less than 20° l To avoid short circuit when wiring, it’s advised to dismantle the negative end of the battery before installation. 6 Before using the system 4,Insert and take out Disc l Insert Disc Directly put part of the Disc (text facing up) into the slot, and then the device will automatically suck the whole Disc into the slot. l Take out the Disc Press (OPEN) or ( )key, the Disc will be ejected. Caution: l When the Disc is unable to be ejected, press and hold ( ) key for 2 seconds, the Disc driver will auto restart after power off, and the Disc can be ejected. l After removing disc, please packaged it in CD-ROM box for safekeeping. 7 Front Panel Functions Front panel diagram LCD monitor Disc slot Power and volume knob Radio tuning knob Monitor brightness control Previous Next Navigation screen Disc in/out Setup destination System setup AV switching Main menu TF card slot Caution: l This picture is for reference only, the product is subject to material object ! 8 Front Panel Functions monitor will be in stand-by mode, touch screen to continue previous operation. Disc in/out slot— insert and take out Disc Function of front panel parts LCD monitor—for touch screen control DIMM ( Brightness control)—for turning on O PEN (Disc in/out control)—to eject Disc, if without Disc, press it, the monitor will display “insert Disc” prompt. screen, or making it dim, medium and bright. AV (Switch)—Press it to rotate among DVD, FM1,FM2,AM,AUX and MP3. NAVI ( Navigation screen)—short cut to access to GPS navigation screen. SEEK+ (Next)—When playing AV, press to select next song; when listening to radio, press to select next . D EST . ( Destination)— Access to destination setup. SEEK- ( Previous)—When playing AV, press to select previous song; when listening to radio, press to select previous radio channel. SETUP (System setup)— Alter system relevant setup Radio turning knob When listening to radio, turn the knob to l select channel. Press the knob to access to “tune and l balance”. In GPS navigation screen, turn the knob to l zoom in/out the map. TF card slot —Insert a TF card with GPS navigation software . MENU ( Main Menu)—Press it to switch to main menu at any time. Power and volume knob—Adjust the output volume l T urn it clockwise to increase volume, turn it counter-clockwise to decrease volume. l Press the knob to turn on/off mute. l Press and hold the knob for 2 seconds, 9 Functions and AV operation Touch screen operation channels. (iPod ):Playing the songs or segments in iPod.(Note:with extra iPod cable to realize this function). (MP3):Playing the song and image in USB or SD cards. ( TV ):Playing mobile TV. (Navigation ):Access to GPS navigation system. (Bluetooth):Playing the music in mobile phone via Bluetooth module. (A2DP):Playing the music in mobile phone via Bluetooth module. (AV IN):Connect to external device. (Settings):Display and setup relevant information in the vehicle. (Rear LCD):Control rearview display output. Main menu At the first time to run this system, press (agree) button in Caution screen, LCD monitor displays the default DVD screen. Click to return to main menu, as following picture: In the main menu, there are 10 functional buttons, as ( Disc):Play DVD, VCD, CD and MP3. 10 Functions and AV operation detailed setup, see the “brake sensing” setup in later pages(P-28). (Day/Night):Press (Day/Night) button to switch to night mode, button indicator will be on, screen is dark. Press(Day/night mode) again to switch to day mode. (Off)(Dark)(Soft)(Bright):Between day mode and non-day mode, user may choose 1 out of 4 display modes as needed. DVD Disc playback When the following picture appears in the monitor, the way to insert Disc: see theprevious instruction of “Insert and take out Disc (P-7). Caution: system, many functions are optional, and useable only when they are chosen. For detailed operation,please see optional function. In this l 1. Disc Playback Caution: Insert Disc to auto access to playback screen. If this Disc is a DVD, you will see the following screen: For safety reason, when watching the l image on monitor, please stop your vehicle and take stopping brake. For 11 Functions and AV operation stop playback; in playback mode, press it to pause. When it’s in pause or stop mode, press it to resume normal playback. ( ):Press it to stop playing Disc. ( ):Fast forward. ( ):Press it to play next song or track. (TRACK LIST):Press it to access to another screen displaying all tracks or songs in the Disc. ( FOLDER ):Press it to access to select folder. ( MUTE ):Press it to play Disc in mute mode. ( 4/3 ): Display 4:3 video. ( 16:9 ):Display16:9 wide screen video. ( Full Screen ):Press it to show full screen video. ( Video) :Press it to access to video ( TITLE0 ):Current playing program title. ( TRAC001 ):Current playing track No. ( 00'34" ):Display the playing time elapsed. ( FOLDER ):Folder of current playing program. ( FILE ):Name of current playing program file. ( ):Fast backward . ( ):Press it to play last song or track . ( ):When Disc is in, press it to start playback; in playing mode, press it to. 12 Functions and AV operation operation and menu screen, as following picture: it when playing to switch to different subtitles (multiple subtitles). ( SETUP ):Adjust video color, contrast, chroma and brightness, as following picture: ( 0h2'30" ):Display elapsed playback time. ( AUDIO ):When using Disc recorded with multiple sound tracks format, press it when playing to switch to sound tracks in different formats (multiple format) . ( SUBTITLE ):When using Disc recorded with multiple subtitles, press ( - ) or ( + ):Increase or decrease, adjust to appropriate visual effect. ( MENU ):This is first level menu. If it’s playing, press it to pause and access to Disc main menu. 13 Functions and AV operation Playing CD or MP3 Disc ( MAIN MENU ):This is second level menu. If it’s playing, press it to pause, and access to track selection screen. The screen list all tracks or songs in the Disc, you may choose any track to play as you like. ( )( )( )( )( )( ) Button functions and operations are completely the same as those in Disc screen. ( )( )( )( )( )( ) When VCD Disc is inserted, following picture appears: Part of function and text are similar as those in DVD function screen. ( RPT ):Press it to rotate playback mode. ( Shuffle ):Press it to start random playback. ( Scan ):Press it to scan program. ( TRACKLIST ):Access to another screen displaying all track or songs in the Disc, as following : Use this 4-direction button to OK select your track from all directions, and press (OK) key to play the track selected. 14 Functions and AV operation picture: to navigate files list or folders list. Caution: l Touch the button on screen to select relevant track or song for playback. The selected button will be highlighted, with serial No. and time displayed on top of the screen. Sound Effect Setup Click( SURROUND )to set up sound effect, as follows: ( FOLDER ):Press it to show files list, as follows: Program navigation:Touch (Prev) and (Next) on touch screen 15 Functions and AV operation treble delivers clear or even harsh sound. (Classic):Classic also requires elevation of both ends, mainly highlighting the performance of instruments. (Turn Off Surround):Close all sound effects. Tune and balance To a large extent, the quality of sound effect is subject to the mixed level of treble and bass. Actually, different music and vocal would be better under different sound levels. It’s very important to keep optimal balance of right and left channels, as well as front and rear sound levels. Taking it into account, this product provides with AUDIO button in the pages of Disc, Radio, iPod, MP3 and Bluetooth music, press this button to set up treble and bass, as well as sound balance between front and rear, left and right, as following picture: The item selected will be highlighted. ( Pop):Pop music requires an average combination of vocal and instruments, so the curve is not seriously fluctuated. ( Jazz ):Jazz music requires to elevates the music within 3-5 kHz improving live sense. ( Rock ):Rock music requires great elevation at both ends. Bass delivers strong power and rhythm; 16 Functions and AV operation between front and rear speakers. ( L )or(R ):Adjust the sound balance between left and right speakers. Press(L) or(R), (FRONT ) or (REAR ) once, yellow bar will move to corresponding direction by 1 unit. ( Back ): Press this button to return to operation screen of upper level. “TREB" ( + )or( - ):Add or reduce treble. “MID" ( + )or( - ):Add or reduce middle. “BASS" ( + )or( - ):Add or reduce bass. ( 10KHz ):Intensify treble, switch treble frequency. ( 500Hz ):Intensify alto, switch alto frequency. (80Hz):Intensify bass,switch bass frequency. (FRONT)or(REAR):Adjust sound balance Caution: l When listening to stereo CD or radio,change left/right balance, the volume of a group of sound will increase, while that of the other group will decrease. 17 Functions and AV operation 2.Listen to radio Receive radio signal AV sound source is switched to radio. Press AV key to switch to radio, or select radio on main menu to access to radio page, receiving the radio signal last time received. Caution: Auto preset radio stations are listed. l In tunnel, behind mountain, between l (190.60MHz):Frequency of radio currently playing. (FM1)&(FM2):Press it to select FM radio station. (AM):Press it to select AM radio station. mansions, where radio wave would easily interrupted, or where radio wave is weak, signal received is also weak. Even though with the list, sometimes signal couldn’t be received according to current location and condition of radio wave. Press corresponding button to switch one mode to another. There are 1 to 6 storage units for reserving radio channel under each mode. Touch the radio frequency stored in the unit to listen to this channel. 18 Functions and AV operation (Clear): Delete all channels stored . ( SCAN ):Auto scan radio frequency. (List ):Click it to access to radio navigation and storage operation screen, as follows: Caution: l When battery is disconnected or fuse is burn, the preset channels will be deleted. Search radio frequency: Preset channel:Directly click on the radio channels stored in the list. Manual:1、Touch( ) 、( )Button to select the channels needed. 2、Turn “radio tuning” knob on the panel to select the channel needed. (Favorite):Click to select the radio channel found, and click (Favorite) to store the selected radio channel. If you'd like to delete one stored radio channel, please click the selected radio channel, and click (Favorite) button to delete it. 19 Functions and AV operation ( TRACK0010/1000 ):Total currently playing songs . Auto:Touch (SCAN)button on operation screen to auto scan frequency. When channel signal is found, the search will auto stop. Press this button to search for next frequency. ( 00'34" ):Time elapsed in song list. ( ):Single song rotation (controlled by RPT button). ( ):Random playback (without this mark, playback is in order). ( 1'45~5'45 ):Songs playback timeline. ( ):Press it to play previous song or track. ( ):Press it to play next song or track. ( ):When playing, press it to pause, re-press it to resume normal playback. ( Display bar): 3 bars are for displaying song name, singer and album name. 3. iPod Control When iPod in the setup page is “ON”, iPod is connected.Click on the iPod icon in main menu to access to the following page: 20 Functions and AV operation ( RPT ): Press it to switch to rotating playback mode. ( Shuffle ): Press it to switch to random play back mode. ( Search ): Click it to access to playback list. "Song navigation ":Press(Prev) (Next)button to turn the page. As following picture: “ ”:Return to iPod folder page. “ Back ”: Return to page setup. ( Video ):Press it to access to video page. ( ): Press it to play previous song or track. ( ):Fast backward control. ( ):When the Disc is inserted, press it to start playback; when in playback mode, press it to pause. When it’s paused or stopped, press it to resume normal playback. 21 Functions and AV operation ( ):Fast forward control. ( ):Press it to play next track or song. ( SETUP ):The same as DVD operation. ( TRACK1 ):Currently playing track No. ( 00'34" ):Display elapsed playing time. ( Display bar ):3 bars are for displaying song name, singer and album name. ( 1'45)( 6'45 ):Song playing timeline. ( ):Press it to play previous song or track . ( ):Press it to play next song or track. ( ):In playback mode,press it to pause,Press it again to resume normal playback. ( RPT ):Press it to switch to rotating playback mode. ( Shuffle ):Press it to switch to random playback mode. ( Playlist ):Press it to access to next screen displaying all tracks and songs in the Disc. 4.MP3 Player Control Click(Mp3 ) button to access toMP3 player control screen, as following picture: ( USB or SD ):In(Playlist) select one playback device. The icon on it will correspondingly change to blue, indicating playing the music or image in the device. 22 Functions and AV operation ( Prev )(Next ):Choose song, use the middle slidingbar to navigate, as following picture: ( Browse ):Click it to see the map, as follows: 5.Navigation system Click on (Navigation) icon in main screen to access to Navigation control screen: (Run Navigation):Click on the map software in the pathway, as follows: 23 Functions and AV operation positioning, please stay at the same location, where is preferable open space,without shield above. l First positioning may need over 3 minutes, subject to current environment and satellite signal. l DO NOT operate the navigation system while driving, so as to ensure safe driving. To avoid accident, please operate this system after safely pulling over the vehicle. Wireless communication product (e.g. mobile phone, speed alarm etc.) may interfere with the receiving of satellite signal, leading to inconsistent signal received. l If any insulation film or explosion-proof membrane is installed in your vehicle, satellite signal may be interfered with. ( OK ):Click on it to select relevant pathway. ( Cancel):Click on it to cancel pathway. Keys operation: Press (NAVI) key on the panel to access to above navigation software selection screen. Navigation notes l GlobalPositionSystem (GPS) is developed and operated by US Ministry of Defense, who is entirely in charge of the accuracy and maintenance of the project. Any alteration made by this unit may affect the accuracy and performance of GPS devices. l Please use this GPS navigation system prudently. This system provides with navigation reference. DO NOT use this system for accurate measurement of direction, distance, location and terrain. l When firstly taking GPS satellite 24 Functions and AV operation route provided by this navigator may not be matching actual practice. Please drive as per actual traffic control or regulation. l The navigation routes provided by this device are for driving reference only. For example, in driver’s familiar area, it may be more effective when choosing routes on his own, rather than following planned routes. Caution: l The traffic units in all areas will adjust property of road (one-way street, left turn forbidden etc.) according to local traffic condition. Please be sure to obey the local traffic instructions. If the road condition differs with what the map shows, please make your own judgment if this road should be taken. Map Receive satellite signal Normally, as long as receiving the signal fromover 3 satellites,the navigation system can accurately locate your position, but sometimes the signal received may be affected by weather or skyscrapers. l As with rapid urban construction and town and country highway traffic development, traffic regulation information of city streets keeps changing constantly. After launching for some time, the product may provide traffic information not exactly matching actual practice. Driver should be aware of actual traffic condition, so as to avoid going against traffic rules. l As with the change of traffic regulation or temporary road control, the instructive 25 Functions and AV operation 6.Bluetooth telephone control Bluetooth is on, click(Pair). Otherwise, it’s off and not for matching mobile. ( ):Receive or dial call key, when in process, the button turns green. ( ):Hang up. In talking, the button is in red Press. this button to hand up, meanwhile it turns grey. ( Del ):Delete error number. ( Records ):Click on this button to see the following picture: Click on the Bluetooth functional key in main menu, as follows: ( Pair ):Click to match Bluetooth mobile phone. ( Handheld ):Change to receive by mobile phone. ( Hands Free ):At hand free mode. ( Bluetooth ON ):Gray indicator turns yellow meanwhile “ ”turn blue indicating 26 Functions and AV operation ( Back ) :Return to upper menu. ( Received calls) and ( Dialed calls): Preserve the most recent 20 received or dialed calls. ( )&( ) :See call records. ( CarRecords ):Jump to vehicle record page. ( Missed Calls ):Missed call list. ( Received Calls ):Received call list. ( Dialed Calls ):Dialed call list. (SIM Contacts):As it states. ( Phone Contacts ):As it states . ( Clear all ):Clear all received and dialed call record. ( Bt Records):Click to see the following picture: 7.Bluetooth music control Play the music in mobile phone via Bluetooth 27 Functions and AV operation ):Press it to play previous song. ( ):When mobile phone is connected, ( press it to start playback. ):In playback mode, press it topause. ( ):Press it to stop playing. ( ):Press it to play next song. ( Back):Return to upper setup page. ( Auto Switch to GPS ( ON )、( OFF ): When it’s ( ON ), and 10 seconds after operation in other page. it will auto switch to navigation page When it’s (OFF),this function is turned off. GPS Voice ( ON )、( OFF ): When it’s ( ON ),turn on GPS voice. When it’s ( OFF ),turn off GPS voice. Rearview Camera ( ON )、( OFF ): When it’s ( ON ),camera will capture the 8.Setup function control Press (Settings) button on main menu, to access to the first page of (Settings)page: 28 Functions and AV operation car reversing live video onto the monitor. When it’s off, no such live video will be provided. It remains the original operation screen. Caution: This function is valid for the cars with l CAN BUS control only. Brake Override ( ON )、( OFF ): When it’s ON, DVD or video picture from auxiliary input can’t be shown until taking stopping brake. But audio is not affected by this setting. When it’s OFF, you may access to DVD or video picture from auxiliary input at any time. Information:Click to display the relevant info about MCU,iPod,Barcode,Bluetooth, MPEG andUUID, as following picture: Auto Dimmer(ON): Day/night mode button in menu disappears. Turning vehicle light on/off may control the day mode and night mode of screen. When turning on the head lamp, the screen will be in night mode.When turning off the head lamp, it’s in day/night mode. Auto Dimmer(OFF): When day/night mode button appears in main menu, press it to adjust the day mode and night mode of the screen. 29 Functions and AV operation Tire pressure:Display vehicle & set up relevant in-car info. Style:Click on(Style) icon, as follows: ( System Style ):Click button(Set) to open style setup page, with a variety of style available, as follows: (Colour Set): Personalize page color, as following picture: "-””+”:Add or reduce RGB color value. Including: "Blue", "Orange", "Green", "Yellow". For quick switching system color,user may use R, G, B tocustomize color style, press and hold the definition to save it. 30 Functions and AV operation “Default”:Click on the default style. “Apply”:Click to apply the selected style. “Cancel”:Click to cancel the selected style. “Next”:Jump to the next style setup page. “ Back ”:Return to the setup page of upper level. ( Language):Use ( )&( ) to switch language. Press (Next) button to 2nd (Settings) page,As following picture: ( TV):WhenTV setup is (ON), turn on TV function; when TV setup is (OFF), convert to XM Radio (for use out of China only). 24 Hour Clock( ON )、( OFF ): When it’s ( ON ),the time is in 24-hour system; When it’s ( OFF ),the time is in 12-hour system. ( Turn On Volume ): Use ( )& ( )to adjust volume output. ( Button Back Lighting ): Use( ) &( )keys to setup the brightness of panel indicators, in consistent with other keys. (Turner Region ): Use( )&( ) keys to select the radio channel of your desired nation. Time Set:Click (Time Set) button to setup, as following picture: 31 Functions and AV operation and accurately use finger or touch pen to hit the center of cross cursor in order. After successfully verifying, cross cursor disappears, 30 seconds count-down starts at the center of screen. In such time hit on the screen to confirm the verify data, Otherwise the verification is invalid, as follows: “ ”and“ ”:Set up relevant time: parameters of the system. “ Back ”:Press it to return to setuppage. Screen verifying:When touch screen becomes insensitive or with drifting sign, it’s needed to verify the touch screen area, in following steps: Start up the system, “notes” page appears, when seeing “agree” button, press and hold the screen for 3 seconds. A white page appears, follow the text prompt on the screen, slightly (Next): Return to upper setup page, press (Next) button to access to page 3 of (Settings) page, as following picture: 32 Functions and AV operation "Mode":Click to highlight it, and click the corresponding key in steering wheel, and click apply to successfully set up your desired shortcut key. Other key functions are the same as those of “mode” operation. (System Reset ):Click on system reset key to restart the mainframe CPU and GPS system. ( System Update ):Product software update. “ Back ”:Press it to return to setup page. ( Timezone):Use ( ) & ( ) buttons to select your desired time zone. ( Steering Wheel to Select):When steering wheel study is(ON),you may then use( ) & ( ) to select steering wheel . ( Steering Wheel Custom):When it’s (OFF), turn off steering wheel study, steering wheel becomes default. When it’s (ON), click to access to (study) operation page, as follows: 33 Optional function Optional function Back LCD Click on (Back LCD) to access to setup page,as following picture: ( ( ): Press it to stop playing Disc. ):Press it play next track or song. ( B ack):Re turn to main menu setup. Watch TV program Click on the (TV) button on the main menu to see following picture: ( DVD Mode):Press it to select playing Disc. ( ):Press it to play previous song or track. ( ):When Disc is in, press it to start playback;When the Disc is playing,press it to pause.When it’s paused and stopped, press it resume normal playback. ( Scan ) :Click to auto search TV channel. ( Setup ) :T he same as (DVD) setup(see P-13 for reference). 34 Optional function ( Menu ) :Program setup menu. ( Program ):Press it to watch the preset TV channel. ( Prev ):Choose previous channel. ( Next ):Choose next channel. ( Stop/Back ):Cancel/return to an operation. ( Pair ) :Match tire pressure and temperature sensor. Press (TPMS Set) button to access to setup page: : In (TV)page, use this button to move the cursor from all directions, press (OK) button to select it. (Hint: / may adjust volume). TPMS setup In main menu, press (Tpms) button to access to the management page as follows: 35 Optional function Click( )&( ) to set up related parameters. matching information. l Press(Next) button, to enter the following picture: ( )&( )button can set up tire pressure alarm type.(OFF、RING、TEXT WARNING). ( Back) :Press to return to previous operation page. (Clear) :Click(clear)button to see the following page, And press(Yes) key to clear related tire pressure 36 Playable Disc type Playable Disc type l Part of functions can’t be used in DVD/CD Disc label side, package box and package bag have the following marks. l DVD-R/RW disc is for playing the files in Playable Disc type and mark DVD Size/sides DVD 12cm/singe side 1 side2 sides TM 12cm/double sides 1 side2 sides Disc. Vid-eo format. l Files in VR format can’t be played in DVD- Longest playing RW Disc. l For playing the Disc burnt by PC, but (MPEG2format) sometimes it can’t be played subject to application setting or environment. Title or other text information may not be displayed in this machine. l DVD-R/RW Disc burnt in video format and music CD or PC-burnt CD-R/CD-RW may not be able to play in this machine, due to scratch, stain or internal lens dirt or dew. l Sometimes, due to direct sunlight or high temperature or abnormal condition in vehicle,CD-R/RW Disc may not start to play. l Unable to play any CD-R/RW Disc burnt in DDCD (Double Density CD) format, and unverified CD-R/RW, DVD-R/RW Disc. Only the Discs with above labels can be played in 133min 240min 266min 484min CD COMPACT CD DIGITAL AUDIO COMPACT 12cm/single side 74min DIGITAL AUDIO TEXT TM Is a reistered remark of DVD Format/ Logo licensing Corporation Caution: 37 Use of the monitor Use the monitor correctly 1,Notes of use l In vehicle installed with the likes of safeair bag, please note DO NOT hinder the working of safety device. l DO NOT expose the monitor under direct 2,About LCD screen sunlight or high temperature area, l The LCD monitor sometimes may be with a otherwise, LCD failure may happen. black dot or a flashing dot (bright dot). This l When not using this machine, please avoid is a unique phenomena of LCD monitor, exposing the monitor to direct sunlight. rather than failure. l Use the monitor within the following l When using it in cold area, afte connecting temperature range: to power, the screen may be dim initially. Temp. range of use:-10 ℃~+50 ℃ After a while, the brightness will resume Temp. range of preservation : -20 normal. ℃~+80 ℃℃ l If with direct sunlight on LCD monitor, the screen may be unclear due to light l For easy watching in vehicle, LCD monitor reflection. sticks out. Please DO NOT press with LCD monitor surface with strength, as it could 3,About maintenance lead to failure. When slightly touching the l When cleansing the dirt on screen, please monitor, except verifying the coordinator, turn off power and use soft cloth to wipe it. please make sure using finger to softly l When wiping monitor, please avoid touch it, otherwise, it maybe damaged or scratching by fingernail. sticking with dirt. l DO NOT use wet cloth, volatile oil or diluents. 38 How to use Disc How to use Disc 2,About maintenance l If the Disc is covered with dirt, please use 1,Notes of handling Disc clean soft cloth to wipe the Disc from inside out. l DO NOT use any Disc with crack or stain, or bended. l DO NOT use abnormal (non-perfect l DO NOT adhere volatile or diluentsdiluent rounded) Disc, so as not to cause failure. onto the Disc. Besides, DO NOT use the cleaner for analogue recorder or antistatic agent. l DO NOT touch the info side (with gloss) of Diluents the Disc when handling it. DO NOT hurt the Disc. l DO NOT stick paper or label on the Disc. Re c or de r Cl ean e r Volatile Oil 3,Notes of preservation l DO NOT expose the Disc under direct sunshine or where is at high temp. l Keep the Disc in box, so as to avoid bending. 39 Trouble shooting function will be triggered, and some functions will be stopped. Trouble shooting When with trouble Please refer to the following table before sending to maintenance 4,About Disc Playback Pnvironment l While driving, Disc data can’t be correctly read due to vibration. l In low temp environment, please play the Disc upon turning on heater. Due to lens or Disc player could be with moisture condensation (condensation effect), normal playback may not be able to start. At this time, wait for about a hour, until the dew is evaporated, and then use soft cloth to wipe out the dew remained on the Disc. Unable to fix it after checking Reset the machine as factory default Still unable to fix it Please consult with the customer services department of the manufacturer l When temperature rises, protection 40 Trouble shooting Common problems Trouble Reason All leads and connectors are not correctly connected. Unable to power on. Not working. Solution Reconfirm stable connection. Blown fuse. Check reason of blown fuse, and replace it with the fuse of the same specification. For noise reason, built-in computer error. Press reset button. Touch key shifting over actual reaction location. Conduct Touch screen coordinate verifying. Disc with dirt. Clean the dirt on Disc. Unacceptable Disc type. Confirm Disc. With wrong Disc side up. Insert Disc with label side up. Turn on the ACC of vehicle(start engine), with engine sound. Confirm the Disc is inserted. Normal working. Black dot or bright dot on LCD screen. Unique LCD phenomena, rather than failure. No response to touch key on screen, or being insensitive. Unable to play. 41 Trouble shooting Improper Brightness adjustment. Adjust brightness. Dark LCD picture. Too cold in the vehicle. Low surrounding temp leads to dark monitor. Use heater to warm up the interior vehicle. Volume is 0. Increase volume. Connection error. Confirm correct connection. No sound. Not connect to parking brake line. No image display. No parking brake. Turn off monitor. Connect to parking brake and execute it. Press POWERkey or touch the screen. No navigation system image display. Not being switched to navigation. Switch the image into navigation system. No sound from front or rear speaker. Improper volume adjustment in front or rear speaker. No sound from left or right speaker. Improper volume adjustment in left or right speaker. 42 Correct adjustment and setup. Trouble shooting DVD Video Trouble Unable to play. Reason The Disc inserted can only be played from Disc menu. Vehicle is driving. Solution Play from Disc menu. When brake cable is detected ON, no image can be played while driving, but with music only. No image display. Access to navigation picture.Press(AV) button to switch picture. No sound. Unable to switch audio and subtitle language. Unable to execute initial setup audio and subtitle language. Standstill picture and slow playback Standstill picture, in slow motion.are without sound accompanied. The DVD is recorded with 1 language soundtrack only. Unable to switch over the Disc recorded with 1 language soundtrack only. Limited switching from Disc menu only. Switch over Disc menu. The DVD isn’t recorded with initial setup language. Such DVD is unable to switch to the selected language. The Disc is recorded with As the system is with function of preventing from analogue copying, When playing Disc, picture chaos copy-forbidden signal. when playing Disc recorded with (It may be recorded subject to Discs).copy-forbidden signal, some monitors or dim. may appear horizontal stripes,This is not failure. 43 Trouble shooting Pictures tagnant, unable to operate. Unable to read data when playing Disc. Wipe out the dirt and play again. CD/MP3Disc Trouble Reason Scratching or bending the Disc. With mass noise while playing CD; suddenly comes to a stop while playing. Disc is very dirty. Solution Change to another Disc, if improve, it proves that it’s Disc problem. Wipe off the dirt. The Disc is sticking with mist or water drop. Wipe out the mist or water drop. Mass noise or no sound while playing MP3 file. Non-MP3 file is attached with [.mp3] extension name. Please replace the Disc(Don’t attach [.mp3] extension name to non-MP3 file). M P3 files are played in a different sequence to burning. M P3 files sometimes aren’t played as per the burning sequence. Some files with names like **01, **02… can be played as per set sequence. 44 Terms Definition Extension format: Jolier:Max.64 characters in file name Romeo: Max.128 characters in file name Terms Definition 1,CD/MP3 Disc Multi-segment writing CD-DA Abbreviation for “Compact Disk Digital Audio”, means uncompressed common CD. Multi-segment burning is a data written way to supply additional data. When burning CD-ROM, CD-R and CD-RW, the process from beginning to ending one burning makes a segment. Multi-segment burning is to burn more than two segments of data on one Disc. MP3(MPEG Audio Layer3) “MPEG Audio Layer3” means MP3,sound compression format specified by Moving Picture Expert Group(MPEG) of ISO(international standard organization).MP3 could compress the sound to 1/10 of original data content Id3 Tag An approach to embed the relevant info of a song into MP3 file. The info for embedding comprises of song name, artist name, album name, device type, production year and comment etc. The content can be edited by software with ID3 Tag editing function. Usually it is limited by character number. When playing songs, the info can be seen. ISO9660 Format According to international standard of CD-ROM file and folder logical format. ISO9660 format is limited by following level: Level 1:File name is 8.3 type (comprising of capital English letters and number, and “-”,with name less than 8 characters,extension name less than 3 characters),all folders have no more than 8 levels. Level 2:File name is with up to 31 characters (Including separating character,"-“ and extension name), Byte rate It is the data provided in 1 second, with unit of bps (bits per second). The larger number means more playable information for music, so the larger number means the better music quality. All file folders are with no more than 8 levels. 45 Terms Definition DVD titled content is divided into several segments with identifiers, for chapter inquiry. VBR(Variable Bit Rate) “Variable Bit Rate” is short for VBR, commonly known CBR(Constant bit rate). When Multi-angle Typically, TV camera shoots program at certain angles, with only 1 angle in playback. Some DVDs comprise of all shooting angles for viewers to choose compressing audio,bit rate is variable as per compression condition. PacketWrite Multi-soundtrack Like using floppy disk and hard disk, write the desired file into the likes of CD-R. DVD may comprise of multiple soundtracks, for you to choose language. m3u Multi-subtitle(Subheading) Extension file name of playable file(.m3u), attaching to the playback file list made by WINAMP. DVD may comprise of subtitles up to 32 languages. Viewer may self-define his own language.。 2,DVD Video Title Area Code DVD has mass content—1 Disc can hold several movies. For example, there are 3 movies in DVD player and DVD Disc are with different playing area codes for every sales area. If the Disc doesn’t comprise of the code in the player, playback can’t be started. The area code of this machine is (6). it---mov1,mov2, mov3. All file names can be inquired. Chapter 46 Specification Amplifier and audio parts Specification l Rated power output:22W X 4(10%T.H.D). (As the product keeps improving, if with change of specification, please forgive that we won’t have separated notice) Max. power output:45W X 4. Load impedance:4Ω. DVDplayer parts Universal l Support Disc:DVD-ROM、DVD-VIDEO、 l Max current consumption:10.0A. DVD-R(video mode) /RW (video mode)、 CD-ROM 、CD-DA 、CD-R/RW . Area No.:6 . Signal format(Sampling rate) (DVDvalue):48/96 K hz (CDvalue):44.1 K hz Signal format(quantization B it) (DVDvalue):16/20/24B it line (CDvalue):16B it line Frequency response:20Hz~20KHz(±3 dB ) Audio SNR:≥65dB. PowerDC14.4V(Usable11V~16V). Grounding:Negative pole grounding. External image input level:1V p-p(75Ω load). External audio max input level1.5V/22KΩ. Image output level:1V p-p(75Ω load) (white100%output /when playing DVD). GPS l Approach:L1、C/A code GPS SPSstandard. positioning service. Receiving way:12 channels. Receiving frequency:1 575.42MHz. Sensitivity:-130dBm. 47 Specification Monitor part Channel separation:≥50dB. Audio distortion plus noise:≤0.03% . Video output level:1.0± 0.3Vpp. Line synchronous amplitude:0.3 ± 0.1Vpp. l Screen size:6.5inch、6.95inch、8.0inch. Display area: 144X78.4、 158X83.6、177.64X100.35. Pixel resolution:800x480. Approach: TFT active matrix, transparent. Edge illumination:Cold cathode L tube. Color system:NTSC/PALcompatible. Temperature range for working: 10 ℃~ +50 ℃ . Temperature range for preserving: 20 ℃~ +80 ℃ . Touch screen:Resistance induction analog(film + glass). GPS antenna Antenna: Microwave transmission with flat l plane antenna/Right circular. polarization wave antenna cable length:3.0m. FM tuner parts l Frequency band:87.5MHz~108MHz). Practical sensitivity:≤12dBμV. Locking sensitivity:35dBμV. SNR: Over 50dB(IHF-A network). THD:0.3%. Frequency response:≥2KHz. Stereo crosstalk:≥27dB. AM tuner parts l Received frequency band: 531k Hz ~1602k Hz (9k Hz ). 530k Hz ~1604k Hz (10k Hz ). Practical sensitivity:≤28dBμV. Locking sensitivity:≤45 dBμV. 48 Specification Dimension and size l Installation size of navigation system mainframe: 178(W) x 100(H) x165 (D)mm. GPSAntenna: 39(W) x 15.5(H) x48.5 (D)mm. l Total weight:about 2.5kg. 49 Quick installation guide. Before installation, please read through all instructions. It’s advised to entrust professional automobile Hi-Fi dealer to install this machine A B 10A fuse Original antenna port GPS antenna Radio antenna C D A GPS antenna E F B D C E F Radio automatic antenna OBD TV Amplifier control Reverse trigger USB Digital audio output Bass output Lin control Car reversing video input Rear LCD Vehicle amplifier Tire pressure USB Reserved Manufacturer:Flyaudio Corporation Address:No.16 Mingzhu Road, Economical & Technology Development Zone, Guangzhou Customer services hotline: 400-700-8180 http://www.flyaudio.cn/ ※ If there would be any change of address or telephone number, please forgive that we won’t have separated notice. Printed in China