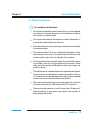
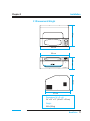
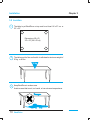
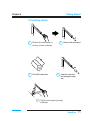
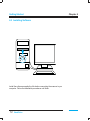
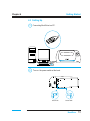
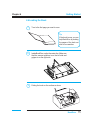
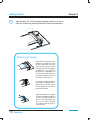
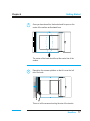
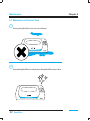
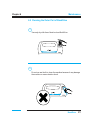
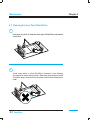
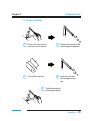
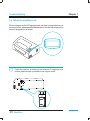
1
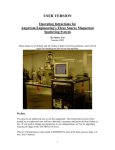
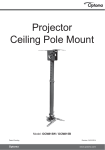
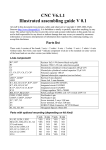
User manual
BookDrive
Automatic Page-turning Scanner
BookDrive
User’s Guide
All rights reserved.
2005 Atiz Innovation Co., Ltd.
Under the copyright laws, this manual may not be copied, in whole or in
part, without the written consent of Atiz.
Atiz and BookDrive are trademarks of Atiz Innovation Co., Ltd., registered in
the U.S. and other countries. Use of the Atiz logo or BookDrive logo for
commercial purposed without the prior written consent of Atiz may constitute
trademark infringement and unfair competition in violation of federal and state
laws.
Every effort has been made to ensure that the information in this manual is
accurate.
Atiz is not responsible for printing or clerical errors.
Atiz Innovation Co., Ltd.
www.atiz.com
Table of contents
Chapter 1 General Information
1.1
Introduction ______________________________________
1
1.2
Copyright Notice __________________________________
2
1.3
Safety Precautions ________________________________
3
Chapter 2 Getting to Know BookDrive
2.1
Components _____________________________________
6
2.2
Part Identification _________________________________
7
2.3
Control Panel ____________________________________
8
Chapter 3 Installation
3.1
Dimension & Weight ______________________________
9
3.2
Location ________________________________________
10
Chapter 4 Getting Started
4.1
Installing a Roller _________________________________
11
4.2
Installing the Software _____________________________
12
4.3
Setting Up _______________________________________
13
4.4
Loading the Book _________________________________
15
Table of contents
Chapter 5 Software
21
Chapter 6 Maintenance
6.1
Maintenance & Normal Care __________________________
22
6.2
Cleaning the Outer Part of the Scanner __________________
23
6.3
Cleaning the Inner Part of the Scanner __________________
24
Chapter 7 Troubleshooting
7.1
Replacing a Roller ___________________________________
25
7.2
When BookDrive appears to malfuction __________________
26
7.3
After a power shortage________________________________
27
7.4
When the machine is on_______________________________
28
7.5
Problems With the Connection ________________________
29
Chapter 1
General Information
1.1 Introduction
Thank you for choosing the Atiz BookDrive. This machine has a modern
design and combines advanced technology with simplicity and ease of
use.
This manual will assist you in becoming familiar with the machine. It
contains all the necessary information for the start-up, its functions and
the replacement of the consumables.
BookDrive
1
General Information
1.2 Copyright Notice
The use of this scanner is subject to the applicable copyrights for the
documents you are scanning. Please observe the copyright laws very
carefully.
Any use of this scanner that infringes the copyright of others are strictly
prohibited.
Any violation of these rights may lead to criminal prosecution.
2
BookDrive
Chapter 1
Chapter 1
General Information
1.3 Safety Precautions
1
For Installation & Relocation
Do not place the machine in a hot, humid, dusty, or poorly ventilated
environment. Prolonged exposure to these adverse conditions
can cause fire or electric shock.
Do not place the machine near heaters or volatile, flammable, or
combustible materials that may catch fire.
Place the machine on a level and sturdy surface that can withstand
the machine weight.
The machine weights 30 kg. for a standard configuration. Use at
least two persons to carry it. One person face the left side of the
machine and the other face the right side of the machine.
Firmly grap the bottom part of both sides. To avoid possible injuries
to your back, never try to lift the machine by one person. When
lifting, get a firm footing, hold BookDrive close to your body, and
bend your knees.
The machine has air ventilation holes on the right side panel. Ensure
that the machine is installed with a minimum clearance of 30 cm
or 12 inches from the right side panel to the wall. A poorly ventilated
machine can cause excessive internal heat and fire.
When moving the machine, be sure to unplug the power cord from
the outlet and unplug the USB cord from the PC connected.
When moving the machine, do not tilt it more than 10 degrees. If
tilted excessively, it may cause some parts in the machine to
dislocate and malfunction.
BookDrive
3
General Information
2
For Power & Earth Connection
Use only the power cord provided with the machine. Using a different
cord may cause fire or electric shock.
This scanner comes with with a convertible adapter that accepts
110 - 240 V electricity.
Do not pull, bend, chafe or otherwise damage the power cord.
A damaged cord can cause fire or electric shock.
Always pull at the plug, never at the wire, when you want to
disconnect the machine from the power supply. Forcibly pulling on
a cord can damage it and cause fire or electric shock.
Connect the machine directly to a wall outlet. If you need to use an
extension cord, make sure it can handle the required power.
Never touch a power cord with wet hands. Danger of electric shock
exists.
Stop operation immediately if you machine produces smoke,
excessive heat, unusual noise, or smell, or if liquid is spilt onto the
machine. These conditions can cause fire. In such cases,
Immediately switch off and unplug the machine, and contact our
Customer Support Center.
If the power cord is broken or insulated wires are exposed, stop
from using the machine. Ask our Customer Support Center or your
dealers for a replacement. Using a damaged cord can cause fire or
electric shock.
Do not unplug the machine while it is on.
When the machine is not used over an extended period of time,
switch it off and unplug it. If an unused machine is left connected to
a power source for a long period, degraded insulation can cause
electric shock, current leakage, or fire.
4
BookDrive
Chapter 1
Chapter 1
General Information
Do not unscrew any parts of the machine. Never open or remove
any covers that are secured with screws unless specifically
instructed in the manual. A high voltage component can cause
electric shock. Leave this work only to a certified technician. Access
to machine’s interior can cause electric shock.
Once a month, unplug the machine and check the power cord for
the following:
The power cord is plugged firmly into a receptacle.
The plug is not excessively heated, rusted, or bent.
The plug and receptacle are free of dust.
The cord is not cracked or frayed.
If you notice any unusual conditions, contact our Customer Support
Center or your dealers immediately.
3
For Machine Operation
Do not place any liquid container such as a coffee cup on the
machine. Split water can cause fire or electric shock.
Make sure no objects fall into the machine. Do not place any objects
on the machine. If an object gets into the operation area, switch off
and unplug the machine to remove it. Do not attempt to remove
the object if it gets inside the electronic panel area on the right side
of the machine or any area that involves unscrewing any parts of
the machine. For such those cases, contact our Customer Support
Center or your dealers.
Do not attempt to alter the machine configuration, or modify any
parts. An unauthorized modification is prohibited. It can cause smoke
or fire.
BookDrive
5
Getting to Know BookDrive
Chapter 2
Your BookDrive is an automatic page-turning scanner.
Your BookDrive includes the following components:
2.1 Component
Viewing Window
Control Panel
LCD Display
Power Button
Green Button
Red Button
Air Ventilation
Opening Lid
Power Switch
Fuse
Power Socket
USB Port
6
BookDrive
Chapter 2
Getting to Know BookDrive
2.2 Part Identification
Page-turning Arm
Length Adjuster
Roller
Roller Spool
Scanner Platform
Gripper Lifter
Gripper Lock
Transparent Gripper
Scan Bar
Maximum Scanning Area
Center Line
Non-slippery Material
BookDrive
7
Getting to Know BookDrive
Chapter 2
2.3 Control Panel
Control Panel
LCD Display
Power Button
Green Button
Red Button
8
BookDrive
Chapter 3
Installation
3.1 Dimension & Weight
57 cm
86 cm
86 cm
32 cm
BookDrive
32 cm
57 cm
Dimensions (W x D x H)
34” x 22” x 13” (86 x 57 x 32 cm)
Weight
66 lb (30 kg)
BookDrive
9
Installation
Chapter 3
3.2 Location
1
The table to put BookDrive on top must be at least 86 x 57 cm. or
34” x 22”.
Dimensions (W x D)
34” x 22” (86 x 57cm)
2
25firm
kg.and is able to withstand a minimum weight of
The table must be
30 kg. or 66 lbs.
30 kg
3
10
Keep BookDrive in a clean area.
Avoid an area that is wet, too humid, or has extreme temperatures.
BookDrive
Chapter 4
Getting Started
4.1 Installing a Roller
1
Release the roller spool by
turning counter-clockwise.
3
Peel off the new roller.
5
2
4
Remove the roller spool.
Insert the new roller
into the page-turning
arm.
Tight the roller spool by turning
clockwise.
BookDrive
11
Getting Started
4.2 Installing Software
Install the software supplied by Atiz before connecting the scanner to you
computer. Follow the installation procedures until finish.
12
BookDrive
Chapter 4
Chapter 4
Getting Started
4.3 Setting Up
1
Connecting BookDrive to a PC.
2
Turn on the power switch at the back.
Switch ON
Switch OFF
BookDrive
13
Getting Started
3
Chapter 4
The message on the LCD display showing that it is in standby mode.
Atiz BookDrive
Stand By ...
Press ON
Press Power button
4
14
Open the Lid.
BookDrive
Chapter 4
Getting Started
4.4 Loading the Book
1
Turn to the first page you want to scan.
Tip
If the book is new, you can
help BookDrive by making
the pages of the book not
stick to one another.
2
Inside BookDrive, notice the center line. Make sure
that the scanner platform is on the left side and
gripper is on the right side.
3
Putting the book on the surface as show.
BookDrive
15
Getting Started
4
Chapter 4
Approximately 2/3 of the transparent gripper should be on top of
the book, moderately pressing the book to keep book stationary.
Positioning the Gripper
Books come in various sizes. The
purpose of the gripper is to keep
the book stationary during the
entire scanning process and to
help keep the page from flipping
spontaneously. The position of
the gripper is re-adjustable. You
have to set a proper position for
the gripper to support the size of
the book you intend to scan.
To change the gripper position,
first release the gripper lock by
pulling the bolt up. Then reposition the gripper set to the left or
right side as desired.
Adjust the position of the gripper
so that the transparent gripper is
on top of the page. Adjust it so
that 2/3 of the transparent gripper is on top of the right page.
The gripper should be firmly on
top of the book.
16
BookDrive
Chapter 4
Getting Started
5
Once you have done this, the book should lie open on the
center of the surface as illustrated here.
The center of the book should be at the center line of the
surface.
6
Reposition the scanner platform so that it is over the left
rim of the book.
This is to tell the scanner how big the size of the book is.
BookDrive
17
Getting Started
7
Press the green button.
8
Once you pressed the green button, the scanner platform will move
from the left edge of the book to the right side.
9
Adjust the length of the page-turning arm so that the roller is near
but does not touch any part of the scanner platform.
18
BookDrive
Chapter 4
Chapter 4
Getting Started
10
Once you have set an appropriate length for the page-turning arm,
pivot it back to its original upright position.
11
Now the book setup is done, BookDrive is ready for your further
instruction from a PC. Close the lid for safety and the quality of
scanning. The lid shields the external ambient light from
interfering the scanning.
Book
Drive
BookDrive
19
Getting Started
12
Now come to the PC. The PC should already be connected with the
BookDrive via USB connection. If not, please make it so.
13
The BookDrive controller software will appear on the PC.
20
BookDrive
Chapter 4
Button to start or
pause task
Set prefix, suffix
options.
Select destination
location here
Scan mode
(Greyscale/color)
Menu
Auto scan mode
Advanced mode
Time remaining
Overall Progress
View mode (Full page / thumb nails)
Time elapsed
Message Area
Page Progress
Chapter 5
Software
BookDrive
21
Maintenance
6.1 Maintenance & Normal Care
1
Avoid putting BookDrive in a wet or humid area.
2
Avoid putting BookDrive in a dusty area. Keep BookDrive free of dust.
22
BookDrive
Chapter 6
Maintenance
Chapter 6
6.2 Cleaning the Outer Part of BookDrive
1
Use only dry cloth free of dust to clean BookDrive.
2
Do not use wet cloth to clean the machine because it may damage
the machine or cause electric shock.
BookDrive
23
Maintenance
6.3 Cleaning the Inner Part of BookDrive
1
Use clean, dry cloth to clean the inner part of BookDrive and make it
free of dust.
2
Avoid using water to clean BookDrive because it can damage
the machine or cause electric shock. Make sure the machine is turned
off and the plug is removed from the power outlet before attempting to
clean.
24
BookDrive
Chapter 6
Chapter 7
Troubleshooting
7.1 Replacing Roller
1
3
Release the roller spool by
turning counter clockwise.
Peel off the new roller.
5
2
Remove the used-up roller
from the page-turning arm.
4
Insert the new roller
into the page-turning
arm.
Tight the roller spool
by turning clockwise.
BookDrive
25
Troubleshooting
7.2 When BookDrive appears to malfuction
Please check the problem from this manual. If you could not find it anywhere
on this manual such as the machine seems to hang, or stop functioning
properly, please contact our customer support center or your dealers. For
more information, visit www.atiz.com/support.php
Please review manual if there is a problem with BookDrive. If you are unable
to solve the problem, please contact our customer support center or your
certified BookDrive dealer.
26
BookDrive
Chapter 7
Chapter 7
Troubleshooting
7.3 After a power shortage
1
After a power shortage or a blackout, please switch off the machine.
Switch OFF
2
Open the lid to check if the page-turning arm is in the middle of turning
the page. If the page is stuck with the roller, remove it and set the
positions of all the components to their normal, original
position.
BookDrive
27
Troubleshooting
7.4 When the machine is on
But the message on the LCD appears blank and does not respond when you
press any button, please get rid of the and ensure that the that power cord is
securely plugged into its socket.
1
28
Check the fuse box at the back of the machine. If it appears to be
broken, please contact your dealer or our support center.
BookDrive
Chapter 7
Chapter 7
Troubleshooting
7.5 Problems with the Connection
Only use BookDrive with a PC that supports USB 2.0 Hi-speed.
Note: BookDrive is not compatible with USB 1.0 or USB 1.1.
It is important that the PC you use meets the minimum requirements set
forth by the instruction.
BookDrive
29