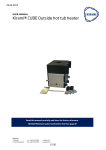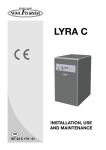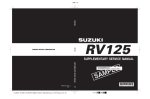
1
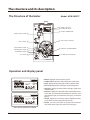
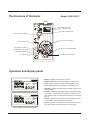
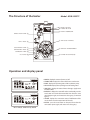
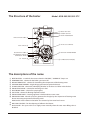
KDB-203/253/353 STC Read the instructions fully before installing or using the appliance. CONSUMER, retain this manual for future reference purposes. illustrations, functional steps and technical data without prior notice. All product images are provided by the manufacturer and are for reference purposes only. Contents The structure and its description 4 How to install 12 Before operating the boiler 14 How to use 16 Safety device 19 Routine checks and maintenance 20 How to replace the parts 23 Electric wiring diagram 24 Trouble shooting 26 Specifications 27 The structure and its description The Structure of the boiler Model : KDB-203STC Η3&4&5#6550/ Θ108&3#6550/ Ι300.5)&3.045"5 $*3$6-"5*0/16.1Ο Ρ"*3'-08$0/530- "6507"-7& &-&$530/*$16.1Ν &9)"645*/(7"-7&Μ &91"/4*0/5"/,Π Κ*(/*5*0/53"/4'03.&3 0*-'*-5&3Ξ Λ'-".&%&5&$503DET Operation and display panel KDC-104CE Ŗ POWER : displays the status of power on /off Ŗ COMBUSTION : displays the status of the burner combustion. Ŗ PUMP : displays the operating status of the circulation pump. Ŗ HOT WATER : displays the operating status of heating water. Ŗ LOW LEVEL : displays the status of water shortage, supply water and drain off air. Ŗ OVERHEAT : displays the status of the tube overheated, press the KDC-104P(E) * KDC-104P(E): DHW Priority Model 4 reset button and set the thermostat low. Even then, the same status happens again, and contact our sales agency, commercial agency . Ŗ SENSOR : displays the connection status of malfunction of the sensor which senses the temperature of the tube. Ŗ MISFIRE : press the reset button on the panel. Even then the same status repeats again, and contact our sales agency. The Structure of the boiler Model : KDB-253STC Η3&4&5#6550/ Θ108&3#6550/ Ι300.5)&3.045"5 $*3$6-"5*0/16.1Ο Ρ"*3'-08$0/530"6507"-7& &-&$530/*$16.1Ν &9)"645*/(7"-7&Μ &91"/4*0/5"/,Π Κ*(/*5*0/53"/4'03.&3 0*-'*-5&3Ξ Λ'-".&%&5&$503DET Operation and display panel KDC-104CE Ŗ POWER : displays the status of power on /off Ŗ COMBUSTION : displays the status of the burner combustion. Ŗ PUMP : displays the operating status of the circulation pump. Ŗ HOT WATER : displays the operating status of heating water. Ŗ LOW LEVEL : displays the status of water shortage, supply water and drain off air. Ŗ OVERHEAT : displays the status of the tube overheated, press the KDC-104P(E) reset button and set the thermostat low. Even then, the same status happens again, and contact our sales agency, commercial agency . Ŗ SENSOR : displays the connection status of malfunction of the sensor which senses the temperature of the tube. Ŗ MISFIRE : press the reset button on the panel. Even then the same status repeats again, and contact our sales agency. * KDC-104P(E): DHW Priority Model 5 The Structure of the boiler Model : KDB-353STC Η3&4&5#6550/ Θ108&3#6550/ Ι300.5)&3.045"5 $*3$6-"5*0/16.1Ο Ρ"*3'-08$0/530- "6507"-7& &-&$530/*$16.1Ν &9)"645*/(7"-7&Μ &91"/4*0/5"/,Π Κ*(/*5*0/53"/4'03.&3 0*-'*-5&3Ξ Λ'-".&%&5&$503DET Operation and display panel KDC-104CE Ŗ POWER : displays the status of power on /off Ŗ COMBUSTION : displays the status of the burner combustion. Ŗ PUMP : displays the operating status of the circulation pump. Ŗ HOT WATER : displays the operating status of heating water. Ŗ LOW LEVEL : displays the status of water shortage, supply water and drain off air. Ŗ OVERHEAT : displays the status of the tube overheated, press the KDC-104P(E) * KDC-104P(E): DHW Priority Model 6 reset button and set the thermostat low. Even then, the same status happens again, and contact our sales agency, commercial agency . Ŗ SENSOR : displays the connection status of malfunction of the sensor which senses the temperature of the tube. Ŗ MISFIRE : press the reset button on the panel. Even then the same status repeats again, and contact our sales agency. The Structure of the boiler Model : KDB-203/253/353 STC Η3&4&5#6550/ Θ108&3#6550/ Ι300.5)&3.045"5 $*3$6-"5*0/16.1Ο "6507"-7& &-&$530/*$16.1Ν &9)"645*/(7"-7&Μ &91"/4*0/5"/,Π 0*-'*-5&3Ξ Ρ"*3'-08$0/530- Κ*(/*5*0/53"/4'03.&3 Λ'-".&%&5&$503DET The descriptions of the name Η Θ Ι Κ Λ Μ Ν Ξ Ο Π RESET BUTTON : a switch for the restart when the “MISFIRE ”, “OVERHEAT” lamp is on POWER BUTTON : a device for the boiler’s power on/off ROOM THERMOSTAT : a device for controlling the temperature of the heating water. IGNITION TRANSFORMER : a high voltage generator(to ignite the burner) FLAME DETECTOR : a device for identifying whether or not there is a flame in the fire box. EXHAUSTING VALVE : a device for removing air in fuel. ELECTRONIC PUMP : a device for spraying fuel. OIL FILTER : a device for filtering impurities in fuel. CIRCULATION PUMP : a heating apparatus which circulates warm water. EXPANSION TANK : Absorbs pressure generated in the pipe by the expansion of heating water due to increasing temperature of heating water. Maintain the water volume in the boiler at a constant by low water level sensor. Ρ AIR FLOW CONTROL : for the adjusting of airflow in the blower. AUTO VALVE : This spare valve is to supply water manually when the auto water filling valve is disabled. 7 User’s Manual for Room Thermostat(DR-2ND, DR-2NDP) Before Usage Thank you very much for purchase this room thermostat(tele-room controller) You had better fully read this user's manual. It can give you more convenient and warm life. Contents Check point for safety Check point for fixing. Check point for usage. Fixing & Wiring. Description & Function. Check point for safety 1. Check the electric voltage before you operate the boiler. 2. Tele-room controller can be adapted to voltage DC 24~31V from the main controller of boiler. Do not adapt to another electric outlet AC 220V or other. 3. Make sure to connect the electric port properly. One is for room controller, the other is for telephone. Check point for fixing 1. Fix the room controller on the wall of main room or living room. The height is about 1.5m. 2. Fix on the properly spot to sense the room temperature. 3. Avoid to fix near the heater or under the sun light, this can cause the torsion of the case and do a harm to the electric parts inside the case. 4. Avoid to fix in the place there is dirty, fumy, humid, this can do a harm to the electric parts inside the case. Check point for usage 1. You had better take care to prevent the metallic parts (Needle, Coin) or in flammables (Paper, Match stick) from entering into the air vent hole of the case. This can make a short-circuit or fire. 2. Do not open the case, and treat yourself. 3. Be careful the power line not to exposed in the room. 4. Keep out form the volatiles. (Thinner, Benzine, Solvent, ...) 5. Before you clean the room controller, plug the power cord out and use a smooth cloth. 8 Fixing & Wiring On the wall To the socket on wall 1. Connect firmly the room controller wire (2 Line) from the boiler, to the room controller port in the back of the room controller. 2. Connect firmly the telephone wire to the telephone port in the back side of the room controller. 3. Fix the room controller firmly on the wall, using the room controller bracket or socket. 4. Wiring controller telephone 9 Room Controller Model : KDB-203/253/353 STC Ι$POUJOVPVT-BNQ Κ0VUHPJOHMBNQ Λ)PUXBUFSMBNQ 5FNQFSBUVSFJOEJDBUJPOΥ 5FNQFSBUVSFCVUUPOΤ Μ)PUXBUFSCVUUPO Ν0VUHPJOHNPEFCVUUPO Ξ$POUJOVPTCVUUPO 5FNQFSBUVSFMBNQΣ Ο5JNFSMBNQ 3VOMBNQΗ $IFDLMBNQΘ Π5JNFSCVUUPO Ρ5JNFDPOUSPMMFS 5FNQFSBUVSFDPOUSPMMFS 1. Continuous : Press this button to heat the room quickly. ōPress the continuous button(Ξ), lamp(Ι) will on. 2. Outgoing : Boiler will stop and the frozen-up preventer will operate. ōPress the outgoing button(Ν), outgoing lamp(Κ) will on. 3. Hot water : You can use hot water without heating room. ōPress the hot water button(Μ), hot water lamp(Λ) and run lamp(Η) will on. (Run lamp will not on at the wall-hung type gas boiler) 4. Temperature control : You can set the room temperature with temperature controller(). (10°C~40°C) ōPress the temperature button(Τ), lamp(Σ) will on. When the setting temperature you chose is higher than the present room temperature, the boiler will run. 5. Time control : You can run the boiler according to the interval you set with the timer. ĶIf you set the time interval. Ĵ “0” : The boiler will run continuously. “1” : The boiler will run 15min., then stop for 60min.(60min. interval) “2” : The boiler will run 15min., then stop for 120min.(120min. interval) “3” : The boiler will run 15min., then stop for 180min.(180min. interval) “4” : The boiler will run 15min., then stop for 240min.(240min. interval) ōPress the timer button(Π), the lamp(Ο) will on. The boiler will run for 15min, with the interval you chose(60min. ~ 240min.), again and again. 6. Run lamp : Lamp is on then the boiler will run. 7. Check lamp : Indicate the trouble of boiler.(Misfire, Low water level, Overheat, ... ) 10 8. Usage of telephone If you run the boiler with telephone, the boiler will run for 30min. then remain in outgoing function and out of run lamp automatically. You can control the working & stopping of boiler and timing of bell when you use interphone(inside) and telephone(telephone and cellular phone). - If you use telephone (telephone and cellular phone), the bell ringing (controlled timing of bell) then sound beep. After sound beep you can control as following below ; - If you use interphone (inside), you just pick phone up then you can control as following below ; 1) Turn on [# button 3times] Call to your home, press the Ö# button× 3times after beep sound. After beep, beep(2 Times) sound, hang up the phone. 2) Turn off [* button 3times] Call to your home, press the Ö* button× 3times after beep sound. After beep, beep, beep(3 times) sound, hang up the phone. 3) To change the timing of ring [0 button 3times] Call to your home, press the Ö0 button× 3times after beep sound. After beep, beep, beep, beep (4 times) sound, press the timing of ring (5, 6, 7, 8, 9) you want 5 times, after beep, beep, beep, beep, beep(5times) sound, hang up the phone. 4) Check point 4-1) If you don't press any button for 15sec. after pressing # or *, the telephone is hung up automatically. 4-2) Make sure that hang up the phone after the beep sound.(Turn on : 2times , Turn off : 3times) 4-3) Use Portable-phone at the clean zone. 4-4) When the beep sound does not sound, try again slowly. 11 How to install Choosing of the installation place Ŗ For the place to install the boiler, choose the place possible to do the accompanying works, such as water supply works or electric works. Ŗ For the place to install, choose the place conformed to the installation standards of the boiler and the construction act or the code of each city or municipality. Ŗ Install the boiler in the place as wide as possible for the maintenance and the fire prevention. Ŗ Install the boiler in the place convenient for controlling and manipulation of the temperature. Ŗ If there is no electric outlet in the proper position, do wiring by requesting to a company designated by the electric power company. Ŗ Around the installation place, there must be no place which stores and treats the combustibles and the inflammables. Ŗ There should be equiped drainage in the installing spot. The diagram of the standard piping : Expansion tank install type Model : KDB-203/253/353 STC Water Suppy Fiter Cold Water Air Vent Pressuer Gauge Hot Water Distirbutor Circulation Pump Auto Valve Heat Radiator Expansion Tank Pressure Relief Valve Return Water Distributor N0te: Install such that the distance between the water level of the eapansion tank and the floor of the boiler may be within 35m. 12 The example of a standard installation Front View Ground View 30cm or more nonflammable Ň B Ň A insulation F E Exhaust inhale pipe Exhaust / inhale pipe C B O I L E R side Inflammable material 60cm or more Inflammable material Wall D Over 20cm F Ground When extending the aluminum flue duct Ŗ When the length of the flue duct is less than 2m, use the flue duct of φ75mm in diameter. Ŗ When the length of the flue duct is between 2m and 5m, use the flue duct of φ100mm in diameter. Ŗ When the length of the flue duct is longer than 5m, use the flue duct of φ125mm in diameter. Checking points after installation Ŗ Check out that the floor is robust and flat inflammables such as concrete and the circumference is also made of inflammables. Ŗ Check out whether rainwater infiltrates into the perforation of the exhaust/inhale pipes. Ŗ Check out whether the boiler is connected to the ground. Ŗ Check out that the boiler and the pipes is in the good heat insulation in order to prevent freezing. 13 Before operating the boiler Fuel It is essential to use only kerosen or light oil. (Don’t use gasoline, alchohol) Store in the place where there is no effect of oil, fire, rain, and keep out of the sun. It is better to use kerosene when the temperature goes down below –5˚C In winter, don’t use the light-oil for summer. Feed oil after turning the power off and locking the tank valve. Pay attention that water or dust may not get in on time of feeding oil.(Water or dust may cause the combustion failure or shorten the boiler span.) Wipe off the oil spilled. Close the lid of the oil inlet without fail. 14 Checking points before starting up Check out if or not oil leaks in the connecting part of the oil pipe. Checking points before starting up Put the surroundings of the boiler in order and don’t put the flammables near the boiler. Check out whether the ignition and the combustion is normal. (Checking through the flame inspection window) When the boiler is going to be not in use for a long time, cut off the power. (Don’t pull out the power cord when there is a danger of freezing) If you pull out the power cord on time of thunder and lightening, you can prevent the damage on the boiler by the falling of the thunderbolts. Be careful not to get burned due to the high temperature of the exhaust/inhale pipe(exhaust pipe). In case of emergency such as you may feel the abnormality of the boiler. cut off the power. Don’t use the hot water for food. 15 How to use How to exhaust Be careful that the oil tank may not run out of oil completely. In that case, even though oil is supplied, air may get in. As a result, ignition failure or operation failure may occurs. Untighten the screw for exhaust in the oil filter by a screwdriver, the air goes out. When oil flows out, please tighten it (This is possible only in case that the oil tank is above the oil filter) If the oil tank is below the oil filter or the air flows out enough like the above, lock the screw for exhaust and remove the air with the exhaust valve. In such case, open the exhaust valve turn the power on to operate the boiler. After about 6-7seconds, the electronic pump exhaust the air off with noise, and “MISFIRE” lamp on, the boiler stops. 16 Now press the reset button on the panel repeatedly, and the oil flows out. Lock the valve and press the reset button again, and the boiler gets ignited. In case that after removing air completely, the ignition has failed repeatedly about five times, contact the sales agency or the commercial agency. Preparation and checking before starting operate Check out that the boiler is grounded to earth. (Don’t ground to the gas pipe or a lightening conductor) Plug the power cord in the outlet.(Checking if the outlet power is 220V) Press the power button, and check out if “COMBUSTION” lamp turns on a little later. 17 How to use Now press the reset button on the panel repeatedly, and the oil flows out. Lock the valve and press the reset button again, and the boiler gets ignited. In case that after removing air completely, the ignition has failed repeatedly about five times, contact the sales agency or the commercial agency. Pressing the power button starts fan motor. And the boiler gets started, or turning the “COMBUSTION” lamp on. If ignition fails and the operation stops, “MISFIRE” lamp turns on. In this case, press the reset button on the panel. In case that the ignition fails with pressing the reset button four or five times, contact the sales agency or the commercial agency. 18 Safety device Combustion safety device When it doesn't ignite even with the power button “ON” or it gets extinguished due to running out of oil, the FLAME Detector(Cds) gets to work and stops the operation. Low water level blocking device If water is insufficient in the boiler, it interrupts the operation of the boiler with the power cut off. When water refills, the boiler starts operating again automatically. Overheating preventer If the temperature of the boiler rises up too high, it is dangerous. So, in such case, this device cut off the power automatically. When the overheating preventer gets to operated the combustion stops and “OVERHEATING, MISFIRE” lamp turns on. If the overheated temperature is fall “OVERHEATING” lamp turns off and “MISFIRE” lamp keep turning on. If the overheating stops operating, restarts it by pressing the “RESET” button, If the operation stop is repeated again, contact the sales agency or the commercial agency. Freezing preventer During the hard winter, the circulation pump or the burner operates automatically to prevent the heating circuit from freezing. In winter, keep on plugging in the power cord and turning the power button “ON”.(the insulation state of the pipes must be normal) Safety device on power-failure If the power gets off, oil gets blocked automatically and the combustion stops. 19 Routine checks and maintenance. Points to be checked once or more year Check out whether the flammables are near. Keep cleaning all the time and don’t let the dust accumulated. Check out whether oil leaks from, is stacked on, or soaks into the oil tank, oil pipes, the body of the boiler, etc. Check out whether there is any water leakage from the body of the boiler and the pipes. Open the drain plug of the oil tank regularly and remove water. 20 Cleaning the boiler Much soot accumulated inside the boiler will reduce the life and efficiency. At least once a year, clean the boiler inside. Cleaning the oil filter In case that the oil filter gets dirty, stop operating, lock the oil valve, and remove dust or rust accumulated below the oil cup. Detach the oil cup by rotating right and left. Pull down the filter. Wash the filter and the inside of the oil cup with clean heating oil (light oil) Cleaning the oil tank Water may get mired in during feeding oil or get accusmulated naturally during the long period in the oil tank. In this case, drain water off through the drain plug in the oil tank, and when oil starts to get out, lock it. 21 Cleaning the flame detector If the light-receiving surface(sensing surface) gets darkened with soot, the bad sensitivity cause the wrong automatic operation. You can pull out the flame detector(black) which is attached in the lower part of the burner. Wipe the glassy surface of the flame detector with a scrap and fix it in its opposition. Checking the exhaust pipe At least once a year, check for any loose joints in the discharge(piping and flue), clogging in flue, corrosion or leak. If any abnormality is found, contact out sales agency for checking up.(blocking pipes or holes, and so on) 22 How to replace the parts There is no parts which gets wear in a short period, but when the replacement of the parts is needed, consult to out sales agency or commercial agency. There is no parts which gets wear in a short period, but when the replacement of the parts is needed, consult to out sales agency or commercial agency. Repairing the boiler by a man without qualification cause another trouble, so never do that. 23 Electric wiring diagram KDC-104 CE MODEL: DR- 2ND Model : KDB-203/253/353 STC 24 Electric wiring diagram KDC-104 P MODEL: DR-2NDP Model: KDB-203/253/353 STC (DHW Priority Model) 25 Trouble Shooting Happening Cause Solution methods &WFOXJUIQSFTTJOHUIFQPXFS CVUUPOUIFNPUPSEPFTOÍU XPSL 5IFUFNQFSBUVSFJOUIFCPJMFS JTBCPWFUIFTFUUFNQFSBUVSF 5IFSPPNDPOUSPMMFSJTPGG 0UIFST 5IJTJTOPUBUSPVCMF8IFO UIFUFNQFSBUVSFPGUIFCPJMFS HPFTEPXOHFUSFTUBSUFE 4FUUIFSPPNDPOUSPMMFSUPUIF PQFSBUJPODPOEJUJPO $POUBDUUPUIFTBMFTBHFODZ PSDPNNFSDJBMBHFODZ 5IFNPUPSSPUBUFTCVUUIF CPJMFSEPFTOÍUJHOJUF 5IFPJMWBMWFJTMPDLFE 5IFSFJTOPPJMJOUIFUBOL 5IFSFJTBJSJOQJQFT 5IFPJMGJMUFSJTMPDLFE 0UIFST 0QFOUIFWBMWF 4VQQMZPJM %SBJOPGGBJS $MFBOUIFCPJMFS $POUBDUUPUIFTBMFTBHFODZ PSDPNNFSDJBMBHFODZ 5IFCPJMFSJHOJUFTCVU JNNFEJBUFMZTUPQT 5IFPJMJOUIFPJMUBOLJT JOTVGGJDJFOU 5IFGMBNFEFUFDUPS$ET DBOOPUTFOTF 5IFPJMGJMUFSJTMPDLFE 5IFSFJTNJYFEJNQVSF NBUFSJBMTJOUIFPJM 0UIFST 4VQQMZPJMNPSF $MFBOUIFGMBNFEFUFDUPS $MFBOUIFPJMGJMUFS 3FQMBDFUIFPJMXJUIHPPEPJM $POUBDUUPUIFTBMFTBHFODZ PSDPNNFSDJBMBHFODZ 5IFFMFDUSPOJDQVNQNBSLFT CJHOPJTF 5IFPJMGJMUFSJTMPDLFE 5IFSFJTBJSJOQJQFT 0UIFST $MFBOUIFPJMGJMUFS %SBJOPGGBJS $POUBDUUPUIFTBMFTBHFODZ PSDPNNFSDJBMBHFODZ 0OJHOJUJOHJUCBDLGJSFT 5IFXJOEGMPXCBDLJOUIF FYIBVTUQJQF 5IFJHOJUJPOEFWJDFJTCBE 0UIFST $POUBDUUPUIFTBMFTBHFODZ PSDPNNFSDJBMBHFODZ æ æ 5IFBCOPSNBMOPJTFPGUIF DPNCVTUJPOIBQQFOT 5IFBJSGPSDPNCVTUJPOJT FYDFTTJWF 5IFBNPVOUPGPJMGFFEJT FYDFTTJWF 0UIFST $POUBDUUPUIFTBMFTBHFODZ PSDPNNFSDJBMBHFODZ æ æ 4NPLFBOETPPUPDDVST 5IFPJMJTCBEPSIBTJNQVSF 3FQMBDFUIFPJM $POUBDUUPUIFTBMFTBHFODZ NBUFSJBMT 5IFBJSGPSDPNCVTUJPOJTTIPSU PSDPNNFSDJBMBHFODZ æ 0UIFST 0UIFST 5IFGVFMQJQFTMFBLT 5IFXBUFSQJQFTMFBLT Ȅ 26 $POUBDUUPUIFTBMFTBHFODZ PSDPNNFSDJBMBHFODZ æ Please contact your local shop and distributor for other unclean matters. Specifications HEATING OIL (LIGHT OIL, KEROSENE OIL) CBS <419 <41: <41: <419 <41: <41: <419 <41: <41: <419 <41: <41: 220,50/60 Ȅ The specification in this operating manual can be changed for improvement without prior notice. 27 memo 28 memo 29 memo 30 memo 31 memo 32 memo 33 memo 34 20008995B BO-EM-10-01 2013.06.20