1
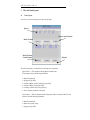
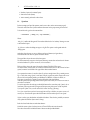
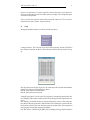
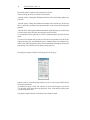
EUROPEAN SOUTHERN OBSERVATORY
Organisation Européenne pour des Recherches Astronomiques dans l’Hémisphère Austral
Europäische Organisation für astronomische Forschung in der südlichen Hemisphäre
VERY LARGE TELESCOPE
ASTO Control
User Guide
Doc.No.VLT-MAN-ESO-19300-2363
Issue 1.0
Date 16/8/01
Fabio Sogni
Prepared.....................................................................................................
Name
Michele Peron
Approved...................................................................................................
Name
Peter Quinn
Released .....................................................................................................
Name
VLT PROGRAMME * TELEPHONE: +49 89 32006-0 * FAX: +49 89 320 2362
2
ASTO Control User’s Guide - 1.0
Change Record
Issue/Revision
Date
Section/Page affected
Reason/Remarks
1.0
October 30, 2000
All
First release
ASTO Control User’s Guide - 1.0
3
Table of Contents
1 Introduction
1.1
1.2
1.3
Purpose and Scope
Reference Documents
Abbreviations And Acronyms
2 The astoControl panel
2.1
2.2
2.3
Panel Layout
Operations
Setup
3 dataSubscriberAsto USER’S GUIDE
3.1
3.2
Panel Layout
Operations
4 astoControl in automatic mode: Romanic
4.1
4.2
Forewords
Operations
5
5
5
5
7
7
8
9
11
11
12
15
15
15
4
ASTO Control User’s Guide - 1.0
ASTO Control User’s Guide - 1.0
1
1.1
5
Introduction
Purpose and Scope
The purpose of the astoControl tool is to simplify the management and production of media.
The tool is based on the ASTO software developed by CADC with release 1.0.
The astoControl tool combines all ASTO operations like connecting to the database, retrieval of
files, usage of the CD-ROM writing software, etc. The tool also shows the status of the processes
running, giving the operator complete control of the media production flow. From astoControl it is
also possible to automatically subscribe to an OLAS server in order to retrieve the data to be archived.
This version of astoControl does not yet include command of the DPPacker tool which creates media packages for visiting and service programmes. This functionality will be added in the next version.
This User’s Guide describes also the dataSubscriberAsto tool.
dataSubscriberAsto is a tool used to manage a dhs subscriber. It’s interface allows the operator to
keep an eye on the transfer of files from a remote machine to the ASTO computer.
1.2
Reference Documents
The following documents are referenced in this document
[1] Archive Storage Subsystem (ASTO) architectural design.
[2] ASTO User Manual
[3] ASTO Command Interface Specifications
[4] VLT-MAN-ESO-19300-2364 “Romanic and printMedia User Guide”
1.3
Abbreviations And Acronyms
The following abbreviations and acronyms are used in this document:
ARCSYS
Archive System
ASM
Astronomical Site Monitor
ASTO
Archive Storage Subsystem
CCS
(VCS) Central Control System
DICB
Data Interface Control Board
DFS
Data Flow System
DHS
Data Handling Server
DMD
Data Management Division
FHT
File Handling Tool
FITS
Flexible Image Transport System
FWHM
Full width at Half Maximum
6
ASTO Control User’s Guide - 1.0
GUI
Graphical User Interface (Toolkit)
HOS
High Level Operating Software
ICD
Interface Control Document
ICS
Instrument Control Software
IDD
Instrument Description Database
IMP
Interprocess Message Passing
INS
Instrumentation Software
LAN
Local Area Network
LCU
Local Control Unit
N/A
Not Applicable
OLAC
On-Line Archive Client
OLAF
On-Line Archive Facility
OLAS
On-Line Archive Subsystem
OS
Observation Software
OSS
Observation Support Software
PAF
VLT Parameter File
SW
Software
TBC
To be Confirmed
TBD
To be Defined
TCS
Telescope Control Software
VCS
VLT Control Software
VOLAC
VCS OLAC Client
WS
Workstation
ASTO Control User’s Guide - 1.0
2
7
The astoControl panel
2.1
Panel Layout
An overview of the astoControl panel is shown in the figure:
Queues
Queues control buttons
Media Volumes
Media Volumes
Control Buttons
Help bar
The astoControl panel is constituted by the following main components:
Upper Listbox -----This area shows the data queues currently active
for each queue we have the following information:
• Media ID number (Id)
• Segregation Type (SEG)
• Number of MBytes currently under the queue (Disk)
• Number of MBytes to be ingested (TBI)
• Percentage of media ready to be queued (%)
• Action currently performed on the queue
Lower Listbox-----This area shows the media waiting to be written or already written. For each
volume we have the following information:
• Media ID number (Id)
• Media Name (media_name)
• Segregation Type (SEG)
8
ASTO Control User’s Guide - 1.0
• Number of copies to be written(Copies)
• Status of the media (Status)
• Action currently performed on the volume
2.2
Operations
Before executing astoControl the operator must be sure to have set the environment properly.
Please refer to the Data Flow System installation document for the proper setting of astoControl.
To launch the tool, type from the command line:
% astoControl [ -debug [1-2] -log <filename> ]
Where:
-debug [1-3] : enables the debug mode. The numbers define the level of verbosity. Messages are sent
to the standard output.
-log <filename>: redirect the debug messages to a log file. This option is used together with the
-debug option.
At the first glance the user can see two listboxes and several buttons (see figure above).
The listboxes show the status of queues and media volumes.
The upper listbox shows the status of the data queues.
The tool automatically recognizes which queue (directory) contains data and searches for information in the database. If a queue is not in use, it is not visualized.
The lower listbox shows the status of the media volumes (CD-ROMs, DVDs, tapes).
The media names (volume name) are visualized and their status tells us if the volume has been
queued, written or verified. Below the upper listbox there are three buttons:
Queue permits the creation of a media volume. If you have enough data to fill up a media (percentage >= 100%) then, using “Queue”, astoControl will split a queue into media volumes each one of
the size of the corresponding media type: 650Mbytes for CDROMs, 4.7Gbytes for DVDs, etc.
Each queue is associated to a media type in the media table of the asto database.
After this operation the percentage of the selected queue will be 0 and you will see one or more entries in the lower listbox.
To use this option first select the queue with the left button of the mouse then push “Queue”, the selected entry will turn green and will be green till the processing of the queue will be completed.
If you push “Update” now you will see the field “Action” showing “Queueing”.
Force Queue is used when you don’t have enough data to fill up a disk but you want to create a volume anyway. First select the queue with the left button of the mouse then push “Force Queue”.
Update is used to query the database and refresh the listboxes. There also the possibility to automatically updates the listboxes (See section 2.3 Setup).
Below the lower listbox there are other three buttons:
MediaMake creates a physical volume (in case of CDs and DVDs) and writes the media.
Select the volume name with the left button of the mouse then push MediaMake.
ASTO Control User’s Guide - 1.0
9
Unqueue is an “undo button”, it is used to “put back” a volume in the queue. If you do this the volume name will disappear from the lower listbox and the percentage of the correspondent queue
will increase in the top listbox.
Cleanup is used to remove the files wich have been successfully written on CD. To use it: select a
media name with a status “Written” and push “Cleanup”.
2.3
Setup
Selecting the menubutton Options you will have the following choices:
“astoIngest Volumes”. This is the final step of the CD/DVD production. After the CD/DVD has
been written and inserted in the juke-box, choose this option and the following window will popup:
Select the volume name and push “Ingest Vol”: the volume name will be verified and the database
updated. The volume name will disappear from the list.
Push the “Status” button to refresh the listbox.
Push the “Quit” button to close the panel.
“Manually Ingest Queue”. Each file received by astoControl is automatically ingested in the database (fileIngest). Under normal conditions the field TBI (To Be Ingested) in the upper listbox is always 0.
If the database is not available the files are stored on disk but there won’t be an entry in the database: the field TBI will be greater than 0. When the DB will be available again, to insert in the database these files, select the queue and choose this option: the complete queue will be ingested and
the missing files will be properly inserted in the database.
If the TBI is still not = 0 check the log file ($DHS_LOG/mediaIngest.<Id>.log), maybe the file(s) has
10
ASTO Control User’s Guide - 1.0
been already copied to a media: It must be removed from the disk.
In this case the log file will tell you wich file must be removed.
“Automatic Update”. Selecting this checkbutton the listboxes will be automatically updated every
30 seconds.
“Automatic Queue”. Selecting this checkbutton the database will be checked every 30 seconds. If
there is a queue with a percentage of data greater than 100% a media volume will be automatically
generated.
“Automatic Write”. Selecting this checkbutton the database will be polled every 30 seconds. If there
is a media volume ready to be written, the writing process will be invoked.
It is recomended to use this option only if you have a medium transporter (Eg. Kodak CD transporter).
If you have a CD transporter and you trust your CD writer (it is not possible to verify the CD thoroughly after writing), you can enable both the options “Automatic Queue” and “Automatic Write”.
In this case the entire CD production will be executed automatically (including the cleanup of the
disk) reaching a rate of 20 CDs in 10 hours (using a writing speed of 6 ).
Choosing the menu option “Subscribe” the following window will pop up:
From this window it is possible to define which type of file we want to retrieve (FITS,LOG,PAF,
OTH) and from which host.
It is mandatory to specify a “From” date, while the “To” date can be left empty. If you leave the
“To” date empty, all the data from the date specified in “From” will be retrieved and the process
will wait for new data to arrive.
Choosing OK, dataSubscriberAsto will be called, see next chapter for details.
ASTO Control User’s Guide - 1.0
3
11
dataSubscriberAsto USER’S GUIDE
3.1
Panel Layout
When executed from astoControl, dataSubscriberAsto will come up with the following window:
Where:
Is an active icon, it is grey when dhsSubscribe is not running, becomes green when is running correctly and red when there is an error.
Is the number of files stored under $DHS_LOG, these are files transferred from the remote host and
waiting to be processed.
Is the number of files processed by the post-arrival command of dataSubscriberAsto.
12
ASTO Control User’s Guide - 1.0
is the percentage of files already retrieved. Here we have, also, the indication of the type of files we
a retrieving and the host from which we are retrieving them (in this case we’re retrieving FITS files
from the host olasg).
The blue bar is an indication of the progress.
If you didn’t specify a “To” date from astoControl the status bar won’t be active (greyed out).
Below the bar we have the indication of the period we are considering (from the first to the 10th of
october 1997).
These are the buttons used to control dataSubscriber asto.
3.2
Operations
When the panel comes up it automatically checks whether a dhs subscriber is running. In case it is
already running the icon will turn green and the numbers of files queued, processed, and the iconbar will be updated.
NOTE: it is not possible to run more than one process for the same type of file from the same host. If
dhsSubscriber is not running the Config button will be active while the Start and Stop button will
be disabled.
ASTO Control User’s Guide - 1.0
13
Clicking on the Config button a window will come up:
Here we decide which period we want to retrieve. An automatic check is performed on the dates.
After selecting the period the “Start ADS” button will highlight. Clicking it we will start a dhs-subscribe process.
The start-up procedure selects the latest log file, and discard the old errors.
If a new error is logged the icon turns red, this is just to warn the operator that an error occurred.
Check the log using the “Show Log” button then click on the icon: it will turn green again.
Before starting a new dhsSubscriber process, dataSubscriberAsto verifies that the repository of data
(DHS_DATA) is empty, if not it executes post command on each file found under the repository.
The “Stop” button when pushed, stops all the dhs subscriber processes, by executing the appropriate script.
Like in the start-up procedure, the stop procedure verifies that DHS_DATA is empty, if not a window pops up asking if we want to process the data now.
It is warmly recommended to process the data.
During normal operations the existence of dhsSubscribe processes is constantly checked.
If dhsSubscribe dies, but its watchdog is alive, the icon turns red and the GUI waits for the watchdog to revive the process. If, after 300 seconds the process is not alive the icon turns grey and everything is stopped. If the “death” of both the processes (dhsSubscribe and watchdog) is detected the
GUI stops everything without waiting.
REMEMBER: quitting dataSubscriberAsto doesn’t kill dhsSubscriber, the correct way to shutdown
the subscriber is by using the Stop button.
By clicking on “Show Log” a window will come up showing the current log. The log showed is the
one with the current date and “lying” under $DHS_LOG (remember that the log name changes every day.
14
ASTO Control User’s Guide - 1.0
ASTO Control User’s Guide - 1.0
4
15
astoControl in automatic mode: Romanic
4.1
Forewords
It make sense to use the automatic mode of astoControl only if you have some device able to change
media, connected to your machine.
If you connect a Rimage Protege Robot to your machine you will make use of Romanic, the server
which “pilots” the robot.
The role of client is taken by astoControl. astoControl generates romanic requests under a directory
defined by $ASTO_REQ_DIR
For more information about Romanic and the format of the request files, refer to ...
4.2
Operations
As already mentioned, to use the client part of Romanic, the environment variable ASTO_REQ_DIR
must be defined and must point to an existing, writable directory.
Under this directory astoControl creates request files, one to each medium to treat, and the request
files will be ingested by the Romanic client.
A medium can be treated in three different ways:
• writeOnly : the medium will be written but NOT printed.
• printOnly: the medium will be printed but NOT written
• writePrint: the medium will be written and printed.
Default is writePrint, if you want to change this functioning mode you have to create a file under
your home directory ($HOME) named .writeControlConf and containing one of the 3 keywords
listed above.
Before starting you must define properly your $ASTO_CONFIG_DIR/libAm.config file and the database. The configuration file should contain a line like:
scripts RIMAGE
cdPrepRunMkisofs
mkisofs.config writeControl
none
and the database must reflect this choice. Refer to the asto documentation for further information.
16
ASTO Control User’s Guide - 1.0
If either the database and the configuration file are set properly and if you put astoControl in automatic mode, a window will pop up (one for each volume associated with RIMAGE):
This is the graphical interface to Romanic.
Here you can follow the processing of a medium and it’s progress while writing.
In case of errors like writing errors or robot errors (magazines empty, door open, etc), an error window will pop up asking to fix the problem. In this case a new request file will be re-submitted.
As soon as the process associated with the window wil complete, the window will close itself automatically.
Log file associated to each media are created under $ASTO_REQ_DIR.