1
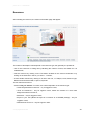
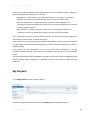
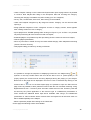
yTeach v1.0 User Manual yTeach ver 1.0 – User Manual © Young Digital Planet SA 2009 Young Digital Planet SA, ul. Słowackiego 175, 80-298 Gdańsk tel. 058 768 22 20, fax 058 768 22 11 email: [email protected] www.ydp.eu © Young Digital Planet 2009 2 yTeach ver 1.0 – User Manual Table of contents Introduction __________________________________________________ 5 Technical requirements _________________________________________ 6 Roles and Rights ______________________________________________ 6 Non-logged-in user _________________________________________________ 7 Teacher ___________________________________________________________ 8 Schooladmin ______________________________________________________ 9 Portal administrator ________________________________________________ 10 Categories _____________________________________________________________ 11 Users _________________________________________________________________ 12 Schools _______________________________________________________________ 13 Publishers _____________________________________________________________ 14 Partners _______________________________________________________________ 14 Invoices _______________________________________________________________ 15 Shop__________________________________________________________________ 15 Packages ______________________________________________________________ 16 Licences _______________________________________________________________ 16 News _________________________________________________________________ 17 Newsletter _____________________________________________________________ 17 Configuration ___________________________________________________________ 17 Update texts ____________________________________________________________ 18 Remove import _________________________________________________________ 18 Settings _______________________________________________________________ 18 Admin access __________________________________________________________ 19 Language ______________________________________________________________ 19 My yTeach ___________________________________________________ 20 Browse resources _________________________________________________ 21 Search results __________________________________________________________ 23 Resources _____________________________________________________________ 24 My Playlists ______________________________________________________ 25 Teacher's panel _________________________________________________________ 28 My class assignments ______________________________________________ 30 My Bookmarks ____________________________________________________ 34 Buy resources _______________________________________________ 35 Shopping Cart ____________________________________________________ 37 yTeach help__________________________________________________ 38 Information Bar _______________________________________________ 38 Importing resources ___________________________________________ 39 Introduction ______________________________________________________ 39 Import configuration _______________________________________________ 40 Database configuration ___________________________________________________ 40 © Young Digital Planet 2009 3 yTeach ver 1.0 – User Manual Links to Excel files configuration ____________________________________________ 41 Importer for Windows _____________________________________________________ 41 Resources import consequences ____________________________________ 41 First import with the new list with keywords and the new map _____________________ 41 Import with the same curriculum list and new map ______________________________ 42 Final remarks _____________________________________________________ 42 Destination folder ________________________________________________________ 42 Comments in the configuration file __________________________________________ 42 Editing Excel documents __________________________________________________ 42 Requirements __________________________________________________________ 42 © Young Digital Planet 2009 4 yTeach ver 1.0 – User Manual Introduction This documentation was created on the basis of the yTeach.co.uk example installation, which is filled with another Young Digital Planet SA authoring project: Universal Curriculum content & elearning technologies for K–12 education high-quality resources, covering Science, Maths, Chemistry, Biology and Physics. The portal gives teachers access to approximately 30 000 topquality digital resources. These can be accessed as granular assets (images, audio files, activities, etc) or as aggregated packages (such as whiteboard presentations, homework activities and lessons). Each ready-to-use e-lesson consists of a selection of interactive activities, simulations, animations, videos, etc, as well as assessment tools offering meaningful feedback to you and your students. The UK portal was lunched in January 2008 and it can be reviewed at www.yteach.co.uk. After months of heavy development it reached its 1.0 version described in this document. yTeach as an on-line resources repository offers its users a number of different possibilities: • accessing resources on-line, • various search options, • creating and evaluating Playlists – sequences of resources, • creating and evaluating assignments, • monitoring results, • bookmarking favourite resources, • creating resources with an on-line lesson builder, • registering a school, • registering and managing users within a school. The application was built to facilitate adaptation, creation and localisation, and to be able to be implemented on every market. Many different possibilities of configuration allow a quick change of the required settings. New functionalities can be added and the existing functionalities can be removed. For the reasons above, buttons, tab names and the structure of a portal may vary from the one described in this document. © Young Digital Planet 2009 5 yTeach ver 1.0 – User Manual Technical requirements • Processor: 1GHz Intel Pentium III (or equivalent) - recommended Pentium IV 2GHz processor • Supported Operating Systems: Microsoft Windows 2000, Windows XP, Windows Vista, Windows 7, Mac OS X 10 or higher , Linux (all stable platforms) • Memory: 1GB RAM (2GB for Windows Vista and Windows 7) • Screen resolution: 1024x768 or higher • Colour depth: 32 bit (true colour) or higher • Audio: sound card (soundblaster equivalent) • Graphics: DirectX 9 compatible integrated video chip with 128MB Ram, 64MB DirectX 9 compatible standalone graphics card preferred • Browsers: Windows: IE7, IE8, Firefox 3 or higher, Opera 10 or higher, Safari 4 or higher; Mac: Safari 4 or higher, Firefox 3 or higher; Linux: Firefox 3 or higher • Plugins: Flash 10 or higher. • Java Runtime Environment. • Cookies: enabled • Javascript: enabled * Technical requirements might change as the new functionalities are developed in the next yTeach version. Roles and Rights Each user within yTeach has a different role and therefore different functions are accessible for different users. A non-logged-in user can only browse resources and create their own user account. One crucial thing that all users have in common is conducting the educational process in the most effective way possible. This happens as a result of cooperation of the main users, who are as follows: • The Teacher (predefined roles): – creates playlists, – creates class assignments, – unlocks resources with school credits, © Young Digital Planet 2009 6 yTeach ver 1.0 – User Manual – conducts lessons using prepared playlists and assignments, – creates content. • In addition to the teacher options, the School Administrator (predefined roles): – adds or removes school administrators and teachers, – buys resource packages and credits for the school, – allocates school credits among teachers. • The Portal Administrator: – manages resources’ structures, – defines and manages rights for portal users, registered schools and portal functionality, – modifies the resources’ metadata, – manages status of invoice, – localises portal to another language, – defines resource package and sample of resources, – creates portal announcements. Other account types are described in the Admin access section of the Portal Administrator chapter. Non-logged-in user Non-logged-in users have access to: • My yTeach section – only browsing resources, • Buy resources section – Buy credits, Unlock Packages, • yTeach help section, • Teacher’s login – in this section it is possible to log in to the yTeach portal and access the new-user registration. A new user can be registered after filling in the registration form with information such as: login, password, first name (optional), last name (optional) and email. This information should be confirmed by clicking on the Save button, • Shopping Cart and Help – links situated in the top-right and bottom-left corners of the screen. © Young Digital Planet 2009 7 yTeach ver 1.0 – User Manual Teacher Teacher can see an additional link in the top-right corner of the screen. This link gives users access to information about Available credits and to the following data: My details – in this part it is possible to modify the following data: password, first and last names, email, etc, My school – information about a school to which a user is assigned. If a user is not assigned to any school yet, then after clicking on either the Select your school button or a link, a user has to create a new school, and after filling in the registration form and clicking on the Create school button, the user will automatically become a School administrator. If the user knows the School code, which is the ID of an already-existing school – he/she should fill in the field and click on the Join School button. It is also possible to import an existing school (institution) database and give users the possibility of using an option, for example Choose your school from the list, which selects the schools (institution) list. This option can help eliminate school redundancy. Used credits – this is a list of all, in this case by credits, purchases made by the user. It is possible to put data in order by clicking on the headline as follows: Type, Name, Date, Purchase price, Licence type and its Duration. Teacher has access to: My yTeach section, Buy resources section, yTeach help section. In Browse resources using…, Teacher has another option – a list of purchased resources, which appears after marking the Show purchased resources checkbox. © Young Digital Planet 2009 8 yTeach ver 1.0 – User Manual Schooladmin School administrator can see an additional link in the top-right corner of the screen. Using this link the Schooladmin can: Manage Users/Credits – on this tab it is possible to start a procedure of: creating new teacher’s account, editing a teacher’s account, removing selected user(s) from school, inviting colleagues to join the school, modifying school settings, reviewing a list of unlocked resources, reviewing a list of unlocked packages, ordering information about a user by clicking on the appropriate headline: – User name, – Email, – Role – it is possible to set a role of Teacher or Schooladmin; Modify school – on this tab it is possible to start a procedure of: editing the school data, editing the school code, editing the school email address, editing the settings of the school, such as: – users can or cannot assign themselves to a school, – users are directly assigned to a school or will have to wait for confirmation, – every school user is allowed to spend credits, or the school admin assigns credits to particular users, © Young Digital Planet 2009 9 yTeach ver 1.0 – User Manual – receiving (or not) occasional information from Young Digital Planet SA, removing current school together with all users and credits; School past purchases – this tab collects information about purchases, made by School via shopping cart (Resource packages and Credits), as follows: – User name – purchaser’s name; after clicking on it the shopping details are displayed with the possibility to preview the Invoice after clicking on the Print link, – School name, – Date, – Licence type, – Total price, – Number of items, – purchase Status – this kind of information is grouped by a particular transaction, to see the details you need to click on the User name link, – Print – clicking on this link enables you to print the Invoice. Portal administrator The Portal Administrator is responsible for organising the portal, as well as correct system administration. This role allows to manage portal parameters according to the local market needs. © Young Digital Planet 2009 10 yTeach ver 1.0 – User Manual Portal management is done with the use of appropriate tools allowing for changes and adjustments within the portal areas such as: applied curriculum structures, users; schools; publishers and partners administration, invoices management, shopping features, sets of packages and their descriptions, licence management, news and newsletter, portal functionalities configuration, localisation (update text), removing import, settings of portal, set particular user's rights in admin access, change portal languages Categories In the Categories area is possible to define or modify the curriculum structure name, which is visible on the Start & Search tab under Browse resources using... section. During the process of importation the resources to yTeach database, it is possible to map portal resources against almost any logical structure, e.g. curriculum document, table of contents of a textbook, program of study, etc, which allows the teachers to search for resources with the use of well-known structures from everyday work. Curriculum – on this tab it is possible to start a procedure of: adding a new curriculum, modifying curriculum, setting sample resources and creating demo packages (Sample resources link), adding icons to particular structures in the search menu. Categories – on this tab it is possible to start a procedure of: setting a sequence of subjects in category, adding a new category. Resource types – on this tab it is possible to start a procedure of: adding a new resource type, modifying the name of the existing resource type. © Young Digital Planet 2009 11 yTeach ver 1.0 – User Manual Users In the Users area the Portal Administrator can create and remove users’ accounts from the portal or only from a particular school, modify the user data and define his/her role. Account types currently available on the yTeach portal: – Admin, – Editor, – EduContent Manager, – Moderator, – Partner, – Publisher, – Seller, – Sub Admin, – Trader, – User, – User Admin, – Deleted User. After clicking on the headline it is possible to sort data by: Login, Email address, account Create date, Number of login (Login count), number of Playlist(s) or Class assignment(s), number of Created content, trial period. It is possible to restrict the data searched to a part of a user name as well as define a time range to search. The Update list button refreshes the counters. After clicking on a particular username link it is possible to: On Info tab: – remove the selected user from school (Remove user from school button) or from portal (Remove user button), © Young Digital Planet 2009 12 yTeach ver 1.0 – User Manual – visit the School to which the user is assigned to, if he/she is assigned to any school registered on the portal, after clicking on the School-name link, – review user-created content(s) if any exist(s), – review user class assignment(s) if any exist(s). On User's past purchases tab: – review a list of purchased resources, which can be sorted after clicking on the following headlines: Type, Name, Date of purchase, Purchase price, Licence type, date of licence Duration. On Edit user tab: – modify personal data, – change the user role, – set a quota in MB, – set a trial period. Schools The Schools area enables the following: sorting by a particular headline link, by clicking on a reviewed list on portal-registered schools data such as: School name, School code, Number of Users assigned to school, Number of Users yet without a role, School Create date; number of: Used school credits; Available school credits and Free credits; Trial period, Free access time, Login count to a particular school, access, after clicking on the School-name link, to the selected school’s details such as: date and name of person who created this school, number of available school credits, resources and packages. After clicking on the School-name link, the Portal Administrator has also additional possibilities: © Young Digital Planet 2009 13 yTeach ver 1.0 – User Manual Modify school data and its settings. For example: define maximum number of school accounts, decide whether users are enabled to assign themselves to a school or not; decide whether after giving a school code, users are directly assigned to school or will have to wait for confirmation; decide if every teacher in the school should be able to spend the school’s credit; set the school amount discount, number of free credits, number of days of trial period and free access, licence end-date, school quota, school status and IP range. Manage Users assigned to the school: adding users to school from a portal-registered user list, removing particular users from school or, after clicking on their name, also from the portal, set user's school role. Review a list of school past purchases, which can be sorted by: transaction Date (after clicking on a particular transaction date link it is possible to change the invoice status and print the Invoice), User name of person who made the transaction, Total price of transaction, Discount, Number of items that were purchased, Transaction Status (Pending, OK, Invalid, Expired). Remove current school. Publishers Within this area it is possible to manage FlipBooks on behalf of the particular Publisher. For each FlipBook it’s possible to set its price and description, change its properties, map resources against FlipBook pages and create a package with a FlipBook and connected resources. Access to Publishers area is also available for the Publisher’s role available to be defined on the portal. Each Publisher have access only to FlipBooks of his own. (*) This section is currently under construction. It’s not necessary to use Publishers section to manage portal settings. Partners yTeach has implemented the affiliation program. The program allows to define two types of partners. © Young Digital Planet 2009 14 yTeach ver 1.0 – User Manual Type 1 – for this type of partner portal owner has to pay a fixed fee to the Partner according to a particular accounting-period summary calculation. Type 2 – in this type, the Partner has to pay a fixed amount of money to portal owner according to a particular accounting-period summary calculation. The payment for the transaction is made only on the basis of money transfer or cheques directly to Partner’s account. In the Partners area it is possible to review Partner accounts. Note: This section is currently under construction. Invoices The Invoices details can be sorted by transaction Date (after clicking on a particular transaction date it is possible to review the transaction details, change the invoice status and print the Invoice), User name of the person who made the transaction, the name of the school (School name) that made the purchase, Total price of transaction, Number of items that were purchased, Transaction Status (Pending, OK, Invalid, Expired). After clicking on the Print link it is possible to print the Invoice of the selected transaction. Clicking on a particular User name and School name leads directly to the User’s or School’s details sections. Shop In the Shop section it is possible to set the parameters of promotions for existing schools (Free Credits or the Trial Period) as well as change the Licence end date for the existing schools. It’s also possible to determine the currency and price for a particular type of resource (Type prices). © Young Digital Planet 2009 15 yTeach ver 1.0 – User Manual Packages In the Packages section it is possible to manage (create, edit and delete) packs with the resources. After clicking on the column headers it is possible to sort the available resource packages by Name, Created date, Number of Resources. Clicking on Image or resource Name will display the Package information. Creating packages The Portal Administrator is able to create packages in a simple way – by clicking on the Create new package button, selecting resources using static or curriculum categories and defining the package details. Packages Screen The look and feel of the screen with packages can be set by changing the ‘New categories on Packages screen’ in the admin’s Settings section. When the setting is marked, it’s possible to define our own package’s categories in the ‘Packages categories’ section. Licences In the Licences section it is possible to manage (create, edit and delete) licences, which can then be used during package creation. © Young Digital Planet 2009 16 yTeach ver 1.0 – User Manual News In the News section it is possible to manage (create, edit and delete) important information that can be displayed on the yTeach’s homepage. Newsletter In the Newsletter section it is possible to manage (create, edit and delete) important information that is, after creation, ready to be send to clients which agreed to receive the yTeach newsletter. Configuration In the Configuration area the Portal Administrator can define the following: preview type (full access, or different kinds of restricted access) for particular user groups, parameters for school and school users: – resource types available for users in the search mode (separately for drop-down filter available with the curriculum search and the Resource types in the Categories box), – user rights, shop options: – discounts, – promotions for new schools and users, – licence parameters, – payment options and currency (in order to add a credit card payment option the development is required in order to integrate yTeach with the card payment provider’s system), off-line licence parameters, export and downloads parameters, users quota. Remember that every change must be saved. © Young Digital Planet 2009 17 yTeach ver 1.0 – User Manual Update texts This section enables the localisation of a particular portal section into almost any of the accessible languages. The administrator selects a relevant section from the drop-down menu (Global, Help, Main, Login, Resources, Assignments, Playlists, Admin, Terms, Shop, etc). In the case of empty cells it is possible to use the Fill empty cells button. The administrator is also able to Restore default texts. All changes will be made after clicking on the Save button. It is also possible to Export to file or Import from file a localised version of the portal and to Restore the default texts. The localised texts are placed in a chart. The first column Label KEY contains particular sections names. The second column is the Original value for the texts on the portal. Changes for the current version are made in the third column Language value. Note that texts contain HTML tags (including links to portal pages), which is crucial for the displayed text structure and appearance. The Original value of the text should be treated of as the guide – i.e. the instruction of how to enter the translated text properly. Remove import This section allows the deletion of imported database relations created on the basis of map and keywords files. Settings In the Settings area, the Portal Administrator can define settings for: global section, homepage section, resource details section, help section, system config. © Young Digital Planet 2009 18 yTeach ver 1.0 – User Manual In the first four sections the administrator selects which elements should be visible or active for portal users, while in the system config section a number of portal performance details are set. Every change must be saved. It is possible to restore the default settings – settings for the basic yTeach installation. Admin access In the Admin access area, the Portal Administrator can define a particular group of users’ access rights to the sections of yTeach portal. Every change must be saved. Language In the Language area, the Portal Administrator can switch portal to the ‘English language mode’. This mode is available only for the Portal Administrator role while he/she configures the application. © Young Digital Planet 2009 19 yTeach ver 1.0 – User Manual My yTeach The screen below presents the yTeach portal view as seen by a non-logged-in user: Non-logged-in users have access to: My yTeach section – only browsing resources, Buy resources section – Buy credits, Unlock Packages, yTeach help section. It is also possible to download a sample SCORM package to implement in user’s Virtual Learning Environment (VLE). After trying out yTeach you may like to register yourself and your own school in the yTeach portal. © Young Digital Planet 2009 20 yTeach ver 1.0 – User Manual Browse resources The main view of My yTeach: in Find resources using... situated on the left (on the yTeach portal it is possible to map imported content into any logical [curriculum] structure): – Keywords – by writing the keyword or a phrase in the search box and pressing the Search button, a page containing all the content that matches the keyword will appear. The results are displayed as a list sorted by the resource types. The order of resources has been defined by the Portal Administrator in the Configuration section. The user is able to select resources of one type and define number of results displayed per page. – Curriculum search – the resources are collected in sections, which enables the user to search for resources using a predefined logical structure. A curriculum is an example of such a logical structure. For instance, a user can select one subject in a particular level to display a list of all resources together with the curriculum. © Young Digital Planet 2009 21 yTeach ver 1.0 – User Manual – Categories – by choosing this option the user can restrict searching to: Subject, Grade, Resource type or Publisher (only if we allow to display this filter). It is possible to map portal resources into any logical structure, i.e. any curriculum, table of contents of a textbook, framework programme etc, which allows teachers to search for resources with the use of well-known structures from everyday work. By using the drop-down menus in the top-left corner of the screen, choose the appropriate structure and then click on a link to a particular subject in the list and select a topic. The Search results page will appear. In the yTeach.co.uk version, the portal resources are mapped to: Resources structure, QCA programmes of study and AQA exam specifications. in My yTeach section, situated in the centre of the page: – Playlists allow you to review a created playlist(s) or start a new playlist creation procedure, – Class Assignments allow you to review a created Class Assignment(s) or start a new Class Assignments creation procedure, – Created Content allows to review the user’s generated content or start creating a new one. in yTeach in action and Training zone sections it is possible to learn how to use the yTeach portal in everyday teaching. in Sample resources – the resources are randomly presented in a thumbnail view. Ranges of sampling are defined in the Portal Administrator / Sample resources sections; samples are chosen from content imported onto the yTeach portal. After clicking on a particular icon, the resources detail page will appear. © Young Digital Planet 2009 22 yTeach ver 1.0 – User Manual Search results After initially browsing the resources, the Search results page will appear: It is possible to set the following restrictions: Display – 10, 25, 50 resources on page. On the bar below there is information about the number of pages along with the resource presentation. By clicking on a page number or Next link it is possible to view the next page with resources. Resource types, e.g. Class activity, Whiteboard presentation, Student activity, Animation, Simulation, Slideshow, whiteboard exercise, Game. Text or Thumbnail – form of presenting the results. Purchased resources are marked by a yellow background with the icon. During the search through Curriculum categories, the user can browse the tree, which gives the possibility of choosing a particular topic using + and – symbols. © Young Digital Planet 2009 23 yTeach ver 1.0 – User Manual Resources After indicating the resource, the resource information page will appear: The number of description rows depends on the resource type, but generally it is possible to: – vote for this resource in Rating line by indicating the number of stars, the statistic for it is located below, – start the resource by clicking on the Start button located on the resource thumbnail or by clicking on the Start link in the Do you want to...? section, – choose another resource by clicking on the link in the row, i.e. Subject, Level, Resource type, Matches and Connected with, Is part of, keywords. The user also has access to: actions in Do you want to...? section, their number depends on the resource type: – Create Playlist with this resource – only for logged-in users, – Send as Homework – only for logged-in users, allows the creation of a new class assignment with this resource, – Bookmark – only for logged-in users, – Export to your VLE (allows the export of a resource as a SCORM package) – only for logged-in users, – Download the resource – only for logged-in users. © Young Digital Planet 2009 24 yTeach ver 1.0 – User Manual If a user has created a Playlist(s), class assignment(s) or user’s bookmarks category, additional options will appear after clicking on the more link: – My Playlists – to add a resource to a particular Playlist, it is necessary to choose the Playlist’s name from the drop-down list and click on the Add to Playlist button. – My class assignments – to add a resource to a particular class assignment, it is necessary to choose the assignment’s name from the drop-down list and click on the Add to class assignment button. – My bookmarks – to add a resource to a particular user’s bookmarks category it is necessary to choose the bookmark’s category and click on the Assign button. On a current resource page it is also possible to Unlock resources using purchased credits and, after clicking on the more link, a related resource(s). If the resource is not unlocked, during presentation there will be a banner with Preview version only information. Such information is presented only with the resources made with Leo editor or yPublisher editor. Every resource is can be assigned to one or more of the resource packages. To see the package information that the current resource is included in, click on the icon in the Packages section. The Portal Administrator and the Moderator role rights give the user access to additional special options allowing editing metadata of a particular resource: Edit resource details and Edit categories. My Playlists To use My playlists the user must be logged in. Playlist is a complete sequence of resources. My playlists area enables the user to: © Young Digital Planet 2009 25 yTeach ver 1.0 – User Manual create a Playlist. Clicking on the Create new Playlist button opens a page where it is possible to create a New Playlist after filling in the description field and choosing the category. Choosing the category is available only after creating your own categories, sort by: Title, Created date, Resources, after clicking on the headline, create own Playlists categories by My categories section. Category can be removed after opening it, assign particular Playlists to user’s categories via Add to category section, which appears after creating at least one user’s category, export playlist as a SCORM package after clicking on Export to your VLE link. It is possible only after purchasing all of the resources used in a Playlist, download playlist. It is possible only after purchasing all of the resources used in a Playlist, start the playlist presentation, add to my favourites or delete from my favourites default category, after adequate link clicking (Create / Remove Shortcut), start playlist editing procedure by clicking on Edit link: It is possible to change the sequence of displaying resources in the Playlist using and symbols. In the Play On/Off column the user will be able to turn on (mark square) or off (empty square) the resources that are being displayed during the playing of your Playlist. Resources on this page can be displayed in the form of Text or Thumbnail. By clicking on the resource title or icon on the Edit Playlist page it is possible to open the Edit resource page, where is possible to edit a particular resource with the use of another authoring Young Digital Planet SA tool – Teacher's panel. All notes created via use of the Teacher’s panel will be saved by the yTeach application. If the resource type is a Whiteboard presentation or Class activities an additional button Split will be available. After using it, the Whiteboard presentation or Class activities will be removed from the Playlist but all resources used in it will be added separately to the Playlist. delete a particular playlist after clicking on the Delete link. On this page the following actions are available: © Young Digital Planet 2009 26 yTeach ver 1.0 – User Manual Add Resources opens a new page where it is possible to add resources to the Playlist using the drag-and-drop method: It is possible to define the following restrictions: selecting number of results per page – Display option, choosing Resource types, Text or Thumbnail View. After finishing work it is necessary to click on the Save button. It is impossible to add a playlist to another playlist. On this screen teachers can use the same search engine as on the homepage. Add File – possibility of adding files. Add Url – possibility of adding Url. Start – begins a playlist presentation. During the presentation the user can use the following links: Homepage, which leads to the My yTeach Start & Search tab, Resource details, which © Young Digital Planet 2009 27 yTeach ver 1.0 – User Manual opens page with playlist details, Edit, which opens the Edit Playlist page, Full screen, which opens a new presentation page with the following options: Close full screen view, Next >> next resources from playlist. Switching to other resources can also be done by choosing a resource number or clicking on the << Previous link. Playlist resources can be closed by clicking on the symbol. Resource details – on this page you will find a list of playlist resources that can be viewed as Text or a Thumbnail, and additionally Rating, Publish date. If the resources have not been bought yet, the information about the price, links to Conditions of Use and Add to cart buttons will be visible. Edit description – it enables editing the description of the playlist. All changes must be confirmed by clicking on the Save button. Save as new – this action enables saving of the existing playlist as a new playlist. It is very useful when using the same resources, for example to achieve different teaching goals. Publish gives the user the possibility of sharing their own work with other users of the yTeach portal. It is necessary to define Keywords correctly: choose Static categories (Subject, Level) and indicate Curriculum categories on the Curriculum tree, which can be viewed in Collapsed or Expanded form. After publishing the Playlist, the Publish action will disappear and the unpublish option will appear. Print, PDF, Remove. Teacher's panel The set of tools described below is available for the resources created with the use of the LEO Editor (page and flo pages). A panel with similar functionalities is also used for the resources made with the yPublisher editor. Both of those editors are dedicated to content creation and were developed by Young Digital Planet S.A. The Teacher’s Panel, thanks to its various buttons with different functionalities, is very useful while holding a multimedia presentation in the classroom. Open/Close buttons – after opening a presentation, the Teacher’s Panel initially contains only a few buttons. © Young Digital Planet 2009 28 yTeach ver 1.0 – User Manual It can be expanded by using the Open button and closed using the Close button, After expansion, the available buttons are as follows: , , , navigation arrows, arrow button, zoom area button, pen button, edit lesson button – enables changing the sequence of individual lesson pages by drag & drop method (only for already-prepared lessons), colour button – enables changing the colour of pen tools and text, thickness button – enables changing the thickness of pen tools, text tool button – allows the making of notes on lesson pages, show area button – this option allows the showing of a certain area on a lesson page, eraser button – enables the deletion of items inserted in a lesson page with the use of the Teacher’s panel, undo/ redo buttons, © Young Digital Planet 2009 29 yTeach ver 1.0 – User Manual zoom-in button, add note button – is used for adding extra pages, which can be used for making notes and drawing, disable feedback sound button. Please note that the teacher panel described above can be used only with the resources made with LEO editor (e.g. Universal Curriculum resources). My class assignments To use My class assignments a user must be logged in. My class assignments area enables the interaction with students: After clicking on the Create new class assignment button or link, opens a page where it is possible to create a new class assignment. You need to fill in the form with information such as: Name, Instruction and Access code, which is necessary for a student to access the class assignment via the www.yLearn.co.uk website: © Young Digital Planet 2009 30 yTeach ver 1.0 – User Manual Adding resources to a class assignment is possible after it has been created. sort by: Name, Create date, Access code, Results (link with number of results will appear when at least one user tries to solve a class assignment) – this data is available by clicking on the headline, create your own class assignments categories in My categories section. Category can be removed after opening it, assign particular class assignments to your own categories in the Add to category section, which appears after creating at least one user’s category, preview class assignment. After clicking on this link, a page with Name and Instruction to class assignment are presented. Clicking on the START button displays the class assignment presentation. Also, the Back link is available. During presentation the Homepage and Class assignment details links are available, edit a particular class assignment by clicking on Edit link, which opens the class assignment page: It is possible to change the sequence of resources used in Class assignment by clicking on the or symbols. It is possible to open the resource by clicking on the resource name link on a particular class assignment page. On this page particular actions are available: © Young Digital Planet 2009 31 yTeach ver 1.0 – User Manual – Add Resources opens a new page where it is possible to add resources to Class assignment using the drag-and-drop method: It is possible to define display restrictions such as: number of results per page (Display option), choosing Resource types, Text or Thumbnail View. After finishing work it is necessary to click on the Save button. On this screen teachers can use the same search engine as on the homepage, – Add File – this action enables adding a file to Class assignment, – Add Weblink – this action enables adding a Weblink to Class assignment, – Preview – after clicking on this action, a screen with Name and Instruction to class assignment is presented. Using the START button enables the class assignment © Young Digital Planet 2009 32 yTeach ver 1.0 – User Manual presentation to begin. Also, a Back link is available. During presentation Homepage and Class assignment details links are available, – Resource details – presents a list of resources used in Class assignment. It is possible to Report this resource as inappropriate to its creator, – Edit description – this action enables the changing of Name, Instruction and Access code of the class assignment, – Save a copy – if all resources are acquired it is possible to copy a class assignment, – Publish gives the user the possibility of sharing their own work with other users of the yTeach portal. It is necessary to define Keywords correctly: choose Static categories (Subject, Level) and indicate Curriculum categories on the Curriculum tree, which can be viewed in Collapsed or Expanded form. After publishing the Class assignment, the Publish action will disappear and the unpublish option will appear, – Lock/Unlock – only unlocked class assignments can be accessed by students. Unlocking an assignment is possible only when all used resources are purchased, – Results – after clicking on this action, the Results page will appear where the information can be ordered by clicking on headlines: User name, Login time – Date and time of login, Session time, Result. Information about the number of Mistakes and Hints is also available. It is also possible to Remove, Print or Download selected results, – Remove – this option enables the removal of a just-opened class assignment, Create/Remove shortcut – class assignment will be visible in My yTeach area of main page, Lock/Unlock class assignment. Only unlocked class assignments can be accessed by students. Unlocking an assignment is possible only when all used resources are purchased or unlocked, Delete a particular class assignment, export class assignments as a SCORM package after clicking on Export to your VLE link. It is possible only after purchasing all of the resources used in a class assignment, download class assignment. It is possible only after purchasing all of the resources used in a Playlist. © Young Digital Planet 2009 33 yTeach ver 1.0 – User Manual My Bookmarks To use My bookmarks user must be logged in. In the My bookmarks section it is possible to: watch resource details after clicking on its name link, preview resource by clicking on the Play link. During presentation, Homepage, Resource details and Full screen links are available. There is also a Do you want to...? section with possibilities as follows: – Create Playlist, – Send as Homework, – Remove this resource from My Bookmarked resources, – Export to your VLE as a SCORM package, – Download the resource, Also available is information about: – Partner resource, – resource Consist of, create your own bookmarks categories in My categories section. Category can be removed after being opened, assign a particular bookmarked resource to your own categories in Add to category section, which appears after creating at least one user’s category, Export to your VLE as a SCORM package. It is possible only after purchasing all resources used in class assignment, Download the resource. It is possible only after purchasing all resources used in class assignment, Remove selected resources – remove particular resource(s) from My bookmarked resources. It is possible to define restrictions such as choosing Resource types and Text or Thumbnail view. © Young Digital Planet 2009 34 yTeach ver 1.0 – User Manual Buy resources Buy Credits The Buy Credits option from the Buy Resources drop-down list allows adding entered amount of credits to the Shopping Cart: Buy Packages The Buy Packs option from the Buy Resources drop-down list allows adding packages of resources to the Shopping Cart: yTeach gives two ways to access the resources: Offers a range of Packages defined by the Portal Administrator. These can be bought in one easy transaction and provide full access for every teacher in a particular school for the next 12 months (depends on the licence length set in admin section). Multi-purpose Credits. You can buy credits and use them to buy either single resources or resource packages (this option must be set in the application). It is possible to familiarise yourself with Package info by clicking on the package name link or the number of an included resource: © Young Digital Planet 2009 35 yTeach ver 1.0 – User Manual It is possible to define restrictions such as: Display – the number of results displayed per page (below is located information about the number of pages with resource presentation; by clicking on a page number or Next link it is possible to see the next page with resources), choosing Resource types in the Find resources using... section, Text or Thumbnail view. Clicking on a particular resource name displays a page with resource details. All resources are available to the yTeach portal users as a preview version. An appropriate note appears over the resource each time the resource is played. It will disappear when users have bought the resource. © Young Digital Planet 2009 36 yTeach ver 1.0 – User Manual Used Credits The Used Credits option from the Buy Resources drop-down list allows you to review a list of resources purchased by user. The list of purchased resources can be sorted by clicking on a particular headline. School Past Purchases The School Past Purchases option from the Buy Resources drop-down list allows you to review a list of resources purchased by school. It is possible to print (review) details of an order. Shopping Cart This tab can be viewed even by a not-logged-in user, but shopping can be done only by a logged-in user with Schooladmin rights. Shopping Cart allows users’ to: – enter a promotion code (if school administrator has it), – receive information about a package by clicking on its Name, – go through the rest of the procedure steps. If all the information has been entered correctly and the Conditions of Use, yTeach.co.uk Privacy policy and the Total price are accepted, a Schooladmin should confirm the purchase by clicking on the Buy button and making the payment. It is possible to implement almost any form of payment for packages and credits. It depends only upon the portal owner’s decision. Each component can be removed from the shopping cart by using the © Young Digital Planet 2009 delete icon. 37 yTeach ver 1.0 – User Manual yTeach help The Help option allows you to review a list of topics containing helpful information about yTeach portal and resources. The Contact Us option allows you to report problems/mistakes; ask about our resources or other issues. The About Us option contains information about our company. Information Bar There is an information bar at the bottom of all yTeach portal pages: The Information bar includes options that enable: Contact Us – communication with the Portal Administrator, obtaining help, becoming familiar with the Privacy policy, becoming familiar with the Conditions of Use, becoming familiar with brief information about Young Digital Planet – About Us link, previewing resource categories at the Site map link, going to the http://www.ydp.eu/ page using the Copyright © 2009 Young Digital Planet link, going to the http://www.universalcurriculum.com/ page using the UNIVERSAL Curriculum link, going to the http://www.ydp.eu/en/technologies/yteach/ page after using the yTeach Sys link. Below the information bar it’s possible to put links to related or similar web pages, e.g. yTeach.com – Multimedia resources and tools for teachers, © Young Digital Planet 2009 38 yTeach ver 1.0 – User Manual Nauczyciel.pl – Multimedialne zasoby edukacyjne obejmujące język angielski, matematykę i przedmioty przyrodnicze, yAuthor.com – WYSIWYG on-line authoring tool for creating interactive content. Importing resources Introduction yTeach portal is a place where users, in a user-friendly environment, are able to use and manage the multimedia resources. The portal represents an innovative and new approach in econtent delivery. It lowers the entry barrier for the users (teachers). Being easy and intuitive to use, the system allows teachers to concentrate on teaching only(no administrative work to be done). Content aggregation allows teachers to search and use the interesting multimedia resources within a few clicks. Resources available on the portal are described with the appropriate keywords, relations between them, and are grouped in the relevant categories. There is a possibility to map resources, against any logical resources structure such as schemes of work or table of contents of a textbook. yTeach can be filled with many different types of content: FLO files (LEO editor lessons), Page files (LEO editor single pages) UTT files (yPublisher lessons), UTP files (yPublisher pages), Binary files (any digital materials in various formats, such as PPT presentations, PDF files, DOC documents, XLS files, multimedia files: JPG, MPEG, MP3), HTML files (html page with any embedded content), FlipBooks (yPublisher’s or yBook’s digital equivalent of a Textbook). Operating with other types of resources can developed on request. The importation of the resources consists of using the external application (importer tool) which interprets the excel files with metadata and inscribes all necessary data in yTeach’s database. © Young Digital Planet 2009 39 yTeach ver 1.0 – User Manual yTeach focuses on search technology, making it easy and intuitive for every user. It is all achieved by precise meta-dating of each individual resource with valuable didactic information like: keywords, connection with a subject, connection with educational level, resource type description, relations to other resources. Different metadata elements can be added on request (development required). Additionally, all resources can be mapped against any logical structures like various curriculum documents, schemes of work, programmes of study or textbook’s table of contents. The mapping scheme is reflected in excel file. The structures are imported to yTeach’s database using the external importer application. This functionality allows to: search for the resources using teachers’ favourite documents, map resources against many different documents and displaying them on the portal. Import configuration Database configuration Before the import can be done, it’s necessary to configure the parameters of yTeach’s database. The parameters are defined in the configuration file: ‘/db/yteach-database.properties’. Four parameters need to be defined in the file: jdbc.url – database URL, jdbc.pass – database user passwords, jdbc.user – database user name, dir.dst – full path to the folder with the resources. Sample parameters are defined in delivered ‘yteach-database.properties‘ file and must be changed in order to make the import (otherwise the error message will be displayed). REMARK © Young Digital Planet 2009 40 yTeach ver 1.0 – User Manual Parameters in the file can be commented using the sign ‘#’ at the beginning of the line. It allows to “hide” for the importer application. Links to Excel files configuration Links to excel files are configured in the file: ‘yTeach-importer.txt’. It’s necessary to define two links: list-filepath – full path to the xls file with the list of resources (*_with keywords.xls), map-filepath – full path to the xls file with the mapped resources. REMARK It is necessary to use the slash symbol: ‘/’, as the folder separator. Importer for Windows The importer is also available in the version for Windows (yTeach-importer.exe). In this version, configuration of the database and paths to excels can be edited directly from the importer window. Resources import consequences First import with the new list with keywords and the new map The resources are inscribed in the database. topic categories are imported to the database (available in the search filters), curriculum map is added to the database (new curriculum structure appears in the application), imported resources are connected with the topic categories and curriculum structure. © Young Digital Planet 2009 41 yTeach ver 1.0 – User Manual Import with the same curriculum list and new map New curriculum map will be added to the database. The resources from the list will be connected with the new curriculum structure. The resources in the topic categories filters stay unchanged. Final remarks Destination folder When the import process is finished it is required to copy all the resources to the folder pointed by the importer at the last stage of the import. The importer will create the destination folder automatically only if the computer used to conduct the import process will be logged to the folder dedicated for the resources pointed in the ‘dir.dst’ parameter. Comments in the configuration file In the configuration file comments can be added with the ‘#’ sign at the beginning of the line. Editing Excel documents It is important to close all Excel documents before starting the import process. Requirements Java 1.4.x or higher is required. © Young Digital Planet 2009 42