1
AXEpad
Cross-Platform Development for PICAXE Chips
Version 2.0.1
2010-07-27
© Copyright 2009-2010, Revolution Education Limited
1 of 29
Contents
Introduction
Warranty, Licensing and Copyright
System Requirements
Trademark Acknowledgements
Latest Documentation
Linux Installation
Downloading LinAXEpad
Installing LinAXEpad
Installing LinAXEpad for Eee PC
Installing LinAXEpad for Ubuntu
Installing LinAXEpad from a Command Shell
Installing an AXE027 USB Download Cable
Installed files
Macintosh Installation
Downloading MacAXEpad
Installing MacAXEpad
Installing AXE027 USB Download Cable Drivers
Installed files
Windows Installation
Downloading WinAXEpad
Installing WinAXEpad for Windows
Installing AXE027 USB Download Cable Drivers
Installed files
Using AXEpad
Menu Bar
Tool Bar
Code Explorer
Label List
Goto Line
Keyboard Shortcuts
Options
Mode
Port
Language
Colors
Text
Editor
PICAXE Programming
Configuration
Syntax Check
Program
2 of 29
Clear Hardware Memory
Debug Display
Terminal
Ring Tone Tune Wizard
Analogue Sensor Calibration Wizard
PWMout Wizard
PICAXE-X2 Conversion Wizard
Additional Information for Linux Users
PDF Viewer Configuration
Configuration for the modprobe command
Additional Information for Macintosh Users
USB Serial Port Configuration
3 of 29
Introduction
AXEpad is a cross-platform development tool for PICAXE chips. It supports BASIC programming
of PICAXE chips on Windows, Macintosh and Linux operating systems.
AXEpad is a 'notepad' type application for the development of PICAXE programs. It supports all PICAXE
chips and has all the normal development features such as source code colour syntax highlighting, auto
indentation, syntax check and download, debug and terminal windows etc. This is the recommended tool
for Linux and Macintosh support of the PICAXE system.
Although a Windows version is also available, we would recommend use of the PICAXE Programming
Editor instead.
Warranty, Licensing and Copyright
PICAXE products are developed and distributed by Revolution Education Ltd. PICAXE is a registered
trademark licensed by Microchip Technology Inc. Revolution Education is not an agent or representative
of Microchip and has no authority to bind Microchip in any way.
This software is protected by copyright law and international treaties. Unauthorised distribution or
reproduction of this program, or any portion of it, may result in severe civil or criminal penalties, and will
be prosecuted to the maximum extent possible under the law.
AXEpad, LinAXEpad, MacAXEpad and WinAXEpad are trademarks of Revolution Education Ltd.
System Requirements
Linux
x86-based Linux distributions with GTK+ 2.8 or higher
glibc-2.4
CUPS (Common UNIX Printing System)
libstdc++.so.6
Compatible Linux Distributions include Xandros on Eee PC
Ubuntu 6.10 ( Edgy Eft ) and later
SUSE Linux Enterprise Desktop 10
Red Hat Enterprise Linux 5
Macintosh
Mac OS X 10.2 (Jaguar) or later, Intel or PowerPC processor
Windows
Windows 2000 or later, including Windows XP, Windows Vista
4 of 29
Trademark Acknowledgements
Adobe and Adobe Reader are registered trademarks of Adobe Systems Incorporated. Basic is a trademark
of the Trustees of Dartmouth College, DBA Dartmouth College. Eee PC is a trademark or registered
trademark of ASUSTeK Computer International or its subsidiaries in the United States and other
countries. Intel is a registered trademark of Intel Corporation. Linux is a registered trademark of Linus
Torvalds. Macintosh is a registered trademark of Apple Computers Incorporated. Mac OS X is a
trademark of Apple Computers Incorporated. Microchip is a registered trademark of Microchip
Technology Incorporated. Microsoft, Windows, Windows 95, Windows 2000, Windows XP and
Windows Vista are registered trademarks of Microsoft Corporation. PowerPC is a registered trademark of
IBM Corporation. Red Hat is a registered trademark of Red Hat Incorporated in the United States and
other countries. SUSE is a trademark of Novell Incorporated in the United States and other countries.
Ubuntu is a registered trademark of Canonical Ltd. WinZip is a registered trademark of WinZip
Computing Incorporated. Xandros is a registered trademark of Xandros Incorporated.
All other trademarks and registered trademarks are the property of their respective owners.
Latest Documentation
The latest version of this document can be downloaded from Revolution Education Ltd's web site at http://www.rev-ed.co.uk/docs/pad001.pdf
5 of 29
Linux Installation
Requirements
Please note that LinAXEpad requires an INtel x86-based Linux distribution with GTK+ 2.8 or higher,
glibc-2.4, CUPS (Common UNIX Printing System) and libstdc++.so.6 installed.
Compatible Linux Distributions include; Xandros on Eee PC, Ubuntu 6.10 ( Edgy Eft ) or later, SUSE
Linux Enterprise Desktop 10 and Red Hat Enterprise Linux 5.
Downloading LinAXEpad
The LinAXEpad download is a single gzipped tar archive ( frequently known as a "tarball" ) which can be
downloaded from Revolution Education Ltd's web site at http://www.rev-ed.co.uk/software/LinAXEpad.tar.gz
Save the LinAXEpad.tar.gz file on hard disk, memory stick or card, CD or DVD which can be accessed by
the Linux PC upon which LinAXEpad will be installed.
Installing LinAXEpad
LinAXEpad is delivered as an application binary distribution and does not require the compilation of any
source code. Providing the system requirements are met it can simply be installed then run.
There are numerous and varying distributions of Linux and it is recommended that the documentation
which accompanies your particular distribution is consulted before installation.
Installing LinAXEpad for Eee PC
Launch the Work > File Manager application
Create or select a folder to extract the LinAXEpad application to. For example, create a "LinAXEpad"
folder in "My Home".
Locate the LinAXEpad.tar.gz file previously downloaded.
Click on LinAXEpad.tar.gz to view the zipped contents, select all the files and folders and drag to your
new folder.
Alternatively, right-click on LinAXEpad.tar.gz and select 'Extract All'. Select your new folder as the
destination, click 'OK', then, when extraction has completed, navigate to your new folder.
When done, you will see three sub-folders - compiler_linux, datasheets and syntax - plus the LinAXEpad
application executable.
Right-click on LinAXEpad, select 'Properties',then select the 'Permissions' tab.
Ensure the 'Exec' option is checked for Owner, Group and Others then click on the 'OK' button.
Move into the compiler_linux folder and for all PICAXE compilers, right-click, select 'Properties' then the
'Permissions; tab and ensure the 'Exec' option is checked for Owner, Group and Others.
To launch AXEpad, double click on the LinAXEpad file.
6 of 29
Adding a LinAXEpad icon to an EEEpc running Xandros
Start a Terminal Console (Ctrl+Alt+T), then change to the AsusLauncher folder ( note that case is
important ) cd /opt/xandros/share/AsusLauncher
Make a backup of the original simpleui.rc file sudo cp simpleui.rc simpleui.rc.backup
Open the simpleui.rc file in a text editor such as kate sudo kate simpleui.rc
Scroll to near the bottom of the file and add in a new parcel section exactly as below ( assuming the
LinAXEpad folder is located in 'My Home' which is known as /home/user/ ) <parcel simplecat="Work" extraargs="/home/user/axepad/LinAXEpad"
icon="documents_norm.png"
selected_icon="documents_hi.png">
<name lang="en">LinAXEpad</name>
<desc lang="en">LinAXEpad for PICAXE</desc>
</parcel>
Save the file and restart the EEEpc.
Note: You can change simplecat="Work" to simplecat="Learn" or even simplecat="Play" depending on
which section you feel is appropriate for your PICAXE projects to appear in.
Installing LinAXEpad for Ubuntu
Launch Nautilus or your favourite file manager and locate the LinAXEpad.tar.gz file previously
downloaded.
Double-click on LinAXEpad.tar.gz and this will launch the File Roller Archive Manager. Alternatively,
right-click on LinAXEpad.tar.gz and select 'Open with Archive Manager'.
Click on the 'Extract' toolbar icon or use the Archive then Extract menu option to load the
LinAXEpad.tar.gz archive.
Create or select a folder to extract the LinAXEpad application to. For example, create a "LinAXEpad"
folder in your 'Home Folder'. Ensure the 'All Files', 'Re-Create Folders' and 'Overwrite Files' options are
all ticked; note that preferences previously selected in LinAXEpad will not be overwritten nor altered.
Click the 'Extract' button.
When the files have been extracted, close the Archive Manager and use Nautilus to navigate to the folder
the LinAXEpad application was extracted to. You will see three sub-folders - compiler_linux, datasheets
and syntax - plus the LinAXEpad application executable.
Right-Click on LinAXEpad, select 'Properties',then select the 'Permissions' tab.
Ensure the 'Execute: Allow executing file as program' option has been ticked then click on the 'Close'
button.
Right-Click on LinAXEpad and select 'Make Link'. This will create a Link to LinAXEpad file in the
current folder.
Right-Click on Link to LinAXEpad and select 'Cut'. Then navigate to your 'Home Folder', then into
7 of 29
'Desktop'. Right-click in the right pane and select 'Paste'. This will move the link to your desktop which
will then be available when Nautilus has been closed. Close Nautilus.
To launch AXEpad, double click on the Link to LinAXEpad file on your desktop. The Link to LinAXEpad
file can be renamed if desired.
Installing LinAXEpad from a Command Shell
Login as a root user then open a Command Shell; under Gnome that will be Terminal, under KDE that
will be Konsole. Create a LinAXEpad directory under the Home Directory and move into that directory.
For example user@linux:~$ mkdir ~/LinAXEpad
user@linux:~$ cd ~/LinAXEpad
user@linux:~/LinAXEpad$
Locate the downloaded LinAXEpad.tar.gz file then use the tar command to extract the contents into the
LinAXEpad directory. The path will be the directory where the LinAXEpad.tar.gz file was downloaded
to user@linux:~/LinAXEpad$ tar -xvzf path/LinAXEpad.tar.gz
Use the chmod command to ensure the LinAXEpad application is executable user@linux:~/LinAXEpad$ chmod 755 LinAXEpad
Launch the LinAXEpad Application using user@linux:~/LinAXEpad$ LinAXEpad
Installing an AXE027 USB Download Cable
Please see the AXE027.pdf file for instructions on installing the AXE027 USB Download Cable drivers.
This document can be viewed when LinAXEpad has been installed by clicking on the 'Help' then
'AXE027 USB Download Cable' menu options, clicking on the 'USB Help' button in the 'View', 'Options',
'Port' configuration window, or by downloading from Revolution Education Ltd's web site at http://www.rev-ed.co.uk/docs/axe027.pdf
Note it is not necessary to install any additional software drivers for the AXE027 USB Download Cable.
Installed files
base ---.--|--|--`---
LinAXEpad
compilers_lin
datasheets
syntax
Executable Application
PICAXE Compilers for Linux
PICAXE Manuals and datasheets (PDF)
Colour syntax highlighting definitions
Preferences File
Preferences for LinAXEpad are remembered on a per-user basis and are held in the normally hidden
.LinAXEpad sub-directory of the user's home directory as an axepad.ini text file. Please note the leading
period, full-stop or dot, which marks the directory as hidden. It may be necessary to enable the display of
hidden directories depending upon file manager application used.
The axepad.ini file is created and automatically updated as necessary by LinAXEpad when run. It is not
normally necessary nor recommended to manually edit the axepad.ini file.
8 of 29
Macintosh Installation
Requirements
Please note that MacAXEpad requires Mac OS X 10.2 (Jaguar) or later, Intel or PowerPC processor.
Downloading MacAXEpad
The MacAXEpad download is a single compressed Macintosh application bundle which can be
downloaded from Revolution Education Ltd's web site at http://www.rev-ed.co.uk/software/MacAXEpad.app.tar.gz - Intel
http://www.rev-ed.co.uk/software/MacAXEpadPCC.app.tar.gz - PowerPC
Save the MacAXEpad.app.tar.gz or MacAXEpadPCC.app.tar.gz file on hard disk, memory stick or card,
CD or DVD which can be accessed by the Macintosh upon which MacAXEpad will be installed.
Installing MacAXEpad
To install simply double-click the MacAXEpad.app.tar.gz or MacAXEpadPPC.app.tar.gz file to extract
the MacAXEpad application bundle.
To launch AXEpad, double-click on the MacAXEpad icon.
Installing AXE027 USB Download Cable Drivers
Please see the AXE027.pdf file for instructions on installing the AXE027 USB Download Cable drivers.
This document can be viewed when MacAXEpad has been installed by clicking on the 'Help' then
'AXE027 USB Download Cable' menu options, clicking on the 'USB Help' button in the 'View', 'Options',
'Port' configuration window, or by downloading from Revolution Education Ltd's web site at http://www.rev-ed.co.uk/docs/axe027.pdf
The latest AXE027 Software Drivers for Macintosh can be downloaded from Revolution Education Ltd's
web site at http://www.rev-ed.co.uk/software/axe027_mac_intel.dmg.zip - Intel
http://www.rev-ed.co.uk/software/axe027_mac_powerpc.dmg.zip - PowerPC
Installed files
base ---.--|--|--`---
MacAXEpad
compilers_mac
datasheets
syntax
Executable
PICAXE Compilers for Mac
PICAXE Manuals and datasheets (PDF)
Colour syntax highlighting definitions
Preferences File
Preferences for MacAXEpad are remembered on a per-user basis and are held in an axepad.ini text file
stored in the user's preferences directory which will normally be -
9 of 29
:Users:username:Library:Preferences:
The axepad.ini file is created and automatically updated as necessary by MacAXEpad when run. It is not
necessary, nor recommended, to manually edit the axepad.ini file.
10 of 29
Windows Installation
Requirements
Please note that WinAXEpad requires Windows 2000 or later. WinAXEpad will work with Windows XP
and Windows Vista. The PICAXE Programming Editor will work with any Windows 32-bit Operating
System, Windows 95 and later.
We recommend the use of the PICAXE Programming Editor for PICAXE development under Windows.
Downloading WinAXEpad
The WinAXEpad download is a single compressed installer which can be downloaded from Revolution
Education Ltd's web site at http://www.rev-ed.co.uk/software/WinAXEpad.exe
Save the WinAXEpad.exe file on hard disk, memory stick or card, CD or DVD which can be accessed by
the Windows PC upon which WinAXEpad will be installed.
Installing WinAXEpad for Windows
Ensure you are logged on to Windows with Administrator privileges.
To install simply double-click the WinAXEpad.exe file to run the Microsoft Installer.
To launch AXEpad, from the Start Menu, select All Programs, Revolution Education, AXEpad,
WinAXEpad.
Installing AXE027 USB Download Cable Drivers
It will not be necessary to re-install the AXE027 drivers if they have already been installed for the
PICAXE Programming Editor.
Please see the AXE027.pdf file for instructions on installing the AXE027 USB Download Cable drivers.
This document can be viewed when WinAXEpad has been installed by clicking on the 'Help' then
'AXE027 USB Download Cable' menu options, clicking on the 'USB Help' button in the 'View', 'Options',
'Port' configuration window, or by downloading from Revolution Education Ltd's web site at http://www.rev-ed.co.uk/docs/axe027.pdf
The latest AXE027 Software Drivers for Windows can be downloaded from Revolution Education Ltd's
web site at http://www.rev-ed.co.uk/software/axe027.zip - XP, 2000, 2003, Vista
http://www.rev-ed.co.uk/software/axe027x64.zip - XP (64-Bit)
Installed files
base ---.--|--|--|--`---
WinAXEpad.exe
WinAXEpad_libs
compilers_win
datasheets
syntax
Executable Application
Windows support files
PICAXE Compilers for Windows
PICAXE Manuals and datasheets (PDF)
Colour syntax highlighting definitions
11 of 29
Preferences File
Preferences for WinAXEpad are remembered on a per-user basis and are held in an axepad.ini text file
stored in the user's preferences directory which will normally be C:\Documents and Settings\username\Application Data
The axepad.ini file is created and automatically updated as necessary by WinAXEpad when run. It is not
necessary, nor recommended, to manually edit the axepad.ini file.
Note that preferences for WinAXEpad are entirely separate to preferences for the PICAXE Programming
Editor; altering preferences in one will not affect preferences in the other if both are installed.
12 of 29
Using AXEpad
PICAXE programmers who have used the PICAXE Programming Editor should find AXEpad to
be very familiar to work with. Those who have not should find AXEpad to be intuitive and
straight-forward to use.
The following sections detail the main aspects of AXEpad.
Menu Bar
File
New
Open
Close
Open Recent
Save
Save As
Page Setup
Print
Exit
Create a new program
Open an existing program file
Close the current program
Open a recently used file
Save the current program
Save the current program
Configure the printer
Print the program
Close AXEpad
Edit
Undo
Redo
Cut
Copy
Paste
Delete
Select All
Find
Collapse Current Block
Collapse All Blocks
Expand All Blocks
Undo previous changes
Redo previous changes
Remove selected text from program
Copy selected text of program
Paste text into program
Delete the selected text
Select all text
Find within program text
Collapse current collapsible block
Collapse all collapsible blocks
Expand all collapsible blocks
13 of 29
PICAXE
Program
Clear Hardware Memory
Check Syntax
Debug
Wizards
Terminal
Download program to PICAXE
Clear the PICAXE program and data memory
Check the syntax of the program
Start the Debug Display
Launch a Programming Wizard
Start the serial Terminal
View
Toolbar
Code Explorer
Options
Show or hide the toolbar
Show or hide the Code Explorer
Select configuration options
Help
PICAXE Manual 1
PICAXE Manual 2
PICAXE Manual 3
AXE027 USB Download Cable
AXEpad User Manual
About
View the Getting Started manual
View the Basic Commands manual
View the Circuit Interfacing manual
View the AXE027 instruction manual
View AXEpad user manual
Show AXEpad version details
Tool Bar
The Toolbar provides graphical one-click access to common operations within AXEpad.
The Toolbar will displayed when the View, Toolbar menu option is ticked.
To perform a Toolbar operation, simply move the mouse over the required icon and single left-click. Each
icon will perform an associated and equivalent menu bar operation New
Open
Save
Undo
Redo
File, New
File, Open
File, Save
Edit, Undo
Edit, Redo
Cut
Edit, Cut
Copy
Paste
Print
Options
Syntax
Program
Edit, Copy
Edit, Paste
File, Print
View, Options
PICAXE, Check Syntax
PICAXE, Program
Create a new program
Open an existing program file
Save the current program
Undo previous changes
Redo previous changes
Remove selected text from
program
Copy selected text of program
Paste text into program
Print the program
Select configuration options
Check the syntax of the program
Download program to PICAXE
14 of 29
Code Explorer
The Code Explorer shows a list of all constants, variables and labels which have been used in the
PICAXE Basic program being edited. This list is updated whenever a Syntax Check is performed, the
program is downloaded into a PICAXE or the heading of the Code Explorer is clicked.
Clicking on one of the Code Explorer entries will cause entries which match that clicked upon to be
cycled through in the PICAXE Basic program being edited.
The Code Explorer will be shown when the View, Show Code Explorer menu option is ticked.
Label List
The Label List, when clicked upon, pops-up a list of all labels which have been defined in the PICAXE
Basic program being edited. This list is updated whenever a Syntax Check is performed, the program is
downloaded into a PICAXE or the heading of the Code Explorer is clicked ( if shown ).
Clicking on one of the List Label entries will cause labels which match that clicked upon to be cycled
through in the PICAXE Basic program being edited.
Goto Line
The Goto Line entry field allows a line in the PICAXE Basic program to be quickly selected.
Simply enter the line number desired and press return. The line specified will be located and highlighted
in the PICAXE program.
Keyboard Shortcuts
AXEpad provides a number of keyboard shortcuts to provide the speedy undertaking of a number of
common activities which will occur when developing PICAXE programs. The keyboard shortcuts
available are as follows Ctrl-A
Ctrl-C
Ctrl-N
Ctrl-O
Ctrl-P
Ctrl-Q
Ctrl-S
Ctrl-V
Edit, Select All
Edit, Copy
File, New
File, Open
File, Print
File, Quit
File, Save
Edit, Paste
Ctrl-X
Edit, Cut
Ctrl-Z
Shift + Ctrl-Z
F4
F5
F6
F8
Edit, Undo
Edit, Redo
PICAXE, Check Syntax
PICAXE, Program
PICAXE, Debug
PICAXE, Terminal
15 of 29
Select all of program
Copy selected text of program
Create a new program
Open an existing program file
Print the program
Quite AXEpad
Save the current program
Paste text into program
Remove selected text from
program
Undo previous changes
Redo previous changes
Check the syntax of the program
Download program to PICAXE
Start the Debug Display
Start the serial Terminal
Options
AXEpad can be configured for use with a particular PICAXE type and for user preferences using
the Options settings.
Options settings are accessed by clicking on the View, Options menu option. This will present a tabbed
panel through which a variety of settings can be changed. Settings are remembered in a preferences file
and are unique for each user of the computer, that is, each user can choose preferences which best suit
themselves -
Mode Options
Port Options
Language Options
Color Options
Text Options
Editor Options
Mode
The Mode panel is used to select the PICAXE type being used; this should match the PICAXE you have
installed in your hardware or that which you are developing code for.
The 'Firmware' button will identify or confirm the PICAXE type installed in your hardware and its
16 of 29
Firmware Version Number. Use the Port panel to select the serial connection used to connect to your
hardware.
The selection of PICAXE type affects the operation of the Debug Display and pre-configures the Ring
Tone Tune and PWM Wizards. Please select the correct PICAXE type before using those facilities.
Port
The Port panel is used to specify the serial connection you have to your hardware.
Windows
The Windows drop-down list will show all serial ports which have been installed. Select the physical port
to which the download cable has been connected or the port name Windows has allocated to a
USB-to-serial cable. If a USB-to-serial cable is inserted while Options are open, close Options and
re-open using the View, Options options or the Options toolbar icon. Added serial ports will automatically
be found.
The 'USB Setup' button will launch Windows Device Manager to allow USB-to-serial cables to be
identified and configured.
The 'USB Help' button will show the AXE027 Installation Instruction manual.
Linux
The Linux drop-down list will allow a physical serial port or a USB-to-serial port to be selected. Select
the physical port to which the download cable has been selected or the USB port which represents the
connected USB-to-serial cable.
The 'USB Setup' button will identify the USB ports available on your system; these will have a name
commencing with /dev/ttyUSB.
The 'AXE027 modprobe' button will execute a modprobe command as may be required for your Linux
installation. Please see the AXE027 Installation Instruction manual for further details The 'USB Help' button will show the AXE027 Installation Instruction manual.
Macintosh
The 'USB Setup' button will identify the USB ports available on your system; these will have a name
commencing with /dev/tty.usbserial-.
Identify the port to which you have connected your USB-to-serial cable and enter the digits following
/dev/tty.usbserial- into the text box.
The 'USB Help' button will show the AXE027 Installation Instruction manual.
Language
The Language panel is used to select the language in which you wish AXEpad to operate in.
Colors
The Colors panel allows AXEpad Syntax Highlighting to be configured.
17 of 29
Text
The Text panel allows basic text operations for AXEpad to be configured.
Font - Selects the font to be used for the display.
Size - Selects font size to be used for the display.
Display Invisible Chars - When ticked, characters such as spaces, tabs and end of lines which are not
visible in the source code will be indicated.
Auto-Indent New Lines - When ticked, pressing return at the end of a program line will automatically
indent the next line to the same horizontal position.
Tab Width - Sets how many spaces a tab character in the source program will be converted to.
Enable Auto-Complete - When ticked, the editor will keep track of what is being entered and maintain a
list of PICAXE Basic commands and constants may be being entered ( like SMS predicative text entry ).
This allows commands and constants to be quickly entered by typing the first few characters of the
command or constant and pressing the Tab key. A list of possible commands and constants will appear in
a pop-up allowing that desired to be selected or the word will be auto-completed if there is only one
possible option.
Save In Unix File Format -When ticked, files will be saved using the standard Unix-style end of line
character.
Editor
The Editor panel allows basic editing functions of AXEpad to be configured.
Enable Collapsing Blocks - When ticked, program statement blocks ( for-next, do-loop, { } braces and
so on ) can be collapsed to make the program source more readable during editing.
Display Line Numbers - When ticked, line numbers are shown for each line of the source program.
Show Borders - When ticked, a border around the text editing area will be shown.
Thick Insertion Point - When ticked, the caret which indicates where next text typed will be entered in
the source program is made thicker and more visible than standard.
Automatically close braces - When ticked, typing an opening bracket or brace will automatically create a
closing one.
Highlight Matching Brackets - When ticked, while moving the editing cursor within the program across
opening and closing brackets and braces, the matching bracket or brace will be highlighted.
Left Margin - The left margin of where the edited text appears on the display can be adjusted by using the
slider bar.
Display Right Margin - When ticked, a right hand margin will be drawn on the editing area of the
display.
18 of 29
PICAXE Programming
Programming a PICAXE consists of four steps; writing the PICAXE program to be executed,
checking the program's syntax for correctness, physically programming the PICAXE chip, plus
testing and debugging as necessary to confirm correct operation of the program.
This section details the mechanisms for getting a PICAXE program into a physical PICAXE chip.
Configuration
Prior to programming a PICAXE it is necessary to configure AXEpad for the PICAXE being used and the
serial connection to your hardware. This is done through the AXEpad configuration options which can be
accessed using the View, Options menu option or by clicking on the Options toolbar icon -
Mode Options
Port Options
Please see the earlier Options section for full details of AXEpad configuration.
Syntax Check
The syntax of a PICAXE program can be checked for correctness at any time by using the PICAXE, Check
Syntax menu option, by using the F4 function key or by clicking on the Syntax toolbar icon.
After the program has been checked for correctness a status report will be presented indicating a passed or
failed result -
Successful Syntax Check
Failed Syntax Check
If the program syntax was correct, the Code Explorer and Label List will be updated to reflect the current
PICAXE program.
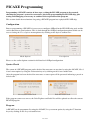
Program
A PICAXE can be programmed by using the PICAXE, Program menu option, by using the F5 function
key or by clicking on the Program toolbar icon.
19 of 29
The syntax of the program being edited will be checked for correctness and any errors will be reported. If
the program is error free then it will be downloaded to the PICAXE hardware and then executed.
A 'splash screen' will show download and programming progress -
After programming completes a status message will be produced providing information about the
programming and PICAXE firmware as appropriate or the Debug Display will automatically launch if the
program contains a debug command.
Clear Hardware Memory
A Clear Hardware Memory can be performed by using the PICAXE, Clear Hardware Memory menu
option.
This will download a 'blank PICAXE program' into the PICAXE, similar to programming the PICAXE
with any other program but one which will "do nothing".
After the PICAXE memory has been cleared a status message will be produced providing information
about the programming and PICAXE firmware as appropriate.
Use of Clear Hardware Memory
It is always recommended to perform a Clear Hardware Memory on PICAXE chips which have
configurable I/O pins before moving them to different hardware or when placing a PICAXE into storage
for later use.
This avoids the potential for conflict between how the PICAXE has been configured and the hardware it is
to be used with. It also prevents a program being left in the PICAXE memory which may prevent a
Firmware Check or Program Download from functioning without a Reset or Hard Reset procedure. This
may otherwise cause some confusion when the PICAXE is taken from storage and how it was previously
used has been forgotten about; the PICAXE may initially appear not to be working properly when it is
working and behaving exactly as it would be expected to.
20 of 29
Debug Display
The Debug Display can be used with a PICAXE Basic program to monitor the contents of variables
and PICAXE chip configuration while that program is executing.
The Debug Display is launched using the Menu Bar, PICAXE then Debug... options or by using the F8
function key. It will also be automatically launched whenever a PICAXE Basic program containing a
debug statement has been downloaded -
Byte Display
Word Display
Note that a PICAXE Basic program must contain at least one Debug statement to produce usable
debugging information. The Debug Display is updated whenever ( and only when ) a Debug statement is
executed. The Debug Display title bar will show "Waiting" until the first debugging information is
received and then show a count of how many Debug statements have been executed.
The displayed information of the Debug Display will vary to match the PICAXE type which is being
debugged. AXEpad should be configured through the View, Options menu option and Mode and Port
panels before debugging commences.
Note that it is necessary to match the Debug Display operation to the speed of the executing PICAXE.
PICAXE operating frequency is chosen using the selection box which allows a choice of 4MHz, 8MHz,
16MHz and 32MHz operating frequencies depending upon PICAXE type.
Data in PICAXE variables can be shown as byte or word data; tick the Words checkbox to display word
data.
The 'Close' button will close the Debug Display and allow editing of the PICAXE Basic program to
continue.
21 of 29
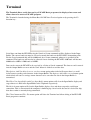
Terminal
The Terminal allows serial data sent by a PICAXE Basic program to be displayed on-screen and
allows data to be sent to a PICAXE program.
The Terminal is launched using the Menu Bar, PICAXE then Terminal option or by pressing the F8
function key -
Serial data sent from the PICAXE using the Sertxd or Serout commands will be displayed in the Input
Buffer. The correct baud rate must be selected to match the baud rate the PICAXE is transmitting with.
For the Sertxd command this will be 4800 baud, for a Serout command, whatever is specified in the
command. The baud rate will need to be adjusted if over-clocking the PICAXE; 4800 baud will become
9600 baud at 8MHz, 19200 baud at 16MHz.
Data can be sent to the PICAXE to be received by a Serin or Serrxd command. The data to send is entered
into the Output Buffer text area and the 'Send' button is clicked to send the data.
The Options, Add 5ms delay between sent bytes menu option when ticked will ensure there is a small
delay between sending each character in the Output Buffer. The Options, Add <CR> on send menu option
when ticked will cause a carriage-return character to be sent after the data in the Output Buffer is
transmitted.
The Edit, Clear Input Buffer and Copy Input Buffer menu options will clear the Input Buffer display and
copy whatever is held in the Input Buffer to the Clipboard respectively.
The Refresh menu option will clear the Input Buffer display, close and then re-open the serial input
connection. This is convenient if the computer is buffering up a lot of serial data and it is desired to skip
that data to what is currently being transmitted.
The 'Close' button and File, Exit menu option will close the Terminal and allow editing of the PICAXE
Basic program to continue.
22 of 29
Ring Tone Tune Wizard
The Ring Tone Tune Wizard can be used to import Ring Tone Tune files ( *.rtl and *.rtttl files )
and convert them to appropriate numeric sequences which can be used with the PICAXE tune
command.
The Ring Tone Tune Wizard is accessed using the Menu Bar, PICAXE, Wizards, then Ring Tone Tunes...
options. This will launch the Ring Tone Tune Wizard interface -
PICAXE-08M Mode
Other PICAXE Modes
The 'Import Tune' button will allow a ring tone tune saved to disk to be loaded and converted to an
equivalent Tune command.
For a PICAXE-08M, the 'Output LED' options will allow the LED Flashing which accompanies the
playing of a tune to be selected. For other PICAXE variants, the 'Output Pin' options allow the output pin
to which the tune will be directed to be selected ( for example, an output pin with a piezo connected ).
The 'Copy' button can be used to copy the converted tone command to the clipboard for pasting elsewhere
and will automatically prompt to also paste the command into the PICAXE Basic program currently being
edited.
The 'Close' button will close the Ring Tone Tune Wizard and allow editing of the PICAXE Basic program
to continue.
23 of 29
Analogue Sensor Calibration Wizard
The Analogue Sensor Calibration Wizard can be used to quickly calibrate analogue sensors and
DS18B20 temperature sensors.
The Analogue Sensor Calibration Wizard is accessed using the Menu Bar, PICAXE,Wizards, then
Analogue Sensor Calibration... option. This will launch the Analogue Sensor Calibration Wizard
interface -
First, select whether it is an analogue sensor or a DS18B20 temperature is to be calibrated, then select the
pin to which the sensor is connected.
Finally click the 'Test' button to download a calibration program into the PICAXE. This will overwrite any
program previously downloaded to the PICAXE but will not affect any source code currently being edited.
The 'Cancel' button will close the Wizard and allow editing of the PICAXE Basic program to continue
without downloading the calibration program.
Once the calibration program has been downloaded, the Debug screen will appear and the sensor reading
will be shown as variable b0 ( "Sensor" ) and updated every second -
The 'Close' button will close the Debug screen when calibration of the sensor has been completed and
allows editing of the PICAXE Basic program to continue.
24 of 29
PWMout Wizard
The PWMout Wizard can be used to quickly and easily determine parameters for the PICAXE
pwmout command.
The PWMout Wizard is accessed using the Menu Bar, PICAXE, Wizards, then PWMout... option. This
will launch the PWMout Wizard interface -
First, select the output pin on which PWM will be generated and choose the operating frequency the
PICAXE will be using. Available options will be presented according to the PICAXE type being used.
The PICAXE type can be changed using the Options settings described earlier.
Secondly, select the PWM output frequency desired ( in Hz ) and the duty of the PWM signal required ( as
a percentage ).
Click on the 'Calculate' button and the required pwmout command parameters will be calculated.
The 'Copy' button can be used to copy the determined pwmout command to the clipboard for pasting
elsewhere and will automatically prompt to also paste the command into the PICAXE Basic program
currently being edited.
The 'Close' button will close the PWMout Wizard and allow editing of the PICAXE Basic program to
continue.
25 of 29
PICAXE-X2 Conversion Wizard
The PICAXE-X2 Conversion Wizard can be used to quickly convert existing PICAXE programs
for use with the PICAXE-28X2 and 40X2.
The PICAXE-X2 Conversion Wizard is accessed using the Menu Bar, PICAXE, Wizards, then Convert to
X2... option. This will launch the PICAXE-X2 Conversion Wizard interface -
Click the 'Cancel' button to abort the conversion, otherwise select the conversion options and click
'Convert'. The source code being edited will be converted for use with an X2 PICAXE according to the
options specified.
When conversion completes, a new editing window will be created which contains your converted
program which may then be edited. Your original source code will not have been changed in its editing
window.
The converted program is not automatically saved to disk; you will be prompted to save the file to disk if
you have not already done so when its editing window or AXEpad is closed.
Detailed information on the X2 conversion process can be found in the PICAXE-X2 Conversion Wizard
manual which can be viewed by clicking on the 'Help' then 'PICAXE-X2 Conversion Wizard Manual'
menu options. The latest version of that document can be downloaded from Revolution Education Ltd's
web site at http://www.rev-ed.co.uk/docs/x2w001.pdf
26 of 29
Additional Information for Linux Users
Linux distributions and individual installations can often be very different to others. While
AXEpad for Linux has been designed to work with the majority of common distributions it may
require configuration tuning to work with your particular distribution or installation.
Configuration tuning can be performed by editing the axepad.ini file that is held in the hidden
./LinAXEpad folder below your home folder. It is not required nor recommended to edit axepad.ini other
than for such configuration tuning.
Before performing configuration tuning, ensure that LinAXEpad has been executed ( this will create the
default axepad.ini file ) and ensure the LinAXEpad application has been closed before making any
changes or they will be lost when LinAXEpad does close.
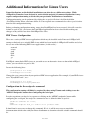
PDF Viewer Configuration
There are a variety of PDF viewer applications which may be installed under Linux and AXEpad will
attempt to find and use a suitable PDF viewer which has been installed. AXEpad will look for and select
for use one of the following PDF viewer applications ( in this order ) acroread
evince
xpdf
kpdf
foxit
gv
If AXEpad cannot find a PDF viewer or you wish to use an alternative viewer to that which AXEpad
selects, you can edit the axepad.ini file.
Locate the following lines [Configuration for Linux]
LinuxPdfApplication=name
Change the name entry to that of your preferred PDF viewer application. For example, if your PDF viewer
were "XyzzyPdfViewer", use [Configuration for Linux]
LinuxPdfApplication=XyzzyPdfViewer
Configuration for the modprobe command
This configuration tuning will likely be required by those using Ubuntu and wishing to use the
'AXE027 modprobe' button when configuring the serial port.
In order to perform a modprobe in response to clicking on the 'AXE027 modprobe' button while
configuring the serial port, the modprobe command to use is defined within axepad.ini [ModProbe Commands for Linux]
Cmd1=
Cmd2=sudo modprobe ftdi_sio vendor=0x0403 product=0xbd90
It should not be necessary to change this command. If it is, it will be necessary to consult the
documentation which came with your Linux distribution to determine what the suitable command should
be.
27 of 29
Where the sudo command executed to give the modprobe access rights to make the change requires a
password ( such as with Ubuntu ), this may be specified by adjusting the Cmd1 entry which will be
executed before the Cmd2 entry. For example, if your Super User or Root password were "Xyzzy", you
could use the following commands [ModProbe Commands for Linux]
Cmd1=echo Xyzzy | sudo -v
Cmd2=sudo modprobe ftdi_sio vendor=0x0403 product=0xbd90
This command sequence should be suitable in most cases. If it is not, it will be necessary to consult the
documentation which came with your Linux distribution to determine what the suitable command should
be.
28 of 29
Additional Information for Macintosh Users
Macintosh installations are usually standardised but depending upon hardware connected an
installation may become user specific and differ to others. While AXEpad for Macintosh has been
designed to work with the majority of common configurations it may require tuning to work with
your particular configuration.
Configuration tuning can be performed by editing the axepad.ini file stored in the user's preferences
directory which will normally be :Users:username:Library:Preferences:
It is not required nor recommended to edit axepad.ini other than for such configuration tuning.
Before performing configuration tuning, ensure that MacAXEpad has been executed ( this will create the
default axepad.ini file ) and ensure the MacAXEpad application has been closed before making any
changes or they will be lost when MacAXEpad does close.
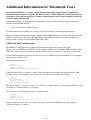
USB Serial Port Configuration
MacAXEpad is configured to use USB serial ports which appear with names in the form
/dev/tty.usbserial-XXXX where 'XXXX' will be a unique identifier for a particular USB serial port. Some
USB Serial cables may present themselves differently to this, for example, /dev/tty.usbserial or similar.
If your USB serial port does not use the /dev/tty.usbserial-XXXX naming convention this can be changed
by editing the axepad.ini file.
Locate the following lines [Target]
Port=0000101D
[Target for Mac]
MacPortPrefix=/dev/tty.usbserial-
Change the MacPortPrefix and Port entries so the two when concatenated will form the correct USB
serial port to use. For example, to use /dev/tty.usbserial the following would be suitable [Target]
Port=usbserial
[Target for Mac]
MacPortPrefix=/dev/tty.
The MacPortPrefix ( "/dev/tty." ) plus Port ( "usbserial" ) entries will give a concatenated USB serial port
descriptor of "/dev/tty.usbserial" as required.
As an alternative, the following would be equally suitable [Target]
Port=serial
[Target for Mac]
MacPortPrefix=/dev/tty.usb
Again, the MacPortPrefix plus Port entries will give a concatenated USB serial port descriptor of
"/dev/tty.usbserial" as required.
29 of 29