1
BRONZE INVENTORY POS SYSTEM.
1.
Introduction
1.1.
What is Bronze Inventory System?
Bronze Inventory System(BrInSy) is the universal inventory management and point of sale system .You can use
this system in your business,office and home. This system will guide you through the creation of vendors list,
products list, receiving lists, invoices, sale receipts and cash receipt. This is in addition to product labels with
barcodes, transfer orders between locations and various types of reports for monitoring your business .
BrInSy Features:
1. The simple intuitive interface. You can proceed with the work without referring to this Help Manual
2. BrInSy is a multi-user and multi - warehouse system .
3. Usage of 50 character alphanumeric product bar codes.
4. Labels of the mostly known Barcodes such as : EAN 13, EAN 8, UPC A, UPC E, ITF,CODE 25, CODE 39,
CODE 128, CODABAR, MSI, POSTNET.
5. Supports non-stock and non-depleting product codes.
6. Calculates sale prices of the list or cost prices.
7. Usage separate product descriptions for invoices and purchase orders.
8. You can group products in storage location and department.
9. BrInSy calculates real-time on hand stock levels on different
warehouses
10. You can independently set up the appearance of the invoice, item receipt and sales receipt.
11. The system and in addition to printing the documents, it can also send E-mails from its own program.
12. You can create and print various types of management reports from our most powerful report wizard.
13. The system is protected with data access control. It can restrict the unauthorized users from having full
access to the database by limiting their access to certain management or confidential information.
16. BrInSy supports using discounts, shipping and two types of taxes in the invoices and orders.
17. Backups and restores databases and many other powerful features.
18. Exports and Imports information from csv (comma-separated-value) files,Excel and QuickBooks.
19.Suitable Point of sale panel for your store or bar.
1.2.
How to begin?
Once you are familiar with the Bronze Inventory System and have worked through the tutorial, you are ready to
create your own database and then add your own data based upon how your organization does its business.
First of all, you have to create a new database by clicking the File Menu. Select New Database. This database
can be created on own computer or any network computer.
If you work with the several companies then create a database for each company.
After creating the database, the system is ready to function all its features as mentioned earlier. You may want to
transfer and existing database information or be imported from a csv (comma-separated-value) file or from QuickBooks
into your newly created database
First of all, set up your company. You should click the Lists button then select the row "Company & Location" in the left
menu select the "_Company" then click the Edit button on the toolbar and enter all the required information.
To insert your vendors, select Vendors:Contracts and click on New Vendor button and enter the information in the
dialog box
To insert your new or existing products from your storehouse, select Items click on New Product button and enter
the details accordingly
If you have a startup stock balance from a vendor, it is suggested to type "Startup Stock Balance" in the Comments field
of the Receiving Item Receipt. Then click the Vendors List to see the payment balance. If the balance is not accurate,
enter the necessary sums for each Vendor in the New Payment to Vendor and type a comment "Startup Payment
Balance".
To insert your customers, select Customers:Jobs in the left menu click on New Customer button and enter the details
accordingly. Should there be any payment balance, apply the above procedures.
Click on New Receiver button to create a Item receipt. This will reflect the field "On Hand" in the Products List ,
You should make out the New Invoice if a customer receives you the products.The amount of the product "On hands"
will decrease.
The Report Wizard part of the system, will keep you up-to-date of all the business operation statistics and alert of any
abnormalities of the day-to-day or monthly business performance expectations. This is plus many other management
reports for future developments
1.3.
System Requirements
-Windows 95,98,2000,NT 4,Me and XP;
-30 MB hard drive space;
-64 MB RAM;
-Ink or Laser Printer.
1.4.
Installation
Before installing use the Bronze Inventory SystemBronze Inventory System make sure that your system has the
required components. In many cases, you will already have everything you need on your system.Otherwise you have to
download the necessary files from and install what you are missing.
The following service packs are provided by Microsoft at no charge.
MDAC 2.5 - mdac_type.exe - Standard with Windows 2000/Millenium
Visual Basic Runtime - VBRUN60sp5.exe - Standard with Windows 2000/Millenium
DCOM95 - dcom95.exe - Win 95 ONLY (if requested when installing MDAC 2.5)
For your convenience you may download these service packs from . They are easy to download and install, and will
ensure that your system has the necessary system files to run the Bronze Inventory System.
Windows 2000/XP/Millenium
Windows 2000 and Millenium has everything needed to run Bronze Inventory System.
Windows NT4.0
Should have service pack 6 installed.
Windows 95/98/NT4.0
Should have MDAC 2.5 installed, please download from http://www.microsoft.com/data/download_25SP2.htm
Should have Visual Basic Runtime installed,please download from
http://download.microsoft.com/download/vb60pro/Redist/sp5/WIN98Me/EN-US/vbrun60sp5.exe
While installing MDAC 2.5 on Windows 95, a message may be displayed requesting DCOM be installed. Normally, it will
have already been installed by another application and you will not see this message. If you get a request for DCOM,
please download and install dcom95.exe from http://www.microsoft.com/com/dcom/dcom95/download.asp.
or dcom98 for Windows 98 from http://www.microsoft.com/com/dcom/dcom98/download.asp
If your system has MDAC 2.6 installed, download and install the Microsoft Jet 4.0 Service pack.
http://www.microsoft.com/data/download_Jet4SP3.htm
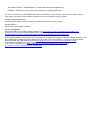
2.
Main Menu
2.1.
New Database
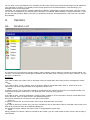
The system is delivered with a ready database "invent.mdb" which you can use for practical work. If you work with
several companies you can create for each a separate database.
If you want create a new database in the menu "File" select item "New" . You can create database on your own
computer or any network computer.
You should enter a name of new database in the appeared dialog box.
If the database already exists, BrInSy will alert you and if you ignore it, it will replace the existing one.Now you can
connect to the new database using Menu Item "Open Database".
If you have MS SQL Server 2000 or MSDE you can create new database using the menu item "New MS SQL database"
2.2.
Open Database
When you open the system, it takes you to its connected default database "invent.mdb". But if you need to be connected
to another database, click the Menu "File" and select a location in the dialog box . Then enter "OK".
The system will stores the last database and will function the Forms and Lists data using this database when starting the
system.
If you use MS SQL Server or MSDE you should use the item "Open database-MS SQL database" and fill a special form
with server name, login=sa and password="your password when you install MS SQL"
2.3.
Backup
It is very important to secure your business data through the backup system using Floppy Disks, Re-Writeable CD's or
any other Hard Drives. To do so, click the Menu "File" and select item "Backup". In the appeared dialog box, choose a
location and name for the backup file and save it in any of the available backup drives
2.4.
Restore
If you want to restore your data from your backup files in the menu "Database" select item " Restore" and in the
appeared dialog box , choose the choice location of the backup file and click button "OK".
2.5.
Page Setup
This is the standard method of changing the printer set-up if it is needed.
2.6.
Forms Font
With this function, you can change the system default font and color to any other desired ones.
2.7.
Send
With the 'Send" function, you can send an e-mail to the support team of the inventory system.
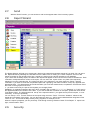
2.8.
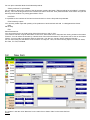
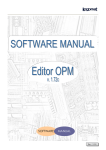
Report Wizard
Report Wizard
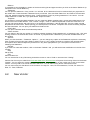
The Report Wizard will help you to create many kinds of the reports that represent results of your work. You can get to
the Report Wizard by selecting the Lists Menu from the Main Form or clicking the button "Reports".The list of the
reports is located on the left part of the form. Actually it is the list of the various requests to your database.
If you select the necessary report, the fields of the request will appear at centre of the form in twelve comboboxes . Each
combobox corresponds with a column of the report. You can set to the report column any field of the request by
selecting it from the combobox list. The column will print in the report then you mark check box "Show" near the
combobox. If you want to create the complicated report with a grouping, then mark checkbox "Group by" opposite to an
appropriate field. This Wizard also have tools that allow you to use sub-total and sort, to update the check boxes "Sum"
and "Sort" in the right part of the form.
If you want to show only the part of the requests you can apply filters.
Establish in a combobox instead of the word "All" a necessary sign or word ("<",">","=","<>","Between" or "Like") and in
the appeared fields enter condition of the filter. If you want to see filter condition on the report, update the check boxes
"Print Report Filter". The Wizard saves all set-up of the report therefore if you again want to print this report, it is not
necessary to set up it repeatedly.
You can set up a font for each sections of the report using the menu "Fonts". The menu "Headers" allows to edit
header and comments of the report. You can also save the report to ASCII comma delimited files using Menu Files
"Save As .csv". This format is easily read by many programs, for example, Excel.
When the report is prepared, you can previously look through it having clicked on button "Print Report". If report is all
right, click the button "Print".
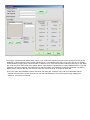
2.9.
Security
The system is protected with data access control. It can restrict the unauthorized users from having full access to the
database by limiting their access to certain management or confidential information. Every user can have a different
access authority to the Forms, Lists and others. In order to do so, enter the File Menu and select Security. In the dialog
box, enter the prime user name in the "Admin Name" field and then a password in the "New Password" field. The "Old
Password" will not be required at this stage but for the future when it is needed to change the password. The Admin
Name person would be the only one who can enter and control the level of access for each user.
Every user name and password must be entered in this dialog box, and then every user to be allocated with the
required Lists and Forms access according to their job responsibilities. This can be done through keeping the
checkbox, checked or unchecked.
3.
Your Company
3.1.
Set up Your Company?
Before you begin the work with this system, you must setup your company. Select in the Lists Menu "Company &
Location" row click on the toolbar button Edit and open the Company Form. Fill in as much as available information many
options as you can and then select the "OK" button . Once all the required information are properly entered, the company
name will be shown in the Form.
3.2.
Company Address
The Billing Address is address where your customers and vendors will mail their payments and bills. The phone number
must also be entered in its field "Phone1". Billing Address will appear at the top of all of your invoices, sale orders,
purchase orders, receiving lists and payment receipt.
The Shipping Address is address on which you will be receiving all of your goods. This address is automatically
entered in the "Ship to" of each new purchase order. You can change the shipping address in the Purchase Order Form.
You can set the number of figures after a decimal point for the prices and extended in the same form .
3.3.
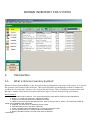
Email address
Email address
You can enter your e-mail address in the "Company E-mail" fields. This E-mail will be used as a back E-mail address for
your customers or vendors. If you already use the mail programs such as Outlook Express or MS Exchange, your
messages will be sent through them.
Otherwise, you need to enter the "Outgoing Mail Server (SMTP)" address that is used to send all the out-going e-mails.
You can find this address at your Internet Service Provider. For example, SMTP address is "smtp.provider.com". If your
provider use authentication SMTP connection you should set check box "Use authentication" and enter your user name
and password.
4.
Vendors
4.1.
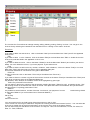
Vendors List
The Vendors List Form allows to manage creating, editing, deleting, sorting, filtering of vendors and printing labels. You
can get to the Vendors List by selecting the Lists Menu from the Main Form or clicking on the button "Vendors". You can
also print a vendors list.
Functions:
New
If you want to add a new vendor, click on the button "New"(or Vendor Menu item "New") and fill the appeared Vendor
form.
Edit
If you want to edit a vendor features, click on the button "Edit"(or Vendor Menu item "Edit" or double click on the
Vendor row) and edit the required fields in the appeared Vendor form.
Delete
To delete a vendor click on the button "Delete"(or Vendor Menu item "Delete") and confirm your request to delete. You
cann't delete a vendor if it still active in any purchase order, receiving list or payment.
Find
If you want to find a vendor by description, number, E-mail or balance, click on the button "Find"(or Vendor Menu item
"Find") and enter what you want to find in the appeared dialog box.
This function searches for concurrence in any part of all list fields.
Print List
To print the vendors list click on the button "Print List"(or View Menu item "Print List").
Filter
If you want to show on the screen only part of the vendors list, click on the button "Filter"(or View Menu item "Filter") and
enter what you want to select in the appeared dialog box.
Pay attention that after filtration the button "Filter" to be highlighted by green light.
Label
Having clicked on the button "Label"(or View Menu item "Label") you can create a label for each vendor with the help of
Label Wizard.
Balance
It is possible to see the balance, number of the last receiving list and payment when you click on the button "Balance" (or
View Menu item "Vendor Balance").
Statement
You can print the statement of any vendor. You will see all the deliveries from this vendor and all your payments for
the certain term. Press the button "Statement" and you will see form with fields "Date from" and "Date to".Press button
"OK" and statement preview window is open. Press the button "Print" for printing statement of the vendor . You can
create statement in HTML file ,if you press button "Export to HTML".
Template
It is an Editor to customize labels template. You can create any labels template using mouse and toolbar buttons. You
should click on the toolbar buttons "Line","Frame","Image", "Text" or "Data" and paint with mouse this elements. You
can use right mouse button and menu items. You should save template in .dtm file after edit. You may create several
template for each document . Before printing you should press on the button "Template" and choose necessary template
file and close editor. You can print your labels from Products List.
Print Label
You can print customize labels for all selected products .
Select vendors.
You can select in the Llist any number of vendors, pressing the button "Select statements" or keeping the key "Ctrl" with
clicking mouse on the extreme left column of the list. If you press button "Statement" you will see the statements of all
the vendors.
Options
When you click the button " Statement Options " , you can change any caption of the Statement to place the necessary
fonts, to restrict from printing some fields, to select a logo of your company and set up a mode of the calculate taxes .
This Options form allows to adjust the printed form in any kind, appropriate for you. The options are saved to the
following new Statement.
Refresh
If you work in a multi-user medium, click on the button "Refresh" and you will see the last modifications in the list of the
vendors.
Help
Call of Help.
Exit
Close Vendors List .
You can sort the list for any field having clicked the mouse on title of field or use menu item "Sorting".
Vendors list form may be called from Purchase Order form, Receiver form or Payment form having clicked on the button
"Vendor". You can select the vendor by a double click of the left mouse button on the vendor row or click on the button
"Select". You may add a new vendor and then select him. You can also use any above mentioned function.
You can use hot keys for fast launch of the functions: F1-Help, F2 - New, F3-Print statement, F4- Edit, F5- select, F6Filter, F7- Find, F8-Delete.
4.2.
New Vendor
To create new vendor click "New Vendor" on the main Menu or button "New" on the Vendors list form.
Fields:
Vendor Name
In this field you must enter the vendor name. This field is a alphanumeric field. You can enter letters and numbers.
Each vendor has unique name and the system will not allow to enter two identical vendor name.
Company name
You must enter a vendor company name. This name will be used on the purchase orders, receiving lists and payments.
Number and name are enough for creation of the new vendor.
Type
The field "Type" is used for classification of the vendors. You can sort and apply a filter by "Type" in the Vendors list .
The field "Type" can be used in the report wizard.
Payment Terms
This Payment term will appear every time you create the new purchase order.
Billing and Shipping Address
The billing address is where you should send purchase orders to. The shipping address is where you ship products to.
These addresses will appear on the top of your purchase orders. You can use a button "=>" for copying billing addresses
into the shipping address.
E-Mail
In the field E-Mail you must enter the e-mail address of this vendor. That allows you to send by e-mail the purchase
orders. If you click the button "E-mail", it can send the letter immediately from this form.
Salesperson
This Salesperson will appear every time you create the new purchase order.
Inactive
This option allows you to setup this vendor as inactive. If you try to do a purchase order for this vendor, the system will
warn you that the vendor on inactive status.
Job/Contract
You can have several contracts with one vendor. Click checkbox and set the contract parameters: Parent
Vendor,Status,Start Date, Projected Ended,Description, Type.
Comment
To enter any special notes about a vendor.
5.
Receiving
5.1.
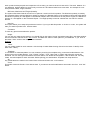
Item Receipts List
The Item Receipt Form allows to manage creating, editing, deleting, sorting, filtering receivers . You can get to the Item
Receipt by selecting the Lists Menu from the Main Form or clicking on the button "Receiving".
Functions:
New
If you want to add a new Item Receipt, click on the button "New"(or Receivers Menu item "New") and fill the appeared
Item Receipt form.
Edit
If you want to edit a Item Receipt features, click on the button "Edit"(or Receivers Menu item "Edit" or double click on
the Receiver row) and edit fields in the appeared Receiver form.
Delete
If you want to delete a Item Receipt, click on the button "Delete"(or Receivers Menu item "Delete") and confirm your wish
to delete. You can't delete the Receiver, if you have payment or receiving by this receiver.
Find
If you want to find a Item Receipt by number, vendor , total or balance, click on the button "Find"(or Receivers Menu
item "Find") and enter what you want to find in the appeared dialog box.
This function searches for concurrence to any part of all list fields.
Print List
To print Item Receipt click on the button "Print List"(or View Menu item "Print List").
Filter
If you want to show on a screen only part of the Item Receipt click on the button "Filter"(or View Menu item "Filter") and
enter what you want to select in appeared dialog box.
Pay attention after filtration on the button "Filter" to be highlighted by green light.
Select for print and Print selected
You can select in the list any amount of the documents, pressing the button "Select for print" or keeping the key "Ctrl"
with clicking mouse on the extreme left column of the list. Then press the button "Print selected" and you will see the
preview window. For printing press button "Print".
Options
When you click the button " Options ", you can change any caption of the Item Receipt, to prohibit show some fields and
set up a mode of the calculate taxes . You can create HTML E-mail invoice in any kind, appropriate for you. The
options are saved in the current Template.
Balance
It is possible to see the balance, number of the last receiver and your payment of current vendor having clicked on the
button "Balance" (or Receivers Menu item "Vendor Balance").
Help
Call of Help.
Exit
Close Receivers List .
You can sort the list for any field having clicked the mouse on title of field .
Item Receipt form may be called from form Payment form having clicked on the buttons "Receiving" . You can select
the Receiver by a double click of the left mouse button on the Receiver row or click on the button "Select"
You can use hot keys for fast launch of the functions: F1-Help, F2 - New, F3-Print selected, F4- Edit, F5- select, F6Filter, F7- Find, F8-Delete.
5.2.
New Item Receipt
To create new receiver click "New Receiving" on the main form or button "New" on the Item Receipts list form.
Fields:
Number
In the field Number you must enter the Item Receipt number or use the default. This field is a alphanumeric field. You
can enter letters and numbers. The system will automatically increment the number each time you create a new Receiver
or you will enter them manually. Each Item Receipt has unique number and the system will not allow to enter two
identical numbers.
Vendor
You must select a vendor name from drop down list. You can add new vendor using row <Add new>.
Billl to and Ship to
Program fills these fields automatically from Vendor and Company info. And you can edit the address on which you
usually receive products.
Date
You must select a date from the calendar which will appear after click on the field "Date".
Salesperson and Payment Term
Text will appear in this fields from Vendors Form "Payment Term" and "Salesperson". If you don't accept this text simply
type a new content .
Reference
You can enter here any additional information concerning given receiver.
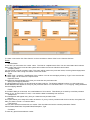
Receiving Items
Click the button "Product". This will display a list of existing products. Click the button "New" to add a new product or
service. Enter a unique Product Code, Invoice and Receiver Description, Cost, List and Sale Price on the Product Form.
Update the check boxes to reflect if taxes are normally applied to sales of this product. If you wish to use this product as
non-stock or non-depleting also check the boxes. Finally, click the OK button on the Product Form and "Select" button(
or double-click on the product row) on the Product List Form. The Receiver Form will be displayed with new item on the
Receiver Items box. On the Receiver Items box, edit the Quantity, Unit Price and the description if necessary. You can
also change the Taxable status for the item on this invoice. Click the Save button. Note that the line item now appears in
the grid and costs, discount, sales taxes, totals and balance due have automatically been calculated. Click the "New
Item" button to add additional items to the Receiver. Note that you can now select product from Products List or click the
"New" button to define an additional product.
You can simply type Product Code in the Receiver Item and press Enter. If this product code exists, BrInSy
automatically will fill fields "Description", "Unit Price" and "Tax". If this product code doesn't exist, you must enter
description, unit price, quantity, tax and after clicking "Save" button system add this product in the Product List.
Besides, you can use any bar code reader that is translated and entered directly into the keyboard buffer as regular text.
You have a possibility to find any product in the big receiving list using button "Find".
You can delete an unnecessary item if establish on it the pointer and click the button "Delete".
If you have several locations or warehouses you can set the checkbox "Location" in the Options Form and indicate the
location for each receiving item. If you purchase goods specially for the Customer Job set column Customer and select
Customer:Job for this items. And finally you may indicate warranty date in the column "Warranty".
Discount rate and Discount
If your vendor uses a discount, you can enter discount rate or discount amount in this field.
The system automatically compute discount through significance of the discount rate (percent). If discount rate is equal
zero, you can manually enter significance of the discount.
Shipping
Enter shipping charges in this field from vendors invoice.
Tax
The system allows to use two kinds of the taxes. The taxes can calculate automatically as significance tax rate(percent)
from the sum of the Receiver (with shipping or without). Only taxable products are used in calculation. If the account of
the tax doesn't submit to automation, it can be entered manually. Update the check boxes "Calc.Tax" if taxes are
automatically settled up through tax rate. If you expect the tax with allowance shipping establish the check box "Tax
Shipping". You can place options of account of the second tax with the help of forms "Receiver Options" which is called
by clicking of the "Option" button.
Comment
The Comment field allows you to enter any Receiver comments.
Due Received
Here you can enter due received date. You must select a date from the calendar which appear after click on this field.
Reference
Here you can do a note about a condition of this Receiver. The Receiver may be printed, sent by E-mail or Receiver
creation may be not completed yet. The content of this field is not printed.
Group
The field"Group" are used for classification of the Receivers. You can sort and apply a filter by "Group" in the Receivers
list and reports. The content of this field is not printed.
Location
You may indicate location for delivery all goods.
Status
You can select status of your Item Receipt : "Approved" for existing receiving,"Waiting" for planned transaction and
"Canceled".
Buttons:
Vendor
Calls the Vendors List form for choice of the vendor.
New Item
Click the "New Item" button to add additional items to the Receiver.
Products
Calls the Products List form for choice of the product.
Find
You may find any product amongst already entered items.
Delete
You can delete an unnecessary item if you establish the pointer on it and click the button "Delete".
Insert
You can insert a row between existing rows.
You can use hot keys for fast luanch of the functions: F2- New Item, F4- Products, change field "Tax" and increase
Quantity,F7- Find.
Paid Amount
You can look through the list of all payments under this Receiver after clicking on this button. Immediately from this list of
payments you can enter new payment or edit already made payments under this Receiver. Total sum of payments is
visible to the right of this button.
Options
When you click the button " Receiver Options " you can change any caption of the Receiving Item Receipt to prohibit
from printing some fields, to select a logo of your company and set up a mode of the calculate taxes. This Options form
allows to adjust the printed form in any kind, appropriate for you. The options are saved to the following new Item
Receipt.
Template
It is an Editor for Item Receipt template. You can create any receiving list template using mouse and toolbar buttons.
You should click on the toolbar buttons "Line","Frame","Image", "Text" or "Data" and paint with mouse this elements.
You can use right mouse button and menu items. You should save template in .dtm file after edit. You may create
several template for each document (for example packing list for invoice). Before printing you should select Template
from drop down list.
Print
Use this button to print the Item Receipt
Save
Any modifications made in the Receiver are made in the POrder will be saved only in case if you click this button.
Close
This button closes the Receiver form. If you want to save all modifications made in the form before closing the form,
necessarily click "Save" button . If you want to leave without saving, safely click on this button.
Form Menu
You can execute any command not only by clicking on an appropriate button but also by choicing Item of the Form
Menu.
5.3.
Edit Item Receipt
You can make any changes necessary for existing Receiving. To call the form for edit of the receiver click "
Receiving" button on the main form. From the Receivers List form, you have to choose the Receiver and click on the
"Edit" button( or double click on the Receiver row). You can change, add and remove Receiver information using any
functions of the Receiver form . We don't recommend you to make any changes in a Item Receipt after it has been sent
to your vendor. You can prepare another Item Receipt for the required adjustment.
6.
Customers
6.1.
Customers List
The Customers List Form allows to manage creating, editing, deleting, sorting, filtering of customers and printing labels.
You can get to the customers List by selecting the Lists Menu from the Main Form or clicking on the button "Customers".
You can also print a Customers list.
Functions:
New
If you want to add a new customer, click on the button "New"(or Customer Menu item "New") and fill the appeared
customer form.
Edit
If you want to edit a customer features, click on the button "Edit"(or Customer Menu item "Edit" or double click on the
customer row) and edit fields in the appeared Customer form.
Delete
To delete a customer click on the button "Delete"(or Customer Menu item "Delete") and confirm your wish to delete. You
can't delete the customer if it was specified in any invoice, sale order or payment.
Find
If you want to find a customer by description, number, E-mail or balance, click on the button "Find"(or Customer Menu
item "Find") and enter what you want to find in appeared dialog box.
This function searches for concurrence in any part of all list fields.
Print List
To print Customers list click on the button "Print List"(or View Menu item "Print List").
Filter
If you want to show on the screen only a part of the Customers list, click on the button "Filter"(or View Menu item "Filter")
and enter what you want to select in appeared dialog box.
Pay attention that after filtration the button "Filter" to be highlighted by green light.
Label
Having clicked on the button "Label"(or View Menu item "Label") you can create a label for each customer with the help
of the Label Wizard.
Balance
It is possible to see the balance, number of the last invoice and payment when you click on the button "Balance" (or View
Menu item "customer Balance").
Statement
You can print the statement of any customer. You will see all the sales of this customer and all payments from the
certain term. Press the button "Statement" and you will see form with fields "Date from" and "Date to".Press button "OK"
and statement preview window is open. Press the button "Print" for printing statement of the vendor . You can create
statement in HTML file, if you press button "Export to HTML".
Template
It is an Editor for customize labels template. You can create any labels template using mouse and toolbar buttons. You
should click on the toolbar buttons "Line","Frame","Image", "Text" or "Data" and paint with mouse this elements. You
can use right mouse button and menu items. You can save template in .dtm file after edit. You may create several
template for each document . Before printing you should select Template from drop down list. You can print your labels
from Products List.
Print Label
You can print customize labels for all selected products .
Select customers for print.
You can select in the list any number of customers, pressing the button "Select " or keeping the key "Ctrl" with clicking
mouse on the extreme left column of the list. If you press button "Statement" you will see statements of all customers.
Options
You can call the form " Statement Options " when you click on this button. You can change any caption of the
Statement to place the necessary fonts, to prohibit from printing some fields, to select a logo of your company and set up
a mode of the calculate taxes . This Options form allows to adjust the printed form in any kind, appropriate for you. The
options are saved to the following new Statement.
Help
Call of Help.
Exit
Close Customers List .
You can sort the list for any field having clicked the mouse on title of field.
The Customers list form may be called from Invoice form, Sale Order form or Payment form having clicked on the
button "Customer". You can select the Customer by a double click of the left mouse button on the customer row or click
on the button "Select". You may add a new customer and then select him. You can also use any above mentioned
function.
You can use hot keys for fast launch of the functions: F1-Help, F2 - New, F3-Print statement, F4- Edit, F5- select, F6Filter, F7- Find, F8-Delete.
6.2.
New Customer
To call the form for creation of new customer click "New Customer" on the main form or button "New" on the Customers
list form.
Fields:
Number
In the field Number you must enter the customer number or use the default. This field is a alphanumeric field. You can
enter letters and numbers. The system will automatically increment the number each time you create a new customer or
you will enter them manually. Each customer has unique number and the system will not allow to enter two identical
numbers.
Company name
You must enter a customer company name. This name will be used on the purchase orders, receiving lists and payments.
Number and name are enough for creation of the new customer.
Type and Group
The fields "Type" and "Group" are used for classification of the customers. You can sort and apply a filter by "Group" in
the Customers list . The fields "Group" and "Type" can be used on the report wizard.
Payment Terms
This Payment term will appear every time you create the new invoice.
Billing and Shipping Address
The billing address is where you should send invoice and sale orders to. The shipping address is where you ship products
to. These addresses will appear on the top of your invoices and sale orders. You can use a button "=>" for copying billing
addresses into the shipping address.
E-Mail
In the field E-Mail you must enter the e-mail address of this customer. That allows you to send by e-mail the invoice
and sale orders. If you click the button "E-mail", it can send the letter immediately from this form.
Salesperson
This Salesperson will appear every time you create the new invoice and sale order.
Inactive
This option allows you to setup this customer as inactive. If you try to do an invoice or sale order for this customer, the
system will warn you that they are on inactive status.
Comment
To enter any special notes about the customer. You can also print the contents of the comment on a customer's sale
orders or invoice (see above).
Job/Contract
You can have several jobs with one customer. Click checkbox and set the contract parameters: Parent
Vendor,Status,Start Date, Projected Ended,Description, Type.
7.
Invoices
7.1.
Invoices List
The Invoices List Form allows to manage creating, editing, deleting, sorting, filtering invoices . You can get to the
Invoices List by selecting the Lists Menu from the Main Form or clicking on the button "Invoices".
Functions:
New
If you want to add a new sale invoice, click on the button "New"(or Invoices Menu item "New") and fill the appeared
Invoice form.
Edit
If you want to edit a invoice features, click on the button "Edit"(or Invoices Menu item "Edit" or double click on the
Invoice row) and edit fields in the appeared Invoice form.
Delete
If you want to delete a invoice, click on the button "Delete"(or Invoices Menu item "Delete") and confirm your wish to
delete. You can't delete the Invoice, if you have payment by this sale invoice.
Find
If you want to find the a sale invoice by number, customer , total or balance, click on the button "Find"(or Invoices
Menu item "Find") and enter what you want to find in appeared dialog box.
This function searches for concurrence to any part of all list fields.
Print List
To print Invoices list click on the button "Print List"(or View Menu item "Print List").
Filter
If you want to show on a screen only part of the Invoices list click on the button "Filter"(or View Menu item "Filter") and
enter what you want to select in the appeared dialog box.
Pay attention after filtration on the button "Filter" to be highlighted by green light.
Select for print and Print selected
You can select in the list any number of the documents, pressing the button "Select for print" or keeping the key "Ctrl"
with clicking mouse on the extreme left column of the list. Then press the button "Print selected" and you will see the
preview window. For printing press button "Print".
Balance
It is possible to see the balance, number of the last invoice and your payment of current
vendor having clicked
on the button "Balance" (or Invoices Menu item "Customer Balance").
Help
Call of Help.
Exit
Close Invoices List .
You can sort the list for any field having clicked the mouse on title of field .
The Invoices List form may be called from Payment form having clicked on the buttons "Invoice" . You can select the
Invoice by a double click of the left mouse button on the Invoice row or click on the button "Select"
You can use hot keys for fast launch of the functions: F1-Help, F2 - New, F3-Print selected, F4- Edit, F5- select, F6Filter, F7- Find, F8-Delete.
7.2.
New Invoice
Click on the button "New Invoice" on the main form or button "New" on the Invoices list form.
In the field Number enter the Invoice number or use the default. This field is a alphanumeric field. Each Invoice has
the unique number.
Fill in the name of the customer or job.
Select a Template
In the detail area, enter the line items.
Invoice Items
Click the button "Product". This will display a list of existing products. Click the button "New" to add a new product or
service. Enter a unique Product Code, Invoice and Invoice Description, Cost, List and Sale Price on the Product Form.
Update the check boxes to reflect if taxes are normally applied to sales of this product. If you wish to use this product as
non-stock or non-depleting also check the boxes. Finally, click the OK button on the Product Form and "Select" button(
or double-click on the product row) on the Product List Form. The Invoice Form will be displayed with new item on the
Invoice Items box. On the Invoice Items box, edit the Quantity, Unit Price and the description if necessary. You can also
change the Taxable status for the item on this invoice. Click the Save button. Note that the line item now appears in the
grid and discount, sales taxes, totals and balance due have automatically been calculated. Click the "New Item" button to
add additional items to the Invoice. Note that you can now select product from Products List or click the "New" button to
define an additional product.
You can simply type Product Code in the Invoice Item and press Enter. If this product code exists, BrInSy
automatically will fill fields "Description", "Unit Price" and "Tax". If this product code doesn't exist, you must enter
description, unit price, quantity, tax and after clicking "Save" button system add this product in the Product List.
Besides, you can use any bar code reader that is translated and entered directly into the keyboard buffer as regular
text.
You'll see the warning message if you enter in the invoice a product with zero or small quantity in the warehouse.
You have a possibility to find any product in the big invoice using button "Find".
You can delete an unnecessary item if establish on it the pointer and click the button "Delete".
The form has the checkbox "Calculate Price from Ext." for switching the mode of calculate price from extention.
Discount rate and Discount
If you use a discount, you can enter discount rate or discount amount in this field.
System automatically compute discount through significance of the discount rate (percent). If discount rate is equal zero,
you can manually enter significance of the discount.
Shipping
Enter shipping charges in this field.
Tax
The system allows to use two kinds of the taxes. The taxes can calculate automatically as significance tax rate(percent)
from the sum of the Invoice (with shipping or without). Only taxable products are used in calculation. If the account of
the tax doesn't submit to automation, it can be entered manually. Update the check boxes "Calc.Tax" if taxes are
automatically settled up through tax rate. If you expect the tax with allowance shipping establish the check box "Tax
Shipping". You can place options of account of the second tax with the help of forms "Invoice Options" which is called by
clicking of the "Option" button.
Comment
The Comment field allows you to enter any Invoice comments.
Reference
Here you can do a note about condition of this Invoice. The Invoice may be printed, sent by E-mail or Invoice creation
may be not completed yet .The content of this field is not printed.
Group
The field "Group" is use for classification of the Invoices. You can sort and apply a filter by "Group" in the Invoices list
and reports. The content of this field is not printed.
Location
You may indicate location for all goods.
Status
You can select status of your Invoice : "Approved" for existing sale,"Waiting" for planned transaction and "Canceled"
Buttons:
Customer
Calls the Customer List form for choice of the customer.
New Item
Click the "New Item" button to add additional items to the Invoice.
Products
Calls the Products List form for choice of the product.
Find
You may find any product amongst already entered items.
Delete
You can delete an unnecessary item if you establish the pointer on it and click the button "Delete".
Insert
You can insert a row between existing rows
From Estimate
You can fill the invoice detail section from any Estimate already sent to the customer.
You can use hot keys for fast luanch of the functions: F2- New Item, F4- Products, change field "Tax" and increase
Quantity,F7- Find.
Sale Order
If you use sale orders you can create invoice as copy sale order already sent to the customer. If you selected the
customer for your invoice you'll see only list of sales orders of this customer. If you not selected customer you'll see all
sales orders. You should choose order and press on the button "Select" or do double click of the mouse. Program pull
over the items, comments and other info from a Sales
Order to an Invoice.
Sold
Here you can look through the list of all invoices under this Invoice. Total sum of sale is visible to the right of this button.
Paid Amount
You can look through the list of all payments under this Invoice after clicking on this button. Immediately from this list of
payments you can enter new payment or edit already made payments under this Invoice. Total sum of payments is
visible to the right of this button.
Options
When you click the button " Options " , you can change any caption of the Invoice and set up a mode of the calculate
taxes . This Options form allows to adjust the screen form in any kind, appropriate for you. The options are saved in the
current template.
Template
It is an Editor for Invoice templates. You can create any receiving list template using mouse and toolbar buttons. You
should click on the toolbar buttons "Line","Frame","Image", "Text" or "Data" and paint with mouse this elements. You
can use right mouse button and menu items. You should save template in .dtm file after edit. You may create several
template for each document (for example packing list for invoice). Before printing you should select Template from drop
down list.
Print
Use this button to print the invoice.
E-mail
You can send the Invoice by E- mail using this button. The Invoice will be created as html file and will be sent to your
customer as attachment of the letter .
Save
Any modifications made in the Invoice will be saved only in case if you click this button.
Close
This button closes the Invoice form. If you want to save all modifications made in the form before closing the form,
necessarily click "Save" button. If you want to leave without saving, safely click on this button.
Form Menu
You can execute any command not only by clicking on an appropriate button but also by choicing Item of the Form
Menu.
The form "Invoice" have the checkbox "Calculate Price from Ext." for switching mode of calculate price from extention.
7.3.
Edit Invoice
You can make any changes necessary for existing Invoices. To call the form for edit of Invoice click " Invoices" button on
the main form. From the Invoices List form, you have to choose the Invoice and click on the "Edit" button( or double
click on the Invoice row). You can change, add and remove Invoice information using any functions of the Invoice form .
We don't recommend you to make any changes in the Invoice after it has been sent to your customer. You can prepare
another Invoice for the required adjustment.
8.
Point of Sale
Point-of-sale panel is a cash registers designed for small and medium-sized firms such as retailing businesses, hotels
,bars, restaurants and warehouses.
Item may be selected by any of:
1 TouchScreen (mouse-clickable)
2 Keyboard
3 Barcode scanning
4 Combination Keyboard / Barcode scanner / TouchScreen
8.1.
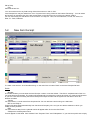
Point of Sale
You can run the POS panel using the button "Create New: Point of Sale "or button "POS" on the Shipping toolbar. First
of all select a Department press Enter and find a selling product in the Item List. Click <Enter> and add product to Sale
Receipt.You can use key Enter for addition and button Minus for subtraction of the items. If you want to edit the receipt
you can select row and press Enter or make mouse doubleclick. After creating the receipt you should click the button
"Print Receipt" or use key combination Alt+R. Then enter payment amount and press Enter.
If you use bar code scanner click on the button "Enter by code"
8.2.
Point of Sale Options
You can adjust the Point of Sale panel for your business. Open the Shipping form and click on the button POS options.
Change check boxes and set filter for item list and click OK.
9.
Items
9.1.
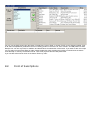
Items List
The Products List Form allows to manage creating, editing, deleting, sorting, filtering products and printing labels. You
can get to the product List by selecting the Lists Menu from the Main Form or clicking on the button "Products". You can
also print a Products list.
Functions:
New
If you want to add a new product, click on the button "New"(or Product Menu item "New") and fill the appeared product
form.
Edit
If you want to edit a product features, click on the button "Edit"(or Product Menu item "Edit" or double click on the
product row) and edit fields in the appeared Product form.
Delete
To delete a product click on the button "Delete"(or Product Menu item "Delete") and confirm your wish to delete. You
can't delete the product if it was specified in any invoice, sale order or payment.
Find
If you want to find a product by description, number, E-mail or balance, click on the button "Find"(or Product Menu item
"Find") and enter what you want to find in appeared dialog box.
This function searches for concurrence in any part of all list fields.
Print List
To print the Products list click on the button "Print List"(or View Menu item "Print List").
Filter
If you want to show on the screen only a part of the Products list, click on the button "Filter"(or View Menu item "Filter")
and enter what you want to select in the appeared dialog box.
Pay attention that after filtration the button "Filter" to be highlighted by green light.
Label
Having clicked on the button "Label"(or View Menu item "Label") you can create a label for each customer with the help
of the Label Wizard.
Print Label
You can print customize labels for all selected products .
Select products for print labels
You can select in the list any number of the documents, pressing the button "Select products for print labels" or keeping
the key "Ctrl" with clicking mouse on the extreme left column of the list. Then press the button "Print Label" and you will
see the preview window. For printing press button "Print".
Last Sale
It is possible to see numbers of the last invoice and receiver where this product is presented.
Print Inventory report
You can easy create report with quantity of the products on hand received and sold in a designated time frame.
Help
Call of Help.
Exit
Close Products List .
You can sort the list for any field having clicked the mouse on title of field .
The Products list form may be called from Invoice form, Sale Order form or Payment form having clicked on the button
"Product". You can select the Product by a double click of the left mouse button on the product row or click on the button
"Select". You may add a new product and then select him. You also can use any above mentioned function.
You can use hot keys for fast luanch of the functions: F1-Help, F2 - New, F3-Print inventory report, F4- Edit, F5- select,
F6- Filter, F7- Find, F8-Delete.
9.2.
New Item
To create of new item click "New Item" on the main form or button "New" on the Items list form.
Fields:
Item Code
In the field Item Code you must enter the Item name. This field is alphanumeric field. You can enter letters and
numbers. Each item code is unique and the system will not allow to enter two identical name.You have 50 spaces in
which you can enter your Product Code.
Invoice description
You must enter invoice description for each product. This description will be used in the sale orders and invoices as the
product being sold. Item Code and description are enough to create the new product.
Purchase Order description
You can enter POrder description for product. This description will be used in the purchase orders and receivers as the
product being bought.You may not type the POrder description and it will be copied with the Invoice description after
saving new product.
Type
You should select type of the new item.The system uses 12 item types: Service,Inventory Part,Non-Inventory Part,Fixed
Asset,Other Charge,Subtotal,Group,Inventory Assembly,Discount,Payment,sales Tax Item,Sales Tax Group.
Cost
The cost is the amount that you have paid for the product when you have bought it. Cost includes the price of
purchasing, shipping and taxes. The system automatically recalculates product cost for each new receiver. The cost can
be used for calculating sale price.
List Price
The list price is used in the calculation of a sale price. The list price is usually the manufactures suggested retail price.
Price Method
You can use several methods of calculating List and Sale prices:
Manual - a price is not automatically calculated by the system, you must enter a price manually.
% Markup from Cost - BrInSy will automatically calculate the list or sale price using the Cost and the percentage. The
formula used to calculate this price is:
(Cost + (Cost * (Percentage/100))).
Margin From Cost -The system will automatically calculate the list or sale price using the Cost and the percentage. If
margin markups the sale price by 15%, enter 15.00 in the percentage field. The formula used to calculate the price is:
(Cost / (1- (Percentage/100))).
Only for Sale price:
Discount From List - BrInSy will automatically calculate the sale price using the List Price and the percentage. The
formula used to calculate this sale price is:
(List Price - (List Price * (Percentage/100))).
The system calculates the prices after clicking on the "Recalculate" button.
Sale Price
This is the unit price used in all new Sale Orders and Invoices, which you can change at Invoice's( Order's) any time.
Pref Vendor
The system finds all vendors who have ever delivered this product and fills in their names in the combobox. You can
select vendor that you prefer or fill in a vendor name. This field appears on your reports to help you in solving what the
vendor you prefer to buy this product from.
Bar Code
You can use any bar code for identification and automatic entering items in invoices and orders.
Department
The field "Department" is used for classification of the products. You can select already existing Department or enter
new Department in this field. You can sort and apply a filter by "Department" in the Items List . The field "Department"
can be used in the report wizard.
Weight
It is weight of product unit.
Tax Invoice and Tax PO.
These check boxes allow you to specify if a product is taxable in POrders and Invoices. The system calculates the tax
only for taxable products. You can change these options at Invoice's( Order's) any time.
Non-Stock / Non-Depleting.
If you establish one of these options, the system will not update the stock balance for this product. The residual of a non-
stock product is always equal zero irrespective of how many you have received or have sold it. The stock balance of a
non-depleting product takes into account only receivers of it and doesn't take into account sale. An example of a nonstock product is labor, freight, software.
Minimum, Maximum and Target Quantity
The system uses these fields for account of an optimum stock level for this product. The Maximum quantity is used by
the Overstock Report and the Minimum quantity is used by the Reorder Report. If the residual of this product falls below,
the Minimum quantity of it will appear on the Reorder Report, and if the stock level of this product higher, the Maximum
quantity of it will appear on the Overstock Report . The target quantity is used to calculate the over-stock or reorder
amount.
Inactive
This option allows you to setup this product as inactive. If you try to add this product to invoice or order , the system will
warn you that this product have inactive status.
Comment
To enter any special notes about the product.
Image
You can link any image to this product. You should click on the button "Image" and select image file in the dialog window.
We recommend to use files in the .JPG format. The BMP files take too much places in your database. If you click on
the button "View" a size of the image will be increased.
Buttons:
Label
You can create a label for each customer with the help of Label Wizard having clicked on the button "Label"(or View
Menu item "Label") .
Template
It is an Editor for Label templates. You can create any receiving list template using mouse and toolbar buttons. You
should click on the toolbar buttons "Line","Frame","Image", "Text" ,"Bar Code" or "Data" and paint with mouse this
elements. You can use right mouse button and menu items. You should save template in .dtm file after edit. You may
create several template for each document. Before printing you should select Template from drop down list.
Ok
Any modifications are made in the Product form will be saved after click on this button.
Close
This button closes the Product form without save. If you want to save all modifications are made in the form click "Ok"
button.
10.
Transfer Order
10.1.
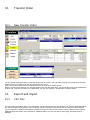
New Transfer Order
Transfer Order
You buy goods and dispose them in different storehouses and rooms. You can track quantity of the products in the each
locations when you create receiving Item Receipts and Invoices.
When you move products from one locations to other you may use a transfer Order.
Select on the left menu Actions row "Transfer Orders" and click the button New. You should select source and destination
location and enter the line items in the detail area, You can use Group for classification Transfer Orders.
11.
Export and import
11.1.
CSV files
You can export information about your Customers, Vendors and Products to the standard csv (comma-separated-value)
file. Select the Menu item "Export" in the Customer,Vendor or Product List and enter the file name for export. Besides
you can export any report from the Report Wizard.The first line of the csv file contains column headers, which match a
database field name within one of the BrInSy database tables. You can view the csv files using Microsoft Excel or
Notepad.
You can import data using the menu item "Import" only for Customer, Vendor and Products from csv files with any
structure . At first indicate a source file and then in the opened table select approaching fields having clicked on the grid
header. Each csv file must contain a column with unique numbers of the customers or vendors or products.During the
import process the BrInSy looks for unique number values. These records are then imported into the BrInSy database. If
the unique value already exists, it skips that record so that you do not get duplicates. The incorrect records will stay in the
table. You can edit numbers and repeat import. After successful import the table will be empty.
11.2.
Excel files
You can import data using the menu item "Import" only for Customer, Vendor and Products from Excel files with any
structure . At first indicate a source file and then in the opened table select approaching fields having clicked on the grid
header. Each Excel file must contain a column with unique numbers of the customers or vendors or products.During the
import process the BrInSy looks for unique number values. These records are then imported into the BrInSy database. If
the unique value already exists, it skips that record so that you do not get duplicates.
11.3.
QuickBooks
You can connect to the QuickBooks database and import from Items,Customers,Vendors,Item Receipts, Purchase
Orders, Sales Orders, Sales Receipts and other tables. And you can imort these tables from BrInSy to the QuickBooks.