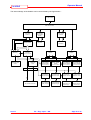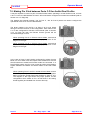
1
Please read this manual carefully before setting-up and using your unit
Supplied By
The electronic version of this document is the controlled copy. Therefore all
printed versions of this document are uncontrolled.
For the latest manual revision always visit “www.tritech.co.uk”
Issue 1
TIL – Eng – Spec – 080
SeaHub OM
COPYRIGHT
© Tritech International Ltd
The copyright in this document is the property of Tritech International
Limited. The document is supplied by Tritech International Limited on
the understanding that it may not be copied, used, or disclosed to
others except as authorised in writing by Tritech International Limited.
Tritech International Limited reserved the right to change, modify and
update designs and specifications as part of their ongoing product
development programme.
F063.1
SeaHub
Operator Manual
1. Contents
1. Contents .................................................................................................................................................. 3
2. Notices ..................................................................................................................................................... 4
2.1. Trademarks ............................................................................................................................... 4
2.2. Handling of Electrostatic Sensitive Devices .............................................................................. 5
2.3. Warranty Policy ......................................................................................................................... 6
2.4. Statutory Compliances .............................................................................................................. 7
2.4.1. Compliance Notice – CE Mark ....................................................................................... 7
2.4.2. Waste Electrical and Electronic Equipment Directive (2002/96/EC - WEEE) ............... 7
2.4.3. Restriction of Hazardous Substances Directive (2002/95/EC – RoHS) ........................ 7
2.5. Safety Statements ..................................................................................................................... 8
2.6. Technical Support & Software Upgrades .................................................................................. 9
3. Before Using ......................................................................................................................................... 10
3.1. Package Contents ................................................................................................................... 10
3.2. General Overview ................................................................................................................... 11
3.3. Front Panel .............................................................................................................................. 13
3.4. Rear Panel .............................................................................................................................. 13
3.5. Underside Label ...................................................................................................................... 13
4. Operation ............................................................................................................................................... 14
4.1. Hardware Installation .............................................................................................................. 14
4.2. Hardware Driver Installation and Configuration ...................................................................... 14
4.2.1. Windows Driver Installation.......................................................................................... 14
4.2.2. Identifying SeaHub Serial Ports ................................................................................... 17
4.2.3. SeaHub Serial Port Functions ..................................................................................... 19
4.3. Seanet Software Installation and Configuration ...................................................................... 20
4.3.1. Seanet Software Installation ........................................................................................ 20
4.3.2. Configuring Seanet with SeaHub COM Ports .............................................................. 21
4.3.3. Selecting SeaHub Port Hardware Modes .................................................................... 22
4.4. Software & Driver Un-installation ............................................................................................ 24
4.4.1. Serial Driver Un-installation ......................................................................................... 24
4.4.2. Seanet Un-installation .................................................................................................. 24
4.5. Status & Mode Indicators ........................................................................................................ 25
4.6. Device Connection, Wiring & Installation ................................................................................ 26
4.6.1. Connecting a Tritech Micron DST Sonar (or Echosounder) ........................................ 26
4.6.2. Connecting a Tritech SeaKing, SeaKing DST, SeaPrinceDST, Bathy, Roll Sensor or
SideScan Sonar ..................................................................................................................... 29
4.6.3. Connecting other Serial Devices ................................................................................. 32
4.6.4. ArcNet Line Termination .............................................................................................. 33
4.6.5. Subsea Sensor Electrical Installation .......................................................................... 33
4.6.6. Ground Fault Monitoring Equipment ............................................................................ 33
5. Power Supplies ..................................................................................................................................... 34
5.1. Power Inputs ........................................................................................................................... 34
5.2. Choosing a DC Source ........................................................................................................... 35
5.3. Power Outputs ........................................................................................................................ 36
5.3.1. Communication Signal Grounding ............................................................................... 37
5.3.2. “Ports C & D” Power Output ........................................................................................ 37
5.3.3. “DC Output Sockets” Power Output............................................................................. 37
5.3.4. “AIF (ARCNET)” Power Output .................................................................................... 37
5.3.5. Power Output Types .................................................................................................... 38
6. Data Interfaces ...................................................................................................................................... 39
6.1. USB PC/Laptop Interface ........................................................................................................ 39
6.2. USB Peripheral Ports .............................................................................................................. 39
6.3. Communication (Sonar/Sensor/Serial) Ports .......................................................................... 40
6.3.1. Port A (RS232[5] & RS485) .......................................................................................... 40
6.3.2. Port B (RS232[3], RS485 & RS422) ............................................................................. 41
6.3.3. Port C & Port D (RS232, RS485 & ArcNet) ................................................................. 42
6.4. AIF (ArcNet) Connector........................................................................................................... 43
6.5. RAT Interface .......................................................................................................................... 43
6.5.1. RAT Connection........................................................................................................... 44
6.5.2. RAT Configuration ....................................................................................................... 44
Issue 1
TIL – Eng – Spec – 080
Page 3 of 70
Operator Manual
SeaHub
7. Hardware Configuration & Maintenance ............................................................................................ 45
7.1. Opening the SeaHub housing ................................................................................................. 46
7.2. Resetting the Software Default Settings ................................................................................. 47
7.3. Selecting the DC “Power Out” Supply Voltage & Ground ....................................................... 48
7.4. Checking & Replacing Fuses .................................................................................................. 51
7.4.1. Checking/replacing the AC “Mains” fuse ..................................................................... 51
7.4.2. Checking/replacing the DC Main Output Power (+28V Supply) Fuse ......................... 52
7.4.3. Checking/replacing the DC Ext Output Power (+12V & +5V Supply) Fuses ............... 53
7.5. Making Pin 5 link between Ports C-D for ArcNet Dual Profiler ............................................... 54
7.6. Changing the ArcNet Power Supply ....................................................................................... 55
7.7. Changing the ArcNet Termination Resistor ............................................................................ 56
7.8. Enabling the legacy Serial Port on the AIF connector ............................................................ 57
7.9. Firmware & Software Update Procedure ................................................................................ 59
7.9.1. Updating the SeaHub with the new software BinFile ................................................... 59
7.9.2. Updating the SeaHub with new FPGA firmware .......................................................... 60
7.10. Portable Appliance Testing Guidelines ................................................................................. 62
8. Troubleshooting ................................................................................................................................... 63
9. Technical Specifications...................................................................................................................... 66
9.1. Electrical .................................................................................................................................. 66
9.2. Software .................................................................................................................................. 68
9.3. Environmental ......................................................................................................................... 69
9.4. Statutory Compliances ............................................................................................................ 69
9.5. Mechanical .............................................................................................................................. 70
2. Notices
2.1. Trademarks
•
Microsoft and Windows 98, Windows ME, Windows 2000 and Windows XP are registered
trademarks of the Microsoft Corporation
•
IBM and AT are registered trademarks of International Business Computers.
•
AMD is a registered trademark of Advanced Micro Devices.
•
Intel and Pentium is a trademark of the Intel Corporation
Tritech International Limited reserved the right to change, modify and update designs and specifications
as part of their ongoing product development programme.
Whilst every effort is taken to keep all the information contained in this document up to date, information
in this document is subject to change without notice and does not represent a commitment on the part of
Tritech International or System Technologies.
Issue 1
TIL – Eng – Spec – 080
Page 4 of 70
Operator Manual
SeaHub
2.2. Handling of Electrostatic Sensitive Devices
ATTENTION
Observe Precautions For Handling
Electrostatic Sensitive Devices
Caution: Certain semiconductor devices used in the equipment are liable to damage due to
static voltages.
Observe the following precautions when handling these devices in their unterminated state, or subunits containing these devices:
•
Persons removing sub-units from any equipment using electrostatic sensitive devices must be
earthed by a wrist strap via a 1MΩ resistor to a suitable discharge reference point within the
equipment.
•
Soldering irons used during any repairs must be low voltage types with earthed tips and
isolated from the Mains voltage by a double insulated transformer. Care should be taken
soldering any point that may have a charge stored.
•
Outer clothing worn must be unable to generate static charges.
•
Printed Circuit Boards (PCBs) fitted with electrostatic sensitive devices must be stored and
transported in appropriate anti-static bags/containers.
F110.1
Issue 1
TIL – Eng – Spec – 080
Page 5 of 70
Operator Manual
SeaHub
2.3. Warranty Policy
Tritech International Limited herein after referred to as TIL
TIL warrants that at the time of shipment all products shall be free from defects in material and workmanship and suitable
for the purpose specified in the product literature.
The unit/system warranty commences immediately from the date of customer acceptance and runs for a period of 365
days. Customer acceptance will always be deemed to have occurred within 72 hours of delivery.
Note: Any customer acceptance testing (if applicable) must be performed at either TIL premises or at one of their
approved distributors unless mutually agreed in writing prior to despatch.
Conditions:
These include, but are not limited to, the following:
1
The warranty is only deemed to be valid if the equipment was sold through TIL or one of its approved distributors.
2
The equipment must have been installed and commissioned in strict accordance with approved technical
standards and specifications and for the purpose that the system was designed.
3
The warranty is not transferable, except or as applies to Purchaser first then to client.
4
TIL must be notified immediately (in writing) of any suspected defect and if advised by TIL, the equipment subject
to the defect shall be returned by the customer to TIL, via a suitable mode of transportation and shall be freight
paid.
5
The warranty does not apply to defects that have been caused by failure to follow the recommended installation or
maintenance procedures. Or defects resulting from normal wear & tear, incorrect operation, fire, water ingress,
lightning damage or fluctuations in vehicles supply voltages, or from any other circumstances that may arise after
delivery that is out with the control of TIL.
(Note: The warranty does not apply in the event where a defect has been caused by isolation incompatibilities.)
6
The warranty does not cover the transportation of personnel and per diem allowances relating to any repair or
replacement.
7
The warranty does not cover any direct, indirect, punitive, special consequential damages or any damages
whatsoever arising out of or connected with misuse of this product.
8
Any equipment or parts returned under warranty provisions will be returned to the customer freight prepaid by TIL
9
The warranty shall become invalid if the customer attempts to repair or modify the equipment without appropriate
written authority being first received from TIL.
10
TIL retains the sole right to accept or reject any warranty claim.
11
Each product is carefully examined and checked before it is shipped. It should therefore be visually and
operationally checked as soon as it is received. If it is damaged in anyway, a claim should be filed with the courier
and TIL notified of the damage.
Note: TIL reserve the right to change specifications at any time without notice and without any obligation to
incorporate new features in instruments previously sold.
Note: If the instrument is not covered by warranty, or if it is determined that the fault is caused by misuse, repair
will be billed to the customer, and an estimate submitted for customer approval before the commencement of
repairs.
F167.1
Issue 1
TIL – Eng – Spec – 080
Page 6 of 70
Operator Manual
SeaHub
2.4. Statutory Compliances
2.4.1. Compliance Notice – CE Mark
Declaration of Conformity (DoC)
“Hereby, Tritech International Limited declares that this product is in compliance with the
essential requirements and other relevant provisions of the Directive 1999/5/EC.”
This notice is based upon compliance of the product to the following directives and standards
• 73/23/EEC Low Voltage Directive with amendment 93/68/EEC
•
89/336/EEC EMC Directive with amendments 92/31/EEC and 93/68/EEC
2.4.2. Waste Electrical and Electronic Equipment Directive (2002/96/EC - WEEE)
Tritech International Limited is very aware of its responsibilities to the environment and to the
sustainability of the resources of our planet. The European Commission has issued the above Directive in
an effort to reduce the impact on the environment due to electronic appliances being committed to landfill
after they have come to the end of their useful life.
When the appliance referred to in this manual is no longer serviceable, it MUST NOT be discarded by
placing in landfill, dumping in the sea or incineration. SEPARATE collection is mandatory.
The owner of the appliance should either return it and its associated leads & accessories, if appropriate,
to Tritech International Limited with a certificate of decontamination (we reserve the right to protect our
staff from the effects of any contamination) or sent to an appropriate treatment or recycling agency.
Any goods manufactured after 08/2005 that fall within the scope of the WEEE Directive are
marked as shown opposite and will have the date of manufacture and the manufacturer’s
identification marks.
2.4.3. Restriction of Hazardous Substances Directive (2002/95/EC – RoHS)
This product is built using lead free (RoHS directive compliant) components and assembly processes.
Issue 1
TIL – Eng – Spec – 080
Page 7 of 70
Operator Manual
SeaHub
2.5. Safety Statements
NOTE
Throughout the manual certain potential problems, or further information relating to
the installation, maintenance, understanding or use of the apparatus will be
highlighted to the operator by indications identified by the adjacent symbol and text.
CAUTION!
Throughout the manual certain safety or operational related comments and
requirements will be highlighted to the operator by indications identified by the
adjacent symbol and text.
DANGER!
Throughout the manual certain safety or operational related comments and
requirements that could lead to injury or loss of life will be highlighted by the
adjacent symbol and text.
Before proceeding please read all of the following safety points…
DANGER!
DANGER!
DANGER!
DANGER!
Issue 1
Power Supply & Power Lead
• Disconnect the unit from a mains or DC power source before attempting
installation or maintenance on the unit. Do not open the unit with a power supply
connected.
• Do not overload a mains supply outlet, extension cord or adapter as this may
result in electric fire or shock.
• Do not modify the power cord or plug.
• Do not bend or twist the power cord.
• Do not place the power cord near any heat sources that may melt the protective
insulation.
• Do not use a damaged or defective power cord.
• Do not use (and unplug) the unit in situations where a power-line surge may occur
(such as a lightning storm), or if the unit is not used for a prolonged period of time.
Liquids
• The unit is NOT protected against the ingress of water, so take care to avoid
exposing the unit to sources of conductive liquids.
• Do not touch the unit with wet hands
Maintenance & Cleaning
• Disconnect the product from the power supply before attempting any maintenance
or cleaning.
• Do not clean with solvents, and only use a light damp cloth on the exterior of the
unit.
• Do not undertake maintenance of the unit, outside the scope of that defined within
this manual, unless instructed to do so by Tritech International Ltd technical
support.
• Do not insert extraneous object (metal or other alien substance) into the unit or
any of its connector apertures.
Location & Ventilation
• Do not place near a source of heat that may cause the operational temperature
parameters to be exceeded, or stacking other heat generating equipment onto of
the unit.
• Do not block any openings on the unit
• Always use the unit on a stable, rigid, flat and lint-free surface.
• Make sure the unit is more than 10cm away from any other appliance that may be
susceptible to electromagnetic interference.
TIL – Eng – Spec – 080
Page 8 of 70
Operator Manual
SeaHub
2.6. Technical Support & Software Upgrades
Contact your local agent or Tritech International Ltd
Mail
Tritech International Ltd.
Peregrine Road,
Westhill Business Park,
Westhill, Aberdeen,
AB32 6JL, UK
Telephone
++44 (0)1224 744111
Fax
++44 (0)1224 741771
Email
[email protected]
Web
www.tritech.co.uk
An out-of-hours emergency number is available by
ringing the above telephone number
Troubleshooting remedies are included in section 8 (page 63) of this manual. If these do not help, or you
have other cause to use our Technical Support service, please ensure that you have the following details
at hand prior to calling:
•
Serial Numbers of the unit any Tritech International Ltd equipment connected directly or indirectly
to it.
•
Software/Firmware Revision Numbers
•
Fault Description
•
Any remedial action implemented
Due to the expansion of equipment capabilities and the fact that new sub-modules are continually being
introduced, this manual cannot detail every aspect of the operation.
The name of the organisation which purchased this system is held on record at Tritech International Ltd.
Details of new software and hardware packages will be announced at regular intervals. Depending on the
module, free upgrades will be offered in keeping with our policy of maintaining the highest levels of
customer support.
Tritech International Ltd can only undertake to provide software support for systems loaded with
Operating System and Tritech Seanet software in accordance with the instructions given in this manual. It
is the customers responsibility to ensure the compatibility of any other package that they may choose to
load unless with the prior consent of Tritech.
Issue 1
TIL – Eng – Spec – 080
Page 9 of 70
Operator Manual
SeaHub
3. Before Using
Read the following sections carefully to learn what parts are included, gain an understanding of the
product, its configurations and setup & installation procedures.
3.1. Package Contents
Upon delivery your SeaHub package contains the following items…
•
A “SeaHub Surface Interface” module
•
A mains power cord
•
A 3m USB2 (Type-A to Type-B) cable
•
Quick-start installation and setup guide
•
Manuals
•
Software & Driver CD – containing…
Seanet Pro software
SeaHub drivers
Electronic Manuals (PDF format) and Acrobat PDF reader
•
Transit Case
•
Connection Kit - comprising…
2 × 9-Way Female D-Type connectors (solder bucket) and shells
2 × 6-Way DIN plugs (solder bucket) and shells
1 × 15-Way Male D-Type connector (solder bucket) and shell
3 × 4mm “Banana Style” plugs (red, black and green)
1 × Yellow Waterblock Adapter with 39Ω internal termination resistor
Issue 1
TIL – Eng – Spec – 080
Page 10 of 70
SeaHub
Operator Manual
3.2. General Overview
The “SeaHub Surface Interface Module” is designed to be a portable and universal interface box
providing a single module solution for interfacing the range of Tritech’s sub-surface products (sonars,
acoustic modems and other undersea sensors) into a PC computer or Laptop.
Power In
The module may be powered from either a “universal mains” AC power-supply, or a DC power input over
the +12 to +36V range, allowing operation from batteries, bench-power-supplies - please refer to section
5 (page 34) for further details and safety instructions.
Communications
Tritech’s sub-surface products, or other supported peripherals may be connected to the ‘AIF ArcNet’ port
or alternatively to one of four communication ports on the rear of the unit. Under software control, the
hardware communication standard of each port may be selected, and these include; ArcNet LAN, RS232
(3 and 5 wire variants), RS485 (Half-Duplex), RS422 (Full-Duplex) and RS232 (Full-Duplex) – although
not all standards are supported on each port, refer to section 6.3 on page 40 for further details.
The front of the module provides LED status indicators for power and the selected communication mode
on each of four communication ports.
For more integrated connections, the ‘AIF ArcNet’ connector is provided giving access to +12V, +5V and
ArcNet signals – both TTL and Analogue variants. Additional legacy wiring configurations are also
supported on this connection, but consult Technical Support for further details.
Power Out
Tritech’s sub-surface products may additionally derive DC power if connected to either of the two 6-pin
“DIN” communications ports (labelled “C” or “D”). If the AC “mains” power input is being used, then the
output voltage on Ports “C” and “D” will be +28V(±5%)1, while a DC power source will have a fused
version of the input voltage available on the output instead – check compatibility with all devices before
connection, see sections 5.2 & 5.3 on pages 35 & 36 for details.
Further DC output power (and Earth) connections are provided for external devices through three 4mm
sockets on the rear of the unit. If the “mains” power input is being used, then the output is internally
jumper selectable from +28V (factory default, see note below), +12V or +5V, while a DC power source
will have a fused version of the input voltage available on the output instead.
NOTE
The +28V(±5%) DC Output, available when AC Mains power is applied, is the factory set
voltage which if necessary can be increased to a maximum of 36V(±5%) by internal
adjustments.
RAT
For sonar specific control, the front panel also contains provision for connection to a RAT (Remote
Access Terminal). However, only RATs with a PS2 “Togglestick” mouse-controller and RS485 serial
communications are supported.
USB
Two USB Type-A sockets are also provided for user specific peripherals to be connected.
Each socket is capable of delivering 500mA of current (to a self-powered hub), and is protected
accordingly.
1
Factory set to 28V. Internal PSU adjustable up to 36V(±5%).
Issue 1
TIL – Eng – Spec – 080
Page 11 of 70
Operator Manual
SeaHub
The internal design of the SeaHub can be summarised by the figure below…
PC USB Interface
USB Hub Controller
Programmable
Gate Array
Dual USB
Interface
RAT Interface
(PS2 to USB &
RS485)
Over Current
Protection
Microprocessor
RAT Port
2 External
USB Ports
ArcNet
Controller
Dual USB
Interface
(and source selection)
Dual USB
Interface
Isolation Barrier
Status and Mode
LED’s
Differential
Driver
Serial Hardware
(RS232, RS485)
(and source selection)
Serial Hardware
(RS232, RS485,
RS422)
(and source selection)
Serial Hardware
(RS232, RS485)
Serial Hardware
(RS232, RS485)
(and source selection)
(and source selection)
Isolation Barrier
Physical Layer
Selection Circuit
Physical Layer
Selection Circuit
Physical Layer
Selection Circuit
Port A Connector
(9-Way D-Type)
Port B Connector
(9-Way D-Type)
Port C Connector
(6-Way DIN or 9Way D-Type)
Port D Connector
(6-Way DIN or 9Way D-Type)
TTL
Physical Layer
Selection Circuit
AIF (ArcNet) Connector
Issue 1
TIL – Eng – Spec – 080
Page 12 of 70
Operator Manual
SeaHub
3.3. Front Panel
c
d
e
f
g
Power and Status LED
Transmit (Green) & Receive (Red) Status LEDs
Communications Port Hardware Mode LEDs (Blue)
RAT Interface
Dual USB “Type-A” Interfaces
3.4. Rear Panel
c
d
e
f
g
h
i
2.1mm DC Power Inlet
IEC “Mains” AC Power Inlet
9-Way D-Type (Male) Communication Ports “A” and “B”
6-Way DIN Communication Ports “C” and “D”
DC Power Outlet – 3 × 4mm “Banana” Sockets
15-Way D-Type (Female) “AIF” Connector
USB “Type-B” Interface to Host Computer
3.5. Underside Label
The underside label of the
SeaHub unit is intended to
provide a quick reference for
connector wiring, fuses and
general handling procedure.
However, always consult
this user manual for further
details, when carrying out
any wiring or maintenance
procedures.
Issue 1
TIL – Eng – Spec – 080
Page 13 of 70
Operator Manual
SeaHub
4. Operation
It is suggested that users installing the SeaHub for the first time should read through the following
sections in a sequential order, prior to proceeding. A ‘Quick Start’ Installation Guide will also be provided
as part of the supplied documentation.
This section covers the hardware installation of the SeaHub unit, software and driver installation on the
PC, configuration of the Seanet software, and connection of devices to the SeaHub. However, it does not
cover device specific use of Seanet – for further details refer to the Seanet Users Manual.
NOTE
Please be aware that Seanet Pro and the SeaHub drivers only support Windows 2000,
Windows XP and subsequent operating systems.
4.1. Hardware Installation
1) Unpack the SeaHub module from its transit case.
NOTE
Before connecting the SeaHub to the PC, ensure that Seanet Pro has first been installed
on the PC from the Installation CD provided, see NOTE below.
2) Connect the SeaHub module’s rear USB port (labelled “PC-USB”) to the PC/Laptop using the
USB cable provided. The SeaHub should be connected to a High-Speed (480Mbps) USB 2.0 port
to achieve maximum performance.
3) Connect the power supply to the SeaHub, and power up – this may be either using an AC mains
power supply, and the power cord provided, or a DC supply and the 2.1mm plug.
4) On the first successful connection and power-up to the PC, the Windows operating system may
start the “plug-and-play” detection of the SeaHub devices. If this happens, refer to “Windows
Drivers Installation” section below (in section 4.2) for further details.
The SeaHub driver package will be loaded across during installation of Seanet Pro from the
Installation CD provided. The SeaHub should be connected to the computer after this software
installation has completed which should ensure that the “plug-and-play” setup be automatic and
not require any user-intervention.
If the drivers have previously been installed on the PC then automatic detection will occur, and
the COM ports will be added. Seanet may be run at this point, although COM port allocation may
need to be checked.
4.2. Hardware Driver Installation and Configuration
4.2.1. Windows Driver Installation
This section covers the driver installation process for the SeaHub hardware on Windows 2000 and
Windows XP operating systems. Other operating systems are currently not supported.
NOTE
Issue 1
Before connecting the SeaHub to the PC, ensure that Seanet Pro has first been installed
on the PC from the Installation CD provided (refer to Section 4.3.1 on Page 20). During
this installation, the SeaHub driver package will also be loaded onto the PC. When the
SeaHub is then connected, “plug-and- play” detection and setup should be automatic,
otherwise follow the manual driver installation procedures below.
TIL – Eng – Spec – 080
Page 14 of 70
Operator Manual
SeaHub
1) On the first connection of a SeaHub to a PC System,
the plug-and-play system should start the automatic
detection and setup of the hardware.
If this fails to happen, manually start the process by
selecting “Add New Hardware” from the Windows
Control Panel, and follow the onscreen instructions
for detecting new hardware.
Add Hardware
The installation process normally occurs in two parts. First the driver for the “USB to Serial”
hardware is identified and installed; once this is done the driver for the “Virtual Communications
Port” (VCP) is then installed.
2) Once the “Found New Hardware Wizard” starts, a
window similar to that shown opposite should appear.
If your PC has an internet connection, you can select
“Install the Software Automatically”. This will search
the internet for the correct drivers, download and
install them – you will not need the driver CD.
Following this option means you may skip over the
next step.
For PC’s without an internet connection, select
“Install from a list or Specific Location”.
Click “Next” to continue.
3) Insert the SeaHub driver CD into the PC’s CD-ROM
drive and ensure the top check-box “Search
removable media” is ticked.
Alternately, copy the contents of the directory onto
the PC’s Hard-Disk and install the driver from there.
To do this, tick the “Include this location in the
search” check-box. Click “Browse” and select the
driver location. The drivers can be found on the
Installation CD at the following location…
<CD Drive>\SeaHub Drivers\WinXP_Win2000_Drivers
Click “Next” to continue.
4) The driver installation wizard will now try to find the
drivers – this process may take several seconds, so
be patient.
During this process and depending on the PC’s setup
prior to installation, the wizard may identify newer
versions of the drivers installed or from an alternate
source on the internet. Select the required driver and
continue.
When the drivers have been found and installed, the
wizard will show the screen opposite.
Click “Finish” to continue.
Issue 1
TIL – Eng – Spec – 080
Page 15 of 70
Operator Manual
SeaHub
5) Windows may display a “speech” bubble showing the
new hardware has been detected and installed. Click
the “X” in the bubble to acknowledge it.
6) The plug-and-play system should now identify that
the Serial ports now need installing, for each USB-toSerial converter identified by the pervious part of the
installation.
This installation is the same process as before, so
repeat the above steps to locate the driver
7) When the process is complete, the following
“success” window should be displayed.
Click “Finish” to complete the installation.
8) Windows may display a “speech” bubble showing the
new hardware has been detected and installed. Click
the “X” in the bubble to acknowledge it.
9) If prompted, reboot the PC. The drivers should then
be installed and ready to use.
Issue 1
TIL – Eng – Spec – 080
Page 16 of 70
Operator Manual
SeaHub
4.2.2. Identifying SeaHub Serial Ports
Having completed the driver installation procedure, the PC should have installed six “Virtual
Communication Ports” (VCPs) that map to Windows serial communication (COM) ports. These ports will
be removed when the SeaHub is disconnected or powered down, and reappear next time the SeaHub is
connected.
The exact allocation of these ports numbering will vary between systems, and depend on other PC
hardware present or previously installed. This section describes how to identify which ports are allocated
to the SeaHub – this allocation must then be used to correctly configure Seanet in subsequent installation
stages…
10) To determine which COM ports have been created,
right click on the “My Computer” icon on the Desktop,
then select “Properties” from the drop-down menu.
Alternately, double click on the “System” from the
control-panel.
System Properties
This will display the “System Properties” window, on
the “General” tab…
11) Select the “Hardware” tab in the “System Properties”
window, and then click on the “Device Manager”
button.
Issue 1
TIL – Eng – Spec – 080
Page 17 of 70
Operator Manual
SeaHub
12) When the “Device Manager” window appears, this
will show all connected hardware to the PC.
Expand the “Ports (COM & LPT)” branch of the tree,
by clicking on the “+” symbol to its left. This will show
all the installed ports on the PC.
There should be six entries titled “USB Serial Port
(COMx)” in this list, each representing a serial port
within the SeaHub module. In the example shown
here, these are numbered from 9 to 14.
Make a note of these numbers, as the Seanet
software will need to be configured with them.
13) Close the “Device Manager” and “System Properties”
windows.
Issue 1
TIL – Eng – Spec – 080
Page 18 of 70
Operator Manual
SeaHub
4.2.3. SeaHub Serial Port Functions
The SeaHub module will always install six serial ports when connected correctly to the PC. As mentioned
earlier, the operating system will allocate COM port numbers to these ports, and depending on the
system setup these numbers may vary.
However, the block of six SeaHub ports will always be installed sequentially in the following order…
SeaHub Port Functions
Example
COM Port
Number
(see previous
example)
Function
Base + 0
COM9
SeaHub Port A
Base + 1
COM10
SeaHub Port B
Base + 2
COM11
SeaHub Port C
Base + 3
COM12
SeaHub Port D
These four ports will return serial data
from devices connected to respective
ports on the rear of the SeaHub, that
use RS232, RS422 or RS485
hardware modes. Ports C & D can
additionally be configured for ArcNet
device connections.
These devices may be Tritech
“SeaNet” compatible devices, or other
serial peripherals (i.e. GPS, Compass,
Modem etc.)
These ports must be configured in
Seanet, for the SeaHub and ArcNet
devices to operate correctly – see
section 4.3 below.
This port returns “SeaNet” formatted
messages from devices connected to
Ports C & D, and the “AIF ArcNet”
connector, which use the ArcNet
hardware mode.
Base + 4
COM13
SeaHub System Connection
Additionally, RAT messages and
system control information to the
SeaHub, is sent via this port
This port must be configured in
Seanet, for the SeaHub and ArcNet
devices to operate correctly – see
section 4.3 below.
This auxiliary port is reserved for
future use by SeaHub expansion
modules.
Base + 5
COM14
SeaHub Auxiliary Reserved Port
This port does not need to be
configured in Seanet, for general
SeaHub operation.
Issue 1
TIL – Eng – Spec – 080
Page 19 of 70
Operator Manual
SeaHub
4.3. Seanet Software Installation and Configuration
4.3.1. Seanet Software Installation
1) Insert the “Seanet Pro” Installation CD into the
PC CD-ROM drive and run the “SerialSetup.exe”
program. Note: If the CD autoruns then select the
“RS-232 Installation” type from the menu page.
2) When the installation program starts, click “Next”
to continue.
3) Read the license agreement, then select the
“YES” option, before you can click “Next”.
Click “Next” to continue.
4) Choose the installation destination directory. By
default this will be “C:\Program Files\SeaNet”.
Click the browse button if you wish to change this
location
Click “Next” to continue.
5) Installation will then proceed copying files onto
your computer, and making entries in the
Windows Registry. This process may take several
minutes.
If any anti-spyware software is running this may
warn you that registry changes are being made.
Allow any changes to be made if prompted.
Once files are copied, you will be prompted to
restart the PC. Click “Finish” to reboot
immediately. Rebooting may be deferred by
selecting “No”, then clicking “Finish”.
Issue 1
TIL – Eng – Spec – 080
Page 20 of 70
Operator Manual
SeaHub
4.3.2. Configuring Seanet with SeaHub COM Ports
On new systems, or if Seanet software has been re-installed, it will be necessary to instruct Seanet which
COM ports it should accept Sonar/Device data from. The SeaHub connection will have installed six COM
ports, and the previous section has described how to identify these. The following section describes how
to allocate these ports to Seanet…
6) After first installing the Seanet Pro software and
connecting the SeaHub, run the installed “Seanet
Setup” software on the PC from the desktop icon that
was created (shown right).
Without any devices connected to the PC, or if the
COM port settings are not configured, the application
should look like the figure to the right…
7) To configure the “COM” ports, select “COM Setup”
from the Utilities menu. This will display the following
dialogue box…
The ‘Type’ column will help to identify the SeaHub
ports from other COM Port types. These are;
‘SeaHubMain’: The Main connection to PC USB.
‘SeaHubA’..’SeaHubD’: SeaHub Ports A to D.
‘SeaHubAux’: The Auxiliary Port.
8) All of the entries in this list represent COM ports, but
Seanet needs to know what sort of device will be
connected.
An “Aif” (Acoustic Interface) type port represents one
that Tritech “SeaNet Compatible” devices will be
connected to: these include SeaKing, SeaPrince,
MiniKing and Micron.
9) Refer back to the COM port numbers that were obtained in section 4.2, representing those added
by the SeaHub. Add an “Aif” device, from the “New” menu, for the COM port BASE+4 (fifth port
installed), to allow SeaHub functions to be accessed*.
* When a SeaHub is connected this is now automatic: The Channel Setup will scan the PC USB ports
for a connected SeaHub. If a SeaHub is found and not yet enabled, the user will be prompted whether
to automatically add and configure an “Aif” at this point.
If necessary, add extra “Aif” ports for serial “Seanet Compatible” nodes (e.g. Sonars) connected to
Ports A-D. For serial GPS modules, Compass’s, Altimeters etc, add the appropriate device type to
the list (selecting from the “New” menu) if not already there.
10) For each device port in the table, use the left and right arrow buttons to select the port number,
and then tick the “Enabled” check-box. The status of each port should be reported as “OK”.
11) The setting for each port can be configured by
clicking the “…” button under the “Settings” column.
For example then “Aif” device setting should
resemble the following…
Issue 1
TIL – Eng – Spec – 080
Page 21 of 70
Operator Manual
SeaHub
12) Close the “COM Setup” form, when complete, and
the SeaHub should be detected.
The Setup window should now resemble the
following figure…
4.3.3. Selecting SeaHub Port Hardware Modes
Once the serial port(s) are correctly setup in the Seanet software, the operating mode of each port can be
selected.
When leaving the factory (or after a reset resulting from a firmware upgrade), the SeaHub will have
hardware modes for Ports A to D selected as “RS232”. Using the “Seanet Setup” program, these modes
may be reconfigured by the user to any of the following…
Port
A
SeaHub Port Hardware Modes
ArcNet
RS232 RS485
RS422
LAN
9
Note 1
B
9
Note 2
C
9
Note 2
D
9
Note 2
9
8
8
9
9
8
9
8
9
9
8
9
•
Note 1: Port A supports either 3 or 5-wire RS232 (RX, TX, Ground and handshaking lines RTS
and CTS)
•
Note 2: Only 3-wire RS232 is supported (RX, TX and Ground). Do not use data-flow control
protocols on these ports
This table is also summarised on the front label of the SeaHub module. Status indicators will show the
current operating configuration when the unit is powered up. These are discussed in section 4.5.
NOTE
If a peripheral is connected to a port that is configured as the wrong hardware mode
for it, internal circuitry and voltage levels should ensure that no damage occurs to
either the peripheral or the SeaHub.
13) From the “Seanet Setup” window, with Seanet
configured (such that the SeaHub appears, as shown
opposite), the operating modes of the module can be
changed by clicking on the “down-arrow” in the
actions column.
From the “drop down menu” select “Setup”.
14) The Setup dialog window below should appear. Refer to the table below for the function of each
control.
Issue 1
TIL – Eng – Spec – 080
Page 22 of 70
Operator Manual
SeaHub
15) Click “OK” to accept changes, or “Cancel” to abort. Changes will only be applied when “OK” is
clicked – not in real-time as the controls are adjusted. Once “OK” is selected, the SeaHub will be
reconfigured, and will reboot. Please allow several seconds for this to occur.
SeaHub Software Settings
Control
Port A Mode
Port B Mode
Port C Mode
Port D Mode
Function
These four drop down lists allow the hardware mode of each port to be
configured.
The example above shows ports A and B as RS232 mode, while C and D
are configured for ArcNet LAN.
AVR Uart Mode
The Aux Mode control is uses for SeaHub expansion modules and faultfinding purposes. For normal operation this should be set to “RAT”
Analogue ArcNet
When “ticked” this check-box selects the analogue ArcNet (long-cable
twisted pair) receiver as the ArcNet source, available on Ports C & D and
Pins 8 and 15 of the “AIF (ArcNet)” connector.
When “unticked” the TTL ArcNet source from Pins 14, 4 & 2 of the “AIF
(ArcNet)” connector is used. Ports C and D will not work for ArcNet in this
mode.
Refer to section 6.4 for further details on the “AIF (ArcNet)” connector
function.
Brightness
This control allows the brightness of the front panel LED’s to be adjusted,
and is useful if the SeaHub is being used in low light conditions.
Setting “1” selects the lowest brightness setting, while “15” is the brightest.
Panel Leds On
Tick this box to enable the front panel status indicators. “Unticking” the
‘Panel Leds On’ check-box will turn off the LEDs completely.
FPGA
If the status in the Setup window is reported as “Upgrade FPGA” then use
the ‘Action’ | ‘Program FPGA’ button for the SeaHub node (back on the
‘Seanet Setup’ main page) to upgrade the SeaHub firmware.
Firmware upgrades are issued by Tritech to correct problems with modules,
or to add additional functionality.
Load/Save Config
Use these buttons to load or save settings from or to a file on the PC.
OK
Clicking this button will close the “setup” window and apply changes if any
have been made – this made take up to 5 seconds for the SeaHub to
reboot.
Cancel
Clicking this button will close the “setup” window and cancel any changes
made.
Issue 1
TIL – Eng – Spec – 080
Page 23 of 70
Operator Manual
SeaHub
4.4. Software & Driver Un-installation
At times it may be desirable to remove Seanet software and the SeaHub serial drivers from the PC.
Follow the procedure below to achieve this.
1) Open the windows “Control Panel”, and
select “Add/Remove Programs”
Follow the procedure below for the software
you wish to remove.
Add or Remove Programs
4.4.1. Serial Driver Un-installation
2) To remove the serial drivers for the
SeaHub, select “FTDI USB Serial
Converter Drivers” from the list, and click
the “Change/Remove” button.
3) The serial driver un-installation program will
be run, and display the screen shown
opposite.
4) Power down and disconnect the SeaHub
unit from the PC, then click “Continue” to
proceed with the un-installation.
5) When un-installation is complete control
will return to the “Add or Remove Program”
window.
4.4.2. Seanet Un-installation
6) To remove the Seanet software select
“Seanet Pro” from the list, and click the
“Remove” button.
7) When prompted click the “Yes” button to
confirm un-installation.
8) Un-installation will commence. This make
take several seconds.
9) Click “Close” when complete to finish the
task.
Issue 1
TIL – Eng – Spec – 080
Page 24 of 70
Operator Manual
SeaHub
4.5. Status & Mode Indicators
Operational status of the SeaHub unit is provided by an array of LED’s mounted on the front panel on the
unit. In addition to the main power/status indicator
This panel is divided into two sections…
c
Power/Status
Indicator [Red]
When the unit is powered up and functioning normally, this indicator will be
continuously lit.
d
Communication
status indicators
The top row of indicators shows the current operational status of the port
indicated by the column heading (A, B, C or D).
The indicator will appear RED if the SeaHub is receiving data, and GREEN
if it is transmitting. The indicator will alternate between these two colours if
both actions are happening simultaneously.
NB: In ArcNet mode, with no device connected, the unit will appear to be
continuously transmitting while attempting to build the “token-ring” network.
NB: Whilst running Seanet software, any enabled COM ports without
devices connected, will occasionally indicate a transmission pulse.
e
Hardware
communications
mode indicators
The indicators in the mode area will illuminate to show the currently
selected configuration mode of the port indicated by the column heading (A,
B, C or D).
NOTE
If working in reduced lighting conditions, the overall brightness of the status indicators may
be controlled through the “Seanet Setup” configuration interface for the SeaHub. Refer to
section 4.3 for further details.
NOTE
When the SeaHub module is powered up, or is rebooted by software (when applying new
settings), all the front-panel status indicators will flash (unless the ‘Panel Led’s On’ checkbox is “unticked”).
Issue 1
TIL – Eng – Spec – 080
Page 25 of 70
Operator Manual
SeaHub
4.6. Device Connection, Wiring & Installation
Once the SeaHub has been correctly installed and connected to Seanet (please refer to previous
sections), Sonar or other peripheral serial devices may be connected to it.
This section describes connection details for many common configurations of Tritech products. For further
details on connecting other peripherals, or creating custom wiring looms, please refer to “Data Interfaces”
& “Communication Ports” (Section 6.3 from page 40 onwards).
4.6.1. Connecting a Tritech Micron DST Sonar (or Echosounder)
The tables below summarises how a Tritech Micron DST Sonar (or Micron DST Echosounder) should be
connected to the ports of the SeaHub module, for all supported hardware modes.
For all configurations, please note…
• When connecting power to the 4mm Power Output Sockets, it is assumed they are configured in
“PWR” mode, where the DC input or internal 28V(±5%) supply is used – refer to section 5.3 for
further details.
•
The power output source on port C or D will be the “PWR” supply – refer to section 5.3.2 for
further details.
•
Like the SeaHub, the Micron DST Sonar also has software configurable hardware modes (RS232
and RS485), the SeaHub must be configured with the same hardware mode for communication to
work.
•
The Micron Sonar should be connected via its “Main” communication port to the SeaHub.
•
Older Microns and cable-looms may have pin-5 on the Micron connected to pin-5 on the D-Type
connector.
This is legacy wiring, and has been superseded with the introduction of the Micron DST
Echosounder (that uses pin-5 as an analogue output). Instead pin-5 on the Micron should be
unconnected, and pin-5 on the D-Type should be connected to pin-4 of the Micron (Power
Ground).
Should a legacy wiring loom be used no damage will occur to either unit, and normal function will
be seen in the case of the Micron DST Sonar.
•
Issue 1
If connecting a Micron DST Echosounder, pin-5 returns an analogue “echo range” signal, ranging
from 0V to 5V. This should not be connected to the SeaHub. Connection in error will not damage
either unit.
TIL – Eng – Spec – 080
Page 26 of 70
Operator Manual
SeaHub
To Ports A or B…
Before connecting please read the notes above.
1
2
6
Connect cable to
Sonar “Main” Port
3
7
4
8
5
9
SeaHub Port A or B Connector
(Face View)
Micron Connector
(Face View)
Pin
Function
Cable Whip
Wire Colour
1
2
RS232 Tx/A
RS232 Rx/B
Yellow
Blue
−
−
4
POWER GROUND
Black
−
3
4
5
6
POWER POSITIVE
POWER GROUND
No Connection
POWER SCREEN
Red
Black
Green
Screen
−
−
SeaHub Red 4mm “Banana” Socket
SeaHub Black 4mm “Banana” Socket
−
SeaHub Green 4mm “Banana” Socket
Pin
1
2
3
4
5
6
7
8
9
RS232 Mode
Function
No Connection
RX
TX
No Connection
GROUND
No Connection
No Connection
No Connection
No Connection
RS485 Mode
Function
No Connection
A
B
No Connection
GROUND
No Connection
No Connection
No Connection
No Connection
To enable Port A or B for a serial Micron connection…
1)
Recall the 6 x USB Serial Ports that were
allocated in Device Manager after the
SeaHub was connected and its drivers
installed. Refer to sections 4.2.2 & 4.2.3 on
page 17 onwards.
2)
In “Seanet Setup”, click on ‘Utilities’ | ‘Com
Setup’ to open the Channel Setup page
(see right). If there is only 1 x “Aif” device,
add a 2nd “Aif” device by clicking on ‘New’
and selecting ‘Aif’. Note: The SeaHub will
need to be connected to its own “Aif”
interface and therefore a 2nd “Aif” interface
is required for the Port A or B connection of
the serial Micron.
3)
For the Micron connection, set the COM
Port of the 2nd “Aif” device to be;
Port A: COM Port = Base + 0.
Port B: COM Port = Base + 1.
In the Channel Setup table, refer to the
‘Type’ column for SeaHub Port description,
i.e. “SeaHubA” = Port A.
Issue 1
i.e. In previous example (see Section 4.2.2), the
SeaHub was installed with 6 x Serial Ports from
COM 9 to 14.
Therefore;
For Port A, Base + 0 = 9.
For SeaHub, Base + 4 = 13.
TIL – Eng – Spec – 080
Page 27 of 70
Operator Manual
SeaHub
To Ports C or D…
Before connecting please read the notes above.
1
6
2
4
5
Connect cable to
Sonar “Main” Port
3
SeaHub Port C or D Connector
(Face View)
Micron Connector
(Face View)
Pin
Function
1
2
3
RS232 Tx/A/LAN-A
RS232 Rx/B/LAN-B
POWER POSITIVE
Cable Whip
Wire
Colour
Yellow
Blue
Red
4
POWER GROUND
Black
6
POWER SCREEN
Screen
5
See Notes Below
Green
−
−
−
−
−
−
1
2
3
4
5
6
RS232
RS485
ARCNET
Mode
Mode
Mode
Function
Function
Function
RX
A
LAN-A
TX
B
LAN-B
POWER POSITIVE
POWER GROUND
COMMS GROUND
EARTH
For legacy compatibility, pin-5 may be connected to
the SeaHub port pin-5 on a Micron DST Sonar, but
should not be connected on a Micron DST
Echosounder.
For Micron DST Sonars, this table summarises one-to-one wiring between the Sonar connector and the
SeaHub port C or D. However this does not apply to the Micron DST Echosounder.
To enable Port C or D for a serial Micron connection…
1)
Recall the 6 x USB Serial Ports that were
allocated in Device Manager after the
SeaHub was connected and its drivers
installed. Refer to sections 4.2.2 & 4.2.3 on
page 17 onwards.
2)
In “Seanet Setup”, click on ‘Utilities’ | ‘Com
Setup’ to open the Channel Setup page
(see right). If there is only 1 x “Aif” device,
add a 2nd “Aif” device by clicking on ‘New’
and selecting ‘Aif’. Note: The SeaHub will
need to be connected to its own “Aif”
interface and therefore a 2nd “Aif” interface
is required for the Port C or D connection of
the serial Micron.
3)
For the Micron connection, set the COM
Port of the 2nd “Aif” device to be;
Port C: COM Port = Base + 2.
Port D: COM Port = Base + 3.
In the Channel Setup table, refer to the
‘Type’ column for SeaHub Port description,
i.e. “SeaHubC” = Port C.
Issue 1
i.e. In previous example (see Section 4.2.2), the
SeaHub was installed with 6 x Serial Ports from
COM 9 to 14.
Therefore;
For Port C, Base + 2 = 11.
For SeaHub, Base + 4 = 13.
TIL – Eng – Spec – 080
Page 28 of 70
Operator Manual
SeaHub
4.6.2. Connecting a Tritech SeaKing, SeaKing DST, SeaPrinceDST, Bathy, Roll
Sensor or SideScan Sonar
For all configurations, please note…
• When connecting power to the 4mm Power Output Sockets, it is assumed they are configured in
“PWR” mode, where the DC input or internal 28V(±5%) supply is used – refer to section 5.3 for
further details.
•
The power output source on port C or D will be the “PWR” supply – refer to section 5.3.2 for
further details.
•
If the connected Sonar also has software configurable hardware modes (RS232, RS485 or
ArcNet), the SeaHub must be configured with the same hardware mode for communication to
work.
•
The Sonar should be connected via its “Main” communication port to the SeaHub.
•
Ports A and B do not support ArcNet LAN, so only serial Sonars should be connected to these
ports.
Ports A or B…
Before connecting please read the notes above.
1
2
6
Connect cable to
Sonar “Main” Port
TIL Water-block
Connector
(Face View)
3
7
4
8
5
9
SeaHub Port A or B Connector
(Face View)
Cable Whip Wire
Colour
Pin
RS232 Mode
Function
No Connection
RX
RS485 Mode
Function
No Connection
A
TX
B
No Connection
GROUND
No Connection
No Connection
No Connection
No Connection
No Connection
GROUND
No Connection
No Connection
No Connection
No Connection
Pin
Function
1
RS232 Tx
RS485 A
RS232 Rx
RS485 B
Yellow
−
2
Blue
−
3
4
POWER GROUND
Black
−
3
4
5
6
POWER POSITIVE
POWER GROUND
No Connection
POWER SCREEN
Red
Black
Green
Screen
−
−
SeaHub Red 4mm “Banana” Socket
SeaHub Black 4mm “Banana” Socket
−
SeaHub Green 4mm “Banana” Socket
1
2
Issue 1
TIL – Eng – Spec – 080
4
5
6
7
8
9
Page 29 of 70
Operator Manual
SeaHub
To enable Port A to D for a ‘Serial’ Sonar connection…
1)
Recall the 6 x USB Serial Ports that were
allocated in Device Manager after the
SeaHub was connected and its drivers
installed. Refer to sections 4.2.2 & 4.2.3 on
page 17 onwards.
2)
In “Seanet Setup”, click on ‘Utilities’ | ‘Com
Setup’ to open the Channel Setup page
(see right). If there is only 1 x “Aif” device,
add a 2nd “Aif” device by clicking on ‘New’
and selecting ‘Aif’. Note: The SeaHub needs
to be connected to its own “Aif” interface
and therefore a 2nd “Aif” interface is
required for the Port A to D connection of
the serial Sonar.
3)
For the serial Sonar connection, set the
COM Port of the 2nd “Aif” device to be;
Port A:
Port B:
Port C:
Port D:
COM Port = Base + 0.
COM Port = Base + 1.
COM Port = Base + 2.
COM Port = Base + 3.
i.e. In previous example (see Section 4.2.2), the
SeaHub was installed with 6 x Serial Ports from
COM 9 to 14.
Therefore;
For Port C, Base + 2 = 11.
For SeaHub, Base + 4 = 13.
In the Channel Setup table, refer to the
‘Type’ column for SeaHub Port description,
i.e. “SeaHubC” = Port C.
Ports C or D…
Before connecting please read the notes above.
1
6
2
4
5
3
SeaHub Port C or D Connector
(Face View)
TIL Water-block
Connector
(Face View)
Connect cable to
Sonar “Main” Port
Pin
Function
1
2
3
4
5
6
RS232 Tx/A/LAN-A
RS232 Rx/B/LAN-B
POWER POSITIVE
POWER GROUND
COMMS GROUND
POWER SCREEN
Issue 1
Cable Whip
Wire
Colour
Yellow
Blue
Red
Black
Green
Screen
−
−
−
−
−
−
TIL – Eng – Spec – 080
1
2
3
4
5
6
RS232
RS485
ARCNET
Mode
Mode
Mode
Function
Function
Function
RX
A
LAN-A
TX
B
LAN-B
POWER POSITIVE
POWER GROUND
COMMS GROUND
EARTH
Page 30 of 70
Operator Manual
SeaHub
In essence, this table summarises one-to-one wiring between the Sonar water-block connector and the
SeaHub port C or D.
To enable Port C or D for an ‘ArcNet’ Sonar connection…
1)
Recall the 6 x USB Serial Ports that were
allocated in Device Manager after the
SeaHub was connected and its drivers
installed. Refer to sections 4.2.2 & 4.2.3 on
page 17 onwards.
2)
In “Seanet Setup”, click on ‘Utilities’ | ‘Com
Setup’ to open the Channel Setup page
(see right). Ensure that the SeaHub “Aif”
interface is enabled and allocated to the
correct Com Port number (referring back to
the 6 x USB Serial Ports allocated). Note:
The ArcNet interface of Ports C & D or for
the ‘Aif ArcNet’ port is via the SeaHub
connection port and unlike a Serial Sonar
connection (see previous few pages) a 2nd
“Aif” port does not need to be added.
3)
For the ArcNet Sonar connection, ensure
the SeaHub “Aif” connection port is enabled
and the Node 252 SeaHub appears in the
‘Seanet Setup’ table.
i.e. In previous example (see Section 4.2.2), the
SeaHub was installed with 6 x Serial Ports from
COM 9 to 14.
Therefore;
For SeaHub connection, Base + 4 = 13.
SeaHub Port : COM Port = Base + 4.
In the Channel Setup table, refer to the
‘Type’ column for SeaHub Port description,
i.e. “SeaHubMain” = Main PC USB
Connection Port.
Issue 1
TIL – Eng – Spec – 080
Page 31 of 70
Operator Manual
SeaHub
4.6.3. Connecting other Serial Devices
The four serial ports on the SeaHub may be used as standard windows “COM” ports, and have any serial
device connected.
When used in RS232 mode, Ports “A” and “B” are wired with a standard 9-Way “DTE” pin out (Data
Terminal Equipment). This means that standard serial-extension leads or null-modem leads can be used
to connect to third-party DCE or DTE wired devices.
All ports support 3-wire RS232 (RX, TX and GROUND signals), however, the RTS and CTS signals are
also supported on Port “A”. Other ports should have “hardware flow control” settings disabled in the
relevant communication software being used.
When used in RS485 mode, the RX and TX lines become the “Data A” and “Data B” lines respectively of
the half-duplex differential pair (also sometime referred to as “DATA-” and “DATA+” respectively).
All ports support the Half-Duplex RS485 differential standard, however Port “B” also supports Full-Duplex
RS422. When configured in this mode, the “Data A” and “Data B” signal described above take on a
dedicated Transmit-Only function. Additionally pin-8 and pin-7 become “Data A” and “Data B” for a
dedicated Receive-Only function. When configured in RS422 mode, this port will still appear, and can be
used as, a standard windows COM port.
Power for peripherals using Port “A” or “B” can be derived from the three 4mm Power Output sockets on
the rear of the SeaHub. The voltage may be selected from one of three types of power supply. However,
if changing from the default “PWR” supply, ensure that the correct ground is also used, and necessary
signal grounds are provided otherwise the isolation barriers will prevent correct operation. Refer to
section 5.3 for details on the power supplies.
Ports C and D both use the Tritech standard 6-pin DIN pin out, and can operate in RS232 or RS485
mode, these ports will also supply the “PWR” power supply only, again refer to section 5.3 for details on
the power supplies.
Further details for creating application specific custom wiring looms to connect to any of the ports (for all
communication modes) can be found in section 6.
Connecting a Serial device to Port A to D…
1)
Recall the 6 x USB Serial Ports that were
allocated in Device Manager after the
SeaHub was connected and its drivers
installed. Refer to sections 4.2.2 & 4.2.3 on
page 17 onwards.
2)
In “Seanet Setup”, click on ‘Utilities’ | ‘Com
Setup’ to open the Channel Setup page
(see right). Ensure that the SeaHub “Aif”
interface is enabled and allocated to the
correct Com Port number (referring back to
the 6 x USB Serial Ports allocated).
3)
To connect a GPS device, enable the “GPS”
device and set it’s COM Port to match the
Port allocation in Device Manager;
Port A:
Port B:
Port C:
Port D:
COM Port = Base + 0.
COM Port = Base + 1.
COM Port = Base + 2.
COM Port = Base + 3.
In the Channel Setup table, refer to the
‘Type’ column for SeaHub Port description,
i.e. “SeaHubA” = Port A.
Issue 1
i.e. In previous example (see Section 4.2.2), the
SeaHub was installed with 6 x Serial Ports from
COM 9 to 14.
Therefore;
For GPS Input on Port A, Base + 0 = 9.
For SeaHub connection, Base + 4 = 13.
TIL – Eng – Spec – 080
Page 32 of 70
Operator Manual
SeaHub
4.6.4. ArcNet Line Termination
The ArcNet communication link normally requires termination resistors to be installed at each end of the
umbilical cable. These resistors are fitted between each line of the twisted pair.
For twisted pair cables that are below 100 metres in length, it is only necessary to install one termination
resistor of value between 47Ω to 100Ω (ohm) (68Ω nominally).
For twisted pair cables that are greater than 100 metres in length, two termination resistors should be
installed, one at either end of the cable. At the surface SeaHub module, a 270Ω resistor should be fitted.
At the subsea end of the cable, a 39Ω resistor should be fitted – if there is more than one Sensor
connected then this resistor should be fitted at the junction / splice point of the cable.
100 - 2500 metre
twisted pair cable
SeaHub
6w Underwater
Connector
8
1
15
2
270 ohm
Resistor
NOTE
39 ohm
Resistor
When shipped from the factory, a 270Ω resistor is internally fitted within the SeaHub module
across the ArcNet signal pair. However, internal “jumper-links” provide a means that allow
either 68Ω or 270Ω termination to be selected, depending on system configuration – section
7.7 provides details of how to change the termination jumpers within the module.
A yellow waterblock Adapter (Part No. 02648) is provided with the
system which has a 39 ohm termination resistor installed internally.
This can optionally be fitted to any subsea Sensor to provide the
ArcNet termination at the subsea end of the cabling.
The Yellow terminated waterblock should be installed directly onto the
‘Main’ connector port (as indicated right) of one of the subsea Sensor
heads attached to the ArcNet network.
CAUTION!
•
Only one yellow 39Ω terminated waterblock to be used per system.
•
Check that there are no other termination resistors present, other than the 270Ω at
the surface, prior to installation.
4.6.5. Subsea Sensor Electrical Installation
If powering Sonar head(s) down a long lead or umbilical, the maximum recommended loop resistance of
the power line must not exceed 10Ω for one head, 5Ω for two heads, and 3Ω for three heads. Refer to the
manual of the specific Sonar being used to determine the minimum acceptable supply voltage.
4.6.6. Ground Fault Monitoring Equipment
Within the SeaHub module, there is a small capacitive connection to the equipment chassis which should
not noticeably affect any impressed current ground fault indicator (GFI) equipment.
Issue 1
TIL – Eng – Spec – 080
Page 33 of 70
Operator Manual
SeaHub
5. Power Supplies
This section is intended for advanced users only, who may be connecting to
specialised or non standard device-configurations.
For further help please contact Tritech Technical Support.
NOTE
5.1. Power Inputs
For convenience of installation, the SeaHub module may be powered from either a “universal mains” AC
power-supply, or a DC power input over the +12 to +36V range, allowing operation from batteries or
bench-power-supplies
Observe the following warnings and observations before powering up the product…
DANGER!
DANGER!
CAUTION!
CAUTION!
When using an AC “Mains” source, the APPLIANCE MUST BE EARTHED.
The EARTH connection is available on the centre pin of the IEC “Mains” inlet
connector, or the Green 4mm socket on the rear of the unit.
If in any doubt, consult a qualified electrician, or Tritech Technical Support.
Always connect the appliance through the appropriate connector, to a power
source that is switched OFF, then power on.
Ensure that the selected voltage source conforms to the appropriate specification
detailed below.
Ensure power requirements from the appliance and any connected external
devices are also met by the source. Further details on DC power source selection
are described in section 5.2.
Simultaneous connection and operation of the unit from both power sources (AC
and DC) is possible. In such a situation, the greater voltage between the DC Input
and 28V (±5%) from the Mains-DC PSU will be used as the External Power for
outputs (see below).
AC Source (“Mains”)…
• “Universal Mains” Range, 90V to 264V AC, 47-63 Hz
•
IEC Female Connector
•
Inlet fused with a 20mm × 5mm 2A ‘Antisurge’ (T)
DC Source…
The DC power connecter input is polarity independent. However, to minimise risk
of shorting to the Earthed metal housing, it is always recommended that the DC
centre pin is POSITIVE, while the outer jacket is GROUNDED.
DANGER!
This is represented by the symbol “
” shown on the rear of the unit.
•
12V to 36V DC range
•
2.1mm pin (0.08”) DC Power Socket
•
On the DC power connecter, the centre pin is POSITIVE, while the outer jacket is GROUNDED.
•
Internal circuitry allows either connection polarity to be used, although outer casing of supply
connector is recommended to be ground to avoid short circuitry to the housing during connection
or disconnection.
•
3W minimum capability – see below, on choosing a DC power source.
Issue 1
TIL – Eng – Spec – 080
Page 34 of 70
Operator Manual
SeaHub
5.2. Choosing a DC Source
CAUTION!
Care should be taken when choosing a DC power source, as it should be ensured
that the necessary power demand from the SeaHub, and connected peripherals, is
met.
•
The minimum specification of the power supply is 5W assuming no other USB or external devices
are connected to the SeaHub. However…
•
If external sensors, Sonars or serial devices are connected to the 6-Way DIN connectors that
draw power, then the additional load of these should be added.
•
Similarly, if power is drawn from the 4mm “Power Output” sockets, then the additional load should
also be taken into account.
•
If any USB peripherals are connected to the two USB front-panel connectors, and these require
more than 100mA, then an extra 2.5W per peripheral should be added.
•
If a RAT is connected, then an additional 3W should be added.
For example, a SeaHub module is to be powered from a 28V DC source, connected to…
• A Tritech RAT (3W)
•
2 × Tritech SeaKing Sonars (10W each)
•
An external USB GPS module requiring 500mA (2.5W)
Then the DC power supply must be capable of supplying at least 30.5W (5W + 3W + 10W +
10W + 2.5W).
The voltage available on communication ports “C” and “D” will be 28V, while the voltage
available on the 4mm power sockets may be either +28V(±5%), +12V or +5V depending on
internal voltage selection settings.
Issue 1
TIL – Eng – Spec – 080
Page 35 of 70
Operator Manual
SeaHub
5.3. Power Outputs
For powering external devices, the SeaHub module provides regulated power supplies from…
•
f The two communication ports “C” and “D” on the rear of the unit.
(labelled in section 3.4, page 13)
•
g The 4mm “DC Power Output” sockets on the rear of the unit.
h The “AIF (ARCNET)” connector on the rear of the unit.
•
Different power and grounding options are available based on the users target application, but these can
be summarised by three categories…
• Sonar Power – “PWR”, derived from the AC-DC converter, or from the DC supply, depending on
which source is being used.
•
External Power – “EXT”, selected by means of internal jumpers within the unit, and may be
either “PWR”, “COMM” or one of the internal isolated +12V or +5V supplies.
•
Communications Power – “COMM”, used to power all the output communications hardware.
Issue 1
TIL – Eng – Spec – 080
Page 36 of 70
Operator Manual
SeaHub
5.3.1. Communication Signal Grounding
All RS232, RS485, RS422 and ArcNet signals on Ports “A”, “B”, “C” & “D” and the “AIF (ARCNET)”
connector, are referenced to the communication power supply (“COMM”) ground, which is available on
the following connectors…
•
The “AIF” connector (see section 6.4) on pins 3 and 9.
•
The three 4mm “Banana” connectors coloured Red, Black and Green for Positive, Ground and
Earth connections respectively, on the rear of the unit.
•
Ground pin on Port A and Port B,
•
Ground Optionally available from Port C and Port D (by means of a jumper)
• Ground permanently available on the “AIF” connector pin 2, in addition to the “EXT” supply.
For further connector pin-out specifics, refer to section 6.3 (page 40).
5.3.2. “Ports C & D” Power Output
The power available on these ports is intended to power external devices such as Sonars, Acoustic
Modems or other sensors connected to the 6-pin DIN connectors (Ports C and D) on the rear of the unit,
and is derived from the “PWR” supply only!
Refer to section 5.3, for further details on the “PWR” supply, and for connector pin-out specifics, refer to
section 6.3 (page 40).
5.3.3. “DC Output Sockets” Power Output
The 4mm DC Output sockets on the rear of the unit may be configured to be either the “PWR” or “EXT”
supply outputs, by means of internal jumpers.
To change the available output supplies, read this section carefully, then refer to
sections 7.3 (page 48).
CAUTION!
Remember that the correct ground must also be selected for the supply being used!
Refer to section 5.3, for further details on the “PWR” and “EXT” supplies, and for connector pin-out
specifics, refer to section 6.3 (page 40).
5.3.4. “AIF (ARCNET)” Power Output
The “AIF (ARCNET)” connector provides the same power supply (and ground) output as the 4mm DC
Output Sockets (see section above on configurations), and additionally a fixed +5V supply and ground
from the “EXT” source.
Refer to section 5.3, for further details on the “PWR” and “EXT” supplies, and for connector pin-out
specifics, refer to section 6.4 (page 43).
Issue 1
TIL – Eng – Spec – 080
Page 37 of 70
Operator Manual
SeaHub
5.3.5. Power Output Types
Refer to section 6.3 (page 40) for further details of all connector wiring, pin-outs and specific signals.
Sonar Power – “PWR”
The “PWR” power supply is intended to be used to power external devices such as Sonars, Acoustic
Modems or other connected sensors needing a high voltage (possibly to drive down long cables).
The “PWR” voltage depends on which Power input source is being used…
• If using an AC “mains” power supply, the output voltage will be +28V (±5%), rated at 50W, with
overload protection.
•
If using a DC power supply, the output voltage will be approximately 1.5V less than the input
supply voltage. Current drawn from the output, when using a DC source should not exceed
2Amps.
The “PWR” supply outputs are internally fused with a standard 20mm × 5mm 2A ‘Quickblow’ (F) cartridge
fuse – for replacement details, see section 7.2 (page 47).
DANGER!
When powering the SeaHub from an AC (“Mains”) source, the derived “PWR”
+28V(±5%) supply is not suitable for powering the Tritech PA altimeter, and hence
sensors such as Bathymetric units or Sonars using the PA altimeter on their
auxiliary port will need to use a DC power input between 20 and 28VDC.
CAUTION!
The “PWR” supply IS isolated from the AC “mains” source, but NOT from the DC
supply source, however “PWR” is isolated from the “EXT” (+12V, +5V) and “COMM”
supplies.
CAUTION!
The output voltage available on ports using this supply (4mm DC output sockets, or
ports “C” and “D”), will change depending on the power supply source used (AC or
DC).
CAUTION!
Power from this source may be shared across ports “C” and “D”, the 4mm DC
Output sockets (if configured as such), and the “AIF (ARCNET)” connector.
The ratings stated apply to the total load from all outputs of the SeaHub.
External Power – “EXT”
The “EXT” power supply is intended for powering external medium power devices (>1W load) that require
a regulated +12V or +5V level.
The “EXT” voltage is selected by internal jumpers within the SeaHub unit (section 7.2). The positive
voltage may be selected from…
• +12V with respect to GROUND (Fused internally at 2A)
• +5V with respect to GROUND (Fused internally at 2A)
The “EXT” supply outputs are internally fused with 2A quick blow fuses – for replacement details, see
section 7.2 (page 47).
NOTE
NOTE
Issue 1
The external power supply is isolated from both the incoming AC/DC source
(“PWR”) and the communications supply (“COMM”).
Using this supply to power un-isolated external devices with communications to the
SeaHub, will require that the isolation barrier between the internal (“EXT”) supply
and the communications (“COMM”) supply is bridged – see section 7.3.
TIL – Eng – Spec – 080
Page 38 of 70
Operator Manual
SeaHub
Communications Power – “COMM”
All RS232, RS485, RS422 and ArcNet signals on Ports “A”, “B”, “C” & “D” and the “AIF (ARCNET)”
connector, are referenced to ground, with respect to the internal “Communications” (COMM) power
supply, which provides maximum protection and noise immunity to connected equipment. These signals
include…
• RS232 signals - “RX” and “TX”.
•
RS485 signals - “RX/TX-A” and “RX/TX-B”.
•
RS422 signals - “TX-A”, “TX-B”, “RX-A” and “RX-B”.
•
ArcNet signals - “LAN-A”, “LAN-B”, “LAN PULSE1”, “LAN PULSE2”, “LAN EN” and “LAN RX”.
NOTE
NOTE
The communications power supply is isolated from both the incoming AC/DC
source (“PWR”) and the external supply (“EXT”).
The communications power supply is intended for use in interfacing to isolation
circuitry only, and not for external device power. The connected load should not
exceed 1W.
6. Data Interfaces
CAUTION!
This section is intended for advanced users only, who may be connecting to
specialised or non standard device-configurations.
For further help please contact Tritech Technical Support.
6.1. USB PC/Laptop Interface
On the rear of the unit, a single “Type-B” upstream connector allows the SeaHub module to be connected
to a host PC with a USB “Type-A” to “Type-B” cable, not exceeding 5m in length.
The interface is compliant with the USB 2.0 “Hi-Speed” (480Mbps) specification and requires only a
100mA USB port.
The SeaHub unit is supplied with a 2m long Type-A to Type-B USB2.0 compatible cable – the end of the
cable contains LED illumination to help diagnose correct connection.
6.2. USB Peripheral Ports
The front panel of the unit includes two “Type-A” downstream USB connectors. A fused 500mA supply is
available on each connector, with USB standard over-current protection & shutdown circuitry.
Each port is compliant with the USB 2.0, and will support
• “Hi-Speed” Mode (480Mbps)
•
“Full-Speed” Mode (12Mbps)
• “Low-Speed” Mode (1.5Mbps)
Shared bandwidth of all USB peripherals within the SeaHub module should be considered before using
“Hi-Speed” devices.
CAUTION!
Issue 1
If using a DC source, ensure power requirements from the appliance and any
connected external USB devices are also met by the source. Further details on DC
power source selection are described in section 5.2.
TIL – Eng – Spec – 080
Page 39 of 70
Operator Manual
SeaHub
6.3. Communication (Sonar/Sensor/Serial) Ports
This section covers the specification, and pin-out specifics of each of the four communication ports on the
rear of the unit. Serial (RS232, RS422 or RS485) or ArcNet connections to external sensors, such as
Sonars, Acoustic Modems, Navigation Systems, GPS’s, environmental sensors etc. can be made through
one of these ports – labelled A, B, C and D on the units rear panel.
The hardware mode of each port is configured through the Seanet control software – refer to section
4.3.1 (on page 20) for further details.
6.3.1. Port A (RS232[5] & RS485)
A 9-Way D-Type Male connector, capable of supporting the following modes (under software selection)…
• RS232 3-Wire (RX, TX, GND)
• RS232 5-Wire (RX, TX, RTS, CTS, GND)
• RS485 Half Duplex
All signals are fully isolated and voltage transient with respect to the communications power supply.
When used in RS232 mode, the pin out of this port is wired in the same way as a PC serial “COM” port
(i.e. using DTE2 signal directions), and compatible with any standard RS232 peripherals and cabling.
Hardware will support data transfer rates of up to 921,600 baud in RS232/RS485 mode.
1
2
6
3
7
4
8
5
9
Connector face view
1
2
3
4
5
6
7
8
9
RS232
‡
RX
TX
‡
COMMS
GROUND
‡
RTS
CTS
‡
RS485
‡
A
B
‡
COMMS
GROUND
‡
N/A
N/A
‡
Notes:
1) Handshaking pins (indicated with “‡”) are internally connected together, but not used during
operation.
2) The “COMMS GROUND” is isolated with respect to the other grounds (i.e. Power) described in
other sections. All voltages on this connector are with respect to this ground.
3) Pins 7 and 8 will still have RS232 signal levels (≈±12V) present on them when configured in
RS485 mode.
4) An internal 150Ω termination resistor is fitted across pins 2 and 3, when in RS485 mode.
5) RTS and CTS handshaking protocol is available on this port. PC Serial ports should be
configured to use either no handshaking, or hardware handshaking.
2
Data Terminal Equipment
Issue 1
TIL – Eng – Spec – 080
Page 40 of 70
Operator Manual
SeaHub
6.3.2. Port B (RS232[3], RS485 & RS422)
9-Way D-Type Male connector, capable of supporting the following modes (under software selection)…
• RS232 3-Wire (RX, TX, GND)
• RS485 Half Duplex
• RS422 Full Duplex
All signals are fully isolated and voltage transient with respect to the communications power supply.
When used in RS232 mode, the pin out of this port is wired in the same way as a PC serial “COM” port
(i.e. using DTE signal directions), and compatible with any standard RS232 peripherals and cabling.
Hardware will support data transfer rates of up to 921,600 baud in RS232/RS485 mode.
1
2
6
3
7
4
8
5
9
Connector face view
1
2
3
4
5
6
7
8
9
RS232
‡
RX
TX
‡
COMMS
GROUND
‡
N/A
N/A
‡
RS485
‡
TX/RX-A
TX/RX-B
‡
COMMS
GROUND
‡
N/A
N/A
‡
RS422
‡
TX-A
TX-B
‡
COMMS
GROUND
‡
RX-B
RX-A
‡
Notes:
1) Handshaking pins (indicated with “‡”) are internally connected together, but not used during
operation.
2) The “COMMS GROUND” is isolated with respect to the other grounds (i.e. Power) described in
other sections. All voltages on this connector are with respect to this ground
3) Pins 7 and 8 will have RS422 signal levels (≈5V) present on them when configured in RS232 or
RS485 mode.
4) An internal 150Ω termination resistor is fitted across pins 2 and 3, when in RS485/RS422 mode,
and pins 7 and 8 permanently.
5) RTS and CTS handshaking protocol not available on this port. PC Serial ports should be
configured to use no handshaking.
Issue 1
TIL – Eng – Spec – 080
Page 41 of 70
Operator Manual
SeaHub
6.3.3. Port C & Port D (RS232, RS485 & ArcNet)
6-Way Female DIN connector, capable of supporting the following modes (under software selection)…
• RS232 3-Wire (RX, TX, GND)
• RS485 Half Duplex
• ArcNet LAN
All signals are fully isolated and voltage transient with respect to the communications power supply.
External DC Power (separate to that described for the DC output power sockets) is available on “POWER
POSITIVE”. When the AC “Mains” power source is used, this will be +28V (±5%) DC, otherwise the DC
source less 1.4V will be present.
Hardware will support data transfer rates of up to 921,600 baud in RS232/RS485 mode.
1
2
3
4
Connector face view
5
RS232
RX
TX
PWR
POSITIVE
PWR
GROUND
COMMS
GROUND
EARTH
RS485
TX/RX-A
TX/RX-B
PWR
POSITIVE
PWR
GROUND
COMMS
GROUND
EARTH
ARCNET
LAN-A
LAN-B
PWR
POSITIVE
PWR
GROUND
COMMS
GROUND
EARTH
6
Notes:
1) The output supply on “PWR POSITIVE” and “PWR GROUND” is isolated with respect to the Data
signals on Pins 1 and 2.
2) The voltage on the Data Signals on Pins 1 and 2 are with respect to the “COMMS GROUND” on
Pin 5.
3) The “EARTH” pin is electrically connected to the housing chassis and Earth pin on the Main’s
power socket.
4) The “COMMS GROUND” pin 5 may be disconnected internally (by means of a jumper) if
required.
5) An internal 150Ω termination resistor is fitted across pins 1 and 2, when in RS485 mode.
6) RTS and CTS handshaking protocol not available on this port. PC Serial ports should be
configured to use no handshaking.
Issue 1
TIL – Eng – Spec – 080
Page 42 of 70
Operator Manual
SeaHub
6.4. AIF (ArcNet) Connector
15-Way Female D-Type connector, providing access to…
• Isolated external and +5V supplies.
• Isolated and protected TTL ArcNet connections (LAN PULSE1, LAN RX & COMMS GROUND)
• Isolated and protected analogue ArcNet connections (LAN A, LAN B)
• Optional connections to “Port A” serial interface signals – consult Technical Support for details.
8
7
6
5
4
3
2
15 14 13 12 11 10
1
9
Connector face view
1
N/A
9
EXT
POSITIVE
2
10
+5V
3
COMMS
GROUND
EXT GROUND
11
4
LAN RX
12
LAN EN
PORT A
RS232 RTS
PORT A
RS232 RX
5
6
7
8
PORT A
RS232 CTS
PORT A
RS232 TX
LAN PULSE2
LAN A
13
14
LAN PULSE1
15
LAN B
Notes:
1) The “External Supply” voltages on pin 3 and pin 9 are selected by the DC “Power Output”
jumpers, described in section 7.3.
2) Signals on pins 4, 5, 6, 7, 8, 11, 12, 13, 14 and 15 are with respect to the ground on pin 2, or if
pin 3 is selected to be “COMMS GROUND” by the DC “Power Output” jumpers, described in
section 7.3.
3) The +5V output on pin 10 is only with respect to pin 3 if the “Power Output” jumpers are set to
select “GROUND” – see section 7.3.
4) The Port-A RS232 signals on pins 5, 6, 12 and 13 are not present on this connector by default, as
internal connection jumpers must be fitted – consult factory for details
6.5. RAT Interface
A single 9-Way D-Type Female connector for connection to a V2 RAT (with PS2 mouse and RS485 data
signals only)
1
5
4
9
3
8
2
7
1
2
6
3
Connector face view
4
5
GROUND
+5V
RAT-B
(RS485)
RAT-A
N/A
6
7
8
9
N/A
SCLK
(PS2 Mouse)
SDATA
(PS2 Mouse)
+12V
Notes:
1) RAT RS485 and PS2 data signals are not isolated, and are with respect to the SeaHub’s internal
power supplies “+5V” and “GROUND”.
2) An internal 150Ω termination resistor is fitted across the RS485 input signals (pins 3 and 4)
Issue 1
TIL – Eng – Spec – 080
Page 43 of 70
Operator Manual
SeaHub
6.5.1. RAT Connection
To connect a RAT terminal through the SeaHub requires the S0756 RAT Extension cable connection
between the RAT and the “PS2 V2-RAT” port on the front of the SeaHub (Cable supplied with the RAT).
6.5.2. RAT Configuration
For the RAT pointer device to function correctly through the module it needs to be a “V2” RAT (i.e. with
Togglestick pointer instead of Trackball) and configured to PS/2. This is as configured on a SeaNet SCU.
However the “older style” SeaKing SCU uses the pointer device set to Serial. Therefore, if your RAT
pointer device fails to operate the following checks must be made.
To open the RAT…
1)
Unscrew the four Pozi-drive screws holding the back plate on the RAT.
2)
Using a 3mm Allen Key, unscrew the Allen screws through the Brass spacers on the four corners
of the RAT.
3)
The Front panel can now be lifted off.
Versa Point wiring for Serial RS232 operation…
8
7
6
5
4
3
2
1
Versa Point
COM 1
6
5
4
3
2
1
Mouse
(Rat) J5
Pin 1
Versa Point wiring for PS/2 operation…
8
7
6
5
4
3
2
1
Versa Point
COM 1
6
5
4
3
2
1
Mouse
(Rat) J5
Pin 1
NOTE
Issue 1
Ensure the “V2” RAT is configured for PS/2 mode when connected through the
SeaHub. The Serial RS232 mode will not work through the SeaHub.
For further help please contact Tritech Technical Support.
TIL – Eng – Spec – 080
Page 44 of 70
Operator Manual
SeaHub
7. Hardware Configuration & Maintenance
The procedures described in the following sections are intended for advanced users
only.
NOTE
CAUTION!
If in doubt, or for further help please contact Tritech Technical Support.
Before carrying out ANY of the following procedures, please read section 2.2 and
section 2.5.
The SeaHub module contains “Mains” High Voltages.
DANGER!
Issue 1
Before carrying out any procedure that require the units housing to be opened,
disconnect from ALL power supplies, and wait for at least 5 minutes for any
residual charge within the internal power-supplies to be dissipated.
TIL – Eng – Spec – 080
Page 45 of 70
Operator Manual
SeaHub
7.1. Opening the SeaHub housing
This procedure describes how to open the SeaHub units housing, for maintenance and hardware
configuration procedures.
DANGER!
Before attempting this procedure ensure that the unit is disconnected from the AC
and DC power source, and all other devices be disconnected from it.
1) Using a 2.5mm Hexagonal (Allen) Key to unscrew the two
screws on the front panel of the unit (see figure below).
NOTE
The two hexagonal screws on the front of the panel
are NOT held captive, and so should be removed and
stored prior to continuing.
2) Remove the front panel assembly from the housing.
3) Remove the lid of the housing, by sliding it forward out of its
guides.
DANGER!
The edges of the lid may be sharp – handle with
care.
4) There is no need for further disassembly of the unit, as the
circuit board and hardware jumpers are now visible.
5) To reassemble the unit, reverse the above steps.
Issue 1
TIL – Eng – Spec – 080
Page 46 of 70
Operator Manual
SeaHub
7.2. Resetting the Software Default Settings
This procedure describes how to return the software settings (and hence hardware mode’s of the
communication ports) to their factory default values.
DANGER!
Before attempting this procedure ensure that the unit is disconnected from the AC
and DC power source, and all other devices be disconnected from it.
1) Follow the steps described in section 7.1 to open the
housing.
2) Locate switch block “SW1” on the PCB.
3) Using a small screw-driver, pair of tweezers or other small
pointed object to set switch 1 to the “ON” position
NB: Switch 2 will already be in the “ON” position, and should
not be changed.
4) Close the SeaHub housing, and apply power for about 10 seconds. The switch settings are only
read when the SeaHub unit powers up.
5) Disconnect from the power, re-open the housing, and set switch 1 back to the off position. If this
is not done, the unit will not be able to store any new settings.
6) Disconnect from the power again, and fully close up the SeaHub unit, reversing the steps
described in section 7.1.
When reset, the following settings should be restored
Control
Port Mode A – D
Panel LED Brightness
ArcNet receive
Source
AVR Aux Mode
Issue 1
TIL – Eng – Spec – 080
Setting
RS232
15 (Full) and
turned On
Analogue
RAT
Page 47 of 70
Operator Manual
SeaHub
7.3. Selecting the DC “Power Out” Supply Voltage & Ground
This procedure describes how to select the DC supply voltage (and corresponding ground) output
available from the 6-way DIN connectors and 4mm Power Outlet “Banana” sockets on the rear of the
SeaHub unit, using jumper blocks J11 and J12 on the PCB.
DANGER!
CAUTION!
Before attempting this procedure ensure that the unit is disconnected from the AC
and DC power source, and all other devices be disconnected from it.
Before attempting this procedure, thoroughly familiarise yourself with sections 5.3
(concerning the output power supplies, on page 36) and 7.1 (concerning the opening
of the housing, page 46).
1) Unplug the SeaHub unit from any power sources.
2) Open the housing, as described in section 7.1, and remove
the lid, so the circuit board is accessible
3) Locate jumper blocks “J11” and “J12”, by the legend on the
circuit board. The diagram highlights their location - “J11” is
the left hand jumper block, when viewing the circuit board in
the orientation shown above, and “J12” is the right
4) Refer to the table on the following page to select the appropriate POWER (“J11 - OUT +V”) and
GROUND (“J12 – OUT GND”) selection required by your application.
Failure to observe the notes below may cause damage to the internal circuitry of the
SeaHub and other external connected devices…
•
On “J11” fit the jumper across ONLY ONE of the VERTICAL pair of pins on the
header to select the output voltage – DO NOT bridge more than one pair of pins at
any time.
•
Do not fit the jumper in any other orientation other than VERTICAL, otherwise the
power supplies of the unit may be damaged.
CAUTION!
Remember that the correct ground must also be selected for the supply being used!
NOTE
5) Use a pair of tweezers or long-nosed pliers to move the jumpers around on the pin-headers.
6) When done, fully close up the SeaHub unit, reversing the steps described in section 7.1.
7) Power up the unit, and verify, using a voltmeter, the correct output voltage is being presented
before connecting any further devices.
Issue 1
TIL – Eng – Spec – 080
Page 48 of 70
Operator Manual
SeaHub
Jumper Settings
Output
Description
Power Limit
J11
+28V
NOTE1
Main Power Output, fully
isolated from communication
signals NOTE2 all other signals
Not to exceed
the greater of
50W of 2A
PWR
+28V
NOTE1
NOTE1
Not to exceed
the greater of
50W of 2A
Not to exceed
the greater of
50W of 2A
Not to exceed
24W (2A)
Not to exceed
24W (2A)
Not to exceed
24W (2A)
PWR GND +
GND +
COMMS GND
5V Output, isolated from
communication signals and
AC/DC power input.
Not to exceed
10W (2A)
+5V
Issue 1
PWR GND +
GND
12V Output, with no isolation
+12V
+5V
GND
12V Output, isolated from
communication signals only
+12V
+12V
PWR GND +
GND +
COMMS GND
12V Output, isolated from
communication signals and
AC/DC power input.
+12V
+12V
PWR GND +
GND
Main Power Output, with no
isolation
PWR
+12V
PWR GND
Main Power Output, fully
isolated from communication
signals only
PWR
+28V
J12
TIL – Eng – Spec – 080
GND
Page 49 of 70
Operator Manual
SeaHub
Output
+5V
Description
Jumper Settings
5V Output, isolated from
communication signals only
Not to exceed
10W (2A)
+5V
+5V
Power Limit
PWR GND +
GND
Not to exceed
10W (2A)
5V Output, with no isolation
+5V
PWR GND +
GND +
COMMS GND
Communication 5V supply,
isolated from all signals apart
from communication signals.
COMMS
+5V
Useful for low power
consummation peripheral
connection without introducing
system noise
Other connection
configurations of the COMMS
+5V supply are not
recommended – use the +5V
supply instead
1W (200mA)
COMMS +5V
COMMS GND
Notes…
1) The output “+28V” (±5%) is the factory set DC output level that is available when running from an
AC “Mains” source – it is possible to increase the 28V output voltage up to 36V (±5%) by internal
PSU adjustment. Otherwise, the DC input voltage (minus approx 1.5V) will be used. The greater
of the two will be present, if both power sources are connected together.
2) The term “Communication Signals” refers to serial signals such as RS232, RS485, RS422 and
TTL ArcNet signals. Analogue ArcNet signals are always isolated by nature of the driver hardware
used.
Issue 1
TIL – Eng – Spec – 080
Page 50 of 70
Operator Manual
SeaHub
7.4. Checking & Replacing Fuses
The section describes the steps required to diagnose a failure due to a fuse blowing, replace the fuse and
recommission the system.
DANGER!
Before attempting any of the sections in this procedure, ensure that the unit is
disconnected from the AC and DC power source, and all other devices be
disconnected from it.
7.4.1. Checking/replacing the AC “Mains” fuse
•
Use this section only if the SeaHub front panel lights do not illuminate when the unit is powered
on
•
If the SeaHub unit is running from a DC-only source, skip this section.
NOTE
If the front status indicators do not illuminate/flash on power-up, it is possible that
these may have been turned off under the software controlled “brightness” settings
(see section 4.3.3).
If in doubt, perform a software reset, as described in section 7.2.
3) Unplug the SeaHub unit from any power sources.
4) On the rear of the unit, slide outwards the “fuse drawer”,
located just below the AC “Mains” inlet socket. This is usually
possible with fingers, but a small flat-bladed screwdriver may
help.
5) The “fuse drawer” is split into two compartments. The
outermost compartment is for a spare fuse, while the inner
one nearest to the housing contains the active fuse.
6) Use a continuity tester to determine if the main fuse has
blown. While the drawer is pulled-out, this fuse is
disconnected from the circuit, so the fuse may be tested
without removing it from its compartment.
7) If the fuse has not blown, try checking the fuses described in
section 7.4.3.
8) If the fuse has blown, use a small screwdriver to remove it
from the “fuse drawer”, and replace with a similar “2A 250V
20×5mm Antisurge (T)” fuse.
Close the drawer, and reconnect the AC supply. The front
status indicators should flash when the unit power’s up.
Issue 1
TIL – Eng – Spec – 080
Page 51 of 70
Operator Manual
SeaHub
7.4.2. Checking/replacing the DC Main Output Power (+28V Supply) Fuse
Use this section if there is no +28V (±5%) power from either Port C or D, or the 4mm Power Sockets on
the rear of the unit (assuming the power selection jumpers are set correctly).
9) Unplug the SeaHub unit from any power sources.
10) Follow the steps described in section 7.1 to open the
housing.
11) Locate fuse holder “F1” on the PCB.
12) Use a continuity tester to determine if the fuse has blown.
13) If the fuse has not blown contact Tritech technical support
for further assistance.
14) If the fuse has blown, use a screw-driver to carefully
remove it from its holder (the body of the fuse is glass!), and
replace with a “2A 250V 20×5mm Quick-Acting (F)” fuse
15) When done, fully close up the SeaHub unit, reversing the
steps described in section 7.1.
Issue 1
TIL – Eng – Spec – 080
Page 52 of 70
Operator Manual
SeaHub
7.4.3. Checking/replacing the DC Ext Output Power (+12V & +5V Supply) Fuses
Use this section if there is no +12V or +5V power from “AIF ArcNet Connector” or the 4mm Power
Sockets on the rear of the unit (and the power selection jumpers are set to output one of these voltages).
16) Unplug the SeaHub unit from
any power sources.
17) Follow the steps described in
section 7.1 to open the housing.
18) Locate fuses “F2” and “F4” on
the PCB.
19) Use a continuity tester to determine if the fuse “F2” has
blown – supplying the main PCB power from which both
+12V and +5V is derived.
20) Use a continuity tester to determine if the fuse “F4” has
blown – supplying the +5V supply.
21) Both these fuses are 2A surface mount “Quick Acting” fuses. If either has blown the most likely
cause is excessive current drain from an externally connected device (5V for USB peripherals is
protected by over-current limiting circuitry to prevent damage) – review you power setup,
requirements and jumper settings. However, it is recommend to contact Tritech Technical Support
for further assistance.
Issue 1
TIL – Eng – Spec – 080
Page 53 of 70
Operator Manual
SeaHub
7.5. Making Pin 5 link between Ports C-D for ArcNet Dual Profiler
It may be required to connect a pair of ArcNet Profiler heads, operating in a Dual Profiler mode, to Ports
C & D. For this, the DIN Sockets of Ports C & D must first be configured for ArcNet Comms Mode (refer to
Section 4.3.3 on Page 22).
The SeaHub has internal jumpers (‘J19’ for Port C, ‘J22’ for Port D) which are used to configure the
operational mode of Pin 5 on the DIN Sockets.
The factory setting is for the Pin 5 of Ports C & D to be linked
through to Comms Ground. In this configuration, when either Ports
C or D are configured for RS-232 Comms Mode (refer to Section
4.3.3 on Page 22) then the RS-232 Comms ground will be
connected through on Pin 5.
When operating Port C in RS-232 Comms Mode, ensure that
‘J19’ is shorted, as indicated by the left jumper position in the
diagram to the right.
When operating Port D in RS-232 Comms Mode, ensure that
‘J22’ is shorted, as indicated by the right jumper position in the
diagram to the right.
In the case of Ports C and D being configured for ArcNet Comms
Mode, Pin 5 on these Ports will require to be isolated from Comms
Ground whenever ArcNet Dual Profiler heads are connected. In a
Dual Profiler system, the Pin 5 line is used to send synchronisation
signals between the Master and Slave heads of the Dual Head
Pair.
When operating Ports C and D in ArcNet Comms Mode, ensure
that the “top row” pins of ‘J19’ and ‘J22’ are shorted together
before connecting ArcNet Dual Head Profilers to Ports C & D.
The diagram to the right shows the jumper position for this
configuration which results in Pin 5 of DIN Ports C & D being
linked together (and isolated from Comms Ground).
Issue 1
TIL – Eng – Spec – 080
Page 54 of 70
Operator Manual
SeaHub
7.6. Changing the ArcNet Power Supply
The SeaHub has an internal jumper (‘J14’) to select between +5V and +12V power options for the ArcNet
line drive.
NOTE
The SeaHub will be supplied with the ArcNet Power Supply set to the factory default
setting of +12V. This is the rail setting that is required to be used when communicating
with Tritech ArcNet devices directly over twisted pair cabling.
However, if the ArcNet is to be operated via a Fibre Optic Modem/Multiplexer then the ArcNet Power
setting should ideally match whatever the ArcNet circuitry uses on the Fibre Optic interface board.
Consult the F.O. manufacturer guidelines before making any changes, else set the ArcNet Power Supply
to +12V on J14 (as default).
To change the jumpers…
1) Unplug the SeaHub unit from any power sources.
2) Follow the steps described in section 7.1 to open the
housing.
3) Locate jumper block “J14”, labelled “ARCNET PWR” on the
PCB.
4) Select either the “+5V” or “+12V” option from the J14 header.
CAUTION!
Do NOT fit both jumpers at the same time, or fit
the jumpers in a horizontal orientation.
5) When done, fully close up the SeaHub unit, reversing the
steps described in section 7.1.
Issue 1
TIL – Eng – Spec – 080
Page 55 of 70
Operator Manual
SeaHub
7.7. Changing the ArcNet Termination Resistor
The ArcNet communication link normally requires termination resistors to be installed at each end of the
umbilical cable. These resistors are fitted between each line of the twisted pair.
•
For twisted pair cables that are below 100 metres in length, it is only necessary to install one
termination resistor of value between 47Ω to 100Ω (ohm) (68Ω nominally).
•
For twisted pair cables that are greater than 100 metres in length, two termination resistors
should be installed, one at either end of the cable. At the surface SeaHub module, a 270Ω resistor
should be fitted. At the subsea end of the cable, a 39Ω resistor should be fitted – if there is more
than one Sensor connected then this resistor should be fitted at the junction / splice point of the
cable.
NOTE
Refer to section 4.6.4 for further details on terminating ArcNet networks at the sonar
end of the link.
On the SeaHub PCB, jumper block “J13” allows either a 68Ω or 270Ω (default) termination resistor to be
selected, depending on the system configuration. To change the jumpers…
6) Unplug the SeaHub unit from any power sources.
7) Follow the steps described in section 7.1 to open the
housing.
8) Locate jumper block “J13”, labelled “ARCNET TERM” on the
PCB.
9) Select either the “68R” or “270R” option from the J13
header.
10) When done, fully close up the SeaHub unit, reversing the
steps described in section 7.1.
Issue 1
TIL – Eng – Spec – 080
Page 56 of 70
Operator Manual
SeaHub
7.8. Enabling the legacy Serial Port on the AIF connector
If backward compatibility with a serial port on an AIF card is required, it is possible to connect the four
RS232 serial signals (TX, RX, RTS and CTS) to pins on the “AIF ArcNet” connector on the rear of the
unit. This procedure describes this.
By default this option is not fitted, as connecting a device to Port-A and the AIFArcNet serial port simultaneously may cause damage to both serial devices.
CAUTION!
It is suggested that the ribbon-cable header to Port-A be disconnected from the PCB
if this procedure is undertaken, to prevent possible damage from occurring.
Observe Precautions For Handling Electrostatic Sensitive Devices – see Section 2.2
CAUTION!
1) Unplug the SeaHub unit from any power sources.
2) Follow the steps described in section 7.1 to open the housing.
3) This procedure requires access to the underside of the
PCB, which must first be completely removed from the
housing.
Start by unplugging the ribbon cable headers for Port-A,
Port-B and the AIF-ArcNet connector from the PCB
4) Unplug the Earth spade socket from the back of the IEC
mains inlet power connector (the Yellow/Green wire – this
cannot be disconnected from the PCB)
5) Unplug the 2-wire mains power header from the PSU
module (with the blue and brown cables)
Issue 1
TIL – Eng – Spec – 080
Page 57 of 70
Operator Manual
SeaHub
6) Use a 10mm spanner to loosen the M6 flanged Earthing
nut holding the PCB onto the earthing stud of the box.
7) The PCB should now be free – slide the circuit board forwards out of the housing, and place the
housing to one side
8) Turn the PCB over to access its underneath side
9) Solder four small links of wire or 0603 size 0Ω links onto the unpopulated component footprints
labelled R75, R76, R77 and R78.
These are located directly beneath the “AIF-ArcNet connector header J23”
10) Reverse the above steps to reassemble the SeaHub unit.
11) Take particular care when inserting the PCB back into the
housing, that it is fully slid back prior to tightening the M6
flanged earthing nut.
The shrouding around the 4mm DC power sockets fit into
their holes in the back of the box. This is shown in the
picture opposite.
CAUTION!
Issue 1
When reassembling the unit. it is suggested that the ribbon-cable header to Port-A be
disconnected from the PCB and the unit labelled appropriately if this procedure is
undertaken, to prevent possible damage from occurring if two serial devices are
simultaneously connected.
TIL – Eng – Spec – 080
Page 58 of 70
Operator Manual
SeaHub
7.9. Firmware & Software Update Procedure
The SeaHub firmware and software can be programmed into the unit using the “Seanet Setup”
application. Future firmware/software updates may become available from Tritech to provide expansion of
the unit’s capabilities. Whenever this occurs, the updated firmware and software files will be included
with the installer package for the new version of Seanet Pro software - this will be available for download
from the Support section of the Tritech website (www.tritech.co.uk).
Whenever this new version of Seanet Pro is installed, the SeaHub Node 252 ‘Status’ in Seanet Setup will
indicate that the unit will require an “Update”. Whenever this happens, follow the procedures below to
update the SeaHub with the new firmware / software changes.
7.9.1. Updating the SeaHub with the new software BinFile
The following procedure describes this…
1) Run the “Seanet Setup” application from the
Windows desktop icon.
2) Ensure the SeaHub Node 252 is detected in the
table. If not, then follow steps in Section 4.3.2 (page
21) which describes setup and configuration of the
SeaHub USB connection and COM port allocation.
3) Once Node 252 is detected, check the ‘Status’
column:
If this appears as “OK” (in Green) then no further
action is required.
Status = “OK”.
Software up to date - no further action required.
If this appears as “Update” (in Red) then continue to
Step 4).
Status = “Update”.
A Software program update is necessary.
Proceed to Step 4).
4) Click on ‘Action’ | ‘Program’ for Node 252. This will
download the new software BinFile into the SeaHub.
5) Click on ‘OK’ to confirm to proceed when requested.
The new program will now be downloaded into the
SeaHub. This may take up to a minute.
Issue 1
TIL – Eng – Spec – 080
Page 59 of 70
Operator Manual
SeaHub
6) Once the Program routine is Done, click the ‘Rebuild’
button and verify that the Node 252 ‘Status’ is now
showing “OK” (in Green). This confirms that the new
software program was successfully downloaded into
the SeaHub.
7.9.2. Updating the SeaHub with new FPGA firmware
The following procedure describes this…
1) Run the “Seanet Setup” application from the
Windows desktop icon.
2) Ensure the SeaHub Node 252 is detected in the
table. If not, then follow steps in Section 4.3.2 (page
21) which describes setup and configuration of the
SeaHub USB connection and COM port allocation.
3) Once Node 252 is detected, check the Status
column:
If this appears as “OK” (in Green) then no further
action is required.
Status = “OK”.
Firmware up to date - no further action required.
If this appears as “Update Fpga” (in Red) then a
firmware update is first required which is described
in Section 7.9.1. Continue to Step 4).
Status = “Update Fpga”.
A Firmware program update is necessary.
Proceed to Step 4).
4) Click on ‘Action’ | ‘Program Fpga’ for Node 252. This
will download the new firmware into the SeaHub.
5) Click on ‘OK’ to confirm to proceed when requested.
The new firmware will now be downloaded into the
SeaHub. This may take up to a minute.
Issue 1
TIL – Eng – Spec – 080
Page 60 of 70
Operator Manual
SeaHub
6) Once the Program routine is Done, click the
‘Rebuild’ button and verify that the Node 252 ‘Status’
is now showing “OK” (in Green). This confirms that
the new firmware was successfully downloaded into
the SeaHub.
Issue 1
TIL – Eng – Spec – 080
Page 61 of 70
Operator Manual
SeaHub
7.10. Portable Appliance Testing Guidelines
As part of the compliance with EEC Low Voltage Directive (73/23/EEC with amendment 93/68/EEC), the
SeaHub unit is fully portable-appliance-tested at the factory. Should the test need to be re-performed, it is
recommended the following guidelines are adhered to…
Read the user manual for the PAT tester and the current IEE code of practice before
carrying out this procedure
CAUTION!
Adhere to any safety statements given by the specific PAT tester used!
The SeaHub unit should be portable appliance testing in accordance with the IEE
code of practice for a “Class-I IT appliance”.
NOTE
•
Earth Bond Test
Use a current of 10A at 6VACRMS passed down the Earth of the mains
power cord for 5 seconds, and check that conduction occurs through the
exposed metal work on the housing connectors. For appliances with a
power cord, this should not exceed 0.2Ω.
With the power cord connected, this should typically be around 0.15Ω.
•
Insulation Test
500VDC should be applied between the Earth pin and the Live and
Neutral of the unit and the resistance is measured and shown to be in
excess of 7MΩ.
With the power cord connected, this should typically be in excess of
300MΩ.
•
Flash Test
(Electrical Strength
Test)
With the Live and Neutral wires connected together, 1500VACRMS should
be applied to the Earth and the induced current measured and checked
not to exceed 3.0mA.
With the power cord connected, this should typically be less than 2.0mA.
•
Load Test &
Leakage Current
Test
The SeaHub should be tested from a 240V supply, and the front-panel
LED’s will flash during the test to show correct operation. A warning may
be generated stating that there is not sufficient load for the test. The load
should be no greater than 0.5KW and the leakage current should be less
than 0.75mA.
Typically the Load test should read around 0.05KVA, and the leakage will
be 0.2mA.
Issue 1
TIL – Eng – Spec – 080
Page 62 of 70
Operator Manual
SeaHub
8. Troubleshooting
The list below covers some of the most common connection and operational faults associated with the
SeaHub. Contact Tritech technical support (see page 7) if your problem is not listed below or the
suggested remedies have no effect.
When the unit is powered up
nothing happens
The unit powers up, but no
output power is available
Sonars or other sensors I
connect to the unit appear
noisy
The ArcNet link (analogue) isn’t
functioning correctly
The ArcNet link (TTL) isn’t
functioning correctly
Issue 1
•
Check that the front panel indicators have not been turned
off under software control – if necessary reset the unit to its
defaults by the procedure described in section 7.2.
•
If using a “mains” AC source, check and replace (if required)
the fuse within the fuse drawer on the IEC power inlet
connector at the rear of the unit.
•
If the above fails or a DC source is being used, check and
replace (if required) the internal fuses – see section 7.2.
•
Check that the power supply requirements for either the AC
(Mains) or DC source have not been exceeded.
•
Check and replace (if required) the internal fuses – see
section 7.2 (page 47).
•
Check that the power supply requirements for either the AC
(Mains) or DC source have not been exceeded.
•
The communication and power grounds may be inadvertently
linked – refer to section 7.3.
•
Disconnect any other sensors or peripherals from the
system, and determine if they are injecting any electrical
noise.
•
Check that either the AC or DC power supplies have
sufficient noise filtering. Try running the system from a
sufficient DC battery if possible.
•
Check that the correct connections are made to the
connector, and signals aren’t crossed over.
•
Check that the correct ArcNet power jumper is specified
(either 5V or 12V) – refer to section 7.6 (page 55).
•
Remove all but one of the ArcNet devices and for each
device, check the node numbers reported in Seanet setup
are all unique and not conflicting – change any conflicting
nodes.
•
Check that the cable has the correct impedance and
termination for its length
•
Check that the correct connections are made to the
connector, and signals aren’t crossed over.
•
Check that the ground signal of the ArcNet link are
connected to the COMMS ground - refer to the power
supplies section 7.3 and section 5.3 for further details.
TIL – Eng – Spec – 080
Page 63 of 70
Operator Manual
SeaHub
The USB link between the
SeaHub and the PC doesn’t
work
USB peripherals I plug into the
front of the SeaHub unit, don’t
work
My serial port device doesn’t
work in RS232 mode
Issue 1
•
If using the USB cable supplied with the SeaHub, check that
the LEDs are illuminated within the cable connector
mouldings – this indicates that there is a voltage on the cable
to the peripheral.
•
Check that the USB cable length doesn’t exceed 5m
•
Check that the SeaHub USB port is not plugged into any
intermediate hubs between the unit and the PC.
•
Use the “Microsoft Windows” hardware Device Manager to
check that all the USB drivers are correctly installed and
setup on the PC.
•
Check that the SeaHub is powered up correctly
•
Check that the SeaHub modules onboard peripherals and
hub controller have correctly registered and detecting on the
PC’s operating system
•
Check that all cables are correctly and firmly connected to
their appropriate sockets.
•
Use the “Microsoft Windows” hardware Device Manager to
check that all the USB drivers are correctly installed and
setup on the PC.
•
Use the “Microsoft Windows” hardware Device Manager to
check that the USB bandwidth available to connected
peripherals versus their demands has not been exceeded.
•
Check that the connected USB peripheral is not exceeding
the 500mA current limit on each USB port. Diagnostic LED’s
are available within the module to indicate this – contact
Technical Support for further details.
•
Check RX and TX connections are correct on both ends –
the SeaHub is wired as a DTE, the same as a PC. The
sensor should use DCE wiring.
•
Check that ground connections are correct, and made to the
COMMS GROUND.
•
Check that baud rates and serial setup on both the device
and the PC are correct.
•
Check the cable length used does not exceed the stated
RS232 specification for the baud rate being used. – 10m or
less for 115.2KBaud.
•
Check that if handshaking is required, Port A is being used
(as it is the only port that supports RTS and CTS signals).
•
Check that nothing is shorting out the RS232 signals, and
voltage levels are between ±5V and ±15V
•
Check that no two conflicting devices have been connected,
if using Port A, and the link connection to the AIF connector
have been made
•
Check the port is correctly configured as RS232 mode
through the Seanet configuration interface.
•
If the device is drawing power from the SeaHub, check that
the power supply requirements for either the AC (Mains) or
DC source have not been exceeded.
TIL – Eng – Spec – 080
Page 64 of 70
Operator Manual
SeaHub
My serial port device doesn’t
work in RS485 mode
My serial port device doesn’t
work in RS422 mode
The RAT does not work
Issue 1
•
Check A and B wiring connections are correct on both ends
or any interconnect cabling, and not crossed.
•
Check that baud rates and serial setup on both the device
and the PC are correct
•
Check the cable length used does not exceed the stated
RS485 specification for the baud rate being used.
•
Check that nothing is shorting out the RS485 signals, and
voltage levels are 5V.
•
Check the port is correctly configured as RS485 mode
through the Seanet Setup configuration interface.
•
Check that the correct termination has been fitted to the
cable (approx 150Ω).
•
Check that the half-duplex turnaround time is less than a ½baud period on the RS485 device.
•
If the device is drawing power from the SeaHub, check that
the power supply requirements for either the AC (Mains) or
DC source have not been exceeded.
•
Check that Port B is being used, as this is the only port that
supports RS422 mode.
•
Check RX and TX connections (with A and B pairs in each)
are correct on both ends of any interconnect cabling.
•
Check that baud rates and serial setups on both the device
and the PC are correct
•
Check the cable length used does not exceed the stated
RS422 specification for the baud rate being used.
•
Check that nothing is shorting out the RS422 signals, and
voltage levels are 5V.
•
Check the port is correctly configured as RS422 mode
through the Seanet Setup configuration interface.
•
Check that the correct termination has been fitted to the
cable.
•
If the device is drawing power from the SeaHub, check that
the power supply requirements for either the AC (Mains) or
DC source have not been exceeded.
•
Check that the RAT being used is labelled as a “Version 2,
PS-2” RAT. The SeaHub unit does not support previous
versions (i.e. With Trackball instead of Togglestick pointer).
•
Check that the connection of the RAT has not caused the
power supply requirements for either the AC (Mains) or DC
source to be exceeded.
TIL – Eng – Spec – 080
Page 65 of 70
Operator Manual
SeaHub
9. Technical Specifications
9.1. Electrical
•
Power Input
AC “Universal” Mains Input
o 90VAC to 264VAC
o
47Hz to 63Hz.
o
IEC-320 ‘C14’ power socket (Use with IEC-320 ‘C13’ power
cord)
o
20mm × 5mm 2A 250V “Antisurge” (T) Fuse
DC Input
o 12VDC to 36VDC
o
2.1mm pin (0.08”) Power Socket (Positive on centre pin
recommended)
Power consumption from either source 4.8W (with no external device
load)
•
Power Output
DC Power is available form 3 sources.
o “PWR” – derived from the input source (and isolated from EXT
and COMMS):
When input source is AC mains, a DC output of 28V (±5%) is
factory set with potential to be increased up to 36V (±5%) by
internal PSU adjustments.
When input source is DC then the DC output will be 1.5V less
than the DC Input supply.
If both supplies are connected, the greater voltage will be used.
Rated at 50W or 2A max.
Fused internally with a 20mm × 5mm 2A 250V “Quick Acting”
(F) Fuse.
o
“EXT” – internally derived (and isolated from PWR and
COMMS), +12V or +5V supply for optional peripheral power.
Rated at 15W max.
Fused internally at 2A, with thermal shut-down.
o
“COMMS” – internally derived (and isolated from PWR and
EXT), +5V supply for communication signals.
Rated at 1W max
Short circuit protected for 1s maximum.
DC Power output available on rear ports (refer to power supply section
for further details regarding isolation barriers and grounding options)…
o “Port C” and “Port D” – PWR source
o
“AIF (ArcNet)” – output is selectable from PWR, EXT or
COMMS
o
4mm Power Output Sockets – output is selectable from PWR,
EXT or COMMS
Current drawn from the outputs should not exceed the greater of 50W or
2Amps in total.
Issue 1
TIL – Eng – Spec – 080
Page 66 of 70
Operator Manual
SeaHub
•
PC Interface
USB 2.0 “Hi-Speed” (480Mbps) Type “B” upstream socket on the rear of
the device.
For optimum performance, the unit should be connected directly to the
PC (i.e. avoiding any USB hubs), with a “Type-A” to “Type-B” cable, not
exceeding 5m in length.
•
Serial Interfaces
Four rear communication ports, labelled “A”, “B”, “C” and “D”, providing
connection to external RS232, RS485, RS422 or ArcNet LAN
peripherals.
Ports A and B…
o 9-Way D-Type Male Connector
o
Supports RS232 (3 wire), RS485 (Half Duplex) on both ports
o
Supports RS232 (5 wire – RTS, CTD) on Port A
o
Supports RS422 (Full duplex differential) on Port B
Ports C and D…
o 6-Way DIN Female Socket
o
Supports RS232 (3 wire), RS485 (Half Duplex) and ArcNet
differential (analogue) LAN on both ports
o
Supports fully screened DIN plugs
o
Device power and earth available on both ports (see above)
AIF (ArcNet) Port…
o 15-Way D-Type Female Connector
•
USB Interfaces
o
Supports ArcNet differential (analogue) LAN
o
Supports ArcNet TTL LAN (for backplane connection)
o
Optional support for “Port A” serial signals
o
Power output available (see above)
Two front panel mounted USB 2.0 compliant “Type A” downstream
sockets, supporting…
o “Hi-Speed” Mode (480Mbps)
o
“Full-Speed” Mode (12Mbps)
o
“Low-Speed” Mode (1.5Mbps)
A 500mA over-current protected +5V supply is available on each
connector for USB self-powered peripherals
•
RAT Interface
A single 9-Way D-Type “Female” front panel connector to be connected
to a “V2” RAT (Remote Access Terminal) – configured with RS485
communications and a PS2 pointing device.
•
Status Indicators
16 front panel mounted status and mode indicators, comprising…
o 1 × Power/Status Indicator (Red)
Issue 1
o
4 × Communication Status Indicators (Red/Green)
o
11 × Communication Hardware Mode Indicators (Blue)
TIL – Eng – Spec – 080
Page 67 of 70
Operator Manual
SeaHub
9.2. Software
•
Plug-and-Play
Detection
On connection, the following devices will be enumerated by the USB
interface…
o 1 × USB 2.0 Hub Controller
o 3 × USB Serial Converters
o 6 × USB Serial Ports, in the following order…
− Port A
− Port B
− Port C
− Port D
− SeaHub System Connection
− Auxiliary Expansion Port (reserved for future use)
o 1 × USB PS2 Mouse Interface (for RAT pointer)
Additionally any connected USB peripherals to the front downstream
connectors will also be detected after the above
•
Drivers
The USB Hub controller is fully USB2.0 compliant, and will work with
any standard driver included in the operating system.
The USB Mouse (part of the RAT interface) is fully USB1.2 compliant,
and will work with any standard driver included in the operating system.
Drivers for the FTDI2232 “USB Serial Converters/Ports” are available
from the “Future Technology Devices International Ltd” website
(http://www.ftdichip.com), for the following operating systems…
o Microsoft Windows 98, 98SE, ME, 2000, XP and XP-Embedded
o Microsoft Windows CE
o Linux 2.40 or greater
o MAC OS-8, OS-9 and OS-X
•
Issue 1
Field Upgradeable
Firmware
The SeaHub internal firmware may be field updated using the Tritech
“Seanet Setup” application, with the “V4” communications protocol and
compatible released “Bin-Files”.
TIL – Eng – Spec – 080
Page 68 of 70
Operator Manual
SeaHub
9.3. Environmental
•
Operating
Temperature Range
-10°C to +35°C
•
Storage Temperature
Range
-20°C to +50°C
•
Water Ingress
DANGER!
The SeaHub module housing is NOT sealed against
the ingress of water, and should not be used in wet
conditions or in close proximity to water.
9.4. Statutory Compliances
•
European
Compliance
This product is designed in compliance with the essential
requirements and other relevant provisions of the Directive
1999/5/EC.
This notice is based upon compliance of the product to the
following directives and standards
• 73/23/EEC Low Voltage Directive with amendment
93/68/EEC
•
89/336/EEC EMC Directive
92/31/EEC and 93/68/EEC
with amendments
•
Recycling
This product is designed to comply with the European
“Waste Electrical and Electronic Equipment Directive
(2002/96/EC - WEEE)”
•
Environmental
This product is built using lead free (RoHS directive compliant)
components and assembly processes, as specified in “Restriction of
Hazardous Substances Directive (2002/95/EC – RoHS)”.
•
Equipment
Classification
“Class I” (BS2754) Portable Appliance Equipment Type
“Equipment in which protection against electric shock does not rely on
basic insulation only, but which includes means for the connection of
exposed-conductive-parts to a protective conductor in the fixed wiring of
the installation”.
Issue 1
TIL – Eng – Spec – 080
Page 69 of 70
Operator Manual
SeaHub
9.5. Mechanical
•
Dimensions
Width 232mm
Height 52mm
Depth 185mm
•
Weight
1.3Kg
•
Materials
Painted Aluminium, Matte Anthracite Textured Finish
181.4mm
228.0mm
Side
51.5mm
Top
231.0mm
Rear
Front
Do not scale from drawings
Issue 1
TIL – Eng – Spec – 080
Page 70 of 70