1
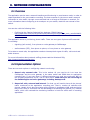
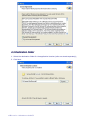
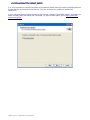
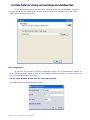
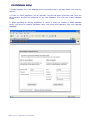
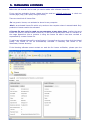
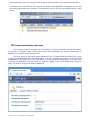
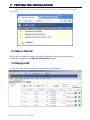
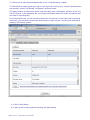
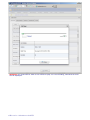
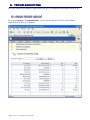
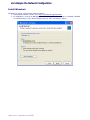
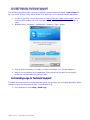
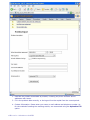
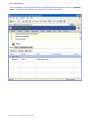
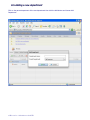
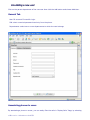
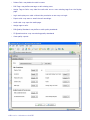
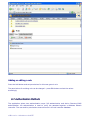
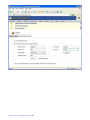
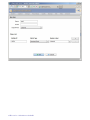
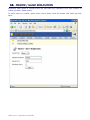
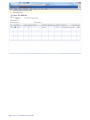
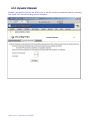
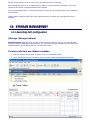
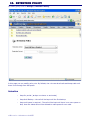
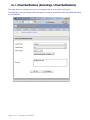
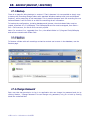
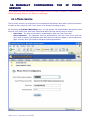
CallRecorder Administrator's Guide © Copyright 2005-2011 RAI Software SRL, Bucharest, Romania www.raisoftware.ro Table of Contents 1. INTRODUCTION..............................................................................................................................................................5 1.1.PRODUCT OVERVIEW.....................................................................................................................................................5 1.2.FEATURES AND BENEFITS................................................................................................................................................5 1.3.TECHNICAL SPECIFICATIONS............................................................................................................................................6 2.2. PREREQUISITES........................................................................................................................................................8 2.1.HARDWARE REQUIREMENTS............................................................................................................................................8 2.2.SOFTWARE REQUIREMENTS.............................................................................................................................................9 2.3.GET THE APPLICATION...................................................................................................................................................9 2.4.GET A LICENSE...........................................................................................................................................................9 3.NETWORK CONFIGURATION..................................................................................................................................10 3.1.OVERVIEW..................................................................................................................................................................10 3.2.IMPLEMENTATION OPTIONS...........................................................................................................................................10 3.3.SERVER SIDE NETWORK CONFIGURATION........................................................................................................................11 4.SETUP...............................................................................................................................................................................12 4.1.WELCOME SCREEN......................................................................................................................................................12 4.2.LICENSE AGREEMENT...................................................................................................................................................12 4.3.DESTINATION FOLDER..................................................................................................................................................13 4.4.DOWNLOAD THE LATEST PATCH ....................................................................................................................................14 4.5.DATA FOLDER FOR STORING CALL RECORDINGS AND DATABASE FILES...................................................................................15 4.6.DATABASE SETUP........................................................................................................................................................16 4.7.LOGIN PAGE................................................................................................................................................................17 5.MANAGING LICENSES................................................................................................................................................18 5.1.COMPANY WIDE RECORDING (CWR) LICENSE...............................................................................................................19 6.NETWORK CARDS SELECTION...............................................................................................................................20 7.TESTING THE INSTALLATION.................................................................................................................................21 7.1.MAKE A TEST CALL....................................................................................................................................................21 7.2.PLAYING A CALL.........................................................................................................................................................21 8.TROUBLESHOOTING..................................................................................................................................................24 8.1.ANALYZE PACKETS CAPTURED.......................................................................................................................................24 8.2.ANALYZE THE NETWORK CONFIGURATION......................................................................................................................25 CallRecorder 6.1 Administrator's Guide2 8.3.GET REMOTE TECHNICAL SUPPORT..............................................................................................................................28 8.4.SENDING LOGS TO TECHNICAL SUPPORT.........................................................................................................................28 8.5.ADDING A NEW DEPARTMENT.........................................................................................................................................32 8.6.ADDING A NEW USER....................................................................................................................................................33 8.7.AUTHENTICATION METHODS.........................................................................................................................................37 8.8. PHONE DIRECTORY.....................................................................................................................................................39 9.EMAIL CONFIGURATION..........................................................................................................................................41 10.MASTER / SLAVE REPLICATION...........................................................................................................................42 11.CALLMANAGERS (PBXS) CONFIGURATION.....................................................................................................44 11.1.FORKED RECORDING..................................................................................................................................................45 12.RECORDING POLICY................................................................................................................................................49 12.1.RESERVED CHANNELS................................................................................................................................................49 12.2. DYNAMIC CHANNELS................................................................................................................................................51 12.3.ADVANCED TAB.........................................................................................................................................................52 13.SILENCE COMPRESSION (VOICE ACTIVITY DETECTION)..........................................................................53 14.STORAGE MANAGEMENT.......................................................................................................................................54 14.1.RECORDING PATH CONFIGURATION..............................................................................................................................54 15.RETENTION POLICY.................................................................................................................................................55 16.AUDIT.............................................................................................................................................................................56 16.1. EMAIL NOTIFICATIONS (RECORDINGS / EMAIL NOTIFICATIONS).......................................................................................57 17.BACKUP (BACKUP / RESTORE)..............................................................................................................................58 17.1.BACKUP...................................................................................................................................................................58 17.2.RESTORE..................................................................................................................................................................58 17.3.CHANGE PASSWORD...................................................................................................................................................58 18.MANUALLY CONFIGURING THE IP PHONE SERVICE...................................................................................59 18.1.PHONE SERVICE........................................................................................................................................................59 18.2. APPLICATION PHONE XML USER..............................................................................................................................60 18.3.CREATE A NEW CISCO USER OR SELECT AN EXISTING ONE...............................................................................................60 18.4.ASSOCIATE ALL DEVICES WITH THE DESIRED USER...........................................................................................................60 18.5.SETTING UP THE AUTHENTICATION................................................................................................................................60 18.6.ADD A NEW SERVICE..................................................................................................................................................61 CallRecorder 6.1 Administrator's Guide3 18.7.ON-DEMAND RECORDING URL FOR SPEED DIALS ........................................................................................................61 18.8.ASSIGN THE SERVICE TO THE PHONES YOU WANT............................................................................................................61 18.9.APPLICATION SERVICE CONTROL (WATCHDOG).............................................................................................................62 CallRecorder 6.1 Administrator's Guide4 1. INTRODUCTION 1.1.Product Overview CallRecorder is an easy to use VOIP call recording solution that implements the corporate call recording keeping policy and provides secure and easy access to call records. It allows managers to review and score phone calls according to their work group. Users are empowered by providing them with accurate records of their calls. CallRecorder is a self-contained software recorder which includes everything necessary to record VoIP calls (besides the Operating System and server hardware): database, web server, Java, etc. 1.2.Features and Benefits Automatically Record Phone Calls - Damage control and increased accountability in your personnel, suppliers and customers. Manual (On-Demand) Control: recording can also be initiated by the user using the browser or IP Phone Service. Both Full Call and Partial Call recording modes are supported. Multiple Recording Methods: CallRecorder supports both port mirroring (SPAN) and forked recording (SPANless). Hardware recording coming soon! Monitor live calls: Listen to a call in progress, through the browser or IP phone service. You can also whisper to the agent without being heard by the external party (IP phone service). Browse Recordings by Agent - Superb browsing interface tracks agents across multiple phone numbers. Search by caller ids, phone numbers, annotations, time, description, tags, etc. Replay, Annotate and e-Mail phone call recordings. Easy, secure access to call recordings, using a web audio player, desktop audio player or IP Phone Service. Tagging & Searching calls with customized hierarchical tags has never been easier. Call Scoring & Custom Forms - Integrated agent scoring and reporting module Agent Call Statistics Reports: the number of calls made, received, etc by each agent Email Notifications: automatically send email when a predefined number appears in a call. Backup & Restore: Archive calls on DVDs, HD-DVDs, BluRays or SANs. A single DVD can store up to 15,000 calls of 5 minutes each, due to the state-of-the-art voice compression technology incorporated in CallRecorder. Reverse Caller Lookup - Displays the caller name and business unit using the company Phone Directory. Multi Site Replication: using queued replication, you can record many network partitions and centralize recordings at the HQ. Recording and replication survive a downed WAN link. Screen Recording – Integration with Memolith Screen Recorder. See what was done on the screen while the phone call occurred. Specialized Speech Compression lowers the storage requirements 8 times over MP3 and allows 18,000 hours of phone calls storage on one 120 GB hard drive. Call History - follow a call as it is transferred, put on hold or parked Audit Replays – prevent recordings abuse by browsing the list of accesses to a call. CallRecorder 6.1 Administrator's Guide5 XML Phone Service – handily review your past calls from your XML enabled phone (Cisco IP Phones 7940, 7960 & 7970). Authenticate, Browse, Play, Rewind, e-mail, mark important. You can also assign calls to folders. Access Control Lists – fine grained permission system to allow listening and acting on calls. Automatic Software Update - the easiest, fastest way to apply patches Thin Client Deployment – The administration and user tools run in all web browsers supporting Flash. Integrated Support Tools – Request & receive technical support with a few clicks, by using the integrated log packer and TeamViewer support tool. Passive network sniffing assures zero impact of recording on PBX performance and improves system reliability. Try Before You Buy – Download a fully-featured evaluation version with a friendly configuration wizard from: http://www.call-replay.com 1.3.Technical Specifications VoIP PBX • Cisco CallManager (all versions) • CallManager Express • Avaya CM S8000 series and IP Office 500 • NEC Univerge - SV8000 series, IP only • generic SIP • IPTrade turrets • All Cisco IP Phones • All SIP phones • selected Avaya models • Any Windows OS • 32 and 64 bit compatible • Software only recording system, no proprietary cards • Industry-standard Intel compatible server supplied by customer • Network connection to voice traffic, using a hub or a mirrored port for promiscuous mode network sniffing Recording Capacity • Up to 400 simultaneous calls on a single dual core CPU Retention Capacity • Speech compression, VBR, Stereo, 170 hours per GB • ~ 18,000 compressed talk hours on one 120GB HDD • G.711, G.722 • G.729 (extra option) IP Phones Operating System Hardware Requirements Supported codecs CallRecorder 6.1 Administrator's Guide6 Recording Architecture • Passive network sniffer, Skinny Protocol • SIP trunk recorder compatible with newer Cisco phones • Stereo, each party is heard in a different channel Embedded Database Security Call records access Support PostgreSQL 9.0 • Secure access to recordings • Managers have access to calls based on logical departments filters • Web interface + desktop player • Phone Service interface (on Cisco IP Phones 7940, 7960, 7970) • Technical Support includes Software Upgrades • TeamViewer software included CallRecorder 6.1 Administrator's Guide7 2. 2. PREREQUISITES 2.1.Hardware Requirements Network • Managed network switch with port-mirroring capability (SPAN) • At least two network interface cards are required on the recording server, one for each monitored switch, and another for the site (a monitoring port can only receive packets). Using one interface card is possible, but the administration site will only be accessible from the physical console. Server Production server requirements for up to 250 simultaneous calls, heavy usage (call center): quad core cpu, 4 GB RAM, 2 NICs, Windows 2003 Server or newer. Dimensioning of the recording server hardware is proportional with the total number of phones visible on the port-mirroring interface, even those which are not recorded. This table assumes only the voice traffic is visible on the SPAN interface, that is, the general data traffic and the voice traffic are segregated into different VLANs. Total Number of Visible Phones Minimum CPU 800 Recommended RAM CPU RAM 10 0.5 Ghz 256 MB 1 Ghz 512 MB 50 1 Ghz 512 MB 3 Ghz 1 GB 100 3 Ghz 1 GB 2 x 3 Ghz 2 GB 200 2 x 3 Ghz 2 GB 4 x 3 Ghz 4 GB 400 2 x 3 Ghz 4 GB 4 x 3 Ghz 8 GB 4 x 3 Ghz, 8 GB RAM, SSD or SAN storage > 5000 IOPS Storage 1.7 KB/s means that each GB on the drive can keep about 160 hours of recordings (voice compression is 8 times better than MP3). That is, you can keep 96,000 calls of 10 minutes on one 100 GB HDD. One month of typical call center recordings (160,000 calls) takes about 55 GB. Please use only redundant disks (RAID1 and over) for storing call recordings! CallRecorder 6.1 Administrator's Guide8 2.2.Software Requirements Server Side Operating System: Any Windows Server. Desktop Windows OSes (Professional, XP, Vista, 7) can also be used, but TCP connection on these platforms are limited to 10 simultaneous sessions, limiting the number of users which can replay calls using the web site or a phone service. IMPORTANT: It is recommended not to run any other server software on a production recording server! Call recording is essentially real-time. Failing to keep up with the traffic can result in lost calls. Other software can unpredictably use critical processor and memory resources which are necessary for packet capture. The application allocates computing resources according to priorities so an uncontrolled processing spike of another program may disrupt recording. Client Side • It can be used any operating system, with a browser running Adobe Flash 10.1 or later, Internet Explorer 6, Firefox 3.0 and Opera 11.x. Software Optimizations The Windows system cache is by default too large. Go to Control Pane / System / Advanced / Performance Settings / Advanced: ➔ set memory usage for best performance of Programs ➔ set processor scheduling for best performance of background services 2.3.Get the Application Our website always contains the latest version of application:http://call-replay.com/go/dl/ The setup automatically downloads the latest patch from our web site. If that does not happen MAKE SURE you download and apply it manually. 2.4.GET a License If you want an evaluation license, you can request it via email from [email protected] or http://www.call-replay.com/Contact CallRecorder 6.1 Administrator's Guide9 3. NETWORK CONFIGURATION 3.1.Overview The application service uses a network interface card functioning in promiscuous mode, in order to capture packets for the conversation recording. The host computer or the server need a network connection to voice traffic, through a non-switched hub or through a SPAN port on a switch. For more information about configuring a mirrored port on your switch, read the user manual of the switch. You can also visit the following links: • Configuring the Catalyst Switched Port Analyzer (SPAN) Feature: http://www.cisco.com/en/US/products/hw/switches/ps708/products_tech_note09186a00 8015c612.shtml The application works by monitoring phone traffic. There are two types of phone traffic essential to recording: • signaling (call control), from phones or voice gateway to CallManager • audio streams (RTP), from phone to phone, or from phone to voice gateway To be able to record calls, the application needs to intercept both types of traffic, call control and audio streams. For more information about network sniffing please read the Wireshark FAQ: http://www.wireshark.org/faq.html 3.2.Implementation Options There are two main options in configuring network monitoring: 1. Record only external calls. This is the easiest. All you need to do is to have the CallManager and the voice gateway in the same switch and SPAN them to application recording port. If you have them in different switches you need two monitoring NICs in the recording application server, one for each switch. Make sure you are mirroring all the CallManagers and voice gateways, including backup ones. 2. Record all calls, external and internal. For that you will need to have all the phones' traffic monitored to the application recording port. That is, monitor all switches with phones. Usually this is done by placing all the phones in a separate VLAN, and monitoring that VLAN. Using a VLAN also has the advantage of discarding the general (PC) network traffic, which can overload the monitoring interface in both the switch and in recording application. CallRecorder 6.1 Administrator's Guide10 Because RTP traffic (green and red in the figure) travels directly between end points, without going through CallManager, in a large enterprise with multiple switches only external calls (PSTN) can be recorded in a cost effective way (one recorder for each voice gateway). To record internal calls also, one recorder per switch with IP phones is required. 3.3.Server Side Network configuration Because monitoring ports cannot usually transmit traffic, for production setups the server you are using must have a minimum of two network cards for application to function properly. One of them will be used for general network traffic and accessing Application Web Administration Interface and the other for listening VOIP related traffic. The NIC selected for website access must have a static IP address. Important: The monitoring NIC must not have an IP address, or Windows may try to route the web site traffic through the monitoring NIC. CallRecorder 6.1 Administrator's Guide11 4. SETUP Make sure you have read the Prerequisites chapter before proceeding further. 4.1.Welcome Screen 1. Check if the setup version you are running is the latest available from our web site. 2. Click Next 4.2.License Agreement 1. Click “I Accept” if you agree with our license. You may not use the software if you do not agree. 2. Click Next CallRecorder 6.1 Administrator's Guide12 4.3.Destination Folder 1. Select the destination folder for the application binaries (calls are stored separately); 2. Click Next. CallRecorder 6.1 Administrator's Guide13 4.4.Download the latest patch It is very important to have the program up-to-date so please leave the option marked unless the firewall blocks connections to the internet. The web site used for updates is update.callreplay.com. If your computer does not have access to the Internet, deselect “Download update” and apply the patch manually after the setup has completed. To get the latest patch, go to http://www.callreplay.com/go/dl/ CallRecorder 6.1 Administrator's Guide14 4.5.Data folder for storing call recordings and database files This is the folder where all the user data, including audio files, the database, logs and licenses will be stored. Please select the disk with the maximum available free space. Use a RAID protected disk for this folder. Site configuration At the end of the setup, the Site configuration utility will be automatically started to assist configuring of the name, IP and port of the administration web site. You may use port 80 if it is not used by another web server. The IP of the website is also used for licensing purposes. Press OK to start the administration web site. CallRecorder 6.1 Administrator's Guide15 4.6.Database Setup This page appears only if the database does not already exists in the data folder. You have two options: a. If this is a fresh installation (not an upgrade), the left-side panel should be used. Enter the administration account and password for the new database, then click the Create Database button. b. When upgrading an existing installation of version 5, enter the location of MSDE database server, the name of instance, database name, user name and password, then click Upgrade Database. CallRecorder 6.1 Administrator's Guide16 4.7.Login page Enter the user name and password. When running with an evaluation license, this page always displays the name of an administrator and a public password “eval” which works for every user. CallRecorder 6.1 Administrator's Guide17 5. MANAGING LICENSES Before the call recorder can be used you need to add a valid software license file. If you need an evaluation license, please send an email at [email protected] or check our contact page (http://call-replay.com/go/contact). There are two kinds of license files: .lix is a generic license, not-activated or bound to any computer. .bind is an activated license file which only works on the computer where it was activated. Only production licenses need to be activated. A license file may only be used on one computer at any given time. Loading the same license file (that is, with the same license ID) on two servers at the same time is a violation of the usage agreement. Also a violation is using the license file after it has been revoked or superseded by a newer license file. To add a new software license file, select System / Licenses from the menu then click the Upload button. The license fill will be automatically activated if necessary and stored in the DataFolder/Licenses directory. If the licensing software cannot contact our web site for license verification, please open the CallRecorder 6.1 Administrator's Guide18 Manual Activation link on a computer with Internet access and fill in the requested information. If you have not a valid license, your license is expired or the application is stopped, you will see some warnings showing the problem. The application service will not be started without a valid license. 5.1.Company Wide Recording (CWR) License This licensing model is obsolete, do not configure it unless instructed by technical support. If you have a Company Wide license type, ensure that application can contact CallManager to establish the number of registered phones. You must supply a user name and a password in the “Company Wide Recording” tab, which is used for authentication with the CallManagers. This user must be the same on all the specified CallManagers. The password must be the same on all the specified CallManagers. You don't need to specify the password each time that you make an update in the configuration page, but only when you need to change the existing password. CallRecorder 6.1 Administrator's Guide19 If the number of phones registered in your CallManager exceeds the number of registered phones in your licenses, the application service will not be started. 6. NETWORK CARDS SELECTION Because monitoring ports cannot usually transmit traffic, for production setups the server you are using must have a minimum of two network cards for application to function properly. One of them will be used for general network traffic and accessing Web Administration Interface and the other for listening VOIP - related traffic. By clicking Capture / Network Interfaces, you can choose which NIC is used for VOIP traffic and which one is used for web administration and general traffic. Important: The two NICs must not be in the same scope of the net mask, or Windows may try to route the web site traffic through the monitoring NIC. Remove the IP address of the monitoring NIC. CallRecorder 6.1 Administrator's Guide20 7. TESTING THE INSTALLATION Make sure there are no pending alerts below the menu bar, by clicking on each alert and solving them. 7.1.Make a Test Call Place a call to an external number. Recording internal calls requires a special network configuration, please see the Network Configuration chapter 7.2.Playing a Call 1. From the menu, choose Recordings / Replay Calls as shown below: CallRecorder 6.1 Administrator's Guide21 2. If there are no calls displayed please skip to the "Troubleshooting" chapter. 3. Click the More button (green plus sign on the right side of every call), choose Properties and a new window, named “Call Details” will appear, as shown below. This page contains all information about a call like caller party, called party, duration of call, file size, file format. In the Advanced tab, you will get information about RTP traffic (ip address and port used in recording call). In the Description tab, you can provide a description for that call. In the Export tab by pressing “Save Call” you can save the call under Wav format or speex format. You can email that call by pressing “Send Email” button. c) Click on Play Button. d) A pop-up will be open and the recording will start playing. CallRecorder 6.1 Administrator's Guide22 Attention You must have a valid G.729 license to play a G.729 recording, otherwise an error will be displayed. CallRecorder 6.1 Administrator's Guide23 8. TROUBLESHOOTING You have installed the software, made some calls, but no recordings are displayed! What to do? 8.1.Analyze Packets captured By clicking Capture / Troubleshooting, you can see the amount of TCP or UDP Packets captured from and to an IP Address. CallRecorder 6.1 Administrator's Guide24 8.2.Analyze the Network Configuration Install Wireshark Wireshark is a free, open source packet analyzer. 1. Download the latest version from http://wireshark.org/download 2. At installation, be sure to not select the “Install WinPcap” option (as it is already installed by CallRecorder) or the “Start WinPcap service “NPF” at startup” option. CallRecorder 6.1 Administrator's Guide25 Capture a Call 1. Go to the Capture menu and select Interfaces 2. In the interfaces window select the same network card you configured for monitoring in CallRecorder. 3. Press the Capture button 4. Start a call 5. Talk a few seconds. In the capture window you should see the number of udp and tcp packets growing. If not, you either configured SPAN incorrectly or captured on the wrong NIC. 6. Stop the call. 7. Stop the network capture. Usually there should be about 100 udp packets per second, so if this number is much smaller, then your server may not be capturing the voice stream. Verify Call Control In the main Wireshark window, set the filter to: ip.addr == {TEST_PHONE_IP} && skinny.messageid == 0x8a and press Apply. The StartMediaTransmission and OpenReceiveChannelAck messages are critical for recording to work. If you don't see any skinny packets after applying this filter, then your call control stream was not captured. To fix it, you should configure SPAN to your computer, in order to forward traffic from CallManager. CallRecorder 6.1 Administrator's Guide26 Verify the Voice Streams In the main window, set the filter to: ip.addr == {TEST_PHONE_IP} && udp and press Apply If you don't see any RTP packets after applying this filter, then your voice stream was not captured. To fix it, you should configure span to forward traffic from your phones to your computer. If you are only interested in external calls, you should only forward traffic from your voice gateway to your computer. CallRecorder 6.1 Administrator's Guide27 8.3.GET Remote Technical Support The recording application has a number of powerful support utilities included. Team Viewer for eg., is a screen sharing utility which allows us to assist you. It is a firewall friendly application. 1. In order to get RTS, you must contact us (http://www.call-replay.com/Contact) and let us know what problem you met. We recommend to reach us by instant messenger or email. 2. Windows Start / Programs / CallRecorder / Support / Team Viewer 3. Send to technical support, by email or instant messenger, your ID and Password 4. Wait for the connection to be established. The program will not work if the support technician was not notified to open his side. 8.4.Sending Logs to Technical Support To enable technical support to understand the cause of a problem, the recording application keeps extensive logs of all the actions it does. To send them to us: 1. From application menu Help / Send Logs CallRecorder 6.1 Administrator's Guide28 2. Describe the problem as detailed as possible, including the phone numbers and IP addresses with issues. 3. Fill in the problem date correctly, or the logs will not be copied from the correct period. 4. Contact Information. Please enter your name, e-mail address and telephone number. As for the method of sending the resulting archive, we recommend using the Upload to FTP option. CallRecorder 6.1 Administrator's Guide29 5. Click Submit report. CallRecorder 6.1 Administrator's Guide30 Users Management You can organize your agents, supervisors and organizational hierarchy by clicking on System / Users. This page is only available for users with "Is Admin" permission. CallRecorder 6.1 Administrator's Guide31 8.5.Adding a new department Click on the parent department of the new department then click the Add button and choose Add Department CallRecorder 6.1 Administrator's Guide32 8.6.Adding a new user Click on the parent department of the new user then click the Add button and choose Add User. General Tab User ID: account ID used for login. PIN: short numerical password used only from the phone. Departments: select one or more departments to which the user belongs. Associating phones to users By associating a phone to a user, you can easily filter the calls in “Replay Calls” Page, by selecting CallRecorder 6.1 Administrator's Guide33 the respective agent node in the left-side tree. Association can be done by phone number, ip address, or mac address. We recommend you to use MACs because they are the most reliable. Filtering by MACs does not work in WAN environments, where there are routers between the recorder and phones. Granting permissions The values for each permission can be Inherit (keep the role permission), Allow or Deny. Call Permissions are for: • Replay Calls on a specific department and its sub-departments. • Is Admin: the administrator has all the permissions and may perform any operation. • Replay All Calls: see all the calls, regardless of user's phone settings. CallRecorder 6.1 Administrator's Guide34 • Delete Calls: may delete the calls he sees. • Edit Tags: may define new tags or edit existing ones • Assign Tags to Calls: may label the calls with one or more existing tags from the Replay page. • Login and replay own calls: without this permission a user may not login. • Export calls: may save or email the call recordings. • Audit calls: may open the audit page. • Assign tags to calls. • Edit Quality Standard: may define or edit quality standards • Fill Questionnaires: may use existing quality standards • View quality reports CallRecorder 6.1 Administrator's Guide35 Roles Roles are collections of permissions similar to Windows user groups. The application has 3 built-in roles: Administrators Group, Supervisors Group and Agents Group. Administrators can configure the application which includes adding other users, upgrading it or configure system-wide settings may take any action on any call Supervisors can replay his own calls and the calls in al the departments and their subdepartmentes. Agents can only access his own calls An administrator can also configure the application so that a manager can only replay calls, with the exception that a manager can view all calls within the filter set. The administrator account settings are made in application web site. CallRecorder 6.1 Administrator's Guide36 Adding or editing a role Press the Add button and set permissions for this new generic role. The permissions for existing role can be changed – press Edit button and set the values accordingly. 8.7.Authentication Methods The application allows two authentication ways: DB authentication and Active Directory/LDAP authentication. AD authentication is used to verify the password against a Windows domain controller. The user and its permissions must still exist in the call recorder database. CallRecorder 6.1 Administrator's Guide37 CallRecorder 6.1 Administrator's Guide38 8.8. Phone Directory This feature allows to identify the caller and destination phone numbers of a call when caller ID is not available. You can organize your contacts hierarchically on organizations and subdepartments by clicking on System / Phone Directory. Adding External Organization / Department Press Add button and choose Add Directory for adding new directory. Adding a new external contact Press Add button and choose Add User for adding new contact. Each contact can have one or more phones After adding an external contact, each call with that contact will have it colored in blue, with a tool-tip when hovering the cursor over the contact name. CallRecorder 6.1 Administrator's Guide39 CallRecorder 6.1 Administrator's Guide40 9. EMAIL CONFIGURATION 1. Enter your SMTP server credentials (SMTP server, Authentication User, password). 2. The Admin Email Password is also used for critical alerts. 3. Click Save. CallRecorder 6.1 Administrator's Guide41 10. MASTER / SLAVE REPLICATION Replication Page allows to configure calls info and audio files replication from slave systems to master (System / Master Slave). To add a slave to a master, select server role as Slave, enter the master host name and click Save. CallRecorder 6.1 Administrator's Guide42 CallRecorder 6.1 Administrator's Guide43 11. CALLMANAGERS (PBXS) CONFIGURATION PBXs Configuration Page allows management of Cisco CallManagers, Avaya and other supported telephony controllers. You can add a PBX by clicking on the Capture / CallManagers (PBXs) / Add PBX. 1. Add all the IPs of CallManagers in a cluster 2. Set its type to either Cisco CallManager, Avaya, NEC or SIP. 3. Enter the PBX version. 4. When using Cisco UCM > 5.0 you have the option to choose between passive (SPAN) and active (forked) call recording). 5. For passive (SPAN) call recording check the box for SIP and Skinny protocols or Add the protocols via the Add Protocol button. 6. For active (forked) call recording check the box for Forked protocols or Add the protocol via the Add Protocol button. Observation: Cisco CallManager Express is a different type than Cisco CallManager. CallRecorder 6.1 Administrator's Guide44 11.1.Forked Recording This option only appears when the PBX type is Cisco CallManager, version is greater or equal than 5.0 and the Forked Recording Protocol is selected in the PBX options. 1. In the Capture / PBXs page, Click button labeled Forked Recording to start configuration wizard. CallRecorder 6.1 Administrator's Guide45 The following configuration wizard utility will be shown: 2. This step is for setting the administration user name and password for PBX which will be used during configuring process. After filling both fields press Next. 3. In the next page leave all the fields unchanged unless instructed by technical support. 4. The Phone Service IP address must be routable from the phones' VLAN. CallRecorder 6.1 Administrator's Guide46 Press Next button. CallRecorder 6.1 Administrator's Guide47 5. This page is for enabling forked recording, configuring destination address in recording profile (also needs to be routable from a phone's IP address). Also the recorder host and port for SIP trunk can be chosen. The SIP port must be available for this application. Syn-Apps' SA-Announce also uses a SIP trunk so make sure in that case to select another port, such as 5061. 6. After this step, the configuration wizard will shown the list of subscribed phones on PBX to be recorded. Add desired phones from left side to right. CallRecorder 6.1 Administrator's Guide48 7. Press Next button and the new selected phones for recording will be processed. The status of processing will be shown. 8. Press Close button to close the wizard configuration utility. 9. Select Capture > Network Interfaces. 10. Check the box for the primary NIC. This will be the NIC that has the Call Replay website IP address. 12. RECORDING POLICY This is the place for you to describe which calls will be recorded and how to prioritize your licensed recording resources. It is accessible from the Capture / Recording Policy menu. There are 2 licensing resource allocation types: Reserved Channels, Dynamic (Unnamed) Channels. Rules from each tab are evaluated in order and if a match is done the next rules are not evaluated. Each licensing allocation type can be triggered automatically or manually (On-Demand). 12.1.Reserved Channels Reserved channels tab contains the list of phones for which the recording will start automatically. Each such guaranteed recording resource will consume one licensing channel. It is recommended that you add reserved phones by MAC address. To disable recording of phones which are not in the reserved list, set Automatic Channels to 0 in the Dynamic Channels page. CallRecorder 6.1 Administrator's Guide49 CallRecorder 6.1 Administrator's Guide50 12.2. Dynamic Channels Dynamic (Unnamed) Channels tab allows you to set the number of channels used for recording First Come First Served recording channel allocation. CallRecorder 6.1 Administrator's Guide51 12.3.Advanced tab Record unlicensed calls: if number of active calls is greater than number of licensed channels or a license is not available then the new call is logged under Recordings > Replay Calls, can be monitored, but the audio file is not generated. Always record parked calls: parked calls are logged under Recordings > Replay Calls, even if Record outbound calls' is disabled. Call demand retention: when a call is recorded at user request, the audio file will contains the entire conversation (Full Call) or from the moment of request (Since demand). CallRecorder 6.1 Administrator's Guide52 13. SILENCE DETECTION) COMPRESSION (VOICE ACTIVITY Accessible from Capture / Silence Compression menu entry. Voice Activity Detection is used with IP Trade Turrets to trigger call recording based on the voice signal intensity. It can also be used with Radio Gateways and other analog-to-IP equipment with no call signalling. VAD Sensitivity: the level of voice activation detection from which the signal is not considered silence. The default value is Normal (40dB). Other values are Low (30 dB, noisy environment) and High (50 dB, Catch every breath). CallRecorder 6.1 Administrator's Guide53 Silence Compression: keep or not to-keep the silence within recordings VAD separation interval: it is enabled when silence is removed within recordings. This is the length of the silence inserted between active signals. Recording prolog duration: it means the length of the interval recorded before the moment of active signal. Silence before stopping VAD calls: after specified value of silence the recorded call will be stopped. 14. STORAGE MANAGEMENT 14.1.Recording Path Configuration (Storage /Storage Volume) Storage Volume Page allows to set the folder where the calls are stored. You can add new folders by clicking Add New Volume button. You can have multiple volumes that store calls on separate drives, which will be used in a round-robin order. To move calls from one folder to another: 1. Edit the volume and change its path to the new destination path. 2. Move the files of the old volume to the new volume path using Windows Explorer. CallRecorder 6.1 Administrator's Guide54 15. RETENTION POLICY To modify policy click on Storage / Retention Policy. In this page you can modify policy rule. By Default, the rule records all calls and keeps calls until there is not enough free disk space. Retention • Keep for period ( x days or x hours or x minutes) • Keep Until Backup – the call will be kept until the first backup. • Keep until space is required - The call will be kept until there is no more space on disk, then the oldest calls will be deleted to make space for new calls. CallRecorder 6.1 Administrator's Guide55 16. AUDIT Audit Page allows to see who listened a call or who emailed a call. You can filter by auditor or / and by phone number. This option is accessible through Recordings / Audit Only the first action of a kind of a user on any call is stored, further logging of the same is redundant. CallRecorder 6.1 Administrator's Guide56 16.1. Email Notifications (Recordings / Email Notifications) This page allows to configure the rule for sending emails when a specific call occurs. The application will send emails when call starts or ends for a specified caller and called according to rules defined. CallRecorder 6.1 Administrator's Guide57 17. BACKUP (BACKUP / RESTORE) 17.1.Backup There is no page for doing backups in version 6. That is because it is now possible to simply copy or backup the recording storage folders with standard Windows backup tools (such as Windows Explorer), while preserving all call meta data. This is possible because each call recording file now has associated a .call file which is an XML file containing all call information. To backup the configuration, including database and licenses, the whole data folder must be copied, by default it is C:\CallReplay. The CallReplayDB service must be stopped, from Start > Run > Services.msc, for the db to be correctly copied. Note: For versions 6.x.x, upgraded from 5.x.x, the default folder is C:\Program Files\CallReplay and calls are stored under folder Calls. 17.2.Restore To Restore a folder with call recordings so that its content can be seen in the database, use the Restore page. 17.3.Change Password Each user that has permission to log in to application site can change his password and pin by clicking Session / Change Password. He can change only password, only pin or both by leaving blank the undesired field. CallRecorder 6.1 Administrator's Guide58 18. MANUALLY SERVICE CONFIGURING THE IP PHONE (This chapter has been obsoleted by the Configure Cisco CM wizard in version 6). Please use the Forked Recording Wizard in the Capture / PBXs page. 18.1.Phone Service The IP phone service is a component of our application that allows users with a primary extension to listen to their calls from their Cisco Phone or to demand recording of calls. By accessing the System/Watchdog menu, you can specify the authentication parameters used with the Cisco Phone XML, and other values that affect the way that the service works: • • Cisco User - The user name used for authentication with the Cisco Phone XML. Cisco Password - The password used for authentication with the Cisco Phone XML.You don't need to specify the password each time that you make an update in the configuration page, but only when you need to change the existing password. • CallRecorder 6.1 Administrator's Guide59 18.2. Application Phone XML User This user is required for the application phone services to function properly. There is only one application Phone XML User, and it is different from the site users. You may choose any user you want, but we recommend creating a new special user that nobody else uses. 18.3.Create a new Cisco User or select an existing one 1. Go to the CallManager Administration Site 2. Go to User/Global Directory 3. Click "Add a New User". For more details about adding a new user, please consult the CallManager Help. 18.4.Associate all devices with the desired user Make sure that this user has all the devices associated to him. Go to the CallManager Administration Site 1. Go to User/Global Directory, then click "Search" 2. Select or create the user you want to use with Cisco Phone XML. For example "CallRecorder" 3. In the User Configuration page, please click "Device Association" 4. Now you have to associate all the phones through which you want to access the application and/or Call Monitoring phone services with this user. If you want to associate all devices, do the following: 5. Press "Select Devices" ( leaving the search field empty ) 6. Select "Check All in Search" 7. Click "Update Selected". 18.5.Setting up the authentication 1. Go to System/IP Phone Service 2. In the "IP Phone Service" page enter the following values: 3. In the "Cisco User" field, enter the name of the user that you associated all your phones with (see the previous step) 4. In the "Cisco Password" field enter the password of that user 5. Press "Save" To make the application service accessible on your Cisco IP phones, you have to go through the CallRecorder 6.1 Administrator's Guide60 following steps: 18.6.Add a new service 1. Go to CallManager Admin/Feature/Cisco IP Phones Services 2. Set "Service Name” to Call Recorder 3. Set the "Description" to your liking?? 4. Set "Service URL" to http://CallRecorderServer(:port)/CallRecorder/phoneService 5. Click Insert. 18.7.On-Demand Recording URL for Speed Dials http://CallRecorderServer(:port)/CallRecorder/phoneService/onDemand PhoneDemandThisCall 18.8.Assign the service to the phones you want For large number of phones this is best done using Device Profiles. Using the Call Manager Administration site: 1. Go to the CallManager Admin/Device/Phone 2. For each phone having access to CallRecorder, do the following: 3. Go to that phone's configuration page 4. Click "Subscribe/Unsubscribe Services" 5. In the available services list select CallRecorder, then click "Continue" 6. Click "Subscribe" 7. Click "Update" 8. Restart the phones so that they can read the new configuration (only if you had to change the URL to the value we specified) Go to CallManager Admin/Device/Phone For each page “Select all”, click “Reset”, then “Restart”. CallRecorder 6.1 Administrator's Guide61 18.9.Application Service Control (Watchdog) By accessing the System/Watchdog menu, you can set the automatically reboot moment of the application service. CallRecorder 6.1 Administrator's Guide62


![解説 [PDF:3.1MB]](http://vs1.manualzilla.com/store/data/006646758_2-3aea56620a91fd8b3622fe793fc29955-150x150.png)