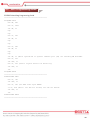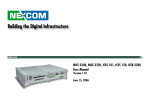
1
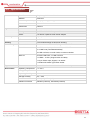
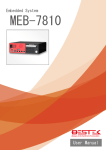
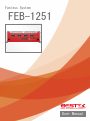
Fanless System FEB-1251 Always at the forefront of innovation User Manual 1 Copyright This publication contains information that is protected by copyright. No part of it may be reproduced in any form or by any means or used to make any transformation adaptation without the prior written permission from the copyright holders. This publication is provided for informational purposes only. The manufacturer makes no representations or warranties with respect to the contents or use of this manual and specifically disclaims any express or implied warranties of merchantability or fitness for any particular purpose. The user will assume the entire risk of the use or the results of the use of this document. Further, the manufacturer reserves the right to revise this publication and make changes to its contents at any time, without obligation to notify any person or entity of such revisions or changes. © 2011. All Rights Reserved. Trademarks All trademarks and registered trademarks of products appearing in this manual are the properties of their respective holders. FCC and DOC Statement on Class A This equipment has been tested and found to comply with the limits for a Class A digital device, pursuant to Part 15 of the FCC rules. These limits are designed to provide reasonable protection against harmful interference when the equipment is operated in a residential installation. This equipment generates, uses, and can radiate radio frequency energy and, if not installed and used in accordance with the instruction manual, may cause harmful interference to radio communications. However, there is no guarantee that interference will not occur in a particular installation. If this equipment does cause harmful interference to radio or television reception, which can be determined by turning the equipment off and on, the user is encouraged to try to correct the interference by one or more of the following measures: Reorient or relocate the receiving antenna. Increase the separation between the equipment and the receiver. Connect the equipment into an outlet on a circuit different from that to which the receiver is connected. Consult the dealer or an experienced radio TV technician for help. Notice: 1. The changes or modifications not expressly approved by the party responsible for compliance could void the user’s authority to operate the equipment. 2. Shielded interface cables must be used in order to comply with the emission limits. 2 Warranty 1. Warranty does not cover damages or failures that are raised from misuse of the product, inability to use the product, unauthorized replacement or alteration of components and product specifications. 2. The warranty is void if the product has been subject to physical abuse, improper installation, modification, accidents or unauthorized repair of the product. 3. Unless otherwise instructed in this user’s manual, the user may not, under any circumstances, attempt to perform service, adjustments or repairs on the product, whether in or out of warranty. It must be returned to the purchase point, factory or authorized service agency for all such work. 4. We will not be liable for any indirect, special, incidental or consequential damages to the product that has been modified or altered. Static Electricity Precautions It is quite easy to inadvertently damage your PC, system board, components or devices even before installing them in your system unit. Static electrical discharge can damage computer components without causing any signs of physical damage. You must take extra care in handling them to ensure against electrostatic build-up. 1. To prevent electrostatic build-up, leave the system board in its anti-static bag until you are ready to install it. 2. Wear an antistatic wrist strap. 3. Do all preparation work on a static-free surface. 4. Hold the device only by its edges. Be careful not to touch any of the components, contacts or connections. 5. Avoid touching the pins or contacts on all modules and connectors. Hold modules or connectors by their ends. Important: Electrostatic discharge (ESD) can damage your processor, disk drive and other components. Perform the upgrade instruction procedures described at an ESD workstation only. If such a station is not available, you can provide some ESD protection by wearing an antistatic wrist strap and attaching it to a metal part of the system chassis. If a wrist strap is unavailable, establish and maintain contact with the system chassis throughout any procedures requiring ESD protection. 3 Safety Measures To avoid damage to the system: • Use the correct AC input voltage range. To reduce the risk of electric shock: • Unplug the power cord before removing the system chassis cover for installation or servicing. After installation or servicing, cover the system chassis before plugging the power cord. Battery: • Danger of explosion if battery incorrectly replaced. • Replace only with the same or equivalent type recommend by the manufacturer. • Dispose of used batteries according to local ordinance. Before Using the System Before using the system, prepare basic system components. If the system comes as a barebone; that is, none of the key components, including processor, memory, and hard drive has been pre-installed as part of your purchase, you will need to at least ensure a compatible counterpart is located and installed. You will also need a few external system peripherals intended for the use of the system, a common pool with at least a keyboard, a mouse, and a monitor is thus suggested. 4 Table of Content Copyright .................................................................................................................................................................... 2 Trademarks .................................................................................................................................................................... 2 FCC and DOC Statement On Class A.............................................................................................................................. 2 Warranty ........................................................................................................................................................................ 3 Static Electricity Precautions ......................................................................................................................................... 3 Safety Measures ............................................................................................................................................................ 4 Before Using the System Board ..................................................................................................................................... 4 Table of Content ............................................................................................................................................................ 5 Chapter 1 General Information 1.1 Main Feature ........................................................................................................................................................... 7 1.2 Specifications ....................................................................................................................................................... 8 1.3 System Layout ................................................................................................................................................... 9 1.4 Indicators and Features .................................................................................................................................. 10 Chapter 2 Preparation 2.1 Before You Begin ...................................................................................................................................... 13 2.2 Precautions......................................................................................................................................................... 13 2.3 Open Up Bottom Cover ...................................................................................................................................... 14 2.4 Accessing Memory ............................................................................................................................................. 15 2.5 Accessing 2.5” Drive ......................................................................................................................................... 16 2.6 Accessing CFast Card ...................................................................................................................................... 17 2.7 Installing Wireless Module & Antenna ........................................................................................................... 18 2.8 Accessing SIM Card ......................................................................................................................................... 20 2.9 Installing SATADOM ........................................................................................................................................ 21 Chapter 3 Operation 3.1 Turning On The System .................................................................................................................................... 23 3.2 Installing Operating System & Drivers ........................................................................................................ 24 3.3 Understanding LED Indicators ........................................................................................................................ 25 Chapter 4 BIOS Setup 4.1 Entering Setup ................................................................................................................................................ 28 4.2 Getting Help .................................................................................................................................................... 28 4.3 Control Keys .................................................................................................................................................... 28 4.4 The Main Menu ............................................................................................................................................... 29 4.5 The Advanced Menu........................................................................................................................................ 30 4.6 The Chipset Menu..................................................................................................................................................... 32 4.7 The Boot Menu................................................................................................................................................ 34 4.8 The Security Menu .......................................................................................................................................... 35 4.9 The Save & Exit Menu ...................................................................................................................................... 36 Chapter 5 Auxiliary Information 5.1 GPIO Programming Guide .............................................................................................................................. 39 5.2 WDT Programming Guide ............................................................................................................................... 40 5 Chapter 1 General Information 6 1.1 Main Feature Processor Performance FEB-1251 is a fanless embedded wall mount system that is pre-installed with Intel® Cedarview D2550 DualCore 1.86GHz processor bundled with integrated graphic and one SO-DIMM slot supporting up to maximum 4GB DDR3-800/1066. All-In-One & Compact Design The system boasts a considerably compact size of just 185x131x54mm, with one DVI-I, one HDMI, dual gigabit RJ45 network, four COM ports, six USB 2.0, and one CFast, all available on the built-in embedded board therein the TCO (Total Cost of Ownership) can be minimized. The provision of wide range DC power input and the true fanless feature has made the system a perfect controller for FA and MA, where a variety of different power sources, such as 12/19/24Vdc, are available. List of Key Features Onboard Intel® Atom™ D2550 1x HDMI + 1x DVI-I Output Dual Intel® Gigabit LAN Ports 2x RS-232, 2x RS-232/422/485 6x USB 2.0 Ports 1x External CFast Socket 1x miniPCIe Slot Two Antenna Outlets 10~28Vdc Wide Range Power Input 7 1.2 Specifications Construction System Drive Bays Form Factor Proprietary Wall Mount Chassis Material Aluminum Dimension (W x D x H) 185 (W) x 131 (D) x 54 (H) mm Color Silver & Red Certification CE/FCC Processor Intel® Atom™ Cedarview D2550 Dual-Core Processor Memory 1x DDR3 SO-DIMM Slot up to 4GB Power 12~28Vdc / Optional 12Vdc Power Adaptor SATA HDD 1 (2.5”) CFast 1x External Accessible True Fanless Design via Aluminum Housing Cooling Connectivity Communication Dual Intel® 82574L PCIe GbE, Support WOL & PXE Front I/O 1x ATX Power Switch, 1x Power LED, 1x HDD LED 4 x COM Ports (Two RS232/422/485) 2x USB 2.0 Ports, 2x Audio Jacks, 2x Antenna Outlets Rear I/O 2x RJ45 LAN Ports, 4 x USB 2.0 Ports 1x HDMI + 1x DVI-I (Support VGA via Cable) 1x 2-pin Power Input, Support +10~28Vdc 1x External Screwed Type CFast Socket Expansion Slots Rear Access 1x miniPCIe Slots for Half-sized and Full-sized Adaptor Environment Operating Temperature -5 ~ 55oC Storage Temperature -20 ~ 80oC Operating Humidity 0% ~ 90% Storage Humidity 0% ~ 90% Shock Protection HDD (20G), CFast (50G) Vibration Protection Random (0.5Grms), Sinusoidal (0.5Grms) 8 1.3 System Layout Figure 1.1: System Layout of FEB-1251 9 1.4 Indicators & Features ►Front View 1. 2. 3. 4. 5. 6. 7. 8. 9. 10. 11. 12. DB9 RS-232 DB9 RS-232/422/485 DB9 RS-232/422/485 DB9 RS-232 Power Switch Antenna Cut-Out Power LED (Green) + HDD LED (Yellow) Microphone Jack Line-Out Jack 1* USB 2.0 1* USB 2.0 Antenna Cut-Out 10 ►Rear View 1. 2. 3. 4. 5. 6. 7. 8. 10-28Vdc Power Input DVI-I HDMI 2* USB 2.0 2* USB 2.0 LAN1 LAN2 CFast Socket 11 Chapter 2 Preparation 12 2.1 Before You Begin A stable and clean working environment are essential. Dust and dirt can get into components and cause a malfunction. Use containers to keep small components separated. Adequate lighting and proper tools can prevent you from accidentally damaging the internal components. Most of the procedures that follow require only a few simple tools, including the following: A Philips screwdriver A flat-tipped screwdriver A set of jewelers Screwdrivers A grounding strap An anti-static pad Using your fingers can disconnect most of the connections. It is recommended that you do not use needle-nosed pliers to disconnect connections as these can damage the soft metal or plastic parts of the connectors. Before working on internal components, make sure that the power is off. Ground yourself before touching any internal components, by touching a metal object. Static electricity can damage many of the electronic components. Humid environment tend to have less static electricity than dry environments. A grounding strap is warranted whenever danger of static electricity exists. Computer components and electronic circuit boards can be damaged by discharges of static electricity. Working on the computers that are still connected to a power supply can be extremely dangerous. Follow the guidelines below to avoid damage to your computer or yourself: Always disconnect the unit from the power outlet whenever you are working inside the case. If possible, wear a grounded wrist strap when you are working inside the computer case. Alternatively, discharge any static electricity by touching the bare metal chassis of the unit case, or the bare metal body of any other grounded appliance. Hold electronic circuit boards by the edges only. Never touch the components on the board unless it is necessary to do so. Do not flex or stress the circuit board. Leave all components inside the static-proof packaging that they shipped with until they are ready for installation. Use correct screws and do not over tighten screws. 13 This is the first step of all to proceed with, if you are to install (or change) a hard drive, a memory module, or a wireless module, etc. It is not necessary to open up the bottom cover if it is to add/remove/swap a CFast card, as another rear accessible cover has been designed for this purpose. Please refer to the CFast section for details. (1) Please shut down the unit, remove the power cable, and place the unit on a clean surface, upside down. (2) Remove the 4 screws as indicated in the places below. (3) Securing the screws is essential for they would be re-used for the restoration of the top cover, after all preparation procedures are completed. 14 Please locate the DDR3 SODIMM slot as indicated below. To install SO-DIMM 1. Make sure the “Key” on Memory module and SO-DIMM slot are perfectly matched, and add slowly the RAM module into the SO-DIMM slot. 2. Push the RAM module downwards to seat it firmly. Make sure the RAM module is snapped perfectly by the slot, and the two handles are restored back to “close” position automatically. If not, press the handles to “close” position. 3. To remove the Memory module, please push the handles outwards, and the memory module will be automatically disengaged. 15 2.5 Accessing 2.5” Drive Procedures: (1) Please locate the 2.5” Drive Bay on the bottom cover as indicated below, and add the 2.5” Drive. Note the I/O side of the hard needs to be on the side away from the cover edge to reserve space for adding cables later on. (2) Flip over the cover and find the four screw holes, find the four hard drive screws enclosed in the accessary bag, and add them to secure the 2.5” drive on the bottom cover. (3) Find the 2.5” drive cable from the enclosed accessory bag, and attach this cable to the drive itself and also the SATA Connector (CN6) and SATA Power Connector (J4) on the embedded board. (4) Add SATA signal cable and SATA power cable to complete the work. 16 2.6 Accessing CFast Card CFast instead of CompactFlash As stated above, significant differences of CompactFlash and CFast are literally defined by their respective interfaces, though the very resemblances can merely be indistinctly differentiated. Perfect Solution for Data Drive CFast card runs on SATA interface, exactly the same way as any SATA device, only it comes with smaller form factor and is a pure flash device with no spindle at all, boasting outstanding stability and SATA performance. The friendly access from the rear side, with no need to open up the bottom cover, has undoubtedly made it a perfect solution as SATA data drive. Procedures: (1) Turn off the system, and find the CFast socket at the front panel. (2) Remove the two screws that hold the cover plate. (3) Add or replace the CFast card. (4) Restore the cover plate and resume the screws back to their positions. Please always power off the system before adding or removing CFast card. 17 2.7 Installing Wireless Module & Antenna To add Wireless Module (1) Please locate the miniPCIe Slot on the embedded board. (2) Add Wireless module onto the slot, ensuring that the golden finger goes into the slot first. (3) Push the module down and secure the module with two screws. 18 To add Wireless Antenna (1) Find the two antenna cut-out with protection covers. (2) Remove the two covers. (3) Put through the two antenna jacks. (4) Add one washer (ring) on each jack. (5) Attach the other end of the antenna onto Wireless module. (6) Connector external antenna onto antenna jack. 19 2.8 Accessing SIM Card (1) Slide to move the SIM card holder to open position, and lift up the top cover. (2) Manage to also slide the SIM card into the top cover. (3) Push down the top cover and slide to move the SIM card holder back to close position. 20 2.9 Installing SATADOM (1) Locate the SATA Connector and also the screw next to it. (2) Now remove this screw. (3) Find the stand-off in the accessory bag, and add this stand-off onto where the screw was seated. (4) (5) (6) (7) Add your SATADOM. Note that only right-angled can be used. Push SATADOM into SATA connector. Add the screw back on SATADOM, into the stand-off. Add SATA power cable onto the embedded board and SATADOM. 21 Chapter 3 Operation 22 3.1 Turning On The System Add your cables, such as USB keyboard, USB mouse, and DVI (or HDMI) Cable as the merest devices to control the system. Leave the power cable as the last cable to be added, right on DC Inlet as indicated below with blue circle. In case a power adaptor is used, please ensure that: (1) The output DC voltage ranges between 10Vdc ~ 28Vdc. (2) The polarity (positive or negative) of the power cable has been well taken into consideration. (3) The AC input range of the power adaptor matches the available AC source. Turn On the Power In some cases, depending on whether a BIOS setting has been configured to allow immediate power-on upon the delivery of AC power, system might come right up unexpectedly for no particular reason. Please refer to BIOS section for details as to “Restore AC Power Loss”. Have you intended to bring it down, simply press once the power switch (located at the right lower corner with yellow circle), or press and hold for 4 seconds, to reach that goal. However, in most occasions, without such abrupt event as stated above, simply press once on the Power Switch to turn on the system. Power LED The power switch comes with a built-in LED (to be used as power LED) which shall come lit constant ON at system start. HDD LED The HDD LED can be found above the power switch, and shall blink in the wake of storage activity, such as SATA drive or CompactFlash. First screen & Optimal BIOS Setting Once the system successfully boots up, it shall activate display signal on monitor, disclosing some system information as checkpoints for debugging, thereafter users are encouraged to bring up BIOS setup menu to at least load the optimal BIOS setting, as the first thing to do at power on. Please refer to the BIOS section for substantial details. 23 3.2 Installing Operating System & Drivers Confirm the Hard Drive List The system is designed to allow booting from a variety of internal devices, including USB pen drive, SATA drive, and CompactFlash drive, etc. Given the tiny footprint and slow performance of USB pen drive, SATA drive and CompactFlash are more prevailing devices to carry operating system and can to be found in the detected drive list, in the section of IDE Configuration. In the event that a particular SATA device is not detected and prompted in the device list, hardly would the system boot from it. Please turn off the system, check or re-apply the SATA cable and SATA power cable, or re-insert CompactFlash card to ensure an appropriate connection. Always Mind the SATA Mode SATA controller is embedded in the Intel® IO Controller Hub, and shall run only in one single SATA mode at a time. Two different modes are available: IDE and AHCI. Please ensure that a SATA mode has been selected for the installation, and always use this particular mode to boot the operating system being installed. Failed to boot the operating system with the correct mode would definitely run into system collapse. While thus disaster occurs, please re-select a SATA mode to try again the advisability of such change, so as to determine the mode being used at installation phase. Procedures to load operating system: (1) (2) (3) (4) (5) (6) (7) (8) (9) Please attach USB CD-ROM or DVD-ROM drive. Start or restart the system. Press “del” to go to BIOS setup menu. Choose to confirm SATA Controller status. If it is enabled, select a SATA mode and go to (6). If SATA Controller is disabled, bring it up and reboot to allow a re-detection of Hard Drives. Confirm if the Hard Drive has been detected by the prompt of it on the drive list. Scroll and choose to boot from optical device (CD-ROM or DVD-ROM). Save and reboot the system to activate the change and start the installation. Upon reception of messages or instruction from Operating System CD or DVD, please proceed with the rest of the work as installer instructs. Loading Extra Driver Files Some challenges might occur during the installation, as if the issue of no Hard Drive detected, where extra driver files are needed. This is mostly found, when AHCI or RAID mode is selected, in operating systems such as Windows-XP, where a USB floppy drive loaded with SATA driver should be prepared and attached on USB port and, at the prompt of such a message, please press “F6” key while being asked to do so, to allow the installer integrate the driver file from floppy drive. Windows-7 or above apparently do not seem to come with such an issue against the onboard SATA Controller, and hence no extra driver should be needed. On completion of the installation of operating system such as Microsoft Windows, please find the driver CD in the enclosed accessory bag and proceed with driver files installation in the sequence as: INF (Chipset), VGA, LAN, and Audio. If some driver updates are available by Windows Update, please accept the updates when prompted. 24 3.3 Understanding LAN Indicators Activity LED The left LED is LAN Port Activity LED, with three different indication status: (1) Constant Yellow: Network is connected. (2) Blinking Yellow: Network activity is on-going. (3) Off: Network is not connected. LAN Speed LED The right LED is LAN Port Speed LED, with three different speeds: (1) Amber: 1000 Speed (2) Green: 100 Speed (3) Off: 10 Speed. Summary Table LED RJ45 NIC Linkage (Left Side) RJ45 NIC Mode (Right Side) Color Yellow Yellow Off Amber Green Off State On Blinking Off On On Off Description LAN linked LAN accessing No LAN linked Gigabit mode 100M mode 10M mode 25 Chapter 4 BIOS Setup 26 About the BIOS The BIOS (Basic Input and Output System) Setup program is a menu driven utility that enables you to make changes to the system configuration and tailor your system to suit your individual work needs. It is a ROM-based configuration utility that displays the system’s configuration status and provides you with a tool to set system parameters. These parameters are stored in non-volatile battery-backed-up CMOS RAM that saves this information even when the power is turned off. When the system is turned back on, the system is configured with the values stored in CMOS. With easy-to-use pull down menus, you can configure such items as: Hard drives, diskette drives, and peripherals Video display type and display options Password protection from unauthorized use Power management features When to Run BIOS This program should be executed under the following conditions: When changing the system configurations. When a configuration error is detected by the system and you are prompted to make changes to the Setup program. When resetting the system clock. When setting the CPU clock speed so that it automatically runs either fast or slow. When redefining the communication ports to prevent any conflicts. When making changes to the Power Management configuration. When changing the password or making other changes to the security setup. Normally, CMOS setup is needed when the system hardware is not consistent with the information contained in the CMOS RAM, whenever the CMOS RAM loses power, or when the system features need to be changed. When to Update BIOS In the event that new features are released and a BIOS update is required, you will need to update your BIOS on your own, with the help of an appropriate guide, a reference tool, and some command files for the job. Please seek for help from your local dealer, or send your request to our technical support department. 27 4.1 Entering Setup When the system is powered on, the BIOS will initiate the Power-On-Self-Test (POST) routines. These routines perform various diagnostic checks. If an error is encountered, the error will be reported in one of two different ways: If the error occurs before the display device is initialized, a series of beeps will be transmitted. If the error occurs after the display device is initialized, the screen will display the error message. Powering on the computer and immediately pressing <Del> allows you to enter Setup. Another way to enter Setup is to power on the computer and wait for the following message during the POST: TO ENTER SETUP BEFORE BOOT PRESS <CTRL-ALT-ESC> OR <DEL> KEY Press the <Del> key or press the <Ctrl>, <Alt>, and <Esc> keys to enter Setup. 4.2 Getting Help The online description of the highlighted setup item is displayed at the right pane of the menu at all time. Press F1 to pop up a small help window that lists allthe function keys and its use. To exit the Help Window, press <F1> or <Esc>. 4.3 Control Keys The table below lists all the function keys for the navigation in the BIOS setup menu. Function Key Description Up/Down Arrow Key Move Up/Down Left/Right Arrow Key Move Left/Right Enter Key Select +/- Key Change value ESC Exit Tab Select a Field F1 General Help F2 Load Previous Values F3 Load Optimized Default Values F4 Save & Exit Setup Program To exit the Help Window, press <F1> or <Esc>. 28 4.4 The Main Menu Figure 4-1: BIOS Setup Utility Main Menu Intel RC Version Displays the Intel Reference Code version. System Date The date format is <day>, <month>, <date>, <year>. Day displays a day, from Monday to Sunday. Month displays the month, from January to December. Date displays the date, from 1 to 31. Year displays the year, from 1999 to 2099. System Time The time format is <hour>, <minute>, <second>. The time is based on the 24-hour military-time clock. For example, 1 p.m. is 13:00:00. Hour displays hours from 00 to 23. Minute displays minutes from 00 to 59. Second displays seconds from 00 to 59. Access Level Displays the access level of the current user in the BIOS. 29 4.5 The Advanced Menu The Advanced menu allows you to configure your system for basic operation. Some entries are defaults required by the system board, while others, if enabled, will improve the performance of your system or let you set some features according to your preference. Launch LAN1/2 PXE OpROM Enables or disables the boot option for legacy network devices connected to LAN1 and LAN2. CPU Configuration Hyper-Threading Enable/Disable CPU Hyper-Threading. Execute Disable Bit This field is used to enable or disable execute disable bit. When this field is set to Disabled, it will force the XD feature flag to always return to 0. XD can prevent certain classes of malicious buffer overflow attacks when combined with a supporting OS (Windows Server 2003 SP1, Windows XP SP2, SuSE Linux 9.2, RedHat Enterprise 3 Update 3). Limit CPUID Maximum The CPUID instruction of some newer CPUs will return a value greater than 3. The default is Disabled because this problem does not exist in the Windows series operating systems. If you are using an operating system other than Windows, this problem may occur. To avoid this problem, enable this field to limit the return value to 3 or lesser than 3. 30 IDE Configuration SATA Controller Enable/Disable SATA Controller. Configure SATA as IDE: This option configures the Serial ATA drives as Parallel ATA storage devices. AHCI: This option allows the Serial ATA devices to use AHCI (Advanced Host Controller Interface). Super I/O Configuration Serial Port Enable/Disable Serial Port. Device Setting Select I/O Address and IRQ for Serial Port. Onboard Serial Port 1 Mode Select Serial Port 1 operation mode from RS-232, RS-422, RS485, or RS-485 AUTO. Onboard Serial Port Max Baud Rate Select Serial Port baud rate from 115200 and 921600 31 4.6 The Chipset Menu Host Bridge IGFX - Boot Type This field is used to configure which video device will be activated during POST. This has no effect if external graphics present. The options are CRT, DVI and CRT + HDMI. Please refer to the following table for BIOS setting and Display Output combination at POST mode. However, there is no such limitation at Windows mode as graphic driver will help to handle all display output. Connected Monitor Type BIOS setting Display output at POST mode HDMI only DVI HDMI HDMI only CRT + HDMI HDMI HDMI+ DVI via Y cable DVI DVI HDMI+ VGA via Y cable CRT + HDMI CRT + HDMI HDMI+ VGA via Y cable VGA VGA Fixed Graphics Memory Size This field is used to configure the memory size of the fixed graphics, the options are 128MB and 256MB. 32 South Bridge Azalia Controller This section disables Azalia or enables HD Audio. SMBus Controller This section is used to configure SMBus. High Precision Timer This section is used to configure High Precision Event Timer. Restore AC Power Loss This field is used to configure the AC power state when power is restored after power failure, the options are Power Off and Power On. 33 4.7 The Boot Menu Setup Prompt Timeout This section configures the number of seconds to wait for the setup activation key. Quiet Boot When Enabled, the BIOS will shorten or skip some check items during POST. This will decrease the time needed to boot the system. GateA20 Active Configures the GateA20 function. Option ROM Messages Configures the ROM message. Interrupt 19 Capture When enabled, it allows the optional ROM to trap interrupt 19. Boot Option #1/#2 This field is used to adjust the boot sequence of the system. Boot Option #1 is the first boot device that the system will boot from, next will be #2 and so forth. 34 4.8 The Security Menu Administrator Password Sets the administrator’s password User Password Sets the user’s password 35 4.9 The Save & Exit Menu Save Changes and Exit To save the changes and exit the Setup utility, select this field then press <Enter>. A dialog box will appear. Confirm by selecting Yes. You can also press <F4> to save and exit Setup. Discard Changes and Exit To exit the Setup utility without saving the changes, select this field then press <Enter>. You may be prompted to confirm again before exiting. You can also press <ESC> to exit without saving the changes. Save Changes and Reset To save the changes and reset, select this field then press <Enter>. A dialog box will appear. Confirm by selecting Yes. Discard Changes and Reset To exit the Setup utility without saving the changes, select this field then press <Enter>. You may be prompted to confirm again before exiting. Save Changes To save changes and continue configuring the BIOS, select this field then press <Enter>. A dialog box will appear. Confirm by selecting Yes. Discard Changes To discard the changes, select this field then press <Enter>. A dialog box will appear. Confirm by selecting Yes to discard all changes made and restore the previously saved settings. Restore Defaults To restore the BIOS to default settings, select this field then press <Enter>. A dialog box will appear. Confirm by selecting Yes. 36 Save as User Defaults To use the current configurations as user default settings for the BIOS, select this field then press <Enter>. A dialog box will appear. Confirm by selecting Yes. Restore User Defaults To restore the BIOS to user default settings, select this field then press <Enter>. A dialog box will appear. Confirm by selecting Yes. Boot Override To bypass the boot sequence from the Boot Option List and boot from a particular device, select the desired device and press <Enter>. Launch EFI Shell from filesystem device To launch EFI shell from a filesystem device, select this field and press <Enter>. 37 Chapter 5 Auxiliary Information 38 5.1 GPIO Programming Guide Digital I/O (Digital Input/Output) pins are provided for custom system design. This appendix provides definitions and its default setting for the Digital I/O pins in the NISE 104. The pin definition is shown is the following table: PIN Description PIN Description 1 +5V 2 GND 3 GPO24 4 GPI20 5 GPO25 6 GPI21 7 GPO26 8 GPI22 9 GPO27 10 GPI23 IO base address : A00h Bit0 : GPI20 Bit1 : GP I21 Bit2 : GP I22 Bit3 : GP I23 Bit4 : GPO24 Bit5 : GPO25 Bit6 : GPO26 Bit7 : GPO27 1. Read/Write GPIO data by I/O port A04h 39 5.2 WDT Programming Guide ITE8783F WatchDog Programming Guide =============================================== SetupWDT PROC mov dx, 2eh mov al, 087h out dx, al nop nop mov al, 01h out dx, al nop nop mov al, 55h out dx, al nop nop out dx, al ;Write operations to special address port (2E) for entering MB PnP Mode. mov al, 07h out 2eh, al mov al, 07h ;Select logical device for Watch Dog. out 2fh, al ret SetupWDT ENDP =============================================== TimeBaseWDT PROC mov al, 72h out 2eh, al mov al, 10h ;Set WDT reset upon PWROK or al, 80h ;Here!! set 80h for second, set 00h for minute out 2fh, al ret TimeBaseWDT ENDP =============================================== 40 =============================================== TimeCountWDT PROC mov al, 73h ;WDT Time-out register. out 2eh, al mov al, 03h ;Here!! Set count 3. out 2fh, al ret TimeCountWDT ENDP =============================================== ExitSetup PROC mov al, 02h out 2eh, al mov al, 02h out 2fh, al ret ExitSetup ENDP =============================================== 41