1
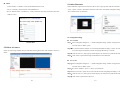
The information in this document is subject to change without notice.
GRAND IP VIDEO SERVER
( Remote View / Control / Recording / Snapshot through IE )
User’s Manual
This document contains materials protected by copyright. All rights are reserved. No
part of this manual may be reproduced or transmitted in any form, by any means or for
purpose without express written consent.
Federal Communications Radio Frequency Interference Statement.
Note: This equipment has been tested and found to comply with the limits for a Class
B digital device, Pursuant to part 15 of the FCC Rules. These limits are designed to
provide reasonable protection against harmful interference when the equipment is
operated in a residential installation. This equipment generates, uses and can radiate
radio frequency energy and if not installed and used in accordance with the instruction
manual may cause harmful interference to radio communications. However, there is no
guarantee that interference will not occur in a particular installation. If this equipment
does cause harmful interference to radio of television reception, which can be
determined by turning the equipment off or on, the user is encouraged to try to correct
the interference by one or more of the following measures:
Reorient or relocate the receiving antenna.
Increase the separation between the equipment and receiver.
Connect the equipment into an outlet on a circuit different from that to which the
receiver is connected.
Consult the dealer or an experienced radio TV technician for help.
Notice :
(1) The changes or modifications not expressly approved by the party responsible for
compliance could void the user authority to operate the equipment.
(2) Shielded interface cables and AC power adapter, if any must be used in order to
comply with the emission limits.
ISSUE:2006/9/5
VERSION:UPD060711
P/N:34416000
CE DECLARATION
This device complies with CE class B.
*EN55024
EN61000-4-5
EN55022
EN61000-4-2
EN61000-4-6
EN61000-3-2
EN61000-4-3
EN61000-4-8
EN61000-3-3
EN61000-4-4
EN61000-4-11
Printed in Taiwan R.O.C.
All contents are subject to change without notice.
All trademarks are the property of their respective owner.
INDEX
1. Introduction
1. Introduction…………………………………………………………1
1.1 Introduction…………………………………………….…….1
1.2 Package Contents………………………………………….....1
1.3 System Requirement…………………………………………1
2. Product Features……………………………………………………2
3. Hardware Connection and Application……………………………3
4. Software Installation And Operation Guide…………….………..4
4.1 First Time To Login Grand IP Video Server……..………..4
4.2 How To Use The Virtual IP Address………………………..6
4.3 Limitation Of FTP Protocol…………………………………9
4.4 Connect To ADSL………. ...………………………………..11
4.5 About Internet Security……….……………………………12
5. Configuration Of Grand IP Video Server……………………….13
5.1 Change Password……………………………………………13
5.2 Camera Control……………………………………………..14
5.3 View Log…………………………………………………….14
5.4 Configuration……………………………………………….14
5.5 Delete A Camera……………………………………………18
5.6 Other Functions…………………………………………….19
6. Trouble Shooting…………………………….…………..…..……20
1.1 Introduction
Grand IP Video Server is a Digital Network broadcaster allows you to transmit audio, video as a
streaming over the Internet. You can share your DVD program or TV Program in your Internet web
site or connect to a Video Camera to watch your home or baby room on internet from anywhere in the
world, and you also can email the image to your friends or families. Grand IP Video Server supports
motion detection function, and also supports the image quality, image size and image parameters
adjustments functions.
1.2 Package Content
This package contains the following items:
Grand IP Video Server
Power adapter DC 5V/2A(-)
(●
(+)
Video cable
RJ-45 Cable (cross over wire)
CDR (Manual + IPedit Soft)
Quick Start
1.3 System Requirement
Router( with DDNS or PPPoE function ) is required
10Base-T Ethernet or 100Base TX Fast Ethernet
Intel Pentium3 800 MHz, AMD 800 MHz or Faster
64M RAM or above
VGA card with 8MB memory or above
Microsoft DirectX 9
Internet Explorer 5.0 or above
1
2. Product Features
3. Hardware Connection And Application
Supports Bypass Output:1 Video and Audio Output.
You can monitor picture and sound in the local end by using video and audio output, and also can
remote monitor by Internet.
Pure hardware design, just Plug & Display.
High performance and fully configurable MJPEG compression engine.
Remote view and record through the IE Browser.
Supports Input:1 Video and Audio Input.
ActiveX control supports digital signature.
Supports image Rotate, Flip Horizontal and Flip Vertical function.
Supports image recording function (MJPEG format) and save current picture function (JPEG
format).
Supports motion detection function and send E-mail when something moving.
Adjustable image quality Low / High / medium / clarity / motion.
Adjustable resolution 160X120 / 176X144 / 320X240 / 352X288 / 640X480 / 704X576.
Adjustable image frequency Indoor 50 / Indoor 60 / outdoor.
Adjustable image parameters Brightness / Contrast / Saturation / Hue / Sharpness.
Support many Network services : HTTP ( User Interface ), FTP ( FTP Client ), PPPoE ( Fixed IP
Address is recommended ), Dynamic DNS, and firewall port forwarding ( used in virtual IP
address ).
Default:Press this button to .restore the original default parameters.
Reboot (reset):Press this button to restart the Grand IP Video Server.
Video In:Connects to video out of video source. (camera、DVD player)
Audio In:Connects to sound output. (microphone、DVD player)
Video Out:Direct connects to DVR or monitor.
Audio Out:Direct connects to audio input of DVR or monitor with audio input.
RJ 45 Input:Connects to router or PC by RJ-45 Cable.
DC IN:Connects to power adapter (-)
(●
Power LED:Power LED indicator.
2
3
(+), DC 5V/2A
4. Software Installation And Operation Guide
Step 3:Click on “Start“ → “Run“ and key in ”command“, then press “ENTER”.
4.1 First time to login Grand IP Video Server
The MS-DOS window will appear, please key in ” ipconfig “ and then press “ ENTER “
Step 1:Please execute the “ipEdit.exe” in the CD, and select the “Unblock”
to get the network information.
( windows XP SP2 only)
Step 4:Then you can assign IP Address, Netmask (Subnet Mask) and Gateway (Default Gateway)
for the IP Controller.
Step 2:“Video Server……192.168.1.127” has been listed in the left side, and double click
”192.168.1.127” to login the Grand IP Video Server.
NOTE:.You must use the same Subnet Mask” 255.255.255.0 “and Gateway ”192.168.2.254”.
You can use any IP Address between 192.168.2.1-254, but please make sure that the
IP Address has never been used or is used by any other IP addressable device.
Step 5:For example, key in the following parameters and click “Submit”.
ipEdit Tool
Window of Video Server
If you can not connect to the Address: 192.168.1.127, please according the following steps to get
Login to the IP Video Server
Default IP Address:http://192.168.1.127/
Network information
4
5
4.2 How To Use The Virtual IP Address
Step 2:Setup your firewall or gateway, and assign a Local Virtual IP: 192.168.1.127 and open
If your network Architecture supports the following figure, you will need to do port and local virtual
a port 8888 and 8889 for the IP Video Server, the following figure is just a example,
IP forwarding in the firewall or gateway setup.
you need to ask your Internet Service Provider.
Step 3:In the Local PC, please open the Internet Explorer then key in the IP address:
http://192.168.1.127
Step 4:In the Remote PC, please open the Internet Explorer, then key in the IP address:
http://61.30.13.40:8888
Step 1:In this Page http://192.168.1.127/Ctl/index.htm?Cus?Audio/, please select “Configuration”
and “System” assign two different port numbers for the Http Protocols ( for example HTTP:8889,
HTTP:8888 )
(Please remember reboot the system)
6
7
Step 5:Setup the Internet Explorer about FTP Client
4.3 Limitation Of FTP Protocol
Click “Tools” → “Internet” → “Options” → “Advanced”, and then the “Internet
If your network Architecture is the same as the figure, you can not transfer Files with FTP, because
Options“ window will appear, please remove the Item ”Use Passive FTP(for firewall
FTP server (IP Video Server) and FTP client (Remote PC) both are virtual IP addresses.
and DSL modem compatibility )”
Internet Options
You need to change the Remote PC to be a real IP address, also can change the IP Video Server
to be a real IP Address
Change the Remote PC to be a Real IP address
8
9
4.4 Connect To ADSL
We suggest that you can use the router to dial up the ADSL, more information please refer to
the router Help
Change the IP Video Server to be a Real IP address
Please Setup the Internet Explorer about FTP Client Select the item “Use Passive FTP(for
firewall and DSL modem compatibility )”
If you want to connect IP Video Server with ADSL directly, please use the following steps to dial
up PPPoE, but if the IP Address is dynamic, you need to setup DDNS function.
Internet Option
10
11
5. Configuration Of Grand IP Video Server
4.5 About Internet Security
Please often change the User ID and Password.
For high Internet Security, we suggest you use the router with the firewall function.
After connected to the IP Video Server, and the Video Server window will appear.
After you update those files to the Player, please remember to delete the Port forwarding
There are “Change Password”, “Camera Control”, View Log”, “Configuration” and “Delete a
camera” setup selections at the left side of the Video Server window.
5.1 Change Password
Before you select “Change Password”, please make sure “User authorization required” enable the
user check function. ( click “Configuration” → “User”→ “User authorization required” )
Click the “Change Password”, then set a new password to replace the old password.
In the next time, you want to update media files, you can connect to the router (for example: key
in the IP address http://61.30.13.40) and reopen the FTP port 8889 and Http port 8888 once more.
Although this way is inconvenient, but that can get highest Internet Security.
After about 10 seconds, the ftp server ftp://192.168.1.127/has been enabled,
12
13
5.2 Camera Control
Quality:To select the image quality and recording mode.
Image Quality:low, high, medium, clarity
Recording Mode:motion ( motion detect function )
Resolution:To select the image resolution. (160x120, 176x144,
352x288, 320x240, 640x480, 704x576)
Frequency:Adjust the light frequency to suit your country.
(Outdoor / Indoor 50 / Indoor 60)
Adjust the image performance:Click “+” or “-” to adjust the
System Setting
values, and click “STD” to reset all values to the original settings.
User
5.3 View Log
User authorization required:Checking the Enable use check function will enable the user
Click “View Log” to check the system and client log information of IP Video Server, including the
check when the users want to Access the Grand IP Video Server. The Login window will
“Main Info”, “Appended Info”, “Operator IP”, “Operator MAC” and “Time”.
prompt for the User name and Password. If the check box is not checked, then the user
check will nor be enabled.
Add a user or change password:To create a new user account, or change current user’s
password.
Delete user:You can delete the current users. Select the user account from the “Username”
list box, and click “Delete” to delete it.
View Log
Current user list:It lists all current users.
5.4 Configuration
System
Camera name:Key in the new name of camera, and select “Change” to summit it.
Camera’s time:You can chose “NTP” or “Input new time” to set up the time.
- NTP:Key in the Server IP address, and IP Video Server will get the time from NTP server.
- Input new time:Disable the “Synchronize with PC’s time”, you can set up the time by
yourself. (please click “Adjust” to adjust the setting after set up)
Http port:Supports 2 Http port setting.
14
User Management
15
Motion Detect
Network
Motion Detect:Select “Enable” to activate the motion detection. And chose the sensitivity of
IP Assgnment
motion detect (High / Middle / Low).
- Manually:Setting IP address / Subnet mask / Default gateay
Mail Setting
- Automatically by DHCP:When IP Video Server is joined into the LAN, it will issue the
- Setup the “SMTP Maul Server” and E-mail address. (Password use or not)
DHCP packets to request an IP address that is dynamically assigned by the DHCP server.
- Key in the sender’s email address and the recipient’s email address.
- Select “Reboot immediately” to take effect about these setting.
- The content of “Subject” can be modified.
PPPoE
FTP Setting:The motion detected images can also be uploaded to FTP server.
- Save & Dial Now:Press the button to connect to the ADSL line by PPPoE immediately.
- Key in the IP address or domain name of the FTP Server.
- Dial On Power Up:When you select this function, Grand IP Video Server will dial up
- Key in “Username” and “Password” of the FTP Server.
PPPoE connection automatically after each power up. If you prefer to use PPPoE
- Certain FTP severs need an “Account” field. Leave it blank if it is not needed.
connection, this function is recommended.
- Key in the remote folder upload path information for saving the setting.
- Key in “Username” and “Password” of the PPPoE.
- Send mail after dialed:Mail sent out after dialing is completed.
- If the mail server needs authentication, the “Password” need to be selected.
- Key in the sender’s email address and the recipient’s email address.
- The content of “Subject” can be modified.
- Click the “Save” to save the setting.
Motion Detection Setting
16
Network Setting
17
5.6 Other Functions
DDNS
- Select “Enable” or “Disable” to activate the DDNS function or not.
On the IE Browser, right mouse click on the video to active a pop-up menu. The menu includes
- Key in “Username” and “Password” of the DDNS Server.
“View”, “Splits”, “Rotate”, “Resolution” functions of the video, and includes “Image Recording” and
- Key in “Domain Name”, “HTTP Proxy”, “Proxy Username” and “Proxy Password”, then click
“Save Current Picture As” functions.
“Submit” to save.
5.6.1 Image Recording
Save as JPEG
Dynamic DNS
Step 1:Select “Image Recording(F11)…”, and the “Image Recording” window will appear, then
select the “Save as JPEG” option.
5.5 Delete A Camera
Step 2:Key in the download “Number” to save the desired number of image, or select “No Limit”
Select one of the image window that you want delete at the right side, then click “Delete a camera” to
delete.
to save the images continuously, unit the “Stop Image Recording” is selected.
Step 3:Click the “Save As”, and a pop-up window displays to select the save path and file name.
Step 4:Click “Start” to perform the image download and save the JPEG files.
Save as AVI
Step 1:Select “Image Recording(F11)…”, and the “Image Recording” window will appear, then
select the “Save as JPEG” option.
Step 2:Key in the “Number”, “Size” or “Time” on each AVI file.
Step 3:Select “No Limit” option will save the video file unit the “Stop Image Recording” is selected.
Step 4:Click the “Save As”, and a pop-up window displays to select the save path and file name.
Step 5:Click “Start” to perform the video save.
18
19
When you need RMA or advanced technical service, please fill in this form as detailed as
possible and FAX or Email it to your dealer or service representative.
Product S/N:
Name:
TEL No.:
FAX No.:
E-mail address:
Full Address:
Image Recording
5.6.2 Save Current Picture As
Other add-on cards:
Monitor:
Horizontal Freq.:
Hz to
KHz
Vertical Freq.:
Hz to
Hz
Step 1:Click “Save Current Picture As…” option to save the current image display to the local PC.
Step 2:Select the save path and key in the name of the picture, and click “Save”.
Problem description:
6. Trouble Shooting
Situation
Forget IP address
and password
Check Point
1. Press “Default” button on the Grand IP Video Server about 10
Seconds.
2.The default IP address:192.168.1.127.
20
21