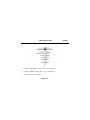
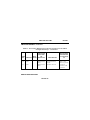
1
TM 9-1240-415-13&P
OPERATOR, UNIT, AND DIRECT SUPPORT MAINTENANCE MANUAL
INCLUDING REPAIR PARTS AND SPECIAL TOOLS LIST
for
TELESCOPE, STRAIGHT: M145
(1240-01-411-6350)
Distribution Statement A – Approved for public release; distribution is unlimited.
HEADQUARTERS, DEPARTMENT OF THE ARMY
28 FEBRUARY 2000
TM 9-1240-415-13&P
WARNING SUMMARY
This warning summary includes general safety precautions and instructions
that must be understood and applied during the operation and maintenance
of the Telescope to ensure personnel against injury, death, or long term
health hazards. A summary of safety and hazardous material warnings that
should be heeded in conduct of operation and maintenance is provided below.
LASER LIGHT – laser light hazard symbol indicates extreme danger for
eyes from laser beams and reflections.
Use of the Telescope without laser filter is
not eyesafe.
a
TM 9-1240-415-13&P
WARNING SUMMARY - Continued
Removal of the Signature Reduction Device (SRD) could
lead to your detection by the enemy.
FIRST AID
For first aid procedures, refer to FM 21-11, First Aid for Soldiers.
b
TM 9-1240-415-13&P
LIST OF EFFECTIVE PAGES/WORK PACKAGES
Dates of issue for original and changed pages/work packages are:
Original ... 0 .... 28 Feb 00
TOTAL NUMBER OF PAGES FOR FRONT AND REAR MATTER IS 22 AND
TOTAL NUMBER OF WORK PACKAGES IS 36 CONSISTING OF THE
FOLLOWING:
Page/WP
No.
*Change
No.
Title .................................. 0
a-b..................................... 0
A ....................................... 0
B Blank ............................ 0
Page/WP
No.
*Change
No.
i-x ......................................0
WP 0001 00 - 0036 00 ......0
Index 1-8...........................0
*Zero in this column indicates an original page or work package.
A/B blank
Change 0
TM 9-1240-415-13&P
HEADQUARTERS
DEPARTMENT OF THE ARMY
WASHINGTON, D.C., 28 FEBRUARY 2000
TECHNICAL MANUAL
OPERATOR, UNIT, AND DIRECT SUPPORT MAINTENANCE MANUAL
INCLUDING REPAIR PARTS AND SPECIAL TOOLS LIST
FOR
TELESCOPE, STRAIGHT: M145
(1240-01-411-6350)
i
TM 9-1240-415-13&P
REPORTING ERRORS AND RECOMMENDING IMPROVEMENTS
You can help improve this publication. If you find any mistakes or if you
know of a way to improve the procedures, please let us know. Submit your
DA Form 2028-2 (Recommended Changes to Equipment Technical
Publications), through the Internet, on the Army Electronic Product Support
(AEPS) website. The Internet address is http://aeps.ria.army.mil. If you
need a password, scroll down and click on "ACCESS REQUEST FORM". The
DA Form 2028 is located in the ONLINE FORMS PROCESSING section of
the AEPS. Fill out the form and click on SUBMIT. Using this form on the
AEPS will enable us to respond quicker to your comments and better manage
the DA Form 2028 program. You may also mail, fax or email your letter, DA
Form 2028, or DA Form 2028-2 direct to: Commander, U.S. Army Tankautomotive and Armaments Command, ATTN: AMSTA-LC-CIP-WT, Rock
Island, IL 61299-7630. The email address is
[email protected]. The fax number is DSN 793-0726 or
Commercial (309) 782-0726.
ii
TM 9-1240-415-13&P
DISTRIBUTION STATEMENT A – Approved for public release; distribution is
unlimited.
iii
TM 9-1240-415-13&P
TABLE OF CONTENTS
WP Sequence No.
WARNING SUMMARY
HOW TO USE THIS MANUAL
GENERAL INFORMATION.............................................................
0001 00
CHAPTER 1 – DESCRIPTION AND THEORY OF OPERATION
Equipment Description and Data ........................................
Theory of Operation ..............................................................
0002 00
0003 00
CHAPTER 2 – OPERATOR INSTRUCTIONS
Description and Use of Operator Controls
and Indicators....................................................................
Assembly and Preparation for Use.......................................
Operation Under Usual Conditions .....................................
Operation Under Unusual Conditions .................................
0004 00
0005 00
0006 00
0007 00
iv
TM 9-1240-415-13&P
CHAPTER 3 – UNIT TROUBLESHOOTING PROCEDURES
Troubleshooting Procedures .................................................
0008 00
CHAPTER 4 – DIRECT SUPPORT TROUBLESHOOTING PROCEDURES
Troubleshooting Procedures ................................................. 0009 00
CHAPTER 5 – OPERATOR MAINTENANCE INSTRUCTIONS FOR THE
M145 STRAIGHT TELESCOPE
Lens Cleaning Procedures .................................................... 0010 00
Preparation for Storage or Shipment................................... 0011 00
CHAPTER 6 – UNIT MAINTENANCE INSTRUCTIONS FOR THE
M145 STRAIGHT TELESCOPE
Service Upon Receipt ............................................................ 0012 00
Preventive Maintenance Checks and
Services (PMCS) Introduction .......................................... 0013 00
Preventive Maintenance Checks
and Services (PMCS) Procedures ..................................... 0014 00
Battery Maintenance ............................................................ 0015 00
v
TM 9-1240-415-13&P
CHAPTER 6 – UNIT MAINTENANCE INSTRUCTIONS FOR THE
M145 STRAIGHT TELESCOPE - Continued
Battery Cap O-ring Maintenance......................................... 0016 00
Lens Cover Maintenance ...................................................... 0017 00
Signature Reduction Device (SRD) and Laser
Filter Maintenance............................................................ 0018 00
CHAPTER 7 – DIRECT SUPPORT MAINTENANCE INSTRUCTIONS FOR
THE M145 STRAIGHT TELESCOPE
Mount Assembly Maintenance ............................................. 0019 00
Rubber Cover Maintenance .................................................. 0020 00
Torque Limiting Knob/Shaft Maintenance .......................... 0021 00
Illustrated List of Manufactured Items ............................... 0022 00
CHAPTER 8 – SUPPORTING INFORMATION
References .............................................................................
Maintenance Allocation Chart Introduction........................
Maintenance Allocation Chart .............................................
Repair Parts and Special Tools List Introduction ...............
M145 Straight Telescope with Case Repair Parts List .......
M145 Sight Assembly Repair Parts List..............................
vi
0023 00
0024 00
0025 00
0026 00
0027 00
0028 00
TM 9-1240-415-13&P
CHAPTER 8 – SUPPORTING INFORMATION - Continued
Battery Cap Assembly Repair Parts List.............................
Laser Filter Assembly/SRD Repair Parts List ....................
Mount Assembly Repair Parts List ......................................
Case Assembly Repair Parts List.........................................
National Stock Number (NSN) Index ..................................
Part Number (P/N) Index .....................................................
Components of End Item (COEI) and Basic Issue
Items (BII) Lists ................................................................
Expendable and Durable Items List ....................................
INDEX
vii
0029 00
0030 00
0031 00
0032 00
0033 00
0034 00
0035 00
0036 00
TM 9-1240-415-13&P
HOW TO USE THIS MANUAL
The safest, easiest, and best way to operate and maintain the Telescope is to
use this manual. Learning to use this TM is as easy as reading through the
next few pages of this section. Knowing what is in this manual and how to
use it will save you time and work and will help you avoid exposing yourself
to unnecessary hazards while performing your job.
So where do you start?
Right here, if this is the first time you are using this TM. Be sure to
completely read this section on how to use this manual first. There’s a lot of
information here that you need to know.
viii
TM 9-1240-415-13&P
Organization
This manual covers the operation and maintenance of the Telescope. The
manual itself is divided into eight chapters, including supporting
information. The eight chapters, and what they contain, are found in the
Table of Contents in the front of this manual. For example, to learn about
operating the Telescope, you would look in the table of contents and discover
that Chapter 2 provides all pertinent information about the operation of the
telescope. Since Chapter 2 covers a great deal of information, you will have
to scan the chapter to find the specific information you will need.
In Chapter 8, you will find the supporting information. Each work package
provides specific information that will assist you in performing the various
operational and maintenance tasks. The work packages provide such
information as additional references (i.e. other TMs or FMs), as in
WP 0023 00, and Expendable and Durable Items List, as in WP 0036 00.
Become familiar with all supporting information work packages and what
they contain before beginning any operational or maintenance task.
ix
TM 9-1240-415-13&P
HOW TO USE THIS MANUAL - Continued
Am I ready to use the TM?
If you’ve taken the time necessary to read this section, and are sure of the
location and arrangement of the different sections of this TM, you are ready
to begin. Remember, this TM has been arranged with you, the user, in mind.
Your safety and ability to perform the operational and maintenance tasks in
the most efficient manner possible hinge on your ability to perform and
understand the information contained in this manual. If you fully
understand the arrangement and purpose of this TM, and have taken the
time to read through this section, you will have no trouble operating and
maintaining the telescope in the manner for which it was designed.
x
TM 9-1240-415-13&P
0001 00
OPERATOR
TELESCOPE, STRAIGHT: M145
(NSN 1240-01-411-6350)
GENERAL INFORMATION
SCOPE
Type of Manual
Operator, Unit, and Direct Support Maintenance Manual including Repair
Parts and Special Tools List.
Model Number and Equipment Name
M145 Straight Telescope with Mount.
0001 00-1
TM 9-1240-415-13&P
0001 00
SCOPE - Continued
Purpose of Equipment
The Telescope is used for sighting targets on the M249 and M240B machine
guns.
MAINTENANCE FORMS, RECORDS, AND REPORTS
Department of the Army forms and procedures used for equipment
maintenance will be those prescribed in DA PAM 738-750, Functional User’s
Manual for the Army Maintenance Management System (TAMMS).
0001 00-2
TM 9-1240-415-13&P
0001 00
REPORTING EQUIPMENT IMPROVEMENT RECOMMENDATIONS (EIR)
If your Telescope or mount needs improvement, let us know. Send us an EIR.
You, the user, are the only one who can tell us what you don’t like about your
equipment. Let us know why you don’t like the design or performance. Put it
on an SF 368 (Product Quality Deficiency Report). Mail it to us at
Commander, U.S. Army Armament Research, Development and Engineering
Center, ATTN: AMSTA-AR-QAW-A (R)/Customer Feedback Center, Rock
Island, IL 61299-7300. We’ll send you a reply.
CORROSION PREVENTION AND CONTROL (CPC)
Corrosion Prevention and Control (CPC) of Army materiel is a continuing
problem. It is important that any corrosion problems with the telescope and
mount be reported so that the problem can be corrected and improvements
can be made to prevent the problem in future items.
0001 00-3
TM 9-1240-415-13&P
0001 00
CORROSION PREVENTION AND CONTROL (CPC) - Continued
While corrosion is typically associated with rusting of metals, it can also
include deterioration of other materials such as rubber and plastic. Unusual
cracking, softening, swelling, or breaking of these materials may be a
corrosion problem.
If a corrosion problem is identified, it should be reported using SF 368,
Product Quality Deficiency Report. Use of key words such as "corrosion",
"rust", "deterioration", or "cracking" will ensure that the information is
identified as a CPC problem.
The form should be sent to:
Commander
U.S. Army Armament Research, Development and Engineering Center
ATTN: AMSTA-AR-QAW-A (R)/Customer Feedback Center
Rock Island, IL 61299-7300
0001 00-4
TM 9-1240-415-13&P
0001 00
OZONE DEPLETING SUBSTANCES
Not applicable.
DESTRUCTION OF ARMY MATERIEL TO PREVENT ENEMY USE
Only your commanding officer can give the order to destroy materiel to
prevent enemy use. Refer to TM 750-244-7.
PREPARATION FOR STORAGE OR SHIPMENT
Refer to WP 0011 00 for preparation for storage or shipment.
WARRANTY INFORMATION
The Telescope and Mount is warranted for 12 months from the date of
delivery. The warranty starts on the date found in block 23 of DA Form
2408-9, Equipment Control Record. Report all defects to your supervisor,
who will take appropriate action.
0001 00-5
TM 9-1240-415-13&P
0001 00
NOMENCLATURE CROSS REFERENCE LIST
Common Name
Official Nomenclature
Laser Filter
Lens Cover
Lens Cover
Picatinny Rail
Rotary Switch
Telescope
Filter Assembly
Front Cap Assembly
Rear Cap Assembly
MIL-STD 1913
Rotary Reticle Illumination Switch
M145 Straight Telescope
SUPPORTING INFORMATION FOR REPAIR PARTS, SPECIAL TOOLS,
TMDE, AND SUPPORT EQUIPMENT
Common Tools and Equipment
For authorized common tools and equipment, refer to the Modified Table of
Organization and Equipment (MTOE), CTA 50-970, Expendable/Durable
Items (Except: Medical, Class V, Repair Parts, and Heraldic Items), or CTA
8-100, Army Medical Department Expendable/Durable Items, as applicable to
your unit.
0001 00-6
TM 9-1240-415-13&P
0001 00
Special Tools, TMDE, and Support Equipment
Refer to WP0025 00 for a list of special tools that are used on this equipment.
Also, refer to WP 0025 00 for the Maintenance Allocation Chart.
Repair Parts
Repair parts are listed and illustrated in supporting information work
packages 0027 00 through 0032 00.
0001 00-7/8 blank
TM 9-1240-415-13&P
CHAPTER 1
DESCRIPTION AND THEORY
OF OPERATION
TM 9-1240-415-13&P
0002 00
OPERATOR
TELESCOPE, STRAIGHT: M145
(NSN 1240-01-411-6350)
EQUIPMENT DESCRIPTION AND DATA
EQUIPMENT CHARACTERISTICS, CAPABILITIES, AND FEATURES;
LOCATION AND DESCRIPTION OF MAJOR COMPONENTS;
EQUIPMENT DATA
EQUIPMENT CHARACTERISTICS, CAPABILITIES, AND FEATURES
The telescope is a fixed 3.4 power, 28mm optical sight that has been designed
to engage targets accurately out to 1200m range. The telescope weighs 24 oz
(681 g) and is extremely rugged for rough field conditions. The telescope has
an 8.2mm diameter exit pupil, which provides excellent vision in low light
levels, i.e. dawn and dusk, and also allows for rapid target acquisition.
0002 00-1
TM 9-1240-415-13&P
0002 00
EQUIPMENT CHARACTERISTICS, CAPABILITIES, AND FEATURES Continued
The zeroing adjustment increments in both windage and elevation are 2.5mm
at 10 meter range for each detent (click of movement) and 5 in. (127mm) at
500 meter range.
The mount is designed to fit to the Picatinny rail. The telescope has an eye
relief of approximately 3 in. (70mm). Eye relief is the distance between the
eye and the sight’s rear eyepiece lens.
The reticle pattern has a built-in trajectory compensation from 300m to
1200m range.
The reticle is illuminated by a battery and will last, at maximum brightness,
for approximately seven days under continuous operation.
The optical housing of the telescope is purged with dry nitrogen to prevent
moisture from fogging the internal optics.
0002 00-2
TM 9-1240-415-13&P
0002 00
WARNING
Use of the Telescope without laser filter is
not eye safe.
Removal of the Signature Reduction Device (SRD) could
lead to your detection by the enemy.
The front objective lens is fitted with a laser filter and a Signature Reduction
Device (SRD).
These parts are removed by rotation in the counterclockwise direction.
0002 00-3
TM 9-1240-415-13&P
0002 00
EQUIPMENT CHARACTERISTICS, CAPABILITIES, AND FEATURES Continued
M 1 4 5 S T R A IG H T T E L E S C O P E
S IG N
R E D
D E V IC
A N D
F R O N
A T U R
U C T IO
E (S R
L A S E
F IL T E
T E
N
D )
R
R
B A C
E Y E
A N D
V IE W
E N D
0002 00-4
K P IE C E
F I R E R 'S
IN G
TM 9-1240-415-13&P
0002 00
LOCATION AND DESCRIPTION OF MAJOR COMPONENTS
Elevation Adjustment Dial (1).
Moves the point of impact up or down
when zeroing the telescope to the
weapon.
3
Silver Lock (2). Locks and unlocks
the elevation adjustment dial.
Front Lens Cover (3). Protects the
front lens when sight is being
transported or stored.
Windage Adjustment Dial (4).
Moves the point of impact to the left
or right when zeroing the telescope to
the weapon.
2
1
0002 00-5
4
TM 9-1240-415-13&P
0002 00
LOCATION AND DESCRIPTION OF MAJOR COMPONENTS - Continued
Rotary Switch (5). Turns the Battery Cap (10). Holds battery in
telescope housing.
reticle light ON and OFF.
6
Rear Lens Cover (6). Protects
the rear lens when sight is
being transported or stored.
5
Torque Limiting Knob (7).
Tightens the mount on the rail.
Mount (8). Assembly to which
the telescope attaches.
Signature Reduction Device
(SRD) (9). Eliminates glint
and glare from reflective lens
surface.
1 0
9
8
0002 00-6
7
TM 9-1240-415-13&P
0002 00
EQUIPMENT DATA
Optics: Anti-reflective coated lens system, 28mm clear objective, 3.4
magnification.
Overall Length: 7 in. (175mm)
Weight (M145): 24 oz (681 g)
Battery Life: 175 hr average (fresh battery). Sight is packed with a new
battery from the factory.
NOTE
Two or more batteries stored together, without
individual packaging, can short out and lose all
their power.
END OF WORK PACKAGE
0002 00-7/8 blank
TM 9-1240-415-13&P
0003 00
OPERATOR
TELESCOPE, STRAIGHT: M145
(NSN 1240-01-411-6350)
THEORY OF OPERATION
THEORY OF OPERATION
The Telescope is a telescopic sight. The telescope magnifies targets by 3-1/2
times or it appears to bring the shooter 3-1/2 times closer to the target. The
telescope will show more clearly the strike of the round and allows more
accurate shooting.
Lens covers protect the lenses when the sight is being transported or stored.
The lens covers should always be kept closed when the sight is not in use.
0003 00-1
TM 9-1240-408-13&P
0003 00
THEORY OF OPERATION - Continued
The battery cap has an O-ring that keeps out moisture and dirt (see
WP 0005 00, item 4).
With practice you may be able to keep both eyes open. With both eyes open
you will be more aware of your surroundings and feel less strain on your eyes.
The telescope must remain matched with the same weapon, attached at the
same slot in the rail system, or be re-zeroed.
END OF WORK PACKAGE
0003 00-2
TM 9-1240-415-13&P
CHAPTER 2
OPERATOR INSTRUCTIONS
TM 9-1240-415-13&P
0004 00
OPERATOR
TELESCOPE, STRAIGHT: M145
(NSN 1240-01-411-6350)
DESCRIPTION AND USE OF OPERATOR CONTROLS AND INDICATORS
CONTROLS AND INDICATORS
CONTROLS AND INDICATORS
Elevation Adjustment Dial
Used for zeroing the telescope to the weapon. The dial can only be rotated
when the silver lock (1) is moved to the UP position. Turning the elevation
adjustment dial (2) counterclockwise (in the direction of the arrow) one click
moves the point of impact up 2.5mm at 10 meters.
0004 00-1
TM 9-1240-415-13&P
CONTROLS AND INDICATORS - Continued
0004 00
1
2
0004 00-2
TM 9-1240-415-13&P
0004 00
Turning the elevation adjustment dial (2) clockwise (opposite direction to the
arrow) one click moves the point of impact down 2.5mm at 10 meters. Ensure
that the silver lock (1) is moved down to prevent any further movement of the
elevation adjustment dial.
0004 00-3
TM 9-1240-415-13&P
0004 00
CONTROLS AND INDICATORS - Continued
Windage Adjustment Dial
Used when zeroing weapon. Turning windage adjustment dial (3) clockwise
one click moves the point of impact left 2.5mm at 10 meters. Turning
windage adjustment dial (3) counterclockwise one click moves the point of
impact right 2.5mm at 10 meters.
0004 00-4
TM 9-1240-415-13&P
3
END OF WORK PACKAGE
0004 00-5/6 blank
0004 00
TM 9-1240-415-13&P
OPERATOR
TELESCOPE, STRAIGHT: M145
(NSN 1240-01-411-6350)
ASSEMBLY AND PREPARATION FOR USE
INITIAL SETUP:
Materials/Parts
Battery (item 1, WP 0036 00)
0005 00-1
0005 00
TM 9-1240-415-13&P
0005 00
ASSEMBLY AND PREPARATION FOR USE
Unpacking
1.
Remove Telescope and Carrying Case (1) and Technical Manual (2)
from shipping carton (3).
2.
Save carton for telescope storage. Record serial number and warranty
expiration date as per unit Standard Operating Procedure (SOP).
0005 00-2
TM 9-1240-415-13&P
0005 00
1
3
2
T M
9 -1 2 4 0 -4 1 5 -1 3 & P
0005 00-3
TM 9-1240-415-13&P
0005 00
ASSEMBLY AND PREPARATION FOR USE - Continued
Installing and Checking Battery
1.
Remove battery cap (1) by turning it counterclockwise while holding the
rotary switch (2) stationary.
2.
Insert battery (3) (item 1, WP 0036 00) with positive (+) end to cap.
0005 00-4
TM 9-1240-415-13&P
2
0005 00
3
1
0005 00-5
4
TM 9-1240-415-13&P
0005 00
ASSEMBLY AND PREPARATION FOR USE - Continued
CAUTION
Before installing battery cap (1), inspect threads on battery
housing and battery cap to ensure that they are free of
moisture and dirt and that the O-ring (4) in the battery cap
is present. Failure to do so could result in loss of electrical
power and shorten battery life.
Hand tighten battery cap. Using tools to tighten battery
cap could damage equipment.
3.
Re-install battery cap (1) by holding the rotary switch (2) stationary
while turning battery cap clockwise until snug. Hand tighten only.
0005 00-6
TM 9-1240-415-13&P
2
0005 00
3
1
0005 00-7
4
TM 9-1240-415-13&P
0005 00
ASSEMBLY AND PREPARATION FOR USE - Continued
4.
Open rear lens cover (5). Turn rotary switch (2) one click
counterclockwise and look through rear lens. Verify that the reticle is
illuminated. If not, replace battery. When finished, turn rotary switch
to OFF position; then replace rear lens cover.
5
R O T A R Y
S W IT C H T U R N S
IN E IT H E R
D IR E C T IO N W IT H
N O S T O P
2
0005 00-8
TM 9-1240-415-13&P
0005 00
Installing M145 Straight Telescope on M249 and M240B Machine Guns
CAUTION
Hand tighten torque limiting knob until you hear two clicks.
Using tools to tighten mounting hardware could damage
equipment.
NOTE
The Telescope mounts directly to the Picatinny rail on the
M249 and M240B machine guns.
0005 00-9
TM 9-1240-415-13&P
0005 00
ASSEMBLY AND PREPARATION FOR USE - Continued
NOTE
It will be necessary to adjust the position of the Telescope
either backward or forward on the Picatinny rail in order to
achieve the correct eye relief (distance of the eye from the
back of the Telescope).
If the same sight is installed in the same position slot on the
rail on the same weapon, re-zeroing is not required.
1.
The torque limiting knob (1) should be turned counterclockwise just
enough for the rail grabber to go over the rail. Do not force the torque
limiting knob past its intended stop.
2.
Mount the telescope firmly over the rail. Ensure that the mount is
seated squarely over the rail.
0005 00-10
TM 9-1240-415-13&P
3.
0005 00
Tighten the torque limiting knob (1) clockwise until two clicks are
heard. Ensure that the mount is securely fastened before commencing
eye relief adjustment.
3
2
1
4.
The telescope is now mounted to the weapon approximately 3 in.
(70mm) in front of the firing eye.
5.
Open rear lens cover (2) and front lens cover (3). Turn each cover inside
out to stow the lens covers while the telescope is being used.
0005 00-11
TM 9-1240-415-13&P
0005 00
ASSEMBLY AND PREPARATION FOR USE - Continued
6.
Assume a comfortable firing position and achieve a good stockweld (at
trigger pull length) with both eyes closed. Open the sighting eye and
compare the view through the telescope with the following examples:
a.
If the target scene fills the telescope to provide the maximum field
of view, the correct eye relief has been attained (see Figure 1). No
further repositioning of the telescope on the Picatinny rail is
required.
0005 00-12
TM 9-1240-415-13&P
3
0005 00
5
7
1 0 m Z
8
9
1 0
1 1
1 2
Figure 1. Maximum Field of View, Correct Eye Relief.
0005 00-13
TM 9-1240-415-13&P
0005 00
ASSEMBLY AND PREPARATION FOR USE - Continued
b.
If the target scene does not fill the sight’s field of view, the
telescope must be repositioned on the rail either forward or
backward (see Figure 2).
3
5
7
1 0 m Z
8
9
1 0
1 1
1 2
Figure 2. Limited Field of View, Incorrect Eye Relief.
0005 00-14
TM 9-1240-415-13&P
7.
0005 00
The telescope must be repositioned for correct eye relief.
a.
Loosen the torque limiting knob (1) and move the telescope in the
appropriate direction (forward or backward) until you achieve the
correct eye relief.
b.
Repeat steps 1 through 5 until the correct field of view is obtained
as shown in Figure 1.
END OF WORK PACKAGE
0005 00-15/16 blank
TM 9-1240-415-13&P
0006 00
OPERATOR
TELESCOPE, STRAIGHT: M145
(NSN 1240-01-411-6350)
OPERATION UNDER USUAL CONDITIONS
OPERATING PROCEDURES
OPERATING PROCEDURES
Zeroing the M145 Straight Telescope on the M240B and M249 Machine
Guns
1.
Zeroing the telescope aligns the sight to the barrel of the machine gun
so that point of aim equals point of impact.
0006 00-1
TM 9-1240-415-13&P
0006 00
NOTE
Adjustment of the Telescope is centered at the factory.
2.
Open front lens cover (1) and rear lens cover (2). Turn each cover inside
out to stow the lens covers while the telescope is being used.
2
1
0006 00-2
TM 9-1240-415-13&P
0006 00
10 Meter Zeroing, Set the M145 Straight Telescope to Mechanical Zero
1.
Adjust the telescope so that the weapon’s barrel and optical sighting
axis are in approximate alignment. The sighting axis will be
approximately 2 to 3 in. (51 to 76 mm) above the machine gun barrel
and therefore the strike of the bullet at 10m range will also be
approximately 2 to 3 in. (51 to 76 mm) low without further zeroing
adjustment.
W H E N G A
E Q U A L T H E T E L E
IS IN A P P R O
A L IG
P S
S C
X IM
N M
A R
O P
A T
E N
E
E
E
T
G A P S T O
0006 00-3
B E E Q U A L
TM 9-1240-415-13&P
0006 00
OPERATING PROCEDURES - Continued
2.
To bring the strike of the bullet up, lift the silver lock (1) and rotate the
elevation adjustment dial (2) counterclockwise (to the right)
approximately one full turn.
1
2
0006 00-4
TM 9-1240-415-13&P
3.
0006 00
Adjust the windage adjustment dial (3) to center the markings on the
front of the telescope.
C E N
M A R
O N T
F R O
T H E
3
0006 00-5
T E R T H E
K IN G S
H E
N T O F
T E L E S C O P E
TM 9-1240-415-13&P
0006 00
OPERATING PROCEDURES – Continued
NOTE
Each click of the zeroing adjustments makes a 2.5mm
movement of the point of impact at 10m.
4.
Make final adjustments as follows:
a.
To move the point of impact to the right, turn windage adjustment
dial (3) counterclockwise with the arrow marked on the dial.
b.
To move the point of impact to the left, turn windage adjustment
dial (3) clockwise opposite to the arrow.
c.
To move point of impact up, turn elevation adjustment dial (2)
counterclockwise (right) in the direction of the arrow and UP
marking.
0006 00-6
TM 9-1240-415-13&P
d.
0006 00
To move the point of impact down, turn elevation adjustment dial
(2) clockwise (left) opposite to the arrow.
2
3
0006 00-7
TM 9-1240-415-13&P
0006 00
OPERATING PROCEDURES - Continued
10m Range Zeroing
NOTE
In the zeroing process, groups of three single shot rounds
are fired at a target. After each three rounds, the center of
the group has to be determined.
The 10mZ (800) line is to be used with the M249 and M240B
machine guns when firing the 10 meter exercise as part one
of the qualifying course. The trajectory of the 5.56 and 7.62
round are equal at this aim point and distance to target.
1.
Look through the telescope and align the reticle’s 10mZ zeroing mark
on the center base of the aiming points on the basic machine gun
marksmanship target.
0006 00-8
TM 9-1240-415-13&P
0006 00-9
0006 00
TM 9-1240-415-13&P
0006 00
OPERATING PROCEDURES - Continued
2.
Fire three single rounds loaded individually without making any
telescope adjustments.
3.
The three round shot group should be within a 4cm circle to establish
the center of shot group in relation to the center base of the aiming
paster.
4.
Measure the amount of movement required left or right (windage) and
up or down (elevation) to move the three round shot group onto the
center of the aiming paster.
5.
Windage correction: Upon completion, return to the firing line to make
corrections to the weapon and re-fire a three round shot group to
confirm zero.
0006 00-10
TM 9-1240-415-13&P
C E N T E
O F T H R E
R O U N
S H O
G R O U
R
0006 00
E
D
P
T
E L E V A T IO N
W IN D A G E
0006 00-11
TM 9-1240-415-13&P
0006 00
OPERATING PROCEDURES - Continued
6.
Repeat steps 1 through 5 until the strike of the round is coincident with
the center of the target. Close the silver lock down to prevent any
further movement of the elevation adjustment dial. The telescope is
now 10m zeroed.
Field Zero at 500m Range
1.
Look through the telescope and align the reticle’s 500m mark on the
center of mass of the double "E" silhouette target.
0006 00-12
TM 9-1240-415-13&P
2.
If firing a M240B weapon, fire a 6 to 9 round burst.
3.
If firing a M249 weapon, fire a 5 to 7 round burst.
4.
Observe impact of rounds.
0006 00-13
0006 00
TM 9-1240-415-13&P
0006 00
OPERATING PROCEDURES - Continued
5.
Determine direction of movement needed for impact (up or down, left or
right).
6.
Estimate or measure the amount of movement required to move the
strike of the round to the center of the target (at 500 meters, 5 in.
equals one click of adjustment in both windage and elevation).
7.
Repeat steps 1 through 6 until the strike of the round is coincident with
the center of the target. Close the silver lock down to prevent any
further movement of the elevation adjustment dial. The telescope is
now zeroed and ready for operational shooting.
0006 00-14
TM 9-1240-415-13&P
0006 00
Reticle
The vertical gap in the stadia lines is for estimating ranges. The height of
gaps in the stadia lines represents a 60 in. (152.4 cm) high target at the
range noted (i.e., 5, 7, 8, 9, 10, 11, or 1200 meters).
0006 00-15
TM 9-1240-415-13&P
OPERATING PROCEDURES - Continued
Reticle Illumination
NOTE
For low light operations, the reticle can be illuminated to
show the 300m, 500m, 700m and 800m aiming marks.
3
5
7
8
0006 00-16
0006 00
TM 9-1240-415-13&P
0006 00
NOTE
Telescope is equipped with variable intensity light emitting
diode (LED) illumination of the reticle. It has 10 positions:
the OFF position and 9 positions for different reticle
intensity settings.
1.
To make reticle illumination adjustments, turn rotary switch (1)
clockwise. The intensity of the illumination increases as the switch is
turned.
1
0006 00-17
TM 9-1240-415-13&P
0006 00
OPERATING PROCEDURES - Continued
2.
Turn rotary switch (1) to OFF position when the telescope is being used
during normal daylight or when illumination is not required.
L IN E O N R O T A R Y
S W IT C H A T
T H E "O F F " P O S IT IO N
NOTE
Ensure the rotary switch is turned to the OFF position
when not in use.
END OF WORK PACKAGE
0006 00-18
TM 9-1240-415-13&P
0007 00
OPERATOR
TELESCOPE, STRAIGHT: M145
(NSN 1240-01-411-6350)
OPERATION UNDER UNUSUAL CONDITIONS
UNUSUAL ENVIRONMENTS AND WEATHER;
NUCLEAR, BIOLOGICAL, AND CHEMICAL (NBC) CONTAMINATION
INITIAL SETUP:
Materials/Parts
Anti-fogging compound (item 3, WP 0036 00)
Lens paper (item 5, WP 0036 00)
References
WP 0010 00
0007 00-1
TM 9-1240-415-13&P
0007 00
UNUSUAL ENVIRONMENTS AND WEATHER
NOTE
Two or more batteries stored together, without individual
packaging, can short out and lose all their power.
1.
Extreme Cold. Extreme cold will shorten battery life. Keep spare
batteries in a non-conductive container in your inner pockets to keep
them warm. If the telescope is brought from cold to warm environment,
wipe off condensation after it has warmed up.
2.
Extreme Heat (Moist or Dry). No special procedures required.
3.
Salt Air. No special procedures required.
0007 00-2
TM 9-1240-415-13&P
0007 00
4.
Sea Spray. Ensure that battery cap is tight before exposing the
telescope to water or sea spray. Hand tighten only. Keep lens caps
closed when telescope is not being used. Clean lens (WP 0010 00) with
lens paper (item 5, WP 0036 00) and dry telescope with a cloth as soon
as possible after being exposed to water or sea spray.
5.
Dust Storms and Sandstorms. Keep lens caps closed when telescope is
not being used.
6.
High Altitudes. No special procedures required.
7.
Mud and Snow. Ensure that battery cap is tight before exposing the
telescope to mud or snow. Hand tighten only. Keep lens caps closed
when telescope is not being used. Clean lens (WP 0010 00) with lens
paper (item 5, WP 0036 00) and dry telescope with a cloth as soon as
possible after being exposed to mud or snow. Use anti-fogging
compound (item 3, WP 0036 00). Try to acclimatize the telescope to the
environment prior to mission usage to minimize fogging of external
surfaces.
0007 00-3
TM 9-1240-415-13&P
0007 00
UNUSUAL ENVIRONMENTS AND WEATHER - Continued
8.
Water. Ensure that battery cap is tight before immersing the telescope
in water. Hand tighten only. Keep lens caps closed when telescope is
not being used. Clean lens (WP 0010 00) with lens paper
(item 5, WP 0036 00) and dry telescope with a cloth as soon as possible
after being immersed in water. Use anti-fogging compound (item 3, WP
0036 00).
NUCLEAR, BIOLOGICAL, AND CHEMICAL (NBC) CONTAMINATION
All rubber must be removed before decontamination procedures using the
M258A1 individual soldier’s personal decontamination kit. The
contaminated rubber material must be disposed of in accordance with the
unit Standard Operating Procedure (SOP).
END OF WORK PACKAGE
0007 00-4
TM 9-1240-415-13&P
CHAPTER 3
UNIT TROUBLESHOOTING
TM 9-1240-415-13&P
UNIT
TELESCOPE, STRAIGHT: M145
(NSN 1240-01-411-6350)
TROUBLESHOOTING
GENERAL, TROUBLESHOOTING PROCEDURES
INITIAL SETUP:
References
TB 43-0134
WP 0015 00
WP 0018 00
0008 00-1
0008 00
TM 9-1240-415-13&P
0008 00
GENERAL
Troubleshooting Procedures lists common malfunctions that you may find
with your telescope. Perform the tests, inspections, and corrective actions in
the order they appear.
Troubleshooting Procedures cannot list all of the malfunctions that may
occur, all of the tests and inspections needed to find the fault, or all of the
corrective actions needed to correct the fault. If the equipment malfunction is
not listed or the actions listed do not correct the fault, notify your armorer.
0008 00-2
TM 9-1240-415-13&P
0008 00
TROUBLESHOOTING PROCEDURES
NOTE
The Telescope uses lithium-manganese dioxide batteries
which, when depleted, are to be disposed of in accordance
with technical bulletin, TB 43-0134, Battery Disposition and
Disposal, paragraph 4-5, and local regulations and
procedures (contact your local defense reutilization and
marketing office (DRMO) for assistance). Certain states
identify lithium-manganese dioxide batteries as hazardous
waste; these states are currently Alaska, California,
Minnesota, Rhode Island, and Washington.
0008 00-3
TM 9-1240-415-13&P
0008 00
TROUBLESHOOTING PROCEDURES - Continued
Table 1. Unit Troubleshooting Procedures.
CORRECTIVE
ACTION
MALFUNCTION
TEST OR INSPECTION
1. RETICLE DOES
NOT
ILLUMINATE.
1. Battery installed incorrectly.
Remove and reinstall
battery (WP 0015 00).
2. Wrong type of battery.
Replace battery (WP
0015 00).
3. Dead battery.
Replace battery (WP
0015 00).
4. Battery not making good
contact.
Remove battery cap and
battery. Clean threads
on battery cap and
battery housing, then
reinstall battery (WP
0015 00).
0008 00-4
TM 9-1240-415-13&P
0008 00
Table 1. Unit Troubleshooting Procedures.
MALFUNCTION
2. VIEW
THROUGH THE
TELESCOPE IS
NOT CLEAR.
TEST OR INSPECTION
CORRECTIVE
ACTION
5. Battery cap spring missing.
Notify armorer.
6. Defective rotary switch.
Notify armorer.
1. Remove SRD and check for
dirt or condensation on laser
filter (WP 0018 00).
Remove dirt or
condensation from laser
filter.
2. Remove laser filter and
check for dirt or
condensation on inner
surface of laser filter or on
the objective lens.
Remove dirt or
condensation from inner
surface of laser filter or
from objective lens.
0008 00-5
TM 9-1240-415-13&P
0008 00
TROUBLESHOOTING PROCEDURES - Continued
Table 1. Unit Troubleshooting Procedures.
MALFUNCTION
TEST OR INSPECTION
3. ELEVATION OR
WINDAGE
ADJUSTMENT
INOPERABLE.
CORRECTIVE
ACTION
Notify armorer.
END OF WORK PACKAGE
0008 00-6
TM 9-1240-415-13&P
CHAPTER 4
DIRECT SUPPORT TROUBLESHOOTING
TM 9-1240-415-13&P
DIRECT SUPPORT
TELESCOPE, STRAIGHT: M145
(NSN 1240-01-411-6350)
TROUBLESHOOTING
GENERAL, TROUBLESHOOTING PROCEDURES
INITIAL SETUP:
References
TB 43-0134
WP 0020 00
WP 0021 00
0009 00-1
0009 00
TM 9-1240-415-13&P
0009 00
GENERAL
Troubleshooting Procedures lists common malfunctions that you may find
with your telescope. Perform the tests, inspections, and corrective actions in
the order they appear in the table.
Troubleshooting Procedures cannot list all of the malfunctions that may
occur, all of the tests and inspections needed to find the fault, or all of the
corrective actions needed to correct the fault. If the equipment malfunction is
not listed or the actions listed do not correct the fault, notify your armorer.
0009 00-2
TM 9-1240-415-13&P
0009 00
TROUBLESHOOTING PROCEDURES
NOTE
The Telescope uses lithium-manganese dioxide batteries
which, when depleted, are to be disposed of in accordance
with technical bulletin, TB 43-0134, Battery Disposition and
Disposal, paragraph 4-5, and local regulations and
procedures (contact your local defense reutilization and
marketing office (DRMO) for assistance). Certain states
identify lithium-manganese dioxide batteries as hazardous
waste; these states are currently Alaska, California,
Minnesota, Rhode Island, and Washington.
0009 00-3
TM 9-1240-415-13&P
0009 00
TROUBLESHOOTING PROCEDURES - Continued
Table 1. Direct Support Troubleshooting Procedures.
MALFUNCTION
TEST OR INSPECTION
CORRECTIVE
ACTION
1. TORQUE
LIMITING
KNOB NOT
SECURING
SIGHT.
Re-adjust torque
limiting knob (WP 0021
00).
2. TORQUE
LIMITING
KNOB NOT
RATCHETING.
Re-adjust torque
limiting knob (WP 0021
00).
3. TORQUE
LIMITING
SHAFT BENT.
Replace shaft
(WP 0020 00, WP 0021
00).
END OF WORK PACKAGE
0009 00-4
TM 9-1240-415-13&P
CHAPTER 5
OPERATOR MAINTENANCE INSTRUCTIONS
FOR THE
M145 STRAIGHT TELESCOPE
TM 9-1240-415-13&P
OPERATOR
TELESCOPE, STRAIGHT: M145
(NSN 1240-01-411-6350)
LENS CLEANING PROCEDURES
INITIAL SETUP:
Materials/Parts
Lens paper (item 5, WP 0036 00)
Optical lens cleaning compound (item 2, WP 0036 00)
0010 00-1
0010 00
TM 9-1240-415-13&P
0010 00
LENS CLEANING PROCEDURES
1.
Remove mud using optical lens cleaning compound (item 2,
WP 0036 00) or by splashing water onto the lens.
2.
Remove large particles from exposed lens surfaces by first blowing on
the surfaces. Blow as much dust and dirt as possible from the exposed
lens surfaces. Gather the center of a sheet of lens paper (item 5, WP
0036 00), and use the edges to brush dust from the front and back lens.
3.
When all visible particles of dust and dirt have been removed, moisten
a piece of lens paper (item 5, WP 0036 00) and gently wipe over the lens
surface. Dry with clean lens paper (item 5, WP 0036 00).
END OF WORK PACKAGE
0010 00-2
TM 9-1240-415-13&P
OPERATOR
TELESCOPE, STRAIGHT: M145
(NSN 1240-01-411-6350)
PREPARATION FOR STORAGE OR SHIPMENT
ADMINISTRATIVE STORAGE
INITIAL SETUP:
References
WP 0014 00
0011 00-1
0011 00
TM 9-1240-415-13&P
0011 00
ADMINISTRATIVE STORAGE
Administrative storage of equipment issued to and used by the Army
activities will have preventive maintenance performed in accordance with the
PMCS table (WP 0014 00) before storing. When removing the equipment
from administrative storage the PMCS should be performed to assure
operational readiness.
END OF WORK PACKAGE
0011 00-2
TM 9-1240-415-13&P
CHAPTER 6
UNIT MAINTENANCE INSTRUCTIONS
FOR THE
M145 STRAIGHT TELESCOPE
TM 9-1240-415-13&P
0012 00
UNIT
TELESCOPE, STRAIGHT: M145
(NSN 1240-01-411-6350)
SERVICE UPON RECEIPT
SERVICE UPON RECEIPT
Inspect the equipment for damage incurred during shipment. If the
equipment has been damaged, report the damage on an SF 361,
Transportation Discrepancy Report.
Check the equipment against Figure 1, WP 0027 00 to see if the shipment is
complete. Report all discrepancies in accordance with applicable service
instructions (e.g. Army instructions, see DA PAM 738-750).
END OF WORK PACKAGE
0012 00-1/2 blank
TM 9-1240-415-13&P
0013 00
UNIT
TELESCOPE, STRAIGHT: M145
(NSN 1240-01-411-6350)
PREVENTIVE MAINTENANCE CHECKS AND SERVICES (PMCS)
INTRODUCTION
GENERAL
GENERAL
Preventive Maintenance Checks and Services (PMCS) are performed to keep
the equipment in operating condition. The checks are used to find, correct, or
report problems. Unit members are to do the PMCS jobs as shown in
WP 0014 00. PMCS are done every day the equipment is used, using
WP 0014 00. Pay attention to WARNING and CAUTION statements. A
WARNING means someone could be hurt. A CAUTION means equipment
could be damaged.
0013 00-1
TM 9-1240-415-13&P
0013 00
GENERAL - Continued
1.
BEFORE OPERATION. Perform your Before PMCS prior to the
equipment performing its intended mission.
2.
DURING OPERATION. Perform your During PMCS when the
equipment is being used in its intended mission.
3.
AFTER OPERATION. Be sure to perform your After PMCS after the
equipment has performed its mission.
If your equipment fails to operate, troubleshoot. Report any deficiencies
using the proper form; see DA PAM 738-750. If you cannot correct it yourself,
notify your armorer.
0013 00-2
TM 9-1240-415-13&P
0013 00
Explanation of Columns
1.
ITEM NUMBER column: Checks and services are numbered in
disassembly sequence. This column shall be used as a source of item
numbers for the "TM Number" column on DA Form 2404, Equipment
Inspection and Maintenance Worksheet, in recording results of PMCS.
2.
INTERVAL column: This column gives the designated interval when
each check is to be performed.
3.
MAN-HOUR column: Tells you how much time should be required for
the procedure.
4.
ITEM TO BE CHECKED OR SERVICED column: This column lists
the items to be checked or serviced.
5.
PROCEDURE column: This column contains a brief description of the
procedure by which the check is to be performed. It contains all the
information required to accomplish the checks and services.
0013 00-3
TM 9-1240-415-13&P
0013 00
GENERAL - Continued
6.
EQUIPMENT NOT READY/AVAILABLE IF column: This column
contains a brief statement of the condition (e.g. malfunction, shortage)
that would cause the covered equipment to be less than fully ready to
perform its assigned mission.
END OF WORK PACKAGE
0013 00-4
TM 9-1240-415-13&P
0014 00
UNIT
TELESCOPE, STRAIGHT: M145
(NSN 1240-01-411-6350)
PREVENTIVE MAINTENANCE CHECKS AND SERVICES (PMCS),
INCLUDING LUBRICATION INSTRUCTIONS
LUBRICATION INSTRUCTIONS, PMCS PROCEDURES
INITIAL SETUP:
References
WP 0015 00
0014 00-1
TM 9-1240-415-13&P
0014 00
LUBRICATION INSTRUCTIONS
No lubrication is required.
PMCS PROCEDURES
Table 1. Preventive Maintenance Checks and Services for M145
Straight Telescope.
ITEM TO BE
CHECKED
OR
ITEM
MANNO. INTERVAL HOUR SERVICED
1
Before
Telescope
PROCEDURE
Look through the
telescope. Inspect for
visual obstruction of
target image; dust, dirt,
pits, or moisture on
optical surfaces; loose or
broken optical elements;
and fogging/condensation.
0014 00-2
EQUIPMENT
NOT READY/
AVAILABLE
IF:
These
conditions are
present and
cannot be
corrected by
cleaning.
TM 9-1240-415-13&P
0014 00
Table 1. Preventive Maintenance Checks and Services for M145
Straight Telescope – Continued
ITEM TO BE
CHECKED
OR
ITEM
MANNO. INTERVAL HOUR SERVICED
PROCEDURE
EQUIPMENT
NOT READY/
AVAILABLE
IF:
2
Before
Telescope
Ensure that battery cap
is present and that
battery cap’s threads are
clean and undamaged.
Inspect for O-ring and
spring in battery cap.
Battery cap,
spring, or Oring missing.
Unable to
install battery
cap.
3
Before
Telescope
Ensure that the 300m,
500m, 700m, and 800m
marks in the reticle are
illuminated when rotary
switch is set to one of the
operating positions. If
necessary, replace battery
(WP 0015 00) and check
again.
The 300m,
500m, 700m,
and 800m
marks are not
illuminated.
0014 00-3
TM 9-1240-415-13&P
0014 00
PMCS PROCEDURES - Continued
Table 1. Preventive Maintenance Checks and Services for M145
Straight Telescope – Continued
ITEM TO BE
CHECKED
ITEM
MANOR
NO. INTERVAL HOUR SERVICED
PROCEDURE
EQUIPMENT
NOT READY/
AVAILABLE
IF:
4
Before
Mount
Check mount for damage
Mount damaged
that will prevent telescope in such a way
from being installed.
that telescope
cannot be
installed.
5
Before
Telescope
Ensure both lens covers
are present and can be
snapped in place.
0014 00-4
N/A
TM 9-1240-415-13&P
0014 00
Table 1. Preventive Maintenance Checks and Services for M145
Straight Telescope – Continued
ITEM TO BE
CHECKED
ITEM
MANOR
NO. INTERVAL HOUR SERVICED
PROCEDURE
EQUIPMENT
NOT READY/
AVAILABLE
IF:
6
Before
Torque
Limiting Knob
Ensure torque limiting
knob is torqued and tight.
Telescope is not
properly attached
and torqued to
the rail.
7
Before
Torque
Limiting Shaft
Ensure torque limiting
shaft is not loose or bent.
Threads not
functional and
torque limiting
shaft loose or
bent.
8
Before
Telescope
Check entire telescope for
loose or missing parts.
Parts not present
or secured.
0014 00-5
TM 9-1240-415-13&P
0014 00
PMCS PROCEDURES - Continued
Table 1. Preventive Maintenance Checks and Services for M145
Straight Telescope – Continued
ITEM TO BE
CHECKED
ITEM
MANOR
NO. INTERVAL HOUR SERVICED
PROCEDURE
EQUIPMENT
NOT READY/
AVAILABLE
IF:
9
Before
SRD and laser
filter
Check that both are
present.
SRD or laser
filter not present.
10
Before
SRD and laser
filter
Check for corrosion.
Corrosion
interferes with
operation.
11
During
Torque
Limiting Knob
Ensure torque limiting
knob is torqued and tight.
After firing every 200
rounds, ensure torque
limiting knob is tight by
turning until you hear two
clicks.
Telescope is not
properly attached
and torqued to
the rail.
0014 00-6
TM 9-1240-415-13&P
0014 00
Table 1. Preventive Maintenance Checks and Services for M145
Straight Telescope – Continued
ITEM TO BE
CHECKED
ITEM
MANOR
NO. INTERVAL HOUR SERVICED
PROCEDURE
EQUIPMENT
NOT READY/
AVAILABLE
IF:
12
After
Telescope
Look through the
telescope. Inspect for
visual obstruction of
target image; dust, dirt,
pits, or moisture on
optical surfaces; loose or
broken optical elements;
and fogging/condensation.
These conditions
are present and
cannot be
corrected by
cleaning.
13
After
Telescope
Ensure that battery cap is
present and that battery
cap’s threads are clean
and undamaged. Inspect
for O-ring and spring in
battery cap.
Battery cap,
spring, or O-ring
missing. Unable
to install battery
cap.
0014 00-7
TM 9-1240-415-13&P
0014 00
PMCS PROCEDURES - Continued
Table 1. Preventive Maintenance Checks and Services for M145
Straight Telescope – Continued
ITEM TO BE
CHECKED
OR
ITEM
MANNO. INTERVAL HOUR SERVICED
PROCEDURE
EQUIPMENT
NOT READY/
AVAILABLE
IF:
14
After
Mount
Check mount for damage
Mount damaged
that will prevent telescope in such a way
from being installed.
that telescope
cannot be
installed.
15
After
Telescope
Ensure both lens covers
are present and can be
snapped in place.
N/A
16
After
Torque
Limiting Knob
Ensure torque limiting
knob is torqued and tight.
Telescope is not
properly attached
and torqued to
the rail.
0014 00-8
TM 9-1240-415-13&P
0014 00
Table 1. Preventive Maintenance Checks and Services for M145
Straight Telescope – Continued
ITEM TO BE
CHECKED
ITEM
MANOR
NO. INTERVAL HOUR SERVICED
PROCEDURE
EQUIPMENT
NOT READY/
AVAILABLE
IF:
17
After
Torque
Limiting Shaft
Ensure torque limiting
shaft is not loose or bent.
Threads not
functional and
torque limiting
shaft loose or
bent.
18
After
Telescope
Check entire telescope for
loose or missing parts.
Parts not present
or secured.
0014 00-9
TM 9-1240-415-13&P
0014 00
PMCS PROCEDURES - Continued
Table 1. Preventive Maintenance Checks and Services for M145
Straight Telescope – Continued
ITEM TO BE
CHECKED
ITEM
MANOR
NO. INTERVAL HOUR SERVICED
PROCEDURE
EQUIPMENT
NOT READY/
AVAILABLE
IF:
19
After
SRD and laser
filter
Check that both are
present.
SRD or laser
filter not present.
20
After
SRD and laser
filter
Check for corrosion.
Corrosion
interferes with
operation.
END OF WORK PACKAGE
0014 00-10
TM 9-1240-415-13&P
UNIT
TELESCOPE, STRAIGHT: M145
(NSN 1240-01-411-6350)
BATTERY MAINTENANCE
REPAIR OR REPLACEMENT, TESTING
INITIAL SETUP:
Materials/Parts
Battery (item 1, WP 0036 00)
0015 00-1
0015 00
TM 9-1240-415-13&P
0015 00
REPAIR OR REPLACEMENT
NOTE
Ensure rotary switch is in the OFF position when the
Telescope is not in use.
1.
Remove battery cap (1) by turning it counterclockwise and holding the
rotary switch (2) stationary.
2.
Insert battery (3) (item 1, WP 0036 00) with positive (+) end to cap.
CAUTION
Before installing battery cap (1), inspect threads on battery
housing and battery cap to ensure that they are free of
moisture dirt and that the O-ring inside battery cap is
present and properly seated. Failure to do so could result in
loss of electrical power and shorten battery life.
0015 00-2
TM 9-1240-415-13&P
3.
0015 00
Tighten battery cap (1) while holding the rotary switch (2) stationary.
2
3
1
0015 00-3
TM 9-1240-415-13&P
0015 00
TESTING
Open rear lens cover (1). Turn rotary switch (2) clockwise and look through
rear lens. Verify that reticle is illuminated. If not, replace battery (3). When
finished, turn rotary switch to OFF position, then close rear lens cover.
1
2
3
END OF WORK PACKAGE
0015 00-4
TM 9-1240-415-13&P
0016 00
UNIT
TELESCOPE, STRAIGHT: M145
(NSN 1240-01-411-6350)
BATTERY CAP O-RING MAINTENANCE
REMOVAL, INSTALLATION
REMOVAL
1.
Remove battery cap (1) by turning it counterclockwise while holding the
rotary switch stationary.
2.
Remove O-ring (2) from battery cap (1).
0016 00-1
TM 9-1240-415-13&P
0016 00
1
2
INSTALLATION
1.
Install O-ring (2) onto battery cap (1). Ensure that the O-ring is
properly seated.
2.
Install battery cap (1) by turning it clockwise until tight while holding
the rotary switch stationary.
END OF WORK PACKAGE
0016 00-2
TM 9-1240-415-13&P
0017 00
UNIT
TELESCOPE, STRAIGHT: M145
(NSN 1240-01-411-6350)
LENS COVER MAINTENANCE
REPAIR OR REPLACEMENT
REPAIR OR REPLACEMENT
To remove the front objective lens cover, carefully pull the rubber cover plug
(1) out of the socket (2), a small bulge and slot in the rubber ring around the
top of the Signature Reduction Device (SRD). To remove the rear eyepiece
lens cover, carefully pull the rubber cover plug (1) out of the socket (2), a
small bulge and slot around the top part of the rubber cover at the back. To
replace the lens covers, press the lens cover plug (1) into the socket (2)
ensuring that the tabs are securely engaged in the socket.
0017 00-1
TM 9-1240-415-13&P
0017 00
REPAIR OR REPLACEMENT - Continued
2
R U B B E R P L U G
P A R T O F L E N S
C O V E R
1
END OF WORK PACKAGE
0017 00-2
S O C
T O T
O R T
R U B
K E T
O P
O P
B E R
F IX
O F
O F
C O
E D
S R D
R E A R
V E R
TM 9-1240-415-13&P
0018 00
UNIT
TELESCOPE, STRAIGHT: M145
(NSN 1240-01-411-6350)
SIGNATURE REDUCTION DEVICE (SRD) AND LASER FILTER
MAINTENANCE
REMOVAL, CLEANING, INSTALLATION
INITIAL SETUP:
Materials/Parts
Optical lens cleaning compound (item 2, WP 0036 00)
0018 00-1
TM 9-1240-415-13&P
0018 00
REMOVAL
WARNING
Removal of the laser filter could result in
the loss of your eyesight.
Removal of the SRD could lead to your detection by the
enemy.
Remove the Signature Reduction Device (SRD) (1) and laser filter (2) by
rotating in a counterclockwise direction. The laser filter has two slots to
assist removal, if necessary.
0018 00-2
TM 9-1240-415-13&P
1
0018 00
2
CLEANING
1.
The SRD can be cleaned by running water through the honeycomb
directly from a faucet. Shake out excess water and leave to dry.
2.
Clean glass surfaces of laser filter (2) with lens cleaning compound
(item 2, WP 0036 00).
0018 00-3
TM 9-1240-415-13&P
0018 00
INSTALLATION
CAUTION
Do not tighten with any tools.
NOTE
The laser filter acts like a mirror; therefore, to minimize
reflections, it is pointed down at a slight angle. The SRD is
screwed on straight to the objective lens finger tight.
1.
Install the laser filter (2) by screwing onto the front objective lens,
finger tight only.
2.
Install SRD. Turn clockwise until finger tight.
END OF WORK PACKAGE
0018 00-4
TM 9-1240-415-13&P
CHAPTER 7
DIRECT SUPPORT MAINTENANCE INSTRUCTIONS
FOR THE
M145 STRAIGHT TELESCOPE
TM 9-1240-415-13&P
DIRECT SUPPORT
TELESCOPE, STRAIGHT: M145
(NSN 1240-01-411-6350)
MOUNT ASSEMBLY MAINTENANCE
REMOVAL, INSTALLATION
INITIAL SETUP:
Tools and Special Tools
Shop set, small arms: field maintenance basic, less power
(item 2, WP 0025 00)
5/32 in. hexagon bit socket (item 4, WP 0025 00)
0019 00-1
0019 00
TM 9-1240-415-13&P
0019 00
REMOVAL
1.
Turn the telescope (1) upside down and remove two screws (2) by using
3/8 in. drive ratchet handle with 5/32 in. hexagon bit socket (item 4, WP
0025 00).
2
3
1
2.
Separate the telescope (1) and the mount (3).
0019 00-2
TM 9-1240-415-13&P
0019 00
INSTALLATION
1.
Ensure four shims (1) are in place on mount (2) before assembling to
the telescope. Replace shims if defective. Any defective shim material
remaining on the mount should be carefully scraped off and the surface
cleaned. Remove shim backing paper from new shim(s) and attach the
sticky surface to the mount in the positions shown.
1 /4 " T O
1 /1 6 " T O
5 /1 6 "
2
1
1
0019 00-3
1 /8 "
TM 9-1240-415-13&P
2.
0019 00
Hold the telescope (3) upside down and position the mount (2) on top.
Place two screws (4) through the mount and tighten using a 3/8 in.
drive torque wrench with 5/32 in. hexagon bit socket. Tighten to 60 to
90 in.-lb (6.83 to 10.24 N-m).
4
2
3
END OF WORK PACKAGE
0019 00-4
TM 9-1240-415-13&P
DIRECT SUPPORT
TELESCOPE, STRAIGHT: M145
(NSN 1240-01-411-6350)
RUBBER COVER MAINTENANCE
REMOVAL, INSTALLATION
INITIAL SETUP:
References
WP 0017 00
WP 0018 00
WP 0019 00
0020 00-1
0020 00
TM 9-1240-415-13&P
0020 00
REMOVAL
NOTE
In case of decontamination, the rubber cover should be cut
off the telescope and disposed of in accordance with unit
Standard Operating Procedures (SOP).
1.
Remove the Signature Reduction Device (SRD) and laser filter
(WP 0018 00).
2.
Remove the rear eyepiece lens cover (1) from the telescope
(WP 0017 00). The complete eyepiece lens cover is pulled from the
rubber cover.
3.
Remove the telescope from the mount (WP 0019 00).
0020 00-2
TM 9-1240-415-13&P
0020 00
P U L L
1
P U L L
0020 00-3
TM 9-1240-415-13&P
0020 00
REMOVAL – Continued
4.
The front portion of the rubber cover (2) is pulled over the front of the
housing (3). The housing can now be pulled out of the rubber cover.
2
F R O N T L A S E R
F IL T E R
A N D S R D
R E M O V E D
B A C K E Y E P IE C E
3
0020 00-4
TM 9-1240-415-13&P
0020 00
INSTALLATION
1.
To increase the flexibility of the rubber cover (1), and to assist with its
installation, the rubber cover should be pre-heated to approximately
120 °F (49 °C).
2.
Install the rubber cover (1) by pressing the eyepiece end of the telescope
(2) into the rubber cover.
3.
The objective end of the rubber cover (1) is carefully pulled over the
objective end of the telescope (2). Ensure that the rubber cover fits
neatly around the housing.
0020 00-5
TM 9-1240-415-13&P
0020 00
INSTALLATION - Continued
1
2
4.
Install the rear eyepiece lens cover over the eyepiece end of the rubber
cover (1) (WP 0017 00).
5.
Install the mount on the telescope (WP 0019 00).
6.
Install the laser filter and the SRD (WP 0018 00).
END OF WORK PACKAGE
0020 00-6
TM 9-1240-415-13&P
0021 00
DIRECT SUPPORT
TELESCOPE, STRAIGHT: M145
(NSN 1240-01-411-6350)
TORQUE LIMITING KNOB/SHAFT MAINTENANCE
DISASSEMBLY/ASSEMBLY
INITIAL SETUP:
Tools and Special Tools
Shop set, small arms: field
maintenance basic, less
power (item 2, WP 0025 00)
3/8 in. special ground socket
(item 3, WP 0025 00)
Materials/Parts
Locktite 680 (item 4,
WP 0036 00)
Sealing compound primer
(item 6, WP 0036 00)
0021 00-1
TM 9-1240-415-13&P
0021 00
DISASSEMBLY
1.
Remove the dust protective plug (1) from the end of the nut (2). (This
may permanently damage the dust protective plug).
2.
Using 3/8 in. special ground socket (item 3, WP 0025 00), remove the
nut (2).
3.
Remove the spring (3) and torque knob (4). Unscrew torque nut (5).
Remove torque nut and flat washer (6) from locking bar (7).
4.
Remove the socket head screw (8) through the top of the mount (9)
using a 5/64 in. key wrench. Remove the shaft (10) from the other side
of the mount.
0021 00-2
TM 9-1240-415-13&P
9
0021 00
8
7
5
1 0
1
4
2
3
6
0021 00-3
TM 9-1240-415-13&P
0021 00
ASSEMBLY
NOTE
Replace torque nut, dust protective plug, nut, socket head
screw, and shaft after each disassembly as well as any
defective parts (see WP 0031 00-1).
1.
Insert the threaded portion of new shaft (1) through the round hole in
the middle of the side of the mount (2), until the round end of the shaft
fits flush into the hole.
0021 00-4
TM 9-1240-415-13&P
0021 00
3
2
1
0021 00-5
TM 9-1240-415-13&P
0021 00
ASSEMBLY - Continued
2.
Apply sealing compound primer (item 6, WP 0036 00) to threads of new
socket head screw (3) and threaded end of shaft (1).
3.
Apply Locktite 680 (item 4, WP 0036 00) to the screw threads of socket
head screw (3).
4.
Install socket head screw (3) and tighten with a 5/64 in. key wrench
through the top of the mount (2) and into the shaft (1).
5.
Place the flat washer (4) into the recess of the torque nut (5) and place
them both into the slot of the locking bar (6). With the wide side of the
locking bar at the top, screw the torque nut finger tight.
6.
Fit the torque knob (7) onto the shaft (1) up to the torque nut (5) so that
they mesh together. Push the spring (8) onto the shaft.
0021 00-6
TM 9-1240-415-13&P
0021 00
2
3
6
1
5
1 0
9
8
7
4
0021 00-7
TM 9-1240-415-13&P
0021 00
ASSEMBLY - Continued
7.
Screw on new nut (9) so that the spring (8) locates over the protruding
side of the nut. Tighten the nut until the torque knob (7) cannot
ratchet. Place a drop of Locktite 680 (item 4, WP 0036 00) onto the
threads of shaft (1). Turn the nut back off, over the Locktite 680, until
the torque knob can ratchet. Back off the nut 3/4 of a turn.
8.
Push on the new dust protective plug (10).
NOTE
Lay the mount on its side, with the shaft vertical. Sealing
compound takes 24 hours to cure.
0021 00-8
TM 9-1240-415-13&P
9
1 0
1
END OF WORK PACKAGE
0021 00-9/10 blank
0021 00
TM 9-1240-415-13&P
DIRECT SUPPORT MAINTENANCE
TELESCOPE, STRAIGHT: M145
(NSN 1240-01-411-6350)
ILLUSTRATED LIST OF MANUFACTURED ITEMS
INTRODUCTION
Scope
This work package includes complete instructions for making items
authorized to be manufactured or fabricated at the direct support
maintenance level.
0022 00-1
0022 00
TM 9-1240-415-13&P
0022 00
How to Use the Index of Manufactured Items
A part number index in alphanumeric order is provided for cross-referencing
the part number of the item to be manufactured to the figure which covers
fabrication criteria.
Explanation of the Illustrations of Manufactured Items
All instructions needed by maintenance personnel to manufacture the item
are included on the illustrations. All bulk materials needed for manufacture
of an item are listed by part number or specification number in a tabular list
on the illustration.
INDEX OF MANUFACTURED ITEMS
Part Number
Figure Number
1
0022 00-2
TM 9-1240-415-13&P
0022 00
A F T E R
M O D IF IC A T IO N
B E F O R E
M O D IF IC A T IO N
1 /2 "
M A X
3 /8 "
(S Q U A R E D R IV E
E N D )
Figure 1. 3/8th Inch Special Ground Socket.
0022 00-3/4 blank
TM 9-1240-415-13&P
CHAPTER 8
SUPPORTING INFORMATION
TM 9-1240-415-13&P
0023 00
OPERATOR, UNIT, AND DIRECT SUPPORT
TELESCOPE, STRAIGHT: M145
(NSN 1240-01-411-6350)
REFERENCES
SCOPE
This work package lists all field manuals, forms, miscellaneous publications,
technical bulletins, and technical manuals referenced in or required for use
with this manual.
PUBLICATION INDEX
Consult DA Pam 25-30 for latest changes or revisions and for new
publications relating to materiel covered in this manual.
0023 00-1
TM 9-1240-415-13&P
0023 00
FIELD MANUALS
FM 3-5
NBC Contamination
FM 3-87
Nuclear, Biological and Chemical (NBC)
Reconnaissance and Decontamination Operations
(How to Fight)
FM 21-11
First Aid for Soldiers
FM 23-68
Crew Served Machine Guns, 5.56mm, 7.62mm
FORMS
DA Form 2028
Recommended Changes to Publications and Blank
Forms
DA Form 2404
Equipment Maintenance and Inspection Worksheet
0023 00-2
TM 9-1240-415-13&P
0023 00
FORMS - Continued
DA Form 2407
Maintenance Request
DA Form 2408-9
Equipment Control Record
SF 364
Report of Discrepancy
SF 368
Product Quality Deficiency Report
MISCELLANEOUS PUBLICATIONS
CTA 50-970
CTA 8-100
DA Pam 25-30
DA Pam 738-750
Expendable Items (Except Medical, Class V, Repair
Parts, and Heraldic Items)
Army Medical Department Expendable/Durable
Items.
Consolidated Index of Army Publications and
Blank Forms
Functional User’s Manual for the Army
Maintenance Management System (TAMMS)
0023 00-3
TM 9-1240-415-13&P
0023 00
TECHNICAL BULLETINS
TB 43-0134
Battery Disposition and Disposal
TECHNICAL MANUALS
TM 750-244-7
Procedures for Destruction of Equipment to
Prevent Enemy Use
END OF WORK PACKAGE
0023 00-4
TM 9-1240-415-13&P
0024 00
OPERATOR, UNIT, AND DIRECT SUPPORT
TELESCOPE, STRAIGHT: M145
(NSN 1240-01-411-6350)
MAINTENANCE ALLOCATION CHART INTRODUCTION
INTRODUCTION
The Army Maintenance System MAC
This introduction provides a general explanation of all maintenance and
repair functions authorized at various maintenance levels under the standard
Army Maintenance System concept.
0024 00-1
TM 9-1240-415-13&P
0024 00
INTRODUCTION - Continued
The MAC (immediately following the introduction) designates overall
authority and responsibility for the performance of maintenance functions on
the identified end item of component. The application of the maintenance
functions to the end item or component shall be consistent with the capacities
and capabilities of the designated maintenance levels, which are shown on
the MAC in column (4) as:
Unit – includes two subcolumns, C (operator/crew) and O (unit) maintenance.
Direct Support – includes an F subcolumn.
General Support – includes an H subcolumn.
Depot – includes a D subcolumn.
The tools and test equipment requirements (immediately following the MAC)
list the tools and test equipment (both special tools and common tool sets)
required for each maintenance function as referenced from the MAC.
0024 00-2
TM 9-1240-415-13&P
0024 00
The remarks (immediately following the tools and test equipment
requirements) contain supplemental instructions and explanatory notes for a
particular maintenance function.
Maintenance Functions
Maintenance functions are limited to and defined as follows:
1.
Inspect. To determine the serviceability of an item by comparing its
physical, mechanical, and/or electrical characteristics with established
standards through examination (e.g., by sight, sound, or feel). This
includes scheduled inspection and gagings and evaluation of cannon
tubes.
2.
Test. To verify serviceability by measuring the mechanical, pneumatic,
hydraulic, or electrical characteristics of an item and comparing those
characteristics with prescribed standards on a scheduled basis, i.e., load
testing of lift devices and hydrostatic testing of pressure hoses.
0024 00-3
TM 9-1240-415-13&P
0024 00
INTRODUCTION - Continued
3.
Service. Operations required periodically to keep an item in proper
operating condition; e.g. to clean (includes decontaminate, when
required), to preserve, to drain, to paint, or to replenish fuel, lubricants,
chemical fluids, or gases. This includes scheduled exercising and
purging of recoil mechanisms.
4.
Adjust. To maintain or regulate, within prescribed limits, by bringing
into proper position, or by setting the operating characteristics to
specified parameters.
5.
Align. To adjust specified variable elements of an item to bring about
optimum or desired performance.
0024 00-4
TM 9-1240-415-13&P
0024 00
6.
Calibrate. To determine and cause corrections to be made or to be
adjusted on instruments of test, measuring, and diagnostic equipment
used in precision measurement. Consists of comparisons of two
instruments, one of which is a certified standard of known accuracy, to
detect and adjust any discrepancy in the accuracy of the instrument
being compared.
7.
Remove/Install. To remove and install the same item when required to
perform service or other maintenance functions. Install may be the act
of emplacing, seating, or fixing into position a spare, repair part, or
module (component or assembly) in a manner to allow the proper
functioning of the equipment or system.
8.
Replace. To remove an unserviceable item and install a serviceable
counterpart in its place. "Replace" is authorized by the MAC and
assigned maintenance level is shown as the third position code of the
Source, Maintenance, and Recoverability (SMR) code.
0024 00-5
TM 9-1240-415-13&P
0024 00
INTRODUCTION - Continued
9.
Repair. The application of maintenance services, including fault
location/troubleshooting, removal/installation, disassembly/assembly
procedures, and maintenance actions to identify troubles and restore
serviceability to an item by correcting specific damage, fault,
malfunction, or failure in a part, subassembly, module (component or
assembly), end item, or system.
NOTE
The following definitions are applicable to the "Repair"
maintenance function:
Services – Inspect, test, service, adjust, align, calibrate,
and/or replace.
0024 00-6
TM 9-1240-415-13&P
0024 00
NOTE - CONTINUED
Fault location/troubleshooting – The process of investigating
and detecting the cause of equipment malfunctioning; the
act of isolating a fault within a system or Unit Under Test
(UUT).
Disassembly/assembly – The step-by-step breakdown
(taking apart) of a spare/functional group coded item to the
level of its least component, that is assigned an SMR code
for the level of maintenance under consideration (i.e.,
identified as maintenance significant).
Actions – Welding, grinding, riveting, straightening, facing,
machining, and/or resurfacing.
0024 00-7
TM 9-1240-415-13&P
0024 00
INTRODUCTION - Continued
10.
Overhaul. That maintenance effort (service/action) prescribed to
restore an item to a completely serviceable/operational condition as
required by maintenance standards in appropriate technical
publications. Overhaul is normally the highest degree of maintenance
preformed by the Army. Overhaul does not normally return an item to
like new condition.
11.
Rebuild. Consists of those services/actions necessary for the restoration
of unserviceable equipment to a like new condition in accordance with
original manufacturing standards. Rebuild is the highest degree of
materiel maintenance applied to Army equipment. The rebuild
operation includes the act of returning to zero those age measurements
(e.g. hours/miles) considered in classifying Army
equipment/components.
0024 00-8
TM 9-1240-415-13&P
0024 00
Explanation of Columns in the MAC
Column (1) – Group Number. Column 1 lists FGC numbers, the purpose of
which is to identify maintenance significant components, assemblies,
subassemblies, and modules with the Next Higher Assembly (NHA).
Column (2) – Component/Assembly. Column (2) contains the item names of
components, assemblies, subassemblies, and modules for which maintenance
is authorized.
Column (3) – Maintenance Function. Column (3) lists the functions to be
performed on the item listed in column (2). (For a detailed explanation of
these functions refer to "Maintenance Functions" outlined above.)
0024 00-9
TM 9-1240-415-13&P
0024 00
INTRODUCTION - Continued
Column (4) – Maintenance Level. Column (4) specifies each level of
maintenance authorized to perform each function listed in column (3), by
indicating work time required (expressed as manhours in whole hours or
decimals) in the appropriate subcolumn. This work time figure represents
the active time required to perform that maintenance function at the
indicated level of maintenance. If the number or complexity of the tasks
within the listed maintenance function varies at different maintenance
levels, appropriate work time figures are to be shown for each level. The
work time figure represents the average time required to restore an item
(assembly, subassembly, component, module, end item, or system) to a
serviceable condition under typical field operating conditions. This time
includes preparation time (including any necessary disassembly/assembly
time), troubleshooting/fault location time, and quality assurance time in
addition to the time required to perform the specific tasks identified for the
maintenance functions authorized in the MAC. The symbol designations for
the various maintenance levels are as follows:
0024 00-10
TM 9-1240-415-13&P
C – Operator or crew maintenance
O – Unit maintenance
F – Direct support maintenance
L – Specialized repair activity (SRA)
H – General support maintenance
D – Depot maintenance
NOTE
The "L" maintenance level is not included in
column (4) of the MAC. Functions to this level of
maintenance are identified by a work time figure in
the "H" column of column (4), and an associated
reference code is used in the REMARKS column (6).
This code is keyed to the remarks and the SRA
complete repair application is explained there.
0024 00-11
0024 00
TM 9-1240-415-13&P
0024 00
INTRODUCTION - Continued
Column (5) – Tools and Equipment Reference Code. Column (5) specifies, by
code, those common tool sets (not individual tools), common Test,
Measurement and Diagnostic Equipment (TMDE), and special tools, special
TMDE and special support equipment required to perform the designated
function. Codes are keyed to the entries in the tools and test equipment
table.
Column (6) – Remarks Code. When applicable, this column contains a letter
code, in alphabetical order, which is keyed to the remarks table entries.
Explanation of Columns in the Tools and Test Equipment Requirements
Column (1) – Tool or Test Equipment Reference Code. The tool or test
equipment reference code correlates with a code used in column (5) of the
MAC.
Column (2) – Maintenance Level. The lowest level of maintenance
authorized to use the tool or test equipment.
0024 00-12
TM 9-1240-415-13&P
0024 00
Column (3) – Nomenclature. Name or identification of the tool or test
equipment.
Column (4) – National Stock Number (NSN). The NSN of the tool or test
equipment.
Column (5) – Tool Number. The manufacturer’s part number, model number,
or type number.
Explanation of Columns in the Remarks
Column (1) – Remarks Code. The code recorded in column (6) of the MAC.
Column (2) – Remarks. This column lists information pertinent to the
maintenance function being performed as indicated in the MAC.
END OF WORK PACKAGE
0024 00-13/14 blank
TM 9-1240-415-13&P
OPERATOR, UNIT, AND DIRECT SUPPORT
TELESCOPE, STRAIGHT: M145
(NSN 1240-01-411-6350)
MAINTENANCE ALLOCATION CHART
0025 00-1
0025 00
TM 9-1240-415-13&P
0025 00
Table 1. MAC for the M145 Straight Telescope
(1)
(2)
(3)
(4)
MAINTENANCE
LEVEL
UNIT
GROUP
NUMBER
00
01
COMPONENT/
ASSEMBLY
MAINTENANCE
FUNCTION
C
M145
STRAIGHT
TELESCOPE
WITH CASE
Inspect
Service
Repair
0.1
0.2
M145 SIGHT
ASSEMBLY
Inspect
Service
Repair
Replace
0.1
0.2
0101
BATTERY CAP
ASSEMBLY
Inspect
Replace
0.1
0.1
0102
FILTER
ASSEMBLY/
SRD
Inspect
Replace
0.1
0.1
DS
GS
O
F
H
0.5
0.3
0.2
0.4
0.2
(5)
(6)
TOOLS AND
EQUIPMENT REF
CODE
REMARKS
CODE
1
A
0025 00-2
1
1
A
A
TM 9-1240-415-13&P
0025 00
Table 1. MAC for the M145 Straight Telescope - Continued
(1)
(2)
(3)
(4)
MAINTENANCE
LEVEL
UNIT
GROUP
NUMBER
02
03
COMPONENT
/ASSEMBLY
MAINTENANCE
FUNCTION
DS
GS
H
C
O
F
0.1
0.1
MOUNT
ASSEMBLY
Inspect
Service
Repair
Replace
0.2
0.1
CASE
ASSEMBLY
Inspect
Repair
0.1
0.1
0.5
0.5
0025 00-3
(5)
(6)
TOOLS AND
EQUIPMENT REF
CODE
REMARKS
CODE
A
1,2,3
1,3,4
TM 9-1240-415-13&P
0025 00
Table 2. Tools and Test Equipment for the M145 Straight Telescope.
TOOL OR
TEST
EQUIPMENT
REF CODE
MAINTENANCE
LEVEL
1
O
Tool Kit, Small Arms
Repairman
5180-00-357-7770
SC 5180-95-A07
2
F
Shop Set, Small Arms: Field
Maintenance Basic, Less
Power
4933-00-754-0664
SC 4933-95-A11
3
F
3/8 Special Ground Socket
(see WP 0022 00)
Make from
5120-00-227-6702
A-A-1404
4
F
3/8 in. Drive, 5/32 in.
Hexagon Bit Socket
5120-01-398-7922
9-46669
NOMENCLATURE
0025 00-4
NATIONAL
STOCK NUMBER
TOOL/PART
NUMBER
TM 9-1240-415-13&P
Figure 3. Remarks for M145 Straight Telescope.
REMARKS
CODE
A
REMARKS
Preventive Maintenance Checks and Services (PMCS)
END OF WORK PACKAGE
0025 00-5/6 blank
0025 00
TM 9-1240-415-13&P
0026 00
UNIT AND DIRECT SUPPORT
TELESCOPE, STRAIGHT: M145
(NSN 1240-01-411-6350)
REPAIR PARTS AND SPECIAL TOOLS LIST INTRODUCTION
SCOPE, GENERAL
SCOPE
This RPSTL lists and authorizes spares and repair parts; special tools;
special test, measurement, and diagnostic equipment (TMDE); and other
special support equipment required for the performance of unit and direct
support maintenance of the Telescope. It authorizes the requisitioning, issue,
and disposition of spares, repair parts, and special tools as indicated by the
Source, Maintenance, and Recoverability (SMR) codes.
0026 00-1
TM 9-1240-415-13&P
0026 00
GENERAL
In addition to the Introduction work package, this RPSTL is divided into the
following work packages.
1. Repair Parts List Work Packages. Work packages containing lists of
spares and repair parts authorized by this RPSTL for use in the performance
of maintenance. These work packages also include parts which must be
removed for replacement of the authorized parts. Parts lists are composed of
functional groups in ascending alphanumeric sequence, with the parts in
each group listed in ascending figure and item number sequence. Sending
units, brackets, filters, and bolts are listed with the component they mount
on. Bulk materials are listed by item name in FIG. BULK at the end of the
work packages. Repair parts kits are listed separately in their own
functional group and work package. Repair parts for reparable special tools
are also listed in a separate work package. Items listed are shown on the
associated illustrations.
0026 00-2
TM 9-1240-415-13&P
0026 00
2. Special Tools List Work Packages. Work packages containing lists of
special tools, special TMDE, and special support equipment authorized by
this RPSTL (as indicated by Basis of Issue (BOI) information in the
DESCRIPTION AND USABLE ON CODE (UOC) column). Tools that are
components of common tool sets and/or Class VII are not listed.
3. Cross-Reference Indexes Work Packages. There are two cross-reference
indexes work packages in this RPSTL: the National Stock Number (NSN)
Index Work package and the Part Number (P/N) Index Work Package. The
National Stock Number Index work package refers you to the figure and item
number. The Part Number Index work package refers you to the figure and
item number.
EXPLANATION OF COLUMNS IN THE REPAIR PARTS LIST AND SPECIAL
TOOLS LIST WORK PACKAGES
ITEM NO. (Column (1)). Indicates the number used to identify items called
out in the illustration.
0026 00-3
TM 9-1240-415-13&P
0026 00
EXPLANATION OF COLUMNS IN THE REPAIR PARTS LIST AND SPECIAL
TOOLS LIST WORK PACKAGES – CONTINUED
SMR CODE (Column (2)). The SMR code containing supply/requisitioning
information, maintenance level authorization criteria, and disposition
instruction, as shown in the following breakout:
Source
Code
Maintenance
Code
Recoverability
Code
XX
XX
X
First two positions:
How to get an item.
Third position:
Who can install,
replace, or use
the item.
Fourth position:
Who can do
complete
repair* on the
item.
Fifth position:
Who determines
disposition action
on unserviceable
items.
*Complete Repair: Maintenance capacity, capability, and authority to
perform all corrective maintenance tasks of the "Repair" function in a
use/user environment in order to restore serviceability to a failed item.
0026 00-4
TM 9-1240-415-13&P
0026 00
Source Code. The source code tells you how to get an item needed for
maintenance, repair, or overhaul of an end item/equipment. Explanations of
source codes follow:
Source Code
Application/Explanation
PA
PB
PC
PD
PE
PF
PG
Stock items; use the applicable NSN to
requisition/request items with these source codes.
They are authorized to the level indicated by the code
entered in the third position of the SMR code.
NOTE
Items coded PC are subject to
deterioration.
0026 00-5
TM 9-1240-415-13&P
0026 00
EXPLANATION OF COLUMNS IN THE REPAIR PARTS LIST AND SPECIAL
TOOLS LIST WORK PACKAGES – CONTINUED
Source Code
Application/Explanation
KD
KF
KB
Items with these codes are not to be
requested/requisitioned individually. They are part of
a kit which is authorized to the maintenance level
indicated in the third position of the SMR code. The
complete kit must be requisitioned and applied.
MO - Made at unit level
MF - Made at DS level
MH - Made at GS level
ML - Made at SRA
MD - Made at depot
Items with these codes are not to be
requisitioned/requested individually. They must be
made from bulk material which is identified by the P/N
in the DESCRIPTION AND USABLE ON CODE
(UOC) column and listed in the bulk material group
work package of the RPSTL. If the item is authorized
to you by the third position code of the SMR code, but
the source code indicates it is made at a higher level,
order the item from the higher level of maintenance.
0026 00-6
TM 9-1240-415-13&P
0026 00
Source Code
Application/Explanation
AO - Assembled by
unit level
AF - Assembled by
DS level
AH - Assembled by
GS level
AL - Assembled by
SRA
AD - Assembled by
depot
Items with these codes are not to be
requisitioned/requested individually. The parts that
make up the assembled item must be requisitioned or
fabricated and assembled at the level of maintenance
indicated by the source code. If the third position of
the SMR code authorizes you to replace the item, but
the source code indicates the item is assembled at a
higher level, order the item from the higher level of
maintenance.
XA
Do not requisition an "XA" coded item. Order
the higher assembly. (Refer to NOTE below.)
XB
If an item is not available from salvage, order
it using the CAGEC and P/N.
0026 00-7
TM 9-1240-415-13&P
0026 00
EXPLANATION OF COLUMNS IN THE REPAIR PARTS LIST AND SPECIAL
TOOLS LIST WORK PACKAGES – CONTINUED
Source Code
Application/Explanation
XC
Installation drawings, diagrams, instruction
sheets, field service drawings; identified by
manufacturer’s P/N.
XD
Item is not stocked. Order an XD-coded
item through normal supply channels using the
CAGEC and P/N given, if no NSN is
available.
0026 00-8
TM 9-1240-415-13&P
0026 00
NOTE
Cannibalization or controlled exchange, when authorized,
may be used as a source of supply for items with the above
source codes, except for those items source coded "XA" or
those aircraft support items restricted by requirements of
AR 750-1.
Maintenance Code. Maintenance codes tell you the level(s) of maintenance
authorized to use and repair support items. The maintenance codes are
entered in the third and fourth positions of the SMR code as follows:
Third Position. The maintenance code entered in the third position tells you
the lowest maintenance level authorized to remove, replace, and use the item.
The maintenance code entered in the third position will indicate
authorization to one of the following levels of maintenance:
0026 00-9
TM 9-1240-415-13&P
0026 00
EXPLANATION OF COLUMNS IN THE REPAIR PARTS LIST AND SPECIAL
TOOLS LIST WORK PACKAGES – CONTINUED
Maintenance
Code
Application/Explanation
C
—
Crew or operator maintenance done within unit maintenance.
O
—
Unit level maintenance can remove, replace, and use the item.
F
—
Direct support maintenance can remove, replace, and use the
item.
H
—
General support maintenance can remove, replace, and use the
item.
L
—
Specialized repair activity can remove, replace, and use the item.
D
—
Depot can remove, replace, and use the item.
0026 00-10
TM 9-1240-415-13&P
0026 00
Fourth Position. The maintenance code entered in the fourth position tells
you whether or not the item is to be repaired and identifies the lowest
maintenance level with the capability to do complete repair (perform all
authorized repair functions).
NOTE
Some limited repair may be done on the item at a lower
level of maintenance, if authorized by the Maintenance
Allocation Chart (MAC) and SMR codes.
0026 00-11
TM 9-1240-415-13&P
0026 00
EXPLANATION OF COLUMNS IN THE REPAIR PARTS LIST AND SPECIAL
TOOLS LIST WORK PACKAGES – CONTINUED
Maintenance
Code
Application/Explanation
O
—
Unit is the lowest level that can do complete repair of
the item.
F
—
Direct support is the lowest level that can do complete
repair of the item.
H
—
General support is the lowest level that can do
complete repair of the item.
L
—
Specialized repair activity is the lowest level that can
do complete repair of the item.
D
—
Depot is the lowest level that can do complete repair of
the item.
0026 00-12
TM 9-1240-415-13&P
Maintenance
Code
0026 00
Application/Explanation
Z
—
Nonreparable. No repair is authorized.
B
—
No repair is authorized. No parts or special tools are
authorized for the maintenance of a "B" coded item.
However, the item may be reconditioned by adjusting,
lubricating, etc., at the user level.
Recoverability Code. Recoverability codes are assigned to items to indicate the
disposition action on unserviceable items. The recoverability code is shown in the fifth
position of the SMR code as follows:
Recoverability
Code
Z
—
Application/Explanation
Nonreparable item. When unserviceable, condemn and
dispose of the item at the level of maintenance shown
in the third position of the SMR code.
0026 00-13
TM 9-1240-415-13&P
Recoverability
Code
0026 00
Application/Explanation
O
—
Reparable item. When uneconomically reparable,
condemn and dispose of the item at the unit level.
F
—
Reparable item. When uneconomically reparable,
condemn and dispose of the item at the direct support
level.
H
—
Reparable item. When uneconomically reparable,
condemn and dispose of the item at the general support
level.
D
—
Reparable item. When beyond lower level repair
capability, return to depot. Condemnation and disposal
of item are not authorized below depot level.
L
—
Reparable item. Condemnation and disposal not
authorized below Specialized Repair Activity (SRA).
A
—
Item requires special handling or condemnation
procedures because of specific reasons (such as
precious metal content, high dollar value, critical
material, or hazardous material). Refer to appropriate
manuals/directives for specific instructions.
0026 00-14
TM 9-1240-415-13&P
0026 00
NSN (Column (3)). The NSN of the item is listed in this column.
CAGEC (Column (4)). The Contractor and Government Entity Code
(CAGEC) is a five-digit code which is used to identify the manufacturer,
distributor, or Government agency/activity that supplies the item.
PART NUMBER (Column (5)). Indicates the primary number used by the
manufacturer (individual, company, firm, corporation, or Government
activity), which controls the design and characteristics of the item by means
of its engineering drawings, specifications, standards, and inspection
requirements to identify an item or range of items.
NOTE
When you use an NSN to requisition an item, the item you
receive may have a different P/N from the number listed.
0026 00-15
TM 9-1240-415-13&P
0026 00
EXPLANATION OF COLUMNS IN THE REPAIR PARTS LIST AND SPECIAL
TOOLS LIST WORK PACKAGES – CONTINUED
DESCRIPTION AND USABLE ON CODE (UOC) (Column (6). This column
includes the following information:
1.
The federal item name, and when required, a minimum description to
identify the item.
2.
P/Ns of bulk materials are referenced in this column in the line entry to
be manufactured or fabricated.
3.
Hardness Critical Item (HCI). A support item that provides the
equipment with special protection from electromagnetic pulse (EMP)
damage during a nuclear attack.
4.
The statement END OF FIGURE appears just below the last item
description in column (6) for a given figure in both the repair parts list
and special tools list work packages.
0026 00-16
TM 9-1240-415-13&P
0026 00
QTY (Column (7)). The QTY (quantity per figure) column indicates the
quantity of the item used in the breakout shown on the illustration/figure,
which is prepared for a functional group, subfunctional group, or an
assembly. A "V" appearing in this column instead of a quantity indicates
that the quantity is variable and quantity may change from application to
application.
EXPLANATION OF CROSS-REFERENCE INDEXES WORK PACKAGES
FORMAT AND COLUMNS
1.
National Stock Number (NSN) Index Work Package.
STOCK NUMBER Column. This column lists the NSN in National item
identification number (NIIN) sequence. The NIIN consists of the last nine
digits of the NSN.
NSN
(e.g., 5385-01-574-1476)
NIIN
When using this column to locate an item, ignore the
first four digits of the NSN. However, the complete
NSN should be used when ordering items by stock
number.
0026 00-17
TM 9-1240-415-13&P
0026 00
EXPLANATION OF CROSS-REFERENCE INDEXES WORK PACKAGES
FORMAT AND COLUMNS - Continued
FIG. Column. This column lists the number of the figure where the item is
identified/located. The figures are in numerical order in the repair parts list
and special tools list work packages.
ITEM Column. The item number identifies the item associated with the
figure listed in the adjacent FIG. column. This item is also identified by the
NSN listed on the same line.
2. Part Number (P/N) Index Work Package. P/Ns in this index are listed in
ascending alphanumeric sequence (vertical arrangement of letter and
number combinations which places the first letter or digit of each group in
order A through Z, followed by the numbers 0 through 9 and each following
letter or digit in like order).
PART NUMBER column. Indicates the P/N assigned to the item.
0026 00-18
TM 9-1240-415-13&P
0026 00
FIG. Column. This column lists the number of the figure where the item is
identified/located in the repair parts and special tools list work packages.
ITEM Column. The item number is the number assigned to the item as it
appears in the figure referenced in the adjacent figure number column.
SPECIAL INFORMATION
USABLE ON CODE (UOC). The UOC appears in the lower left corner of the
Description Column heading. Usable on codes are shown as "UOC: ..." in the
Description Column (justified left) on the first line under the applicable
item/nomenclature. Uncoded items are applicable to all models.
Fabrication Instructions. Bulk materials required to manufacture items are
listed in the bulk material functional group of this RPSTL. Part numbers for
bulk material are also referenced in the Description Column of the line item
entry for the item to be manufactured/fabricated. Detailed fabrication
instructions for items source coded to be manufactured or fabricated are
found in WP 0022 00.
0026 00-19
TM 9-1240-415-13&P
0026 00
SPECIAL INFORMATION - Continued
Index Numbers. Items which have the word BULK in the figure column will
have an index number shown in the item number column. This index
number is a cross-reference between the NSN / P/N index work packages and
the bulk material list in the repair parts list work package.
HOW TO LOCATE REPAIR PARTS
1.
When NSNs or P/Ns Are Not Known.
First. Using the table of contents, determine the assembly group to which
the item belongs. This is necessary since figures are prepared for assembly
groups and subassembly groups, and lists are divided into the same groups.
Second. Find the figure covering the functional group or the subfunctional
group to which the item belongs.
0026 00-20
TM 9-1240-415-13&P
0026 00
Third. Identify the item on the figure and note the number(s).
Fourth. Look in the repair parts list work packages for the figure and item
numbers. The NSNs and part numbers are on the same line as the
associated item numbers.
2.
When NSN Is Known.
First. If you have the NSN, look in the STOCK NUMBER column of the NSN
index work package. The NSN is arranged in NIIN sequence. Note the
figure and item number next to the NSN.
Second. Turn to the figure and locate the item number. Verify that the item
is the one you are looking for.
0026 00-21
TM 9-1240-415-13&P
0026 00
HOW TO LOCATE REPAIR PARTS - Continued
3.
When P/N Is Known.
First. If you have the P/N and not the NSN, look in the PART NUMBER
column of the P/N index work package. Identify the figure and item number.
Second. Look up the item on the figure in the applicable repair parts list
work package.
ABBREVIATIONS
Not applicable.
END OF WORK PACKAGE
0026 00-22
TM 9-1240-415-13&P
UNIT AND DIRECT SUPPORT MAINTENANCE
TELESCOPE, STRAIGHT: M145
(NSN 1240-01-411-6350)
M145 STRAIGHT TELESCOPE WITH CASE
REPAIR PARTS LIST
0027 00-1
0027 00
TM 9-1240-415-13&P
0027 00
"
#
!
F ig u r e 1 . M 1 4 5 S tr a ig h t T e le s c o p e
w ith C a s e .
0027 00-2
TM 9-1240-415-13&P
(1)
ITEM
NO.
(2)
SMR
CODE
(3)
NSN
(4)
CAGEC
0027 00
(5)
(6)
(7)
PART
NUMBER
DESCRIPTION AND
USABLE ON CODE
(UOC)
QTY
GROUP 00
FIG. 1 TELESCOPE WITH
CASE, STRAIGHT, M145
1
AFFFF
36126
901581-001
SIGHT ASSEMBLY,
M145 (For assembly
breakdown see
Figure 2) ........................
2
PAFFF
1
1240-21-920-2783
36126
901614-001
.SIGHT ..........................
1
3
PAFFF
1240-21-920-2492
36126
901615-001
.MOUNT
ASSEMBLY (For
assembly breakdown see
Figure 5) ........................
1
4
PAFZZ
5305-00-419-0820
80205
MS16996-10B
..SCREWS ....................
2
5
PAOOO
1240-21-920-2782
36126
204721-001
CASE ASSEMBLY (For
assembly breakdown see
Figure 6) ........................
1
END OF FIGURE
0027 00-3/4 blank
TM 9-1240-415-13&P
UNIT AND DIRECT SUPPORT MAINTENANCE
TELESCOPE, STRAIGHT: M145
(NSN 1240-01-411-6350)
M145 SIGHT ASSEMBLY, PN 901581-001
REPAIR PARTS LIST
0028 00-1
0028 00
1
TM 9-1240-415-13&P
0028 00
3
2
4
F ig u r e 2 . M 1 4 5 S ig h t A s s e m b ly .
0028 00-2
TM 9-1240-415-13&P
(1)
ITEM
NO.
(2)
SMR
CODE
(3)
NSN
(4)
CAGEC
0028 00
(5)
(6)
(7)
PART
NUMBER
DESCRIPTION AND
USABLE ON CODE
(UOC)
QTY
GROUP 01
FIG. 2 ASSEMBLY, M145
SIGHT
1
PCOZZ
6650-21-920-2502
36126
901798-001
CAP ASSEMBLY,
FRONT..........................
2
PCOZZ
6650-21-920-2495
36126
901799-001
CAP ASSEMBLY,
REAR ............................
1
3
PAFZZ
6650-21-920-2508
36126
204138-001
COVER, RUBBER ........
1
4
PAOOO
6160-21-920-2487
36126
901610-001
BATTERY COVER
WITH O-RING (For
assembly breakdown see
Figure 3)........................
1
END OF FIGURE
0028 00-3/4 blank
1
TM 9-1240-415-13&P
UNIT MAINTENANCE
TELESCOPE, STRAIGHT: M145
(NSN 1240-01-411-6350)
BATTERY CAP ASSEMBLY
REPAIR PARTS LIST
0029 00-1
0029 00
TM 9-1240-415-13&P
0029 00
1
2
F ig u r e 3 . B a tte r y C a p A s s e m b ly .
0029 00-2
TM 9-1240-415-13&P
(1)
(2)
ITEM
NO.
SMR
CODE
(3)
NSN
(4)
CAGEC
0029 00
(5)
(6)
(7)
PART
NUMBER
DESCRIPTION AND
USABLE ON CODE
(UOC)
QTY
GROUP 0101
FIG. 3 BATTERY CAP
ASSEMBLY
1
XAOZZ
2
PAOZZ
5331-21-920-3021
36126
204250-001
BATTERY CAP .............
1
36126
022-2347
O-RING .........................
1
*See expendables for battery NSN
END OF FIGURE
0029 00-3/4 blank
TM 9-1240-415-13&P
UNIT MAINTENANCE
TELESCOPE, STRAIGHT: M145
(NSN 1240-01-411-6350)
LASER FILTER ASSEMBLY/SRD
REPAIR PARTS LIST
0030 00-1
0030 00
2
TM 9-1240-415-13&P
1
F ig u r e 4 . L a s e r F ilt e r A s s e m b ly /S R D .
0030 00-2
0030 00
TM 9-1240-415-13&P
(1)
(2)
ITEM
NO.
SMR
CODE
(3)
NSN
0030 00
(4)
(5)
(6)
(7)
CAGEC
PART
NUMBER
DESCRIPTION AND
USABLE ON CODE
(UOC)
QTY
GROUP 0102
FIG. 4 LASER FILTER
ASSEMBLY/SRD
1
PAOZZ
6650-21-920-2497
36126
901518-001
FILTER
ASSEMBLY....................
1
2
PAOZZ
6650-21-920-2496
36126
901613-001
SIGNATUREREDUCTION
DEVICE..........................
1
END OF FIGURE
0030 00-3/4 blank
TM 9-1240-415-13&P
DIRECT SUPPORT MAINTENANCE
TELESCOPE, STRAIGHT: M145
(NSN 1240-01-411-6350)
MOUNT ASSEMBLY, PN 901615-001
REPAIR PARTS LIST
0031 00-1
0031 00
TM 9-1240-415-13&P
0031 00
8
1 2
3
4
5
9
1 0
6
7
F ig u r e 5 . M o u n t A s s e m b ly .
0031 00-2
TM 9-1240-415-13&P
(1)
(2)
ITEM
NO.
SMR
CODE
(3)
NSN
0031 00
(4)
(5)
(6)
(7)
CAGEC
PART
NUMBER
DESCRIPTION AND
USABLE ON CODE
(UOC)
QTY
GROUP 02
FIG. 5 MOUNT ASSEMBLY
1
PCFZZ
TBD
36126
204788-001
2
PAFZZ
5310-21-920-2488
36126
204782-001
NUT ................................. 1
3
PAFZZ
TBD
92830
C0360-055-0560M
SPRING........................... 1
4
PAFZZ
5355-01-466-4063
19200
12598124
TORQUE KNOB.............. 1
5
PAFZZ
5310-01-465-1402
19200
12598125
TORQUE NUT................. 1
6
PAFZZ
5310-01-466-4061
36126
12598127
FLAT WASHER............... 1
7
PAFZZ
1240-21-920-2514
36126
204723-001
LOCKING BAR................ 1
8
PAFZZ
5305-00-141-6179
80205
NAS1352C02-5
SCREW, SOCKET
HEAD .............................. 1
0031 00-3
PLUG, PROTECTIVE,
DUST............................... 1
TM 9-1240-415-13&P
(1)
(2)
ITEM
NO.
SMR
CODE
(3)
NSN
0031 00
(4)
(5)
(6)
(7)
CAGEC
PART
NUMBER
DESCRIPTION AND
USABLE ON CODE
(UOC)
QTY
GROUP 02
FIG. 5 MOUNT ASSEMBLY
9
PAFZZ
3040-01-466-4062
19200
12598123
SHAFT ...........................
1
10
PCFZZ
TBD
36126
204959-001
SHIM ..............................
4
END OF FIGURE
0031 00-4
TM 9-1240-415-13&P
UNIT MAINTENANCE
TELESCOPE, STRAIGHT: M145
(NSN 1240-01-411-6350)
CASE ASSEMBLY, PN 204721-001
REPAIR PARTS LIST
0032 00-1
0032 00
TM 9-1240-415-13&P
0032 00
1
2
F ig u r e 6 . C a s e A s s e m b ly .
0032 00-2
TM 9-1240-415-13&P
(1)
(2)
ITEM
NO.
SMR
CODE
(3)
NSN
(4)
0032 00
(5)
(6)
(7)
PART NUMBER
DESCRIPTION AND
USABLE ON CODE
(UOC)
QTY
CAGEC
GROUP 03
FIG. 6 CASE ASSEMBLY
1
XAOZZ
2
PAOZZ
5340-00-753-5580
36126
NPN
CASE ............................. 1
81349
MILH9890TYPE10
KEEPER, BELT
STRAP........................... 2
END OF FIGURE
0032 00-3/4 blank
TM 9-1240-415-13&P
UNIT AND DIRECT SUPPORT MAINTENANCE
TELESCOPE, STRAIGHT: M145
(NSN 1240-01-411-6350)
NATIONAL STOCK NUMBER INDEX
STOCK NUMBER
FIG.
ITEM
5305-00-141-6179
5340-00-753-5580
5310-01-465-1402
5310-01-466-4061
5355-01-466-4063
6160-21-920-2487
5310-21-920-2488
1240-21-920-2492
6650-21-920-2495
6650-21-920-2496
6650-21-920-2497
6650-21-920-2502
6650-21-920-2508
1240-21-920-2514
1240-21-920-2782
1240-21-920-2783
5
6
5
5
5
2
5
1
2
4
4
2
2
5
1
1
8
2
5
6
4
4
2
3
2
2
1
1
3
7
5
2
0033 00-1/2 blank
0033 00
TM 9-1240-415-13&P
0034 00
UNIT AND DIRECT SUPPORT MAINTENANCE
TELESCOPE, STRAIGHT: M145
(NSN 1240-01-411-6350)
PART NUMBER INDEX
PART NUMBER
C0360-055-056M
MIL-H-9890TYPE 10
MS16996-10B
NAS1352C02-5
022-2347
12598124
12598125
12598127
204138-001
204250-001
204663-001
204721-001
204723-001
204782-001
FIG.
5
6
1
5
3
5
5
5
2
3
5
1
5
5
ITEM
3
2
4
8
2
4
5
6
3
1
9
5
7
2
PART NUMBER
204788-001
204959-001
901518-001
901581-001
901610-001
901613-001
901614-001
901615-001
901798-001
901799-001
0034 00-1/2 blank
FIG.
5
5
4
1
2
4
1
1
2
2
ITEM
1
10
1
1
4
2
2
3
1
2
TM 9-1240-415-13&P
0035 00
OPERATOR
TELESCOPE, STRAIGHT: M145
(NSN 1240-01-411-6350)
COMPONENTS OF END ITEM (COEI) AND BASIC ISSUE ITEMS (BII) LISTS
INTRODUCTION
Scope
This work package lists COEI and BII for the telescope to help you inventory
items for safe and efficient operation of the equipment.
General
The COEI and BII information is divided into the following lists:
0035 00-1
TM 9-1240-415-13&P
0035 00
INTRODUCTION - Continued
Components of End Item (COEI). There are no COEI for the telescope.
Basic Issue Items (BII). These essential items are required to place the
telescope in operation, operate it, and to do emergency repairs. Although
shipped separately packaged, BII must be with the telescope during
operation and when it is transferred between property accounts. Listing
these items is your authority to request/requisition them for replacement
based on authorization of the end item by the TOE/MTOE. Illustrations are
furnished to help you find and identify the items.
0035 00-2
TM 9-1240-415-13&P
0035 00
Explanation of Columns in the BII List
Column (1) — Illus Number. Gives you the number of the item illustrated.
Column (2) — National Stock Number (NSN). Identifies the stock number of
the item to be used for requisitioning purposes.
Column (3) — Description, CAGEC, and Part Number. Identifies the Federal
item name (in all capital letters) followed by a minimum description when
needed. The stowage location of COEI and BII is also included in this
column. The last line below the description is the CAGEC (Commercial and
Government Entity Code) (in parentheses) and the part number.
Column (4) — Usable On Code. When applicable, gives you a code if the item
you need is not the same for different models of equipment.
Column (5) — Unit of Measure (U/M). Indicates the physical measurement
or count of the item as issued per the National Stock Number shown in
column (2).
Column (6) — Qty Rqr. Indicates the quantity required.
0035 00-3
TM 9-1240-415-13&P
0035 00
BASIC ISSUE ITEMS (BII) LIST
Table 1. Basic Issue Items List.
(1)
ILLUS
NUMBER
(2)
NATIONAL
STOCK
NUMBER
1
(3)
DESCRIPTION,
CAGEC, AND
PART NUMBER
MANUAL,
TECHNICAL,
OPERATOR’S,
UNIT, AND
DIRECT SUPPORT
MAINTENANCE
END OF WORK PACKAGE
0035 00-4
(4)
(5)
(6)
USABLE
ON CODE
U/M
QTY
RQR
EA
1
TM 9-1240-415-13&P
0036 00
UNIT AND DIRECT SUPPORT MAINTENANCE
TELESCOPE, STRAIGHT: M145
(NSN 1240-01-411-6350)
EXPENDABLE AND DURABLE ITEMS LIST
INTRODUCTION
Scope
This work package lists expendable and durable items that you will need to
operate and maintain the telescope. This list is for information only and is
not authority to requisition the listed items. These items are authorized to
you by CTA 50-970, Expendable/Durable Items (Except Medical, Class V,
Repair Parts, and Heraldic Items), or CTA 8-100, Army Medical Department
Expendable/Durable Items.
0036 00-1
TM 9-1240-415-13&P
0036 00
Explanation of Columns in the Expendable/Durable Items List
Column (1) – Item Number. This number is assigned to the entry in the list
and is referenced in the narrative instructions to identify the item (e.g., Use
optical lens cleaning compound (item 2, WP 0036 00)).
Column (2) – Level. This column identifies the lowest level of maintenance
that requires the listed item (C = Operator/Crew, O = Unit, F = Direct
Support).
Column (3) – National Stock Number (NSN). This is the NSN assigned to the
item which you can use to requisition it.
Column (4) – Item Name, Description, Commercial and Government Entity
Code (CAGEC), and Part Number (P/N). This column provides the other
information you need to identify the item.
Column (5) – Unit of Measure (U/M). This code shows the physical
measurement or count of an item, such as gallon, dozen, gross, etc.
0036 00-2
TM 9-1240-415-13&P
0036 00
EXPENDABLE AND DURABLE ITEMS LIST
Table 1. Expendable and Durable Items List.
(1)
(2)
(3)
ITEM
NUMBER
LEVEL
NATIONAL
STOCK
NUMBER
1
O
6135-01-3985922
Battery
(OE890) DL1/3N
EA
2
O
6850-00-3929751
Cleaning Compound,
Optical Lens
(06650) Lens Cleaner
OZ
3
O
6850-00-7542671
Compound, Anti-fogging
OZ
0036 00-3
(4)
ITEM NAME,
DESCRIPTION,
CAGEC, PART
NUMBER
(5)
U/M
TM 9-1240-415-13&P
0036 00
EXPENDABLE AND DURABLE ITEMS LIST - Continued
Table 1. Expendable and Durable Items List – Continued.
(1)
(2)
(3)
ITEM
NUMBER
LEVEL
NATIONAL
STOCK
NUMBER
4
O
8030-01-3030502
Locktite 680
(05972) 68035
BT
5
O
6640-00-6630832
Paper, Lens, Type 1
(81348) NNN-P-40
BK
0036 00-4
(4)
ITEM NAME,
DESCRIPTION,
CAGEC, PART
NUMBER
(5)
U/M
TM 9-1240-415-13&P
0036 00
Table 1. Expendable and Durable Items List – Continued.
(1)
(2)
(3)
ITEM
NUMBER
LEVEL
NATIONAL
STOCK
NUMBER
6
O
8030-00-1818372
(4)
ITEM NAME,
DESCRIPTION,
CAGEC, PART
NUMBER
Primer, Sealing
Compound
(05972) 74756
END OF WORK PACKAGE
0036 00-5/6 blank
(5)
U/M
CN
TM 9-1240-415-13&P
INDEX
Subject
WP Sequence No. - Page No.
A
Assembly and Preparation for Use ..................................
0005 00-1
B
Basic Issue Items (BII) ....................................................
Battery Cap O-ring Maintenance .....................................
Battery Maintenance ........................................................
0035 00-1
0016 00-1
0015 00-1
C
Cleaning ...........................................................................
Components of End Item .................................................
Controls and Indicators, Operator ...................................
Corrosion Prevention and Control (CPC) ........................
1
0010 00-1
0035 00-1
0004 00-1
0001 00-3
TM 9-1240-415-13&P
INDEX
Subject
WP Sequence No. - Page No.
D
Description and Use of Operator
Controls and Indicators ..............................................
Destruction of Army Materiel to Prevent
Enemy Use ..................................................................
0004 00-1
0001 00-5
E
Equipment Characteristics, Capabilities,
and Features ...............................................................
Equipment Data ...............................................................
Expendable and Durable Items List .................................
2
0002 00-1
0002 00-7
0036 00-1
TM 9-1240-415-13&P
INDEX - Continued
Subject
WP Sequence No. - Page No.
G
General Information - Scope ............................................
0001 00-1
H
How To Use This Manual ................................................
viii
I
Illustrated List of Manufactured Items .............................
0022 00-1
L
Lens Cleaning Procedures ...............................................
3
0010 00-1
TM 9-1240-415-13&P
INDEX - Continued
Subject
WP Sequence No. - Page No.
L
Lens Cover Maintenance .................................................
List of Effective Pages .....................................................
Location and Description of Major Components .............
0017 00-1
A
0002 00-5
M
Maintenance Allocation Chart
Introduction ................................................................
Table ...........................................................................
Maintenance Forms, Records, and Reports .....................
Mount Assembly Maintenance ........................................
4
0024 00-1
0025 00-1
0001 00-2
0019 00-1
TM 9-1240-415-13&P
INDEX - Continued
Subject
WP Sequence No. - Page No.
N
National Stock Number (NSN) Index ..............................
Nomenclature Cross Reference List ................................
Nuclear, Biological, and Chemical (NBC)
Contamination ............................................................
0033 00-1
0001 00-6
0007 00-4
O
Operating Procedures ......................................................
Operation Under Usual Conditions .................................
Operation Under Unusual Conditions .............................
Operator Controls and Indicators ....................................
Ozone Depleting Substances ...........................................
5
0006 00-1
0006 00-1
0007 00-1
0004 00-1
0001 00-5
TM 9-1240-415-13&P
INDEX - Continued
Subject
WP Sequence No. - Page No.
P
Part Number Index ..........................................................
Preparation for Storage or Shipment ...............................
Preventive Maintenance Checks and Services (PMCS)
Introduction, Unit .......................................................
PMCS Procedures, Unit .............................................
0034 00-1
0001 00-5, 0011 00-1
0013 00-1
0014 00-1
R
References .......................................................................
Repair Parts and Special Tools List
Introduction ................................................................
Parts Lists ...................................................................
6
0023 00-1
0026 00-1
0027 00 thru 0032 00
TM 9-1240-415-13&P
INDEX - Continued
Subject
WP Sequence No. - Page No.
R
Reporting Equipment Improvement
Recommendations (EIR) ............................................
Reporting Errors and Recommending
Improvements .............................................................
Rubber Cover Maintenance .............................................
0001 00-3
ii
0020 00-1
S
Service Upon Receipt ......................................................
Signature Reduction Device (SRD) and
Laser Filter Maintenance ............................................
Supporting Information for Repair Parts, Special
Tools, TMDE, and Support Equipment ......................
7
0012 00-1
0018 00-1
0001 00-6
TM 9-1240-415-13&P
INDEX - Continued
Subject
WP Sequence No. - Page No.
T
Theory of Operation ........................................................
Torque Limiting Knob/Shaft Maintenance ......................
Troubleshooting
Direct Support ............................................................
Unit ............................................................................
0003 00-1
0021 00-1
0009 00-1
0008 00-1
U
Unusual Environments and Weather ...............................
0007 00-2
W
Warning Summary ...........................................................
Warranty ..........................................................................
8
a
0001 00-5
By Order of the Secretary of the Army:
ERIC K. SHINSEKI
General, United States Army
Chief of Staff
Official:
JOEL B. HUDSON
Administrative Assistant to the
Secretary of the Army
9935401
DISTRIBUTION:
To be distributed in accordance with initial distribution number (IDN) 410462
requirements for TM 9-1240-415-13&P.
PIN: 077547-000