1
DIGITAL CAMERA
)C)
User's Manual
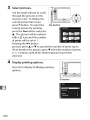
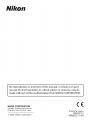
Active D-Lighting preserves details in highlights and shadows,
creating photographs with natural contrast. Use for high contrast
scenes, for example when photographing
brightly lit outdoor
scenery through a door or window or taking pictures of shaded
subjects on a sunny day.
Active D-Lighting
off
Active D-Lighting:
Auto
Active D-Lighting
off
Active D-Lighting:
High
179
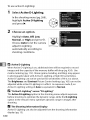
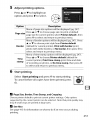
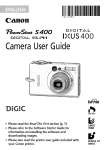
To use active D-Lighting:
1
Select Active D-Lighting.
In the shooting menu (pg. 268),
highlight Active D-lighting
and press I_.
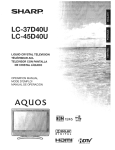
2
Choosean
option.
Highlight Auto, Off, Low,
Normal, or High and press _).
Choose Auto to let the camera
adjust D-Lighting
automatically according
shooting conditions.
_[I_
to
Active D-Lighting
When Active D-Lighting
is on, additional
time will be required
images and the capacity
of the memory
buffer will drop (pg. 424). Use
to record
matrix metering (pg. 112). Noise (grains, banding, mottling) may appear
in photographs
taken with Active D-Lighting at high ISO sensitivities.
Active D-Lighting
The Brightness
can not be used at ISO sensitivities
and Contrast
of Hi 0.3 or above.
Picture Control settings (pg. 165) can not be
adjusted while active D-Lighting is in effect. In exposure mode !I, an
Active D-Lighting setting of Auto is equivalent to Normal.
[I_ "Active
D-Lighting"versus
The Active D-Lighting
option
"D-Lighting"
in the shooting
menu adjusts exposure
before shooting to optimize the dynamic range, while the D-Lighting
option in the retouch menu optimizes dynamic range in images after
shooting.
[]
The Shooting
Active D-Lighting
display
180
(pg. 15).
Information
Display
can also be adjusted
from the shooting
information
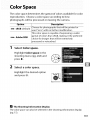
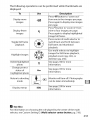
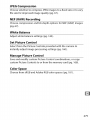
Thecolorspace
determines
thegamutofcolorsavailable
forcolor
reproduction.
Choose
acolorspace
according
tohow
photographs
willbeprocessed
onleaving
thecamera.
Option
Description
sRGBsRGB (default)
Choose for photographs
that will be printed
used "as is:' with no further modification.
This color space is capable
AdobeAdobe
RGB
of expressing
or
a wider
gamut of colors than sRGB, making it the preferred
choice for images that will be extensively
processed or retouched.
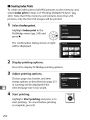
1
Select Color space.
Highlight Color space in the
shooting menu (pg. 268) and
press I_.
2
Select
a color
space.
Highlight the desired option
and press 0.
[]
The Shooting
Information
Display
The color space can also be selected
(pg. 15).
in the shooting
information
display
181
[]
Color Space
Color spaces define the correspondence
values that represent
widely
used, while
them
between
colors and the numeric
in a digital image file. The sRGB color space is
the Adobe RGB color space is typically
used in
publishing and commercial printing,
sRGB is recommended
when taking
photographs
that will be printed without modification
or viewed in
applications
that do not support
photographs
that will be printed
on some household
color management,
or when taking
with ExifPrint, the direct printing
printers, or kiosk printing
or other commercial
services. Adobe RGB photographs
can also be printed
options, but colors will not be as vivid.
JPEG photographs
taken in the Adobe
DCF 2.0 compliant;
applications
print
using these
RGB color space are Exif 2.21 and
and printers that support
DCF 2.0 will select the correct color space automatically.
or device does not support
option
Exif 2.21 and
If the application
Exif 2.21 and DCF 2.0, select the appropriate
color space manually. An ICC color profile is embedded
in TIFF
photographs
taken in the Adobe RGB color space, allowing applications
that support
color management
space. For more information,
application
[]
select the correct color
provided
with the
or device.
Nikon Software
ViewNX (supplied)
select the correct
the D700.
182
to automatically
see the documentation
and Capture
NX 2 (available
color space when
opening
separately)
photographs
automatically
created with
Flash Photography
-
Using the Built-in
This chapter
The Built-in
Flash
describes how to use the built-in
flash.
Flash ...........................................................
Using the Built-in
pg. 184
Flash ................................................ pg. 185
Flash Modes ....................................................................
pg. 188
Flash Corn pensation .....................................................
pg. 190
FV Lock ...........................................................................
pg. 192
183
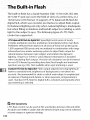
The built-in flash has a Guide Number (GN) 17/56 (m/ft, ISO 200,
20 °C/68 °F) and can cover the field of view of a 24mm lens, or a
16mm lens in DX format. It supports i-TTL balanced fill-flash for
digital SLR, which uses monitor pre-flashes to adjust flash output
for balanced lighting not only when natural lighting is inadequate
but when filling in shadows and backlit subjects or adding a catch
light to the subject's eyes. The following types of i-TTL flash
control are supported:
i-TTLbalancedfill-flash fordigital SLR:Speedlight
invisible
preflashes
(monitor
preflashes)
emits series of nearly
immediately
before
main flash.
Preflashes reflected from objects in all areas of frame are picked up by
1,00S-segment RGB sensor and are analyzed in combination
with range
information
natural
from matrix metering
balance between
system to adjust flash output
main subject and ambient
for
background
lighting.
If type G or D lens is used, distance information
is included
when calculating flash output.
Precision of calculation can be increased
for non-CPU lenses by providing
aperture;
see pg. 210).
lens data (focal length and maximum
Not available
when spot metering
is used.
Standardi-TTLflashfordigital SLR:Flash output adjusted to bring lighting
frame to standard level; brightness of background
is not taken into
account.
Recommended
at expense of background
for shots in which
in
main subject is emphasized
details, or when exposure
used. Standard i-TTL flash for digital SLR is activated
spot metering is selected.
compensation
automatically
is
when
ISO Sensitivity
i-TTL flash control can be used at ISO sensitivities
At values over 6400 or under 200, the desired
at some ranges or aperture
184
settings.
between
200 and 6400.
results may not be achieved
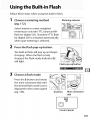
Follow these steps when using the built-in
1
Choosea metering
flash.
method
Metering
selector
(pg. 112).
Select matrix or center-weighted
metering to activate i-TTL balanced fillflash for digital SLR. Standard i-TTL flash
for digital SLR is activated automatically
when spot metering is selected.
2
Press the flash pop-up
button.
The built-in flash will pop up and begin
charging. When the flash is fully
charged, the flash-ready indicator (2)
will light.
Flash pop-u_ button
3
Choose a flash mode.
Press the _ button and rotate
the main command dial until
the desired flash mode icon is
displayed in the control panel
(pg. 188).
button
Main command
dial
U.U
©
Control
panel
185
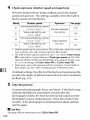
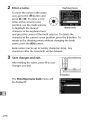
4
Check exposure
(shutter speed and aperture).
Press the shutter-release button halfway and check shutter
speed and aperture. The settings available when the built-in
flash is raised are listed below.
_=Mode'='_°:::_--S°h_uiter=s_l_cl-_'
:'_'
p
s_°eepa=g_e
='°
Set automatically by camera
(1/250
S-1/60
Value selected by user
(1/2s0s-30 s)2
R
Set automatically by camera
!I
1 Shutter
S)1,
by camera
speed
119
The built-in
as 30s in slow
sync with
reduction
flash
FP) is selected
by user 3
may be set as slow
supports
for Custom
SB-900,
red-eye
speeds
Setting
118
Value selected
2
Value selected by user
(1/2s0s-30 s)2
sync, and slow
Optional
S-1/60
116
Set automatically
S) 1, 2
,5
(1/250
2
Aperture
of up to
el
(Flash
SB-800 and SB-600 flash
sync, slow
flash
1/320
sync
units
121
rear-curtain
modes.
S
when
speed,
support
1/320
s {Auto
pp. 305-306).
speeds
of up
to 1/8.000
s at settings of 11320s (Auto FP) or 11250s (Auto FP).
3 Flashrangevaries with aperture and ISOsensitivity.
Consult table of
flash ranges (pg. 427) when setting aperture in Aand/I, modes.
At default settings, the effects of the flash can be previewed by
pressing the depth-of-field
preview button to emit a modeling
preflash (pg. 315).
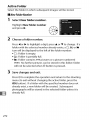
S
Takethe
picture.
Compose the photograph, focus, and shoot. If the flash-ready
indicator ($) blinks for about three seconds after the
photograph
is taken, the flash has fired at full output and the
photograph
may be underexposed.
Check the results in the
monitor. If the photograph
is underexposed, adjust settings
and try again.
[]
See Also
See page 306 for information on 11320 s (Auto FP).
186
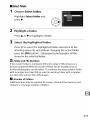
Lowering
the Built-in
Flash
To save power when the flash is not in use,
press it gently downward
clicks into place.
until the latch
[I_ The Built-in Flash
Use with lenses with focal lengths
of 24-300
mm in FX format
(pg. 374).
Remove lens hoods to prevent shadows. The flash has a minimum
range
of 60 cm (2 ft.) and can not be used in the macro range of macro zoom
lenses.
If the flash fires in continuous release mode (pg. 86), only one picture will
be taken each time the shutter-release
button is pressed.
The shutter release may be briefly disabled to protect the flash after it has
been used for several consecutive shots. The flash can be used again after
a short pause.
[]
See Also
See page 192 for information
on locking
subject before recomposing
a photograph.
For information
a flash sync speed, see Custom Setting
on choosing
(Flash sync speed, pg. 305).
flash value (FV) for a metered
For information
on choosing
el
the slowest
shutter speed available when using the flash, see Custom Setting e2
(Flash shutter speed, pg. 308). For information
on using the built-in flash
in commander
mode, see Custom Setting
e3 (Flash cntrl for built-in
flash, pg. 309).
See page 377 for information
information
on using optional
on the range of the built-in
flash units.
For
flash, see page 427.
187
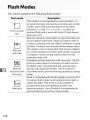
Flash
Modes
The camera supports
_-_ash-'mode
the following
flash modes:
'"T_
Description
This mode is recommended
programmed
Front-curtain
sync
for most situations.
auto and aperture-priority
In
auto modes,
shutter speed will automatically
be set to values
between 1/2s0 and 1/60s (1/8,000to 1/60 s when an
optional
flash unit is used with Auto FP High-Speed
Sync) (pg. 377).
Red-eye reduction lamp lights for approximately
one
second before main flash. Pupils in subject's eyes to
Red-eye
reduction
contract,
reducing
by flash.
Owing to one-second
is required.
Avoid moving
)ortraits
caused
shutter-release
delay,
with moving subjects
quick shutter response
camera while red-eye
lamp is lit.
Combines
slow sync
effect sometimes
this mode is not recommended
or in other situations in which
reduction
Red-eye
reduction with
"red-eye"
red-eye reduction
with slow sync. Use for
taken against a backdrop
Available only in programmed
priority auto exposure modes.
recommended
shake.
to prevent
Flash is combined
blurring
with shutter
of night scenery.
auto and apertureUse of a tripod is
caused by camera
speeds as slow as 30 s
to capture both subject and background at night or
under dim light. This mode is only available in
programmed
Slow sync
exposure
)revent
188
auto and aperture-priority
modes.
blurring
Use of tripod
auto
is recommended
caused by camera shake.
to
U
Rear-curtain
In shutter-priority
auto or manual
exposure
flash fires just before the shutter closes.
mode,
Use to create
sync effect of a stream of light behind moving objects. In
programmed
auto and aperture-priority
auto, slow
rear-curtain
sync is used to capture both subject and
background.
Slow rear-curtain
Use of tripod
_revent blurring
is recommended
to
caused by camera shake.
sync
[]
Flash Control
Mode
The shooting information
display shows the flash control mode for the
built-in flash (Built-in) and for optional flash units attached to the camera
accessory
shoe (Optional) as follows:
1 Available with SB-900 and SB-800 only.
2 Flash control mode for built-in flash can be selected using Custom Setting e3
(Flash cntrl for built-in flash, pg. 309).
[]
See Also
See Custom Setting
el (Flash sync speed, pg. 305) for information
on
flash sync speeds as fast as 1/32os.
189
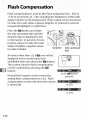
Flash compensation
is used to alter flash output by from -3 EV to
+1 EV in increments of 1/3 EV, changing the brightness of the main
subject relative to the background.
Flash output can be increased
to make the main subject appear brighter, or reduced to prevent
unwanted highlights or reflections.
Press the _ button and rotate
the sub-command
dial until the
desired value is displayed in the
control panel. In general, choose
positive values to make the main
subject brighter, negative values
to make it darker.
At values other than _+0,a _
button
Sub-command
dial
icon will be
displayed in the control panel and
viewfinder after you release the _ button.
The current value for flash compensation
can be confirmed by pressing the
button.
Normal flash output can be restored by
setting flash compensation
to _+0.0. Flash
compensation
is not reset when the camera
is turned off.
+0 EV(1_1_
button
pressed)
-0.3 EV
+1.0 EV
190
[]
Optional
Flash Units
Flash compensation
is also available
SB-400, and SB-R200 flash units.
[]
with optional
SB-900, SB-800, SB-600,
See Also
For information
setting
on choosing the size of the increments available
flash compensation,
see Custom Setting
when
b3 (Exp comp/fine
tune,
pg. 292).
191
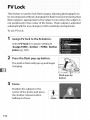
This feature is used to lock flash output, allowing photographs to
be recomposed without changing the flash level and ensuring that
flash output is appropriate to the subject even when the subject is
not positioned in the center of the frame. Flash output is adjusted
automatically
for any changes in ISO sensitivity and aperture.
To use FV lock:
1
Assign FV lock to the Fnbutton.
Select FV lock for Custom Setting f5
(Assign FUNC. button > FUNC. button
press, pg. 320).
2
Press the flash
pop-up
button.
The built-in flash will pop up and begin
charging.
Flash pop-up
button
3
Focus.
Position the subject in the
center of the frame and press
the shutter-release button
halfway to focus.
192
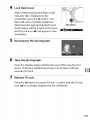
4
Lock flash level.
After confirming that the flash ready
indicator (_) is displayed in the
viewfinder, press the Fn button. The
flash will emit a monitor preflash to
determine the appropriate flash level.
Flash output will be locked at this level
and FV lock icon (_) will appear in the
viewfinder.
S
Recompose the photograph.
6
Takethe
Fnbutton
photograph.
Press the shutter-release button the rest of the way down to
shoot. If desired, additional pictures can be taken without
releasing FV lock.
7
Release
FV lock.
Press the Fnbutton to release FV lock. Confirm
icon (_) is no longer displayed
that the FV lock
in the viewfinder.
193
[I_ Using FV Lock with the Built-in Flash
FV lock is only available
option)
with the built-in
flash when TTL (the default
is selected for Custom Setting e3 (Flash cntrl for built-in
flash,
pg. 309).
[]
Using FV Lock with Optional
FV lock is also available
Flash Units
with SB-900, SB-800, SB-600, SB-400, and SB-R200
flash units (available separately). Set the optional flash to TTL mode (the
SB-900 and SB-800 can also be used in AA mode; see the flash manual for
details).
While FV lock is in effect, flash output
adjusted
for changes in flash zoom head position.
When Commander
for built-in
will automatically
mode is selected for Custom Setting
e3 (Flash cntrl
flash, pg. 309), FV lock can be used with remote
SB-900,
SB-800, SB-600, or SB-R200 flash units if (a) any of the built-in
group
A, or flash group
entirely
[]
B is in TTL mode, or (b) a flash group
Metering
areas for FV lock when
Speedlight
using optional
speedlight
are as
Flash mode
i-TTL
Stand-alone
flash unit
Used with other flash
AA
i-TTL
units (Advanced
AA
Wireless Lighting)
A (master flash
5-mm circle in center of frame
Area metered
by flash exposure
meter
Entire frame
Area metered
by flash exposure
meter
See Also
For information
on using the depth-of-field
preview or AE-I./AF-Lbutton for
FV lock, see Custom Setting f6 (Assign preview button,
Custom Setting f7 (Assign AE-LIAF-L button, pg. 325).
194
flash, flash
is composed
of SB-900 and SB-800 flash units in TTL or AA mode.
The metering
follows:
[]
be
pg. 324) or
OtherShootingOptions
This chapter covers restoring default settings, making multiple
exposures, interval timer photography, and using GPS units and
non-CPU lenses.
Two-Button
Multiple
Reset: Restoring
Default Settings ........ pg. 196
Exposure .........................................................
Interval Timer Photography
pg. 198
........................................ pg. 203
Non-CPU Lenses ............................................................
pg. 210
Using a GPS Unit ............................................................
pg. 213
195
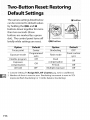
The camera settings listed below
can be restored to default values
by holding the QUA/and []
buttons down together for more
than two seconds (these
buttons are marked by a green
dot). The control panel turns off
briefly while settings are reset.
Option
Focus point
Flexible program
Exposure
compensation
AE hold
Option
Bracketing
Programmed
auto
Off
Setting
of shots is reset to zero.
f7 (Assign
bracketing)
Front-curtain
Flash mode
sync
Flash
Off
FV lock
Off 1
1 Custom
Default
Off 2
compensation
Off
2 Number
196
QUALbutton
Default
Center
Exposure mode
(exposure/flash
[] button
Multiple
AE-L/AF-L
button,
Bracketing
or 1 (white
Off
exposure
Off
pg. 325) is unaffected.
increment
balance
is reset to 1EV
bracketing).
The following shooting-menu
options will also be reset. Only
settings in the bank currently selected using the Shooting menu
bank option will be reset (pg. 269). Settings in the remaining
banks are unaffected.
* Fine-tuning
off.
If the current Picture Control has been modified,
for the Picture Control will also be restored.
[]
existing settings
See Also
Seepage 418 for a list of default settings.
197
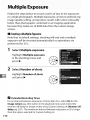
Follow the steps below to record a series of two to ten exposures
in a single photograph.
Multiple exposures can be recorded at any
image quality setting, and produce results with colors noticeably
better than photographs combined in an imaging application
because they make use of RAW data from the camera image
sensor.
II Creating a Multiple Exposure
Note that at default settings, shooting will end and a multiple
exposure will be recorded automatically
if no operations are
performed for 30 s.
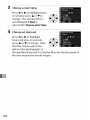
1
Select Multiple
exposure.
Highlight Multiple exposure
in the shooting menu and
press I_.
2
Select Number of shots.
Highlight Number of shots
and press I_.
[]
Extended
Recording
Times
For an interval
between
Image review
(pg. 265) option
monitor-off
exposures
menu and extend the
delay for image review using Custom Setting
delay, pg. 297). The maximum
than the option
198
of more than 30 s, select On for the
in the playback
interval between
selected for Custom Setting
c4.
c4 (Monitor
exposures
off
is 30 s longer
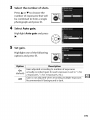
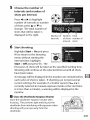
3
Select the number
Press •
or •
of shots.
to choose the
number of exposures that will
be combined to form a single
photograph and press 0
4
Select Auto gain.
Highlight Auto gain and press
I_.
5
@
Set gain.
Highlight one of the following
options and press 0.
A
_--_g
.. un .-. _sure
tae_aui_)
_ng
Off
__
to number of exposures
is set to 1/2for
multiple
exposure.
199
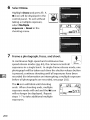
6
Select Done.
Highlight
Done and press 0. A
icon will be displayed in the
control panel. To exit without
taking a multiple exposure,
select Multiple
exposure > Reset in the
shooting menu.
7
Frame
a photograph,
focus,
and shoot.
_81
In continuous high-speed and continuous lowspeed release modes (pg. 84), the camera records all
exposures in a single burst. In single-frame release mode, one
photograph will be taken each time the shutter-release button
is pressed; continue shooting until all exposures have been
recorded (for information on interrupting a multiple exposure
before all photographs are recorded, see page 202).
The _ icon will blink until shooting
ends. When shooting ends, multiple
exposure mode will end and the _ icon
will no longer be displayed. Repeat
steps 1-7 to take additional multiple
exposures.
200
[_
Multiple
Exposure
Do not remove or replace the memory
card while recording
a multiple
exposure.
Live view (pg. 89) can not be used to record multiple
exposures.
The information
listed in the playback photo information
display
(including date of recording and camera orientation)
is for the first shot in
the multiple
exposure.
If no operations
are performed
during
or menu operations,
playback
for 30 s after the monitor
shooting
exposure will be created from the exposures
that point.
[]
Interval
has turned
off
will end and a multiple
that have been recorded
to
Timer Photography
If interval timer photography
is activated before the first exposure is
taken, the camera will record exposures at the selected interval until the
number
of exposures
taken (the number
ignored).
specified
in the multiple
exposure
of shots listed in the interval
These exposures
will then be recorded
timer
menu have been
shooting
menu is
as a single photograph
and multiple exposure mode and interval timer shooting will end.
Cancelling multiple exposure cancels interval timer shooting.
[]
Other Settings
While multiple exposure mode is in effect, memory cards can not be
formatted and the following can not be changed: bracketing and
shooting
menu options
shooting
(note that Interval
other than White balance and Interval
timer
shooting
timer
can only be adjusted
the first exposure is taken). The Lock mirror up for cleaning
ref photo options in the setup menu can not used.
before
and Dust off
201
II Interrupting Multiple Exposures
Selecting Multiple exposure in the shooting
menu while a multiple exposure is being
recorded displays the options shown at right.
To interrupt a multiple exposure before the
specified number of exposures have been
taken, highlight Cancel and press O. If
shooting ends before the specified number of exposures have
been taken, a multiple exposure will be created from the
exposures that have been recorded to that point. If Auto gain is
on, gain will be adjusted to reflect the number of exposures
actually recorded. Note that shooting will end automatically
if:
• A two-button
reset is performed (pg. 196)
• The camera is turned off
• The battery is exhausted
• Pictures are deleted
202
The camera is equipped
preset intervals.
1
to take photographs
automatically
at
Select Intervaltimer
shooting.
Highlight Interval timer
shooting in the shooting
menu (pg. 268) and press I_.
2
Select a starting
Highlight
trigger.
one of the following
andpress
Choose
I_. starttime options
• Now: Shooting begins about
3 s after settings are
completed (proceed to Step 4).
• Start time: Choose a start time (see Step 3).
_I_ Before Shooting
Choose single-frame (S),continuous low speed (CL),or continuous high
speed (CH)release mode when usingthe interval timer. Before beginning
interval timer photography, take a test shot at current settings and view
the results in the monitor. Remember that the camera will focus before
each shot--no shots will be taken if the camera is unable to focus in
single-servo AF.
Before choosing a starting time, select World time in the setup menu and
make sure that the camera clock is set to the correct time and date
(pg. 38).
Use of a tripod
shooting
is recommended.
Mount the camera on a tripod
before
begins.
To ensure that shooting
charged.
is not interrupted,
be sure the battery
is fully
203
3
Choose a start time.
Press • or I_to highlight hours
or minutes; press • or • to
change. The starting time is
not displayed if Now is
selected for Choose start time.
4
Choose an interval.
Press • or I_ to highlight
hours, minutes, or seconds;
press • or • to change. Note
that the camera will not be
//_
o',_
able to take photographs at
the specified interval if it is shorter than the shutter speed or
the time required to record images.
204
5
Choose
the number
intervals
shots
of
and number
of
@
per interval.
Press • or I_ to highlight
number of intervals or number
of shots; press • or • to
change. The total number of
shots that will be taken is
displayed
6
Start
to the right.
Numberof
intervals
Number
of shots/
interval
Total
number of
shots
shooting.
Highlight
Start > On and press
@ (to return to the shooting
menu without starting the
interval timer, highlight
Start > Off and press @). The
first series of shots will be taken at the specified starting time.
Shooting will continue at the selected interval until all shots
have been taken.
A message will be displayed in the monitor one minute before
each series of shots is taken. If shooting can not proceed at
current settings (for example, if a shutter speed of b_ L _, is
currently selected in manual exposure mode or the start time
is in less than a minute), a warning will be displayed in the
monitor.
[]
Close the Viewfinder
Eyepiece Shutter
Close the viewfinder eyepiece shutter
focusing. This prevents light entering
viewfinder
from interfering
after
via the
with exposure
when
shooting with your eye away from the
viewfinder.
205
[I_ Out of Memory
If the memory
card is full, the interval
pictures will be taken.
pictures or turning
[]
timer will remain active but no
Resume shooting
(pg. 207) after deleting
the camera off and inserting
another
some
memory
card.
Bracketing
Adjust bracketing
exposure
and/or
settings
before starting
flash bracketing
interval
is active while
timer
interval
photography.
If
timer
photography
is in effect, the camera will take the number of shots in the
bracketing program at each interval, regardless of the number of shots
specified
in the interval
while interval
timer menu.
timer photography
If white
balance bracketing
at each interval and process it to create the number
the bracketing program.
[]
During
At other times, the number
shots in each interval
button
halfway
(once the button
To view current
interval
interval
interval
timer shooting
timer
timer
the current
progress.
206
remaining
by pressing
time, and the number
shots.
While
of intervals
and
None of these items can be
while interval
timer
[rP_A
photography
--8
\ \ / /
in
is in
-_]
/
_'J_'\_l\_ __]
and the number
the shutter-release
speed and
meters turn off).
timer settings, select
between
L---I
is released, the shutter
until the exposure
photography
is in progress, the
menu will show the starting time,
shots remaining.
changed
of intervals
can be viewed
will be displayed
Interval
of copies specified
Shooting
the control panel will blink. Immediately
before
the next shooting interval begins, the shutter
During interval timer photography,
the _
icon in
speed display will show the number of intervals
remaining, and the aperture display will show the
number of shots remaining in the current interval.
aperture
is active
is in effect, the camera will take one shot
of
J
II PausingInterval TimerPhotography
Interval time photography can be paused by:
• Pressing the 0 button between intervals
• Highlighting
Start > Pause in the interval timer menu and
pressing 0
• Turning the camera off and then on again (if desired, the
memory card can be replaced while the camera is off)
• Selecting live view (I]_), self-timer (@), or mirror-up (MuP)release
modes
To resume shooting:
1
Choosea new starting
trigger.
Choose a new starting trigger
and start time as described on
page 203.
2
@
Resume shooting.
Highlight Start > Restart and
press 0. Note that if interval
timer photography was paused
during shooting, any shots
remaining in the current
interval will be canceled.
207
II Interrupting Interval TimerPhotography
Interval timer shooting will end automatically
if the battery is
exhausted. Interval timer photography can also be ended by:
• Selecting Start > Off in the interval timer menu
• Performing a two button reset (pg. 196)
• Selecting Reset shooting menu in the shooting menu (pg. 271)
• Changing bracketing settings (pg. 130)
Normal shooting will resume when interval timer photography
ends.
II No Photograph
Photographs will not be taken if the previous photograph has yet
to be taken, the memory buffer or memory card is full, or the
camera is unable to focus in single-servo AF (note that the camera
focuses again before each shot).
[]
Release Mode
Regardless of the release mode selected, the camera will take the
specified number of shots at each interval. In C, (continuous high speed)
mode, photographs will be taken at a rate of up to Sshots per second. In S
(single frame) and CL(continuous low-speed) modes, photographs will be
taken at the rate chosen for Custom Setting d4 (CL mode shooting
speed, pg. 299).
[]
Using the Monitor
Pictures can be played back and shooting and menu settings can be
adjusted freely while interval timer photography is in progress. The
monitor will turn off automatically about four seconds before each
interval.
2O8
[]
Shooting
Menu Banks
Changes to interval
269).
If shooting
timer settings
apply to all shooting
menu banks (pg.
menu settings are reset using the Reset shooting
item in the shooting
follows:
menu (pg. 271 ), interval
menu
timer settings will be reset as
• Choose start time: Now
• Interval:
00:01 ':00"
• Number
of intervals:
• Number
of shots: 1
• Start shooting:
1
Off
209
Non-CPU Lenses
By specifying lens data (lens focal length and maximum aperture),
the user can gain access to a variety of CPU lens functions when
using a non-CPU lens. If the focal length of the lens is known:
• Automatic power zoom can be used with SB-900, SB-800, and
SB-600 Speedlights (available separately)
• Lens focal length is listed (with an asterisk) in the playback photo
info display
When the maximum aperture of the lens is known:
• The aperture value is displayed in the control panel and
viewfinder
• Flash level is adjusted for changes in aperture
• Aperture is listed (with an asterisk) in the playback
display
Specifying
lens:
both the focal length and maximum
photo info
aperture
of the
• Enables color matrix metering (note that it may be necessary to
use center-weighted
or spot metering to achieve accurate results
with some lenses, including Reflex-Nikkor lenses)
• Improves the precision of center-weighted
and spot metering
and i-TTL balanced fill-flash for digital SLR
[] Focal Length Not Listed
If the correct focal length is not listed, choose the closest value greater
than the actual focal length of the lens.
[]
Zoom Lenses
Lensdata are not adjusted when non-CPU lenses are zoomed in or out.
After changing the zoom position, select new values for lens focal length
and maximum aperture.
210
II TheNon-CPULensData Menu
1
Select Non-CPU lensdata.
Highlight Non-CPU lens data
in the setup menu (pg. 331)
and press I_.
2
Select a lens number.
Highlight Lens number and
press < or I_ to choose a lens
number between 1 and 9.
3
@
Select a focal length.
Highlight Focal length (mm)
and press < or I_ to choose a
focal length between 6 and
4,000 mm.
4
@
@
Select a maximum
aperture.
Highlight Maximum aperture
_
and press < or I_ to choose a
maximum aperture between
f/1.2 and f/22. The maximum aperture for teleconverters is the
combined maximum aperture of the teleconverter and lens.
211
5
Select Done.
Highlight
Done and press 0.
The specified focal length and
aperture will be stored under
the chosen lens number. This
combination
I ,_xlll
of focal length
and aperture can be recalled at any time by selecting the lens
number using camera controls as described below.
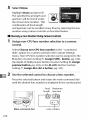
II Choosinga LensNumber Using CameraControls
1
Assign non-CPU lens number selection to a camera
control.
Select Choose non-CPU lens number as the "+command
dials" option for a camera control in the Custom Settings
menu. Non-CPU lens number selection can be assigned to the
Fn button (Custom Setting fS, Assign FUNC. button, pg. 320),
the depth-of-field
preview button (Custom Setting f6, Assign
preview button, pg. 324), or the AE-//AF-/button (Custom
Setting f7, Assign AE-L/AF-L button, pg. 325).
2
Use the selected control to choose a lens number.
Press the selected
button and rotate the main command
until the desired lens number
is displayed
Focal
length
Main command
212
dial
Maximum
aperture
Lens number
dial
in the control panel.
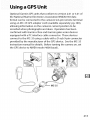
Optional Garmin GPS units that conform to version 2.01 or 3.01 of
the National Marine Electronics Association NMEA0183 data
format can be connected to the camera's ten-pin remote terminal
using an MC-35 GPS adapter cord (available separately; pg. 389),
allowing information on the camera's current position to be
recorded when photographs are taken. Operation has been
confirmed with Garmin eTrex and Garmin geko series devices
equipped with a PC interface cable connector. These devices
connect to the MC-35 using a cable with a D-sub 9-pin connector
provided by the manufacturer of the GPS device. See the MC-35
instruction manual for details. Before turning the camera on, set
the GPS device to NMEA mode (4800 baud).
MC-35
213
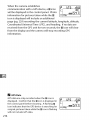
When the camera establishes
/rrn
communication
|L--q
with a GPS device, a [] icon
_2 S
r_6_]
_
will be displayed
in the control
panel.thePhoto
[_mA
_[_'_]J
information
for pictures
taken while
[]
icon is displayed will include an additional
page (pg. 229) recording the current latitude, longitude, altitude,
Coordinated Universal Time (UTC), and heading. If no data are
received from the GPS unit for two seconds, the [] icon will clear
from the display and the camera will stop recording GPS
information.
[]
GPS Data
GPS data are only recorded
when the [] icon is
displayed.
Confirm
that the [] icon is displayed
the control
panel before shooting.
in
A flashing []
icon indicates that the GPS device is searching for
a signal; pictures taken while the [] icon is flashing
will not include GPS data.
214
|
II SetupMenu Options
The GPS item
in the setup
menu
• Auto
off: Choose
whether
meter
turn off automatically
when
contains
a GPS unit
Option
the options
if no operations
are performed for the period specified in Custom Setting c2
(Auto meter-off delay). This reduces the drain on the
battery but may prevent GPS data from being recorded
the shutter-release
button is pressed all the way down
without
pausing.
Disable
Exposure meters will not turn offwhile a GPS unit is
connected;
GPS data will always be recorded.
when
will
Description
(default)
• Position:
This item
it displays
is only
available
the current
Coordinated
Universal
the GPS device.
[]
below.
meters
is attached.
Exposure meters will turn off automatically
Enable
listed
or not the exposure
Time
latitude,
if a GPS device
longitude,
(UTC), and heading
if
is connected,
altitude,
as reported
by
Heading
equipped with a digital
Keep the GPS
device pointing in the same direction as the lens
and at least 20cm (8in.) from the camera.
[]
Coordinated
Universal
UTC data is provided
clock.
Time (UTC)
by the GPS device and is independent
of the camera
215
216
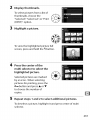
More About Playback
-
Playback
Options
This chapter describes now to play back photographs and details
the operations that can be performed during playback.
Full-Frame
Playback ......................................................
Photo Information
........................................................
Viewing Multiple Images: Thumbnail
pg. 218
pg. 220
Playback ...... pg. 232
Taking a Closer Look: Playback Zoom ....................... pg. 234
Protecting Photographs from Deletion .................... pg. 235
Deleting Individual Photographs ............................... pg. 236
217
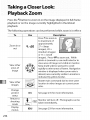
To play photographs back, press
the [] button. The most recent
photograph
monitor.
will be displayed
in the
Multi
selector
Sub-command
dial
Main command
dial
button
[]
button
--
MENUbutton
__
o-n button
--
ql_ button
__
button
_
__
Q button
[]
Rotate
Tall
To display "tall" (portrait-orientation)
photographs
in tall orientation, select On for the
Rotate
tall option in the playback
menu (pg. 265).
Note that because the camera itself is already
the appropriate
orientation during shooting,
images are not rotated automatically
image review (pg. 219).
218
during
in
__==
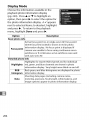
To
Use
View
Description
_,,_\
Press • to view photographs
additional
photographs
_
recorded,
• to view photographs
reverse order.
View photo
information
©
Press •
the thumbnail
Zoom in on
photograph
(_
(pg. 220).
Delete images
"_
Change
protect
Omm
Confirmation
MENU
menus
dialog will be displayed.
To protect image, or to remove
protection from protected image, press
/ []
[_
on
Press @ again to delete photo.
o_ button
shooting
Return to
mode
on
display.
See page 234 for more information
playback zoom.
status
[]
photograph
See page 232 for more information
thumbnails
Display
in
or • to view information
about current
View
in order
(pg. 235).
Monitor will turn off. Photographs
can be taken immediately.
See page 259 for more information.
Image Review
When On is selected for Image review
photographs
are automatically
default setting)
after shooting.
in the playback
displayed
menu (pg. 265),
in the monitor
In single-flame,
for about
self-timer,
4 s (the
and mirror-up
release modes, photographs
are displayed one at a time as they are taken.
In continuous release mode, display begins when shooting ends, with the
first photograph
[]
in the current
series displayed.
See Also
For information
on choosing
how long the monitor
no operations
are performed,
see Custom Setting
will remain on when
c4 (Monitor
off delay,
pg. 297).
The roles of the multi
selector
buttons
can be reversed, so that the •
• buttons display other images and the • and • buttons
information.
See Custom Setting f4 (Photo info/playback,
details.
and
control photo
pg. 320) for
219
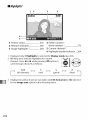
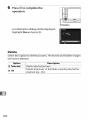
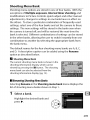
Photo information is superimposed on images displayed in fullframe playback. There are up to 9 pages of information for each
photo. Press • or • to cycle through photo information as shown
below. Note that shooting data, RGB histograms, and highlights
are only displayed if corresponding
option is selected for Display
mode (pg. 264; shooting data page 4 is only displayed if copyright
information was recorded with the photograph as described on
page 343). GPS data are only displayed if a GPS device was used
when the photo was taken.
File Information
Overview
Data
GPS Data
Highlights
RGB Histogram
220
Shooting
Data pages 1-3
Shooting
Data page 4
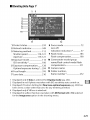
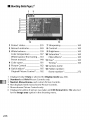
II FileInformation
1
2
3
4
6
13--
12
11
1 Protect status .............................235
2 Retouch indicator .....................349
3 Focus point i ..............................264
109
8
Image quality ...............................64
8 Image size ......................................69
9 Image area 2..................................58
4 AF area brackets ...................45, 94
10 Image authentication
5 Frame number/
1! Time of recording
..............342
total number of frames
6 File name .....................................274
12 Date of recording ........................38
13 Folder name ................................272
.......................38
I Display only if Focus point is selected for Display mode (pg. 264).
2 [] is displayed if FX format (36 x 24) was selected for the Imagearea
option in the shooting menu. If DX format (24 x 16) was selected, []
will
be displayed in yellow.
221
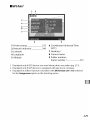
IIHighlights
7
1
2
1
Protect status .............................235
2
Retouch indicator .....................349
3 Image highlights
2....................264
4 Folder numberframe number 3 .........................272
5 Current channel 2
6 Highlight
I
2
Displayed only if Highlights is selected for Display mode (pg. 264).
Blinking areas indicate highlights for current
I_
channel. Press _1 or • while pressing ql_l button to
cycle through channels as follows:
9J
RGB
(all channels)
3
222
display indicator....264
R
G
B
(red)
(green)
(blue)
Displayed in yellow if picture was taken with DX format (24 x 16) selected
for the Image area option in the shooting menu.
II RGBHistogrom7
1
I
2
Protect status .............................
235
$ Histogram (RGB channel) 4. In all
histograms, horizontal axis gives
.....................349
2 Retouch indicator
3 Image highlights
pixel brightness, vertical
number of pixels.
2
4 Folder numberframe number
3 .........................272
6 Current
axis
channel 2
7
Histogram
(red channel) 4
8
Histogram
(green channel) 4
9
Histogram
(blue channel) 4
1 Displayed only if RGB histogram is selected for Display mode (pg. 264).
2 Blinking areas indicate highlights for current
channel. Press _1 or • while pressing ql_l button to
cycle through channels as follows:
RGB
R
G
(red)
Highlight
3
Displayed
in yellow
for the Image
area
if picture
option
(green)
display
wastaken
in the shooting
with
1_
B
(blue)
off
DX format
(24 x 16) selected
menu.
223
Some
sample
• If the
histograms
image
wide range
distribution
relatively
contains
are shown
objects
below:
with
a
of brightnesses,
the
of tones will be
even.
• If the image
distribution
is dark, tone
will be shifted
to the
left.
• If the image
distribution
is bright, tone
will be shifted to the
right.
Increasing
right,
exposure
while
the left.
Histograms
bright ambient
monitor.
[]
exposure
can provide
lighting
makes
shifts the distribution
compensation
a rough
it difficult
of tones
to the
shifts the distribution
idea of overall
exposure
to see photographs
when
in the
Histograms
Camera
those
224
compensation
decreasing
histograms
displayed
are intended
in imaging
as a guide
applications.
only
and
may differ
from
to
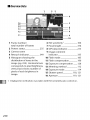
II ShootingData Page 17
1
2
12
11
1 Protect status .............................235
2 Retouch indicator
.....................349
3 Metering
.....................112
Shutter
Aperture
method
(vibration
reduction)
4...............37
speed ...................118, 121
9 Flash mode ..................................185
.............................119, 121
Flash compensation .................190
10 Commander mode/group
name/flash control mode/flash
4 Exposure mode .........................114
ISO sensitivity 2 ..........................
106
5 Exposure compensation
Optimal
8 Focus mode ....................................
Lens VR
exposure
compensation
........ 128
tuning 3....294
Focal length ................................376
............................311
11 Camera name
12 Folder number-
7 Lens data .....................................210
frame number
s..........................272
I Displayed only if Data is selected for Display mode (pg. 264).
2 Displayed in red if photo was taken with ISO sensitivity auto control on.
3 Displayed if Custom Setting b6 (Fine tune optimal exposure, pg. 294) has
been set to a value other than zero for any metering method.
4 Displayed only ifVR lens is attached.
5 Displayed in yellow if picture wastaken with DX format (24 x 16) selected
for the Image area option in the shooting
menu.
225
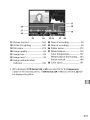
II Shooting DataPage 2 7
1
2
12
I Protect status .............................235
2
Retouch indicator .....................349
3 White
balance ............................139
7 Sharpening ..................................165
8 Contrast ........................................165
................... 147
9 Brightness ....................................165
10 Saturation 4..................................165
White balance fine-tuning....
143
Preset manual ............................148
11 Hue 4 ..............................................165
Color temperature
4 Color space .................................181
5
13
Picture Control ..........................162
6 Quick adjust 2.............................165
Original Picture Control 3....... 162
Filter effects 5 ..............................165
Toning s.........................................165
12 Camera name
13 Folder numberframe
number
6..........................272
I Displayed only if Data is selected for Display mode (pg. 264).
2 Standard and Vivid Picture Controls only.
3 Neutral, Monochrome, and custom Picture Controls.
4 Not displayed with monochrome Picture Controls.
5 Monochrome Picture Controls only.
6
226
Displayed in yellow if picture was taken with DX format
for the Image area option in the shooting menu.
(24 x 16) selected
II Shooting Data Page 3 7
1
2
1 Protect status .............................235
5 Vignette
control ........................276
2 Retouch indicator
6 Retouch
history .........................349
.....................349
3 High ISO noise reduction ......278
Long exposure noise
reduction .....................................277
4 Active D-Lighting
1
Displayed
only
2
Displayed
in yellow
for the Image
is selected
if picture
option
........................335
9 Folder number-
.....................179
if Data
area
7 Image comment
8 Camera name
frame number
for Display
wastaken
in the shooting
with
mode
2..........................272
(pg. 264).
DX format
(24 x 16) selected
menu.
227
II Shooting Data Page4 7
1
2
5
Protect status .............................235
5 Camera name
2
Retouch indicator .....................349
3
Name of photographer
6 Folder numberframe number 2..........................272
4 Copyright
1
Displayed
2
Displayed
for the
..........343
holder ......................343
only if Data is selected
information
228
6
1
was appended
in yellow
Image
if picture
area option
for Display
mode
to photograph
wastaken
in the shooting
(pg. 264) and copyright
(pg. 343).
with
DX format
menu.
(24 x 16) selected
IIGP5Data7
1
2
1 Protect status .............................235
2 Retouch indicator
6 Coordinated
.....................349
3 Latitude
Universal Time
(UTC)
7 Heading 2
8 Camera name
4 Longitude
5 Altitude
9 Folder numberframe number
1
Displayed
only
if GPS device
was used when
2
Displayed
only
if GPS device
is equipped
3
Displayed
in yellow
for the Image
area
if picture
option
wastaken
in the shooting
photo
with
with
3..........................272
was taken
electronic
DX format
(pg. 213).
compass.
(24 x 16) selected
menu.
229
II OverviewData
1
2
3
16
15
14
--5
6
17
--8
11
9
10
1
Frame number/
total number
2
6 ISO sensitivity
of frames
Protect status .............................235
3 Camera name
4
Retouch indicator .....................349
5
Histogram
distribution
showing the
of tones in the
image (pg. 224). Horizontal axis
corresponds to pixel brightness,
vertical axis shows number of
pixels of each brightness
image.
in
1..........................106
7 Focal length ................................376
8 GPS data indicator ....................213
9 Image comment
indicator .......................................335
10 Flash mode ..................................185
1! Flash compensation
.................190
12 Exposure compensation
13 Metering
method
........128
.....................112
14 Exposure mode ..........................114
15 Shutter speed ...................118, 121
16 Aperture
.............................119, 121
1 Displayed in red if photo was taken with ISO sensitivity auto control on.
230
17
18
28
19
25
24
2322
21
20
17 Picture Control ..........................162
24 Time of recording
18 Active D-Lighting
....................180
19 File name .....................................274
25 Date of recording ........................38
26 Folder name ................................272
20 Image quality ................................64
27 White
2! Image size ......................................69
22 Image area 2...................................58
23 Image authentication
indicator ......................................342
.......................38
balance ............................139
Color temperature
....................147
White balance fine-tuning
....143
.........
Preset manual ............................148
28 Color space ..................................181
2 [] is displayed if FX format (36 x 24) was selected for the Imagearea
option in the shooting menu. If DX format (24 x 16) was selected, []
will
be displayed in yellow.
231
i
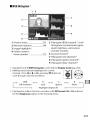
To display images in "contact sheets" of four or nine images, press
the 91_ button.
Full-frame
232
playback
Thumbnail
playback
The following
displayed:
operations
To
can be performed
Use
while thumbnails
Description
Press ql_ button
Display more
to "zoom
Press again to display
per page.
button
Display fewer
images
playback
out"
from one to four images per page.
images
Toggle full frame
are
nine images
to "zoom
in" from
nine to four images per page.
Press again to display
image full frame.
®
highlighted
Press center of multi selector
to
switch back and forth between
full frame and thumbnail
playback.
Use multi selector to highlight
Highlight
images for full-frame
images
Delete highlighted
highlighted
Display menus
[]
deletion
(pg. 236).
See page 235 for more
information.
o_
photo
Return to shooting
mode
zoom (pg. 234), or
See page 236 for more
information.
y
photo
Change protect
status of
playback,
playback
/ []
MENU
Monitorwillturn
off. Photographs
can be taken immediately.
!
See page 259 for more
information.
See Also
For information
on choosing
selector, see Custom Setting
the role played by the center of the multi
f2 (Multi selector center button, pg. 318).
233
Press the _ button to zoom in on the image displayed in full-frame
playback or on the image currently highlighted
in thumbnail
playback.
The following
operations
To
can be performed
Use
Description
_to
zoom in
to maximum
Zoom
in or
% 91_
out
while zoom is in effect:
of
approximately
27 x (large
images), 20 x
(medium images)
or 13 x (small
images). Press 9l_to zoom out. While
photo is zoomed in, use multi selector to
view areas of image not visible in monitor.
View other
Keep multi selector
areas of
pressed to scroll
rapidly to other areas of frame.
image
window
is displayed
Navigation
when zoom ratio is
altered; area currently visible in monitor
indicated by yellow border.
Rotate main command
location
ratio.
images
View
other
is
dial to view same
in other images at current
zoom
Change
protect
status
shooting
Return to
mode
Display
menus
234
o-n
See page 235 for more information.
/ []
-_
MENU
Monitor will turn off. Photographs
taken immediately.
See page 259 for more information.
can be
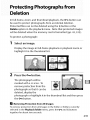
In full-frame, zoom, and thumbnail playback, the o-n button can
be used to protect photographs from accidental deletion.
Protected files can not be deleted using the @ button or the
Delete option in the playback menu. Note that protected images
will be deleted when the memory card is formatted (pp. 43, 332).
To protect a photograph:
1
Select
an image.
Display the image in full-frame playback or playback zoom or
highlight it in the thumbnail
list.
2
Press the o-n button.
The photograph will be
marked with a _ icon. To
I _?III
remove protection from the
photograph so that it can be
deleted, display the
photograph or highlight it in the thumbnail
the o-n button.
[]
Removing
Protection
To remove protection
together
for about
from All Images
from all images in the folder
selected in the Playback
list and then press
folder
or folders currently
menu, press the o-n and _ buttons
two seconds.
235
To delete the photograph displayed in full-frame playback or the
photograph highlighted
in the thumbnail list, press the @ button.
Once deleted, photographs can not be recovered.
1
Select an image.
Display the image or highlight it in the thumbnail list.
2
Press the _ button.
A confirmation
displayed.
dialog will be
Full-Frame
Playback
Thumbnail
Playback
in the playback
menu
To delete the photograph, press the
button again. To exit without deleting
the photograph,
press the [] button.
[]
See Also
To delete multiple
(pg. 262). The After
images, use the Delete
delete
option
option
in the playback
menu determines
whether the next image or the previous image is displayed
is deleted (pg. 265).
236
after an image
Connections
-
Connecting
to External
Devices
This chapter describes how to copy photographs to a computer,
how to print pictures, and how to view them on a television set.
Connecting
to a Computer
Direct USB Connection
...........................................
pg. 238
................................................................
pg. 240
Wireless and Ethernet Networks ..............................................
pg. 242
Printing
Photographs
....................................................
Direct USB Connection
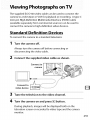
Viewing
Photographs
Standard Definition
High-Definition
pg. 243
.............................................................pg. 244
on TV ........................................
pg. 255
Devices ......................................................
pg. 255
Devices .............................................................
pg. 257
237
This section describes how to use the supplied UC-E4 USB cable to
connect the camera to a computer. Before connecting the camera,
install Nikon Transfer and ViewNX from the supplied Software
Suite CD (see the Install Guide for more information).
Nikon
Transfer starts automatically
when the camera is connected and is
used to copy photographs to the computer, where they can be
viewed using ViewNX (Nikon Transfer can also be used to back up
photographs and embed information in photographs as they are
transferred, while ViewNX can be used to sort photographs,
convert images to different file formats, and perform simple
editing on NEF (RAW) photographs).
To ensure that data transfer is
not interrupted, be sure the camera battery is fully charged. If in
doubt, charge the battery before use or use an EH-Sa or EH-5 AC
adapter (available separately).
II Supported Operating Systems
The camera can be connected to computers running the following
operating systems:
• Windows:Windows Vista Service Pack 1 (32-bit Home Basic/Home
Premium/Business/Enterprise/Ultimate)
and Windows
Service Pack 2 (Home Edition/Professional)
• Macintosh:Mac OS X (version 10.3.9, 10.4.11, or 10.5.2)
XP
See the websites listed on page xxiv for the latest information
supported operating systems.
238
on
_I_ Connecting
Cables
Be sure the camera is offwhen
connecting
cables. Do not use force or attempt
[]
Camera Control
Camera Control
interface
at an angle.
Pro 2
Pro 2 (available
the camera from a computer.
will be displayed
or disconnecting
to insert the connectors
in the control
separately;
pg. 388) can be used to control
When Camera Control
Pro 2 is running,"P
E"
panel.
239
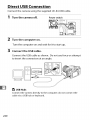
Direct USB Connection
Connect the camera using the supplied
1
Turn the camera
off.
2
Turn the computer
UC-E4 USB cable.
Power switch
on.
Turn the computer on and wait for it to start up.
3
Connect
the USB cable.
Connect the USB cable as shown. Do not use force or attempt
to insert the connectors at an angle.
_I_ USB Hubs
Connect the camera directly to the computer; do not connect the
cable via a USBhub or keyboard.
240
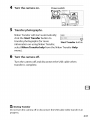
4
Turn the camera on.
S
Transfer photographs.
Powerswitch
Nikon Transfer will start automatically;
click the Start Transfer button to
transfer photographs (for more
Start Transfer button
information on using Nikon Transfer,
select Nikon Transfer help from the Nikon Transfer Help
menu).
6
Turn the camera
off.
Turn the camera off and disconnect
the USB cable when
transfer is complete.
1_
During Transfer
Do not turn the camera off or disconnect
the USB cable while transfer is in
progress.
241
Wireless
and Ethernet
If the optional
WT-4 wireless
photographs
networks
network
computers
separately).
transmitter
can be transferred
Ethernet
Camera
The WT-4 can be used
Control
or
from
Pro 2 (available
in any of the
following
modes:
Function
Transfer mode
Upload new or existing
server.
Thumbnail
Preview photographs
select mode
upload.
Control
photographs
on computer
camera from computer
Pro 2 (available
Print mode
over wireless
can also be controlled
Mode
PC mode
(pg. 385) is attached,
or printed
and the camera
running
Networks
to computer
monitor
or ftp
before
using Camera Control
separately).
Print JPEG photographs
on printer
connected
to network
computer.
For more information,
see the WT-4 user's manual.
update to the latest versions of the WT-4 firmware
softwa re.
Be sure to
and supplied
Transfer Mode
When Wireless transmitter
> Mode > Transfer mode is selected in the
camera setup menu, the @ button is used during playback to select
pictures for upload,
preventing
it from being used to select pictures
for
other operations, such as side-by-side comparison (pg. 362). To restore
normal operation, select another option for Wireless transmitter
>
Mode.
[]
WT-4A/B/C/D/E
The principal
number
difference
between
of channels supported;
the WT-4 and WT-4A/B/C/D/E
unless otherwise
the WT-4 also apply to the WT-4A/B/C/D/E.
242
is in the
stated, all references to
Photographs can be printed by any of the following methods:
• Connect the camera to a printer and print JPEG photographs
directly from the camera (pg. 244).
• Insert the camera memory card in a printer equipped with a card
slot (see the printer manual for details). If the printer supports
DPOF (pg. 435), photographs can be selected for printing using
Print set (DPOF) (pg. 253).
• Take the camera memory card to a developer or digital printer
center. If the center supports DPOF (pg. 435), photographs can
be selected for printing using Print set (DPOF) (pg. 253).
• Print JPEG photographs on a printer connected to a network
computer using the WT-4 wireless transmitter (available
separately; see the WT-4 user's manual for details).
• Transfer pictures (pg. 238) and print them from a computer using
ViewNX (supplied; pg. 238) or Capture NX 2 (available separately;
pg. 388). Note that this is the only method available for printing
RAW (NEF) pictures.
[]
TIFF Photographs
TIFF photographs
can be printed from a computer.
services may also support
Some digital
print
TIFF; check with the service before ordering.
243
Direct USB Connection
If the camera
USB cable,
camera.
is connected
selected
to a PictBridge
JPEG pictures
printer
can be printed
via the
supplied
directly
from
Take photographs
Select Print
using
photographs
set (DPOF)
for (pg.
printing
253)
1
1
]
I
Connect
Print photographs
one at a time
(pg. 246)
camera to printer
4
the
(pg. 245)
11mu"
] Creat
ne x r
photographs
(pg. 252)
(pg. 249)
Disconnect
J
USB cable
|
USB Hubs
Connect the camera directly to the computer;
do not connect
the cable
via a USB hub or keyboard.
[]
Printing
Via Direct
USB Connection
Be sure the battery is fully charged
adapter. When taking photographs
connection,
244
or use an optional EH-5a or EH-5 AC
to be printed via direct USB
set Color space to sRGB (pg. 181).
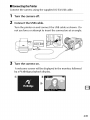
IN Connecting the Printer
Connect
the camera using the supplied
1
Turn the camera
2
Connect
UC-E4 USB cable.
off.
the USB cable.
Turn the printer on and connect the USB cable as shown. Do
not use force or attempt to insert the connectors at an angle.
3
Turn the camera
on.
A welcome screen will be displayed
by a PictBridge playback display.
in the monitor,
followed
245
II Printing PicturesOneat a Time
1
Select a picture.
Press • or I_ to view additional
pictures, or press the _ button
to zoom in on the current
frame (pg. 234). To view six
pictures at a time, press the ql_
button. Use the multi selector to highlight
to display the highlighted
2
Display
printing
pictures, or press
picture full frame.
options.
Press 0 to display PictBridge
options.
printing
Q button
246
3
Adjust printing options.
Press• or • to highlight an option and press I_ to select.
Menu shown at right will be
displayed.
Press •
or •
to
choose page size (to print at
Page size default page size for current
)tinter, select Printer default),
then press _ to select and return
to previous
menu.
Menu shown at right will be
displayed. Press • or • to
No. of
copies
choose
number
of copies
(maximum 99), then press Q to
select and return to previous
menu.
Menu shown at right will be
displayed. Press • or • to
Border
choose print style from Printer
default (default for current
printer), Print with
border (print
_hoto with white border), or No
l_order, then press O to select
and return to previous
menu.
Menu shown at right will be
displayed. Press • or • to
choose Printer default
(default
Time
for current
stamp
stamp (print time and date of
recording on photo), or No time
printer),
Print time
stamp, then press Q to select
and return to previous
menu.
247
-_O_ption ........ _-°_°_°_°°_°°_°°_°°_°-!!_Description
Menu shown at right will be
displayed. To exit without
cropping picture, highlight
cropping
picture,
No
and press @. To crop
highlight Crop and press
Cropping
If Crop is selected, dialog
shown
at right will be displayed.
Press o_
to increase size of crop, qll_ to
decrease. Choose position of
crop using multi selector and
)ress _).
4
Start printing.
Select Start printing and
press @ to start printing. To
cancel before all copies have
been printed, press @.
_I_ Selecting
Photographs
for Printing
Images created at image quality
settings of NEF (RAW) or TIFF (RGB)
(pg. 64) can not be selected for printing.
[]
See Also
See page 415 for information
printing.
248
on what to do if an error occurs during
Printing
1
Displaythe
Multiple
Pictures
PictBridge
Press the MENUbutton
menu.
in the PictBridge
playback display (see Step 3 on page
245).
MENU
button
iii¸
2
Choose Print select or Print
(DPOF).
@
Highlight one of the following
options and press I_.
• Print select: Select pictures
for printing.
• Print (DPOF): Print an existing print order created with the
Print set (DPOF) option in the playback menu (pg. 253). The
current print order will be displayed in Step 3.
To create an index print of all JPEG pictures on the memory
card, select Index print. See page 252 for more information.
249
:3 Selectpictures.
®-!
Use the multi selector to scroll
through
©
the pictures on the
memory card. To display the
current picture full screen,
press _ button. To select the
current picture for printing,
press the o-n button and press
• . The picture will be marked
with a _ icon and the number
of prints will be set to 1.
Keeping the o-n button
O-n button
pressed, press • or • to specify the number of prints (up to
99; to deselect the picture, press • when the number of prints
is 1). Continue until all the desired pictures have been
selected.
4
Display
printing
options.
Press O to display PictBridge
options.
printing
Q button
250
5
Adjust
printing
options.
Press • or • to highlight an
option and press I_ to select.
@
Description
Page size
Menu of page size options will be displayed (pg. 247).
Press • or • to choose page size (to print at default
page size for current
printer, select Printer
_ress _ to select and return to previous
default),
then
menu.
Menu of border options will be displayed (pg. 247). Press
• or • to choose print style from Printer default
Border
default
for current
printer),
Print with
border
(print
ahoto with white border), or No border, then press Q to
;elect and return to previous menu.
Menu of time stamp options
Time
stamp
6
will be displayed
Press •
or •
to choose Printer
default
current
printer), Print time stamp
(pg. 247).
(default
for
(print time and date
of recording on photo), or No time stamp, then press Q
to select and return to previous menu.
Start printing.
Select
Start
To cancel
printing
before
and press 0
all copies
to start
have been
printing.
printed,
press
@.
[]
Page Size, Border, Time Stamp, and Cropping
Choose printer default to print at current printer settings. Only options
supported by the current printer can be selected. Note that print quality may
drop if small crops are printed at large sizes.
[]
See Also
See page 415 for information
on what to do if an error occurs during
printing.
251
II (rearing IndexPrints
To create an index print of all JPEG pictures on the memory card,
select Index print in Step 2 of "Printing Multiple Pictures" (pg.
249). Note that if the memory card contains more than 256
pictures, only the first 256 images will be printed.
1
Select Index print.
Highlight Index print in the
PictBridge menu (pg. 249) and
press I_.
@
The confirmation dialog shown at right
will be displayed.
2
Display printing
options.
Press 0 to display PictBridge printing options.
3
Adjust printing
options.
Choose page size, border, and time
stamp options as described on page 251
(a warning will be displayed if the
selected page size is too small).
@
4
Start printing.
Highlight
Start printing and press ® to
start printing. To cancel before printing
is complete, press 0.
252
%
II Creating a DPOFPrint Order:Print Set
The Print set (DPOF) option in the playback menu is used to
create digital "print orders" for PictBridge-compatible
printers and
devices that support DPOE Selecting Print set (DPOF) from the
playback menu displays the menu shown in Step 1.
1
Choose Select/set.
Highlight Select/set and press
I_.
2
Select pictures.
Use the multi selector to
scroll through the pictures on
the memory card. To display
the current picture in full
screen, press _ button. To
select the current picture for
printing, press the O-n button
and press A. The picture will
be marked with a _ icon and
/_'A_
o-n button
the number of prints will be
set to 1. Keeping the O-n
button pressed, press • or •
to specify the number of prints (up to 99; to deselect the
picture, press • when the number of prints is 1). Press O
when all the desired pictures have been selected (to exit to the
playback menu without changing the print order, press MENU).
253
:3 Selectimprintoptions.
Highlight the following options and
press I_ to toggle the highlighted
option on or off (to complete the print
order without including this
information,
proceed to Step 4).
• Data imprint: Print shutter speed and aperture on all
pictures in print order.
• Imprint date: Print date of recording on all pictures in print
order.
4
Complete
the print
order.
Highlight Done and press O
to complete the print order.
[I_ Print
Set
To print the current
PictBridge
print order when
the camera is connected
printer, select Print {DPOF) in the PictBridge
to a
menu and follow
the steps in "Printing Multiple Pictures" to modify and print the current
order (pg. 249). DPOF date and data imprint options are not supported
when printing
photographs
via direct USB connection;
in the current
to print the date of recording
print order, use the PictBridge
on
Time stamp
option.
The Print Set option
memory
can not be used if there is not enough
space on the
card to store the print order.
Images created at image quality settings of NEF (RAW; pg. 64) can not be
selected for printing using this option.
Print orders may not print correctly if images are deleted using a
computer or other device after the print order is created.
254
The supplied EG-DIO0 video cable can be used to connect the
camera to a television or VCR for playback or recording. A type C
mini-pin High-Definition
Multimedia
Interface (HDMI) cable
(available separately from commercial sources) can be used to
connect the camera to high-definition
video devices.
Standard
Definition
Devices
To connect the camera to a standard television:
1
Turn the camera off.
Always turn the camera off before connecting
disconnecting
the video cable.
2
Connect the supplied
Connect
or
video cable as shown.
to
camera
Connect
video
to
device
3
Tune the television
4
Turn the camera on and press [] button.
to the video channel.
During playback, images will be displayed both on the
television screen or recorded to video tape and the camera
monitor.
255
[]
Video Mode (pg. 333)
Be sure that the video standard matches the standard used in the video
device. Note that resolution will drop when images are output on a PAL
device.
[]
Television
Playback
Use of an EH-5a or EH-5 AC adapter
for extended
monitor-off
playback.
(available
separately)
is recommended
When the EH-5a or EH-5 is connected,
delay will be fixed at ten minutes
and the exposure
the camera
meters
will no longer turn off automatically.
Note that the edges may not be
visible when photographs
are viewed on a television screen.
[]
Slide Shows
The Slide show option
playback
256
(pg. 266).
in the playback
menu can be used for automated
High-Definition
Devices
The camera can be connected to HDMI devices using a type C
mini-pin HDMI cable (available separately from commercial
sources).
I
Turn the camera off.
Always turn the camera off before connecting or
disconnecting an HDMI cable.
2
Connect the HDMI cable as shown.
Connect
to
camera
Connect to highdefinition device
3
Tune the device
to the HDMI
4
Turn the camera
on and press
channel.
[]
button.
During playback, images will be displayed on the highdefinition television or monitor screen; the camera monitor
will remain off.
[]
HDMI (pg. 333)
At the default
setting
of Auto,
the camera automatically
selects the
appropriate
HDMI format for the high-definition
device. The HDMI format
can be chosen using the HDMI option in the setup menu (pg. 333).
257
258
Menu Guide
This chapter
describes the options
available in the camera menus.
[] The Playback Menu: Managing
a The Shooting
Menu: Shooting
Images ............... pg. 260
Options ................. pg. 268
Custom Settings: Fi he-Tuning
Camera Settings ........................................................ pg. 280
y The Setup Menu: Camera Setup ............................... pg. 331
I_ The Retouch Menu: Creating
Retouched Copies ..................................................... pg. 349
My Menu: Creating a Custom Menu ....................... pg. 364
259
The playback menu contains the options listed below. To display
the playback menu, press MENUand press • to highlight the tab for
current menu, then press • or • to highlight the playback menu
tab; for more information,
see page 26.
- =
Delete
Playback folder
Hide image
Display mode
Image review
After delete
Rotate tall
Slide show
Print set (DPOF)
Selecting
0.
= =
262
263
263
264
265
265
265
266
253
Multiple
Pictures
Follow the steps below to select multiple pictures for Delete (pg.
262), Hide image (pg. 263), or Print set (DPOF) (pg. 267). Multiple
pictures can also be selected for direct printing (pg. 249).
1
Display
the menu.
Press the MENUbutton, select the playback menu tab, and
select the desired item in the playback menu.
260
2
Display
thumbnails.
To select pictures from a list of
thumbnails, choose the
"Selected'_ "Select/set'_ or "Print
(DPOF)" option.
:3
Highlighta
@
picture.
To view the highlighted
picture full
screen, press and hold the _ button.
4
Press the center of the
multi selector to select the
highlighted
®
picture.
Selected pictures are marked
by an icon. When selecting
pictures for printing, press the
o-n button and press • or •
to choose the number of
®
copies.
5
Repeat
steps
1 and 2 to select
To deselect a picture, highlight
selector.
additional
pictures.
it and press center of multi
261
6 Press0 to completethe
operation.
@ button
A confirmation dialog will be displayed;
highlight Yes and press @.
Delete
Select this option to delete pictures.
will not be deleted.
262
Protected and hidden images
Playback
Folder
Choose a folder for playback.
Hide Image
Hide or reveal selected pictures. Hidden pictures are visible only in
the Hide image menu and can only be deleted by formatting the
memory card.
[I_
Protected
and Hidden
Revealing a protected
Images
image will also remove protection
from the image.
263
Display
Choose
Mode
the
playback
information
photo
(pg. 220).
option,
Press •
then
the photo
or •
to highlight
information
to selected
and
press I_. To return
display.
items;
highlight
to the
for
A _ appears
highlight
playback
and press I_.
.......
Active
an
the option
to deselect,
Done
_-_°!-oi_tion_!_i::_ I
Basic photo info
in the
display
press I_ to select
next
menu,
available
information
Description
focus point (or, in single-servo
AF, focus point
where focus first locked) is shown in red in photo
information
display. No focus point is displayed if
Focus point
Detailed
camera
was unable to focus using continuous-servo
autofocus
or if continuous-servo
with auto-area AF.
photo info
Highlights
Highlights
Data
for master RGB channel and for individual
display.
Very bright
Red, green, and blue histograms
information
display.
Shooting
data pages (including
metering,
exposure,
image options)
264
was used
red, green, and blue channels are shown in photo
information
RGB
histogram
autofocus
areas blink on and off.
are displayed
in photo
camera name,
focal length, white balance, and
appear in photo
information
display.
Image
Review
Choose whether pictures are automatically
monitor immediately after shooting.
After
displayed
in the
Delete
Choose the picture displayed after an image is deleted.
Description
Show next
Display following
(default)
frame, previous
picture.
If deleted
picture was last
picture will be displayed.
Show
Display previous
picture.
previous
frame, following
picture will be displayed.
Continueas
before
pictures
picture was first
If user was scrolling
through
recorded,
following
picture will be displayed
described
for Show next. If user was scrolling
through
in order
as
pictures in reverse order, previous
will be displayed
Rotate
If deleted
as described
picture
for Show previous.
Tall
Choose
whether
display
during
already
in the appropriate
not rotated
to rotate
playback.
automatically
"tall"
Note
(portrait-orientation)
that
orientation
during
because
shooting,
images
review
pictures
................
rotated for display in the camera monitor.
with Off selected for Auto image rotation
Off
"Tall" (portrait-orientation)
(default)
"wide"
in "wide" (landscape)
(landscape)
pictures
are
are automatically
On
be displayed
is
(pg. 219).
-_77:_7-°776_p_ti_7-7_'_:
"Tall" (portrait-orientation)
for
itself
during
image
pictures
the camera
Pictures taken
(pg. 336) will
orientation.
are displayed
in
orientation.
265
Slide Show
Create a slide show of the pictures in the current playback folder
(pg. 263). Hidden images (pg. 263) are not displayed.
To start the slide show, highlight Start and press @. The following
operations can be performed while the slide show is in progress:
Skip back/skip
ahead
View additional
photo info
Pause slide show
Exit to playback
menu
Exit to playback
mode
Exit to shooting
mode
A dialog shown at right is displayed when
the show ends or when the @ button is
pressed to pause playback. Select Restart to
restart (if the slide was paused, the show will
resume from the next slide) or Exit to return
to the playback menu.
266
Print
Set (DPOF)
Choose Select/set to select pictures for printing on a DPOFcompatible device (pg. 253). Choose Deselect all? to remove all
pictures from the current print order.
267
The shooting menu contains the options listed below. To display
the shooting menu, press MENUand press • to highlight the tab for
current menu, then press • or • to highlight the shooting menu
tab_ for more information,
see page 26.
Shooting
menu bank
Reset shooting
menu
271
Active folder
272
File naming
274
Image quality
64
Image size
69
Image area
58
JPEG compression
67
NEF (RAW) recording
White balance
140
Set Picture Control
160
Manage
168
Picture Control
67
181
Color space
Active D-Lighting
180
Vignette
276
control
277
Long exp. NR
278
High ISO NR
ISO sensitivity
Live view
Multiple
Interval
268
269
settings
exposure
timer shooting
106
9O
198
203
Shooting
Menu
Bank
Shooting menu options are stored in one of four banks. With the
exceptions of Multiple exposure, Interval timer shooting, and
modifications
to Picture Controls (quick adjust and other manual
adjustments), changes to settings in one bank have no effect on
the others. To store a particular combination of frequently-used
settings, select one of the four banks and set the camera to these
settings. The new settings will be stored in the bank even when
the camera is turned off, and will be restored the next time the
bank is selected. Different combinations of settings can be stored
in the other banks, allowing the user to switch instantly from one
combination
to another by selecting the appropriate bank from
the bank menu.
The default
and
option
[]
names
for the four shooting
D. A descriptive
as described
Shooting
The current
shooting
caption
menu
can be added
banks
using
are A, B, C,
the Rename
below.
Menu Bank
shooting
information
menu bank is shown in the
display, which
can be
viewed by pressing the [] button. The shooting
menu bank can also be selected from the
shooting
information
display
(pg. 15).
II RenamingShootingMenu Banks
Selecting Rename in the Shooting menu bank menu displays the
list of shooting menu banks shown in Step 1.
1
Select a bank.
Highlight
press I_.
the desired bank and
269
2
Enter a name.
Keyboard
area
To move the cursor in the name
area, press the 91_ button
and
press • or I_. To enter a new
letter at the current cursor
/,_s_x_
position, use the multi selector
to highlight the desired
Name area
character in the keyboard area
and press the center of the multi selector. To delete the
character at the current cursor position, press the _ button.
return to the shooting menu without changing the bank
name, press the MENUbutton.
Bank names can be up to twenty characters long. Any
characters after the twentieth will be deleted.
3
Save changes
and exit.
After editing the name, press 0 to save
changes and exit.
Q button
The Shooting
be displayed.
270
menu bank menu will
To
Reset
Shooting
Menu
Choose whether to restore default settings for the current
shooting menu bank. See page 419 for a list of default settings.
With the exceptions of image quality, image size, white balance,
and ISO sensitivity, shooting menu settings are not reset when a
two-button
reset (pg. 196) is performed.
Option
Yes
No (default)
Description
Restore defaults for the current shooting menu bank.
Exit without changing shooting menu settings.
271
Active
Folder
Select the folder in which subsequent images will be stored.
II New FolderNumber
1
Select New folder number.
Highlight New folder number
and press I_.
2
@
Choose a folder number.
Press • or I_ to highlight
a digit, press • or •
to change.
Ifa
folder with the selected number already exists, a I_1,I_1,or I_1
icon will be displayed to the left of the folder number:
• I_1 : Folder is empty.
• I_1 : Folder is partially full.
• I_1 : Folder contains 999 pictures or a picture numbered
9999. No further pictures can be stored in this folder; folder
will not be selected when 0 button is pressed.
3
Save changes and exit.
Press 0 to complete the operation and return to the shooting
menu (to exit without changing the active folder, press the
rv1ENU
button). If a folder with the specified number does not
already exist, a new folder will be created. Subsequent
photographs will be stored in the selected folder unless it is
already full.
272
II SelectFolder
1
Choose Select folder.
Highlight
press I_.
2
Select folder and
Highlight
@
a folder.
Press• or • to highlight a folder.
3
Select the highlighted
folder.
Press 0 to select the highlighted
folder and return to the
shooting menu (to exit without changing the active folder,
press the MENUbutton). Subsequent photographs will be
stored in the selected folder.
11_ Folder and File Numbers
If the current
folder is numbered
picture
numbered
further
photographs
with a number
999 and contains
9999, the shutter-release
999 pictures or a
will be disabled and no
can be taken. To continue
less than 999, or select an existing
shooting,
create a folder
folder with a number
less than 999 and less than 999 images.
[]
Number
Additional
of Folders
time may be required
contains a very large number
for camera startup
if the memory
card
of folders.
273
File Naming
Photographs are saved using file names consisting of"DSC_" or, in
the case of images that use the Adobe RGB color space, "_DSC'_
followed by a four-digit number and a three-letter extension (e.g.,
"DSC_O001 .JPG"). The File naming option is used to select three
letters to replace the "DSC" portion of the file name. For
information on editing file names, see steps 2 and 3 of "Renaming
Shooting Menu Banks" (pg. 270). Note that the portion of the
name that can be edited is a maximum of three characters long.
[]
Extensions
The following extensions are used: ".NEF"for NEF(RAW) images, ".TIF"for
TIFF(RGB)images, ".JPG"for JPEGimages, and ".NDF" for dust off reference
data.
Image Quality
Choose image quality (pg. 64).
Image Size
Choose the size at which pictures are recorded (pg. 69).
Image
Area
Although the D700 can record photographs with the same
diagonal picture angle as a 35mm format camera using a 3 : 2
aspect ratio, it can also be used to record photographs with the
smaller DX picture angle (pg. 58).
274
JPEG Compression
Choose whether to compress JPEG images to a fixed size or to vary
file size for improved image quality (pg. 67).
NEF (RAW) Recording
Choose compression and bit-depth
(pg. 67).
White
options for NEF (RAW) images
Balance
Adjust white balance settings (pg. 140).
Set Picture
Control
Select from the Picture Controls provided with the camera to
instantly adjust image processing settings (pg. 160).
Manage
Picture
Control
Save and modify custom Picture Control combinations, or copy
custom Picture Controls to or from the memory card (pg. 168).
Color Space
Choose from sRGB and Adobe RGB color spaces (pg. 181).
275
Active
D-Lighting
This option can be used to prevent loss of detail in highlights and
shadows (pg. 179). Choose from Auto, High, Normal, Low, and
Off (the default setting).
Vignette
Control
"Vignetting"
is a drop
in brightness
at the
edges of a photograph.
Its effects
vary from
lens to lens and are most
maximum
aperture.
Vignette
G and
D lenses
Normal
[]
(DX and
(the default
Vignette
control
PC lenses
setting),
reduces
excluded).
noticeable
at
vignetting
Choose
from
for type
High,
Low, and Off.
Control
Depending on the scene, shooting conditions, and type of lens, TIFF and
JPEG images may exhibit unevenness or variations in peripheral
brightness,
while
custom
have been modified
effect.
from
Picture Controls and Nikon Picture Controls that
default settings
may not produce
Take test shots and view the results in the monitor.
the desired
Vignette
control does not apply to multiple exposures (pg. 198), DX-format images
(pg. 58), or images created with Image overlay (pg. 361). The effects of
vignette
276
control
can not be previewed
in live view (pg. 89).
Long Exp. NR (Long Exposure
Choose
whether
to reduce
noise
Noise Reduction)
in pictures
taken
at slow
shutter
speeds.
Description
Photographs
taken at shutter
pFF-.
speeds slower than 1 s are
)rocessed to reduce noise. While
photographs
are being
)rocessed, the capacity
1_ m-A---[5"_ _] I
of the
memory buffer will drop.
"Job nr"will
blinkintheshutter
On
speed/aperture
Eli/
displays for a
)eriod of time approximately
equal to the current shutter
speed. In continuous
mode, frame rates will slow and while
being processed, the capacity
drop.
Photographs
release
photographs
of the memory
are
buffer will
can not be taken until processing
is
complete and "Job
n r" has cleared from the displays.
Noise reduction will not be performed if the camera is
turned
Off (default)
[]
off before
Long exposure
The Shooting
Information
Long exposure noise reduction
information
display (pg. 15).
processing
is complete.
noise reduction
off.
Display
can be adjusted
from the shooting
277
High ISO NR
Photographs
reduce
taken
at high
ISO sensitivities
can be processed
to
"noise"
Option
Description
HIGH High
Noise reduction
is performed
Normal
NORM(default)
2000 and higher. While photographs
are being
processed, the capacity of the memory buffer will drop.
LOW Low
Choose the amount of noise reduction
High, Normal, and Low.
Noise reduction
Off
[]
The amount
the amount
ISO NR.
performed
Information
High ISO noise reduction
display
(pp.
of ISO
performed
at sensitivities
of noise reduction
from
of Hi 0.3
is less than
when Low is selected for High
Display
can be adjusted
from the shooting
information
(pg. 15).
ISO Sensitivity
Adjust
is only performed
and higher.
The Shooting
at ISO sensitivities
ISO sensitivity
Settings
and
ISO sensitivity
auto
control
settings
106, 108).
Live View
Choose a live view mode and the release mode that will be used
when the camera is in live view mode (pg. 90).
Multiple
Create
278
Exposure
a single
photograph
from
two
to ten
exposures
(pg. 198).
Interval
Timer
Shooting
Take photographs automatically at pre-selected intervals. Use for
time-lapse movies of such subjects as flowers opening or
butterflies emerging from cocoons (pg. 203).
279
Nikon
No reproduction
in any form of this manual, in whole or in part
(except for brief quotation in critical articles or reviews), may be
made without written authorization
from NIKON CORPORATION.
((
NIKONCORPORATION
Fuji Bldg., 2-3 Marunouchi 3-chome,
Chiyoda-ku,Tokyo
© 2008
100-8331,
Japan
Nikon Corporation
Printed
in Japan
SB8G04(11)
6MB02311-04