1
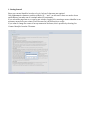
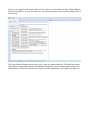
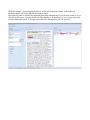
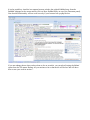
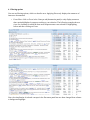
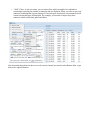
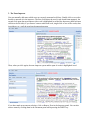
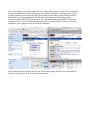
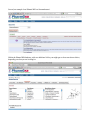
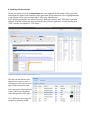
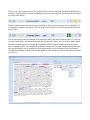
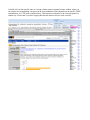
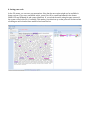
ODIN:
OntoGene Document Inspector
User Manual, v 0.5
Fabio Rinaldi, Simon Clematide, Gerold Schneider, Tilia
Ellendorff
http://www.ontogene.org/
Introduction
ODIN is a lightweight graphical interface for literature curation that can be run within a web browser.
Currently ODIN is coupled with the OntoGene pipeline which provides its text mining capabilities,
however nothing prevents ODIN from being interfaced with other text mining services as long as they
support the same data exchange format.
In order to achieve optimal performance and user satisfaction, the OntoGene team typically customizes
the OntoGene pipeline and ODIN for the specific curation task. OntoGene and ODIN have already
been customized for some experiments in assisted curation in collaboration with well known databases,
in particular PharmGKB, CTD and RegulonDB, which have been described in a number of journal
publications. For details please see: www.ontogene.org
The purpose of this manual is to describe how ODIN can be used by a curator to perform some
literature-based curation tasks, as for example exploring the entity annotations of a given article, or
validate interactions suggested by the system.
For any problem, comment or suggestion please contact us at [email protected]
Best regards,
The OntoGene Team
http://www.ontogene.org/
1. Getting Started
Enter your curator identifier in order to log in. At least 2 characters are required.
Only alphanumeric characters, and the symbols '@', '-' and '.' are allowed. It does not need to be an
email address, but make sure it is unique and use it consistently.
If you reload the page later on, or open a new window, logging in by entering a curator identifier is not
necessary anymore as your curator id will be saved in your browser as a cookie.
If you want to change the curator id at any moment in the future, this is possible by choosing Set
Curator Identifier from the File menu.
Once you are logged into the system, select a file to inspect. You can either use Open Pubmed Abstract
from the File menu or you can also select one of the provided sample files from Select Sample File, as
shown below.
The Open Pubmed Abstract option allows you to enter any pubmed identifier. The OntoGene system
will fetch the corresponding abstract from PubMed and process it, before delivering the results to the
ODIN interface. The process could last a couple of seconds, depending on the length of the abstract.
2. The ODIN panels
Below you can see an example of an annotated document: the PubMed abstract is in the Document
panel (left in the picture) and the interactions appear in the Annotation panel (right side of the picture).
If the Annotation panel is empty, you can select an annotation type in the View menu. The available
annotations depend on the version of ODIN and the customized application. Typically, they are
application-specific concepts (such as genes, proteins, diseases, organisms), and interactions among
them. In the example we see interaction annotation. The concepts annotation has also been selected in
the View-menu, and can be brought to the foreground by clicking on the Concepts-tab in the
Annotation-panel.
A brief online introduction to each annotation table is also available, in the Help-menu within the
Annotation-panel (top right corner). [The Help-menu is currently being revised]
ODIN has actually 3 panels (see figure below): on the left the Inspector panel, in the center the
Document panel, and on the right the Annotations panel.
The Inspector panel is closed at the beginning and opens automatically if you click on a term, or if you
click the double arrow on its top (at the left of the interface). In the same way, you can also open and
close the Annotation panel on the right. We will discuss the Inspector panel in section 5.
It is also possible to visualize in a separate browser window the original PubMed entry from the
PubMed webpage for the current article (click on Show PubMed Entry on top of the Document panel).
Note that this functionality will not work correctly if your browser has a popup blocker.
If you are unhappy about what you have done so far on an article, you can reload it using the Reload
option from the File menu. Beware: all your actions so far on that article will be lost! We will show
how to save your work in section 7.
3. Working with Concepts
Click on the Concepts tab in the
Annotation panel. All concepts
are displayed. Clicking on the
right of the column title, you
can sort them by the column of
your choice.
If you drag the column fringe,
the column gets broader or
smaller.
If you double-click on a concept
or name, a definition is provided
in a separate window. ODIN
tries to provide this definition
from a reference database.
Which database is used for
reference depends on the
specific application for which
ODIN has been customized.
Ticking the box on the left highlights all occurrences of the corresponding concept in the text.
You can delete all selected or unselected concept occurrences in the document using the red buttons on
top of the Annotation panel.
You can mark all concepts of a certain type by selecting Mark by concept type from the View menu.
A search in the reference databases (which depend on the application) can be launched by doubleclicking on a concept name or identifier, or by clicking on the plus-symbol at the beginning of a line.
4. Filtering options
You can use filtering options, which we describe now. Applying filters only displays the sentences of
interest to the annotator.
•
Focus filter: click on Focus in the Concepts tab (Annotation panel) to only display sentences
that contain highlighted concepts according to your selection. The following example shows a
view of a document in which the three most frequent terms were selected for highlighting,
before and after clicking on Focus.
Note: the visualization of selected concepts in the Document panel has now been changed from a frame
to background highlight.
•
Column Filters:
The following filters can be chosen by clicking the down-arrow which appears when hovering
over the column labels of the Concepts tab in the Annotation panel
•
•
•
•
Type filters: in the Type column you may restrict the view of concepts to only certain
types of concepts (which depend on the application). This can be done by clicking the
required boxes. Limiting to specific types is a suitable preparatory step to using the
Focus filter (as described before) in order to show sentences containing terms of the
selected types.
Name filters: in the Name column the view of concepts can be restricted to certain
names. In order to do so, click on the Filter option and enter a name, e.g. 'Serotonin' in
the text field. Only one name can be chosen at a time.
Frequency filters: in the Filter option of the Frequency-column, an exact frequency or
range of frequency can be chosen to only display terms which occur the given number of
times. Values can be entered in three possible ways: either by entering a number after the
'>' sign to only display terms with a frequency greater than the given number, by
entering a number after the '<' sign to only display terms with a frequency lower than the
given number, or by entering a number after the '=' sign to display only terms with the
exact given frequency.
Score filters: in the Filter option of the Score column, terms can be restricted according
to their confidence score assigned by the system. The confidence score expresses the
confidence of the system in respect to correctness of the displayed terms. High scores
correspond to a high probability that a term is correct and in most cases it makes sense to
sort out terms with a lower probability. The boxes for entering the filter values for the
Score Filters work in the same way as the boxes of the Frequency Filters (described
above).
In order to remove all of the above filters, press the Refresh button (it might be
necessary to do it twice).
•
“AND” Filters: in the view menu, you can select filters which are applied in combination,
increasingly restricting the number of sentences that are displayed. When you select a type, only
sentences containing that type are displayed. If several types are selected, only sentences which
contain all selected types are displayed. For example, you are able to inspect only those
sentences which contain both genes and effects.
Note that unchecking the boxes does not work correctly. Instead you need to select Remove filter to get
back to the original situation.
5. The Term Inspector
You can manually add terms which were not correctly annotated as follows. Double-click on a word to
be able to annotate it in the inspector. The first click selects the word (a red dotted frame appears), the
second click opens the term inspector (the word is highlighted in red and the Inspectors panel becomes
visible on the left side). If you want to create a multi-term word, single-click on one of the words, then
its neigbour, etc., until the term has the appropriate span.
Then, when you click again, the term inspector opens and the span of words is highlighted in red.
If you have made an erroneous selection, click on Remove Term in the Inspector panel. You can also
remove terms by clicking them in the Document panel while pressing the SHIFT key.
In the Term Inspector, you can manually edit the concept and the type of a term, leave a comment or
browse term databases (click the down arrow next to Search Databases). The specific set of DBs
available depends on the version of ODIN, but typically include Entrez, Uniprot and a reference
database for the specific application. The following screenshots give a browsing example.
First, an example from CTD. Click on a term in the document panel ('pseudorabies', in red in the
example below). Tick CTD in the Inspectors panel (left), then click Search Terms. As this term is
ambiguous, we are given a selection. We choose 'Diseases'.
Notice that this function will not work if your browser has a popup blocker (as it is the default in
Chrome). In order to use it, deactivate the popup blocker.
Second, an example from 'PharmGKB' on 'dexamethasone'.
Within the PharmGKB database, with two additional clicks you might get to the screen shown below,
depending on what you are looking for.
Repeated Term Mode
The Term Inspector has two modes of operation, which can be selected in the Mode menu: Single Term
and Repeated Term. In Single Term mode, only the single instance which you select is changed. In
Repeated Term mode, all occurrences inside the document are changed. In order to assist the annotator
in his or her decision whether all occurrences are of the same type, ODIN only displays the sentences
containing the term that is being edited.
Notice that Repeated Term mode can be applied only to existing terms. It cannot be applied to
words which have not already been marked as terms (if you do it, the entire document seems to
disappear. In this case, just unselect Repeated Term mode to go back to normal).
While the core of ODIN is similar in all versions, it is a flexible tool and the version that is adapted to
your task may look different.
We will look at two typical tasks in the following chapters: working with interactions in section 6, and
with organisms in section 7.
6. Working with Interactions
We are now going to look at the interactions that were suggested by the system. Select one of the
interactions: the terms in the document which participate in this interaction will be highlighted and a
colored frame will be placed around them to allow easy identification.
In the following screenshot, the relation between “Pulmonary edema” and “TNF-alpha” has been
selected. Note that a search has been performed in the reference database to confirm that the gene
“TNF” actually corresponds to “TNF-alpha”.
The user can then decide if the
interaction is correct or not by
clicking one of the options to the
right of the Interactions panel.
If the interaction is believed to be
correct, the first box should be
ticked (see picture on the right).
If it is believed to be wrong, the
second box should be ticked.
There are two other options. In case the abstract does not provide sufficient information and the user is
not able to make a decision without consulting the full text of the paper, the third box should be ticked,
as in the picture below:
Finally, if the document actually expresses that there is NO interaction between the two entities (i.e. it
is expressing a negative interaction), the user should tick the last box (which automatically select also
the first one).
You can optionally resize the columns of the interaction table, and remove some of them. If you hover
over the column titles, a down-arrow between the columns will appear: use it in order to open a menu.
The menu contains options for sorting, and a submenu called Columns, which can be used to select
which columns to show. For example, the columns Concept1 and Concept2 could be removed because
the same information can be obtained by hovering the mouse over the columns Name1 and Name2.
An additional submenu (called Filters) might appear in some columns. Its function has been explained
in section 4.
A double click on the specific name or concept column opens a separate browser window where you
can inspect the corresponding concept from the source database (which depends on the specific ODIN
customization, it's CTD in the example below). This functions works also in the Concepts panel in a
similar way. Notice that if you have a popup blocker this function will not work correctly.
7. Constraining Organisms
In the following example, we show a version of ODIN that works with information on organisms.
Depending on your customization and field of application, this may not be available.
We open the sample PubMed file 1226314, and select organism and term tables from the View menu, if
your version of ODIN offers them. Your screen may now look as follows.
The article deals with human genes and proteins. If we click the Organism tab of the Annotation panel
we see that indeed the system assign the highest probability (51.3%) to human.
We can discard all non-human concepts (e.g. interpretations terms as non-human proteins) as follows:
tick all organisms except human, then click on the – selected symbol, as shown below.
All organisms except for human disappear. Also in the text, fewer terms are highlighted. If we click the
Terms tab no change is immediately apparent, we first need to press the Refresh button to see only
human terms. If we click on a term in the text, the term inspector only gives human concept values,
which considerably reduces ambiguity.
8. Saving your work
In the File menu, you can save your annotations. Note that the save option might not be available in
demo versions. If you save a modified article, a new file will be created and named in the format
PMID-CID.xml (Pubmed-id and curator identifier). If you reload the article using the same curator id,
the system will use this file, if available. This means your selections up to that point will be there when
reloading an article that has been modified and saved before.
9. Summary of database search options
Inside ODIN it is possible to launch searches into reference databases in several ways. Here you can
find a brief summary of the available options.
1. From the Inspector panel: when editing a term, you can use the button 'Search Term Text'.
2. From the Concepts tab in the Annotation panel: when clicking on the concept name or id, a
search in the reference DB (which depends on the application) can be launched.
3. From the Interactions tab in the Annotation panel: clicking on the name of one of two entities
participating in the interaction launches a search in the reference DB. This function is not
always available, depending on the application.
10. Known Bugs
– cdt version: Terms in term tab in the annotation panel do not change to the new file if one file is
closed with unsaved changes and a new file is opened
– ctd version: If there are subordinate titles in the abstract (such as Background or Methods), all
of these are converted to “Abstract”.
– ctd version: Tabs in the Annotation panel are not parallel anymore if they are added again.
– ccg version: File → Reload does not work once some changes have been made. Then it is also
not possible to load a new file.