1
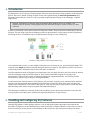
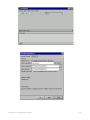
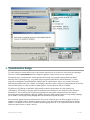
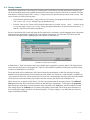
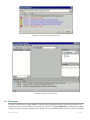
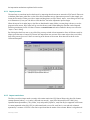
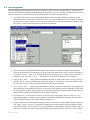
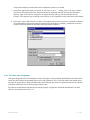
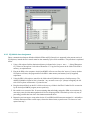
EQ-Software
User manual
Versión 0.2.0.15 [2009-Dic-18]
Jeisson Hidalgo-Céspedes
[email protected]
Developer
Diego Apéstegui-Quesada
[email protected]
Translator
Centro Centroamericano de Población
Universidad de Costa Rica
http://ccp.ucr.ac.cr/eqsoftware/
Index
1.Introduction................................................................................................................................................3
2.Installing and configuring EQ-Software..................................................................................................3
2.1.Handheld Device Setup....................................................................................................................................4
2.1.1.Palm OS devices setup..............................................................................................................................4
2.1.2.Windows Mobile devices setup................................................................................................................5
2.1.3.General suggestions for PDA manipulation..............................................................................................6
2.2.EQ-Software installation and configuration.....................................................................................................6
2.2.1.EQ-Control start-up and configuration.....................................................................................................7
2.2.2.EQ-Palm Installation and configuration....................................................................................................9
2.2.3.EQ-Mobile installation and configuration.................................................................................................9
3.Questionnaire design...............................................................................................................................10
4.Survey control..........................................................................................................................................11
4.1.Survey creation...............................................................................................................................................12
4.2.Data import....................................................................................................................................................13
4.2.1.Import process........................................................................................................................................14
4.2.2.Import restrictions...................................................................................................................................14
4.3.Area assignment.............................................................................................................................................16
4.3.1.EQ-Palm Area Assignment.....................................................................................................................17
4.3.2.EQ-Mobile Area Assignment..................................................................................................................18
4.3.3.EQ-Pc Area Assignment.........................................................................................................................19
4.4.FTP Data Transfer.........................................................................................................................................19
5.Data collecting..........................................................................................................................................21
5.1.Introduction to hardware and operating system.............................................................................................21
5.1.1.Introduction to Windows Mobile............................................................................................................21
5.1.2.Introduction to Palm OS.........................................................................................................................22
2 / 24
1. Introduction
EQ-Software is a set of tools for collecting statistic data from census and surveys using computer aid and electronic
devices, due to this, instead of filling out paper forms, data is gathered using an electronic questionnaire (EQ:
Electronic Questionnaires) which is a way to represent the questionnaire relying on the advantages computer
usage allows.
Warning: EQ-Software is currently under development. Many features are not yet available. This
manual is valid for partially working applications, but functional enough for census’ and survey’s data
collection.
In order to successfully collect data from the field using this software, the process shown in Illustration 1 must be
followed. The first thing to get done is building an electronic questionnaire, for this purpose is that EQ-Software’s
EQ-Design exists, it is intended to help in the questionnaire's design in a user friendly way.
Illustration 1: Steps needed to conduct an EQ-Software survey.
Once a questionnaire is built, you must identify which places are of interest for you, and potential informants. This
is known as the sample and must be divided among the interviewers (Step 3). EQ-Software provides a tool known
as EQ-Control with is intended to help in field work tasks’ coordination.
Once the enumeration areas are assigned to the interviewers, they will apply the survey and write down the answers
from the informants using EQ-Collector (Step 4). The previously mentioned program is in charge of the
questionnaire’s filling out flow control, executing the appropriate jumps automatically, and checking for data
inconsistencies, which is in great help for assuring data quality.
As each interviewer enters the answers, EQ-Collector will save them. Logically you’re interested in the statistical
analysis of the data extracted and accumulated in the data base, to answer this need, EQ-Control will aid in the
extraction and visualization of the collected data (Step 5), while also allowing to export them in formats that Stata,
SPSS and many other statistic analysis programs may understand (Step 6).
This document is intended as to describe in much more detail the process previously mentioned, and to show the
way EQ-Software suite takes part in the different stages that take place in a typical survey.
2. Installing and configuring EQ-Software
Although EQ-Software is multi platform software, only the Microsoft Windows procedure is described in this
document. EQ-Software can use handheld devices such as Palm OS or Windows Mobile to collect data. In order to
do this it's necessary to have access to Palm Desktop or Microsoft Active Sync software according to the device
2.Installing and configuring EQ-Software
3 / 24
used. If you are planning to collect data using these devices and have not yet installed the corresponding software, it
is advised that you do this before installing EQ-Software.
2.1. Handheld Device Setup
This section discusses the process of setting up the handheld devices so that data may be collected. Firstly for those
using Palm OS, afterwards for those using Windows Mobile. At the end of the section recommendations are
presented in order to physically protect the devices, this part may be omitted.
2.1.1. Palm OS devices setup
So that information may be exchanged between the computer and the devices acquired, Palm Desktop, Palm’s
official software is necessary. Palm Desktop can be found in a bundled CD that comes with the device, or can be
downloaded from Palm’s website. Reinstalling isn’t necessary. When selecting the destination folder it is advised to
leave the default one, usually C:\Program Files\PalmOne.
Once Palm Desktop is installed, Hot Sync Manager icon will appear in the task bar [Illustration 2], this program is
part of Palm Desktop and is silently waiting for a palm to connect and synchronize. So as to synchronize a Palm
device, it must be connected to the computer, usually using a USB cable, turn on the device and look for a program
called HotSync, press the huge center button that has the same icon as HotSync Manager [Illustration 2]. As the
synchronization takes place the software will show animations in the computer as in the device until the process is
completed. Notice that the palm is the one that starts the HotSync process.
Illustration 2: HotSync icon
Illustration 3: Palm Desktop’s users (palms) list.
Palm Desktop detects which devices belong to it by assigning a name. This name is assigned the first time a palm is
synchronized. In the case a palm has never been synchronized, HotSync Manager will ask for a name to be selected
or a new one to be assigned [Illustration 4]. Choose names shorter than 6 characters so as to avoid future conflicts.
One may use names such as E01, E02 o Z01, etc., for Tungsten E or Zire, respectively.
2.Installing and configuring EQ-Software
4 / 24
Illustration 4: Dialog for assigning the palm’s name at first synchronization.
If the palm has been previously synchronized using a different computer and has a name already assigned, Palm
Desktop will keep the previously designated name. If one is interested in changing a palm’s name, it can be done by
selecting the Users menu which can be accessed in the upper right corner drop down menu of the Palm Desktop
software, and then selecting the Edit users… option [Illustration 3]. You must synchronize the device afterwards
so as to refresh the new name.
2.1.2. Windows Mobile devices setup
To let your PC communicate with a Windows Mobile device, Microsoft ActivesSync, for Windows XP computers, or
Microsoft Windows Mobile Device Center (WMDC), for Windows Vista computers, is required. This software is
included in the CD bundled with the device, or can be downloaded from the Microsoft download center.
Once the appropriate software is installed, an icon will appear in the task bar, this is a piece of software the silently
waits for a device to be connected through a USB cable. When this occurs, the ActiveSync/WMDC application will
show up. If it’s the first time the device is connected, an installation wizard will start; this program will help in
synchronizing contacts, emails, favorites and other. This feature might be useful if you’re interested in using the
device for managing personal information, but if the PDA is used for census and surveys data collecting this might
not be the case, so you may cancel the assistant.
ActiveSync/WMDC allows the internal memory and the memory card (if available) of a device connected, to be
accessed using Windows Explorer. It can be launched from different places, for example, by right clicking over the
ActiveSync/WMDC icon in the taskbar and then Explore. This file manager has a reduced set of features, such as
copy or move files between the computer’s hard drive and PDA.
It is important that each device has a unique name associated; this will make the identification of each interviewer
easier and quick. The device’s name can be changed in the device itself, it’s not necessary to connect it to a
computer, this can be accomplished by clicking "[PDA] Start | Setup | System | About | Device ID". If
possible stick a permanent label with it's name in the back of the device. EQ-Software uses this ID for identifying
the device where the survey was done.
After a few seconds of inactivity Windows Mobile dims the backlight or turns off the screen in order to save battery.
Since the interviewer might take a while reading the question or waiting for the answer, the previous behavior may
be inadequate, to avoid this, the following is advised:
•
Disable the backlight completely by clicking "[PDA] Start | Setup | System | Backlight".
•
After 2 minutes of inactivity, turn off the device, this can be done by clicking "[PDA] Start | Setup |
System | Power | Advanced".
2.Installing and configuring EQ-Software
5 / 24
2.1.3. General suggestions for PDA manipulation
The following sections discuses some general suggestions for a better use of the devices employed to collect data.
Some PDA’s use a plastic pen to enter the data; this may cause the screen to damage due to the continuous pressure
over some areas. It’s advisable to acquire adhesive plastic sheets that can be stuck over the screen, once the sheet
has been used enough it can be replaced by another one.
The device’s battery life might limit the amount of interviews an interviewer can complete in a day. From 3 to 5
hours of intensive work can be achieved according to the quality of the battery. This restriction can be elongated if
you consider the following:
1. Interviewers must carry the assigned PDA’s power adapter at all time. Every day before going out to the
field they must have the device fully charged. If the device is soon to run out of battery, he/she must get to a
power outlet (for example, a restaurant at lunch time) and within a few minutes the battery will gain a good
part of its charge (it’s not necessary to wait until it reads 100%)
2. Batteries can be replaced depending of the model in use. Usually this is done once the battery is depleted;
but the possibility of replacing them allows the interviewer to always carry new ones. When they wear out,
simply replace by another one. Afterwards both can be charged or new ones can be bought.
3. Power booster accessories could be available for some models. They use 4 AA batteries for supplying
energy. The interviewer carries the charger in his pocket, when the device is running low on charge; he/she
connects the adapter to the PDA. Among the advantages of this capability is the AA batteries long lasting
charge, great availability, and use among many other devices.
2.2. EQ-Software installation and configuration
To install EQ-Software, download the latest version of the program, it can be found in the following address
http://eqsoftware.ccp.ucr.ac.cr/en/download/, double click on it and follow the steps. Once this is done, a new set of
tools is accessible through “Start | Programs | EQ-Software", as shown in Illustration 5.
Illustration 5. EQ-Software tool set menu bar
Each of the tools is explained next.
•
Downloads page. A link to the EQ-Software download page. Here you can check for newer versions of the
programs or other files not included with the installer.
•
EQ-Control is the program in charge of coordinating the field work tasks. This will be explained in chapters
4 and 6.
•
EQ-Design is a tool intended to aid in the design of questionnaires in a user friendly manner. At the time
this document was written, EQ-Design was still under development and is not yet functional.
•
EQ-Manual is this same document.
2.Installing and configuring EQ-Software
6 / 24
•
EQ-Mobile installer is an EQ-Mobile installer for Windows Mobile devices. It’ll be explained in section
2.2.3.
•
EQ-Palm allows the interaction with Palm OS devices. This icon links directly to the folder where the Palm
OS executable files are (.prc files), you shouldn't need to install them manually, EQ-Control can do it for
you, this is shown in section 4.3.
•
EQ-Pc is a program for carrying out interviews on the same computer where EQ-Control is installed,
possibly throughout a telephone interview. It can also be used for viewing the data entered by another
collector.
•
The Examples folder contains real census’ and surveys’ questionnaires, they can be used for illustrative
purposes o by creating your own questionnaire out of one of them. Quick instructions on how to work with
these can be found in the same folder.
•
Uninstall EQ-Software allows you to quickly uninstall EQ-Software from your computer.
EQ-Mobile, EQ-Palm and EQ-Pc are collector programs. A collector is the program used by an interviewer to
apply a survey. In the future EQ-Software might include collectors using other platforms or technologies. The usage
of the collectors is discussed in chapter 5.
Summing it up, the tools previously described work together in this way. To gather the data using EQ-Software, a
questionnaire is needed first, then open it using EQ-Control, create an enumeration areas list, import it to the data
base, assign collectors to each area, apply the interviews, extract the data, review the data in the data base, export it
to statistic analysis tools. The remainder of this chapter will teach you how to install and configure each tool you
need to start collecting data.
2.2.1. EQ-Control start-up and configuration
When executing EQ-Control for the first time, a screen like the one in Illustration 6 will appear. EQ-Control tries to
guess the language in which the operating system (Microsoft Windows) was installed. If you wish to change it, you
may do so by clicking “Tools | Preferences | General | Language". From now on the English version of the
program will be used.
Also when running for the first time, EQ-Control will try to guess where is Palm Desktop installed. This can be
checked in the "Tools | Preferences | Collectors | Palm OS" menu, as seen in Illustration 7. If using a Palm
device for collecting data, check that the folders are the appropriate ones, corresponding with the location of the
Palm Desktop program. If you installed Palm Desktop after installing EQ-Control, press the Detect button so that
EQ-Control may find the location of the program. If this can’t be achieved, enter them manually.
2.Installing and configuring EQ-Software
7 / 24
Illustration 6. Plain EQ-Control main screen
Illustration 7: EQ-Control Collectors’ Configuration
2.Installing and configuring EQ-Software
8 / 24
2.2.2. EQ-Palm Installation and configuration
EQ-Collector for Palm OS (EQ-Palm) can be installed manually in each device using Palm QuickInstall; this
program is included with Palm Desktop. Nevertheless, this procedure is carried out automatically by EQ-Control
when a questionnaire is installed in the device, so this step may be omitted in most cases.
If for example, you wish to install EQ-Palm in order to update an older version of the program without modifying
the existent questionnaires in the collector; open the folder where EQ-Collector for Palm OS executable is. For
simplicity EQ-Software installer will leave a shortcut to such folder in the start menu [Illustration 5]. Inside this
folder there will be one folder for the English (en) and one for the Spanish (es) versions of EQ-Palm. Open the
desired folder, double click the EQCollector.prc file. Palm QuickInstall will then pop up and let you choose the
device where the program is to be installed. Choose the desired palm from the list and press OK. The program will
be installed the next time the device is synchronized. Plug in the PDA and start the HotSync procedure.
2.2.3. EQ-Mobile installation and configuration
If several Windows Mobile PDAs are going to be used, first install EQ-Mobile in each one of them. In general, EQMobile can run in PocketPC 2003, Windows Mobile 5 and 6; moreover it supports any device that uses a pen to pin
point over the screen, whether they are cell phones or not. In order to install EQ-Mobile, follow these steps.
1. Using the USB cable, plug in the PDA to the computer where EQ-Software is installed.
2. ActiveSync/WMDC will now become active. If a wizard shows up, you may cancel it. If ActiveSync/WMDC
hasn’t been installed, refer to section 2.1.2.
3. Open the EQ-Mobile installer by clicking "Start | Programs | EQ-Software | EQ-Mobile installer"
[Illustration 5]. The installation program will take care of installing EQ-Mobile in the PDA currently
connected [Illustration 8].
4. Follow the steps indicated by the wizard, when notified check the PDA to finish the installation.
5. If a memory card is installed in the device, when prompted always choose to install EQ-Mobile in the main
memory.
6. If warned about the absence of a digital signature proceed to install anyway, this only occurs in devices
running Windows Mobile 5 or higher. Several reasons support the absence of a digital signature in EQMobile, one of them is to maintain compatibility with PocketPC 2003.
7. When the wizard finishes up, accept the final message. To start EQ-Mobile for the first time, search it’s
icon in the PDA menu, this can be done by clicking "[PDA] Start | Programs | EQMobile".
8. EQ-Mobile will start for the first time and probably won’t be able to find a survey to collect data, so it’ll
show instructions for installing questionnaires and areas. Later on this manual this procedure will be
explained.
9. EQ-Mobile’s language and other preferences can be modified by clicking "Edit | Preferences" in the
application’s main menu. For these changes to take effect restart EQ-Mobile by clicking the cancel button
in the lower part of the EQ-Mobile screen, then initiate it from the start menu of the PDA.
10. If EQ-Mobile must be installed in other devices, unplug the current one and repeat steps 1 to 9 in each one
of them. If an older version of EQ-Mobile is installed in any of the PDAs, the same procedure will update
the software to the one present in the computer.
2.Installing and configuring EQ-Software
9 / 24
Illustration 8: EQ-Mobile device installation
3. Questionnaire design
To collect data from census and surveys for the research required, one is in need of a tool that allows capturing it.
This tool is called a questionnaire and in a simplistic approach it may be seen as a set of questions.
Through the years, researchers have written questionnaires using office related software (Microsoft Word,
Microsoft Excel, OpenOffice.org...) or graphic design programs (QuarkXPress, Adobe Illustrator...). These
programs are designed to accommodate the aesthetic part of a questionnaire, but are not as useful in the basic
questionnaire making needs. For example, by changing a question’s name a design tool might update all of the flow
control related issues, or could warn about orphan jumps in case that question was to be deleted.
EQ-Software’s EQ-Design is intended to help researchers build a questionnaire in a user friendly way.
Unfortunately, EQ-Design is currently under development and its features are not discussed in this document.
Nevertheless, one can still exploit EQ-Software advantages by using plain text questionnaires that respect
Electronic Questionnaire Markup Language (EQML) syntax, this being a questionnaire writing markup language,
just as HTML is a web page writing language that can be understood by web browsers.
Since electronic questionnaires are plain text files, they can be created by any text editor program as long as it
complies with EQML notation. Assume a designer wants to write the question presented in Illustration 9 using
EQML, it’s composed of a text field, a numeric variable ranging from 0 to 25, or a special 99 value in case the
interviewer doesn’t know or doesn’t answer.
3.Questionnaire design
10 / 24
Illustration 9: Numeric variable question
Each of the question’s parts can be written on a text file. But it’s necessary to enclose the text label, variable and
categories using tags, so that the program can distinguish between the different elements of a question, these are
highlighted in the piece of code that comes next.
<question>
<text>How many living children do you have?</text>
<variable>
<text>Children</text>
<categories>
<category>None</category>
<category>DK/DA</category>
</categories>
</variable>
</question>
Which tags can a designer use to form a question? These will be formally written in a document called Electronic
questionnaire specification (eqml-version.pdf) that will be available in the EQ-Software web page [currently in
development]. This document will specify the tag’s names, what they mean, the attributes allowed and how are they
used. The following code shows the previously presented question written in EQML.
<question name="pQ12">
<text>How many living children do you have?</text>
<variable name="Q12" type="num" range="0:25,99">
<text>Children</text>
<categories>
<category code="00">None</category>
<category code="99">DK/DA</category>
</categories>
</variable>
</question>
From the earlier code, EQ-Software infers that the question name is pQ12, the text that should be read to the
interviewee is “How many living children do you have?”, and that a numeric answer ranging from 0 to 25 or
99 is expected and should be saved in variable Q12. Out of those values, two have special meanings, 0 means he/she
has no living children and 99 means the interviewee doesn’t know the answer or doesn’t want to respond.
Since EQ-Design is not yet functional, a tailored questionnaire can be built using an existing one, these are available
in the Examples folder where EQ-Software was installed, it’s also accessible by entering the "Start | Programs |
EQ-Software | Examples" menu. Extra help might be found in the EQ-Software web page.
4. Survey control
Once the questionnaire’s design stage is done, all we get is a text file saved in the computer’s memory, so as to
collect data it's necessary to create a “survey”, point out the places where data is going to be gathered, who are the
interviewees and assign this to the interviewers. EQ-Control is in charge of this step, its features are discussed in
this chapter.
4.Survey control
11 / 24
4.1. Survey creation
An electronic questionnaire is not enough for collecting data. A data base to save the interviewee’s answers, point
out the enumeration areas where to gather data and which interviewers will do the field work are needed. All of this
information is what EQ-Control calls a “survey”. Using the electronic questionnaire you must create a survey. This
can be done by one of the following ways:
•
If the electronic questionnaire (.eqml) is open in a file explorer, just drag and drop the file into EQ-Control.
The "Create new survey" dialog will pop up [Illustration 10].
•
Press the "New Survey" button in EQ-Control's main screen or click the "Survey | New..." menu or press
Ctrl+N. An empty “Create new survey" dialog will appear [Illustration 10]. Press the browse button […],
find the .eqml file and click the accept button.
By any of both means EQ-Control will open the file and check for consistency with the language syntax, this means
ensuring that the questionnaire complies with some minimal requirements. It’s likely that EQ-Control will find
some errors and report them by highlighting in red as shown in Illustration 11.
Illustration 10: Create new survey dialog
In Illustration 11, EQ-Control reports that a type variable wasn’t supplied for question qPROT2. The designer must
correct the error and reopen or drag again the .eqml file. This should be repeated as needed until a positive answer,
as the one in Illustration 10, is received.
The create button will be enabled once EQ-Control realizes the questionnaire is valid. By pressing it an empty
database from the questionnaire will be created in the same folder, such file has an .eqdb extension. In addition an
.eqcf extension control file will be created, this is a list of files corresponding to the survey plus some other details.
If both files are created successfully, EQ-Control will open a survey just like the one in Illustration 12.
When an interview is opened in EQ-Control, it’ll show several panels that the user may relocate. The Collected
Data panel shows the data collected and saved in the data base up to that moment. To the right is the Properties
panel that shows details about a selected element, above this panel is the Tools panel, which is divided in several
tabs, among them is the Collectors tab, the names of the palms synchronized will be shown here. Illustration 12
shows these panels empty since there’s no data collected yet. To start working it’s very likely that you’ll need to
import some data beforehand.
4.Survey control
12 / 24
Illustration 11: Create new survey dialog with errors
Illustration 12: Empty survey in EQ-Control
4.2. Data import
In a newly created survey an empty database is expected, and it should be filled up as the field work advances. It’s
common that some data is known before interviews are done. This is called pre known data. Visiting place samples
or people to interview are good examples of this behavior. Yet any available variable may have a pre set value using
4.Survey control
13 / 24
the importation mechanisms explained in this section.
4.2.1. Import process
The usual way to enter data into the data base is by importing them from sources external to EQ-Control. Electronic
worksheets, data bases, palm files or other files can become data sources. Importation process is rather simple, just
locate the files and/or folders you wish to import and drag them over EQ-Control, Import data dialog will show up
as in Illustration 13, here you’ll be able to check the files’ list before importation process begin.
When the import list is rather large or the files are distributed in many folders, one may drag a directory over the
program’s main screen. EQ-Control will go over the directory and folders adding the files that can be imported.
Searching inside many levels of folders is known as recursive scan and can be enabled in the Options tab in the
"Import data" dialog.
By clicking the check box next to any of the files you may exclude it from importation. Once all files are ready for
import, press the Import button. EQ-Control will import them one at a time in the same order as they were listed,
then as the process goes on it’ll show an event log at the bottom of the screen. New data will be shown in the
Collected data panel.
Illustration 13: Import data dialog
4.2.2. Import restrictions
The files you wish to import need to comply with certain restrictions. EQ-Control allows only three file formats:
comma separated values (.csv), palm (.pdb) and text records (.eqea) files. Microsoft Excel 97-2003 (.xls),
OpenDocument Spreadsheet (.ods), Stata (.dta) and possibly SQLite3 (.db3) files may be supported in the future.
A comma separated values file (CSV) is a table transferred to a text file, each line is a row and each column is
separated by a comma. A CSV file’s first line is special and has the names of the columns. Below is a hypothetical
4.Survey control
14 / 24
table and its conversion to a CSV file.
LotId
LotDescr
Province
429
El Ceibo
6
430
Convento, Unión 6
432
Las Esperanzas
1
LotId,LotDescr,Province
429,El Ceibo,6
430,"Convento, Unión",6
432,Las Esperanzas,1
EQ-Control prefers CSV files for many reasons. They’re not limited to 256 columns or 65535 rows, but to the
amount of space available in the hard drive. They have a simple structure. They’re universal, meaning they can be
transported to any operating system. Almost any electronic worksheet or data base table can become a CSV file.
CSV files importation and exportation is supported by most related applications. If EQ-Control had to import
electronic worksheets directly, it’ll have to evaluate the formulas so as to obtain the values, whereas a CSV file only
has the values. Even though it has a freely format, CSV files must comply with the restrictions below to accomplish
a successful importation:
1. The CSV file must have a valid syntax. The file must respect the previously explained notation. If a comma
is contained in a value it must be enclosed by quotation marks as shown in the preceding example. Usually
programs that export CSV files take care of this matter.
2. The file’s name and the entity’s (analysis unit) name must match. A CSV file is an entity table. Since there’s
not a field inside the file where to put the entity’s name, EQ-Control needs for the file’s name to have the
entity’s exact name.
3. All the variables must be in the questionnaire and belong to the same entity. Each CSV column must make
reference to a questionnaire variable’s name and all CSV’s variables must belong to the same entity. Even
though it’s not necessary for the variables to be in the same order as in the questionnaire or to be case
sensitive; it’s advisable to do this so as to make it easier to correct errors in case EQ-Control reports them.
4. Entity’s hierarchy order, which is declared in the questionnaire, must be followed when importing files.
Entities relate to each other in a hierarchy, so that they depend among them. To add an instance to the
survey, its parent instance must already exist in the data base. For example, using a housing survey, to add a
Home member it’s necessary for a Home to already exist in the data base, and to be able to add a Home a
House must had been added.
Up to this date, EQ-Software imposes the existence of two entities: the enumeration area (EnumerationArea), and
the observation (Observation) as a child of the first one. An enumeration area is a geographical unit usually
assigned to a single interviewer. An observation corresponds to the interview done inside an enumeration area.
Naturally these are the first entities needed and the researcher must generate the two corresponding CSV files
(EnumerationArea.csv and Observation.csv) in order to import data from other entities. The contents of these
files are usually known as the survey's sample.
Every instance to be added in the data base must be identified and the researcher must choose the keys for the
enumeration, observation and other instances. A CSV file must contain the keys belonging to its superior entities.
For example, to identify homes these might be the CSV variables:
EnumerationArea.csv =
Observation.csv =
House.csv =
Home.csv =
HomeMemeber =
{
{
{
{
{
PCCDD,
PCCDD,
PCCDD,
PCCDD,
PCCDD,
Seg,
Seg,
Seg,
Seg,
Seg,
DescriptionArea }
NumHouse, NombreBoss, LName }
NumHouse, NumHou2 }
NumHouse, NumHou2, NumHome }
NumHouse, NumHou2, NumHome, NumHM, Name }
In the above fragment PCCDD is understood as the codes for Province (State or department), County (Municipality),
District (Parrish) and Seg for censual segment. Enumeration and observation entities will become optional in future
versions of EQ-Software. Please notice that the names of .csv files for these two entities must be in English.
4.Survey control
15 / 24
4.3. Area assignment
Once the sample has been imported to the survey’s data base, you’ll have a set of empty areas. To fill them up, it’s
necessary to distribute the enumeration areas among the interviewers. It’s not convenient to assign all areas to every
collector, but just a few chosen carefully. In general, a manner to do this is as presented next:
1. Use the tree- like structure in the collected data panel to choose the areas. Illustration 14 shows 4 areas
selected (in blue). To multi select hold down the Ctrl key while clicking over the desired areas, or holding
the Shift key to select a range. The arrow keys can be used as well. An area can be quickly found by using
the “Search” text box in the lower part of the collected data panel.
Illustration 14: Areas selection for assignment
2. Once the collector’s designated areas are chosen, export them to a format the collector can understand.
There are several ways to accomplish this. You may right click and press the Export option in the menu or
by clicking "Survey | Export" in the main menu, also by clicking the Export button in the tool bar or by
pressing Ctrl+E. An "Export data..." dialog as the one presented in Illustration 15 will appear.
3. In the "Export data..." dialog choose the destination format according to the collector device in use. For
example, choose "Palm" to generate areas in Palm OS format or "TextRecords" if Windows Mobile or EQPc is going to be used. These formats will be discussed later on this document.
4. In the “Export data..." dialog choose the destination directory where the exported files are going be sent.
Since these files are disposable once they’re on the collector, this directory may be disposable. Avoid using
the same directory as where the questionnaire is, since the exportation may produce many files and most of
them would be considered unimportant for the researcher’s purpose.
5. Check the Export questionnaire option if it’s the first time you’re sending files to a collector, or if a
questionnaire update is intended. A questionnaire is essential for fulfilling the interviews. This check box
can be unchecked once the collector has the questionnaire in it.
6. If many collectors have different areas assigned, it may be convenient to use the same destination directory.
The “empty target directory” option allows emptying the output directory before exportation is done,
this could be useful if one is in need of only copying the files corresponding to a specific collector, and is a
time saver since there's no need to select among many other meaningless files. The "Recursively" option
4.Survey control
16 / 24
is used when emptying nested folders inside of destination directory is needed.
7. Once all the appropriate options are chosen on the "Export data..." dialog, click on the Export button.
EQ-Control will generate the areas, the questionnaire (if requested) and other files into the destination
directory. Open a file explorer, navigate to the output directory and copy the exported files into the
collector. This step may vary according to the collector; it’ll be explained in more detail later on the chapter
.
8. Once step 7 is done, EQ-Collector is ready to start making interviews; this process is explained in chapter 5.
All collected data will be saved within the exported areas in the device’s memory. Instructions on how to
extract this data and update the data base will be presented in chapter 6.
Illustration 15: Data export dialog used to assign areas to the collectors.
4.3.1. EQ-Palm Area Assignment
After generating palm files in the destination folder, EQ-Control will launch Palm QuickInstall which will allow to
choose the device where the generated files are to be sent [Illustration 16]. Choose the name of the desired device
and click the accept button. Plug in the PDA and start the HotSync procedure. The generated files will be installed
in the palm without the risk of overwriting the previous data.
EQ-Control’s Palm Desktop link directory should be properly configured so that Palm QuickInstall is invoked
correctly, as mentioned in section 2.2.1..
4.Survey control
17 / 24
Illustration 16: Choose the destination palm where the files are to sent
4.3.2. EQ-Mobile Area Assignment
Direct communication between Windows Mobile's PDAs and EQ-Control isn’t supported in the present version of
EQ-Software, instead the file’s transfer must be done manually by the field coordinator. This procedure is explained
below.
1. Using a file explorer find the destination directory indicated in the "Export data..." dialog [Illustration
15], as done in the explorer’s left side on Illustration 17. Copy the files present in the folder to the PDA’s
memory, as explained next.
2. Plug in the PDA to the computer. ActiveSync/WMDC will now start. Press the "Explore" button. Another
file explorer will start; this program allows the PDA’s main memory and memory card (if supplied)
exploration.
3. Using the PDA’s file explorer, search for the folder where EQ-Mobile expects to find the surveys. The
default EQ-Mobile’s folder for this is located at "\My documents\Surveys" (always in English); the left
side of file explorer in Illustration 17 points this out.
4. Drag the selected files from the PC’s folder to the Surveys folder in the PDA. If asked for file conversion
by the ActiveSync/WMDC program, answer positively.
5. Be careful not to overwrite files. If areas containing data and already assigned to PDA are overwritten by
new empty ones, the information gathered will be lost. Keeping a PDA’s files back up is the only way of
preventing possible data loss due to the situation mentioned above.
6. Repeat the previous steps to setup other devices. If each PDA has different areas assigned, it’s advisable to
clean the destination folder at each export, choose the desired areas, export them as "TextRecords" and
repeat from step 2.
4.Survey control
18 / 24
Illustration 17: How to copy exported enumeration areas to the PDA’s memory
Up to this point, the questionnaire and enumeration areas are assigned to one o more Windows Mobile devices. EQMobile is now ready to carry out the interviews, as explained in chapter 5. If the start up instructions still show up
when EQ-Mobile is opened, exit EQ-Mobile and restart it (press the
button located in the button bar or click
“Menu | Exit" menu). If after doing this, a survey isn’t yet available, check that the questionnaire’s file (.eqrf) is
among the generated files, and that the PDA’s folder where files are copied is the same as the one present in EQMobile’s configuration.
Notice the interviews can be stored in the memory card (if supplied). So as to do this change the "Survey
directory" path with one to the memory card, usually "\Storage Card", in EQ-Mobile’s configuration. If done so,
be advised to insert the memory card every time EQ-Mobile is used.
4.3.3. EQ-Pc Area Assignment
EQ-Collector for PC, also known as EQ-Pc, is the PC version of EQ-Mobile, and is available in the computer where
EQ-Control is installed. EQ-Pc may be used for error check and correction, conduct telephone interviews using a
set of computes or by the use of netbooks or tablet pc’s.
To assign areas to EQ-Pc, copy the files generated for EQ-Mobile ("TextRecords") to the folder where EQ-Pc
expects to find them, by default it’s "My documents\Surveys". This may be changed in the EQ-Pc preferences
menu; it could even be the one chose in the "Export data..." dialog shown in Illustration 15. Be advised that EQPc saves data in the .eqea files located in this folder, avoid accidental overwriting.
4.4. FTP Data Transfer
If using EQ-Mobile and an FTP (File Transfer Protocol) server is available, one can take advantage out of it so that
every time an interview is done a copy is sent to the FTP server. Certain requirements must be satisfied to correctly
use this feature:
4.Survey control
19 / 24
•
Devices must be connected to the internet. The most popular ways of doing this are by (1) connecting to a
wireless network (Wi-Fi) or (2) purchasing an internet mobile plan (GPRS). Any other type of connection
might work as well, it’s not necessary to have a continuous connection; for example, interviewers working
in remote areas could upload the interviews at the end of the day or on weekends.
•
An FTP server is accessible to everyone. It's needed to create an account (username and password) and
allow EQ-Software to use it; this is explained later on this manual.
•
Network bandwidth. If there are many interviewers uploading information to the server, be sure there’s
enough disk space and bandwidth to satisfy the needs. Each enumeration area’s size varies according to the
amount of variables in the questionnaire. You may get an approximation by completing an interview and
checking for the .eqea file’s size.
EQ-Software will know an FTP server is in use when there’s an .ftp extension file in the questionnaire’s folder.
Initially the file must have one line with the server’s address, username, password and path where files are meant to
be copied. Use the following notation:
ftp://username:[email protected]/home/user/folder
Underlined words must be replaced by the real values; the rest should stay the same. Type the password literally and
save the .ftp file. When EQ-Control opens the .ftp file, it’ll replace the password with an encrypted one [Not
implemented yet].
So that the PDA realizes it needs to send interviews’ copies to the FTP, a copy of the .ftp file is necessary in the
PDA’s electronic questionnaire’s folder (Surveys folder). Once an interview is completed EQ-Mobile will try to
connect silently to the FTP server. If succeeded, a copy of the interview will be placed on the server under a folder
with the PDA’s name and the date time of the copy.
EQ-Control can access the FTP server and download the files sent by the collectors while they’re still on the field.
Unfortunately this feature wasn’t implemented at the time this manual was written. Instead, the coordinator can
download the complete folder from the FTP server to his/her hard disk (using any FTP client software, such as
FileZilla) and then drag the folder to the EQ-Control main screen so as to import the information into the collected
data base.
4.Survey control
20 / 24
5. Data collecting
Once each collector has a copy of the questionnaire and enumeration areas assigned, they must be hand over to the
personnel on the field (enumerators and supervisors) so as to search for informants and carry out the interviews.
Field personnel must be trained of how to operate the computer where work shall be done, both on hardware and
software as in the program used to carry out the interviews, EQ-Collector. This chapter is dedicated to these three
aspects for each collector supported by EQ-Software.
5.1. Introduction to hardware and operating system
EQ-Collector is a data collecting program, it needs to be executed on a computer. Additional knowledge on the
hardware and operating system is required before data collecting starts. This sections supplies a basic introduction
on these matters.
5.1.1. Introduction to Windows Mobile.
A Windows Mobile device is a small computer similar to a PC, with many limitations but suitable to carry out
personal interviews thanks to its portability. It provides a touch screen that utilizes a stylus that comes with the
device. Avoid the use of extreme pressure while handling it, since may become damaged. If possible protect the
screen with adhesive plastic sheets sold separately as accessory.
A rechargeable battery supplies the energy the device needs, its duration varies according to many factors. To
extend its charge the PDA will turn off automatically after a certain time if inactivity has passed ( but it may be
configured as told in section 2.1.2.). The PDA can be turned on and off as pleased, at any time without incurring in
data loss.
Illustration 18. Today's screen
Illustration 19. Windows Mobile's start menu
Illustration 18 Depicts the “Today” screen which is similar to Windows PC's desktop. The “Today” screen provides
recent information like notes on the agenda or received mails. Some devices are equipped with special buttons to
turn on and off wireless internet (WiFi), bluetooth, GPS or cellphone. To save energy try to keep this features
disabled. If the “Today” screen is not visible, you may do it so by clicking “Start” and then “Today”.
Installed programs are accessed by the Start menu located at the upper left part of the screen [Illustration 19], this is
divided into several sections, above all stand out the more frequently used programs and two special groups:
5.Data collecting
21 / 24
“Programs” and “Configuration”. The
first one allows access to all programs installed in the device, the latter is
a "control panel" to configure the device.
Windows Mobile allows to execute several programs at a time, but all programs work in full screen so only the
active one will be visible. If access is needed to a program running in the background, one may press the[X] on the
upper right corner of the screen until such program is visible again, or well, by invoking the program again from the
Start Menu.
Notice that the [X] on the upper right corner has a misleading effect, it doesn't close the program, but minimizes it
and will still run on the background. If terminating a program is intended, do so by clicking "Start |
Configuration | System | Memory | Running".
5.1.2. Introduction to Palm OS
Palms usage is very similar to traditional computers, but some differences must be bear in mind. These devices are
notoriously more limited than desktop computers, but useful enough for collecting statistical data.
Palm's screen is touch sensitive and is operated using a plastic pencil or stylus kept in the right side of the device, as
Illustration 20 shows. Pressing over an area in the screen is known as tap or tapping. The whole area of the screen is
sensitive and must not be pressed in excess in order to avoid damages. It's advisable to add protective adhesive
plastic sheets sold separately as accessories (sold by Palm).
Palms power up from a rechargeable battery, its charge duration is in direct relationship with many factors. To
extend the battery's life the device turns off automatically after 2 minutes of inactivity (this may be changed in the
preferences menu). A palm device can be turned on and off as desired, at any time, without incurring into any data
loss.
Available programs are presented as icons (drawings) in the Application's Launcher menu, shown in Illustration 21.
To start a program just tap over it's icon. Only one program may be active at a time. To exit a program or to start
another, return to the application's launcher by tapping over the “Home” icon located near the lower left corner of
the screen.
On/off button
Stylus
Battery level
indicator
Application
categories
to input
A Area
letters
B
Area to input
numbers
System time
Returns to the
application launcher
Application's menu
Screen keyboard
(letters)
Brightness control
A B
Screen keyboard
(numbers)
Hardware
buttons
Illustration 20. Palm OS hardware controllers
Illustration 21. Palm Os start menu
Applications (programs) are sorted into categories( Games, Utilities, System, etc.). To show programs belonging to
a certain category, select such category on the upper right corner of the screen (Illustration 20). Tapping several
times over Home will change the categories in a cyclic order.
5.Data collecting
22 / 24
Most applications have an option menu, available by tapping over the title bar in the upper left part of the screen
(clock in Illustration 20). If the title bar isn't available, use the button located bellow the home button. Illustration 21
shows the application's lunch menu, notice the Delete option which allows to uninstall applications.
is one of the most important programs included in a Palm [Illustration 22], it allows to choose the date time,
among many other characteristics. Appearance may vary according to the device. For successful data collection it's
necessary to set the date time correctly and that the device is capable of receiving wireless data (Beam receive:
on), this can be found in the Power or General tab [Illustration 23]. If by any chance while tapping another area
than the one desired is selected, calibration may solve the problem, do this by using the Digitizer
option[Illustration 22].
Prefs
Hardware buttons located in the lower part of the device [Illustration 20] work for starting programs in charge of
handling personal information, such as the Date Book, Contact List, Memo pad, among others. Since such buttons
are not of great use for data collecting, they might be used to launch EQ-Collector, calculator, HotSync or others
useful features. This can be configured in the Buttons tab as Illustration 24 shows.
Illustration 22: Palm OS preferences
Illustration 23: Allowing wireless data transfers Illustration 24: Setting up hardware buttons with
applications
Many programs need text or numbers to be entered. This can be fulfilled by two means: using Graffiti or by the on
screen keyboard. Graffiti is a feature consisting of drawing traces similar to the ones made while writing with a
pencil, over area A in Illustration 20 for lower case letters, or on B area for numbers. If the trace is made between
these two areas, higher case letters are produced. Most traces are made similar to the way writing on paper is done,
but if help is needed, tap over A or B areas and drag the stylus to the upper part of the screen, this will trigger the
help menu of Illustration 25, the dot in each trace marks the starting point.
The other way to enter text is using the on screen keyboard, it's accessed by tapping over the ABC icon for letters or
123 for numbers. These are found on the far lower end of the A and B areas in Illustration 20. Once the keyboard is
active, tap over the “keys” to enter the text, when ready press the Done button[Illustration 26].
To select a text fragment, tap in the starting place and drag the stylus up to the point where selection is intended.
Selected text can be cut, copied, o pasted using the Edit menu provided by most programs. Context menu is not
available in Palm OS, nevertheless, a command bar is available by drawing the
trace in the A zone of
Illustration 20.
5.Data collecting
23 / 24
Illustration 25: Graffiti's help menu.
Illustration 26: On screen keyboard
Illustration 27: Command bar
Other drawings appear in the upper part of A and B areas[Illustration 20]. To the left is clock icon that allows to
check and change the device's date time. The sun icon to the right allows to change the screen's brightness. When
using the palm in a bright place, the screen's brightness must be increased so as to be capable of reading it, however,
this must be used wisely, because as brighter the screen is, more battery charge is used .
5.Data collecting
24 / 24