1
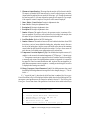
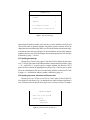
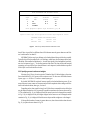
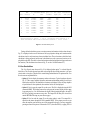
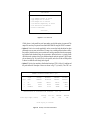
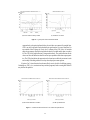
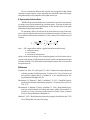
MICHBACK User’s Manual (Version 1.0 for DOS) PAV EME Load E1 E2 E3 NT Deflection ? Ronald S. Harichandran Cynthia M. Ramon Gilbert Y. Baladi MICHBACK USER’S MANUAL (Version 1.0 for DOS) by Ronald S. Harichandran Associate Professor Cynthia M. Ramon Graduate Student and Gilbert Y. Baladi Professor Department of Civil and Environmental Engineering Michigan State University East Lansing, MI 48824-1226 March 2000 1995 Michigan State University Board of Trustees 2 Table of Contents 1. Introduction .........................................................................................................1 2. Summary of Modeling and Backcalculation.....................................................2 2.1 2.2 Modeling of the Pavement and Forward Calculations................................................2 Backcalculation and Convergence Control.................................................................2 3. System Requirements..........................................................................................3 4. Configuring the Computer .................................................................................3 4.1 4.2 4.3 4.4 Installation Procedure .................................................................................................3 The “config.sys” File ..................................................................................................3 Required Amount of Free Memory.............................................................................4 Printing Graphics ........................................................................................................4 5. Using MICHBACK .............................................................................................4 5.1 5.2 5.3 5.4 5.5 5.6 5.7 5.8 5.9 File Names ..................................................................................................................4 Cursor Movement and Editing Keys...........................................................................5 Title Screen .................................................................................................................5 Main Menu..................................................................................................................5 Data File Menus and Associated Forms .....................................................................7 5.5.1 Specifying system of units ........................................................................8 5.5.2 Specifying initial data and convergence control.......................................8 5.5.3 Specifying pavement type.......................................................................10 5.5.4 Specifying layer names, thicknesses and Poisson’s ratios......................10 5.5.5 Specifying sensor locations and weights ................................................11 5.5.6 Returning to the main menu....................................................................13 Entering Deflection Data using the Keyboard ..........................................................13 Reading Deflection Data from a File ........................................................................14 5.7.1 Zooming..................................................................................................16 5.7.2 Identifying test locations for analysis .....................................................16 5.7.3 Deleting readings ....................................................................................17 5.7.4 Manually editing deflection basins .........................................................18 5.7.5 Backcalculation.......................................................................................18 5.7.6 Format of user-created ASCII deflection data file..................................18 Performing Backcalculation......................................................................................20 View Results Menu...................................................................................................22 Problem Reporting ................................................................................................25 Credits and Acknowledgments ............................................................................25 Appendixes .............................................................................................................25 References ..............................................................................................................26 Glossary..................................................................................................................27 iii List of Figures Figure 1. Figure 2. Figure 3. Figure 4. Figure 5. Figure 6. Figure 7. Figure 8. Figure 9. Figure 10. Figure 11. Figure 12. Figure 13. Figure 14. Figure 15. Figure 16. Figure 17. Figure 18. Figure 19. Figure 20. Figure 21. Figure 22. Figure 23. Figure 24. Figure 25. Figure 26. Figure 27. Title screen..................................................................................................................6 Credits screen..............................................................................................................6 Main menu ..................................................................................................................7 New data file menu .....................................................................................................7 Form for initial data ....................................................................................................8 Form for changing convergence control parameters ..................................................9 Form for pavement type............................................................................................10 Extension to form for pavement type 2.....................................................................10 Form for layer names, thicknesses and Poisson’s ratios...........................................11 Form for sensor locations and weights .....................................................................12 Possible extensions to Sensor Location/Weight form .............................................12 Form for station identification and number of data sets ...........................................13 Form for specifying deflection data..........................................................................13 Deflection data file type menu..................................................................................14 Typical plot of deflection data ..................................................................................15 Typical listing of drops for which the load differs by more than 10% from the target load...................................................................................................16 Deflection profiles before and after deletion for example ........................................17 Deflection basins for example before and after deletion at test location 8..............18 Sample ASCII deflection data file with instructions ................................................19 Form for seed moduli and moduli ranges .................................................................20 Prompt to request whether stiff layer should be incorporated in the analysis ..........21 Form for changing stiff layer properties ...................................................................21 Run-time summary screen ........................................................................................22 View results menu.....................................................................................................22 Summary results from backcalculation.....................................................................23 Typical profiles of the backcalculated moduli..........................................................24 Cumulative distribution functions for AC modulus and peak deflection .................24 List of Tables Table 1. Keypad functions within data-entry forms .................................................................5 iv 1. Introduction MICHBACK is a menu-driven program which uses a modified Newton method for the backcalculation of flexible and composite pavement layer moduli, thicknesses, and stiff layer depth from measured surface deflections. The backcalculation procedure is an iterative one, requiring several forward calculations. MICHBACK Version 1.0 has the capability of automatically processing falling weight deflectometer (FWD) measurement files created by the KUAB FWD device used by the Michigan Department of Transportation (MDOT). For other measuring devices, the data files should be translated into an ASCII file having the format specified in Section 5.7.6 before processing. The advantage of using data files containing several sets of measurements is that MICHBACK allows you to visually inspect the measured data, and manipulate the data prior to backcalculation. MICHBACK also computes useful statistics of the backcalculated results. Alternatively, you may analyze individual deflection basins by manually entering the measured deflections. The following files are included in the release of MICHBACK Version 1.0: 1. readme — An ASCII file containing installation instructions. 2. michback.exe — The executable backcalculation program. 3. sample.dat — Sample input data file. 4. kuab.fwd — Sample KUAB FWD deflection data file created by the KUAB software. The “sample.dat” file should be used with this deflection file. 5. sample.out — Sample output file generated by using “sample.dat” and “sample.fwd” and backcalculating at test locations1 through 18. The stiff layer depth was optimized at each test location. 6. sample.plt — Sample plot file corresponding to “sample.dat” and “sample.out”. 7. ascii.fwd — The ASCII template for translating deflections measured by devices other than the KUAB FWD. The supplied files can be used to generate screen images of most of the figures in this User’s Manual without having to perform an analysis. Once these files have been copied into your system, the program is started by typing michback. Four basic procedures are required when using the program: 1. Input of the initial data; 2. Input of the deflection data; 3. Backcalculation; and 4. Viewing the results Each of these procedures is described in this manual. Most of MICHBACK is written in FORTRAN 77. Graphics and screen manipulations are performed using the FORTRAN callable GRAFMATIC graphics library, marketed by Microcompatibles Inc., 301 Prelude Drive, Silver Spring, MD 20901. 1 2. Summary of Modeling and Backcalculation This section gives a summary of the modeling and backcalculation so that you are aware of the capabilities and limitations of the MICHBACK program. Further details about the modeling and backcalculation, and various sensitivity studies, are given in the publications by Harichandran et al. (1993 and 1994) and Mahmood (1993). 2.1 Modeling of the Pavement and Forward Calculations Each layer in a pavement cross section is assumed to extend infinitely in the horizontal directions, and the last layer—which may possibly be a stiff layer such as bedrock—is assumed to be infinitely deep. All the pavement layers are assumed to be fully bonded so that no slip occurs due to applied load. The load applied by the FWD or other device is assumed to be a uniform pressure over a circular area. Due to the assumptions used, the problem is reduced to an axisymmetric one. The pavement layers are assumed to be composed of linear elastic material. An extended precision CHEVRON program is used for the forward calculations. 2.2 Backcalculation and Convergence Control MICHBACK uses a modified Newton method for the backcalculation. Several parameters control the backcalculation procedure and the convergence checks. Default values for these parameters are automatically supplied in MICHBACK, but you can change these if desired. For unusual or difficult problems, control parameters that are different from the default values may yield better results. In the modified Newton method, a gradient matrix is used to determine how to change the current estimates of the layer moduli (and perhaps a layer thickness). Calculation of this gradient matrix is time consuming since it requires several calls to the CHEVRON program. Therefore, rather than calculating the gradient matrix after every iteration, by default it is usually updated only after three iterations. Although this procedure slows down convergence, overall efficiency is attained. If the program appears to be converging to an incorrect solution for a particular problem, then calculating the gradient matrix after every iteration may yield better results. Two criteria are used to check for convergence. Convergence is assumed to have occurred if one of the following conditions are met: 1. The root-mean-square (RMS) percentage error between the measured and calculated surface deflections is smaller than a specified tolerance. This criterion is expressed as 1 100 ---m m–1 ŵ j – w j - ∑ ----------------wj 2 ≤ ε1 j=0 where wj is the deflection measured by sensor j, and wˆ j is the deflection calculated at the location of the jth sensor using the current estimates of the moduli (and perhaps a layer thickness). The default value for ε1 is 1.0%. Often, only for theoretical deflection basins generated by an elastic layer program can the iteration be carried on until the RMS error in the deflections is extremely small. For deflection basins measured in the field, it will usually not be possible to obtain an arbitrarily close match between the computed and measured deflections. If a larger RMS error is acceptable, then ε1 can be increased. 2 2. The percentage error in each successive moduli (and perhaps a layer thickness) estimate is smaller than a specified tolerance. This criterion may be expressed as Ê ki + 1 – Ê ki ------------------------ × 100 ≤ ε 2 , k = 1, 2, …, n Ê ki t̂ i + 1 – t̂ i ------------------ × 100 ≤ ε 2 t̂ i where Ê ki is the estimated modulus of layer k at iteration i (and t̂ i is a layer thickness at iteration i). The default value for ε2 is 1.0%. This criterion indicates that the iterative scheme has stabilized and that the unknown variables are not changing significantly from one iteration to another. Increasing the value of ε2 is not recommended. For most problems, the default of 10 for the maximum number of iterations is sufficient. However, if convergence does not occur after 10 iterations, then you can increase the maximum number of iterations and try again. 3. System Requirements The MICHBACK program was originally written for personal computers running the DOS operating system. Soon it will also be available for Sun and Hewlett-Packard workstations running the UNIX operating system. For DOS systems, the following hardware and software are required. • MS-DOS version 3.0 or higher • 640 KB of random access memory (RAM) • A hard disk • A color graphics adapter (CGA, EGA or VGA) and compatible monitor Although not strictly required for the use of the program, the following hardware is strongly recommended. • A 386 or later PC. • A math co-processor (8087, 80287 or 80387). Running time will be greatly increased if a math co-processor is not installed. • A printer for obtaining hard copies of plots and output. 4. Configuring the Computer 4.1 Installation Procedure The MICHBACK program is initially supplied on one high density diskette. To install the program on a hard disk, first make a subdirectory to hold the program (e.g., MD \MBACK) and copy all the files in the supplied diskette to the hard disk. 4.2 The “config.sys” File In the root directory, there is a file named “config.sys” which configures the PC system and loads any requested device drivers when the computer is turned on. The following statement will need to be added to the “config.sys” file, if it does not already exist: FILES=20 3 The MICHPAVE program uses a Fortran callable graphics package called GRAFMATIC. Unfortunately, this package is not compatible with the “ansi.sys” device driver used by some other programs for screen manipulations. Thus, if the “config.sys” file has the statement DEVICE=ANSI.SYS then this statement will need to be removed and the computer re-booted (by simultaneously pressing the CTRL, ALT and DEL keys) before running MICHBACK. If available, use of an “ansi.sys” compatible device driver that can be unloaded from memory on demand is convenient since it eliminates the need to re-boot the computer. 4.3 Required Amount of Free Memory The MICHBACK program requires about 550 KB of free memory to run. If the output file is to be viewed or sent to the printer from within MICHBACK, then about 585 KB of free memory is required before running MICHBACK. DOS and memory resident programs reduce the amount of free memory for use by other programs. The amount of free memory available can be checked by using the DOS command MEM or CHKDSK. If there is insufficient free memory, then memory resident programs will need to be removed before running MICHBACK. If there is insufficient memory to load the program, a message similar to that shown below will be displayed: Program too big to fit in memory. 4.4 Printing Graphics Graphic screens produced by MICHBACK can be dumped onto an attached printer if the DOS command GRAPHICS.COM is issued after the computer is turned on and before MICHBACK is used. It may be convenient to include the command in the AUTOEXEC.BAT file so that it is issued every time the computer is turned on. To download graphics that are on the screen to the printer simply press the SHIFT and PRSCR keys simultaneously. 5. Using MICHBACK MICHBACK is designed to be user-friendly. Menus are used to perform the required steps in the backcalculation, and data-entry forms facilitate data input. In addition, extensive checking of input data is performed and appropriate error messages are displayed upon completion of each form. 5.1 File Names The names of files in which the data and results are saved may include an absolute or relative path name if necessary (e.g., “a:sample.dat” to save the file “sample.dat” on the diskette in drive A:, “\job1\sample.dat” to save the file in subdirectory “\job1”, “job1\sample.dat” to save the file in the subdirectory “job1” relative to the default directory, etc.). If no path is specified, the file will be saved in the default directory in which MICHBACK was started. 4 TABLE 1 KEYPAD FUNCTIONS WITHIN DATA-ENTRY FORMS Function KEY Return/Enter Tab Shift Tab Move cursor to next field Move cursor to next field on the right Move cursor to previous field on the left Home Move cursor to first field in the form End Move cursor to last field in the form ↑ or PgUp Move cursor to field above current one ↓ or PgDn Move cursor to field below current one Backspace Delete character before cursor Del Delete character at cursor Ins Insert space at cursor → Move cursor one space to the right ← Move cursor one space to the left F1 Check validity of entries in each field and save data. If some of the data is invalid, prompts will be issued for corrections. Esc Discards any changes made on the current screen and return to previous screen. 5.2 Cursor Movement and Editing Keys The data-entry forms have several fields into which data is typed. The field in which the cursor resides is highlighted on IBM compatible systems. The functions of the cursor movement and editing keys within a form are described in Table 1. 5.3 Title Screen When MICHBACK is loaded the title screen shown in Fig. 1 is displayed. Pressing the F1 key displays the credits screen shown in Fig. 2, while pressing any other key displays the main menu. 5.4 Main Menu The main menu is shown in Fig. 3. Any one of the eight options shown on the menu may be selected by typing a number from 0 to 7. These options are described below: • Option 1: Used to input data relating to a new backcalculation problem. • Option 2: Used to change data for the problem currently being worked. • Option 3: Used to read the data from a previously defined problem and modify it if necessary. The name of the file in which the previous data was saved will be requested. • Option 4: Used to enter deflection data manually using the keyboard. • Option 5: Used to read a KUAB FWD file, or an appropriately formatted ASCII file containing measured deflections from a series of tests. • Option 6: Prompts for run-time data and begins the backcalculation process. 5 Version 1.0 MICHBACK Backcalulation of Flexible and Composite Pavement Layer Properties Using a Modified Newton Method Developed for Michigan Department of Transportation by Dept. of Civil & Environmental Engineering Michigan State University East Lansing, MI 48824-1226 For further information, call: (517) 355-5107 Copyright (C) 1995 MSU Board of Trustees F1 to list credits Press any key to start Figure 1 Title screen MICHBACK Version 1.0 June 1995 Conceptual Development and Overall Guidance: Ronald S. Harichandran, Tariq Mahmood and Gilbert Y. Baladi Contributions: Cynthia M. Ramon and Weijun Wang - Programming A. Robert Raab - Collaboration Lynne Irwin - Corrected CHEVRON Program Sponsers: Michigan Department of Transportation University of Michigan Transportation Research Institute Project Directors: Gilbert Y. Baladi - Prinicipal Investigator Ronald S. Harichandran - Co-Principal Investigator Press any key to continue Figure 2 Credits screen 6 MAIN MENU 1. 2. 3. 4. 5. 6. 7. 0. Create a New Data File Change Current Data File Modify an Existing Data File Enter Deflection Data using Keyboard Read Deflection Data from a File Perform Backcalculation View Results Exit Selection: _ Figure 3 Main menu • Option 7: Used to view the backcalculated results. • Option 0: Exits from the MICHBACK program and returns to DOS. 5.5 Data File Menus and Associated Forms Data File, Modify Current Data File, and Modify Existing Data File menus are displayed when selecting options 1, 2 or 3, respectively, from the main menu. All three menus are identical in structure, and the first is shown in Fig. 4. The only difference between these menus is that in those used for modifying data files, existing data is modified instead of specifying new data. It is recommended that the options in the data file menu be followed in sequence. DATA FILE MENU 1. Specify System of Units (Current System is English) 2. Initial Data (Input/Output Filename, Tolerances, etc.) 3. Specify Pavement Type 4. Specify Material Properties 5. Specify Sensor Location 0. Return to Main Menu Selection: _ Figure 4 New data file menu 7 When modifying an existing file it is mandatory to first use option 2 and specify new names for the required file names, or to indicate that the input and output files used earlier should be overwritten. The other options may be performed in any sequence. 5.5.1 Specifying system of units Selecting Specify System of Units (option 1) in the Data File Menu allows you to change the system of units in which the data is entered, displayed and stored. The system of units that are currently active are shown within parentheses in item 1 of the Data File Menu. Whenever the system of units is changed, all data is automatically converted to the chosen system. When this option is chosen, the following prompt appears below the menu: Select System of Units Press E for English Units or S for SI Units: Press E to select English or British units, or S to select the international system of units. For new data files, the default is English units. Avoid changing back and forth between English and SI units since this can cause some changes in the data due to rounding errors. 5.5.2 Specifying initial data and convergence control Selecting Initial Data (option 2) in the Data File Menu displays the form shown in Fig. 5 (typical data is also shown in bold typeface). The data that should be entered into the fields are described below: 1. Filename to Save Data to: All data that is entered in this and other forms is stored in this file. The data may be recovered at a later time and modified if necessary. INITIAL DATA 1. 2. 3. 4. 5. 6. 7. 8. 9. 10. 11. Filename to Save Data to: sample.dat Filename to Output Results to: sample.out Route: MSU 29F District: 12 Control Section: 3 Lane: 2 Job No.: 6 Description #1: Test pavement section designated MSU 29F Description #2: Pavement has moderate alligator cracking Number of Layers: 3 (Max. 5) Load Plate Radius: 5.91 inches Number of Sensors: 7 (Max. 10) Temperature Correction Required? [y/n]: n Change Convergence Control Parameters? [y/n]: n Number of layers includes roadbed and excludes stiff layer. Maximum number of layers is 4 if stiff layer is to be incorporated in analysis. Figure 5 Form for initial data 8 2. Filename to Output Results to: The output from the analysis will be directed to this file. The output is in standard ASCII form and may be viewed or edited using any text editor. Output needed for graphical plots are stored in a file having a “.plt” file name extension and the same base name (i.e., the name without the extension) as the output file. For example, if the output file is named “sample.out” the plot file will be named “sample.plt”. 3. Route / District / Control Section: Descriptive alphanumeric data. 4. Lane / Job No.: Descriptive alphanumeric data. 5. Description #1: Descriptive alphanumeric data. 6. Description #2: Descriptive alphanumeric data. 7. Number of Layers: The number of layers in the pavement section. A maximum of five layers are permitted. If a stiff layer such as bedrock is to be included in the analysis, then the number of layers is limited to four and does not include the stiff layer. 8. Load Plate Radius: Radius of the FWD loading plate. 9. Number of Sensors: The number of sensors to be used in the backcalculation. Some FWD devices have a series of sensors behind the loading plate, and another sensor in front or to the side of the loading plate. Only the sensor at the middle of the plate and the remaining sensors behind the plate should be included in the analysis. If seven or fewer sensors are used, then one of two default sensor configurations may be selected later. 10. Temperature Corrections Required? [y/n]: If the backcalculated asphalt concrete (AC) modulus is to be corrected to the standard temperature of 77°F then type “y” otherwise type “n.” If temperature corrections are requested, then the AC modulus corrected according to a commonly used version of the Asphalt Institute equation (see Appendix A) is reported in the output file. Please be warned that deflection data, in general, does not support the Asphalt Institute temperature correction equation—a warning screen advising the user of this is displayed when creating a new data file. 11. Change Convergence Control Parameters? [y/n]: If the default parameters that control the modified Newton algorithms and convergence are to be changed, then type “y”. The default is “n.” If “y” is typed for item 11, then when the Initial Data form is completed, the Convergence Control form shown in Fig. 6 will be displayed with the default values shown in bold typeface. The convergence control parameters may be changed as outlined in Section 2.2. The last line of the Convergence Control form relates to the generation of seed values for the moduli and stiff layer CONVERGENCE CONTROL 1. 2. 3. 4. 5. Calculate Gradient Matrix After 3 Iteration(s) Maximum Number of Iterations: 10 (Min. 10) Modulus Tolerance (%): 1.00 RMS Tolerance Desired (%): 1.00 Suppress Internal Generation of Seed Values? [y/n]: n Figure 6 Form for changing convergence control parameters 9 PAVEMENT TYPE Flexible 1 Composite 2 AC on Rubblized Concrete 3 Pavement Type to be Analyzed: 1 Figure 7 Form for pavement type depth to begin the iteration procedure, and is used only as a safety mechanism. Usually the seed values for the moduli are generated internally using built-in regression equations, but may be changed before backcalculation begins. While every effort has been taken to ensure that the regression equations do not cause a run-time failure, for unusual situations a run-time failure causing the program to crash may occur. If this should happen, then the internal generation of seed values may be turned off by typing “y” for item 5. 5.5.3 Specifying pavement type Selecting Specify Pavement Type (option 3) in the Data File Menu displays the form shown in Fig. 7. The type of pavement for which backcalculation is being attempted is specified by typing 1, 2 or 3, respectively. If 2 is typed to specify a composite pavement, then when the F1 key is pressed, the form is extended by appending the lines shown in Fig. 8. Data may now be entered only on the extended portion of the form. You must identify which layer consists of the PCC slab by typing 2 or 3, and whether the subbase is granular or stabilized by typing 1 or 2. 5.5.4 Specifying layer names, thicknesses and Poisson’s ratios Selecting Specify Layer Thicknesses and Poisson’s Ratios (option 4) from the Data File Menu displays the form shown in Fig. 9 for entering the layer names, thicknesses and Poisson’s ratios. A thickness cannot be input for the last layer, even if it overlies a stiff layer. The depth to ~ COMPOSITE PAVEMENT Which layer is PCC slab? 2 Subbase Type: 1 GRANULAR 1 STABILIZED 2 Figure 8 Extension to form for pavement type 2 10 ~ LAYER THICKNESSES AND POISSON’S RATIOS Layer No. 1 2 3 Layer Name AC Base Roadbed Thickness (inches) 13.5 11.0 Poisson’s Ratio .35 .40 .45 Allow program to improve layer thickness? [y/n]: n Depth to stiff layer can be specified on Stiff Layer Properties screen. SUGGESTED VALUES FOR POISSON’S RATIO AC 0.35 Concrete 0.20 Granular 0.40 Cohesive 0.45 Figure 9 Form for layer names, thicknesses and Poisson’s ratios the stiff layer is specified in a different form. All thicknesses must be greater than zero and Poisson’s ratios must be less than 0.5. MICHBACK allows one layer thickness to be backcalculated along with the layer moduli. Typically this will be the roadbed soil or AC thickness, which have the most impact on the backcalculation. If the roadbed soil thickness (i.e., the stiff layer depth) is fixed and another layer thickness is to be improved, type “y” for the last question on the form. The form will then be extended requesting you to specify the layer whose thickness is to be improved, and the thickness specified for this layer is used as an initial seed value. 5.5.5 Specifying sensor locations and weights Selecting Specify Sensor Locations (option 5) from the Data File Menu displays a form similar to that shown in Fig. 10 if seven or fewer sensors are used. To select one of the default sensor layouts, type 1 or 2 for item 1. To select a custom layout type 3. By default, MICHBACK weights all sensors equally in the backcalculation process. If you suspect that one or more sensors are erroneous and wish to de-emphasize their readings at all locations in the backcalculation, then type y for item 2. Depending on the values typed for items 1 and 2 of the form, an extended version of the form may be displayed when the F1 key is pressed The possible extensions to the form are shown in Fig. 11. The extension in Fig. 11 (a) is displayed if only the sensor layout is to be changed; the extension in Fig. 11 (b) is displayed if only the weights assigned to the sensors are to be changed; and the extension in Fig. 11 (c) is displayed if both the sensor layout and the weights are to be changed. If the specified number of sensors is greater than seven, then a form similar to that shown in Fig. 11 (c) replaces the one shown in Fig. 10. 11 SENSOR LOCATION/WEIGHT DATA 1. Select sensor layout (1, 2 or 3): 1 2. Do you want to change default weights? [y/n] n SENSOR LOCATION Default Layout (1) Sensor No.: Sensor Location (inches): 1 .0 2 8.0 3 12.0 4 18.0 5 24.0 6 36.0 7 60.0 Default Layout (2) Sensor No.: Sensor Location (inches): 1 .0 2 12.0 3 24.0 4 36.0 5 48.0 6 60.0 7 72.0 Enter 1 or 2 to accept one of the default layouts. Enter 3 for any other configuration. Figure 10 Form for sensor locations and weights ~ ~ User Defined Layout (3) Sensor No.: Sensor Location (inches): 0 .0 1 8.0 2 12.0 3 18.0 4 24.0 5 36.0 6 60.0 (a) Sensor layout 3 and default weights ~ ~ User Defined Weights Sensor No.: Weight: 0 1.0 1 1.0 2 1.0 3 1.0 4 1.0 5 1.0 6 1.0 (b) Sensor layout 1 or 2 and user-defined weights ~ User Defined Layout (3) and Weights Sensor No.: Sensor Location (inches): Weight: ~ 0 .0 1.0 1 8.0 1.0 2 12.0 1.0 3 18.0 1.0 4 24.0 1.0 (c) Sensor layout 3 and user-defined weights Figure 11 Possible extensions to Sensor Location/Weight form 12 5 36.0 1.0 6 60.0 1.0 STATION IDENTIFICATION Station: 5 Starting Mile Post: Number of Data Sets (Max. 4): Figure 12 2.0 Ending Mile Post: 8.0 4 Form for station identification and number of data sets 5.5.6 Returning to the main menu Selecting Return to Main Menu (option 0) from the Data File Menu returns you to the main menu. Throughout MICHBACK, the “0” option returns you to the parent menu. 5.6 Entering Deflection Data using the Keyboard Deflection data may be entered manually by selecting Enter Deflection Data using Keyboard (option 4) from the Main Menu. The form shown in Fig. 12 is then displayed. Entries for the station number, starting milepost and ending milepost are optional. The number of deflection basins that are to be entered manually is specified in the last field. Up to four deflection basins can be entered at a time. When the F1 key is pressed, a form similar to that shown in Fig. 13 is displayed. The number of columns will equal the number of data sets specified on the previous form. The sensor readings for each deflection basin are entered in the columns. Deflections may be positive or negative (theoretically, negative deflection can arise for thin pavements). The average FWD drop load and DEFLECTION DATA (mils) Sensor No. 0 1 2 3 4 5 6 Data Set 1 Data Set 2 Data Set 3 Data Set 4 24.37000 20.87000 18.50000 15.58000 13.10000 9.50000 5.53000 22.27000 18.79000 16.48000 13.49000 11.04000 7.42000 3.50000 15.04000 11.63000 9.43000 6.67000 4.53000 1.71000 -.33000 19.63000 17.03000 15.42000 13.33000 11.59000 8.93000 5.66000 Load (lbs) AC Temperature (οF) 9000. 79. Figure 13 9000. 77. 9000. 80. Form for specifying deflection data 13 9000. 65. pavement temperature for each test are also entered on this form. The pavement temperature must be entered if temperature correction was requested, otherwise it is optional. Upon exiting from this form, the manually entered deflection basins may be plotted one after another or overlaid on the same plot. The visual display is useful for finding gross errors in the input data and for examining the general shape of the basins. Deflection basins entered manually are saved in the data file and may be recovered at a later time. 5.7 Reading Deflection Data from a File Deflection data for up to 400 tests may be read from a file generated by the KUAB FWD device operated by MDOT, or from a specially formatted ASCII file, by selecting Read Deflection Data from a File (option 5) from the Main Menu. The deflection data may be viewed graphically and manipulated prior to backcalculation. MICHBACK computes various useful statistics of the backcalculated results. When this option is selected, the menu shown in Fig. 14 is displayed. Options 1 is used to read a file created by the KUAB software, option 2 is used to read a file created by the newer SFWD software, or option 3 is used to read a file having the format specified in Section 5.7.6. For all three options, you will be prompted for the name of the deflection data file. Enter the name of the deflection data file, or press RETURN to return to the Main Menu. For a valid deflection data file, the data is read, unit conversions are performed if the data in the file is not in the same system of units as that being used in MICHBACK, and the deflection profiles are displayed graphically in a plot similar to that shown in Fig. 15. The data file must have deflections for at least two locations for the profile to be displayed. If the file has deflections only at one location, then the deflection basin is displayed rather than the deflection profiles. Occasionally, a deflection data file may have embedded comments, duplicate drops, or other anomalies that may cause problems when the data is read. If this should happen, an error message is displayed at the bottom of the screen, and a message such as the following is displayed below it: Delete line containing: "FORCE DIFFERENCE DETECTED... MEASUREMENTS MAY BE IN..." The deflection data file must then be edited to remove the line containing the string displayed within quotes, so that it can be read by MICHBACK. Note, however, that such errors may indicate a DEFLECTION DATA FILE TYPE 1. 2. 3. 0. Created by KUAB (old) Software Created by SFWD (new) Software User Created ASCII file (See User’s Manual for format) Return to Main Menu Selection: _ Figure 14 Deflection data file type menu 14 Figure 15 Typical plot of deflection data potentially serious problem at the related test location, and you should carefully consider whether to use the data at this location for backcalculation. Each curve in the profile plot (see Fig. 15) shows the deflections measured by a sensor along the length of pavement that was tested and is plotted in a different color on color monitors. In order to have a meaningful comparison between deflections at different test locations, the deflections at each test location are linearly scaled to correspond to the target load. This scaling is done only for the profile plot. Backcalculations at different test locations are actually performed using the average drop load at each location. The X-axis indicates the test location number which is sequentially assigned to the data in the file. The test location in feet (or meters) from a reference point, as entered by the FWD operator during testing, is displayed above the X-axis at major tick marks. In Fig. 15, the test location does not increase monotonically, but is somewhat erratic. This figure is selected to emphasize that the test location entered by the FWD operator may not be meaningful. It is recommended that the FWD operator be instructed to enter the test location distance from a fixed reference point, and that the tests be performed in sequence beginning from the closest to the farthest location. This will facilitate the physical interpretation of the data presented in the plot. In essence, the deflection profiles indicate the variation in the measured deflections along the pavement section. The plot is useful for identifying weak locations, erroneous measurements and for selecting test locations or segments for analysis. The deflections stored in the file must all be measured for the same target load and the number of drops at each test location must be identical. If the FWD deflection data file violates these requirements, then an error message is displayed. Error messages are also issued if there are unexpected entries in the data file, in which case you may need to edit the file and delete inappropriate 15 Test location(s) at which loads are outside 10% of target load of 9000. lbs are listed below: Location Number 3 4 4 4 Location Distance 20. 40. 40. 40. Drop Number 2 1 2 3 Difference from Target Load (%) 36.6 37.1 36.7 36.5 Finished reading data file. Press any key to continue Figure 16 Typical listing of drops for which the load differs by more than 10% from the target load lines before trying to read the file again. Additional tasks are performed using the menu displayed below the plot. Occasionally, an FWD file may contain drop loads that differ significantly from the target load, and in this case, drops for which the load differs by more than 10% from the target load are listed on the screen when the file is read. Fig. 16 shows a typical listing. 5.7.1 Zooming If deflections are measured at a very large number of test locations, then the initial deflection profiles shown after the file is read may be highly compressed and difficult to interpret. Selecting Zoom In/Out (option 1) allows you to obtain a clearer view. You are then prompted for a beginning and ending test location number for zooming in (or out). You may enter appropriate numbers for zooming, or enter R at either prompt to re-display the entire deflection profiles. When viewing a deflection profile that is zoomed such that successive test locations are displayed at each major tick mark along the X-axis, each sensor reading is shown with a circle symbol on the profiles. The circle symbol is not shown for deleted readings (see Section 5.7.3 below). 5.7.2 Identifying test locations for analysis The Identify Analysis Locations option (option 2) is used to begin specifying test locations for backcalculation. Typically, backcalculations are performed over a given pavement segment. You will be prompted for the beginning and ending location numbers for selecting the pavement segment. Three options are then presented for selecting deflection basins used for backcalculation: 1. Representative Basin: This option selects one deflection basin from among those measured at the test locations along the segment as the most “representative” one. Backcalculation is performed using the deflections measured at this single location. The basin is selected using the criterion outlined in Appendix B. 2. Individual Locations: This option performs backcalculation at each of the test locations in the selected segment. If the segment has several test locations, then the time required for the backcalculations may be considerable. A sub-menu is presented for selecting how to view the deflection basins. You may omit the viewing of basins, view only the first basin, or view the basin at each test location in the selected segment. 16 (a) Before Deletion Figure 17 (b) After Deletion Deflection profiles before and after deletion for example 3. Average Basin: This option computes an average deflection basin by averaging the deflections measured by each sensor over all test locations in the selected pavement segment. A single backcalculation is then performed using the average basin. 5.7.3 Deleting readings Selecting Delete Readings (option 3) allows you to delete the readings of one or more sensors at one or more test locations. This option may be useful if one or two sensors seem to give erratic measurements at some locations and you suspect that they are in error. You may then wish to delete suspicious measurements prior to backcalculation in order to obtain a more uniform deflection profile. During backcalculation MICHBACK assigns a zero weight to deleted measurements. Note that the original deflection data file is not changed in any way. Test locations with one or more deletions are not considered when determining the representative basin for a pavement segment. Deleted sensors are not considered when the average basin is computed for a segment. Up to 50 deletions may be made. You are prompted for a test location number and sensor number for each deletion. You may type “A” at the prompt for the sensor number to delete all sensors at the specified location. Note that sensors are numbered starting with 0. To quit without saving the deletions (in memory), type “Q” at either prompt. To keep the deletions and replot the modified profiles, type “X” at either prompt. Fig. 17(a) shows an example deflection profile in which the deflections measured by the second sensor at test location 8 appears to be high and that measured by the 5th sensor at test location 15 appears to be low. Prior to performing backcalculation, one may wish to explore the effect of deleting the readings of the second sensor at test location 8 and the fifth sensor at test location 15. The deflection profiles after the two deletions are shown in Fig. 17(b). The deflection basins at test location 8 before and after the deletion are shown in Fig. 18. In MICHBACK deflection basins are drawn using cubic splines. Note that the circle symbol is not shown for the deleted reading. For this example, the deflection basin after the deletion at test location 8 seems more reasonable than that before the deletion. 17 5.7.4 Manually editing deflection basins After selecting test locations for analysis, you may manually view/edit the sensor readings by returning to the Main Menu and selecting Enter Deflection Data using Keyboard (option 4). If the representative basin or average basin was selected for backcalculation, then only that single basin may be viewed/edited. If individual locations were selected for backcalculation, then the first four basins may be viewed/edited. Basins that are viewed/edited in this manner are saved in the data file and may be recovered at a later time. If you wish to perform backcalculation using the edited basins, then you must select Perform Backcalculation (option 6) from the Main Menu. 5.7.5 Backcalculation After identifying the analysis locations, the Backcalculate option (option 4) is used to initiate the backcalculation. This option is similar to the Perform Backcalculation option (option 6) in the Main Menu. Please see Section 5.8 for details on this option. 5.7.6 Format of user-created ASCII deflection data file If you use an FWD device that is different from the KUAB FWD then you will need to transfer your deflection measurements into an ASCII file having the format described in this section. MICHBACK can then read this ASCII file and plot deflection profiles, enable segments to be selected for backcalculation, and allow data manipulations as described in Sections 5.7.1, 5.7.2 and 5.7.3. The sample ASCII deflection data file shown in Fig. 19 is supplied with MICHBACK and can be used as a template for preparing a data file. The file has two parts: the first part contains comments, the second part contains the required data, and the two parts are delimited by a separator line consisting of at least 20 “=” signs. The required data must be formatted as follows: 1. An E or S must be typed as the first non-blank character of the first line (following the separator line) to identify English or SI units. Any comments entered after the first character are ignored. The data in the file may be in either system of units and if this is different from the system of units being used in MICHBACK, then the data is converted appropriately. (a) Before Deletion (a) After Deletion Figure 18 Deflection basins for example before and after deletion at test location 8 18 MICHBACK V1.0 ASCII DEFLECTION DATA The data before the separator line below is optional. The separator line, consisting of 80 "=" signs, must appear in each file followed by the required data formatted according to the instructions given below. Instructions -----------1) Make a backup copy of this file for a permanent record. 19 2) Arrange your deflection data in the column format shown at the bottom of this file. The data following the separator line are as follows: a) An E or S to identify English or SI units for all data in this file must be typed in the first column of the first line. If the system of units specified in this file is different from that specified in MICHBACK, then the deflection data in this file will be converted to correspond to the units being used in MICHBACK. b) The number of drops per test must be typed at the beginning of the second line. c) The target load must be typed at the beginning of the third line. All deflections are scaled linearly to correspond to the target load prior to backcalculation. d) The fourth, fifth and sixth lines are ignored. e) The deflection data begins at the eight line, and n+3 columns are required, where n=number of sensors. f) Columns may be separated by spaces or tabs. g) The number of drops at each station must be the same. h) Deflections for each test are grouped together. The station location and pavement temperature must be entered on the first line of the group along with the deflections measured for the first drop. Deflections for subsequent drops must be entered on consecutive lines. Deflections for different test locations must be separated by a blank line. List of Abbreviations --------------------SL = Station location (distance) from a fixed reference point TEMP = Pavement temperature LOAD = Actual load applied during FWD drop Dn = Deflection at sensor n (n = 1, 2, .., 10) Optional Information -------------------Project Number Test Location Additional Comments : : : (Replace the example data below with your data) ================================================================================ E <-- Type E for English or S for SI units 3 <-- Number of FWD drops per test 9000 <-- Target load SL TEMP LOAD 0 53.2 9663 9655 9648 100 52.5 200 56.2 D1 D2 D3 D4 D5 D6 D7 19.37 10.56 10.31 18.95 13.78 10.25 18.80 13.75 10.21 6.93 6.89 6.91 4.96 4.98 4.94 2.87 2.88 2.87 1.63 1.62 1.62 9769 9760 9736 10.22 9.98 9.88 7.84 7.69 7.65 6.25 6.12 6.09 4.76 4.73 4.69 3.78 3.79 3.75 2.52 2.52 2.51 1.48 1.47 1.50 9672 9671 9648 10.40 10.17 10.06 7.87 7.74 7.68 6.36 6.29 6.26 4.81 4.78 4.74 3.84 3.83 3.83 2.58 2.54 2.53 1.49 1.50 1.50 3) Cross-section data, number of sensors, and other pertinent information must be input directly in MICHBACK. Units ----------Deflections Temperature Load English ---------mils Fahrenheit pounds SI ------microns Celsius kN Figure 19 Sample ASCII deflection data file with instructions D8 D9 D10 2. The number of FWD drops per test must be typed at the beginning of the second line. Any comments entered after the load are ignored. Up to 5 FWD drops may be recorded at each test location, but the number of drops must be the same for all test locations and all the drops must be for the same target load (i.e., the drop height must not be changed). 3. The target load must be typed at the beginning of the third line. Any comments entered after the load are ignored. Each measured deflection is linearly scaled to correspond to the target load. 4. The fourth, fifth and sixth lines are ignored and may contain optional headers identifying the columns of data. 5. The deflection data is entered in columns separated by spaces and/or tabs. Up to 10 sensors may be used, and in addition to the sensor readings, the station location, pavement temperature and actual drop load must be entered. Deflections for each test are grouped together. The station location and pavement temperature must be entered on the first line of the group along with the deflections measured for the first drop. Deflections for subsequent drops must be entered on consecutive lines. Deflections for different test locations must be separated by one blank line. 5.8 Performing Backcalculation Backcalculation is initiated by selecting Perform Backcalculation (option 6) from the Main Menu, or by selecting the Backcalculate option in the deflection profile display when a deflection data file is used. Several forms are presented so that you may enter additional data required for the backcalculation. A form similar to that shown in Fig. 20 is displayed for specifying seed moduli and moduli ranges. Default values are generated by MICHBACK, but you may change these. The default values are generated using the representative basin, the first basin in the identified segment, or the average basin, depending on whether the backcalculation is being performed using the representative basin, at each individual location, or using the average basin, respectively. The seed moduli provide an initial starting point for the backcalculation and the moduli ranges constrain the backcalculated results. For well-behaved deflection basins, the backcalculated results are not sensitive to the seed moduli and very wide moduli ranges may also be specified. However, the convergence SEED MODULI (psi) Layer No. Layer Name Seed Modulus 1 AC 500000.0 50000.0 3000000.0 2 Base 10000.0 300.0 500000.0 3 Roadbed 7500.0 3000.0 100000.0 Figure 20 Minimum Modulus Form for seed moduli and moduli ranges 20 Maximum Modulus STIFF LAYER DEPTH 1. Program estimates the stiff layer depth to be: 2. Incorporate stiff layer? [y/n] Figure 21 192.1 inches _ Prompt to request whether stiff layer should be incorporated in the analysis will occur sooner if good seed moduli are provided. For ill-defined deflection basins (e.g., from badly damaged composite pavements), the final backcalculated results may be dependent on the seed moduli. If backcalculation is being performed at several individual locations, then the seed moduli specified on the form are used for the first backcalculation, and the backcalculated moduli are used as seed values for the subsequent backcalculation. MICHBACK uses internal regression equations to obtain an initial estimate of the depth to a stiff layer. The estimated value is displayed with a prompt as shown in Fig. 21. You may type y or n at the prompt to include or exclude a stiff layer in the analysis. If the backcalculation is being performed for a deflection basin generated by an elastic layer program without using a stiff layer, or if the estimated stiff layer depth is very large (say more than 400 in.), then you may wish to exclude the stiff layer. If a stiff layer is to be included in the analysis, then a form similar to that shown in Fig. 22 is displayed. You may change the modulus, Poisson’s ratio and estimated depth of the stiff layer, and indicate whether MICHBACK should optimize the estimated stiff layer depth. The stiff layer depth cannot be optimized if the thickness of a layer other than the roadbed soil is to be improved, since MICHBACK currently allows the optimization of only one layer thickness. In many cases, allowing the program to vary the stiff layer depth gives better results. However, for deep stiff layers, the backcalculated moduli may not be too sensitive to the stiff layer depth. MICHBACK does not allow the stiff layer depth to exceed 720 inches, since larger depths have a negligible effect on the backcalculated layer moduli. STIFF LAYER PROPERTIES 1. Modulus: 2000000.0 psi 2. Poisson’s Ratio: .45 3. Estimated Depth to Stiff Layer From Top Surface: 4. Allow Program to Vary Above Depth? [y/n] y Figure 22 Form for changing stiff layer properties 21 600.0 inches Iter. 0 1 2 3 4 5 6 7 8 RMS ---- Estimated Moduli (psi) ---Error(%) AC Base Roadbed 156.62 12.41 13.17 30.41 13.82 2.75 1.32 1.13 1.11 500000. 432148. 795023. 454054. 526295. 528461. 525222. 519612. 531109. 10000. 29687. 7422. 29687. 17043. 31564. 37951. 39751. 36592. 7500. 30000. 35250. 42328. 32889. 23597. 23710. 23710. 23883. Stf. Layer Depth (in) 600. 639. 666. 708. 720. 720. 720. 720. 720. Calculation Time (sec) 2 7 1 1 10 5 2 1 5 Backcalculating at station 1 out of 18 stations (Test Location # 1) Total Calculation Time at End of Previous Iteration = 0 min. 34 sec. Figure 23 Run-time summary screen During the backcalculation process, run-time summary information similar to that shown in Fig. 23 is displayed on the screen. Estimates of the layer properties during each iteration and the calculation time for each iteration are shown in tabular form. The test location at which the backcalculation is being performed and the total calculation time at the current test location are displayed below the table. The table is cleared and rewritten when backcalculation is begun at the next test location. (The calculation times shown in Fig. 23 are for a 90 MHz Pentium PC.) 5.9 View Results Menu The View Results menu shown in Fig. 24 is displayed when option 7 is selected from the Main Menu. The file with the same base name as the output file but with the extension “.plt” must exist in order to view plots. This plot file is created during backcalculation. The options on the View Results menu are explained below: • Option 1: Used to display the summary results on the screen. Typical results are shown in Fig. 25. The average, standard deviation, maximum and minimum moduli for each layer based on the analysis of all identified test locations are displayed. If the stiff layer depth or a layer thickness is also optimized, then statistics for this are also displayed. • Option 2: Used to type the output file on the screen. The file is displayed using the DOS command MORE. The display pauses after each page and you may display the next page by pressing any key. You can terminate the display without paging through to the end of the file by pressing CTRL-BREAK at any time. The output file can always be viewed from outside MICHBACK using any text editor or pager. • Option 3: Used to send the output file to the printer when it exists. The output file is spooled to the printer through the DOS command PRINT. If the printer port was not set since the computer was booted up you will be prompted for the port. You may respond by pressing RETURN if the printer is connected to LPT1 (also called PRN), or typing LPTn or 22 VIEW RESULTS 1. 2. 3. 4. 5. 0. Type Summary Results on Screen Type Output File on Screen Send Output File to Printer View Results Graphically on Screen Plot Statistical Information Return to Main Menu Selection: _ Figure 24 View results menu COMn, where n is the parallel or serial port number to which the printer is connected. The output file can always be printed from outside MICHBACK using the PRINT command. • Option 4: Used to view results graphically on the screen when backcalculation has been performed at two or more test locations. You may view overlaid profiles (similar to deflection profiles) which show the percent variation of each layer modulus from the corresponding modulus backcalculated using the representative deflection basin, or a single profile which shows the variation of any layer modulus along the analysis segment. Typical examples are shown in Fig. 26 (a) and (b). On color systems, each curve in the overlaid profiles is shown in a different color along with a legend. • Option 5: Used to plot cumulative distribution functions (CDF’s) of the AC modulus and the peak deflection. Examples of these are shown in Fig. 27 (a) and (b). The CDF’s are SUMMARY OF BACKCALCULATED MODULI (psi) Layer 1 2 3 Layer Name AC Base Roadbed Average Modulus Standard Deviation 567508. 47163. 18259. 187015. 33329. 4719. Maximum Modulus Backcalculated at individual test locations Stiff Layer Depth (inches) Average 603. Std. Dev. 198. 918713. 139658. 24498. 1 to Summary results from backcalculation 23 251865. 6927. 8784. 18. Maximum 720. Press any key to continue Figure 25 Minimum Modulus Minimum 154. (a) Percent variation of all layer moduli Figure 26 (b) Variation of AC moduli Typical profiles of the backcalculated moduli computed only at the points indicated in the plot, and these are connected by straight lines. CDF’s can only be plotted if backcalculations are performed at 10 or more locations. For any modulus value M along the X-axis, the Y-ordinate of the CDF of the AC modulus shows the percentage of basins having backcalculated AC moduli smaller than or equal to M. The CDF of the peak deflections is interpreted similarly. The peak deflections are the values read from the deflection data file and are input quantities rather than output quantities. The CDF plots indicate the proportion of test locations at which the pavement is weak and can help in deciding whether to overlay the analyzed pavement segment. If options 2 or 3 do not function, then the most likely cause is the lack of sufficient memory. Unloading any TSR’s (i.e., terminate-and-stay-resident programs) before running MICHBACK may alleviate the problem. (a) CDF of backcalculated AC modulus (b) CDF of peak deflection Figure 27 Cumulative distribution functions for AC modulus and peak deflection 24 Problem Reporting Although MICHBACK has been tested quite extensively, it is possible that errors causing the program to terminate abnormally may still be encountered if a haphazard sequence of options is used. To report a problem, note down the number and message displayed when the program terminates abnormally, and send it along with a diskette containing the input data file and deflection file to: Dr. Ronald S. Harichandran or Dr. Gilbert Y. Baladi Department of Civil & Environmental Engineering Michigan State University East Lansing, MI 48824-1226 Alternatively, send the input data file, deflection file, and a description of the error by electronic mail to [email protected] or [email protected]. Credits and Acknowledgments The MICHBACK program reflects the combined effort of many individuals. Conceptual development and overall guidance for the development of MICHBACK Version 1.0 was provided by Ronald S. Harichandran, Tariq Mahmood and Gilbert Y. Baladi. Most of the coding was performed by graduate students at Michigan State University: Cynthia M. Ramon coded the user-interface, pre-processing of deflection data and post-processing of results; Weijun Wang coded most of the analysis routines. An initial formulation of a gradient-based approach for backcalculating layer moduli was provided to the research team by Robert A. Raab from the Strategic Highway Research Program. Lynne Irwin from Cornell University improved the numerical quadrature in our version of the CHEVRON program. Baoyan Wu assisted in porting the program to UNIX systems. MICHBACK Version 1.0 for DOS was developed with funding from the MDOT and the University of Michigan Transportation Research Institute as part of the project entitled “Reduction of Rutting under Heavy Vehicle Loads,” with Gilbert Y. Baladi as Principal Investigator and Ronald S. Harichandran as Co-Principal Investigator. Members of the Technical Advisory Committee for this project, especially Dave Smiley, Jack DeFoe, Kurt Bancroft, Jerry Sweeney and Ishvarlal Patel, provided helpful suggestions regarding the user-interface. Appendixes A. Temperature Correction When requested, correction of the backcalculated AC modulus to the standard temperature of 77°F is performed using the following commonly used version of the Asphalt Institute equation: –4 log E 0 = log E + 1.47362 ×10 ( t 2 – t 02 ) where E0 = corrected AC modulus in psi; E = backcalculated uncorrected AC modulus in psi; t = test temperature in degrees Fahrenheit; and t0 = reference temperature = 77°F. 25 The user is cautioned that deflection data, in general, does not support the Asphalt Institute temperature correction equation. A proper temperature correction should be based on the temperature gradient and the average temperature in the asphalt concrete layer. B. Representative Deflection Basin MICHBACK allows the backcalculation to be performed at a basin that is most representative among a series of basins measured along a pavement segment. The percent variations in the backcalculated moduli plotted in the graphical display, are also calculated relative to the moduli backcalculated using the representative basin. The representative basin is selected based on the deviation from the average of three measures: (a) the peak deflection under the load; (b) the deflections measured by all sensors; and (c) the area under the deflection basin (Alexander et al. 1989).A measure of the deviation at any test location is 2 ISM – ISM ∆ = --------------------------- + ISM m–1 2 w j – w j A – A 2 ----------------------------+ ∑ w A j j = 0 where ISM = impact stiffness modulus = (applied load)/(deflection under the load); wj = deflection at sensor j; m = no. of sensors; A = area under the deflection basin; and the over-bar denotes the average of the corresponding quantity over all test locations in the selected pavement segment. All deflection basins are linearly scaled to correspond to the same target load when calculating ∆. The scaled deflection basin having the smallest value of ∆ is selected as the representative one. References Alexander, D. R., Kohn, S. D., and Grogan, W. P. (1989). “Nondestructive resting techniques and evaluation procedures for airfield pavements.” In Nondestructive Testing of Pavements and Backcalculation of Moduli, Bush, A. J., and Baladi, G. Y., eds., American Society for Testing and Materials, Philadelphia, 502–524. Harichandran, R. S., Mahmood, T., Raab, A., and Baladi, G. Y. (1993). “A modified Newton algorithm for backcalculation of pavement layer properties.” Transportation Research Record, 1384, 15–22. Harichandran, R. S., Mahmood, T., Raab, A., and Baladi, G. Y. (1994). “Backcalculation of pavement layer moduli, thicknesses and bedrock depth using a modified Newton method.” In Nondestructive Testing of Pavements and Backcalculation of Moduli, volume 2, American Society for Testing and Materials, Philadelphia, PA. Mahmood, T. (1993). “Backcalculation of pavement layer properties from deflection data.” Ph.D. Thesis, Michigan State University, East Lansing. 26 Glossary AC Asphalt concrete. ASCII file A file containing only characters in the American Standard Code for Information Interchange. An ASCII file can contain only standard keyboard characters and a few non-printing characters (carriage return, new line, etc.). backcalculation The process of estimating layer properties from measured surface deflections. CDF Cumulative distribution function. The CDF FX(x) is equal to the proportion of all observations for which X ≤ x. Thus if M denotes the AC modulus, then FM(100,000 psi) is the proportion of all test locations in the analyzed segment for which M ≤ 100,000 psi. CHEVRON program An elastic layer program developed by the Chevron Oil Company. The numerical quadrature used in the original CEHVRON program is not accurate enough, especially for stiff pavements, and an extended precision version is used in MICHBACK. composite pavement A pavement containing a concrete slab as the first (uppermost) or second layer. deflection basin The deflected shape of the surface measured by a FWD. deflection profiles Plots of sensor deflections along a length of pavement. deletions Measurements at particular test locations and particular sensor locations that are deleted by the user. Deleted measurements are assigned a zero weight during backcalculation. Test locations with deletions are not considered when determining the representative basin. FWD Falling weight deflectometer. gradient matrix A matrix that indicates the sensitivity of each calculated surface deflection to variations in the pavement layer moduli and/or a thickness. KUAB FWD file A file containing deflections measured by a KUAB FWD. Two software products are available for producing deflection files using the KUAB FWD: the KUAB software and the SFWD software. MICHBACK supports both software products. KUAB Acronym of a Swedish FWD manufacturing company. MDOT Michigan Department of Transportation. modulus profiles Plots of backcalculated layer moduli (or percent variation of moduli from those backcalculated at the representative basin) along a pavement segment. modulus tolerance The acceptable percentage error between successive estimates of each layer modulus (see Section 2.2). If a layer thickness is also being op- 27 timized, then the tolerance used for the layer thickness is the same as that used for the moduli. Newton method A numerical method of solving non-linear equations using a gradient matrix. If the gradient matrix is not updated after every iteration, then the method is referred to as the modified Newton method. pavement segment A length of pavement selected for backcalculation. PCC slab Portland cement concrete slab. RMS tolerance The root-mean-square percentage error between the measured and calculated surface deflections that is acceptable (see Section 2.2). representative basin The deflection basin at a test location that best represents the collection of deflection basins at all test locations in a pavement segment. rubblized pavement A repaired pavement in which a previously constructed concrete slab has been rubblized prior to pouring the AC layer. sensor weights Weights assigned to each sensor measurement during backcalculation. Weights smaller than 1.0 may be used to indicate that a particular reading is perceived to be inaccurate. Weights assigned using the sensor layout form are used at all test locations. One or more sensors at arbitrary test locations may be assigned a zero weight by performing deletions. seed moduli Initial estimates of layer moduli that are used to begin the backcalculation process. Good seed moduli usually reduce the computation time. For well-behaved deflection basins the backcalculated layer properties are not sensitive to the seed moduli. However, for some deflection basins, usually involving stiff composite pavements, the backcalculated layer properties may depend on the seed moduli. stabilized subbase A treated subbase. stiff layer A real stiff layer usually consists of bedrock. However, some analysts prefer to use an artificial stiff layer to approximately account for the stress stiffening nature of the roadbed soil. The stiff layer depth is measured from the pavement surface (i.e., top of the AC layer). test location A location at which an FWD test is performed. 28