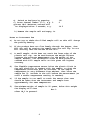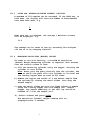
1
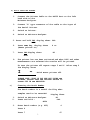
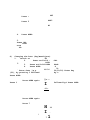
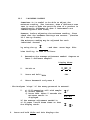
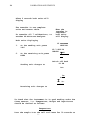
SINAR AP MOISTURE ANALYZER
USER MANUAL
Read all instructions prior to operating your
SinarTM AP Moisture Analyzer.
Whenever using this unit, remember to follow the
appropriate operating procedures.
For your reference/record:
Serial Number:
Purchase Date:
Date Registration Card Mailed:
Version 2.0
. ... .
13th May, 1993
Page
CONTENTS
I
INTRODUCTION
1
II
BASIC PRINCIPLE OF OPERATION
1
III
OPERATING INSTRUCTIONS
Measuring % Moisture Content
Measuring Sample Temperature
Using the ‘Average’ Moisture
content facility
Measuring Hectolitre (Bushel) Weight
Using the Printer
2
111:1
111:2
111:3
111:4
111:5
IV
2
4
5
5
6
CALIBRATION ADJUSTMENTS
10
IV:l
% Moisture Content
10
IV:2
Hectolitre (Bushel) Weight
11
VII
CALIBRATION TRANSFERS
KARDWARE SECTION
Set up Checks
Changing Default settings
Replacement of Batteries
Changing the Password
Routine Maintenance
SPECIFICATION
12
14
14
18
20
20
21
23
VIII
MAIN PARTS ILLUSTRATION
25
IX
CROSS SECTION OP SAMPLE CELL
26
V
VI
VI:1
VI:2
VI:3
VI:4
VI:5
APPENDIX I
Version 2.0
-
Error Code Sunmiary
27
13th May, 1993
The performance of this Moisture Analyzer is dependent on the
correct use and instrument care by the customer. It is important
to
check
the
calibration
(both
commodity
and
hardware)
periodically and, if necessary, make adjustments following the
procedure in this manual. The commodity calibration can be checked
by comparing the Moisture Analyzer results against reference
samples, e.g. oven tested samples (please ensure that tested
samples are based on the correct oven test specification).
If the hectolitre (bushel) weight facility is used, the results
should be checked against reference samples and if required the
readings can be adjusted following the procedure detailed in this
manual.
Version 2.0
13th May, 1993
The SinarTM AP Moisture Analyzer houses the latest
moisture
measuring
technology
in
a
compact,
portable package. it has been designed to provide
fast moisture results using whole grain samples. In
addition to % moisture content, the AP measures
sample
temperature
and
has
facilities
for
hectolitre (bushel) weight tests.
Each instrument is pre—calibrated for up to seven
commodities either chosen from a standard package
of programmes or selected from Sinar’s calibration
library. The calibration of any product can be
optimised using a bias facility (moisture and
hectolitre (bushel) weight).
The SinarTM TM AP Moisture Analyzer is one of a
family of 4 Moisture Analyzers. All 4 models have a
facility to transfer and receive calibrations from
each
other.
Either
new
commodities
can
be
transferred or existing calibrations can be updated
with new information.
II
BASIC PRINCIPLE OF OPERATION
The design concept of the SinarTM AP Moisture
Analyzer is based on the simultaneous sensing of
capacitance, weight and temperature of the sample
being tested, providing a corrected moisture (%)
reading in a few seconds. It works accurately on
products
with
moisture
content
ranging
from
approximately
1%
to
35%
depending
on
the
application.
The instrument incorporates 3 sensors:
1.
Capacitance
The moisture in a sample absorbs the electrical
energy between the walls of the sample cell. The
electrical
signal
known
as
“Capacitance”
increases with the moisture content of the
sample and the size of the sample.
Version 2.0
13th May, 1993
I
INTRODUCTION
This, oscillating weight balance, which was developed from
space technology, uses frequency measurement to determine
mass (weight in grams). The weight is measured by reference
to a frequency, which varies with mass and is detected
through an electro—magnetic system and processed by the
computer. This weighing technique offers flexibility in
sample size allowing the use of samples between 20 and 240
grams.
3.
Temperature Correction
The capacitance of a sample increases with temperature. A
temperature sensing thermistor is mounted in the sample cell
and the microprocessor carries out an automatic correction.
The capacitance corrected for weight and
temperature is known as the instrument reference reading but
in practice it is commonly referred to as the capacitance
value.
III OPERATING INSTRUCTIONS
111:1 MEASURING % MOISTURE CONTENT
a) Place the hopper on the sample cell
ensuring the hopper slider is in the closed position.
b) Pour the sample into the hopper ensuring the amount
used will not exceed level “A” (see Section IX) when
the cell is filled. Experience will tell you how much
of each product type you need.
[See point C) in ‘Notes on Instrument Use’).
C)
Tap slider upwards to allow the sample
to flow through the hole and into the cell.
d) Remove hopper.
Check that the cell is not overfull. If the sample is
heaped on one side, refill sample cell again. Any sample
remaining on the cell cap should be brushed off into the
sample cell.
1
2.Oscillating Weight Balance
e) Switch on Analyzer by pressing
f) Press channel number (1—7), e.g. 2
g)Press %H20. Moisture content will
be displayed after 5 seconds, e.g.
HI
2
—
—
14.5
h) Remove the sample cell and empty it.
Notes on Instrument Use
a)
Do not tap or shake the filled sample cell as this will change
the packing density.
b)
If the product does not flow freely through the hopper, then
fill the cell by pouring the sample over the cell cap. Do not
fill directly into the bottom of the cell.
c)
A small sample, which does not reach the lower edge of the
plastic cell cap, can be used because the weight balance
corrects the moisture measurement for the weight of the
sample. However, the calibration curve of each product is
created with full sample cells as this gives the highest
accuracy.
d)
The flexible temperature sensor below the plastic block in
the cell should be in contact with the sample, so that the
temperature correction will be accurate. If the sample
temperature is very different from ambient, then leave the
sample for 30 ‘seconds in the cell before the measurement (or
until a stable temperature reading is reached).
e)
If the sample is too small to reach the sensor then care
should be taken that the instrument and sample have
approximately the same temperature.
f)
The minimum weight of sample is 20 grams, below this weight
the display will show
Err.0
after %H20 is pressed.
2
g)
If the sample cell is not correctly mounted, the display will
show
Err.
after %H20 is pressed.
If this appears on the display, remount sample cell firmly on
to the interface. Switch the Analyzer of f and then on again
before proceeding with your work.
h)
Samples as high as 50°C. can be measured but do not leave the
instrument in direct hot sunlight. Clean the sample cell with
a soft brush or with a cloth dampened with methanol. NEVER USE
WATER! Take care not to damage the flexible temperature
sensor.
j)
If you have more than one Analyzer, do not interchange sample
cells. Each Analyzer is individually calibrated with its own
sample cell for greater accuracy. Ensure that both the
instrument and the sample cell show the same serial number;
the serial numbers are located on the bottom of the
instrument and on the underside of the sample cell.
k)
The SinarTM lM AP Moisture Analyzer has been calibrated using
clean samples. Accuracy can be affected by the presence of
stones, dirt, weeds, seeds, admixture, chaff or other foreign
matter.
111:2 MEASURING SAMPLE TEMPERATURE
Sample temperature can be measured by pressing TEMP when the
sample is in the measuring cell. If the sample temperature is
very different from the ambient temperature, leave the sample
for 30 seconds in the cell before you press the TEMP key.
Alternatively, keep on pressing the TEMP key until a stable
temperature is displayed.
3
111.3
USING THE ‘AVERAGE MOISTURE CONTENT’ FACILITY
A maximum of 254 samples can be averaged. If the AVER key, is
held down, the display will show the number of measurements
that have been made, e.g.
3
When this key is released, the average % moisture content
will be displayed, e.g.
10.6
The average can be reset to zero by switching the analyzer
off and on or by changing channels.
111.4
MEASURING RECTOLITRE (BUSHEL) WEIGHT
Th order to use this facility, a SinarTM Th Hectolitre
(Bushel) Weight Measuring cylinder is required. This ensures
that the correct volume is used.
a) Fill the measuring cylinder using the hopper, ensuring the
cylinder is over filled.
Note: Never pour the grain directly into the cylinder. The
rate at which the grain fills the cylinder is critical and
the loading hopper must be used at all times.
b) Remove the hopper and strike of f the excess sample from
the cylinder by closing the metal slider. Pour away the
excess sample.
c) Open the metal slider and pour the fixed volume of sample
using the loading hopper into the Sample Cell. Remove
hopper. Any sample remaining on the cell cap should be
brushed of f into the sample cell.
d)
Select channel and press lb/bu
kg/hl
The hectolitre (bushel) weight reading will be
displayed after 5 seconds.
*
4
*Note: Always remember to select the correct
channel. The hectolitre (bushel) weight
readings can be adjusted for individual
commodities(Section IV:2) so that they
read the same as reference samples.
In order to change from hectolitre to
bushel weight units and vice versa see
Section VI:2 Changing Default Settings.
*
To repeat the test, repeat steps a) to d).
The nature of the operation means that
every time lb/bu
kg/hi is pressed, the sample
packing successive tests on the same
sample, it is important to reload the
sample first.
111.5
USING THE PRINTER
a) Print Format
An example of the printer output format is as follows:
5
b) HOW TO START THE PRINTER
1.
Connect the Printer Cable to the RS232 Port on the left
hand side of the
Moisture Analyzer.
2.
Connect “D” type connector of the cable to the input of
the Serial Printer.
3.
Switch on Printer.
4.
Switch on Moisture Analyzer.
5. Press and hold CAL display shows
AUTO
CAL.
6.
Press TEMP key, display shows
(Means printer on).
P on
7.
Press CAL display shows
—
HI
—
AUTO
8.
The printer has now been activated and when %H20 and other
measurements are selected the results will be printed.
To turn the printer off repeat steps 5 and 6. After step 6
the display shows
I
~
— -
which means printer off.
PLEASE NOTE, THAT IF YOU ARE NOT USING THE
PRINTER, ENSURE THAT THE PRINTER SWITCH IS
TURNED OFF IN TEE ANALYZER.
c)
Chancing the Batch Number
The batch number is a useful facility when
samples need to be recorded:
Display Shows
1.
2.
Switch on Moisture Analyzer
Press and hold ~
AUTO
3.
Enter batch number (e.g. 485)
—
HI
CAL.
—
4
Press 4
Press 7
47
5
Press
485
A
b485
Press 5
HI
4.
Press AVER
5.
Press CAL
AUTO
once
48~
d)
Changing the Date (day/month/year)
1.
Switch on
HI
2.
Press and hold ~
AUTO
5
3.
Press and hold AVER
4.
Press AVER
—
.
Enter date ‘(e.g.
(30), by pressing 3 followed
—
CAL.
dAtE
d ...
30
30/10/92) Enter day
by’O
fd 30
Press AVER
Press AVER again
Press 1
[r.~
...
followed byO Press AVER
I
~10~
Press AVER again
Press 7
H
I
6
7
10
• •
1
7
Press
A
Press
AVER
Press 2’
twice
92
I
92
omponent of the date can be viewed and corrected by pressing AVER.
‘6.When the date is correct
Press~
_HI_
AUTO
7
IV:1
% MOISTURE CONTENT
Sometimes it is useful to be able to adjust the
moisture reading, (for instance, when a different oven
test is used or when the particle size of a product is
significantly different or when 2 instruments are
checked against each other).
However; before adjusting the moisture reading, first
check that the hardware settings are correct. (Section
VI:l Set-up Checks).
The moisture reading may be adjusted for each
individual channel
by using the up
I
A
and down
“
arrow keys. This
bias facility is used as follows:
1.
Determine the average adjustment needed. Compare at
least 3 different samples.
Display Shows
*
2.
Switch on
3.
Press and hold ~
AUTO
4.
Enter Password* and press P
CAL.
The Analyzer “rings” if the wrong password is entered.
5.
a) Fill measuring cell with sample.
b) Select channel.
c) Press %H2O. After 5 seconds the
moisture result is
displayed.
If the average adjustment needed is
+0.3% press A arrow three times so that
the display reads:
6.
I_HI_I
Press and hold ib/bu and this displays the
9,
I’
10.91
II
11.2
IV
CALIBRATION ADJUSTMENTS
kg/hi
channel number that has been adjusted.
Release the key and the display will show the adjustment that
has been made.
10
CALIBRATION ADJUSTMENTS
IV
*
Note’: When the instrument leaves the factory the password
is 123. However this can be changed as explained in Section
Vi:4.
In order to check to see whether a channel ha,s been adjusted,
proceed as follows:
Display Shows,
IV: 2
1.
Switch on
IC
0.0
2.
Press and hold ~
AUTO
3.
Select channel, e.g. Number 1
4.
Press ib/bu
kg/hi
(0.0 means that no adjustment has been
made).
HECTOLITRE (BUSHEL) WEIGHT
CAL.
In the same way as moisture readings can be matched to oven
test results or some other test, e.g. merchants moisture
analyzer; the hectolitre (bushel) weight results can also be
adjusted to read the same as another instrument.
As for the moisture adjustment, it is important that the set-up
checks are correct, particularly the Weight Balance, before any
hectolitre (bushel) weight comparisons and any subsequent
adjustments are made.
The procedure to adjust the hectolitre (bushel) weight readings
is as follows:
Display Shows
1.
Switch on
10
CALIBRATION ADJUSTMENTS
IV
2.
Select channel No. (1—7) e.g. 1
Jr
3.
Press and hold P.
HI
1
11
CALJ
CALIBRATION ADJUSTMENTS
IV
I
4.
Use the arrow keys to make the
0.5
adjustment necessary for the
particular product,
e.g. if readings are to be increased by 0.5kg/hi,
press A 5 times.
5.
Press CAL
I
End
AUTO
The adjustment is now complete.
In
order to. see whether a channel has been adjusted,
proceed as follows:
Display Shows
I
1.
Switch on
2.
Select channel No. (1—7) e.g.
3.
Press and hold P.
4.
Press P
—
HI
—
I
I
i
CAL
I
I
0.5
(Shows that readings have been increased by 0.5).
Note:
Please be aware of the effect of moisture content on
hectolitre (bushel) weight, i.e. above 15% as moisture
content
increases
the
hectolitre
(bushel)
weight
decreases. For this reason it is best to base any
adjustment on tests which have been made using samples
which have a moisture content of approximately 15%.
V
CALIBRATION TRANSFERS
The SinarTM T~~ AP Moisture Analyzer can be used to send
and receive calibrations from other SinarTM TM Moisture
Analyzers.
This
facility
is
extremely
useful
for
updating
calibrations and also for providing a calibration for
testing a new commodity.
The following instructions relate to communicating with
other AP Analyzers only. Details of communications with
11
IV
CALIBRATION ADJUSTMENTS
other models are included in their
manuals.
12
respective
user
CALIBRATION ADJUSTMENTS
IV
In order to transfer one calibration to an AP analyzer, proceed as
follows:
Display Shows
1.
Ensure both units are switched of f
2.
Connect the calibration transfer
cable to the P2232 port on the left
hand side of the Moisture. Analyzers.
3.. Switch
5.
Enter
6.
Press ~
I_HI_
i
on both units.
For both
instruments:
4.
Hold down ~
AUTO
Password and press P
1
CAL.
AUTO
1J
By this stage both units should be displaying
CO.PA
(This is known as the communication mode)
I
‘I
1I
CO.PA
Out
On the Sending Unit
7.
Pres.s Channel number e.g. 1 (This contains the
calibration curve
to be transferred to the other AP Analyzer).
8.
Press’ %U20.
_________
I
‘
“~‘
I
On the Receiving Unit
9.
Pres.s
Channel
number,
calibration is to be
installed.
eg
7
in
which
new
10. Press AVER
On the Sending Unit:
On the Receiving
Unit:
12
Jo
I’
I
CALIBRATION ADJUSTMENTS
IV
After 6 seconds both units will
display
The transfer is now complete.
units and remove cable.
To transfer all 7 calibrations, to
another AP Moisture Analyzer.
When the
transfer is
completed
both units
will display
Both units displaying
1.
2.
On the sending unit press
%H20
On the receiving unit press
AVER
Sending unit changes to
VI HARDWARE
SECTION
VI:l SET UP
CHECKS
PASS
I
Switch off both
CO.PA
Out
In~
Out.
I
Receiving unit changes to
in.
PASS
To check that the instrument is in good working order the
three sensors, i.e. Temperature, Weight and Capacitance
should be checked as follows:
Temperature
Pour the sample into the cell and leave for 30 seconds so
13
IV
CALIBRATION ADJUSTMENTS
that the sample and cell temperature are in equilibrium.
Check temperature of grain using an accurate thermometer.
Switch on instrument and press TEMP. The two readings should
not differ by more than 1.5°C.
14
CALIBRATION ADJUSTMENTS
IV
The weight balance is checked using a sample that weighs 180
grams. Any 180g sample should read 64.5 kg/hI ±1.0 when lb/bu is
pressed,
kg/hi
i.e. between 63.5 and 65.5.
‘The weight balance should be reset if 180 g
weighs less than 63.5 kg/hi or greater than 65.5
kg/hi.
Capacitance
This is checked using .a capacitance reference sample. With the
sample in the cell press 0 and then press %H20. The result should
be no greater than ± 0.6 from the value of the capacitance
reference sample.
If any of these measurements are out of tolerance, the instrument
should be reset.
As a daily check. the
Q~
key can be used to
AUTO
c’heck that the instrument is set up correctly when the sample
cell is empty. The procedure is as follows:
Display Shows
1.
Switch on..
2.
Press CAL’
AUTO
After 5 seconds
_
HI
I
—
1
AUTO
A 000
This indicates that for the empty sample cell test, the weight and
capacitance are within the limits. The first two zeros are
capacitance checks. The third 0 is’ the chec’k of the empty cell
weight.
NB.
If the display shows anything other than
instrument needs to be reset.
14
f
A 000 then the
Weight
a) Procedure for Resetting Hardware Ensure cell is empty and
hopper removed.
-
Display Shows
HI —
1. Switch on.
2.
Press and hold ~
3.
Enter password
andpressP
—
CAL.
AUTO
I
Press and hold ~
AUTO
5.Press and hold AVER
until analyzer bleeps.
I
~
4.
H.CAL
I
1= ‘I
.______
lj
6.
Fill the cell with a 180 gram capacitance reference
sample (eq 28.1) Allow 1 minute for the cell and sample
temperature to equalise.
7. Enter Reference Value (eg 28.1)
Press 2
I
2J
Press 7
Press
A
once
I
I
28
Press 1
I
281
I
Press lb/bu
kg/hi
15
28.1
I
Weight
8.
Enter Temperature
Insert thermometer probe into grain and note reading, (eq
21.0°C)
Press 2
2
Press 1
21
Pres’s 0
210
Press. TEMP
21.0
Press and hold %E20 until analyzer
2
bleeps.
2
2
9.
This completes the hardware resetting. Now check the
temperature., weight and capacitance.
b) Resetting the Weight Balance Only
As. the only moving part in the instrument, the weight
balance generally needs resetting more often than the other 2
sensors. For this reason there is .a quick procedure to reset
the weight balance only.
Ensure the cell is empty and hopper removed.
Display Shows
1.
Switch on.
2..
—
I
—
Press and hold CAL
AUTO
3.
HI
L
1
Enter password
and press P
16
‘CAL.
~
Weight
4. Press and hold
~L
AUTO
5.Press 0 and press and hold
P until analyzer bleeps.
H. CAL
I
I
1= 11
°
-
11
6, Add a 180 gram sample to the cell.
Press 1 and press and hold P
bleeps.
1 until analyzer
2J
21
This completes the resetting of the weight balance only. Switch
analyzer off and on, reload the 180 gram sample and and check
the ib/bu reading to ensure it is 64.5 ±1 kg/hl. kg/hi
VI:2 CHANGING DEFAULT SETTINGS
The following options are available:
a) Hectolitre or bushel weight readings.
b) Temperature °C or °F.
C)
Baud rate setting of 300 or 4800.
d) High or low frequency moisture measurement.
-
The procedure to change from one default setting to the other
is as follows:
Display Shows
1. Switch on.
2.
Press and hold ~
AUTO
—
HI
3. Enter password and press P P
17
—
CAL.
Weight
4. Press CAL AUTO
5. Press CAL
again
AUTO
CO.PA
I
In
—
this
mode
the
TEMP
SEt
1
following keys have specific functions:
When thi.s key i.s hel.d down, the display changes from USA to Euro
or vice versa. In Euro units the readings are °C for temperature and
kg/hi for specific weight i.e. hectolitre weight. In USA units, the
readings are °F for temperature and lb/bu for specific weight, i.e.
bushel weight.
AVER
When this key i.s held down the baud
rate changes from 300 to 4800 or vice
versa.
-
—
When this key is held down, the analyzer changes from high to low
frequency measurements or vice versa. It is always possible to say
what
frequency
is %H20 being used as soon as the analyzer in
switched on:
I_HI_
I
Iii
i~ I
-
-
Low
Frequency
High Frequency
High frequency moisture measurements improve the
performance of the analyzer at higher moisture
values, e.g. 20%+ for cereals. Please be aware that
unless
specifically
requested
all
SINARTM
Th
calibrations are designated for low frequency
testing.
When this key is held down the
lb/b
u
kg/h
i
display changes from nor to l8Or or
vice versa. When 180r is displayed,
this fixes the sample weight that
will be used in the moisture
calculation.
18
Weight
Battery Low
The alkaline batteries in your Moisture Analyzer should
last for at least 8,000 readings or one years regular use.
Battery Low Indicator
Should the batteries begin to fail, a warning signal will
appear when the instrument is switched on:
I
bittseconds.
will continue to flash on and off for a few
To Replace the Batteries
1. Remove the sample cell from the instrument.
2. Unscrew the battery cover from the underside of the
instrument.
3. Remove the old batteries and replace with
four standard l.5v alkaline batteries (Size
C, MN 1400 or equivalent). BE SURE TO
INSERT BATTERIES THE CORRECT WAY ROUND AS
MARKED IN THE BATTERY COMPARTMENT.
4. Replace the battery cover.
Important! Always use alkaline batteries for longer life and
better storage. If you are not going to use the moisture
analyzer for some time, remove the batteries from the
instrument.
VI:4 CHANGING THE PASSWORD
The password can be changed to prevent unauthorised
changes being made to the instrument.
When the instrument leaves the factory the password is
123.
19
VI.3 REPLACEMENT OF BATTERIES
Display Shows
1. Switch on.
I
2. Press’ and hold
Q~
C
O
.
P
A
AUTO
3. Enter password 123 and press P
4. Press’ and hold Q~ AUTO
I
5.. Press ~ again AUTO
6. Enter new password, 3 digits of
your choice (if necessary use
arrows, i.e. if you want’ to
use 8 or 9 in the password).
7. Press ib/bu. (enters new
password kg/hi
into memory).
8. Switch off and on Check new
password
I_~_I
x~z
I!
P
x
Y
z
I
CAL.
I
I
H.CAL
Write down new password in appropriate place and make known to.
authorised personnel only. If the wrong pas’sword is entered
the analyzer will ‘ring’; try entering the correct password
again.
20
It can be changed as follows:
VI: 5 ROUTINE MAINTENANCE
it is. important that on a monthly basis, (or more frequent depending on the
operating environment) the male and female interfaces are cleaned with
Methanol or a similar solvent, using a piece of kitchen towel or other soft
material. (The female interface is located, on the underside of the cell)
Blow away any dust from the seal around the male interface.
21
It can be changed as follows:
If you have more than one Analyzer be sure to use each sample
cell only with the instrument with which it was supplied. Each
Analyzer is individually calibrated with its own sample cell.
Ensure that both the instrument and the sample cell display the
same serial number; the serial numbers are located on the
bottom of the instrument and on the underside of the sample
cell.
21
b)Serial Number
Dimensions
325mm x 164mm x 120mm.
Weight
1.8kg.
Operating Environment
Temperature 0 to +55 deg °C.
Storage Temperature
-20 deg C to +55 deg C; Humidity up to 95% non condensing.
Construction
Polyurethane Reaction Injection Moulding.
Display
3.5 character. LCD 15mm high.
Power Supply
Four C size 1.5 volt alkaline batteries.
Processor
Intel 80C3l microprocessor.
Memory
EPROM and. RAN.
Measurement Range
1 35% moisture, wet basis depending on applications.
—
Printer Output
RS232. ‘C.
Accuracy
Typical standard deviation 0.3 for moisture
(dependent on application and moisture level)
and 1.0 for hectolitre (bushel)’ weight.
Repeatability
Standard deviation 0.05 to ‘0.15 (dependent on
application).
Weight Balance
Oscillating weight balance which also operates in nonhorizontal po.sition. Measures and corrects for weights.
be.tween 20-240 grams.
Temperature Correction
Thermistor sensor connected to microprocessor.
The c’orrection is software programmable.
Temperature rea.d out and c’orrection 0—50 deg C.
22
VII
TE~MNI~AL SPECIFICATION
Full Cell
290m1 volume.
Bias Facility
Moisture content and hectolitre (bushel) weight readings can be
biased in increments of 0.1.
Temperature
°C or °F
-
Specific Weight
Hectolitre or Bushel weight readings.
23
VII
TE~MNI~AL SPECIFICATION
MAIN PARTS ILLUSTRATION
VIII
A
S
C
O
J”IOPPER.
HOPPER SLIDE
SENSOR BLOCK,
TEMPERATURE
SAMPLE.
CEL
E
SAMFLE
CELL MOUNTING
ON
WEIGHT BALANCE
F
c
3
H
WEIGHT BALANCE
COVE
24
VII
TE~MNI~AL SPECIFICATION
DIGITAL DISPLAY
K’ E YB.
25
VII
TE~MNI~AL SPECIFICATION
\ \fl
—~_..TEMP SENSOR
V
C
CELL CAP
-For optimum reading the cell should be filled to level
“A” (bottom of the plastic cell cap).
-The sample should not cover the plastic cell cap or
inaccuracies will be introduced.
-Smaller samples are allowed and give slightly lower
accuracy.
-The minimum sample is 20 g.
25
Ix
CROSS SECTION OP SAMPLE CELL
ERROR CODE SUMMARY
Error
n
Code
Explanat
ion
:
d
Recomme
e
Act
d
ion
Err.0
than 20g) Remount sample
Err. 1
Sample. weight too low
cell firmly on to
Sample cell
mounted
not
correctly
the interface
Use larger sample (greater
Err.
5
changing ‘byte down
capacitance
28
Err.2
Capacitance reading is too
high (‘over 100)
Check hardware If
necessary, scale by
Err.3
Capacitance
too high at
reading is low
moisture
Chec.k hardware
If
necessary,
scale
Check cabl,e and.
by
ch’anging
byte 28
down
capacitanc
e
26
start again Replace
the batteries
APPENDIX I
.Err.4High moisture reading
at
low capacitance reading
batt
indicator
Check hardware
If necessary, this can be
rectified by shifting the
calibration
Capacitance reading
is too low for t’he
calibration curve.
(i.e. %M..C. would
be negative)
Err..6
Battery low
‘Check hardware
Check calibration. curve
CommuniHcation,
error in RS232
27