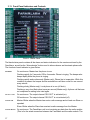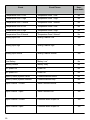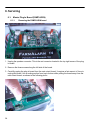
1
Model Wyr-LS
User Manual
4.2.2.1 rev.1
4100 Whispering Pines Drive, Marshville, NC 28103 800-407-5455
www.FarmAlarm.com
11/15/11
Read This First!.........................................................................................1
1.Overview!................................................................................................2
2.Quick Start Guide!.................................................................................3
3.Operator’s Guide!..................................................................................7
3.1. The New & Improved FarmAlarm!..............................................................7
3.2. Settings pre-programmed at the factory!..................................................7
3.3. Events Can Sound an Alarm and/or Place a Phone Call!.........................8
3.3.1.Local Alarms!................................................................................................................8
3.3.2.(1) Alarm Calls!.............................................................................................................8
3.3.3.(2) Test Call!..................................................................................................................9
3.3.4.(3) System Reset Call!..................................................................................................9
3.3.5.Announcement!............................................................................................................9
3.3.6.Unanswered Calls!.......................................................................................................9
3.3.7.Call Completion!...........................................................................................................9
3.3.8.Calls to a Pager!.........................................................................................................10
3.3.9.Downstream Disconnect!..........................................................................................10
3.4. Things You Can Change About an Event!...............................................11
3.5. Automatic Temperature Settings!............................................................13
3.6. How you control the FarmAlarm!.............................................................14
3.7. Getting a Status Report!............................................................................15
3.8. Maintenance Reports !...............................................................................16
3.9. Acknowledging Alarms and Phone Calls!...............................................16
3.10. Phone Line Tests!......................................................................................16
3.11. Front Panel Indicators and Controls!.......................................................17
3.12. Sensor Inputs and Other Connections!...................................................21
3.13. Battery!.......................................................................................................23
3.13.1.Semi-Automatic Battery Testing!............................................................................23
3.14. Radio System!............................................................................................24
3.14.1.Radio Module Indicators!........................................................................................24
3.14.2.Radio Modules as Radio Repeaters!......................................................................25
3.14.3.Separate FarmAlarm Systems in the Same Area!.................................................25
3.14.4.Testing Your Radio Network!...................................................................................26
4.Programming Guide!...........................................................................27
4.1. (1) System controls!..................................................................................27
4.2. (2) Event programming!............................................................................27
4.3. (3) Custom voice message recording!.....................................................28
4.4. FarmAlarm default settings.!....................................................................31
4.4.1.Sensors!......................................................................................................................31
4.4.2.Other Conditions!.......................................................................................................32
4.5. How to Use Programming (Setup) Mode!................................................33
4.6. Temperature and Analog Channel Programming!..................................36
4.7. Set Temperature Ramping Schedule !......................................................37
4.8. Input Channel Programming!...................................................................38
4.9. Phone Number Programming!..................................................................39
4.10. Event Enable and Disable !........................................................................40
4.11. House Enable and Disable!.......................................................................41
4.12. Record Custom Phrases !..........................................................................42
4.13. Set Date & Time !........................................................................................43
4.14. Miscellaneous Settings!............................................................................44
4.14.1.Miscellaneous Settings - Output Channel!............................................................44
4.14.2.Miscellaneous Settings - Test Call!.........................................................................45
4.14.3.Miscellaneous Settings - Number of Rings!..........................................................46
4.14.4.Miscellaneous Settings - Password!......................................................................46
4.14.5.Miscellaneous Settings - System Number!............................................................47
4.14.6.Miscellaneous Settings - External Alarm ON/OFF Times!....................................47
4.14.7.Miscellaneous Settings - Memory Examine & Change!........................................48
4.14.8.Miscellaneous Settings - DTMF Dialing Power Level!..........................................48
4.15. Radio Report!.............................................................................................49
4.16. Software Version Report!..........................................................................50
5.Troubleshooting Guide!......................................................................51
5.1. Computer and Other Electronic Components!.......................................51
5.2. Radio Network!...........................................................................................51
5.2.1.Poor Reception or Interference!...............................................................................51
5.2.2.Cannot Establish Radio Contact!.............................................................................52
5.3. No Power!....................................................................................................53
5.4. Temperature Error!.....................................................................................53
6.Servicing!..............................................................................................54
6.1. Master Plug-In Board (FAMPLUGIN)!.......................................................54
6.1.1.Removing the FAMPLUGIN board!...........................................................................54
6.1.2.Installing the FAMPLUGIN board!.............................................................................55
6.2. Rear Compartment Access (for Fuses, Battery & Speaker)!.................56
6.3. Fuse Replacement!....................................................................................57
6.4. Battery Replacement!................................................................................58
6.5. Speaker Installation or Replacement!......................................................59
7.Installation Guide!...............................................................................60
7.1. Equipment Supplied!.................................................................................60
7.2. Installation Plan!........................................................................................60
7.3. Power Connections!..................................................................................61
7.4. Assigning House Numbers!......................................................................62
7.5. Wiring Diagram!.........................................................................................65
8.Example Applications!........................................................................66
8.1. Connecting A Generator Via A Wired Connection!.................................66
8.2. Connecting A Generator Via A Wireless Connection!............................67
8.3. Using A Radio With A Driveway Sensor (Or Similar Device)!................70
Read This First
Your FarmAlarm is a high-tech piece of electronics. It is not difficult to set up and use, but as in any
device of this nature it does require a certain minimum amount of knowledge. This manual is intended
to make that process as easy as possible.
It is organized into eight chapters.
• an Overview, describing what the FarmAlarm is, its components and a general description of how
the system works.
• a Quick Start chapter, designed to get you up and running with the default settings as quickly as
possible.
• an Operator’s Guide chapter, where you are shown how to operate your FarmAlarm and to learn of
its features.
• Programming Guide chapter, which shows you how to program your FarmAlarm to customize it to
suit your requirements. While this section contains page after page describing every detail of what
can be programmed, you really only need to refer to those sections that are of interest.
• a Troubleshooting section, which contains suggestions for ways to isolate and fix most problems
which may arise.
• a Servicing section, which illustrates how to remove, install or replace the user-serviceable components of the system.
• the Installation Guide. This chapter is last in the manual even though it is one of the first sections
you will refer to. It is last because it will probably only be referred to once when the system is installed and then most likely never again.
If you are viewing this as a .PDF file you can click on any word in blue or click on a line in the Table of
Contents and be taken directly to the page referenced by that word. After reading you can return to
the page from which you left by clicking the pdf reader’s Back button, Previous View button, or by
holding the ALT key and pressing the left arrow key (in Windows).
Users should read the Overview first, then the Quick Start guide to get a feel of what is needed to get
the FarmAlarm up and running initially. The Quick Start will direct you to the Installation Guide to learn
how to install and wire your FarmAlarm.
1
1.Overview
This is a description of what the FarmAlarm is, the components that make up the system and a brief
description of how the system works.
The FarmAlarm is an environmental monitoring system that maintains surveillance over many conditions in a farm building. A change in any condition causes what we refer to as an “event”. An “event”
could be a loss of AC power, the water pressure switch closing or opening, a low battery, etc. It notifies up to 8 people by telephone when any event occurs if that event is programmed to cause a call to
be made. The system monitors such things as temperature (in 2 zones), water pressure, power to the
building, generator status, feed system status, feed level (requires optional sensor), and even the
status of a security system if one is present in the building. Although the FarmAlarm is shipped with a
standard set of events programmed into it, the user can easily change what events cause a phone
call to be placed and what events cause an alarm to be sounded at the building. The user can even
redefine an event to create one or more of their own. (For example, you could connect a switch to a
fence gate, wire it into the FarmAlarm and have it call you and say “Gate open” or “Gate closed”
whenever the switch opens or closes. You could also have it sound an alarm at the building when the
gate opens, and do nothing when it closes. The possibilities are nearly endless.)
When an event is detected the FarmAlarm will do one or two things depending on how you have programmed it. If the event has been programmed to sound an alarm it will sound a beeper at the FarmAlarm and flash a light on the front panel. The light identifies which of the monitored conditions is
causing the alarm. It can also activate an optional horn (usually located outside the building). If the
event has been programmed to do so, it will place a phone call to as many as 8 different telephone
numbers and announce the condition in plain English. Every unit will flash the “Remote Alarm” light on
the front panel and will beep the internal beeper if any of the other units are in alarm. In addition, the
Master will also sound the optional external horn when any unit is in alarm.
In a typical installation one FarmAlarm is connected to the incoming telephone line for making the
phone calls. This unit is referred to as the Master and is usually located in building (or house) #1.
Other FarmAlarms in other buildings (referred to as “Slaves”) are connected to the Master by a long
range and very reliable radio link. This enables the system to monitor conditions in remote buildings
without the expense of running special wiring to the remote buildings.
A system consists of the main FarmAlarm unit, a radio module, a water pressure sensor and a temperature sensor (a second optional temperature sensor may also be added). Every building to be
monitored has this minimum set of equipment. The FarmAlarm has several electrical signal inputs in
addition to the water pressure sensor input and the temperature probe inputs. These additional inputs
are used to connect to and monitor other systems within a building, such as the alarm output of an
existing environmental control system, a generator run/stop relay, a feed auger run/stop relay, or the
alarm output of a security system. The user has the ability to reassign these inputs to monitor a wide
variety of other conditions, limited only by the needs and imagination of the user.
2
2.Quick Start Guide
This section will guide you to setting up and operating your FarmAlarm using the factory default settings. It is assumed that you have not changed any factory settings since installing your new FarmAlarm.
First, if you have not already done so, jump to the Installation Guide chapter and follow the instructions for installing your FarmAlarm Master, then return to this section.
From here we assume that you have installed and wired up your FarmAlarm Master. The Master
FarmAlarm must be connected to the incoming telephone line and also to a standard telephone (referred to as the “local phone” and is used for setup) as described in the Installation Guide chapter.
The local phone connection is not required but is certainly convenient to have.
On/Off Switch
Power Light
Board Status Light
!
Photo 1
1. Power up the Master
See Photo 1. Open the cover of the FarmAlarm and turn the power switch to ON. The switch is located at the top of the circuit board and is labeled “OFF - ON”. Once switched on, check for the following conditions:
• The green power light (located just to the right of the power switch) should come on.
• The amber “BOARD STATUS” light (located just above the column of connectors along the right
side of the board) should also come on and should be slowly pulsating on and off. If this light is
flashing a series of bright, short flashes, then there is a problem somewhere.
• The yellow “COMM WARN” light on the status panel should be flashing about once a second. (This
light will stop flashing and the “COMM OK” will begin to flash once you have one or more Slaves
powered up.)
If these lights do not come on as stated, refer to the troubleshooting section 5.1.
3
Be aware that when you turn off a FarmAlarm, it may take up to 10 seconds for the unit to shut down
even after the On/Off switch is moved to Off. While the unit is shutting down, all indicators on the
status board will be lit until the unit has finished the power-down process. Also see Battery Testing,
section 3.13.1.
In the steps that follow, the keys that you press on the telephone are shown in bold type.
2. Program the telephone number(s) to be called
• Lift the receiver of the telephone which you have connected to the Master’s “PHONE HANDSET”
connector. You should hear a voice saying “Farm Alarm” followed by the current date and time. If
you have no local phone connected to the FarmAlarm then use any telephone or cellphone and call
the number that the FarmAlarm is on and allow it to answer.
• To program the 1st number to be called, press these numbers on the telephone keypad:
00281 x x x x x x x #
and replace the “x”s with the phone number you wish to be called. The number you programed will
be spoken back to you. The number of digits you can enter may be as long as necessary.
• To program the 2nd number to be called:
00282 x x x x x x x #
• To program the 3rd number to be called:
00283 x x x x x x x #
Etc. up to 8 phone numbers. If you wish to call a digital pager, enter * 8 * 8 * 9 after the pager’s
phone number and before the final # key. Dialing options are more fully described in the Programming Guide.
As an example, suppose you wish to program the 4th number to be 1-336-555-1234. Your complete
entry would be: 0 0 2 8 4 1 3 3 6 5 5 5 1 2 3 4 #. (The phone number you are programming is shown
underlined for additional clarity.)
If you wish to verify that all the numbers have been programmed properly, enter 0 0 2 8 #.
3. Set Temperature Limits for All Houses
The default low and high temperature alarm limits are preset at the factory to 50° and 90°F. To set
new low and high alarm limits for zone #1 (temperature sensor #1) in all houses, enter:
00014LL#
and replace the “L L” with the low alarm limit, in degrees F. Then enter:
00024HH#
and replace the “H H” with the high alarm limit, in degrees F. (HH can be up to 127 degrees.)
Temperature zone #2 is disabled as shipped from the factory. To enable zone #2 see section 4.9.
4
If you wish to set low and high alarms for an individual house, replace the 1st two zeros with the
house number. For example, to set a new low alarm limit for house #2 zone #1 to be 80° you would
enter:
0201480#
! |! |! |! |
! |! |! |! |
! |! |! |! |!...........
! |! |! |
! |! |! |!................
! |! |
! |! |!....................
!|
!|
!|
!|
! |!..........................
We’ll use this example to show you what all those numbers mean. And
of course these are fully explained in the Programming Guide.
The temperature limit.
Always a “4” when setting limits.
01 = Zone #1 low limit
02 = Zone #1 high limit
04 = Zone #2 low limit
05 = Zone #2 high limit.
The house number. Always 2 digits. Use “00” for “all houses”.
Hang up the phone once you have finished setting the phone numbers and temperature settings.
Don’t get discouraged thinking you have to remember everything you have entered so far. Once you
go through the Programming Guide you will see that all you have to do to program a setting is to refer
to the programming tables, find the item you wish to change, then follow the sequence shown in the
table.
4. Quick Test
To perform a quick test of your system you can create an alarm condition and verify that an alarm call
is placed. Perhaps the easiest way to force an alarm condition is to unplug the zone #1 temperature
sensor. The FarmAlarm will think that the sensor has failed and will generate an alarm call. To do this,
open the FarmAlarm cover (on either a Master or Slave) and unplug the connector labeled “TEMP1”.
Within a second or two the temperature #1 alarm light on the front panel will come on continuously,
indicating that a temperature low or high condition is present in Zone 1. After 5 seconds (the default
alarm delay for this temperature zone) the light will start to flash very rapidly. The rapid flashing is the
indication that an alarm has been triggered. Then the Master will first speak the alarm announcement
at its speaker, the local beeper will start to beep, then the Master will call all numbers in your call list
and repeat the alarm announcement. It will report a temperature of zero degrees, with a status of “error”.
Once the alarm is triggered (i.e., the “Temperature 1” light starts flashing) you can turn off the alarm
by (1) pressing the “ACKNOWLEDGE” pushbutton on the front of the Master FarmAlarm or on the
Slave having the alarm, (2) by lifting the receiver of the local phone, or (3) by allowing all the calls to
be completed.
5. Power up all Slave FarmAlarms
As you install each FarmAlarm Slave turn the Slave ON. Once switched on, check for the following
conditions:
5
• The green power light should come on.
• The amber “BOARD STATUS” light should also come on and should be slowly pulsating on and off.
If this light is flashing a series of bright, short flashes, then there is a problem somewhere.
• The yellow “COMM WARN” light on the status panel will slowly blink until the slave has established
radio contact with the master, at which time the “COMM OK” light will begin blinking. It may take up
to 2-3 minutes for the slave to acquire a signal from the master but usually it only takes a few seconds.
If these lights do not come on as stated, refer to the troubleshooting section 5.1.
Once the green “COMM OK” light in the Slave starts flashing, the “COMM OK” light in the Master will
also start to flash. The Slave’s COMM OK light blinks when it has contact with the Master, and the
Master’s COMM OK light blinks when it has contact with any Slave.
You can test the operation of the Slave by repeating the Quick Test (step #4) for the Slave just like
you did for the Master.
You now have a fully operational FarmAlarm, but you should read the Operator’s Guide to learn what
all the indicators mean and how to control your FarmAlarm.
6
3.Operator’s Guide
3.1.
The New & Improved FarmAlarm
You may or may not have any experience with previous versions of a FarmAlarm (this is the 4th generation), but some things that our customers kept asking were “Can I connect my controller’s alarm
signal to it?”, “Can I tell if my generator is running or not?”, “I have a security system installed. Is there
any way I can get a phone call when it goes off?”, “Can I make it call me if my feed auger runs too
long?”. One request was “Is there a way I can be notified when someone pulls into my driveway at my
house, down the street?” The list goes on and on.
The new FarmAlarm is intended to address all these requests and more, even ones we haven’t heard
of yet. It can do this due to its versatility. You can customize FarmAlarm to react in several ways to a
wide variety of conditions that you want monitored. You tell it what you want it to do when something
happens, and you also tell it what to do when that something is no longer happening. Every change in
any condition being monitored will trigger the FarmAlarm into following your instructions for that
event. For example, your generator automatically starts. Want it to call you, yes or no? What do you
want it to say when it does? Want it to sound an alarm at the farm, yes or no? How long do you want
it to wait before it calls or sounds an alarm? When the generator stops, want it to call you again and
do all those other things? As you can see, with FarmAlarm Wry-LS you are not restricted to a fixed
set of actions that the device will perform as in most alarm systems.
With all this versatility comes increased complexity, but we addressed that issue too. The only thing
you need to do to get the FarmAlarm up and running is to enter the phone numbers you want it to
call, and set the high and low limits for your temperature sensors. All the other things that the FarmAlarm can monitor and the actions the FarmAlarm will take have already been pre-programmed for you
at the factory. The important thing is that you can change any of these to suit your special needs if
they are different from the default actions.
3.2.
•
•
•
•
•
•
•
•
•
•
•
•
•
•
•
7
Settings pre-programmed at the factory
Power failure: After 30 seconds, calls you and sounds an alarm at the building.
Power restored: After 30 seconds, calls you, no alarm.
Low battery: After 15 seconds, calls you, no alarm.
Battery restored: After 5 minutes, no call, no alarm.
Radio system problem: After 5 seconds, calls you, sounds alarm.
Radio system restored: After 10 seconds, calls you, no alarm.
Temperature zone #1 low: After 5 seconds, calls you, sounds alarm. (Default setting 50°F)
Temperature zone #1 high: After 5 seconds, calls you, sounds alarm. (Default setting 90°F)
Temperature zone #1 normal: After 5 seconds, calls you, no alarm.
Temperature zone #2 low: After 5 seconds, no call, no alarm, disabled. (Default setting 50°F)
Temperature zone #2 high: After 5 seconds, no call, no alarm, disabled. (Default setting 90°F)
Temperature zone #2 normal: After 5 seconds, no call, no alarm, disabled.
Analog channel low: After 5 seconds, no call, no alarm, disabled. (Default setting 20%)
Analog channel high: After 5 seconds, no call, no alarm, disabled. (Default setting 80%)
Analog channel normal: After 5 seconds, no call, no alarm, disabled.
•
•
•
•
•
•
•
•
•
•
•
•
Low water pressure: After 30 seconds, calls you, sounds alarm.
Normal water pressure: After 30 seconds, calls you, no alarm.
Controller alarm on: After 5 seconds, calls you, sounds alarm.
Controller alarm off: After 5 seconds, calls you, no alarm.
Generator running: After 10 seconds, calls you, sounds alarm.
Generator stopped: After 10 seconds, calls you, no alarm.
Feed system running: After 30 minutes, calls you, sounds alarm.
Feed system stopped: After 5 seconds, calls you, no alarm.
Security system alarm on: After 1 second, calls you, sounds alarm.
Security system alarm off: After 1 second, calls you, no alarm.
Remote channel closed: After 1 seconds, calls you, no alarm.
Remote channel open: After 1 seconds, calls you, no alarm.
3.3.
Events Can Sound an Alarm and/or Place a Phone Call
The FarmAlarm can do two things when some event occurs. It can place a phone call to many people
to speak the status of the event and it can generate an audible alarm at the farm. It can do either of
these things, or both, or neither, depending on what you want.
3.3.1.
Local Alarms
If the event is programmed to generate an alarm, it will first turn on the corresponding light on the
status panel. Then, if the condition persists for the alarm delay time it will trigger an alarm, and the
status light will begin flashing very rapidly, a beeper inside the FarmAlarm will begin beeping, and if
the external alarm horn has been installed, it too will begin to sound. These audible and visible alarm
indicators are intended to notify any worker who happens to be present that there is an alarm and
what the alarm is. Once the alarm has been silenced the beeper and horn will stop but the front panel
light will continue to be lit and will flash slowly and briefly until the alarm condition goes away.
An alarm is silenced by (1) pressing the “ACKNOWLEDGE” button on the front of the unit having the
alarm or on the front of the Master, (2) by picking up the local phone connected to the Master, or (3)
when all phone calls have been successfully completed.
If the event is programmed to place a phone call it will call every phone number from the phone number list which you have set, announce the alarm and hang up. After all phone calls have been completed the FarmAlarm will acknowledge and silence any alarms which were also triggered by the
event.
There are three types of calls the FarmAlarm can make. These are:
3.3.2.
(1) Alarm Calls
This type of call is made for any event which has been programmed to place a call. It is simply a short
announcement stating the house number, the condition, and the status. For example, a low water
pressure event would be “House four, water pressure low, status: alarm”. A high temperature condition would be “House two, temperature zone 2 high, high limit is 90, temperature is 92 degrees,
status: alarm”. One more example, “House four, water pressure normal, status: okay”. The status
word is “alarm” if the event is programmed to generate an alarm, and is “okay” if not. A status word of
“error” can also be spoken if the FarmAlarm has detected a failure of a temperature sensor.
8
Be aware that the call does not report any condition that has already been acknowledged. For example, if you get a call that reports that house #4 has a water alarm, and then later get another call stating that house 2 has a high temperature alarm, then house #4 will still have the water alarm present
(unless it specifically states that house #4 has a water pressure normal condition). The calls only report the change in conditions at your farm. To get a summary of all conditions at the farm you will
need to call into the FarmAlarm and request a status report.
When the FarmAlarm calls you, the FarmAlarm is not in a state where you can request a status report. However, you can force the FarmAlarm to behave as though you have just called into it and it
has answered the call, and then request the report. To “flip” the FarmAlarm from making an alarm call
to receiving your call, enter “##” at any time during the alarm call. The FarmAlarm will then react as
though you had just called into it and it has answered the call. You may then do anything that you
normally could do when calling into the FarmAlarm.
3.3.3.
(2) Test Call
This call can be programmed to be made automatically at a certain time of day, and at any day or
days of the week. You can also program test calls to be made to any of the phone numbers in your
call list. Its report states how many houses are present in the system and how many of those currently are in an alarm condition (acknowledged or not). For example, “Test call. Five houses present
and two in alarm.” A test call is also made when the FarmAlarm has detected a defective phone line
and then later detects that the line is working again (provided no other alarm calls are pending).
3.3.4.
(3) System Reset Call
When lightning strikes nearby it can send a magnetic and electrical shock wave throughout the building. If severe enough it can scramble the brains of any computer, FarmAlarm included. In such a case
the FarmAlarm will reset itself and reboot. Upon restart the FarmAlarm may not know all the events
which it has already reported (if any) and which ones it has not, so it places a call and reports “System start. Three houses present and one with alarm” (or whatever the numbers may be). The number
of houses reported could very well be inaccurate, depending on whether or not any Slaves were also
affected by this electrical disturbance or if the radio communications were temporarily disrupted. If
you ever receive a System Restart call, wait a few minutes for the system to fully recover then call
into the FarmAlarm and get a full status report. This will insure that you are up to date with the status
at your farm. System Reset calls should be a rare occurrence.
3.3.5.
Announcement
Calls made by the FarmAlarm can contain an announcement message which you can change as you
see fit. As shipped, this announcement is “This is a call from a FarmAlarm automated environmental
monitoring system. Please get in touch with the owner and tell them there is a problem at their farm.”
You can set it so this message is only played for certain numbers that are called. See Phone Number
Programming.
3.3.6.
Unanswered Calls
When a call is placed, if the FarmAlarm hears a busy signal, or if the call is not answered, or if the call
requires a response and none is heard (see next paragraph), it will hang up and try that number again
later. The first retry will occur in 1 minute, then the next retry in 2 minutes, then the next after 4 minutes, and then every 4 minutes thereafter.
3.3.7.
Call Completion
Normally, a call is marked as completed when the FarmAlarm detects that someone has answered
the call (when it hears any voice on the phone line). For an additional measure of security, you can
9
cause the FarmAlarm to only mark a call as completed when it hears any touchtone signal on the line
sent by the called party (See “call requires response”). This will prevent an answering machine from
causing the call to be acknowledged. It will also require that the person called knows to press any key
on their keypad to acknowledge the call, helping to insure that the intended party is reached. Calls
requiring a response will include a 5-second pause at the end of the call, between the phrase “End of
report”, and “Good-bye”, allowing the called party time to press any key to complete the call (although
the person can press any key at any time during the message).
3.3.8.
Calls to a Pager
Calls made to a numeric pager will give some indication of the conditions at your farm, but not all.
There are just too many events that can be reported to have all of them included within the short display area of a typical pager. Also, be aware of the fact that, just as in voice calls that you may get, the
alarms shown will be just those alarms that are present that have not been acknowledged. The following is a description of the information contained in a pager display in character positions “A”
through “J”.
!
A-BC-DEFGHIJ
• A: The FarmAlarm system number will be in the first digit. A “0” indicates no system number has
been programmed. A dash follows this number.
• BC: The house being reported, from 01 to 13, or will be 99 if more than 1 house is being reported. A
dash follows this number.
• D: 1 if a power alarm triggered the call, or 0 if not.
• E: 2 if a water alarm was triggered, or 0 if not.
• F: 3 if a temperature alarm was triggered, or 0 if not.
• G: 4 if a controller alarm was triggered, or 0 if not.
• H: 5 if the feed system running triggered the call, or 0 if not.
• I: 6 if an alarm was triggered from the security system, or 0 if not.
• J: 7 if any other alarms were triggered, or 0 if not.
As you can see, not all alarms are specifically identified. We recommend that you call into the FarmAlarm and get a full status report when you receive a page from a FarmAlarm.
As an example, suppose your pager displayed the following code: 1-02-0030000
The first digit (1) indicates that this call came from your FarmAlarm System #1. The alarm is in house
#02, and the alarm is a temperature alarm (3). When the temperature returns to its normal range another call will be made to the pager with a zero in the same position, however, you can never be sure
if it was the temperature that went into a normal state or some other event.
So, be sure to call into your FarmAlarm when receiving a page, because, if you see a digit other than
zero in one of the digit positions, you can be sure that the alarm went active, but seeing a zero in a
position does not always mean that alarm went inactive.
3.3.9.
Downstream Disconnect
When the Master attempts to make a call and cannot get a dial tone it will do the following:
10
• It will say “FarmAlarm” on the line as a warning to anyone who may be using the same line that the
FarmAlarm needs the line, and is a signal for them to hang up. It will then hang up and try again 15
seconds later.
• On the next try, if a dial tone still cannot be obtained the FarmAlarm will again say “FarmAlarm”, and
hang up and wait 15 seconds more.
• On the third attempt the FarmAlarm will break the telephone connection on its “Tel Line Out” connector and try once again (also breaks the connection on the Line #2 port of the Phone Handset
connector). If this third try fails the FarmAlarm will mark the line as defective and start sounding the
local beeper and external horn for 1 second every minute (unless the beeper and horn were already
sounding due to an alarm). The phone call that was attempted will continue to be tried until the
FarmAlarm gets through or until someone acknowledges the alarm.
For this to work, all phones on your premises that are to share the same line as the FarmAlarm
should be connected to the “Tel Line Out” connector and not directly to the incoming phone line. The
FarmAlarm can break the connection to all phones connected to the “Tel Line Out”, so that any phone
left off-hook can be removed from the phone line when the FarmAlarm needs to make a call.
If you use a two-line phone and connect its “L1/L2” port into the “Phone Handset” connector on the
FarmAlarm, then its Line #1 will be the local phone connection and its Line #2 will be internally connected to the “Tel Line Out” without having to run a separate connection to the “Tel Line Out”.
3.4.
Things You Can Change About an Event
• What to say to identify what caused the event. For example, when your generator run/stop relay
closes it tells you what happened by speaking “generator running”. But suppose you have no generator and you have connected this signal to, say, a static pressure sensor. You can have it say,
“Static pressure low” by making your own voice recording and replace the pre-programmed “generator running” phrase. Likewise, you can have it call you and say “Static pressure normal” when
the signal from the sensor goes away. (See Record Custom Phrases.) This may be obvious, but if
you change the function of any of the pre-programmed alarms you would probably also want to
make a small label that you can paste to the front of the FarmAlarm in place of the pre-printed alarm
label that is already there, if your new alarm is not described by the existing label.
• How long to wait before the event causes the FarmAlarm to take some action (placing a phone call
or sounding an alarm). In some cases delays can be very important. For example, the default delay
setting for “feed system running” is 30 minutes. You don’t want the FarmAlarm to react every time
the feed auger runs, but you do want to be called and have the local alarm to go off if it fails to stop
running after a period of time. A setting of 30 minutes means it will only call you (and/or sound an
alarm) if the auger runs longer than 30 minutes. If you have no preference for an alarm delay, we
recommend a setting of 5 seconds for most alarms. This will prevent an intermittent sensor signal
(usually caused by “contact bounce” of the sensor switch) from repeatedly generating alarms.
• Whether or not to place a phone call when the event occurs.
• Whether or not to sound the local alarm at the site when the event occurs. In most cases when you
have chosen to have the local alarm sound off you would have also programmed it to place a phone
call, but you can do one without the other.
• Turn on or off the monitoring of any event in any house. You can quickly disable and enable the
checking of any of the conditions the FarmAlarm is monitoring. For example, if workers are repairing
a water leak in a building you may want to disable the water pressure switch in that building until
they have finished so they don’t activate an alarm if they turn off the water supply. If they are work11
ing on the electrical system you may want to disable the power alarm until they have finished. If you
close off part of your barn you may want to disable the temperature sensor in the closed half of the
building. You get the idea. (See Event Enable and Disable.).
• Turn on or off monitoring all events in a specific house. You can also quickly disable and enable the
checking of all external alarm conditions the FarmAlarm is monitoring for an entire house with one
command. You would use this feature to turn off all alarms in a house once the flock is sold off, then
later turn them all back on once the barn is stocked with a new flock. (AC power, radio communications and battery are still monitored and reported as an alarm even when the entire house is disabled.) (See House Enable and Disable.)
12
3.5.
Automatic Temperature Settings
Many environmental control systems allow you to set it so that the temperature changes automatically
over a period of time. You can also set your FarmAlarm temperature high and low limits to automatically change day-by-day to match the settings you have programmed into your controller.
Consider the following graph. The green line shows the setting for your controller. It starts on day #0
to maintain 90° and by day #28 the control temperature is 70°, where it remains until changed. You
can set your FarmAlarm temperature high and low alarm points to track this changing temperature. In
this example, the high and low limits are set on day #0 to be 95° and 85°, and gradually change to be
80° and 60° on day #28, where it will remain until changed by you.
Low
High
Target Temp
Temperature
100 95
90 85
80
80
60
60
28
Maintained
80
70
60
0
Day Number
A more refined graph is shown below to demonstrate the fact that you can set the FarmAlarm to a
more complex temperature ramp than was shown in the first example. You can set the high/low limits
for up to 5 points in time, shown here to be day #0, day #7, #14, #21 and finally day #28.
Low
High
Target Temp
100 95
Temperature
90
90 85
85
80
80
80
80
60
60
80
70
70
65
60
0
7
14
21
Day Number
13
28 Maintained
Programming the FarmAlarm to set temperature limits automatically is done in three steps.
1. First, you create the “temperature schedule”, where you specify the temperature high/low set
points and the day number for each high/low point. You can program two separate temperature
schedules. See Set Temperature Schedule.
2. Second, you program the desired house and temperature zone to use one of the two schedules.
See Temperature and Analog Channel Programming.
3. Third, you program that same house and zone for the date you want automatic ramping to start.
See Temperature and Analog Channel Programming.
When that date arrives, the zone you programmed will automatically set itself to the high/low points
for day #0, then change gradually so that the high/low points will match the next day number in the
schedule, and so on until the last day of the schedule. The last high/low points will be maintained until
you manually change them or set a new starting date and that date arrives. Automatic high/low temperature adjustments are made every night at midnight. Obviously, it is important for the FarmAlarm’s
date and time to have been set correctly in order for scheduling to work properly.
If you manually change any high/low temperature settings while a schedule is in effect, then the
schedule will disengage and the unit will revert to manual control. However, if you turn the unit off and
then back on and it discovers that it should be in the middle of a temperature schedule, it will snap to
the high/low limits as required by the schedule as it powers up. To force manual control and keep it
that way one should go into setup mode and turn scheduling off by setting it to off. Of course, if the
schedule has expired then it will be in manual mode regardless.
Normally you only need to program a temperature schedule once. It is remembered even when power
is shut off, so once you set a schedule you would probably only need to change it when your flock is
of a different type and has different temperature requirements. Likewise, once you assign one of the
schedules to a house and zone, it too will remain in effect until you change it. So once you’ve set up
temperature ramping, all that is required to activate the same schedule for the same house and zone
is to set the starting date for that house and zone and it will repeat the schedule it last used.
3.6.
How you control the FarmAlarm
You control the FarmAlarm using a standard telephone that you have connected to it, or via any telephone anywhere in the world that you have used to call into the FarmAlarm. You use the keypad on
the phone to enter a sequence of digits that are interpreted by the FarmAlarm as a command, and it
responds to that command with a voice message for you to verify that what it did was what you
wanted. When you call into a FarmAlarm or pick up the phone connected to it, it will respond by saying “Farm Alarm” followed by the date and time and then a long continuous beep. Hearing this long
beep tells you that it is ready to accept a command. If the FarmAlarm does not hear any commands
for 2 minutes it will hang up (if you had called into it) or disconnect the local phone (if you were using
the local phone).
You can instruct the FarmAlarm to only allow setup commands (commands which change the way the
FarmAlarm behaves) only after a security password has been entered. You can set it so a password
is required when someone has called into the FarmAlarm, or when someone is using the local phone,
or both. Some people use a password when a call has been received but set it so that no password is
required when using the local phone (since the local phone is usually right there next to the FarmA-
14
larm). If a password is required it must be entered before the unit will accept any setup commands.
Once the password is entered or if no password is required, the FarmAlarm will say “setup mode enabled”. The default setting is that no password is required for a received call or from the local phone.
If a password is required you enter the password number followed by the pound key. Example:
7518322#
If correct the FarmAlarm will say “Password okay, setup mode enabled”, otherwise it will say “Password error”. (Note that if a password is not required or you have already entered a password and you
attempt to enter it again, it will say “Please repeat”, since it is expecting a setup command and not a
password at that time.)
3.7.
Getting a Status Report
A Status Report gives you a voice message reporting the conditions in all buildings. There are two
ways to hear a status report. First, by pressing the “Acknowledge” button on the status board of the
Master when no alarms or calls are being made. If pressed while an alarm is sounding or when calls
are being made, it will silence the audible alarm and stop all calls. (More about this in the next section, “Acknowledging alarms and phone calls”). Second, by entering the command on the telephone
keypad when you have called into the unit or have the local phone picked up. The format of this
command is:
!
0 #!
(what you enter on the telephone keypad)
The report speaks the following information:
• House number.
• Whether there is an alarm present in that house or not (“Alarm” or “OK”), or if a battery test is in
progress (“Battery test”).
• If there are any alarms present, will speak the conditions (example: “Water pressure low”). Events
not in alarm are not spoken, with the exception of temperature and the analog channel.
• The temperature in zone 1 (and zone 2 if enabled), followed by their status (example: “Temperature
zone 1 is 66 degrees, status: low alarm”).
• The status of any monitored condition that does not have an alarm programmed for either a closed
switch or an open switch condition.
• The low and high limits currently set for temperature zones 1 and 2, and the analog channel (if not
disabled).
• If any input channels have been disabled, will speak the list of disabled channels (example: “disabled events are: temperature zone two, analog channel”).
• The current setting of the “output channel”, either off or on (example: “Output channel is: OFF”). The
output channel allows the FarmAlarm to turn on or off some external equipment by remote control.
• After all house have been reported, speaks “End of report”.
The report is repeated for all houses present in your system. Notice that the more important items are
spoken first. Things that are not often used or of less importance are spoken last. This is done to allow you to skip ahead to the next house once you have heard all you care to hear, without having to
wait until the entire report is given for each and every house. You can skip ahead to the next house by
pressing the # key. In addition, you can back up to hear the previous house report by pressing the *
key, and to hear the same house report again (from its start) you use the 0 key. We tried to make
15
these keys easy to remember by assigning the function to the row of keys along the bottom of your
telephone keypad. The one on the left (*) backs up one house, the one in the middle (0) repeats the
house you’re hearing, and the one on the right (#) skips ahead.
* Backs up and repeats the report for the previous house.
0 Repeats the report for the current house.
# Skips forward to the next house and speaks that report.
3.8.
Maintenance Reports
Two other reports are the Radio Report ( 1 # ) and the Software Version Report ( 9 # ). These are intended to be used by FarmAlarm maintenance personnel in diagnosing and troubleshooting any problems that may arise within the system, and are not normally of any concern to the user.
3.9.
Acknowledging Alarms and Phone Calls
An event may cause an alarm to be generated (the beeper and horn sound and a light on the status
board flashes) or may cause phone calls to be placed, or both. When either of these actions are taking place, the user can acknowledge that he has seen or heard the event, and cause the audible
alarms to cease, and for all calls about this event (or events if more than one) that are being made or
about to be made, to stop. You do this by:
1. Pressing the “Acknowledge” button on the status board of the Master or on the Slave having the
alarm while an alarm is present or while any phone calls are being made.
2. Lifting the handset of the telephone connected to the FarmAlarm’s “Telephone Handset” connector
of the Master (the “local phone”).
3. When all phone calls have been completed.
In the case of (1) or (2), the FarmAlarm will respond by saying “All acknowledged”.
You can also force the FarmAlarm to acknowledge all events when it calls you with any alarm call, by
entering * 0 # on your phone. It will then say “all acknowledged” and all events will be acknowledged
immediately, stopping any local audible alarms and preventing any more calls from being made (until
another call is triggered from another event). This feature would be useful if, for example, your phone
is the first to be called and you know you will handle the alarm and there is no need for anyone else
to be called. As soon as you hear the alarm message, enter *0# and no one else will be called and
the alarm will be silenced.
3.10. Phone Line Tests
As shipped, the Master FarmAlarm will pick up the phone line every 30 minutes and check for electrical current in the line, indicating that it is connected to the telephone company. You can change this
time period or turn off line tests completely (see Event Enable and Disable). If no line current is detected during this test, it will begin trying to make a test call if no other alarm calls are pending. (If an
alarm call is pending then there is no need to also make a test call.) It does this so that you will be informed as soon as possible once the line is restored. A dead line is also indicated by the Master’s local beeper and external horn sounding for 1 second every minute and the PHONE indicator flashing
rapidly and continuously.
16
3.11. Front Panel Indicators and Controls
!
Photo 2 Status Panel
The black status panel contains all the alarm and status indicators for the events monitored by the
FarmAlarm, as well as the “Acknowledge” button used to silence alarms and terminate phone calls.
The function of each indicator is given below.
PHONE!
On continuous: Master has the phone in use.
!
Flashing rapidly for 2 seconds, Off for 4 seconds: Phone is ringing. The beeper also
beeps rapidly while the phone is ringing.
!
Flashing rapidly and continuously (Master only): Phone line is inoperative. While this
condition is present the beeper and the external horn will also sound for one second
every minute.
!
Flashing slowly (Master only): Local phone is in use (off hook).
!
Flashing a very short flash about once per second (Master only): A phone call that was
not completed is waiting to be tried again.
Output On!
On continuous: The output channel “ISO OUT” is activated (on).
!
Off continuous: The output channel “ISO OUT” is not activated (off).
Comm OK!
Master: Blinks when the Master has sent a radio message and at least one Slave responded.
!
Slave: Blinks when the Slave has received a radio message from the Master.
Comm Warn! On continuous: The FarmAlarm unit is not receiving any data from the radio module.
(This is for the wired connection between the FarmAlarm and the radio module. The
17
indicator can be lit due to bad wiring, a faulty radio module, or possibly a problem
within the FarmAlarm itself.)
!
Master: Blinks when the Master has sent a radio message and at least one Slave did
not respond. This only applies when a Slave had previously responded to the Master
and now is no longer responding. If a Slave has never responded then it is considered
not present and therefore no response from that Slave is expected. It is not unusual
for this light to blink occasionally (up to about 5-10 times per minute, depending). Persistent blinking indicates a potential problem with the radio network.
!
Slave: Blinks when the Slave has failed to receive a radio message from the Master.
Comm Fail!
On Continuous: After about 2 minutes with no radio contact. This is the indication that
a communications failure alarm is about to be triggered once the alarm delay for this
event expires.
!
Flashing rapidly and continuously: The communications failure alarm has been triggered.
!
On with a short off-blink: The alarm has been acknowledged but the condition is still
present.
!
Off:! No communications failure condition is present.
!
There is a slight difference on what constitutes a Comm Fail condition in a Master and
a Slave. For a Slave, a Comm Fail is generated if it is out of radio contact with the
Master for about 2 minutes. For a Master, a Comm Fail is generated if the Master
loses contact with its radio module (the wired connection) for about 2 minutes.
Analog!
On Continuous: The analog signal at connector “ANALOG” has exceeded either the
low limit or the high limit, and an analog alarm is about to be triggered once the alarm
delay for this event expires.
!
Flashing rapidly and continuously: The analog alarm has been triggered.
!
On with a short off-blink: The alarm has been acknowledged but the condition is still
present.
!
Off:! No analog failure condition is present.
!
Note that this channel is disabled as shipped from the factory, so this indicator will
never show an alarm condition. To enable this channel see Event Enable and Disable.
Temperature 1! On Continuous: The temperature in zone #1 has exceeded either the low limit or
the high limit, and a temperature zone #1 alarm is about to be triggered once the
alarm delay for this event expires.
!
Flashing rapidly and continuously: The temperature alarm has been triggered.
!
On with a short off-blink: The alarm has been acknowledged but the condition is still
present.
!
Off:! No low or high temperature condition is present in zone #1.
Temperature 2! On Continuous: The temperature in zone #2 has exceeded either the low limit or
the high limit, and a temperature zone #2 alarm is about to be triggered once the
alarm delay for this event expires.
!
Flashing rapidly and continuously: The temperature alarm has been triggered.
!
On with a short off-blink: The alarm has been acknowledged but the condition is still
present.
18
!
Off:! No low or high temperature condition is present in zone #2.
!
Note that zone #2 is disabled as shipped from the factory, so this indicator will never
show an alarm condition until it has been enabled and set up properly.
Power!
On Continuous: The unit has lost AC power and is operating under battery power. The
alarm for this event will be triggered once the alarm delay has expired.
!
Flashing rapidly and continuously: The power alarm has been triggered.
!
On with a short off-blink: The alarm has been acknowledged but the condition is still
present.
!
Off:! No AC power failure has been detected.
Low Batt!
On Continuous: The 12 volt battery has dropped to 11.0 volts or less, and a low battery alarm will be triggered once the alarm delay has expired.
!
Flashing rapidly and continuously: The low battery alarm has been triggered.
!
On with a short off-blink: The alarm has been acknowledged but the condition is still
present.
!
Off:! The battery is above 11.0 volts and/or is being charged via AC power.
!
Be aware that the unit will abruptly shut down if the battery voltage continues to fall to
less than 8.0 volts. This may occur within 5 to 30 minutes after the low battery alarm is
triggered.
Remote Alarm!
Flashing rapidly and continuously: An alarm has been triggered in one of the
other FarmAlarms (applies to both Master and Slave). A Master will also sound its external horn for any alarm in any Slave.
!
On with a short off-blink (Master only): An alarm in one of the Slave units has been
acknowledged but the condition is still present. Slave units never indicate this.
!
Off (Master): There is no alarm condition (acknowledged or not) in any Slave.
!
Off (Slave): There is no UNacknowledged alarm in any other unit. Note that a Slave’s
“Remote Alarm” indicator only flashes when there is an alarm present in any other unit
and is off when the condition has either been acknowledged but is still present, or is
no longer present. This is slightly different than what you will see on a Master.
Water!
On Continuous: The unit has detected an alarm condition on “IN 1” channel, normally
an open switch from the water pressure sensor (loss of water pressure). The alarm for
this event will be triggered once the alarm delay has expired.
!
Flashing rapidly and continuously: The water alarm has been triggered.
!
On with a short off-blink: The alarm has been acknowledged but the condition is still
present.
!
Off:! A closed switch has been sensed on channel “IN 1”, normally a closed switch
from the water pressure sensor (water pressure normal).
Controller! On Continuous: The unit has detected an alarm condition on channel “IN 2”, normally
a closed switch from an in-house environmental control system. The alarm for this
event will be triggered once the alarm delay has expired.
!
Flashing rapidly and continuously: The controller alarm has been triggered.
!
On with a short off-blink: The alarm has been acknowledged but the condition is still
present.
19
!
Off:! An open switch has been sensed on the “IN 2” channel, normally an open switch
from the environmental control system (no alarms).
Generator!
On Continuous: The unit has detected a closed switch on channel “IN 3”, normally
from a run-stop relay in an AC generator’s control panel (generator running). The
alarm for this event will be triggered once the alarm delay has expired.
!
Off:! An open switch has been sensed on the “IN 3” channel, normally from a run-stop
relay in an AC generator’s control panel (generator stopped).
Feed System! On Continuous: The unit has detected a closed switch on channel “IN 4”, normally
from a run-stop relay in the feed control system (feed auger running). The alarm for
this event will be triggered once the alarm delay has expired.
!
Flashing rapidly and continuously: The feed system alarm has been triggered.
!
On with a short off-blink: The alarm has been acknowledged but the condition is still
present.
!
Off:! An open switch has been sensed on channel “IN 4”, normally an open switch
from the feed control system (feed auger stopped).
Security System! On Continuous: The unit has detected a closed switch on channel “IN 5”, normally from an in-house security alarm system. The alarm for this event will be triggered once the alarm delay has expired.
!
Flashing rapidly and continuously: The security alarm has been triggered.
!
On with a short off-blink: The alarm has been acknowledged but the condition is still
present.
!
Off:! An open switch has been sensed on channel “IN 5”, normally an open switch
from an in-house security alarm system.
Internal Beeper! Pulsating on/off continuously: An alarm has been triggered in either this unit or in
any other unit. If the alarm is in this unit then one of the status lights will also be flashing rapidly. If the alarm is in one of the other units the “Remote Alarm” status light will
be flashing rapidly.
On/Off Switch
Power Light
This circuit board is
present only in a Master
Speaker Volume
(Master only)
Board Status Light
Test Switch
!
20
Photo 3 Other Than Status Panel
ON/OFF Switch! Turns the unit on and off. When a FarmAlarm is turned off it must first notify the
other units in the system that it is shutting down. Depending on radio conditions this
may require a few seconds, so even after switching a unit off it may remain on for
several seconds (maximum of 10 seconds) until it finishes notifying the other devices.
When operating under battery power and the battery is critically low, the unit can shut
itself off even when the On/Off switch is in the On position. Also see section 3.13.1.
Power Light! Is lit whenever the FarmAlarm is powered on.
Speaker Volume! Controls the volume from the speaker in a Master. The circuit board that this control is on is only present in a Master FarmAlarm.
Board Status Light!
This indicator shows the status of the computer and other electronic components that comprise the FarmAlarm. If the computer has sensed that all the components appear to be working normally, this indicator will slowly pulsate as though the
unit is breathing. If a problem has been detected, this indicator will flash a series of
short, bright flashes. If the flashes are counted, this will reveal a code that indicates
what the problem may be. If there is more than one code to be reported then there will
be a pause between each series of flashes. When these error codes are seen the
problem should be reported to FarmAlarm, Inc. so that we can determine if the unit
needs to be returned for repair. The codes are:
1 flash: problem with the computer.
2 flashes: IIC bus error.
3 flashes: status board LED controller problem.
4 flashes: main board EEPROM failure.
5 flashes: Master/Slave configuration error.
9 flashes: date/time chip error.
10 flashes: plug-in board EEPROM failure.
11 flashes: DTMF chip error.
12 flashes: voice chip error.
If this indicator is either on continuously or off continuously while powered on, then
there is a serious problem within the unit and it should be shut down and repaired or
replaced.
During a battery test this indicator will be flashing rapidly.
3.12. Sensor Inputs and Other Connections
Starting at the top left corner of the FarmAlarm board and proceeding counter-clockwise around the
board, these are the connections that may be made to the FarmAlarm and a description of their purpose. Each connection below is labelled with the same name as is printed on the FarmAlarm circuit
board.
Power 15VDC!
This connector supplies 15 volts DC to the FarmAlarm from the AC power supply
located behind the circuit board. As long as AC power is on, there will always be 15
volts on this connector regardless of the position of the On/Off switch.
Tel Line In! The telephone company line is connected at this point. Either wire can be connected
to either terminal. The phone company must have installed lightning suppression devices where this line enters the building.
21
Radio!
The wired connection to the radio module is made at this point. Color codes for the
wires attached to this connector must match the same color codes within the radio
module.
IN 1!
Input channel #1. Connection is to an on/off switch, normally the water pressure sensor where an open switch indicates no or low pressure (or an open circuit in the wiring) and a closed switch indicates the presence of water pressure.
IN 2!
Input channel #2. Connection is to an on/off switch or relay, normally the existing environmental control system where a closed switch indicates the presence of an alarm
within the controller and an open switch indicates a normal, no-alarm condition.
IN 3!
Input channel #3. Connection is to an on/off switch or relay, normally to the run/stop
relay in an AC generator’s control panel, where a closed switch indicates the generator is running and an open switch indicates it is stopped.
IN 4!
Input channel #4. Connection is to an on/off switch or relay, normally to the run/stop
relay in the feed system’s control panel, where a closed switch indicates the feed
auger is running and an open switch indicates it is stopped.
ISO OUT!
Output channel. This port is connected to an electronic switch inside the FarmAlarm
and is used to turn on or off some electrical device in the building by remote control.
Piezo!
The FarmAlarm’s internal beeper is plugged into this connector.
BATT!
Battery, 12 volt 1.3Amp-Hour gel-cell. Connection to the battery is made at this point.
IN 5!
Input channel #5. Connection is to an on/off switch, normally an existing security system (burglar or fire alarm) where a closed switch indicates the presence of an alarm
within the security system and an open switch indicates a normal, no-alarm condition.
Analog!
This connection is to any sensor that produces a varying voltage which represents
whatever the sensor is measuring. The FarmAlarm reports this voltage in percentage
of maximum. Full-scale voltages can be set for 3 volts, 5 volts, 10 volts, 12 volts and
20 volts, depending on the output of the sensor used. A typical use for this input is to
measure and report the quantity of feed in the feed bin, from 0% to 100%.
Horn!
Connection for the optional external alarm horn. This output supplies 12 volts at a
maximum of 0.5 amps to an external annunciator. Red is +12v, yel is grounded (negative) when horn is on, and blk/grn is not normally used.
Temp1!
Temperature Zone #1. Connection is to the FarmAlarm temperature sensor only. Color
codes for the wires attached to this connector must match the same color codes within
the temperature sensor module.
Temp2!
Temperature Zone #2. Connection is to the FarmAlarm temperature sensor only. Color
codes for the wires attached to this connector must match the same color codes within
the temperature sensor module.
Phone Handset! This connection is for the telephone used for programming the FarmAlarm (the
“local phone”). It may also be connected to a 2-line phone, where Line #1 is the local
phone and Line #2 is the telephone company line (the outside line).
Tel Line Out!If there are any other telephones used on the same line the FarmAlarm is on they
should be connected to this point. Connecting any other phones at this point allows
the FarmAlarm to disconnect any of these phones if they are left off-hook when the
22
FarmAlarm needs to make a call. The Phone Handset Line #2 is internally connected
to this point.
SPKR!
This connection is available only on a FarmAlarm configured as a Master. It is a small
2-pin connector used to attach the Master’s speaker to the FarmAlarm, and is located
on the “FAMPLUGIN” circuit board (see Photo 3).
3.13. Battery
The FarmAlarm uses a 1.3 amp-hour, 12 volt rechargeable “gel-cell” battery. It should provide many
years of service provided that it is taken care of properly. There are two things you need to do in order
to prevent premature failure of the battery. (1) Avoid very high temperatures (over 100°F), and (2) do
not allow a discharged battery to remain discharged. The sooner a discharged battery gets recharged
the better. The FarmAlarm will automatically charge the battery while it is on, and keep it in a fully
charged state (13.8 volts) once the battery is charged. Even when the FarmAlarm is off, the battery is
trickled-charged as long as AC power is present.
A fully charged battery should run a FarmAlarm for over 12 hours. (In testing, new batteries, fully
charged, usually run a FarmAlarm for 18-20 hours.) When the battery gets low (11.0 volts) the FarmAlarm will place a phone call to warn of a low battery condition. Shortly after a low battery call is
made, you can expect the FarmAlarm to turn itself off when the battery voltage drops even lower (8.0
volts). This will be somewhere around 5 to 30 minutes after the low battery call. When a FarmAlarm
turns itself off due to a dead battery, you should expect to receive a “Communications Failure” alarm if
the unit shutting down is a Slave. If the Master shuts down it obviously cannot place a call for any
reason. You should therefore consider a Low Battery condition in your Master unit as your last warning that your entire system is about to go offline.
A FarmAlarm in a low battery condition will NOT sound its external horn for any alarm. The reason
being is that the external horn draws a considerable amount of power and a low battery may not be
able to provide such power. The result would be that the FarmAlarm could abruptly shut down due to
low voltage from the battery, so to be safe the external horn is never sounded for a low battery condition.
3.13.1.
Semi-Automatic Battery Testing
A FarmAlarm will automatically perform a 1-hour battery test whenever the unit is turned off, after
having been on continuously for at least 2 days. This usually takes place once your flock is sold off
and you shut down the FarmAlarms. The Master should be the last unit turned off when shutting down
your entire system. During the battery testing period they will continue to run under battery power for
1 hour, then shut themselves off automatically. During the battery test the Board STATUS light will
flash very rapidly and the POWER LED will be on continuously. If any unit detects a low battery condition the Master will place a phone call and report a low battery condition and the LOW BATT LED will
be lit on the unit having the low battery. Be aware that any FarmAlarm running a battery test will not
report any events other than a low battery and a communications failure (all other alarms are disabled). Also note that if you receive a communications failure call during a battery test then this indicates that a FarmAlarm shut itself down due to a dead battery. A communications failure alarm during
a battery test will in almost all cases be preceded by a low battery call, but if the battery voltage falls
very quickly then you may only get a communications failure call. In other words, either a low battery
call or a communications failure call during a battery test period indicates that the battery in question
23
should be replaced. When you shut down your FarmAlarms and receive no calls during the 1-hour
test period then your batteries are OK.
You can force a battery test without the requirement that it be powered up for 2 days by holding down
the “ACKNOWLEDGE” button when you turn off the unit. The battery test will then begin immediately.
Also, if a battery test is underway, you can terminate it by pressing the “ACKNOWLEDGE” button and
it will shut down after notifying the other units in the system that it is doing so (10 seconds or less).
Be aware that when a FarmAlarm is running under battery power and is switched off via the On/Off
switch, it will not be able to be turned on again until at least 5 seconds after it has completely shut
down. So if you are going to turn the unit off and back on again while AC power is off, wait 5 seconds
after all the LEDs go out before turning it back on (or it may not come on).
3.14. Radio System
When we set out to provide a wireless system for the new FarmAlarm, we literally looked the world
over for an existing system which we could use. We found none. Our requirement was not for low
power, or high speed, or extremely long range, but for reliability and affordability. All were suffering
from the same problem that most other radio systems suffer from, bad performance due to interference, or high cost. So we spent nearly two years developing our own radio system, one that could
communicate through some of the most severe interference that you would ever likely encounter. Just
to give you an idea of some of the steps we go through to insure that your radio system has the reliability that you need, consider this (Please pardon us for getting a little technical here, but we feel that
you will appreciate the fact that your communications system isn’t just an ordinary wireless device.):
• All radios have a range of around 1 mile in ideal conditions.
• All radios repeat the broadcast made by the Master FarmAlarm, so if one radio can receive at least
one other radio, a message from the Master will get through to the intended Slave.
• The radio messages sent are protected against corruption (due to interference) by something called
“Forward Error Correction”, a technique that can not only detect a corrupted message but can actually repair many damaged messages to their original state. If a message cannot be repaired it is repeated until received correctly.
• All radios broadcast on 56 different channels 25 times a second. Each time they transmit they use a
different channel so if one channel is blocked by some local interference the broadcast will still get
through on an alternate channel.
• The Master FarmAlarm continuously examines the signal strength that every radio is receiving from
all other radios, on all 56 channels, and decides on the optimum order that each radio will repeat the
message from the Master. The result of this is that no matter what the layout of your farm is, the radios will repeat the broadcast from the Master in the order that insures that every radio gets as
many chances as is possible to receive the message.
The amazing thing is that the wireless system contributes just a small portion of the overall cost of a
FarmAlarm system. This cost will be recovered many times over in the savings you will realize by not
having to run underground wires from building to building, not to mention the savings from less frequent lightning damage that a wireless system brings you.
3.14.1.
Radio Module Indicators
On each radio module there is a small clear window with a red LED behind it. Basically all you need
to know about this indicator is that, in a normally running system, the red LED will be flashing about
once a second if the radio is communicating with the other radios in the system. On some radio mod-
24
els there is also a green LED, and this LED flashes when it receives a broadcast from another radio
(it may flash several times a second) and the red LED flashes when it transmits a message (once or
twice a second). At startup or if no radio broadcasts are received for 2 minutes, the red LED will be on
continuously or flashing very rapidly while the radio seeks out other radios within the system, and will
only start its normal flashing once it is in sync with the radio network.
3.14.2.
Radio Modules as Radio Repeaters
Since every radio module is used to rebroadcast every radio message sent by the Master, you can
use a radio module by itself (no connected FarmAlarm) as a “repeater”, to help extend the range of
your radio network. For example, assume that you had four houses in a valley, and on the other side
of a nearby ridge you had another four houses. Since it is not possible for radio signals to travel
through the ground, you can install a radio module at the top of the ridge so that signals it picks up
from the Master and the first 3 Slaves can be rebroadcast to the 4 houses on the other side of the
ridge. This repeater radio can be powered by a simple AC wall adapter if there is a source of AC
power in a building on the ridge, or by a solar panel and rechargeable battery if no source of AC
power is available. If you use a radio module for this purpose it is recommended that you set its
house number to 14 or 15 although any house number will work.
3.14.3.
Separate FarmAlarm Systems in the Same Area
If you and a neighboring farm both have FarmAlarm Wry-LS systems, it would be possible for one of
your houses to become part of your neighbor’s radio network, and vice versa, if they are within radio
range of each other. To avoid this situation one farm’s radios should be set for “System A” (the normal
setting) and the other set for “System B”. Performance is the same for either setting. The two systems
would then be using separate channels so that they do not interfere with one another.
25
3.14.4.
Testing Your Radio Network
If you really want to know how well your radio system is performing you can follow the procedure here
to check the signal strength from one radio to another. All you need is a pencil, paper and a telephone. Use the local phone or call into the FarmAlarm and request a Radio Report by pressing 1 #.
Your system should have been running for at least 4 minutes before this report will be accurate. First
draw a table with your house numbers along the top and side, such as this example:
1 (Master)
2
3
4
5
1 (Master)
2
3
4
5
The Radio Report will first say all the house numbers that are present in the system (but not necessarily in order). After that it will beep, then say (the numbers shown here are for example only)
“House 1 from 2 is 65, house 1 from 3 is 44, house 1 from 4 is 29, house 1 from 5 is 28. (Beep)
House 2 from 1 is 59, house 2 from 3 is 39, house 2 from 4 is 37, house 2 from 5 is 29. (Beep)
House 3 from 1 is 40, house 3 from 2 is 41, house 3 from 4 is 63, house 3 from 5 is 55. (Beep)
House 4 from 1 is 24, house 4 from 2 is 33, house 4 from 3 is 66, house 4 from 5 is 78. (Beep)
House 5 from 1 is 19, house 5 from 2 is 22, house 5 from 3 is 51, house 5 from 4 is 84. (Beep)
End of report.”
As you hear the report, write down the numbers in the table, from left to right. Our example is:
1 (Master)
1 (Master)
2
3
4
5
65
44
29
28
39
37
29
63
55
2
59
3
40
41
4
24
33
66
5
19
22
51
78
84
For each house, find the highest number across a row and the highest number down a column. For
house #1 the highest across the #1 row is 65 and the highest down #1 column is 59. For house #2
the highest across the #2 row is 59 and the highest down #2 column is 65. For house #3 the numbers
are 63 and 66. And so on. Then, for each of these houses choose the lowest of the two numbers and
ignore the highest number. If all the numbers you’re left with are greater than around 20 to 30, you’re
radio system should be very reliable. If any are less than 15 to 20 you should try to reposition the antenna for the house(s) having the low number. Refer to Troubleshooting, section 5.2.1.
26
4. Programming Guide
With FarmAlarm Wry-LS you have the ability to configure many of its new features. When it is
shipped from the factory, all common settings have already been pre-programmed for you. In most
case you will only need to make a few minor adjustments to the default setup to configure the FarmAlarm to completely fulfill your needs, so don’t let the length of this section scare you.
All programming of the FarmAlarm’s features is done using a standard touchtone telephone. You can
use the telephone which you have connected to the FarmAlarm’s “Phone Handset” connector (which
we refer to as the local phone), OR you can use any telephone on the planet by calling into the FarmAlarm and having it answer the call.
There are 3 basic categories that may be programmed. (1) Items that govern how the overall system
operates, (2) Items that control the action to be taken by the FarmAlarm for every event that the FarmAlarm monitors (there are many), and (3) recording of your custom voice messages, if any.
4.1.
(1) System controls
1. The list of phone numbers to call. You can have the FarmAlarm call up to 8 different numbers.
2. The number of rings to hear before the FarmAlarm answers an incoming call, and the number of
rings to hear for a “no-answer” when placing a call.
3. Whether or not to require a password to enter setup mode, for both an incoming call and for the
local phone, and the password used to gain access to setup mode.
4. The “System Number” to use to identify your farm. As shipped the system number is set to zero,
but you may change it to any digit. It’s primary purpose is to identify which farm is calling you
when you have more than one system under your control. When set to any number other than
zero, this number will be spoken at the beginning of a call. Also, when calling a digital pager this
number will appear in the pager’s window.
5. Setting the date and time, allowing automatic switchover to daylight savings time, and adjusting
the clock to run slower or faster in order to maintain good accuracy.
6. Turning on or off test calls and the time and day test calls are made.
4.2.
(2) Event programming
There are 27 events that can trigger some action when the FarmAlarm detects the event. “Events”
are:
•
•
•
•
•
•
•
•
•
27
AC power ON and AC power OFF
Low battery and battery normal
Radio system (“Comm”) failure and Radio system restored
Analog input exceeding the low limit, or the high limit, or return to normal range
Temperature Zone 1 exceeding the low limit, or the high limit, or return to normal range
Temperature Zone 2 exceeding the low limit, or the high limit, or return to normal range
Input Channel #1 closed, and Input Channel #1 open (normally the water pressure sensor)
Input Channel #2 closed, and Input Channel #2 open (normally the controller alarm output)
Input Channel #3 closed, and Input Channel #3 open (normally the generator run/stop signal)
• Input Channel #4 closed, and Input Channel #4 open (normally the Feed system run/stop signal)
• Input Channel #5 closed, and Input Channel #5 open (normally the security system alarm)
• Remote Input Channel closed, and Remote Input Channel open
The actions or settings that can be programmed for each of these events are:
1. Whether or not the FarmAlarm is to place a phone call when this event occurs.
2. Whether or not this event creates an alarm.
3. The time delay between when the event occurs and when the alarm activates and/or places a
phone call. You can set this to any value between 1 second and 63 minutes, 30 seconds.
4. For the Analog and Temperature channels, the high & low limit settings.
Note that when the FarmAlarm creates an “alarm” it sounds a beeper at the FarmAlarm and, if the optional horn is purchased, an external horn (usually placed outside the building). For each event, you
choose whether or not an alarm is generated and also whether or not a phone call is to be placed.
This gives you great flexibility in configuring the FarmAlarm to behave exactly like you want it to. As
an example, you may want the alarm to sound and a phone call to be placed if the water pressure
switch opens (low pressure), but probably just a phone call and no alarm when the pressure switch
closes (pressure OK). This is its default setting, by the way.
It is a special feature of the FarmAlarm to treat any change in any condition as a separate event, as in
“Power ON” and “Power OFF”, or “Water switch closed” and “Water switch open”. You are able to
configure what the FarmAlarm does when something happens as well as when that something is no
longer happening. This is something very few environmental monitoring systems provide. Add to that
the ability to make your own voice recordings to identify your custom events and you have an alarm
system with quite a bit of flexibility.
4.3.
(3) Custom voice message recording
You can make your own voice recordings to identify some of the events that are monitored by the
FarmAlarm. When shipped, the FarmAlarm is pre-programmed with commonly used phrases to identify these events, but you are free to record over these phrases if the default phrase does not suit
your needs. Your recordings for these custom phrases can be no longer than 3 seconds each. There
is also one special recording that is allowed for your announcement message if you wish to include it.
If you so desire, your announcement message will be played whenever the FarmAlarm makes a
phone call to report conditions at your farm. The announcement message can be turned on for any
phone number it calls, so you can set it so some people will hear it and others won’t. It can be 10
seconds in length.
The following is a list of all the the events and the voice phrases the FarmAlarm uses to identify every
event. Phrases that you may re-record are indicated under “user recordable”. We allowed you enough
space in the table below for you to pencil in your own phrase so you can keep a record of your custom recordings.
28
Event
Event Phrase
Userrecordable
Temperature Zone 1 Low
“Temperature Zone 1 Low”
No
Temperature Zone 1 High
“Temperature Zone 1 High”
No
Temperature Zone 1 Normal
“Temperature Zone 1 Normal”
No
Temperature Zone 2 Low
“Temperature Zone 2 Low”
No
Temperature Zone 2 High
“Temperature Zone 2 High”
No
Temperature Zone 2 Normal
“Temperature Zone 2 Normal”
No
Analog Input Low
“Analog Channel Low”
Yes
Analog Input High
“Analog Channel High”
Yes
Analog Input Normal
“Analog Channel Normal”
Yes
Low Battery
“Battery Low”
No
Battery Normal
“Battery Okay”
No
AC power ON
“Power On”
No
AC power OFF
“Power Off”
No
Radio (Comm) System Failure
“Communications Failure”
No
Radio (Comm) System Restored
“Communications Okay”
No
Input Channel 1 Closed
“Water Pressure Normal”
Yes
Input Channel 1 Open
“Water Pressure Low”
Yes
Input Channel 2 Closed
“Controller Alarm Output On”
Yes
Input Channel 2 Open
“Controller Alarm Output Off”
Yes
29
Event
Event Phrase
Userrecordable
Input Channel 3 Closed
“Generator Running”
Yes
Input Channel 3 Open
“Generator Stopped”
Yes
Input Channel 4 Closed
“Feed System Running”
Yes
Input Channel 4 Open
“Feed System Stopped”
Yes
Input Channel 5 Closed
“Alarm signal from security system is on”
Yes
Input Channel 5 Open
“Alarm signal from security system is off
Yes
Remote Input Channel Closed
“Remote Input Channel Closed”
Yes
Remote Input Channel Open
“Remote Input Channel Open”
Yes
Custom Announcement
“This is a call from a FarmAlarm environmental monitoring system. Please get in
touch with the owner and tell them there is a
problem at their farm.”
Yes
Table IV. Event Phrases
30
4.4.
FarmAlarm default settings.
4.4.1.
Sensors
As shipped, all inputs are enabled except the analog channel and temperature zone #2.
Input
Temp Sensor #1
Temp Sensor #2
Analog Input
Input #1
(water pressure)
Input #2
(controller)
Input #3
(Generator)
Input #4
(Feed system)
Input #5
(Security system)
Remote Input signal
to house 14 or 15
radio
31
Event
Causes Alarm
Makes Call
Alarm or Call Delay
(seconds)
Below 50°
YES
YES
5
Above 90°
YES
YES
5
Between 50-90°
NO
YES
5
Below 50°
NO
NO
5
Above 90°
NO
NO
5
Between 50-90°
NO
NO
5
Below 20%
NO
NO
5
Above 80%
NO
NO
5
Between 20-80%
NO
NO
5
Switch closed
NO
YES
30
Switch opened
YES
YES
30
Switch closed
YES
YES
45
Switch opened
NO
YES
45
Switch closed (run)
YES
YES
5
Switch opened (stop)
NO
YES
5
Switch closed (run)
YES
YES
30 minutes
Switch opened (stop)
NO
YES
5
Switch closed
YES
YES
1
Switch opened
NO
YES
1
Switch closed
NO
YES
1
Switch opened
NO
YES
1
4.4.2.
Other Conditions
Items in bold blue are not programmable by the user.
Condition
Battery
AC Power
Radio
communications
Event
Causes Alarm
Makes Call
Alarm or Call Delay
(seconds)
Battery Low
(Below 11.0 volts.)
NO
YES
15
Battery OK
(Above 11.0 volts.)
NO
NO
5 minutes
Below 8.0 volts.
Shuts down.
Shuts down.
Shuts down.
Loss of power
YES
YES
30
Power restored
NO
YES
30
Failed
YES
YES
5
Restored
NO
YES
10
Failed
Yes: Beeper and
horn sound for 1
second every minute.
n/a
Default test interval
is 30 minutes.
Restored
NO
A test call is placed if
no other calls are
pending.
n/a
At programmed time
of day and day(s) of
week.
n/a
YES (to one or more
phone numbers in
the directory)
Default schedule for
test calls is none.
Other
Phone Line test
Automatic test call
32
4.5.
How to Use Programming (Setup) Mode
It’s important for you to know how to do this. It will take less than 5 minutes to read.
First make a connection from a telephone to the FarmAlarm. This can be done in two ways:
1. Lift the receiver of the telephone connected to the “Phone Handset” connector.
2. Call into the FarmAlarm and allow it to answer.
In both cases, once the connection is made the FarmAlarm will say “FarmAlarm” followed by the date
and time. Then, if a password is NOT required it will say “Setup mode enabled”, telling you that it is
ready to accept setup commands. If you do not hear “Setup mode enabled” then a password IS required and it must be entered before the FarmAlarm will respond to any setup commands. If a password is required, enter the password on the telephone keypad and press the pound key when done. If
the correct password was entered it will say “Password okay. Setup mode enabled”, otherwise it will
say “Password error”.
In the tables that follow, locate the item you wish to change and enter the numbers shown in the table
to change the item to the desired setting.
We’ll show you how to change the zone #2 temperature high limits for all houses to 92 degrees, followed by some other examples. You first start by locating the table having the item you wish to
change, in this case it is the table titled “Temperature and Analog Programming” (section 4.6), reproduced for you here.
33
The entry you make would be:
00 05 4 92 #
Temperature and Analog Channel Programming
House number
Item number
Setting
Value
Enter
XX
XX
X
X..X
#
House #
Item
Setting (what is being
set)
Value Allowed
00 All Houses
01 Temperature Zone 1 Low
01 to 13 House
number
02 Temperature Zone 1 High
1 Causes alarm, or not
9 or 6 (Yes or No)
2 Place call, or not
9 or 6 (Yes or No)
3 Alarm delay
00 01 to 63 30
(min, sec)
05 Temperature Zone 2 High
4 Low or High limits
01 to 127
06 Temperature Zone 2 Normal
5 Schedule start date
MMDDYY
07 Analog Channel Low
6 Temp schedule
1 or 2 or 0 (off)
03 Temperature Zone 1 Normal
04 Temperature Zone 2 Low
08 Analog Channel High
09 Analog Channel Normal
You start from the left, and enter the digits that correspond to the description in the table below it. The
“X”s show you how many digits are needed for that item (and “X..X” means 1 or more digits, depending on what is being set). So, for the “House number” you would use “00” for the “XX” house number
since you are setting the temperature limits for all houses. Next, for the “Item number” you would use
“05” since that corresponds to “Temperature Zone 2 High”, the event you’re trying to set. Next is the
“Setting”, which lists all the things about a temperature high condition that you can do. The one we’re
looking for is “4”, the “Low or High limits”. Finally, for the “Value” you enter the high temperature limit
that you want, from 01 to 127 degrees. You would then press the pound key to enter the setup command into the FarmAlarm, and the FarmAlarm will then speak back to you the setting you just made.
If the FarmAlarm did not understand the command you gave it, or the value you entered was out of
the allowed range, it will say, “Please repeat”. If you make a mistake and realize it before you have
pressed the final “#” key, press star then pound ( * # ) to force the FarmAlarm to ignore your key
strokes, and try again.
34
Another example, setting the Temperature Zone 2 Low condition in house 3 to not cause an alarm.
!
030416#
0 3 House number 3
0 4 Temperature Zone 2 Low is the event being set
1 Causes alarm, or not
6 No
(We use a “9” and a “6” for Yes or No values since those numbers correspond to the letters “Y” and
“N” on a telephone keypad.)
Another example, setting the Analog Channel High condition in house 5 to 90%:
!
0508490#
0 5 House number
0 8 Analog Channel High
4 Low or High Limits
9 0 the value of the limit, in percentage
One more, setting the Temperature Zone 1 High alarm delay in house 1 to 1 minute, 15 seconds:
!
010230115#
0 1 House number
0 2 Temperature Zone 1 High is the event being set
3 Alarm delay is what we’re setting
0 1 1 5 1st 2 digits are minutes, last 2 digits are seconds.
You can also check what any particular setting is currently set to by entering everything except the
value. It will then speak to you and tell you what the value is. Using our last example from above, if
you enter 0 1 0 2 3 #, it will say, “House one, temperature zone one high alarm delay is one minute
fifteen seconds”. (Provided, of course, that you actually did set it to 1 minute 15 seconds prior to this
command.)
You can take this one step further and have the FarmAlarm speak to you what all the settings are for
any of the events in the Item table, by entering everything except both the Setting number and the
Value, like so: 0 1 0 2 #. It will then speak to you all of the settings for everything in the Setting table,
like this: “House one. Temperature zone one high: Alarm activates, yes. Place phone call, yes. Alarm
delay, 1 minute, 15 seconds. Temperature zone one low and high limit is 60 and 92. Temperature
zone one schedule start day is: none. Temperature zone one schedule is: none.”
To summarize, leave off the Value to have it speak what the value currently is, and leave off the Setting and Value to have it speak all the settings for that event.
35
4.6.
Temperature and Analog Channel Programming
House number
Item number
Setting
Value
Enter
XX
XX
X
X..X
#
House #
Item
Setting (what is being
set)
Value Allowed
00 All Houses
01 Temperature Zone 1 Low
01 to 13 House
number
02 Temperature Zone 1 High
1 Causes alarm, or not
9 or 6 (Yes or No)
2 Place call, or not
9 or 6 (Yes or No)
3 Alarm delay
00 01 to 63 30
(min, sec)
05 Temperature Zone 2 High
4 Low or High limits
00 to 127
06 Temperature Zone 2 Normal
5 Schedule start date
MMDDYY
07 Analog Channel Low
6 Temp schedule
1 or 2 or 0 (off)
03 Temperature Zone 1 Normal
04 Temperature Zone 2 Low
08 Analog Channel High
09 Analog Channel Normal
Note! Temperature scheduling is turned off if the low or high limits are set manually while a schedule is in effect.
Temperature Schedule (Setting 6) will always report “Schedule: None” if scheduling is off, regardless
of the set schedule number.
Temperature scheduling is turned off by doing any of the following:
• Setting a temperature limit manually (Setting # 4) while a schedule is in effect.
• Setting the schedule start date (Setting #5) to “000000”.
• Setting the Temp Schedule (Setting #6) to 0.
Scheduling is turned on by:
1. Setting the Temperature Schedule to 1 or 2, and
2. Setting the Schedule Start Date (Setting #5) to any date other than “000000”.
Scheduling is explained more fully in Automatic Temperature Settings.
36
4.7.
Set Temperature Ramping Schedule
House number
Item number
Setting
Value
Enter
00
33
X
X..X
#
House #
Item
Setting (what is being
set)
Value Allowed
00 All Houses
Or house number of
Master
33 Set Temperature Schedule
1 Set Schedule #1
DDLLHH...etc. See
below.
2 Set Schedule #2
DDLLHH...etc. See
below.
Setting a Temperature Ramping Schedule allows you to set the FarmAlarm to automatically adjust its
low and high temperature alarms to match the changing temperatures that you use throughout the
lifetime of your flock. For example, on the first day (day #0) you may have a target temperature of 90
degrees, with a low and high alarm limit set for 85 and 95. By the 5th day this may change to a target
of 85 with a low and high alarm of 80 and 90, and likewise up to a point where the temperature will
remain constant until the flock is sold off.
To set up a schedule you enter the day number (DD) and the low (LL) and high (HH) limits you wish
to have in effect on that day, then continue with another day number with its low and high limits, and
on and on for up to 5 day numbers. For the example above you would use “008595” for the DDLLHH
value to program it for day #0, low limit of 85 and high limit of 95. This would be followed by “048090”
to program day #4 for a low and high of 80 and 90. To continue this example, you may then wish to
have the temperature limits on day #9 to be 75 and 85 and to remain that way until the flock is sold
off. So, the last value to enter would be “097585”. Since this is the last day and temperature you enter, then after day #9 the FarmAlarm will maintain those last limits until you change them manually or
establish a new schedule start date (using the Temperature and Analog Channel Programming table,
Setting #5). The entire entry for this example (using schedule #1) would then be:
00 33 1 008595 048090 097585 #.
(Note that the maximum temperature that may be set in a schedule is 99 degrees.)
You have the ability to program two separate schedules, and you may assign either of these schedules to any temperature sensor in any house. See the Temperature and Analog Channel Programming table, Setting #6 for assigning a schedule to a sensor.
You use the Temperature and Analog Channel Programming table, Setting #5 to establish the date
that a schedule is to start. That day becomes day #0 and the schedule then takes over in setting your
low and high temperature limits, automatically. You can not use the present date for your starting
day. The start date must be either a previous day’s date or any future date.
Normally you should only need to program the Temperature Schedule just once for any particular type
of flock, but you need to set a schedule start date every time you want to activate the automatic temperature scheduling.
When a temperature schedule is in effect the low and high limits are calculated and adjusted automatically every night at midnight. The changed settings are done gradually so that the low & high settings from the schedule are reached on the day number specified in the schedule.
37
4.8.
Input Channel Programming
House number
Item number
Setting
Value
Enter
XX
XX
X
X..X
#
House #
Item
00 All Houses
10 Low Battery
01 to 15 House
number
11 Battery Normal
12 AC power Failure
13 AC power Restored
14 Radio (Comm) System Failure
Setting (what is
being set)
Value Allowed
1 Causes alarm, or
not
2 Place call, or not
9 (Yes) or 6 (No)
3 Alarm delay
00 01 to 63 30
(min, sec)
9 (Yes) or 6 (No)
15 Radio (Comm) System Restored
16 Input Channel 1 Closed
Water-Default is 1=6, 2=9, 3=00 30
17 Input Channel 1 Open
Water-Default is 1=9, 2=9, 3=00 30
18 Input Channel 2 Closed
Controller-Default is 1=9, 2=9, 3= 00 45
19 Input Channel 2 Open
Controller-Default is 1=6, 2=9, 3= 00 45
20 Input Channel 3 Closed
Generator-Default is 1=9, 2=9, 3=00 05
21 Input Channel 3 Open
Generator-Default is 1=6, 2=9, 3=00 05
22 Input Channel 4 Closed
Feed System-Default is 1=9, 2=9, 3=30 00
23 Input Channel 4 Open
Feed System- Default is 1=6, 2=9, 3=00 05
24 Input Channel 5 Closed
Security-Default is 1=9, 2=9, 3=00 01
25 Input Channel 5 Open
Security-Default is 1=6, 2=9, 3=00 01
26 Remote Input Channel Closed
House 14/15 only-Default is 1=6, 2=9, 3=00 01
27 Remote Input Channel Open
House 14/15 only-Default is 1=6, 2=9, 3=00 01
A couple of examples here:
!
All houses, IN3 input channel closed (generator running), Causes alarm, No.
Another example:
!
38
00 20 1 6 #
04 22 3 60 00 #
House 4, IN4 closed (feed system running), Alarm delay, 60 minutes zero seconds.
4.9.
Phone Number Programming
House number
Item number
Setting
Value
Enter
00
28
X
X..X
#
House #
00 All Houses
Or house number
of Master
Item
28 Program Phone Numbers
Setting
Value Allowed
(The number
being set)
1 Phone number #1 Any number up to 32 digits.
2 Phone number #2 Setting any number to a
single zero deletes that
3 Phone number #3 number from the list of
4 Phone number #4 numbers to be called.
5 Phone number #5
One or more of the following
6 Phone number #6 2-digit commands may be
7 Phone number #7 included in the number (at
start, middle or end).
8 Phone number #8
*1 to *4 = 2, 4, 6 or 8 sec
dialing pause
*0 = Call requires response
*9 = Call to pager
*8 = 1 sec silence before
talk
*7 = Include
announcement
*6 = Use pulse dialing
A 2-second dialing pause can be generated by entering * 1 at the point where the pause is desired. A 4, 6 or 8 second
pause can be generated by * 2 , * 3 , or * 4 .
A * 0 as part of the number (anywhere) will cause the call to be considered as answered ONLY if the FarmAlarm hears
any touchtone digit sent by the called party. Otherwise the call will be placed to the same number again in a short while.
A * 9 as part of the number (anywhere) will cause the call to be placed to a pager, i.e., touchtone codes will be transmitted when the call is answered. These codes will appear in the called party’s pager and will contain a numeric code based
on the alarm type.
A * 8 as part of the number (anywhere) will cause the FarmAlarm to require a one-second period of silence before it begins talking (or sending touchtone signals in the case of calls to a pager). This can be repeated to add one second to the
required period of silence, for as many times as it is repeated. This is most useful when making calls to a pager or if you
expect that an answering machine may answer the call.
A * 7 as part of the number (anywhere) will cause the announcement message to be played when the called party answers and before the alarm report is given.
A *6 included at the beginning of the number will cause the number to be dialed using pulse dialing (touch-tone dialing
will be used if *6 is not included in the number).
A number should always be programmed into slot #1 in order for the test calls to always function properly, since the default test call is to the number in slot #1.
39
4.10.
Event Enable and Disable
House number
Item number
Setting
Value
Enter
XX
29
XX
X or
XXXX
#
House #
Item
Setting
(The event being set)
Value Allowed
00 All Houses
01 to 15 House
number
29 Enable/Disable Event
01 Temperature zone #1
02 Temperature zone #2
9 = Yes (enable)
6 = No (disable)
03 Analog channel
04 Battery alarm
05 Power alarm
06 Communications alarm
07 Input channel #1 (water)
08 Input channel #2 (cont.)
09 Input channel #3 (gen.)
10 Input channel #4 (feed)
11 Input channel #5 (Sec.)
12 Remote Input Channel
For house #14 and #15
(radio repeaters) the only
valid setting is #12.
13 Telephone line alarm/test HH:MM = Test Interval
(All or Master house
only)
14 Remote Alarm
Acknowledge
Only valid for Master
house # (or wildcard)
This setup item allows you to turn on or off the monitoring of specific events in a house. For example,
if you close off half of a house you would want to also disable the temperature zone in that part of the
house that is not being used. This will prevent unwanted alarms from that temperature sensor, since
that part of the house would probably not be temperature-controlled while it is not in use. Another example would be to disable any water pressure alarms while you have workers present who are working on your water system. Also be aware of the fact that when the FarmAlarm speaks the settings to
you, it will say the phrase that is shown in the “Settings” table above, and NOT the normally spoken
phrase for the alarm. For example, for setting #7 it would say “Input channel number 1” rather than
“Water pressure low” or “water pressure high”. It does this because the setting enables or disables
the entire input channel and not just the low pressure and/or high pressure event associated with
that channel.
Setting #14 allows the FarmAlarmAlert device to acknowledge all alarms when the user presses the
“Alarm Silence” pushbutton on that device. If this item is set to 6 (disabled) then the pushbutton only
silences the local audible alarm at the FarmAlarmAlert. Disabled is the default setting as shipped from
the factory. (The FarmAlarmAlert device is a radio unit that provides remote monitoring of the alarms
occurring in a FarmAlarm system. Consult your dealer for more information.)
40
4.11.
House Enable and Disable
House number
Item number
Setting
Value
Enter
XX
30
1
X
#
House #
Item
Setting
(The event being set)
Value Allowed
00 All Houses
01 to 15 House
number
30 Enable/Disable Entire House
1 Enable/Disable Entire 9 = Yes (enable)
House
6 = No (disable)
If you disable an entire house it will turn off monitoring for everything in that house except Battery,
Power, Communications and Telephone (in the case of Telephone this applies to the Master only). In
a disabled house, nothing will be reported when you ask for a status report (other than “House x, Disabled”). When you enable an entire house it will enable only those events which were enabled the
last time you disabled that house; in other words, it will return the house to the state it was in before
you disabled it. This is what you would use to temporarily put a FarmAlarm in a stand-by state when
there is no stock in that house. Later when the house is stocked and ready to go, you resume monitoring in that house by enabling that entire house. This is preferred over simply turning a FarmAlarm
off while it is not stocked, since every FarmAlarm radio in your system is used to forward radio messages from a Master to any Slave that is out of range of the Master.
41
4.12.
Record Custom Phrases
House number
Item number
Setting
Value
Enter
00
31
XX
X
#
House #
Item
Setting
31 Event phrase recording
”The default recording”
00 All Houses
Or house number
of Master
Value Allowed
00 Announcement Message 9 = Yes (record)
6 = No (play back)
01 Input channel 1 closed
“Water Pressure Normal”
When recording, start
speaking after hearing
02 Input channel 1 open
the 3 short beeps.
“Water Pressure Low”
Pressing any key on the
03 Input channel 2 closed
phone or pressing the
“Controller Alarm Output On” “Acknowledge” button
on the front panel while
recording will end the
04 Input channel 2 open
“Controller Alarm Output Off” recording. (When using
the local phone to make
the recording, the
05 Input channel 3 closed
Acknowledge button is
“Generator Running”
the preferred way to
end the recording.)
06 Input channel 3 open
“Generator Stopped”
07 Input channel 4 closed
“Feed System Running”
08 Input channel 4 open
“Feed System Stopped”
09 Input channel 5 closed
“Alarm Signal from security
system is on”
10 Input channel 5 open
”Alarm Signal from security
system is off”
11“Remote Input channel
closed”
12 “Remote Input channel
open”
13 Analog channel low
14 Analog channel high
15 Analog channel normal
The announcement recording can be up to 10 seconds long. All other messages are limited to 3 seconds.
42
4.13.
Set Date & Time
House number
Item number
Setting
Value
Enter
00
32
X
X..X
#
House #
Item
Setting (what is being set)
Value Allowed
00 All Houses
Or house number of
Master
32 Set Date & Time
1 Set Date
MMDDYY
2 Set Time
HHMM
3 Clock Correction + (faster)
00 to 99 (secs/mon)
4 Clock Correction - (slower)
00 to 99 (secs/mon)
5 Enable Automatic Daylight
Saving Time
9 = Yes
6 = No
When setting the time, the clock is set to the hour and minute that you entered as soon as you press
the final “#” key. The seconds are always set to “00”. When the time is spoken, the reported time is
the hour, minute and second that was read from the clock at the instant the final “#” key was pressed.
For those of you who are picky about your clocks keeping accurate time, you may refer to the following paragraphs about Clock Correction. This part is entirely optional.
If the clock is running slow by some number of seconds per month, enter that many seconds for the
“+ (faster)” setting to speed it up. If the clock is running fast by some number of seconds per month,
enter that many seconds for the “- (slower)” setting to slow it down. It is important to use a very accurate clock when determining if the FarmAlarm clock is running slow or fast. A wall clock or a watch is
not good enough. A reliable and very accurate source of the correct time can be obtained from
www.time.gov. While in front of your computer looking at www.time.gov you can call into the FarmAlarm and check and/or set the time and the Clock Correction. Do a time check at a 30-day interval.
On the first check, set the time to match www.time.gov; 30 days later check the time again and determine how many seconds the FarmAlarm is ahead (FA clock is fast) or behind (FA clock is slow), set
the clock to match www.time.gov, and then set the Clock Correction based on how many seconds the
FarmAlarm clock was fast or slow. When you do this the clock is speeded up or slowed down by the
amount you entered and should result in it being very, very accurate from that point on. If you wish
you can check it again 30 days later for verification. Once the Clock Correction is set properly it will
seldom if ever need adjusting again provided the average temperature does not change drastically.
Be aware that when you set a Clock Correction, the number of seconds that you enter will be added
to or subtracted from the value that was already in effect for the correction. Therefore, what you hear
spoken back to you is the total correction and will probably not be the value that you entered, depending on what the value was before you made a correction.
(Use the command 0 0 3 2 1 # to hear the current date and time. The time reported is the time at the
instant the final # key was pressed.)
43
4.14. Miscellaneous Settings
4.14.1.
Miscellaneous Settings - Output Channel
House number
Item number
Setting
Value
Enter
XX
34
X
X..X
#
Item
Setting
(What is
being set)
House #
00 All Houses
01 to 13 house
number
34 Output Channel
Control
Value Allowed
1 Output Channel
ON or OFF
9 (Yes-ON) or 6 (No-OFF)
2 Automatic ON
when alarm active:
00: No event (automatic control off)
01: Power alarm
02: Low Batt alarm
03: Comm Fail alarm
04: Phone line failure (Master house)
05: Water alarm (IN1 alarm)
06: Controller alarm (IN2 alarm)
07: Generator alarm (IN3 alarm)
08: Feed System alarm (IN4 alarm)
09: Security alarm (IN5 alarm)
10: Temperature #1 low alarm
11: Temperature #1 high alarm
12: Temperature #2 low alarm
13: Temperature #2 high alarm
14: Analog input high or low alarm
15: Any Alarm any house
Setting #1 turns the “ISO OUT” channel on or off manually. Setting #2 automatically turns ON the “ISO OUT”
channel when the specified alarm is present (acknowledged or not). The ISO OUT channel is a built-in switch
inside the FarmAlarm that you may use to turn on or off some device or equipment. Also see XX.X.X.
For setting #2, the phrase “House XX, output activates on event number X..X“ is spoken when this setup item
is entered. Note that event #04, “Phone line failure”, can only occur in the Master house so it should not be
specified for any other house. Also note that manually turning the output channel ON will override the automatic control. Omitting the Setting number is not allowed for this setup Item (#34). You may enter up to 13
alarms as one string of numbers to activate the output for more than one event. Example:
03 34 2 10 12 # Sets house #3’s ISOOUT to come ON whenever there is a temperature zone #1 or zone #2
low alarm. The output will go OFF when neither of these conditions are in alarm. In this example the ISO OUT
could be used to turn on emergency heat.
This feature is probably most useful when used with a feed system alarm. When the feed alarm is activated,
the ISOOUT can be used to drive a relay which can be wired so that it stops the feed motor when activated.
The only way to turn off an automatic setting once it has been programmed to be on, is to first turn them all off
(using “00” for value) then turn ON only the ones you wish to be on. We’re talking about the programmed setting, not the current ISO OUT state.
44
4.14.2.
Miscellaneous Settings - Test Call
House number
Item number
Setting
Value
Enter
00
35
X
X..X
#
House #
Item
Setting (what is being
set)
Value Allowed
00
Or house number of
Master
35 Test Call
1 Set hour of day
00 to 23 (hour of day)
2 Set day(s) of week
1..7, 1..7, etc, up to 7
digits, or “0” for none
(day #1 is a SUNDAY,
i.e., like a calendar).
Default is “none”.
3 Number(s) to be
called
1..8, 1..8, etc, up to 8
digits. Default is “1”.
Test calls are made to the numbers in the list you specify in setting #3 above. For example if the
numbers to be called are “128” then the first, second, and eighth numbers in the directory are called.
The voice message will be, for example, “FarmAlarm test call. Four houses present, and none with
alarm.” If one or more houses have an alarm condition present, either acknowledged or not, it would
say “...and 2 with alarm” (for example) rather than “... and none with alarm”. So, the spoken message
could be “FarmAlarm, system 2, test call. 4 houses present, and two with alarm”. Example: To make
a test call to number 7 & 8 on Mon-Fri at 9am: 00 35 1 09 #, and 00 35 2 23456 #, and 00 35 3 78 #.
The “Number(s) to be called”, setting #3, should always point to a valid phone number in the directory
even if you do not use the automatic test call scheduling. If you set this value to zero, it will change to
a “1” (pointing to the 1st number in the phone directory, which should always have a valid phone
number programmed in that slot.) A “1” is also the default setting. The TEST pushbutton uses this list
of phone numbers to make a test call, so in order for the TEST button to always function properly, the
“Number(s) to be called” should always be set to a list of valid phone numbers in the directory.
45
4.14.3.
Miscellaneous Settings - Number of Rings
House number
Item number
Setting
Value
Enter
00
36
X
X
#
House #
Item
Setting (what is being
set)
Value Allowed
00
36 Number of rings
Or house number of
Master
1 Number of rings
before answer
(Incoming calls)
0 to 9 (0 to never
answer)
2 Number of rings
before NO-answer
(Outgoing calls)
2 to 9
3 Number of seconds
20 to 99 (0 to disable
between incoming calls. this feature)
(Enables answer on 2nd
call within this period.)
Setting #3 can be used to reduce the possibility of interference between an answering machine and the FarmAlarm when both are connected to the same phone line. The FarmAlarm may cause some answering machines to hang up prematurely. To avoid this possibility setting #3 should typically be set for 30 to 45 seconds.
What that does is to cause the FarmAlarm not to answer or pick up the phone line on the first incoming call, but
to answer on the 2nd incoming call if the 2nd call is received within 30 (or 45) seconds of the last ring of the
first call. Also, when this feature is used, it works best if the number of rings before answer (setting #1) is set
for one ring. This will cause the FA to answer before your answering machine if the answering machine already
has one or more messages waiting. (So, to connect to the FarmAlarm, call into it and let it ring twice then hang
up and immediately call again. It will answer on the 2nd call.)
4.14.4.
Miscellaneous Settings - Password
House number
Item number
Setting
Value
Enter
00
37
X
X..X
#
House #
Item
Setting
(what is being set)
Value Allowed
00
Or house number of
Master
37 Set Password
1 New password
000 to 99999999
(for new password)
2 Local phone requires
password
9 (Yes) or 6 (No)
3 Remote phone
requires password
9 (Yes) or 6 (No)
You can set a password so that no one can hear or change any of the programmable items without first entering the password. You can enable the password requirement for either the local phone, a remote phone, or
both. The default password is “000”, and the default setting for #2 and #3 above is 6 (No password required).
46
4.14.5.
Miscellaneous Settings - System Number
House number
Item number
Setting
Value
Enter
00
38
1
X
#
House #
Item
Setting
(what is being set)
Value Allowed
00
38 Set system number
1 System number
0 (none) to 9
Or house number of
Master
You would use this to assign a system number to a farm when you have more than one farm using a
FarmAlarm. This system number is spoken when calls are made so you can identify which farm is
calling.
4.14.6.
Miscellaneous Settings - External Alarm ON/OFF Times
House number
Item number
Setting
Value
Enter
00
39
1
HHHH
#
House #
Item
Setting (what is being
set)
Value Allowed
1 ON/OFF Times for all
external alarm horns
HHHH ON time hour
followed by OFF time
hour, in 24-hr time.
(All zeroes to enable
the alarm 24 hours a
day.)
00
Or house number of
Master
39 Ext Alarm ON/OFF Times
You would use External Alarm ON/OFF Times to set the time of day you wish the external alarm
horns to be enabled and disabled. The on/off hours are entered using the 24-hour clock format (military time), with the on-time hour first followed by the off-time hour. For example, if you enter 0621 for
Value (HHHH) it would enable all external alarm horns in all houses between the hours of 6AM to
9PM, and keep them off from 9PM until 6AM the next day. You would use this if you wanted to insure
that your farm did not disturb any nearby neighbors if an alarm occurred late at night. The alarm
beeper inside the FarmAlarm would not be affected by this setting, and any events programmed to
make a phone call would also not be affected.
If you enter “0000” for the on & off times the external horn will be enabled 24 hours a day. If you enter
the same hour for the on and off times (such as “1212”), but not “00” for both, then the horn will be
disabled 24 hours a day. The default is “0000”, enabled 24 hours a day.
47
4.14.7.
Miscellaneous Settings - Memory Examine & Change
House number
Item number
Setting
Value
Enter
00
41
X
X..X
#
House #
Item
Setting
(what is being set)
Value Allowed
00
41 Memory examine & change
Or house number of
Master
1 Memory address
0 to 65535
2 Memory data
000..255,000..255
(up to 10 values)
This command is for troubleshooting and maintenance only and is not to be used by anyone except
by those people who know why they are using it.
4.14.8.
Miscellaneous Settings - DTMF Dialing Power Level
House number
Item number
Setting
Value
Enter
00
90
X
X
#
House #
Item
Setting
(what is being set)
Value Allowed
00
Or house number of
Master
90 DTMF dialing power
1 Call Power
0 to 7
This command sets the volume level of the DTMF tones sent by the FarmAlarm when dialing. 7 is the
loudest, and 5 is the default value set when shipped. If the FarmAlarm is having trouble dialing out,
changing this value to a different value will sometimes fix the problem. (This is especially true if you
are on a fiber-cable telephone system or are using a Telular cell phone device for your phone line.)
48
4.15.
Radio Report
Enter
1#
What is Said
1) A list of house numbers that are communicating with the Master starting with the house number of the Master. If
the house does not have a working FarmAlarm attached to the radio, that house number will be followed with the
phrase “radio only”.
Example: “House one, house two, house three, house five, house four, house fifteen, radio only, house six.” As
shown in this example the houses are not necessarily listed in ascending order. They are listed in order of the
route a radio message must take to get from the Master to the farthest Slave in the most reliable way. (The route
changes with radio reception conditions, such as rain, day or night, radio interference, vehicles parked near a
radio antenna, and other factors.)
2) A list of every house and the radio signal strength it is receiving from all the other houses in the system. Example: “House one from two is 60, from three is 45, from four is 10, from five is 22. <beep> House two from one is
75, from three is 65, from four is 59, from fifteen is 37. <beep> House three from one is ....”, etc. This part of the
radio report is obviously not for everybody, but it can be useful to FarmAlarm technical support if the user is experiencing radio problems.
Pressing the pound key during this report will cause it to skip ahead and continue with the next
house. Pressing the star key will back up to the previous house. Pressing the zero key will repeat the
current house, and any other key will end this report.
49
4.16.
Software Version Report
Enter
9#
What is Said
The version number of the software in the Master FarmAlarm, followed by the date that this revision of software was
created. Example: “System data is: four point zero point one point zero. November 18, 2007.” This information
would usually only be useful to FarmAlarm engineers in diagnosing a software problem within the FarmAlarm.
50
5.Troubleshooting Guide
5.1.
Computer and Other Electronic Components
The computer chip within the FarmAlarm can detect most problems arising within itself or within many
of the electronic subsystems on the circuit board. It reports the problem by flashing a series of short
bright flashes on the “Board Status” indicator LED. If no problems are detected this indicator will
slowly pulsate as though the unit is breathing. If the short flashes are counted, this will reveal a code
that indicates what the problem may be. If there is more than one code to be reported then there will
be a pause between each series of flashes. When these error codes are seen the problem should be
reported to FarmAlarm, Inc. so that we can determine if the unit needs to be returned for repair. The
codes are:
1 flash:!
2 flashes:!
3 flashes:!
4 flashes:!
5 flashes:!
9 flashes:!
10 flashes:!
11 flashes:!
12 flashes:!
13 flashes:!
problem with the computer.
IIC bus error.
status board LED controller problem.
main board EEPROM failure.
Master/Slave configuration error.
date/time chip error.
plug-in board EEPROM failure.
DTMF chip error.
voice chip error.
no speech recorded in speech chip.
If this indicator is either on continuously or off continuously while powered on, then there is a serious
problem within the unit and it should be shut down and repaired or replaced.
A code of 9 (date/time chip) usually indicates that the date/time has been lost and needs to be reset.
When this code is seen, turn the unit off (and wait until all LEDs have gone out) and then back on. If
the code is still present then notify FarmAlarm, Inc. If the code is no longer present, set the time and
date, then turn the unit off and back on, and see if the code returns. If the code returns then notify
FarmAlarm, Inc. If the code is no longer present you may continue using your FarmAlarm.
A code of 5 indicates one of two conditions. (1) The FarmAlarm is set up to be a Master (i.e., the Master Plug-In board is installed) but the radio connected to it is set for a Slave, or (2) the FarmAlarm is
set up to be a Slave (the Master Plug-In board is NOT installed) but the radio connected to it is set for
a Master. A Master FarmAlarm must have a radio configured as a Master and a Slave FarmAlarm
must have a radio configured as a Slave. See section 8.4.
5.2.
Radio Network
5.2.1.
Poor Reception or Interference
Your radio network is performing properly if you see the green “COMM OK” LED flashing about once
per second on the Master and all Slaves. You may occasionally see the yellow “COMM WARN” LED
flash, which indicates that one or more radios have experienced poor reception or temporary interference. If the COMM WARN is flashing more than about 10 times per minute on any Slave it usually
indicates that the radio reception is marginal in one or more FarmAlarms, and this condition should be
rectified. Since this is a radio network and not just a simple point-to-point radio, determining which ra-
51
dio has the marginal reception is not as straightforward as you might expect. (It is not always the one
with the highest blink rate of the COMM WARN LED.) We have included a “Radio Report” to help
simplify this process. All it requires is a pencil and paper and a phone. To determine the weak link in
your radio network, go to section 3.24.4 and follow the procedure to determine the signal strength of
all radios. The Radio Report will first say all the house numbers that are present in the system, but
not necessarily in order. Write down the house numbers in the order spoken to you (the house list),
and continue with the procedure. At the end of the procedure you will have a single number for each
FarmAlarm that represents how well each radio is performing (its signal strength). The Slave (or Master) with the lowest number is the one whose antenna needs repositioning, either to a higher elevation
and/or farther away from metallic objects. However, if you have more than one FarmAlarm with a signal strength number less than 20, then consult the list of house numbers you wrote down from the
house list and reposition the antenna for the FarmAlarm nearest the front of your list (that is below
20). After repositioning the antenna on the weak FarmAlarm radio, recheck the signal strengths again
per the procedure in section 3.24.4 and reposition the next (or same) FarmAlarm antenna if necessary. Repositioning the antenna for one radio with a weak signal will generally increase the signal
strength to other radios also having a weak signal. Be sure to wait at least 4 minutes after relocating
an antenna before getting the Radio Report.
We realize that determining which radio is causing the excessive COMM WARN condition can be
somewhat confusing. It’s just the way it is in a network of this type, but it is many times more reliable
than a simple point-to-point radio system. Feel free to call our technical support department for assistance in this area and we will be happy to help you.
5.2.2.
Cannot Establish Radio Contact
When you first turn on a Slave you will notice that the red LED in the window of the radio module will
at first come on continuously and may then periodically blink rapidly for a few seconds, then return to
being on continuously. It will repeat this until it locks onto a radio transmission from the Master or another Slave, at which time the red LED will blink about once per second and the green LED may blink
more frequently. If the red LED never gets to the point where it is flashing about once per second then
this indicates that it is either out of range of any other radio or there is a problem of some kind. Be
aware that it may take up to several minutes in a worst-case condition to lock onto other radios, but
usually it locks within 5 to 30 seconds depending on signal strength and how many other radios are
already operating. If it cannot acquire lock within 5 minutes then you need to reposition the radio to a
higher elevation and/or away from metallic objects in order to improve its ability to receive.
A Master radio does not depend on locking onto other radios; it is the other radios that lock onto it or
to another Slave that is locked onto it. Therefore, the red LED on a Master radio will start blinking as
soon as you turn on a Master even if there are no other radios present.
Be aware that a Slave will go into a Communications Alarm if it is turned on and it cannot find another
radio within about 2 minutes. (It will also go into a Communications Alarm if it loses contact with the
Master, either directly or via other radios, for a period of about 2 minutes.)
It goes without saying that you should double-check all wiring connections between a radio and a
FarmAlarm if you are experiencing any difficulty with the radio network. A problem due to a loose wire
in the radio connector on the FarmAlarm can manifest itself in very mysterious ways.
Almost all problems with the radio network have been found to be caused by wiring errors,
bad connections, or incorrect settings of the DIP switches in the radio module. Check these
carefully.
52
5.3.
No Power
If the red Power LED is lit while the unit is turned on, it indicates that there is no AC power available
to the FarmAlarm (it will be running under battery power in this case). There are four possible causes
for this, and the recommended solutions are as follows:
1. The power cord is not connected to a source of AC power (either 120VAC or 240VAC).
2. One or both fuses in the power supply are blown.
✓
See section 6.3 to check for a blown fuse and replace if necessary.
3. Wiring problem within the FarmAlarm.
✓ Check that the AC power connector is firmly plugged into the power supply (see photo in section 6.3, Step #2) and that the “Power 15VDC” connector (located in the top left corner of the
FarmAlarm circuit board) is plugged in and the wires into the connector are firmly clinched by
the screws.
4. Defective power supply.
✓ If you are sure that the FarmAlarm is connected to a source of AC power and the fuses are not
blown and there is no wiring problem, then the most likely cause for this problem is a defective
power supply. The unit should be returned for repair.
5.4.
Temperature Error
A problem with a temperature sensor will most likely result in a temperature reading of zero degrees
or a temperature reading that is far off from the actual temperature.
1. Temperature of zero degrees. The FarmAlarm will report a temperature of zero degrees with a
status of “error” if it cannot get a signal from the temperature sensor.
✓ Check that the “Temp 1” or “Temp 2” connector (corresponding to the zone in question) is
plugged into the FarmAlarm and the wires into the connector are firmly clinched by the screws.
✓ Check that the in-line connector at the temperature sensor is firmly plugged in and latched.
✓ Replace the sensor with a known working sensor to see if the problem goes away. If so then
the sensor is defective.
2. Temperature more than a few degrees off from the actual temperature.
✓ First, to verify that this is the case, tape a known accurate thermometer to the temperature
sensor so that the bulb of the thermometer is very close to the end of the sensor. Wait 5 minutes and check the temperature of the sensor and the temperature of the thermometer. If the
sensor is more than a couple of degrees off from the thermometer then you may wish to have
the sensor replaced. Sensors should be accurate to within 2 degrees F. It goes without saying
that your reference thermometer needs to be more accurate than 2 degrees to be able to use it
for comparison.
53
6. Servicing
6.1.
Master Plug-In Board (FAMPLUGIN)
6.1.1.
Removing the FAMPLUGIN board
1. Unplug the speaker connector. This is the red connector located in the top right corner of the plugin board.
2. Remove the three screws along the left side of the board.
3. Carefully unplug the plug-in board from the main circuit board. It requires a fair amount of force to
unplug this board. Use a rocking motion from top to bottom while pulling the board away from the
main circuit board, as shown in the following photo.
54
6.1.2.
Installing the FAMPLUGIN board
1. Carefully align the pins which connect the plug-in board to the main circuit board, then press firmly
and evenly across the connector to fully seat the pins into the socket. Be certain that the pins are
aligned correctly.
2. Install the three screws along the left edge of the plug-in board and tighten firmly.
3. Plug the speaker connector into its matching socket in the top right corner of the plug-in board.
55
6.2.
Rear Compartment Access (for Fuses, Battery & Speaker)
1. Remove the screw holding the the top of the circuit board to the case, as shown below.
2. Tilt the board forward to reveal the rear compartment.
The power supply module is on the left and the battery is on the right.
56
6.3.
Fuse Replacement
A blown fuse is indicated by a glowing LED located on the power supply cover. To replace a fuse:
1. Gain access to the rear compartment by following the procedure in section 6.2 above.
2. Unplug the incoming AC power connector, as shown below.
Fuse LEDs
3. Remove the screws holding the cover to the frame and remove the cover.
4. Remove the blown fuse and replace.
Fuses
57
5. When reinstalling the cover be sure that the wires leading out of the power supply module are
routed through the cutout in the cover and are not pinched between the cover and the frame.
6.4.
Battery Replacement
1. Gain access to the rear compartment by following the procedure in section 6.2.
2. Remove the velcro strap holding the battery in place.
3. Pull the red and black connectors off the battery terminals.
4. Replace with the same type and capacity of battery. Connect the red and black connectors to the
same color terminals on the new battery.
5. Insert the new battery in the same location as the old battery and secure with the velcro strap.
!
58
6.5.
Speaker Installation or Replacement
1. Gain access to the rear compartment by following the procedure in section 6.2.
2. The speaker is held in place by two screws as shown below.
3. The speaker is connected to the Master Plug-In board via a 2-position connector plugged into the
socket located in the top right corner of the plug-in board. See photo in section 6.1.1.
4. If installing a speaker into a FarmAlarm case for the first time, it may be necessary to remove the
gland covering the hole in the case. If this rubber gland is present, remove it by squeezing it firmly
and pulling it out of the hole with a twisting motion.
Note: Some models of the FarmAlarm WyrLS have the speaker mounted to the rear of the enclosure
and not to the bottom as shown in the picture.
59
7. Installation Guide
7.1.
Equipment Supplied
In every building you will be installing:
1. The FarmAlarm main unit.
2. One radio module.
3. One water pressure sensor.
4. One temperature sensor.
Each FarmAlarm is shipped with these components plus the following additional items:
1. One 25-foot 4-conductor cable used to connect the water pressure sensor to the FarmAlarm (only
2 of the 4-conductors are used in this cable).
2. One 50-foot 4-conductor cable used to connect the temperature sensor to the FarmAlarm.
3. Screws for mounting FarmAlarms and radio modules.
4. 2 spare fuses (included with each Master unit).
7.2.
Installation Plan
The FarmAlarm main unit should be mounted in your control room. If possible you should avoid
mounting it inside the barn where it would be exposed to harsh chemicals or water spray. It can also
be mounted outside if no other location is available, but it should not be exposed to direct sunlight nor
to severe weather conditions. Under the eaves in a shaded location would be acceptable. Since the
enclosure is sealed and also has a clear plastic cover, exposing it to direct sunlight would create very
high temperatures inside the enclosure (like the inside of a parked car, only worse). Even in shade,
mounting the unit outside would still expose it to high temperatures during hot summer days. High
temperatures will greatly shorten the life of the built-in rechargeable battery. Your control room is by
far the best location.
The use of ‘U’ shaped staples is required for attaching the wires to walls, as a flat (or box)
shaped staple will damage the internal wires.
The ideal location for mounting the radio module is along the side of your control room and under the
eave if possible. See the photo following this paragraph. The number one requirement for the radio
module mounting is for it NOT to become a lightning rod! Do NOT mount the radio module so that it
becomes the highest point in the vicinity, or even close to the highest point. Acceptable locations are
along the side of your control room or barn. The radio must be mounted with the pvc tube parallel to
the ground, which orients the radio box vertically, pointed to the sky. The radios should be mounted
using the screws provided. There are two mounting holes drilled in the right angle bracket at the end
of the pvc tube for mounting.
60
For testing your radio network see Testing Your Radio Network.
You should install the FarmAlarm designated as the Master first. The Master is installed in the house
that has access to the incoming telephone line. A Master FarmAlarm differs from a Slave in that it
contains the components needed to make and receive phone calls, contains the speech for the spoken reports, and has an internal speaker. (These components are located on a small plug-in circuit
board and is what converts a Slave FarmAlarm into a Master.)
After installing the Master you should return to the Quick Start Guide and complete steps 1 through 4.
Once you have verified that the Master is installed and working properly you can proceed to install the
Slaves, turning on and verifying the operation of each one as you complete its installation.
7.3.
Power Connections
Although not shown in the connection diagram at the end of this section, the AC power cord is attached to any source of 120VAC or 240VAC in your AC power panel. The FarmAlarm will report a
power failure condition if this voltage is ever lost, so choose your source of voltage appropriately. If
connecting to 120VAC, connect the black wire in the FarmAlarm power cord to the hot side of the line
and the white to the neutral side. If connecting to 240VAC connect the black and white to opposite hot
sides of the line. It is extremely important that you attach the green ground wire to a proper earthground point in the power panel, otherwise you will lose all lightning protection provided by the
FarmAlarm. Consult an electrician if you have any doubts whatsoever about making these power
connections.
61
There is a small switch located under the power supply and this switch must be in the position labelled “220VAC” if you are connected to 220VAC, and to the “115VAC” position if you are connected
to 115VAC. If this switch is set to the wrong position, either the power supply will not function at all, or
will not provide adequate protection in case of a partial power failure.
7.4.
Assigning House Numbers
For each FarmAlarm, you must assign a house number to the FarmAlarm that corresponds to the
number of the house in which it is installed. House numbers are assigned in the radio module attached to each FarmAlarm by setting a few switches in the radio module to one position or the other.
To do so, remove the cover of the radio module by removing the four screws holding the cover. Inside
you will see a radio board as pictured below:
The first 4 switches are labelled 0 on the left and 1, 2, 4 and 8 on the right. To set a house number,
move these 4 switches to the left or the right so that the total of the numbers add up to the desired
house number. For example, to set it for house #3 you would move the first 2 switches to the right so
that the “1” and “2” add up to 3. For house #11 you would move the 1st, 2nd and 4th switches to the
right so that the “1”, “2” and “8” add up to 11. The photo above shows the house number set to #3,
System A, and Slave.
The 5th switch is set to “SA” to select “System A” and to “SB” to select “System B”. See 3.24.3.
The last switch is set to “SL” to set the FarmAlarm as a Slave, and to “MA” to set it for a Master.
Be sure that you do not create duplicate house numbers in your system, and only set one FarmAlarm
to be a Master (the FarmAlarm connected to the incoming phone line).
These miniature switches can sometimes be a little difficult to set properly. They can appear as
though they are in one position but in fact are in the opposite position. To be sure, flip the switch one
way or the other and you will feel a slight click or bump when the switch moves to that position, then
62
leave the switch in the desired position once you feel it click into that position. Do this for all switches,
even ones you think are already in the correct position. Setting these switches to the wrong position
has been one source of error that we have seen fairly often, and troubleshooting problems due to incorrect switch settings is sometimes quite difficult.
The following pictures show a Farm Alarm installation in a control room.
63
A Feed Monitor Sensor installed:
64
7.5.
65
Wiring Diagram
8. Example Applications
8.1.
Connecting A Generator Via A Wired Connection
If you have an AC backup generator you can connect the generator’s run/stop relay directly into your
FarmAlarm so that you will be called whenever power is being supplied by the generator. If the generator is fairly close to the FarmAlarm, you attach a pair of wires from the run/stop relay to the “IN3”
connector on a FarmAlarm closest to the generator. (If the generator is some distance from the FarmAlarm, the next section describes how to use a radio at the generator to provide a wireless link from
a FarmAlarm to the run/stop relay.)
The run/stop relay within the generator is a switch that is closed when the generator is running and its
transfer switch is closed. This switch must be an isolated dry contact closure, and this connection
point should not supply any voltage into the Farm Alarm. An example of a dry contact closure is
shown in the next section.
When a power failure occurs, the generator should be running before the power alarm in the FarmAlarm is triggered so that all you get is one call stating that the generator is running. Knowing that the
generator is running tells you that there is a power failure at the farm, but the generator has taken
over to supply power. If the generator fails to start, then you will get a call stating that there is a power
failure at the farm and power is not being supplied by the generator.
First, the alarm delay for a power alarm should be longer than the expected startup time for the generator. The default delay is 30 seconds which should be adequate for most users, but you can set it to
whatever works best with your generator.
Next, you need to set the generator input (Input Channel 3) to not cause an alarm when the run/stop
relay closes (or opens), but you do need to set it to place a phone call when it either closes (running)
or opens (stopped). As shipped, the generator input does cause an alarm when the run/stop switch
closes, so this needs to be changed. That setup command is:
XX 20 1 6 #!
Set for no alarm when switch closed.
The “XX” is the number of the FarmAlarm that you connected the generator signal to. The other settings for the generator input should not need to be changed since they are already set to be compatible with common generator systems. These factory default settings are:
1. No alarm when switch opens.
2. Place phone call when switch closes or opens.
3. Delay time before generator running or generator stopped phone call is 1 second.
66
8.2.
Connecting A Generator Via A Wireless Connection
If you have an AC backup generator you can connect the generator’s run/stop relay into your FarmAlarm so that you will be called whenever power is being supplied by your generator. When the generator is too far from the nearest FarmAlarm to run a wired connection, you can use a radio module to
carry the signal from the run/stop relay into the FarmAlarm system. You do this by attaching a pair of
wires from the run/stop relay in the generator to the signal input terminals on a FarmAlarm radio that
you mount adjacent to the generator. Since this radio module is not connected to any FarmAlarm unit,
the radio also needs to be connected to an AC adapter in order to obtain operating power.
The run/stop relay within the generator is a switch inside the generator’s control panel that is closed
when the generator is running and its transfer switch is closed. You will probably need to contact the
electrician responsible for maintaining your generator in order to locate the proper connection point at
the generator. It is important that this switch be an isolated dry contact closure, and that this connection point should not supply any voltage into the radio. Once the connections are made from the generator run/stop to the proper terminals of a radio module and the AC adapter is connected to the radio
module, you will then need to make a few setup changes to the FarmAlarm in order to have it call you
at the appropriate time and speak the appropriate message.
The picture below shows a connection to a dry contact point in a transfer switch.
67
A picture showing the connections you need to make at the radio interface box:
You will need a specially modified radio module, one that has minor wiring changes made to the radio
board. Be sure you obtain a radio from your dealer that is intended to be used as a remote generator
sensor.
The 6 volt AC adapter you use (available from FarmAlarm) has its DC plug cut off and the wires
stripped of insulation so that you can attach them to the screw terminals in the radio interface board
as shown in the above drawing. Be sure to observe the correct positive & negative polarity when connecting these wires.
The connection to the Run/Stop relay in the generator is not polarity sensitive. Either wire may go to
either terminal of the run/stop relay.
68
The DIP switches in the radio must be set so that the house number is either 14 or 15, and the
Master/Slave switch set to Slave. The System A/B switch should be set the same as the other A/B
switches in your FarmAlarm system (typically System A, as shipped).
What we will now do is to have the time delay for a power failure alarm to be longer than the startup
time of the generator, and have the FarmAlarm call you whenever the generator starts running and
again when it stops. When a power failure occurs, the generator should be running before the power
alarm in the FarmAlarm is triggered so that all you get is one call stating that the generator is running.
Knowing that the generator is running tells you that there is a power failure at the farm, but the generator has taken over to supply power. If the generator fails to start, then you will get a call stating
that there is a power failure at the farm and power is not being supplied by the generator.
First, the alarm delay for a power alarm should be longer than the expected startup time for the generator. As shipped from the factory this delay is 30 seconds which should be adequate for most users,
but you can set it to whatever works best with your generator.
Next we need to set the FarmAlarm to call you and say “Generator running” when the run/stop relay
closes and say “Generator stopped” when it opens. (As shipped from the factory, the spoken phrase
for an input signal into a #14 or #15 radio is “Remote input channel closed” or “Remote input channel
open”.) Here is how to change the spoken phrase using the phone connected to the Master:
1.
2.
3.
4.
Pick up the local phone and wait until the speech stops.
Press 00 31 11 9 # and you should hear 3 short beeps.
Begin speaking “Generator Running” as soon as the 3 beeps end.
Press the ACKNOWLEDGE button on the front of the FarmAlarm to end the recording.
It will play back to you what you just recorded. Repeat if desired. Next, make the recording for the
stopped condition:
1.
2.
3.
4.
Pick up the local phone and wait until the speech stops.
Press 00 31 12 9 # and you should hear 3 short beeps.
Begin speaking “Generator Stopped” as soon as the 3 beeps end.
Press the ACKNOWLEDGE button on the front of the FarmAlarm to end the recording.
You can also make this recording from a phone used to call into the FarmAlarm. The procedure is the
same except to end the recording you press any key on the telephone keypad. (Recordings sound a
little better when the local phone is used to make the recording... except maybe when there are 4000
chickens talking in the next room.)
As shipped from the factory, the FarmAlarm is set to place a phone call and to not sound an alarm for
both a switch closing and opening, and the call delay time is 1 second. All these settings are suitable
for use as a generator sensor so no settings changes need be made.
69
8.3.
Using A Radio With A Driveway Sensor (Or Similar Device)
Some users would like to be informed when someone drives into their farm. You can use a FarmAlarm radio module and a commercially available driveway sensor to accomplish this. Basically there
are two ways this can be done. The first is to have the FarmAlarm call you whenever the driveway
sensor is tripped, but for many people this creates just too many phone calls. The second way is to
use the FarmAlarm radio & driveway sensor with a FarmAlarm system and the FarmAlarmAlert (FAA)
device. The FAA is an optional remote alarm indicator that is usually placed in the user’s residence if
the residence is within radio range of the farm. In this case, the FAA beeps 4 times whenever the
driveway sensor is tripped, and the FarmAlarm is typically set up to not place a phone call (although it
can be) for this event. The FAA also sounds its beeper continuously and flashes a red LED whenever
there is any unacknowledged alarm occurring at the farm. (The next section covers the use of the
FAA.)
To use a radio with a driveway sensor, the driveway sensor receiver must be equipped with a contact
closure that activates whenever the driveway sensor detects a car or person passing in front of it.
You will need a specially modified radio module, one that has minor wiring changes made to the radio
board. Be sure you obtain a radio from your dealer that is intended to be used as a remote generator
sensor or driveway sensor.
The 6 volt AC adapter you use (available from FarmAlarm) has its DC plug cut off and the wires
stripped of insulation so that you can attach them to the screw terminals in the radio interface board
as shown in the above drawing. Be sure to observe the correct positive & negative polarity when connecting these wires.
The connection to the N.O. terminals in the driveway receiver is not polarity sensitive. Either wire may
go to either terminal of the N.O. terminals. The driveway receiver’s N.O. terminals must not supply
any voltage to the radio terminals. It must be a dry contact closure only.
The DIP switches in the radio must be set so that the house number is either 14 or 15, and the
Master/Slave switch set to Slave. The System A/B switch should be set the same as the other A/B
switches in your FarmAlarm system (typically System A, as shipped).
As shipped, the FarmAlarm will place a phone call when the driveway receiver’s N.O. contacts close
and again when they open, and it will say “Remote Input Channel is On” or “Remote Input Channel is
Off” unless the recording has been changed by you to say otherwise. If using the FAA, you would
probably want to set the FarmAlarm to not place a phone call when the sensor is tripped. To do this,
enter the following setup commands:
XX 26 2 6 #! Sets the FarmAlarm to not place a call when the switch closes.
XX 27 2 6 #! Sets the FarmAlarm to not place a call when the switch opens.
Replace the “XX” with the number that you have the radio set to, 14 or 15.
Now, when a car or person passes in front of the driveway sensor, the FAA will sound 4 beeps. If you
have left the settings so that a phone call is placed, it will also call you.
70
One example of a driveway monitor is here:
The MURS Alert™ Probe Sensor is a long-range wireless driveway
alarm that will detect vehicles only. It combines the features of the
vehicle sensor drive alert with our MURS Alert™ technology. The
MURS Probe is very reliable and will not give false signals from
large animals or other sources. When the MURS Alert™ detects a
vehicle, it will send an alert signal to either the M538-BS or M538HTtransceivers. The alert signal will be in spoken English and twice
repeats the phrase “Alert Zone One,” “Alert Zone Two,” “Alert Zone
Three,” or “Alert Zone Four.” The four alert messages are easily selected at the transmitter, so that up to four different zones can be
monitored simultaneously.
The MURS Alert™ Probe Sensor has five channels and 38 sub-channels to choose from. This will
help to eliminate interference from other users. The MURS Probe operates on 6 AA alkaline batteries.
The battery life should be about six to twelve months under most conditions. The channels, subchannels, and alert zones are all easily selected by the user. The probe is connected to the transmitter box with 50' of direct burial cable.
The MURS transmitter will have a range of up to several miles* to the hand-held or base station
transceivers. This extended range will help monitor areas that have been very difficult to monitor in
the past. It will be of great value to businesses monitoring customer traffic, security guards trying to
monitor remote warehouses, and farmers monitoring vacant farm sites.
An another option for a driveway sensor is below.
The MURS Alert™ transmitter is a revolutionary new trail monitoring
system. The MURS Alert™ transmitter is a passive infrared sensor
that can be mounted on a tree or a post to monitor activity at remote
locations. When the MURS Alert™ detects people, vehicles, or large
animals, it will send an alert signal to either the M538-BS or M538HT transceivers. The alert signal will be in spoken English, twice repeating the phrase “Alert Zone One,” “Alert Zone Two,” “Alert Zone
Three,” or Alert Zone Four.” The four alert messages are easily selected at the transmitter so that up to four different zones can be
monitored simultaneously.
The MURS Alert™ transmitter has five channels and 38 sub-channels to choose from. This will help
to eliminate interference from other users. The MURS Alert™ operates on 6 AA alkaline batteries. The
battery life should be about one year under most conditions. The channels, sub-channels, and alert
zones are all easily selected by the user. In most instances, it should only take a minute to make the
changes.
71
The MURS Alert™ transmitter will have a range of up to several miles* back to the hand-held or base
station transceivers. This extended range will help monitor areas that have been very difficult to monitor in the past. It will be of great value to businesses trying to monitor customer traffic, security guards
trying to monitor remote warehouses, farmers monitoring vacant farm sites, and hunters monitoring
game trails. MURS Alert™ will give you real time monitoring of any location that you choose.
Please call Farm Alarm for additional information on driveway sensors.
72
Using The FarmAlarmAlert Device
The FarmAlarmAlert (FAA) is a radio receiver used with a FarmAlarm monitoring system and, if located within radio range of a FarmAlarm, will provide a visual and audible indication whenever there
is any alarm occurring within the system. It consists of an enclosure containing a beeper, red LED,
green LED, pushbutton, and a wall mounted AC adapter.
When any alarm occurs at the FarmAlarm, the red LED will flash rapidly and the beeper will beep rapidly. Pressing the pushbutton (”Alarm Silence”) will cause the beeper to stop, but the red LED will continue to flash rapidly until the alarm is acknowledged or is no longer present. Alarms at the FarmAlarm
are normally acknowledged by (1) all phone calls being completed or (2) by the user pressing the Acknowledge button at the FarmAlarm, or (3) by the user picking up the local phone at the FarmAlarm.
There is an option which the user can set at the FarmAlarm Master that can enable the pushbutton at
the FAA to also cause all alarms to be acknowledged. (See FarmAlarm user manual, setup section
titled “Event Enable And Disable”, item #14.)
If an alarm occurs and then goes away, and the pushbutton at the FAA has not been pushed, the red
LED will continue to blink a short flash about every 2 seconds as an indicator that an alarm had occurred while the user was not present to see it. This reminder flashing can be ended by pressing the
pushbutton on the FAA.
The green LED is an indicator that flashes once or twice a second whenever the FAA is within radio
range of a FarmAlarm and has had time to find and synchronize to the radio network. When first
turned on, this indicator may be on continuously or flashing very rapidly for up to 2 minutes while it
locates and joins the FarmAlarm radio network. If for any reason the FAA loses radio contact with a
FarmAlarm during normal operation, it will again attempt to acquire the network after 2 minutes of no
contact. If radio contact remains broken the FarmAlarm will trigger a communications failure alarm
and will place phone calls to inform you.
------------There are two possible alarm conditions at the FarmAlarm that are not detected by the FAA. These
two alarms are not enabled as shipped from the factory but can be enabled by the user via a setup
item at the FarmAlarm Master. These are the “Remote Input Channel” for radio units #14 and #15.
These two events are very seldom, if ever, used as an alarm. Normally they are used as “Generator
Running” sensors for generators located some distance away from a barn and are not normally configured to create an alarm. An alternate use of “Remote Input Channel” for #14 and #15 is as a driveway sensor indicator. When used for this purpose, radio units #14 and/or #15 are connected to a
driveway sensor and when tripped, the FarmAlarm will send a signal to the FAA to cause its beeper to
beep 4 times. The 4 beeps will occur regardless if #14 and #15 have been configured to create a
FarmAlarm alarm or not. Please consult your dealer or distributor if you wish to use radio units #14
and #15 as driveway sensors.
73
74