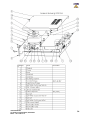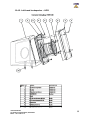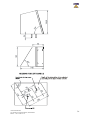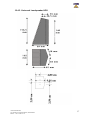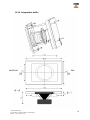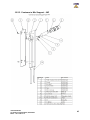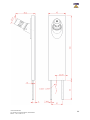
1
Magellan User Manual Digital Counter Intercom Version eng.1.3 Ateïs International Ch. du Dévent, 1024 Ecublens, Switzerland. Phone : +41 21 881 25 10 1. 2. 3. Introduction/Operation ....................................................................................................... 4 Global characteristics and Compliance .............................................................................. 6 Software and Drivers Installation....................................................................................... 6 3.1. Software Installation .................................................................................................. 6 3.2. Drivers Installation..................................................................................................... 7 4. Typical Equipment Arrangement ....................................................................................... 8 5. Wiring................................................................................................................................. 9 5.1. UC1 ............................................................................................................................ 9 5.2. PMUC....................................................................................................................... 12 5.3. CFUC ....................................................................................................................... 14 6. Commissioning................................................................................................................. 15 7. Software ........................................................................................................................... 16 7.1. Communication setup............................................................................................... 17 7.2. Version and Update.................................................................................................. 18 7.3. Buttons and Indicators.............................................................................................. 18 7.3.1. General Button ................................................................................................. 18 7.3.2. Customer/Clerk window .................................................................................. 19 7.3.3. Standby window............................................................................................... 21 7.3.4. Auxiliary output window (PMUC & CFUC)................................................... 21 7.3.5. Remote output window (PMUC & CFUC)...................................................... 21 7.3.6. View window ................................................................................................... 21 7.3.7. Feedback suppressor window........................................................................... 22 7.3.8. Function, Buzzer call and Buzzer alarm windows........................................... 22 7.4. Setting process.......................................................................................................... 23 8. Maintenance caution ........................................................................................................ 24 9. Device characteristics....................................................................................................... 24 9.1. UC1 .......................................................................................................................... 24 9.1.1. General ............................................................................................................. 24 9.1.2. Inputs................................................................................................................ 24 9.1.3. Outputs ............................................................................................................. 24 9.1.4. Electrical diagram ............................................................................................ 25 9.2. PMUC / CFUC :....................................................................................................... 25 9.2.1. General ............................................................................................................. 25 9.2.2. Inputs................................................................................................................ 26 9.2.3. Outputs ............................................................................................................. 26 9.2.4. I/O contact LED ............................................................................................... 26 9.2.5. Wiring on PMUC/CFUC.................................................................................. 27 10. Drawings ...................................................................................................................... 29 10.1. UC1 ...................................................................................................................... 29 10.2. UC1 Flange .......................................................................................................... 31 10.3. PMUC................................................................................................................... 32 10.4. Speakers ............................................................................................................... 33 10.4.1. Right-hand loudspeaker - HPD ........................................................................ 33 10.4.2. Left-hand loudspeaker – HPG.......................................................................... 35 10.4.3. Universal Loudspeaker HPU............................................................................ 37 10.4.4. Integratable baffle ............................................................................................ 38 10.5. Microphones......................................................................................................... 39 10.5.1. Sales Assistant’s Mic on Panel – MAP............................................................ 39 10.5.2. Micro on Document Cover MPD .................................................................... 41 10.5.3. Customer’s Mic Support – MC ........................................................................ 43 Ateïs International Ch. du Dévent, 1024 Ecublens, Switzerland. Phone : +41 21 881 25 10 2 10.6. Hard of Hearing Loop BME................................................................................. 45 11. Troubleshooting ........................................................................................................... 46 11.1. Troubleshooting system equipped with UC1 ....................................................... 47 11.1.1. Power supply defects and power on issues ...................................................... 47 11.1.2. PC <-> UC1 Communication fault .................................................................. 47 11.1.3. Audio fault........................................................................................................ 47 11.1.4. Replacing device instructions........................................................................... 48 11.2. Troubleshooting system equipped with PMUC ................................................... 49 11.2.1. Power supply defects and power on issues ...................................................... 49 11.2.2. PC <-> PMUC communication fault................................................................ 49 11.2.3. Audio and Input/Output contact fault............................................................... 50 11.2.4. Replacing device instructions........................................................................... 51 11.3. Troubleshooting system equipped with CFUC .................................................... 51 11.3.1. Power supply defects and power on issues ...................................................... 51 11.3.2. PC <-> CFUC communication fault ................................................................ 52 11.3.3. Audio and Input/Output contact fault............................................................... 52 11.3.4. Replacing device instructions........................................................................... 53 Ateïs International Ch. du Dévent, 1024 Ecublens, Switzerland. Phone : +41 21 881 25 10 3 1. Introduction/Operation When fitted to point of sale counters, the ING MAGELLAN intercom allows or improves communication between the sales assistant and the customer, in the case of sales windows (IDF, TER, PVR90) or when used during “rush hours” (with the window raised) HEX counters or possibly, in the case of open sales counters, with the hard of hearing. It has been designed to meet a number of criteria: • Aesthetic qualities, so that it matches the style of new sales counters. • Sturdiness and the ability to stand up to any acts of vandalism which might occur. • Acoustic qualities: high fidelity reproduction (users should “forget” they are even using the system), the ability to reach high volume levels (in noisy lobbies) without feeding back (Larsen effect), with the intercom level matching the level of the ambient sound and related functions. The ING MAGELLAN intercom is made up of the following components: • Customer side: a microphone (MC/MPD), one or two loudspeakers (HPD, HPG, HPU or other) and a transmitting area for the hard of hearing (BME). • Sales Assistant’s side: a microphone with control keys and indicators (MAP or MAS), one or two loudspeakers (HPD, HPG, HPU or other) and an electronic control unit (UC1, CFUC) or console that integrates microphone, speaker and central unit (PMUC). The way that the interphone works is very simple: the customer’s voice is captured by the microphone, then amplified and played back by the sales assistant’s loudspeaker and vice versa, so that the two people can talk to each other at the same time (full duplex operation). The sales assistant has a key which switches on the intercom (ON/OFF) and a power boost (+6dB, with indicators) key in case there is not enough level. The microphones and loudspeakers are connected to an electronic control unit (CU) the various functions of which are described below (cf. general electrical diagram). The most important of these functions is digital speech processing using a DSP (Digital Signal Processor). To do this, the analogue modulations from the microphones are preamplified, converted into digital signals and then sent to the DSP which uses a complex algorithm-based internal program stored in “flash” memory to provide all the ING’s functions: • Anti-Larsen function: this well-known phenomenon - involving continuous amplification until it reaches saturation and starts oscillating by looping a microphone/loudspeaker system, from a certain gain level - could occur here because we have two mic/loudspeaker channels which could easily form a loop within a restricted area (the sound from a loudspeaker is captured by the other channel’s microphone and amplified). To cure this phenomenon, we use two distinct functions. The first one is an echo cancelling process by means of which the program analyses and defines the interfering signal’s parameters and then subtracts it from the wanted signal. This means that the amplification loop is broken either on one of the two channels or on both of them simultaneously. The second one is the feedback suppressor that is Ateïs International Ch. du Dévent, 1024 Ecublens, Switzerland. Phone : +41 21 881 25 10 4 suitable for opened counter. This function is permanently searching for feedback frequencies and prevents feedback by applying a narrow filter. • Automatic variation in amplification level according to the level of ambient noise: the DSP uses the customer or sales assistant’s mic to measure the noise level in the lobby and automatically adapts each channel’s gain to retain good audibility. • Limitation function: allows the sound level in the loudspeakers to be limited if the sales assistant or the customer is speaking too loudly or too close to the microphone. • Setting levels and sound activity detection thresholds: in an attempt to make the system as foolproof as possible, all of the settings are made using the MAGELLAN software application (cf. instructions) installed on a laptop PC connected to the CU by an RS232 serial (UC1) or USB (PMUC, CFUC) connection, when the system is commissioned (and when necessary for any subsequent settings changes). So who do not have a PC with the software can not change following settings. The following settings can be software adjusted: - level for the sales assistant and the customer’s loudspeakers and the hard of hearing system. - threshold for power boost function +6dB: this function is only active from a certain sound level detected by the microphones. This level can be varied depending on the ambient noise. - threshold and delay before Standby mode: it is possible to set the system up so that, after the sales counter has been inactive for a certain period of time, the interphone automatically becomes inactive (so that it does not constantly amplify the noise in the lobby or in case the sales assistant needs to speak in greater privacy). This period of time, along with the sound activity threshold at which the interphone goes into and comes out of standby mode, can be set. New features of the PMUC CFUC: Based on the UC1, the new central unit, call-station (PMUC) or to build-in (CFUC), integrate all the functionalities from the previous one like echo cancellation, feedback suppressor and all other real time adjustment features but it also includes advanced features: • External command input that allows to emit a call signal • Output contact allowing commanding external devices such as video recorder, light, door strike, alarm, etc. • dB output for external amplification in order to make external audio call • Audio, microphone and speaker input/output that greatly improve integration in specific products. Extension allows this unit to suit to almost every reception and concern audio solutions such as: • queue management • Counter intercom with or without hard of hearing possibilities • Specific product integration such as trap-doors and security vestibule Ateïs International Ch. du Dévent, 1024 Ecublens, Switzerland. Phone : +41 21 881 25 10 5 2. Global characteristics and Compliance • • • • Customer microphone: anti-vandal construction, omnidirectional electret capsule. On glass sticking or on metal plate fixation or even directly screwed on the desk with two M3 screw. Clerk microphone: flexible mount fixed on a built-in plate or on a basement that integrates the two command keys. Clerk and/or customer speaker HPU, HPD, HPG: anti-vandal conception, ø80mm speaker and medium 14mm baffle, painted steel front grill, on plate fixation with two 6mm lag screws. Sensitivity: 85dB/1W/1m. BME Hard of hearing emitter: coil winding on PVC encapsulated ferrite. Normal operating condition: Temperature: -10°C to 40°C; relative humidity: 100%; waterproofness: IP23. The Magellan complete system has been design to be compliant with the three following norms: • EC standards: EN55103-1 (EMC emission) • EN55103-2 (EMC immunity) • EN60950 (Low voltage) 3. Software and Drivers Installation The MAGELLAN software allows to control and to set the settings of the digital counter intercom MAGELLAN. The following chapter describes the software installation process. 3.1. Software Installation Execute the magellanv10.exe file to start the installation process. It will detect if there is already a previous version installed on the computer and, if yes, will prompt to do the update. Please follow the few steps in order to complete the installation process. At the end of the installation, the setup wizard prompt that the installation is complete and ask if you want to run the Magellan software. Then click on finish. Ateïs International Ch. du Dévent, 1024 Ecublens, Switzerland. Phone : +41 21 881 25 10 6 3.2. Drivers Installation When you connect PMUC for the first time, you will have to install drivers in order to allow the O.S. to communicate with the digital counter intercom. There are two different drivers to install, one is Magellan Interface USB and the other is Magellan USB-Serial Port. The install procedure is identical for both drivers and is automatically launched; please follow the next few steps. If the installation CDrom is inserted, Microsoft Windows can automatically find the appropriate drivers. So please choose automatic install (windows recommended). If windows cannot find the right driver, please install it manually by choosing the right location of the driver (default: C:/Magellan). On Windows XP, it might happen that Windows will display caution messages because this software has not been verified by Microsoft Corporation. Please accept the installation of those drivers. Ateïs International Ch. du Dévent, 1024 Ecublens, Switzerland. Phone : +41 21 881 25 10 7 4. Typical Equipment Arrangement MC /MAS, MAP/PMUC : ¾ Microphones need to be placed beside the computer monitor, in case there is one, in order to create a natural speaking position for workers. Loudspeakers should be placed at the other extremity according to the further notation. ¾ For MAS and PMUC, if they are not fixed on the counter, take care to keep enough cable slack in order to avoid cables deterioration. Note for PMUC: The PMUC can be integrated into the counter, same for the MAP. Note for MC : If placed on the counter, point the microphone vertically. HP/MC, MAS, MAP, PMUC : ¾ Minimum Distance: for an optimal performance and behaviour, keep at least 40cm between speakers and microphones. HPU, HPD, HPG : ¾ Should point to the respective interlocutor. For aesthetic requirement, speakers are place vis-à-vis in order to create a mirror visual effect. Don’t place the speakers at height unless you are using ceiling speakers. BME : ¾ Should be placed parallel to the counter ¾ Should be placed perpendicularly to the customer/clerk ¾ Should be positioned as close as possible of the customer position, BME radiatiation capabilities is more or less 1 meter UC1/CFUC : ¾ Need to be fixed under the counter, need to be accessible for wiring, maintenance and PC connection. Wiring : ¾ In order to avoid vandalism, please hide all wires from the customer side. HP Customer Side BME Clerk Side HP UC1 or CFUC Ateïs International Ch. du Dévent, 1024 Ecublens, Switzerland. Phone : +41 21 881 25 10 MC MAS or MAP PC monitor 8 HP Customer Side BME MC PMUC Clerk Side HP (optional) PC Monitor 5. Wiring There are multiple wiring possibilities and options. Here you will find examples for UC1, PMUC and CFUC. You will see how to make a basic counter intercom to more complex arrangement. 5.1. UC1 The UC1 minimal wiring is composed of: • • • • • • • UC1 central unit (CU) Customer Microphone (MC) Customer Speaker (HPC) Clerk Microphone (MAS or MAP) Clerk Speaker (HPA) Hard of Hearing system (BME) Computer (PC) In order to achieve the wiring, please refer to figure 1 and 2. Ateïs International Ch. du Dévent, 1024 Ecublens, Switzerland. Phone : +41 21 881 25 10 9 Op tional: 2nd Optional : 2nd sales Clerk assistant's Speaker LS SaleClerk s Assistant's LS Speaker CCustomer ustomer's LS Speaker HPA HPC Optional :2nd Optional : 2nd customer's Customer LS Speaker BMEHOHS (HOHS) Clerk Microphone MAS SAMP Customer Microphone CM orMC DD Customer HFHFHSM Headset 230 v MIC HP-BME Alim CU RS 232 PC Figure 1: Basic UC1 wiring Ateïs International Ch. du Dévent, 1024 Ecublens, Switzerland. Phone : +41 21 881 25 10 10 Figure 2: UC1 connector and wiring Ateïs International Ch. du Dévent, 1024 Ecublens, Switzerland. Phone : +41 21 881 25 10 11 5.2. PMUC Figure 3 shows the wiring for PMUC in case of basic counter intercom. Figure 4 shows PMUC wiring for security vestibule. Figure 3: PMUC Counter Intercom Ateïs International Ch. du Dévent, 1024 Ecublens, Switzerland. Phone : +41 21 881 25 10 12 Figure 4: PMUC Security Vestibule Wiring Ateïs International Ch. du Dévent, 1024 Ecublens, Switzerland. Phone : +41 21 881 25 10 13 5.3. CFUC Figure5 shows CFUC wiring for intercom with security vestibule. Figure 6 shows wiring for intercom using trap-doors. Figure 5: CFUC wiring for security vestibule Ateïs International Ch. du Dévent, 1024 Ecublens, Switzerland. Phone : +41 21 881 25 10 14 Figure 6: CFUC wiring for trap-doors 6. Commissioning When the intercom is installed at a standard new sales counter the location of each of the interphone components on the sales counter is predefined, as a result of a study on aesthetic, ergonomic and functional aspects. If an old sales counter has been renovated there are certain rules which need to be followed when installing: • • As written before, leave a minimum distance of around 40 cm between microphone and loudspeaker when they are on the same side of the glass. Make sure you get the best acoustic and mechanical isolation (the support must not vibrate) between the microphone and loudspeaker on a single channel to prevent direct feedback appearing too easily. Ateïs International Ch. du Dévent, 1024 Ecublens, Switzerland. Phone : +41 21 881 25 10 15 • In any case, make sure you comply with the connection polarity of the microphones and loudspeakers. Only connect the electronic control unit to the mains once all the wiring has been carried out (warning! The CU is powered on and off by simply plugging in the mains lead. There is no on/off switch). We also recommend using the backup mains supply (if available) to power the CU. Once the ING MAGELLAN interphone has been installed and connected, carry out the following operations: • Power the CU on and check that the green indicator on the front lights up. • Check that the indicators on the MAP control panel (ON/OFF, +6dB) light up after you press the keys. Turn off the +6dB indicator. • Check that each of the mic/HP channels and the HOHS are all working properly (using an AMPETRONIC magnetic loop tester Ref. ILR2) by placing the microphone 10cm from the artificial mouth (LEM ref. P1466MK3) set to 3Pa. The corresponding loudspeaker level, measured at 40cm, should be around 75dBA (using the CU’s default gain settings). Check that using the +6dB function does not cause feedback. • Carry out a test to make sure that the interphone goes into standby mode (the ON/OFF indicator flashes) after 10 sec. (default setting) when there is no activity. • Connect the PC to the CU’s subD9 connector and run the Magellan software (see instructions). All the settings are then accessible. 7. Software Once the wiring is complete, launch the Magellan software by double clicking on the Ateis Magellan icon, see below. The picture below shows the Magellan software main page. The Magellan software is not a multi window software, so every function and parameter are accessible from this page. Please read the following in order to learn how to configure a Magellan installation. Ateïs International Ch. du Dévent, 1024 Ecublens, Switzerland. Phone : +41 21 881 25 10 16 7.1. Communication setup In the Magellan software, the user has to define on which communication port the UC1, PMUC or CFUC is connected. When installing the driver, the driver creates a virtual com port and the number of this com port can be found in the Control Panel -> System ->Device Manager ->Ports (Com & LPT). Here you will be able to see on which port the Magellan have been defined. Once you know which com port to use, select on the Magellan window the right com port. If the wrong port is selected or if there is a connection issue, the Magellan software will launch a pop-up window that will indicate to you that there is no response from the central unit (UC1, PMUC, CFUC). Ateïs International Ch. du Dévent, 1024 Ecublens, Switzerland. Phone : +41 21 881 25 10 17 In case of “No Response” message, check if the right com port has been selected and/or the connection cable is defect or the central unit is powered off. 7.2. Version and Update You can check the current version of the UC1, PMUC or CFUC by clicking on the Version button: If the version does not correspond to the one of the software, the software will prompt you to do an update. In order to do so, click the update button. The central unit should not be disconnected during update process. Note: For the first installation, please do an update. 7.3. Buttons and Indicators Here you will find a description of the buttons’ function and explanation about the action they generate. 7.3.1. General Button On the top of the Magellan Window, you will find general purpose buttons, see picture below. • • • • • • • Language: This drop down menu allows user to choose the software language between English, French and German. Waiting for command: indicates the current action status (writing, reading, updating, etc.). Hardware: allows choosing between PMCU, UC1 and CFUC if none is connected. At the upper right of the window, a slideshow of the counter intercom product range. Version: allows checking the version of the central unit. Update: starts the firmware update process. Read: reads the current configuration stored in the central unit. Ateïs International Ch. du Dévent, 1024 Ecublens, Switzerland. Phone : +41 21 881 25 10 18 • • • Write: write the current parameter setting to the central unit. Save: save the current parameter settings to an external file (.ing). Open: opens a *.ing file with custom parameter settings. 7.3.2. Customer/Clerk window The customer window and the Clerk window are similar except for the BME settings as the Clerk does not have the BME on his side. Limiter: The limiter option allows avoiding saturation on speakers when speaking into microphones. By default, this option is ticked. The limiter prevents an exaggerate amplitude of the signal to be send to the speakers. The threshold level of the limiter is not adjustable. The limiter threshold level cannot be adjusted; it is set to -6dB of the microphone full scale level. AGC: the Automatic Gain Control allows adjusting the gain of the speakers according to the surrounding noise level from the customer side or clerk side. The AGC work in fact like an attenuator (0 dB for noisy environment and -6 dB for calm environment). The AGC act by measuring the ambient noise level (measured without speech) and then diminish the microphone gain in accordance. Example: When AGC is active on the customer side, we measure the noise level at the customer side and we adjust the clerk microphone’s gain into the customer speaker. Attenuation vs Ambient noise is approximately: 0 -1 -2 for for for 70 dB 65 dB 60 dB Ateïs International Ch. du Dévent, 1024 Ecublens, Switzerland. Phone : +41 21 881 25 10 19 -3 -4 -5 -6 for for for for 55 dB 50 dB 45 dB 40 dB Echo Cancellation: The Acoustic Echo Cancellation filter works as follow in case of activation on the clerk side (Clerk is talking and customer is listening). Here are some abbreviations that will be used: MA = Clerk microphone MC = Customer microphone HPA = Clerk loudspeaker HPC = Customer loudspeaker AEC = Acoustic Echo Cancellation filter The schematic below shows where the echo is created and process between the customer and the clerk. MA ------|-----> HPC AEC HPA <---|------ MC Acoustic echo The signal emitted by the MA goes to the HPC and in the AEC filter, the MAf (clerk microphone filtered) signal is sent back to the HPA. The HPA receive a signal that is the subtraction: MC – MAf. In an ideal echo cancellation, the subtraction MC –MAf = 0, no echo. The Acoustic Echo Cancellation is permanently adapted. LS: here you can adjust the speaker gain level from 0 dB to -40 dB. Default settings is -15 dB for both side +6 dB Threshold: the over amplification device (+6dB button on the MAS) is active only when one or the other of the two microphones pick up a sufficient sound level in order to avoid inopportune activation from a ambient noise. The trigger threshold for both microphone can be set from 0 (highest sensitivity) to 100 (lowest sensitivity). For example, for a 100 threshold, the over amplification is never active, reciprocally 0 makes the over amplification always working. Default is 60. Note: The over amplification is only active at on side at a time. MAX: this is additional over amplification for UC1 version 3.x. This setting allows adding from 0 dB to 10 dB additional gain. When this setting isn’t available, it is grey shaded and not selectable. Default is 0 dB. Standby threshold: This parameter allows setting the threshold for putting the central unit into standby state. The standby/active state’s change is driven by sound level detected by any of the two microphones. The threshold can be set from 0, very sensitive, to 100, not sensitive. Default is 70. Ateïs International Ch. du Dévent, 1024 Ecublens, Switzerland. Phone : +41 21 881 25 10 20 High-Pass filter: user can add a tonal correction by using the high-pass filter. By limiting the low frequency in outside use, user can greatly reduce, as example, noises coming from wind. The cutoff frequency of this filter can be set from 71 Hz to 400 Hz. Adjusting correctly the high-pass filter can improve echo cancellation efficiency as well as intelligibility. BME: the BME cursor allows adjusting the hard of hearing system emission’s level from 0 dB to -40 dB. Default is -6 dB. 7.3.3. Standby window The “Standby after...” cursor allows selecting, in accordance to the standby threshold, the amount of inactivity time before the central unit goes into standby mode. The time can be set in the range from 0, inactive, to 99 seconds. Default is 10 seconds. 7.3.4. Auxiliary output window (PMUC & CFUC) This setting is made for adjusting the auxiliary output level for PMUC and CFUC only. Default is -10 dB. 7.3.5. Remote output window (PMUC & CFUC) This part of the window allows setting the output contact mode. Normally open, the output contact can be closed using one of the following options: • • • • • On Remote in: activation of the remote in makes the contact to toggle in latch mode. On pressure closes the contact, one more pressure re-opens the contact. ON: when the central unit is powered on, the contact is closed. Standby: when the central unit is in standby mode, the contact is closed +6dB (momentary): the contact is closed when +6dB button is maintained pressed, the contact is re-opened as soon as the button is released. +6dB (latching): A long pressure on the +6dB button allows toggling the current contact state. 7.3.6. View window This window is acting in real time mode and shows the system status. • Central unit state: standby/On/Off Ateïs International Ch. du Dévent, 1024 Ecublens, Switzerland. Phone : +41 21 881 25 10 21 • • • • Remote output activation: Aux Over amplification: 0dB/6dB Sound level (visualisation bar) picked up by clerk’s microphone (A->C) and customer’s microphone (C->A) Clerk and customer loudspeakers gain display 7.3.7. Feedback suppressor window The feedback suppressor window allows initialising and activating the feedback suppression function. • • Automatic: will activate the feedback suppressor. Once the setup is launch, this option is automatically ticked. Detail: display the feedback suppressor filter frequency. Note: When the feedback suppressor has to be used, a setup should be done in case of first installation, furniture’s changes or system location transfer. Note: don’t disturb the setup process by making too much noise. 7.3.8. Function, Buzzer call and Buzzer alarm windows The digital counter intercom can work in two modes, Counter and Secure Counter. Counter: a buzzer can be played when the remote input is closed. This buzzer is interrupted as soon as either the On or +6dB button is pressed. Secure counter: does only concern CFUC central unit. The buzzer call option is still available but a buzzer alarm option is added. This buzzer trigger when the +6dB input is opened for time set up by the cursor (open door alarm for example). Ateïs International Ch. du Dévent, 1024 Ecublens, Switzerland. Phone : +41 21 881 25 10 22 Note: this mode activation disables the +6dB over amplification. 7.4. Setting process This chapter describes a quick procedure to obtain a suitable setting configuration. Please follow the few next steps: • Put the clerk microphone on • Verify the behaviour of both channel (microphones and loudspeakers) o Set the clerk speaker gain to -40dB and the customer speaker gain to -14dB. Write the configuration into central unit by clicking on the Write button. When the clerk is speaking, the customer should be able to hear him. o Set the customer speaker gain to -40dB and the clerk speaker gain to -14dB. Write the configuration by clicking the write button. When the customer is speaking, the clerk should be able to hear him. • Echo cancellation setting up: If you are using the echo cancellation feature for the first time, please respect the following procedure. o Set the speakers’ gain to their default value. Verify that there is no feedback. If feedback can be heard, please decrease the speakers’ gain until the feedback effect disappear. o Tick the echo cancellation option on both clerk and customer sides then click on the save button. o Speak for a few seconds in the clerk microphone, then few seconds in the customer microphone. This is an important step because echo cancellation, at first use, needs to be calibrated to the room configuration. o Click on the Write button. This is not necessary to repeat this procedure at each parameter’s change. • Gain adjustment: o Adjust gains for both sides in order to have a good hearing comfort, this with and without +6dB over amplification. • In outside condition, if the wind generates too high turbulences, try to increase the cut off frequency of the high-pass filter. This until obtaining the maximum diminishing of noise in order to achieve good hearing condition. This filter could also be used to correct tone of the voices. You can diminish low frequency if voices sound too dull. • If the feedback suppressor function is used, click the “Setup” button then “OK” to optimise the anti-Larsen function, depending on the site, then “write”. • The level settings should be adjusted according to how much ambient noise there is (around 6dB above the ambient level) and any requirements to make sure that the sales assistants are comfortable (after all, they will be using the system for several hours at a time!) Ateïs International Ch. du Dévent, 1024 Ecublens, Switzerland. Phone : +41 21 881 25 10 23 8. Maintenance caution Every usual cleaning product could be used for the maintenance of the Magellan, however avoid using solvent such as White Spirit, Acetone, etc. Although the intercom offers relative waterproofness, it is recommended to avoid direct cleaning liquid projections on parts like microphone. Better use a soaked rag. 9. Device characteristics 9.1. UC1 Here you can find the UC1 characteristics as well as internal electrical diagram. 9.1.1. General Frequency Bandwidth THD for maximum output level S/N ratio Maximum voltage gain (dB) Crosstalk Loudspeakers’ cables Microphones’ Cables Power Supply Supply power Computer Link Overall dimensions (L x H x W) Weight -/+ 3dB 50Hz – 7KHz Æ Microphones to Loudspeakers 200Hz – 7KHz Æ Microphone to BME HP <0. 4% @1KHz 1W BME <0.5% -60 dB Æ Microphones to loudspeakers -60 dB Æ Microphone to BME 55 dB@1KHz Æ Microphones to Loudspeakers 70 dB@ 5KHz Æ Microphone to BME @1KHz : -70 dB between the 2 inputs SubD25 Fem Æ HPA : L=3 m S=2x0.5²; +Red -Black ; lugs Æ HPC : L=3,8 m ; S=2x0.5² ; +Red -Black ; lugs Æ BME : L=2.4 m ; S=2x0.5² ; +Grey –Streaked Gray; terminal SubD25 Male Æ MA : L= 2,2m S=8x0.22²; HE14 Fem (2x4) Æ MC : L= 2,4m ; 1x0.22²+Drain ; +white (core) -braid Supply 230V AC / Supply cable L=2.5m 2G1² Full load 30W Non standard RS232 cable L= 2m 240 x 45 x 240 mm 2 KG 9.1.2. Inputs Type Clerk Microphone Customer Microphone Electret / supply 6V DC Electret / supply 6V DC GAIN Input impedance Max level before saturation Connection 43 dB 1,2 KΩ -22 dBu SubD 25 pins, male 40 dB 1,2KΩ -18 dBu SubD 25 pins, male 9.1.3. Outputs Power / maximum level HPA 4 Ω THD<0.1% 8W HPC 4 Ω THD<0.1% 8W BME 400 mA/m at 60 cm Amplifier protections Voltage gain 10 dB (x19) 10 dB (x19) 38 dB (x60) Output Stage Power OP amplifier Power OP amplifier Power OP amplifier Connections SubD 25 pins, female SubD 25 pins, female SubD 25 pins, female Short-cut, open circuit, over heating, high frequency Ateïs International Ch. du Dévent, 1024 Ecublens, Switzerland. Phone : +41 21 881 25 10 24 9.1.4. Electrical diagram 9.2. PMUC / CFUC : 9.2.1. General Frequency Bandwidth THD for maximum output level S/N ratio Ateïs International Ch. du Dévent, 1024 Ecublens, Switzerland. Phone : +41 21 881 25 10 -/+ 3dB 120Hz – 7KHz HP <0.54% @1KHz 1W BME <0.7% @1kHz AUX <0.06% @1KHz -70 dB Æ Microphones to loudspeakers -50 dB Æ Microphone to BME -77 dB Æ Microphone to AUX 25 55 dB@1KHz Æ Microphones to loudspeakers 53dB@1KHz / 60dB@ 5KHz Æ Microphone to BME 39 dB@1KHzÆ Microphone to AUX @1KHz -55 dB between the 2 inputs Bloc transformer 230V AC / 12V DC 1.5A supply with equipment. Without signal 4W / full load 18W USB Type A-B cable L=3m PMUC = 200x 200 x 240 mm. With flexible microphone Maximum Voltage Gain (dB) Crosstalk Power supply Supply power Computer link Overall dimension (L x H x P) PMUC = 0,8 Kg Weight 9.2.2. Inputs Type Clerk Microphone Customer Microphone Electret / supply 6V DC Electret / supply 6V DC GAIN Input Impedance Max level before saturation 32 dB 4 KΩ -22 dBu 29 dB 2,3KΩ -18 dBu Connection Ext. Mic. : 3.81 mm pace terminal 3.81 mm pace terminal 9.2.3. Outputs HPA HPC BME AUX Power/Maximum Level 4 Ω THD<0.1% 6W 4 Ω THD<0.1% 6W 400 mA/m à 60 cm Ouput Impedance +16 dBu balanced Amplifier protections 50 Ω Voltage Gain 23 dB (x19) 23 dB (x19) 56 dB (x60) +6 dB (x2) Ouput Stage Connection D CLASS Ext. HP : 3.81 mm pace terminal D CLASS 3.81 mm pace terminal D CLASS 3.81 mm pace terminal Active balanced line drivers 3.81 mm pace terminal Short-cut, open circuit, over heating, high frequency 9.2.4. I/O contact LED Contact output Contact input Input ON/OFF & +6dB Output LED ON/OFF & +6dB Relay contact : Iremaxl= 500mA, Vbreak = 30V DC/AC ; contact resistor Rc=150mΩ ; maximum toggle frequency Fmax=500Hz. REM input activation by contact CN3-3 to the ground CN3-4, Contact current Icont= 1 mA. Input max voltage VRRM=50VDC. Only for CFUC ON/OFF input activation by contact CN4-1 to the ground CN4-5. +6dB input activation by contact CN4-2 to the ground CN4-5 Only connect Light-Emitting Diode (LED) on outputs ON/OFF and +6dB. LEDs characteritics : vf max=2.1V If max = 30mA. LED ON/OFF : anode (+) on CN4-3 cathode (-) on CN4-5. LED +6dB : anode (+) on CN4-4, cathode on CN4-5. Ateïs International Ch. du Dévent, 1024 Ecublens, Switzerland. Phone : +41 21 881 25 10 26 9.2.5. Wiring on PMUC/CFUC +6dB 5 1 ON/OFF LON 4 3 2 L+6 6 0V 7 CN4 9 Pins connector only for CFUC, PMUC only pins 89 Connector Function Pin Name CN1 supply External bloc supply 12VDC 1.5 A 1 +12V 2 1 0V/ ground BME - 2 BME+ 3 HPC- 4 HPC+ 5 6 1 2 3 4 5 6 7 MC+ MCREL REL REM+ REM+0dB -0dB GND 8 HPA+ 9 HPA- CN2 Customer side Customer speaker Customer microphone Dry contact output CN3 Aux Contact input, with REM- = electrical ground Symmetrical auxiliary output, hot, cold and ground PMUC 8 SW1 BME for hard of hearing PMUC / CFUC 9 1 SW1 : (default position no 1) Clerk speaker selection 1 : Embedded speaker 2 : external, wiring on pins CN4 (8-9) Product MCA+ 1 CN2 CN3 CN1 5 4 3 2 MCA- 6 HPA+ 1 HPA- 2 BME+ BME- 3 HPC- REL 4 HPC+ REL 5 MC+ REM+ 6 MC- REM- 7 +0dB 1 -0dB +12V 2 GND 0V Rear Panel PMUC / CFUC CN4 clerk side External clerk speaker, active if SW1 is in position 2 (position 1 default, internal speaker) Ateïs International Ch. du Dévent, 1024 Ecublens, Switzerland. Phone : +41 21 881 25 10 Cable 0.5² black/ white 0.5² black 0.5² grey 0.5² streaked grey 0.5² grey 0.5² streaked grey 0.22² white braid N/A N/A N/A N/A N/A N/A N/A 0.5² Gris strié 0.5² Gris 27 CFUC CN4 Clerk side ON/OFF key +6dB key/ +6dB contact ON/OFF LED +6dB LED Keys and LEDs External clerk microphone Clerk speaker, active when SW1 in position 2 Ateïs International Ch. du Dévent, 1024 Ecublens, Switzerland. Phone : +41 21 881 25 10 1 2 3 4 5 6 7 ON/OFF +6dB LON L+6 0V MCA+ MCA- 8 HPA+ 9 HPA- See wiring MAS / MAP (§ wiring UC1) 0.5² streaked grey 0.5² grey 28 10. Drawings 10.1. UC1 44,4 REAR VIEW 242,8 43 FRONT 236 L.S HOHS 230V power supply 198 MIC PC RS 232 Ateïs International Ch. du Dévent, 1024 Ecublens, Switzerland. Phone : +41 21 881 25 10 29 Ateïs International Ch. du Dévent, 1024 Ecublens, Switzerland. Phone : +41 21 881 25 10 30 10.2. UC1 Flange 46,6 237,4 4,5 30 185 140 4 251,4 261,4 Ateïs International Ch. du Dévent, 1024 Ecublens, Switzerland. Phone : +41 21 881 25 10 31 10.3. PMUC 122 mm 200 mm Ateïs International Ch. du Dévent, 1024 Ecublens, Switzerland. Phone : +41 21 881 25 10 32 10.4. Speakers 10.4.1. Right-hand loudspeaker - HPD Ateïs International Ch. du Dévent, 1024 Ecublens, Switzerland. Phone : +41 21 881 25 10 33 Ateïs International Ch. du Dévent, 1024 Ecublens, Switzerland. Phone : +41 21 881 25 10 34 10.4.2. Left-hand loudspeaker – HPG Ateïs International Ch. du Dévent, 1024 Ecublens, Switzerland. Phone : +41 21 881 25 10 35 Ateïs International Ch. du Dévent, 1024 Ecublens, Switzerland. Phone : +41 21 881 25 10 36 10.4.3. Universal Loudspeaker HPU Ateïs International Ch. du Dévent, 1024 Ecublens, Switzerland. Phone : +41 21 881 25 10 37 10.4.4. Integratable baffle BOTTOM Ateïs International Ch. du Dévent, 1024 Ecublens, Switzerland. Phone : +41 21 881 25 10 TOP 38 10.5. Microphones 10.5.1. Sales Assistant’s Mic on Panel – MAP Ateïs International Ch. du Dévent, 1024 Ecublens, Switzerland. Phone : +41 21 881 25 10 39 Ateïs International Ch. du Dévent, 1024 Ecublens, Switzerland. Phone : +41 21 881 25 10 40 10.5.2. Micro on Document Cover MPD Ateïs International Ch. du Dévent, 1024 Ecublens, Switzerland. Phone : +41 21 881 25 10 41 Ateïs International Ch. du Dévent, 1024 Ecublens, Switzerland. Phone : +41 21 881 25 10 42 10.5.3. Customer’s Mic Support – MC Ateïs International Ch. du Dévent, 1024 Ecublens, Switzerland. Phone : +41 21 881 25 10 43 Ateïs International Ch. du Dévent, 1024 Ecublens, Switzerland. Phone : +41 21 881 25 10 44 184 10.6. Hard of Hearing Loop BME 20,5 Wiring 20,5 Ateïs International Ch. du Dévent, 1024 Ecublens, Switzerland. Phone : +41 21 881 25 10 45 11. Troubleshooting In this chapter, the procedures described are only level 1, which is wiring checking, central unit configuration and devices replacement (microphones, loudspeakers, wiring, central unit, etc.) CAUTION: Not qualified persons should not attempt to open devices. The following operations could result in serious damages. Electrical shock hazard Opening device will put an end to guarantee. In case of trouble, please contact our after sales office: ATEIS INTERNATIONAL S.A. Chemin du Dévent 1024 Ecublens Switzerland Phone : +41 (0) 21 881 25 10 Fax : +41 (0) 881 25 09 Ateïs International Ch. du Dévent, 1024 Ecublens, Switzerland. Phone : +41 21 881 25 10 46 11.1. Troubleshooting system equipped with UC1 11.1.1. Power supply defects and power on issues ! The UC1 On/Off warning light stays off, no sound in the loudspeakers, no PC communication: • Check the power cable connection in the input socket and in the UC1. • Be sure to have electricity by connecting another devices, which is working, on the same input socket. • If the problem still remains, replace the UC1, see 11.1.4. ! The On/Off light doesn’t light up after the ON button has been pressed and the digital counter intercom doesn’t work. At the power up, the On/Off and +6dB light don’t blink briefly: • Check that the cable linking the clerk’s microphone and the UC1 is well connected. Firstly, check on the UC1 “MIC” connector and then on the MAP/MAS after opening it, see 11.1.4. • IF the problem still remains, power off the UC1 by unplugging it, wait for 10 seconds and power it on again. • Check the wiring between UC1 and MAP/MAS. • If the intercom still doesn’t work, replace the central unit UC1, see 11.1.4. 11.1.2. PC <-> UC1 Communication fault ! When opening the MAGELLAN software, the following message is display “No Response”: • Check the RS232 connection cable (supply with the MAGELLAN), note: There is no connection direction. Then click on the version button. If the central unit version’s number appears, the PC-UC1 connection does work. • Check the PC com Port selection, see 7.1. • Check that the power on LED is ON. ! When updating the software, the progression bar stops, the message “no response” is display when read/write configuration is launched: • Disconnect the power supply cable, wait for 10 seconds and plug it back. Restart the updating process. • If the problems still remains, replace the UC1, see 11.1.4. 11.1.3. Audio fault This chapter only takes place after removing any other communication/power supply issues. All checking have to be made in ON state. ! No sound is played from the clerk to the customer and from customer to clerk: • Check the UC1 configuration from the MAGELLAN software. Save the current UC1 configuration, and store the default configuration, initconfig34.ing for open intercom and initconfig46.ing for closed intercom, in the C:\magellan\ folder. • Check the entire connections between UC1 and microphones see 5.1. Ateïs International Ch. du Dévent, 1024 Ecublens, Switzerland. Phone : +41 21 881 25 10 47 ! The sound is played from the customer to the clerk but not from clerk to customer HP+BME: • Connect the PC to the UC1, launch the MAGELLAN software and restore the system with initconfigXX.ing. • On the A->C vu meter of the software when speaking into the MA, check: o That the vu meter is moving. If not, the MA is either wrong connected or faulty, so check cable and/or replace the MA. o If the vu meter is active and moving according to ambient noise, the MA is working properly. Check the connection of the HPC and BME. See 5.1, then if needed replace HPC and/or BME. ! Sound is played from clerk to customer but not from customer to clerk: • Connect the PC to the UC1, launch the MAGELLAN software and restore the system with initconfigXX.ing. • On the C->A vu meter of the software when speaking into the MC, check: o If the vu meter is not moving, the MC is either wrong connected or faulty, so check cable and/or replace the MC. o If the vu meter is active and moving according to ambient noise, the MC is working properly. Check the HPA connection, see 5.1, and/or replace HPA. ! The sound quality is not good, either too saturated or too attenuated: • Check the sound level settings: o If needed, save the current UC1 configuration and restore the system by loading iniconfigXX.ing. o Adjust settings, until the sound suits the needs. • Check all the UC1 connection to microphones and loudspeakers, see 5.1. • If the intercom is still not working, replace the UC1, see 11.1.4. ! When pressing on the ON key of the MAS/MAP, high level hiss can be heard instantaneously or when a person stands near one microphone: • Connect the PC to the UC1, read the current configuration and check that the levels aren’t too high. Reduce level in order to obtain a suitable hiss level. • Check that the microphones are not placed too close to the loudspeakers. Increasing distance between microphone and loudspeaker can reduce feedback effect. • The UC1 unit has two functions that could reduce feedback, echo cancellation and feedback suppressor. The echo cancellation is set by default for closed counter, check if it is the case. To correctly set the echo cancellation see chapter 7.3.2. For the older counter where there can be an opening between clerk and customer or an open counter, use the feedback suppressor, see 7.3.7. Note: echo cancellation and feedback suppressor can not work at the same time. • If the intercom is still not working, replace the UC1, see 11.1.4. 11.1.4. Replacing device instructions If despite of troubleshooting procedure, the counter intercom system still not work, please follow the device replacement instruction. Ateïs International Ch. du Dévent, 1024 Ecublens, Switzerland. Phone : +41 21 881 25 10 48 • • • • • UC1: the unit is maintained in his flange by four bosses. Disconnect all the wire from the UC1, slightly lift the front of the UC1 and take it out by the front. Customer microphone MC/MPD: normally, only the microphone capsule is to be replaced. Slightly unscrew the two grub screw at the microphone baseplate until the trim comes out. Warning: be careful when removing the trim because of the contact tip. Replace the entire set and replace the new one by pressing on it until it fully locked. Screw back the two screws. Clerk Microphone: o MAS: unscrew the two M3x6 torx screw situated on both side of the MAS base. Disconnect the 8 pins plug. o MAP: unscrew the four wood screws, remove the plate and disconnect the 8 pins plug. HPA/HPC: unscrew the four screws from the speaker enclosure, unscrew the four baffle screw. Disconnect the speaker terminals. BME: disconnect the wires coming from the BME. Cut the bearing collar and remove the BME. 11.2. Troubleshooting system equipped with PMUC 11.2.1. Power supply defects and power on issues ! The On/Off light does not light on after pressing the ON key and the intercom does not work. When connecting the 230V/12VDC power bloc to the PMUC, the two LEDs ON/OFF and +6dB doesn’t briefly blink: • Check that the power bloc is well connected into the socket. • Check that the two pins supply connector is well connected to the CN1 connector, see 5.2. • Check the wiring of the connector, see 5.2. • Be sure that you have current on the socket by connecting any working electronic device on the socket. • Check the voltage at the end of the supply cable on the 2 pins connector. The measure should be within 11V and 12.5V. If not, replace the power bloc. • If the problem still remains, replace the PMUC. 11.2.2. PC <-> PMUC communication fault ! At the opening of MAGELLAN software, a “no response” message is displayed: • Check the USB cable connection then click on the version button. If the version appears, the connection is ok. • Check that selected port comm is the right one, if not see 7.1. • Check that the On/Off LED is on when pressing the ON button, if not see 11.2.1. ! When updating the software, the progression bar stops and the message and the message “no response” is displayed. When writing or reading a configuration, the message “no response” is displayed: • Disconnect the power supply, wait for 10 seconds and plug it back. Redo the update process. • If this issue can be reproduced, replace the PMUC, see 11.2.4. Ateïs International Ch. du Dévent, 1024 Ecublens, Switzerland. Phone : +41 21 881 25 10 49 11.2.3. Audio and Input/Output contact fault This chapter is only valid after turning down all connection and supply issues. All checkings have to be made in ON state. ! No sound is played from clerk to customer and from customer to clerk: • Check the PMUC configuration via the MAGELLAN software. Save the current PMUC configuration and load default configuration initconfig50.ing in the C:\magellan\ folder. • Check the all the speaker and microphone connection, see 5.2. ! The sound is played from customer to clerk but not from clerk to customer: • Connect the PC to the PMUC and run the MAGELLAN software. Then do a restore process by loading the default configuration file initconfig50.ing. • On the A->C vu meter of the software when speaking into the MA, check: o That the vu meter is moving. If not, the MA is either wrong connected or faulty, so check cable and replace the MA if needed. o If the vu meter is active and moving according to ambient noise, the MA is working properly. Check the connection of the HPC and BME. See 5.2, then if needed replace HPC and/or BME. ! Sound is played from clerk to customer but not from customer to clerk: • Connect the PC to the PMUC, launch the MAGELLAN software and restore the system with initconfigXX.ing. • On the C->A vu meter of the software when speaking into the MC, check: o If the vu meter is not moving, the MC is either wrong connected or faulty, so check cable and replace the MC if needed. o If the vu meter is active and moving according to ambient noise, the MC is working properly. Check the HPA connection, see 5.2, then if needed replace HPA. ! The sound quality is not good, either too saturated or too attenuated: • Check the sound level settings: o If needed, save the current UC1 configuration and restore the system by loading initconfig50.ing. o Adjust settings, until the sound suits the needs. • Check all the PMUC connection to microphones and loudspeakers, see 5.2. • If this issue still remains, replace the PMUC, see 11.2.4. ! When pressing on the ON key of the PMUC, high level hiss can be heard instantaneously or when a person stands near one microphone: • Connect the PC to the PMUC, read the current configuration and check that the levels aren’t too high. Reduce level in order to obtain a suitable hiss level. • Check that the microphones are not place too close to the loudspeakers. Increasing distance between microphone and loudspeaker can reduce feedback effect. Ateïs International Ch. du Dévent, 1024 Ecublens, Switzerland. Phone : +41 21 881 25 10 50 • The PMUC unit has two functions that could reduce feedback, echo cancellation and feedback suppressor. The echo cancellation is set by default, check if it is the case. To solve the problem, configure the echo cancellation, see chapter 7.3.2, or use the feedback suppressor, see 7.3.7. Note: echo cancellation and feedback suppressor can not work at the same time. • If the intercom is still not working, replace the PMUC, see 11.2.4. ! When a long pressure is applied on the ON key, the ON LED blink rapidly but sound is not played on the auxiliary output: • Check the CN3 wiring where does the auxiliary output stand, see 5.2. Caution: do not connect loudspeaker to this output, it result in damaging the unit. • If the problem remains, replace the PMUC, see 11.2.4. ! The contact output is used but no action makes it trigger: • Check the output contact wiring, see 5.2. • Check the contact output configuration with the MAGELLAN software, see 7.3.5. • If the problem remains, replace the PMUC, 11.2.4. 11.2.4. Replacing device instructions If despite of troubleshooting procedure, the counter intercom system still not work, please follow the device replacement instruction. • PMUC: disconnect all wires connected on the PMUC. Send back the unit in its original package. • Customer microphone MC/MPD: normally, only the microphone capsule is to be replaced. Slightly unscrew the two grub screw at the microphone baseplate until the trim comes out. Warning: be careful when removing the trim because of the contact tip. Replace the entire set and replace the new one by pressing on it until it fully locked. Screw back the two screws. • HPA/HPC: unscrew the four screws from the speaker enclosure, unscrew the four baffle screw. Disconnect the speaker terminals. • BME: disconnect the wires coming from the BME. Cut the bearing collar and remove the BME. 11.3. Troubleshooting system equipped with CFUC 11.3.1. Power supply defects and power on issues ! The On/Off light does not light on after pressing the ON key and the intercom does not work. When connecting the 230V/12VDC power bloc to the CFUC, the two LEDs ON/OFF and +6dB doesn’t briefly blink: • Check that the power bloc is well connected into the socket. • Check that the two pins supply connector is well connected to the CN1 connector, see 5.3. • Check the wiring of the connector, see 5.3. • Be sure that you have current on the socket by connecting any working electronic device on the socket. Ateïs International Ch. du Dévent, 1024 Ecublens, Switzerland. Phone : +41 21 881 25 10 51 • • • Check the voltage at the end of the supply cable on the 2 pins connector. The measure should be within 11V and 12.5V. If not, replace the power bloc. Check that the command cable between the MAP/MAS and the CFUC is well connected, see 5.3. If the problem still remains, replace the CFUC, see 11.3.4. 11.3.2. PC <-> CFUC communication fault ! At the opening of MAGELLAN software, a “no response” message is displayed: • Check the USB cable connection then click on the version button. If the version appears, the connection is ok. • Check that selected port comm is the right one, if not see 7.1. • Check that the On/Off LED is on when pressing the ON button, if not see 11.3.1. ! When updating the software, the progression bar stops and the message and the message “no response” is displayed. When writing or reading a configuration, the message “no response” is displayed: • Disconnect the power supply, wait for 10 seconds and plug it back. Redo the update process. • If this issue can be reproduced, replace the CFUC, see 11.3.4. 11.3.3. Audio and Input/Output contact fault This chapter is only valid after turning down all connection and supply issues. All checkings have to be made in ON state. ! No sound is played from clerk to customer and from customer to clerk: • Check the CFUC configuration via the MAGELLAN software. Save the current CFUC configuration and load default configuration initconfig50.ing in the C:\magellan\ folder. • Check the all the speaker and microphone connection, see 5.3. ! The sound is played from customer to clerk but not from clerk to customer: • Connect the PC to the CFUC and run the MAGELLAN software. Then do a restore process by loading the default configuration file initconfig50.ing. • On the A->C vu meter of the software when speaking into the MA, check: o That the vu meter is moving. If not, the MA is either wrong connected or faulty, so check cable and replace the MA if needed. o If the vu meter is active and moving according to ambient noise, the MA is working properly. Check the connection of the HPC and BME. See 5.3, then if needed replace HPC and/or BME. ! Sound is played from clerk to customer but not from customer to clerk: • Connect the PC to the CFUC, launch the MAGELLAN software and restore the system with initconfigXX.ing. • On the C->A vu meter of the software when speaking into the MC, check: Ateïs International Ch. du Dévent, 1024 Ecublens, Switzerland. Phone : +41 21 881 25 10 52 ! ! ! ! o If the vu meter is not moving, the MC is either wrong connected or faulty, so check cable and replace the MC if needed. o If the vu meter is active and moving according to ambient noise, the MC is working properly. Check the HPA connection, see 5.3, then if needed replace HPA. The sound quality is not good, either too saturated or too attenuated: • Check the sound level settings: o If needed, save the current UC1 configuration and restore the system by loading initconfig50.ing. o Adjust settings, until the sound suits the needs. • Check all the CFUC connection to microphones and loudspeakers, see 5.3. • If this issue still remains, replace the CFUC, see 11.3.4. When pressing on the ON key of the MAS/MAP, high level hiss can be heard instantaneously or when a person stands near one microphone: • Connect the PC to the CFUC, read the current configuration and check that the levels aren’t too high. Reduce level in order to obtain a suitable hiss level. • Check that the microphones are not place too close to the loudspeakers. Increasing distance between microphone and loudspeaker can reduce feedback effect. • The CFUC unit has two functions that could reduce feedback, echo cancellation and feedback suppressor. The echo cancellation is set by default, check if it is the case. To solve the problem, configure the echo cancellation, see chapter 7.3.2, or use the feedback suppressor, see 7.3.7. Note: echo cancellation and feedback suppressor can not work at the same time. • If the intercom is still not working, replace the CFUC, see 11.3.4. When a long pressure is applied on the ON key, the ON LED blink rapidly but sound is not played on the auxiliary output: • Check the CN3 wiring where does the auxiliary output stand, see 5.3. Caution: do not connect loudspeaker to this output, it result in damaging the unit. • If the problem remains, replace the CFUC, see 11.3.4. The contact output is used but no action makes it trigger: • Check the output contact wiring, see 5.3. • Check the contact output configuration with the MAGELLAN software, see 7.3.5. • If the problem remains, replace the CFUC, 11.3.4. 11.3.4. Replacing device instructions If despite of troubleshooting procedure, the counter intercom system still not work, please follow the device replacement instruction. • CFUC: unscrew the unit and disconnect all wires connected on the CFUC. Send back the unit in its original package. • Customer microphone MC/MPD: normally, only the microphone capsule is to be replaced. Slightly unscrew the two grub screw at the microphone baseplate until the trim comes out. Warning: be careful when removing the trim because of the contact tip. Replace the entire Ateïs International Ch. du Dévent, 1024 Ecublens, Switzerland. Phone : +41 21 881 25 10 53 • • • set and replace the new one by pressing on it until it fully locked. Screw back the two screws. Clerk Microphone: o MAS: unscrew the two M3x6 torx screw situated on both side of the MAS base. Disconnect the 8 pins plug. o MAP: unscrew the four wood screws, remove the plate and disconnect the 8 pins plug. HPA/HPC: unscrew the four screws from the speaker enclosure, unscrew the four baffle screw. Disconnect the speaker terminals. BME: disconnect the wires coming from the BME. Cut the bearing collar and remove the BME. Ateïs International Ch. du Dévent, 1024 Ecublens, Switzerland. Phone : +41 21 881 25 10 54