1
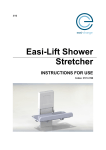
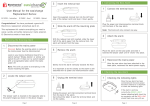
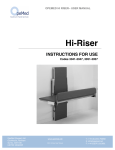
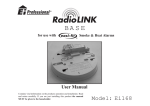
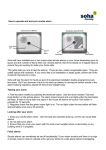
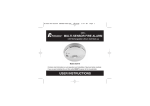
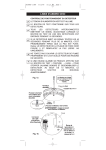
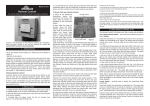
3
Inserting the removal tool
Ei144EK - Heat
E i 1 4 6 E K - O p t i c al
E i161EK - Ion i s a t i o n
Ei164EK - Heat
E i 1 6 6 E K - O p t i c al
Congratulations! You have purchased a genuine Ei
Electronics replacement smoke/heat alarm kit.
Reconnect the mains power
After the new alarm has been attached to the
base plate, reconnect the mains power supply.
User M a n u a l f o r t h e e a s i c h a n g e
Replacement Series:
E i141EK - Ion i s a t i o n
2
3. Checking the new Alarm
Insert the supplied removal tool approx. 1cm into
the alarms removal slot and lever it down gently.
4
1
Checking the indicating lights
Once the new alarm has been
connected and the mains power
has been restored it is important
to check the indicating lights.
Slide the alarm off the mounting pl a t e
This replacement kit contains everything you need to
easily, quickly and safely replace your mains powered,
Ei Electronics smoke or heat alarm.
1. R e m o v i n g t h e E x i sting Alarm
1
D i s c o n n e c t t h e mains power
Warning! Before the existing alarm is removed
the mains power must be disconnected.
Look on your mains distribution board for a
switch marked “Smoke Alarms” or similar and
switch this off. If there isn’t a switch marked
with a recognisable label, switch the mains
power off.
Note: This will cut power to everything in the
house including the lights.
2
L o c a t e t h e r e m oval Slot
If the alarm is working correctly
the GREEN LIGHT should be on
constantly and the RED LIGHT
should flash once every 40 sec.
With the removal tool still inserted, slide the lower
half of the alarm away from the removal tool in the
direction of the arrow on the cover.
5
2
Te s t i n g t h e a l a r m s
Remove the alarm
Press and hold the test
button for 10 seconds, the
alarm should sound loudly.
If there are other alarms in the
house these should also sound
within 10 seconds of the test
button being pressed.
Remove the alarm from the base by moving it
vertically towards the floor.
2. Connecting the New Alarm
1
Attach the alarm
Any problems?
If you have any problems fitting your new
alarm please give us a call on: 0800 612 4837
or email [email protected]
4. Keeping a Record
Locate the directional arrow on the front face of
the alarm, the removal slot is located directly
above the arrow.
Page 1
Place the alarm on the base, slightly offset from
the centre and slide in the opposite direction to
the arrow on the cover until it “clicks” into place.
Page 2
Now that you have installed and tested your new alarm,
it is essential to keep a record of the date when it was
fitted. We have included a handy replacement record
sticker in this pack.
Fill in the date and stick it near your distribution board
for future reference.
Page 3
5. I m p o r t a n t I n f o r m a tion
Do not paint your alarm. Do not allow paint,
water or dust to contaminate your alarm.
Your alarm is a mains 230V AC electrical
appliance. Do not open or insert anything
into the alarm.
Regularly check that the green mains
indicator light on the cover is lit.
Test weekly - press and hold the test button
on the alarm for 10 seconds. The alarm wil l
s ound loudly and the red light should flash
rapidly. All other interconnected alarms
s hould sound.
If alarm beeps once every 40 seconds for
over 20 minutes, the battery is probably
depleted (models Ei141EH/144EH/146EH
only)and must be replaced. (See “Changing
the Battery” section on page 5)
6. Changing the Battery
( 1 4 1 E H / 1 4 4 E H / 1 4 6 E H only)
1. Switch off mains power to alarm (the green li ght on
the cover should go out).
2. Remove unit as shown in “Removing the Exis ting
Alarm” section on page 1.
3. Locate the battery slot in the alarm as shown below.
4. Unclip battery from battery snap connectors.
5. Connect new battery by clipping back on to battery
snap connectors. Use only 9V Alkaline batteries
Duracell MN1604, Energizer 522. Other batteries
can cause problems. We recommend that the “use
by date” on the battery should still have at least 2
years to go. Older batteries will give beeps
prematurely.
6. Slide unit back on to the base. A click should be
heard as the alarm engages. (The unit cannot be
replaced on the base unless a battery is installed).
7. Press and hold the test button the horn should
sound loudly.
8. Reinstate mains power to alarm (green light on
cover should come on).
B AT T E RY S N A P S
(141EH/144EH/146EH
O N LY )
B A SE
If a nuisance alarm occurs, press the test/
hush button. This will silence the alarm for
10 minutes.
4 WAY P L U G E N G A G E S
SOCKET ON MOUNTING
P L AT E TO C O N N E C T
M A I N S A N D B AT T E RY
Clean your alarm regularly. This will reduce
the risk of false alarms.
Remove or completely cover your alarm
when decorating to prevent dust and
c ontamination damaging the unit.
If your alarm sounds for no reason and will
not reset, it can be removed by releasing
the clip on the base. (See “Removing the
Existing Alarm” section on page 1)
Page 4
We recommend that the battery is replaced at least
every three years for optimum performance.
7. Testing & Maintaining Your Alarm
Checking your Alarms
Check all your alarms weekly, especially after the initial
installation or after reoccupation i.e. after a holiday.
Page 5
1. Check that the green mains indicator light is on.
(If it is off check circuit breakers, fuses etc.) Check
the red light on the cover flashes every 40 seconds.
2. Press the test button for up to 10 seconds to ensure
the sensor chamber, electronics and sounder are
working. A red light on the cover will flash while the
alarm is sounding. The alarm will stop when the
button is released. Pressing the test button
simulates the effect of smoke or heat during a real
fire and is the best way to ensure the alarm is
operating correctly.
WARNING: DO NOT TEST WITH FLAME
The can damage the alarm and can be a fire risk
We do not recommend testing the alarms with smoke or
heat as the results can be misleading unless special
apparatus is used.
3. Check for any sign of contamination such as cob webs or dust and clean the alarm as
described in the “Cleaning your Alarm” section on
page 8 if necessary.
4. Interconnected Alarms only - Test the first alarm
by pressing the button for 10 seconds. All the alarms
should sound within 10 seconds of the first alarm
sounding. The red light on the first alarm only will
flash about once a second. Repeat this test on all
the other alarms.
5. Check the functioning of the battery back-up directly
after installation and then at least yearly as follows:
-
-
Turn off the mains power at the distribution
board and check that the green indicator light is
off.
Press the test button for 10 seconds and ensure
the horn sounds loudly.
Reinstate the mains supply at the distribution board.
Note: If the mains is disconnected and the battery is
almost depleted the alarm will beep every 40 seconds
for at least 30 days.
6. Monitor the alarm over a short period of time for any
beeps.
Page 6
8. L o w B a t t e r y Wa n ing
The alarm automatically monitors the battery every 4 0
seconds to ensure that it is satisfactory. If it is depleted
it will give a short beep every 40 seconds.
Ei141EH, Ei144EH & Ei146EH Models
Before replacing the battery, check that the beeps
are not due to one of the following:
1. Battery snaps not connected properly.
2. On the optical smoke alarm only (Ei146) if the
unit beeps and the red light does not flash at the
same time it indicates a problem with the smoke
chamber (see “Cleaning your Alarm” section on
page 8)
3. If the beeps have continued for over 20 minutes
(and the other causes of beeps have been ruled
out (see “Troubleshooting” section on page 10)
the battery must be replaced. (See “Changing
the Battery” section on page 5)
Ei161EH, Ei164EH & Ei166EH Models
1.
2.
Check that the green mains power indicator light
is on. If it is off the alarm is not receiving mains
power and is being powered from its internal
back-up cells, the beeps indicate that they are
depleted. Reconnect the mains, check the fuse/
circuit breakers and wiring. If in doubt contact a
qualified electrician. The beeps should cease
within 2 hours as the cells charge up. Fully
charged, the cells will provide up to 6 months
back-up without mains power.
On the optical smoke alarm only (Ei166EH) if the
unit beeps and the red light does not flash at the
same time it indicates a problem with the smoke
chamber (see “Cleaning you Alarm”
section on page 8.)
If all of the above poss ible causes of beeps have
been ruled out, but the beeping has still persisted for
over 2 hours with the green light on, the rechargeable
cells may be defective. The smoke/heat alarm must
be returned for repair or replacement. (See “5 Year
Guarantee” section on page 12)
Page 7
Please note: The ionisation and heat alarms (Ei141EH/
Ei144EH/Ei161EH/Ei164EH) give two short beeps about
a second apart at the end of the hush period (i.e. about
10 minutes after test/hush button has been pressed).
These two beeps should not be confused with low bat tery beeps.
An alarm will operate from the mains alone, even with a
fully depleted or a defective battery, and give beeps
every minute, though it may not give sufficient
warning of fire if the mains supply is disconnected for
any reason.
If there are any problems get a qualified electrician to
inspect the house wiring and connections to the alarms.
If there are still problems the unit must be returned to
us at one of the addresses on the back page for
examination and analysis.
9. Cleaning Your Alarm
WARNING: Electrical shock hazard. Disconnect the
mains power at the fuse box or circuit breaker powering
the alarm before following the cleaning instructions.
Clean your alarm regularly, particularly in dusty areas.
Use the narrow nozzle attachment of your vacuum
cleaner to remove dust, insects and cobwebs from the
sides and cover slots where the smoke/heat enters. To
clean the cover, wipe with a damp cloth. Dry cover
thoroughly with a lint free cloth.
WARNING: Do not paint your Alarm.
Other than the cleaning described above, no other
customer servicing of this product is required. Repairs,
when needed, must be performed by the manufacturer.
All alarms are prone to dust and insect ingress which
can cause false alarms or failure to alarm.
The latest design, materials and manufacturing
techniques have been used in the construction of the
alarm to minimise the effects of contamination.
However it is impossible to completely eliminate the
effect of dust and insect contamination, and therefore,
to prolong the life of the alarm you must ensure that it
is kept clean so that excess dust does not build up. Any
insects or cobwebs in the vicinity of the alarm s hould be
promptly removed.
Page 8
In certain circumstances even with regular cleaning,
contamination can build up in the smoke sensing
chamber causing the alarm to sound or fail. If this
happens the alarm must be returned to us for servicing
or replacement. Contamination is beyond our control, it
is totally unpredictable and is considered normal wear
and tear. For this reason contamination is not covered
by the guarantee and a charge is made for servicing
such alarms.
10. Nuisance Alarms
If absolutely sure that the alarm is just a nuisance
alarm, simply press the test/hush button briefly on the
alarm with the rapidly flashing red light to silence the
alarm for 10 minutes.
If, when the alarm goes off, there is no sign of smoke,
heat or noise to indicate that there is a fire, you should
get your family into a safe place before you start
investigating.
1. Check the house carefully in case there is a small
fire smouldering somewhere.
2. Check whether there is some source of smoke or
fumes, for example cooking fumes being drawn past
the alarm by an extractor.
If there are frequent nuisance/false alarms it may be
necessary to relocate the device away from the source
of the contamination or replace it with a more
appropriate type of alarm.
If cleaning the alarm does not correct the problem it can
be returned to returned to us at one of the addresses on
the back page for repair or replacement.
Hush Feature
The alarm has a combined Test/Hush button to help you
control nuisance false alarms.
1. To cancel a false alarm, press the Test/Hush Button
located on the cover. The alarm will automatically
switch to a reduced sensitivity condition (very large
levels of smoke from a nearby fire will override the
Hush feature on smoke alarms). This condition al lows unwanted alarms to be silenced for a period of
approximately 10 minutes.
Page 9
The red light will flash every 10 seconds to indicate
the sensitivity is reduced. At the end of the hush pe riod the Ionisation smoke alarms (Ei141EH/161EH )
and the heat alarms (Ei144EH/164EH) will give tw o
short beeps.
On interconnected alarms, pressing the Test/Hush
button on the alarm with the rapidly flashing red
light will silence all alarms. Pressing the hush button
on any of the other units will not silence the alarm.
2. The unit will reset to normal sensitivity at the end
of the silenced period. If additional silenced time is
required, simply push the Test/Hush
button again.
11. Tr o u b l e s h o o t i n g
Frequent Nuisance Alarms Occur:
1. Close kitchen / bathroom door when in use.
2. Ensure that the alarm is sited at least 6m away from
sources of fumes.
3. Contamination from insects, paint or paint fumes
may have occurred. Clean the alarm (see “Cleaning
you Alarm” section on page 8.)If the problem
persists, resiting of the alarm should be considered.
Alarm Sounds for no Apparent Reason:
1. Identify the alarm source. On interconnected alarms,
the red light on the cover will flash rapidly only on
the alarm which is the source of the detection. If
an optional Ei1529RC Control Switch is installed,
press locate when all alarms are sounding to identify
source of alarm.
2. Check for fumes, steam etc. from the kitchen or
bathroom. Paint and other fumes can cause
nuisance alarms.
3. Press the test/hush button to silence the alarm for
10 minutes.
4. If alarm does not stop, switch off the mains and
remove unit - see “REMOVING THE EXISTING
ALARM” section on page 1. (Only remove the alarm
with rapidly flashing red light).
Low Battery & Other Beeps: ( E i 1 6 1 E H / 1 6 4 E H / 1 6 6 E H o n l y )
Check the green mains power light is on. If not, check
the fuse/circuit breakers. If the green light is off, the
Lithium cells will deplete after some months with out
mains and will need to be recharged. If turning on the
mains fails to stop the beeps after 2 hours, a fault may
exist. Switch off mains and remove the alarm (see
“Removing the Existing Alarm” section on page 1)
Low Battery & Other Beeps: (All Alarms)
1. If the green mains light is on and replacing the
battery, recharging the Lithium cells or cleaning
alarm has not stopped the beeps, a fault may exist.
Disconnect the mains first and replace the unit (see
“Removing the Existing Alarm” section on page 1)
2. Ionisation smoke alarms (Ei141EH/161EH) and heat
alarms (Ei144EH/164EH) give two beeps 10 minutes
after the test/hush button is pressed.
3. If an Optical unit (Ei146EH/166EH) beeps without
the red light flashing at the same time, the chamber
is defective. Clean the chamber.
Interconnected Alarms do not all Sound
1. Hold test button for 10 seconds after first alarm has
sounded to ensure the signal is transmitted to all of
the alarms.
2. One or more of the connections may not be correctly
connected, we recommend you consult a qualified
electrician.
C o n s t r u c t i o n P r o d u c t Ty p e : S m o k e A l a r m D e v i c e s
European Standard: EN14604:2005
Certificate of Conformity: 0086-CPD-537430
Model
Type
Ei141
Ionisation 230V Smoke Alarm
Ei146
Optical 230V Smoke Alarm
Ei161
Ionisation 230V Smoke Alarm
Ei166
Optical 230V Smoke Alarm
Low Battery & Other Beeps: ( E i 1 4 1 E H / 1 4 4 E H / 1 4 6 E H o n l y )
If the battery is correctly connected and the alarm has
been beeping for over 20 minutes the battery may be
depleted (See “Changing the Battery” section on page 5)
0086
08
Page 10
P a g e 11
1 2 . F i v e Ye a r G u a r a n t e e
Ei Electronics guarantees this alarm (excluding battery
in the Ei141EH/144EH/146EH models) for five years
from date of purchase against any defects that are due
to faulty materials or workmanship. This guarantee only
applies to normal conditions of use and service, and
does not include damage resulting from accident,
neglect, misuse, unauthorised dismantling, or
contamination howsoever caused. This guarantee
excludes incidental and consequential damage. If this
alarm should become defective within the guarantee
period, it must be returned, with proof of purchase,
carefully packaged, with the problem clearly stated. We
shall at our discretion repair or replace the faulty unit.
Do not interfere with the alarm or tamper with it. This
will invalidate the guarantee, but more importantly may
expose the user to shock or fire hazards.
This guarantee is in addition to your statutory rights as
a consumer.
Distributed By:
easichange . c/o Safelincs Ltd, Unit 1 Farlesthorpe
Road, Lincolnshire, LN13 9PS U.K.
Tel: 0800 612 4837
www.easichange.co.uk
Manufactured By:
Ei Electronics. Shannon, Co Clare, Ireland
Tel: +353 (0)61 471377
www.eielectronics.co.uk
Aico Ltd. Mile End Business Park, Maesbury Rd,
Oswestry, Shropshire, SY10 8NN, U.K.
Tel: 0870 758 4000
www.aico.co.uk
The crossed out wheelie bin symbol that is on
your product indicates that this product should
not be disposed of via the normal household
waste stream. Proper disposal will prevent
possible harm to the environment or to human
health. When disposing of this product please
separate it from other waste streams to ensure
that it can be recycled in an environmentally
sound manner. For more details on collection
and proper disposal, please contact your local
government office or the retailer where you
purchased this product.
Page 12