1
ENGLISH
SCANORA® 5.0
Installation Manual
207633 rev. 2
Copyright
Code: 207633 rev 2
Date: 10 August 2011
Document code: D507636 rev 2
Copyright © 08/2011 by PaloDEx Group Oy.
All rights reserved.
Windows® is trademark of Microsoft Corporation in the United
States of America and other countries. Pentium® a registered
trademark of Intel Corporation. DIGORA® Optime is a registered
trademark of SOREDEX.
Documentation, trademark and the software are copyrighted
with all rights reserved. Under the copyright laws the
documentation may not be copied, photocopied, reproduced,
translated, or reduced to any electronic medium or machine
readable form in whole or part, without the prior written
permission of SOREDEX.
The original language of this manual is English.
SOREDEX reserves the right to make changes in specification
and features shown herein, or discontinue the product described
at any time without notice or obligation. Contact your SOREDEX
representative for the most current information.
Manufactured by
SOREDEX
Nahkelantie 160 (P.O. Box 148)
FI-04300 Tuusula
FINLAND
Tel. +358 10 270 2000
Fax. +358 9 701 5261
For service, contact your local distributor.
Table of Contents
1
Introduction.................................................................................................................. 1
1.1 General ................................................................................................................. 1
1.2 Manufacturer’s liability........................................................................................... 2
1.3 Abbreviations ........................................................................................................ 2
1.4 System requirements ............................................................................................ 3
1.5 The software specifications................................................................................... 7
1.6 The software DICOM SOP Classes .................................................................... 10
1.7 The software compatibility table.......................................................................... 11
2
Software installation.................................................................................................. 13
2.0.1 Standalone system................................................................................... 13
2.0.2 Network environment ............................................................................... 13
2.1 Software installation ............................................................................................ 16
2.2 Display settings for the software ......................................................................... 25
3
Driver installation ...................................................................................................... 27
3.1 CRANEX D driver installation.............................................................................. 27
3.1.1 PCI driver update ..................................................................................... 30
3.1.2 Uninstalling the driver............................................................................... 32
3.2 Intraoral camera installation ................................................................................ 33
3.2.1 Video Format dialogs ............................................................................... 34
3.2.2 Video Source dialog ................................................................................. 35
3.2.3 Video Input dialog .................................................................................... 36
3.2.4 Link the software to Intra camera event ................................................... 37
4
Configuring DICOM ................................................................................................... 39
4.1 General page ...................................................................................................... 40
4.1.1 DICOM License number........................................................................... 41
4.1.2 Retired Command Elements .................................................................... 41
4.2 SOP Class configuration ..................................................................................... 41
4.3 Worklist configuration.......................................................................................... 43
4.3.1 WorkList SCP Box ................................................................................... 43
4.3.2 Search for worklist items by date ............................................................. 45
4.3.3 Modalities Box ......................................................................................... 45
4.3.4 Scheduled Station .................................................................................... 45
4.3.5 Worklist Page buttons .............................................................................. 45
4.3.6 Other options............................................................................................ 48
4.4 Storage and Storage Commitment configuration ................................................ 49
4.4.1 Storage page - Destinations .................................................................... 50
4.4.2 Storage page -Attributes List buttons ...................................................... 53
4.4.3 Storage Commitment settings.................................................................. 55
4.5 Print configuration ............................................................................................... 57
4.5.1 Print page - Destinations ......................................................................... 57
4.5.2 Print page - Attributes List buttons ........................................................... 60
4.6 Query / Retrieve configuration ............................................................................ 61
4.6.1 Query options........................................................................................... 63
4.6.2 The Log Files and Performance pages .................................................... 65
4.7 Storage SCP ....................................................................................................... 66
207633 rev 2
SOREDEX
i
4.8 Log File and Performance Settings..................................................................... 67
4.9 Glossary ............................................................................................................. 70
5
Software database ..................................................................................................... 73
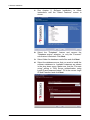
5.1 Installing the software database to existing MS SQL server............................... 73
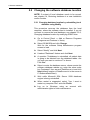
5.2 Changing the software database location ........................................................... 76
5.2.1 Changing database location by uninstalling local database using Modify 76
5.2.2 Changing database location by modifying ODBC alias............................ 77
5.2.3 Changing Standalone database to Network database using Modify........ 78
5.3 Database backup and restore ............................................................................. 79
5.3.1 Making instant backup from the software database................................. 79
5.3.2 Restoring the software database from the backup................................... 80
5.4 Restoring database to a new installation and/or location.................................... 81
5.4.1 How to restore a database to another installation or new location........... 81
5.4.2 How to reconfigure Database connection (ODBC) .................................. 83
5.5 Renaming Database Computer........................................................................... 84
5.5.1 Configuring the file server ........................................................................ 84
5.5.2 Modifying Datasource.ini.......................................................................... 84
5.5.3 Modifying Already Installed Clients to Use New Database Computer Name
85
6
Upgrading the software............................................................................................. 87
6.1 Upgrading the software from version 3.1 or newer ............................................. 87
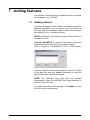
7
Adding features ......................................................................................................... 89
7.1 Adding devices.................................................................................................... 89
7.2 Adding options .................................................................................................... 90
8
Uninstalling ................................................................................................................ 91
8.1 Uninstalling the software ..................................................................................... 91
9
Software Manager...................................................................................................... 93
9.1 Login ................................................................................................................... 93
9.2 Archiving ............................................................................................................. 94
9.2.1 Create archive.......................................................................................... 94
9.2.2 Restore archive ........................................................................................ 95
9.3 Images ................................................................................................................ 96
9.3.1 Remove archived ..................................................................................... 96
9.3.2 Settings .................................................................................................... 97
9.3.3 Image folder location................................................................................ 97
9.3.4 Report, Exposure statistics ...................................................................... 98
9.4 Database........................................................................................................... 100
9.4.1 User Management.................................................................................. 100
9.4.2 Database backup ................................................................................... 101
9.4.3 Trash ...................................................................................................... 102
9.4.4 System Logs .......................................................................................... 103
9.4.4.1 Search logs.............................................................................. 103
9.5 File Server Configuration .................................................................................. 104
9.6 License.............................................................................................................. 104
10 Using practice management interface................................................................... 107
ii
SOREDEX
207633 rev 2
10.1 Introduction ....................................................................................................... 107
10.2 How to use SCANORA.ini................................................................................. 110
10.3 Interface to access image information .............................................................. 111
11 Software license ...................................................................................................... 113
207633 rev 2
SOREDEX
iii
iv
SOREDEX
207633 rev 2
1 Introduction
1 Introduction
1.1 General
SCANORA software (hereafter called “the software”) is a
complete solution for digital image acquisition, processing,
viewing and storing. The software supports SOREDEX
SCANORA 3D, CRANEX D, CRANEX 3D, CRANEX
Novus, DIGORA PCT, DIGORA Toto and DIGORA Optime
devices, DIGORA Vidi and other intraoral cameras. Images
can also be imported from other digital sources. The
software stores images and patient information in a SQL
database and provides tools for image archiving.
This installation manual covers the installation of the
software Standard and DICOM versions. The user manual
describes how to use the software. See the equipment
manuals before installing or using the equipment. See the
Windows manuals for further information about the
Windows environment.
With the software you can perform the following
operations, assuming that all the equipment is ready for
use:
– Create a new patient and store patient information in
a database.
– Capture and store digital X-ray images with
exposure values from the device.
– Capture and store intraoral photographs.
– Export and import digital images.
– Process images to enhance their diagnostic value
with dental specific tools.
– Analyse the image with application specific
measurement tools.
– Build an environment with multiple workstations
using a database shared over a network.
– Printing images and image information.
– Capture 3D images and launch 3rd party image
analyzing and planning tools
The software allows you to import and export image files.
Supported file formats are D32, JPG, JPG2000, TIF, BMP
and PNG. D32 is SOREDEX’s proprietary own file format.
Images can be saved in the database in PNG (16 bit) or
JPG formats (12 bit).
207633 rev 2
SOREDEX
1
1 Introduction
The software can be used in a network environment. If the
software is installed in several computers, the patient and
image database can be shared and used from different
workstations.
We recommend to read this manual before installing and
using the software.
1.2 Manufacturer’s liability
As a manufacturer, we can only assume liability for safe
and reliable operation of this software when the PC
software is installed and used according to the software
installation and user manuals.
NOTE! Safe and reliable usage of the product requires that
the user has read and understood the instructions and
restrictions given in the manual.
1.3 Abbreviations
2
PC
Personal computer
HD
Hard disk
Hz
Hertz; cycles per second
MHz
Megahertz, millions of cycles per second
CPU
Central processing unit (computer)
RAM
Random access memory
MB
Megabytes
GB
Gigabytes
CCD
Charge-coupled device
DVD-RW
Digital Versatile Disc
(re-writable)
PCI
Peripheral Component
Interconnect
DAT
Digital audio tape
MOD
Magneto optical drive
USB
Universal Serial Bus
VfW
Video for Windows, a video format
supported by the software Intraoral
Camera interface.
SOREDEX
207633 rev 2
1 Introduction
WDM
Windows Driver Model, a video format
supported by the software Intraoral
Camera interface.
WLAN
Wireless Local Area Network
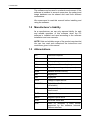
1.4 System requirements
Minimum system requirements for the software client
Operating System
(OS)
Windows XP Professional
SP3 (32-bit)
Windows Vista Business/
Ultimate/Enterprise SP2
(32 or 64-bit)
Windows 7 Professional/
Ultimate/Enterprise SP1
(32 or 64-bit)
Windows Server 2008
SP2* (32-bit)
Windows Server 2008
SP2* (64-bit)
*requires installation of Desktop
Experience
207633 rev 2
Memory (RAM)
At least 1 GB (32-bit OS) or
2 GB (64-bit OS)
Processor
2 GHz Pentium 4 or better
Hard disk
8 GB free space
DVD-ROM
DVD-ROM drive for installation
Keyboard
Yes
Mouse
Yes
Network card
10/100/1000 Mb/s Ethernet
Monitor
19" or larger recommended,
capable of 1280 x 1024 resolution,
24-bit color, or better
PCI slot
PCI slot for CRANEX D capture
card in CRANEX D acquisition PC
USB port
USB port for DIGORA Toto
SOREDEX
3
1 Introduction
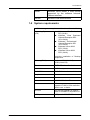
CB3D additional
requirements
GPU graphics card supplied
with CB3D device, requires
one available PCI-express
x16 full-length, dual-slot
Power supply for
reconstruction GPU:
- Minimum 500 watt power
supply
- 6-pin x 2 supplementary
power connectors
At least 3 GB RAM
Intel Core 2 Quad 2.0 GHz or
better
1600 x 1200 monitor or better
Other software
We recommend anti-virus software
be used for continuous file
protection. However, the CPU
must still be fast enough to run
multi-tasks during image capture.
Other device
Device to support archive and
backup media
Minimum system requirements for the software database
and SQL Server
Operating system (OS)
Windows XP Professional
SP3 (32-bit)
Windows Vista Business/
Ultimate/Enterprise
SP2 (32 or 64-bit)
Windows 7 Professional/
Ultimate/Enterprise SP1
(32 or 64-bit)
Windows Server 2003
SP2 (32-bit)*
Windows Server 2008
SP2 (32-bit)
Windows Server 2008
R2 SP1 (64-bit)
Windows Server 2008
SP2 (64-bit)
*requires Windows Server 2003
hotfix
(KB925336)
before
CliniView installation
4
SOREDEX
207633 rev 2
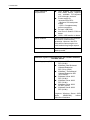
1 Introduction
Supported SQL Server
versions
SQL Server 2005 SP2
(32-bit x86 edition)
Express/Standard/
Workgroup/Enterprise
SQL Server 2008 with SP1*
(32-bit x86 edition)
Express/Standard/Workgroup
SQL Server 2008 R2
(32-bit x86 edition)
Express/Standard/
Workgroup
*requires SP1 installation after
SQL Server installation
Memory (RAM)
At least 1 GB (32-bit OS) or 2 GB
(64-bit OS)
Processor
2 GHz Pentium 4 or better
Monitor
VGA or higher-resolution
monitor
DVD-ROM
DVD-ROM drive
Hard disk
8 GB free space
Pan / ceph images
4 GB /1000 panorama or
cephalometric images
DIGORA Optime
2 GB/1000 images
DIGORA Toto
Standard resolution mode:
1.3 GB/1000 images
High resolution mode:
4 GB/1000 images
207633 rev 2
SCANORA 3D,
CRANEX 3D
100 GB/1000 CB3D study
Other software
We recommend anti-virus software
be used for continuous file
protection. However, the CPU
must still be powerful enough to
run multi-tasks during image
capture.
Backup
Backup system and RAID 1 or
RAID 5 disks highly recommended
SOREDEX
5
1 Introduction
NOTE! If the audio card is installed, speakers are needed
to hear the signal.
NOTE! In the case of installation being done in Windows
Server 2003, it requires the Windows Server 2003 hotfix
(KB925336) before installation can be done.
Pentium® is a registered trademark of Intel Corp.,
Windows® Vista, Windows® XP Professional and Windows
7 are registered trademarks of Microsoft Corp.
For safe and reliable system performance, you need to
arrange an appropriate backup procedure; meaning that
you regularly back up the system and store the labelled
back up media in a safe place. The end-user is solely
responsible for backing up all data.
6
SOREDEX
207633 rev 2
1 Introduction
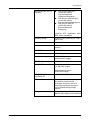
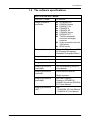
1.5 The software specifications
APPLICATION SOFTWARE:
PRODUCT NAME
SCANORA
Image acquisition
modalities
SCANORA 3D
DIGORA Optime
DIGORA Toto
CRANEX D
CRANEX 3D
CRANEX Novus
DIGORA PCT
TWAIN-compatible
scanners and digital
cameras
Video acquisition devices
VfW format
WDM format
Patient database
Microsoft SQL Server 2008
R2 (Express/Workgroup/
Standard/ Enterprise Edition)
Image storage
Local or network
Password security
Yes
Image appearance
Instantly on monitor
Imaging procedures
(pan/ceph):
See corresponding Device's
User Manual
Imaging procedures
(intraoral):
Series Mount exposure
Single exposure
207633 rev 2
Imaging procedures
(pan/ceph):
See User Program
Chapter in CRANEX D,
CRANEX Novus and DIGORA
PCT User Manual.
Imaging procedures
(3D):
See
- SCANORA 3D User Manual
- CRANEX 3D User Manual
SOREDEX
7
1 Introduction
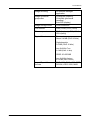
Image processing
Brightness & Contrast
Zoom
Move
Noise Reduction
Edge enhancement
Embossment
Invert
Mirror
Rotate
Sharpen
Unsharp mask
Pseudocolor
Isodensity color
Optimize contrast (low,
medium, high)
Gamma correction
adjustments
Equalized histogram,
logarithmic histogram, linear
histogram
NOTE! CB3D 3D images
require 3rd party viewing and/
or planning software.
Overlay graphics
Text, Line, Free hand, Angle,
Rectangle, Circle, Arrow,
Region of Interest tools,
Implant tools,
Drag or Erase graphics,
Edit graphics, Save graphics
NOTE! CB3D 3D images
require 3rd party viewing and/
or planning software.
Measurements
Length
Calibration
Angle
Free Angle
NOTE! CB3D 3D images
require 3rd party viewing and/
or planning software.
Image Printing
(2D modalities only)
8
SOREDEX
MS Windows compatible
printers
DICOM Printers
(SCANORA DICOM)
Multi-image printing
Free print layout design
Image information printing
207633 rev 2
1 Introduction
Image archiving
SCANORA Manager
application
Image dynamics/
grayscales
12-bit/4096 (capture)
16-bit/64k (process &
handling)
8-bit/256 (display)
Image storage mode
16-bit enhanced
File formats
PNG (16-bit), JPG (12-bit)
File compression
PNG (lossless), JPG (100 % 60% quality)
Typical file size
Panoramic
About 2-4 MB (PNG 16 bits)
Cephalometric
3-5 MB (PNG 16 bits)
Intra DIGORA Toto
3-5 MB (PNG 16 bits)
CB3D- 60-350 MB
Intra DIGORA Optime
0.3-2 MB (PNG 16 bits)
Import/Export file
formats
207633 rev 2
SOREDEX
BMP, D32, PNG, JPG, TIFF,
DICOM, JPEG 2000, MNG
9
1 Introduction
1.6 The software DICOM SOP Classes
SOP Class Name
SOP Class UID
Verification
Verification Service Class
1.2.840.10008.1.1
DICOMDIR
Basic Directory
1.2.840.10008.1.3.10
Storage SCU
Digital X-ray Image Storage for Presentation
Digital X-ray Image Storage for Processing
Digital Intra-oral X-ray Image Storage for Presentation
Digital Intra-oral X-ray Image Storage for Processing
VL Photographic Image Storage
CT Image Storage
Enhanced CT Image Storage
Computed Radiography Image Storage
Secondary Capture Image Storage
Multi-frame Grayscale Byte
Secondary Capture Image
Storage
Multi-frame Grayscale Word
Secondary Capture Image
Storage
Multi-frame True Color
Secondary Capture Image
Storage
1.2.840.10008.5.1.4.1.1.1.1
1.2.840.10008.5.1.4.1.1.1.1.1
1.2.840.10008.5.1.4.1.1.1.3
1.2.840.10008.5.1.4.1.1.1.3.1
1.2.840.10008.5.1.4.1.1.77.1.4
1.2.840.10008.5.1.4.1.1.2
1.2.840.10008.5.1.4.1.1.2.1
1.2.840.10008.5.1.4.1.1.1
1.2.840.10008.5.1.4.1.1.7
1.2.840.10008.5.1.4.1.1.7.2
1.2.840.10008.5.1.4.1.1.7.3
1.2.840.10008.5.1.4.1.1.7.4
Storage Commitment SCP
Storage Commitment Push Model
1.2.840.10008.1.20.1
Query/Retrieve SCU
Patient Root Find
Patient Root Move
Study Root Find
Study Root Move
1.2.840.10008.5.1.4.1.2.1.1
1.2.840.10008.5.1.4.1.2.1.2
1.2.840.10008.5.1.4.1.2.2.1
1.2.840.10008.5.1.4.1.2.2.2
Modality worklist SCU
Modality Worklist
1.2.840.10008.5.1.4.31
DICOM Print SCU
Printer SOP Class
Basic Grayscale Print Management
Basic Film Session
Basic Film Box
Basic Grayscale Image Box
1.2.840.10008.5.1.1.16
1.2.840.10008.5.1.1.9
1.2.840.10008.5.1.1.1
1.2.840.10008.5.1.1.2
1.2.840.10008.5.1.1.4
Basic Color Print Management
Basic Color Image Box
1.2.840.10008.5.1.1.18
1.2.840.10008.5.1.1.4.1
10
SOREDEX
207633 rev 2
1 Introduction
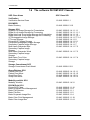
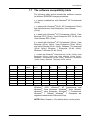
1.7 The software compatibility table
The following table shows allowed the software versions
for different SOREDEX imaging modalities.
x = tested combinations with Windows® XP Professional
(32-bit)
y = tested with Windows® 2000, XP Professional (32-bit)
and Vista Business, Vista Enterprise, Vista Ultimate
(32-bit)
z = tested with Windows® XP Professional (32-bit), Vista
Business SP2 (32-bit), Vista Enterprise SP2 (32-bit) and
Vista Ultimate SP2 (32-bit)
b = tested with Windows® XP Professional (32-bit), Vista
Business (32-bit, 64-bit), Vista Enterprise (32-bit, 64-bit)
and Vista Ultimate (32-bit, 64-bit), Windows 7 Professional
(32-bit, 64-bit), Windows 7 Enterprise (32-bit, 64-bit),
Windows 7 Ultimate (32-bit, 64-bit)
c = tested with Windows® Vista Business (32-bit, 64-bit), Vista
Enterprise (32-bit, 64-bit) and Vista Ultimate (32-bit, 64-bit),
Windows 7 Professional (32-bit, 64-bit), Windows 7 Enterprise
(32-bit, 64-bit), Windows 7 Ultimate (32-bit, 64-bit)
3.0
3.1
3.2
4.2
4.3
5.0
SCANORA DIGORA
3D
Optime
CRANEX
Novus
CRANEX
D
x
z
z
b
b
b
z
z
b
b
b
z
z
b
b
b
y
z
z
b
b
b
CRANEX
3D
DIGORA
Toto
DIGORA
Vidi
DIGORA
PCT
c
z
b
b
b
z
b
b
b
z
b
b
b
Windows® 2000, Windows® XP Professional and
Windows® Vista Business, Windows® Vista Ultimate,
Windows® Vista Enterprise, Windows® 7 Professional,
Windows® 7 Ultimate, Windows® 7 Enterprise are
registered trademarks of Microsoft Corp.
NOTE! Refer Chapter 1.4 for details about service packs.
207633 rev 2
SOREDEX
11
1 Introduction
12
SOREDEX
207633 rev 2
2 Software installation
2 Software installation
The software can be used as a standalone system or in a
network environment. The software system components:
Client (basic software)
– with DICOM option
Database
If the software is installed to a network environment of
several computers, the patient and image database can be
shared and used from different workstations.
2.0.1 Standalone system
In standalone system all system components are installed
to the same workstation connected to the X-ray device.
2.0.2 Network environment
In network environment the software system components
can be divided to several workstations.
Modality workstation for image capturing
– Client: Common, Image capturing
– DICOM option
Viewing workstation(s)
– Client: Common
– DICOM option
– 3D image viewing software
Database workstation
– Database: Common, Database engine
If you have existing MS SQL server,
see chapter 5.1, Installing the software database to
existing MS SQL server.
NOTE! Installation is possible only with Administrator user
rights. In case of problems, contact the system
administrator.
207633 rev 2
SOREDEX
13
2 Software installation
NOTE!
Configure network with sufficient access rights and
priviledges.
NOTE! In a case of misconfigured DNS server or absence
of a local DNS server, use the IP address in the file server
configuration instead of hostname in the Database
computer (refer chapter 9.5). This should be done after the
Database installation is completed and before the start of
Client(s) installation.
NOTE!
In case the Firewall is enabled, you may have to add new
Inbound Rules or Exceptions for the following in the
Database Computer:
–
–
–
–
The software file service i.e FileServer.exe
SQL Server service i.e sqlserver.exe
SQL Browser service i.e sqlbrowser.exe
SQL Server port i.e port on which sqlserver.exe is
listening
– SQL Browser port i.e port on which sqlbrowser.exe
is listening
The default path for the executables for above services:
– File Server ⇒ C:\Program Files
(x86)\Scanora\Database\FileServer.exe
– SQL Server ⇒ C:\Program Files
(x86)\Scanora\Database\MSSQL10_50.SCANORA\
MSSQL\Binn\sqlservr.exe
– SQL Browser ⇒ C:\Program Files (x86)\Microsoft
SQL Server\90\Shared\sqlbrowser.exe
As an example In Windows 7 operating system, if the
Windows Firewall is enabled, you can add the inbound
rules by navigating to Control Panel ⇒ Windows Firewall
Advanced settings ⇒ Inbound Rules.
14
SOREDEX
207633 rev 2
2 Software installation
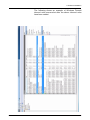
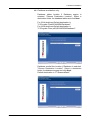
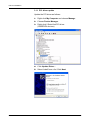
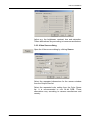
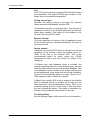
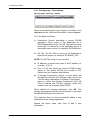
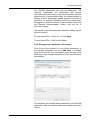
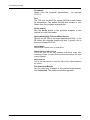
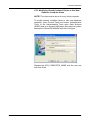
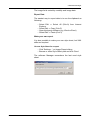
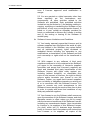
The following shows an example of Windows Firewall
inbound rules screen-shot after the above inbound rules
have been added:
207633 rev 2
SOREDEX
15
2 Software installation
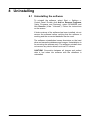
2.1 Software installation
NOTE! Do not install any of the software components to
external hard disks.
1.
Insert the software DVD into the DVD-ROM.
2.
The installation program starts automatically. If the
installation program does not appear, double-click the
SCANORASetup.exe file on the DVD to start the
software installation.
3.
Follow the on-screen instructions to install the
software.
NOTE! Depending on the operating system, one or
more reboots of the computer is needed and/or
pompted during the installation process. Observe
automatic continuation on installation after each
reboot.
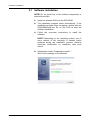
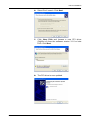
4.
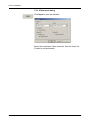
16
Initialization screen "Preparing to Install...".
Wait for the package to be extracted.
SOREDEX
207633 rev 2
2 Software installation
207633 rev 2
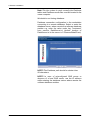
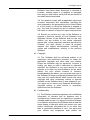
5.
"Welcome to the InstallShield...". Click Next.
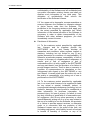
6.
"License Agreement". Read the software license and
click Yes.
SOREDEX
17
2 Software installation
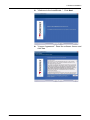
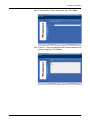
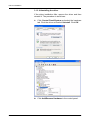
7.
General location. "Choose Destination Location".
Select general destination folder for the software and
click Next.
For 32-bit platforms Default destination is
"C:\Program Files\SCANORA\".
For 64-bit platforms Default destination is
"C:\Program Files (x86)\SCANORA\".
18
SOREDEX
207633 rev 2
2 Software installation
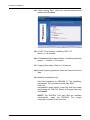
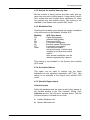
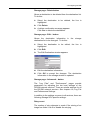
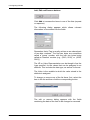
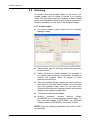
8.
"Select Features". Select the features to be installed to
this workstation. This selection should be made
carefully observing the descriptions.
Standalone system:
Select all needed features, but no Database sharing.
Network system:
Select database sharing at database workstation.
Modality workstation only:
Select “Image capturing.”
Click Next.
207633 rev 2
SOREDEX
19
2 Software installation
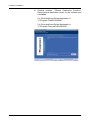
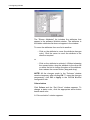
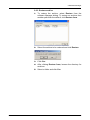
9.
Select used device for enabling image capturing.
Click Next.
10. "License Agreement". Read the Microsoft license and
click Yes.
20
SOREDEX
207633 rev 2
2 Software installation
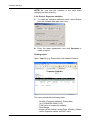
11. Database workstation only:
Database tables location if Database engine is
selected. "Choose Destination Location". Select a
destination folder for database tables and click Next.
For 32-bit platforms Default destination is
"C:\Program Files\SCANORA\Database\".
For 64-bit platforms Default destination is
"C:\Program Files (x86)\SCANORA\Database\".
Database media files location if Database is selected.
"Choose Destination Location". Select a destination
folder for database images and click Next.
Default destination is "C:\ScanoraData\".
207633 rev 2
SOREDEX
21
2 Software installation
Note! For the system to work correctly the Database
tables and Database media files must be located in the
same computer.
Workstation not having database:
Database connection configuration in the workstation
connecting to a remote database. Select or enter the
database server, where remote the software database
resides e.g. enter the value under key "hostname"
from server's DataSource.ini (default location of
DataSource.ini in the server is C:\ScanoraData\Client).
NOTE! The Database path should be shorter than
58 characters.
NOTE! In case of misconfigured DNS server or
absence of a local DNS server, use the IP address
while entering the database server where remote the
software database resides.
22
SOREDEX
207633 rev 2
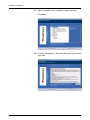
2 Software installation
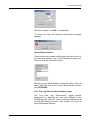
12. "License Entry". Enter the license key. Click Next.
13. "License". User is presented with licensed features the
license key grants. Click Next.
207633 rev 2
SOREDEX
23
2 Software installation
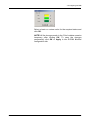
14. "Start copying files". Verify the selected features and
folders and click Next.
15. If .NET 2.0 is missing. "Installing .NET 2.0".
Wait for 1-10 minutes.
16. If Database Engine was selected. "Installing database
engine...". Wait for 1-15 minutes.
17. Copying files dialog. Wait for 1-5 minutes.
18. DirectX license agreement. Read the license and click
Yes.
19. Modality workstation only:
Gain file installation for CRANEX D. The installation
wizard asks ‘Do you want to install Gain files?’
Click Yes.
GainInstaller dialog opens. Insert the Gain file media
and browse the Gain file. Select all the gain files and
click Install.
NOTE! The DIGORA Toto gain files are installed
automatically, when the DIGORA Toto image
capturing is started for the first time.
24
SOREDEX
207633 rev 2
2 Software installation
20. "InstallShield Wizard Complete". Reboot the computer
if reboot is asked and click Finish.
NOTE! If You get the following error message during
the installation, click OK to continue installation: "The
Windows Installer service cannot update the system
file c:\WINDOWS\system32\msxml6r.dll because the
file is protected by Windows. You may need to update
your operating system for this program to work
correctly.
NOTE! Make sure that the screensaver does not lock
the computer on the CB3D image capturing
workstation.
2.2 Display settings for the software
The Windows display settings may have to be changed if
the display is difficult to read after the software installation.
To change display mode, select Start ⇒ Settings ⇒
Control Panel and double-click the display icon. Select the
Settings tab to make specific changes (Windows may
prompt to restart Windows for this change to take effect).
The recommended Windows display settings are:
– Desktop area at least 1024 x 768 pixels
– Color quality/Colors: Highest (32 bit)
207633 rev 2
SOREDEX
25
2 Software installation
26
SOREDEX
207633 rev 2
3 Driver installation
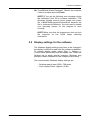
3 Driver installation
3.1 CRANEX D driver installation
NOTE! Before installing a PCI driver, the PCI board must
be installed. Refer to the instructions in the CRANEX D
Installation Manual.
When the PC is switched on for the first time after PCI
board installation, Windows recognizes the hardware
changes and launches a wizard. Follow the instructions on
the screen to install the PCI driver.
NOTE! The screenshots are from Windows XP.
207633 rev 2
1.
Windows recognizes the hardware changes.
Select Install from a list. Click Next.
2.
Select Don't search. Click Next.
SOREDEX
27
3 Driver installation
28
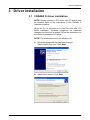
3.
Select Imaging devices and Click Next.
4.
Click Have Disk.
5.
Insert the software installation DVD into the DVD-ROM
and browse the PCI driver (DdxDrv.inf) from path
<SCANORA DVD>\Drivers\PCIDrv.
SOREDEX
207633 rev 2
3 Driver installation
207633 rev 2
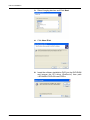
6.
Click OK.
7.
Click Next.
8.
The PCI driver is now installed. Proceed to software
installation. If the driver installation fails, proceed to the
chapter ‘Uninstalling the driver’.
SOREDEX
29
3 Driver installation
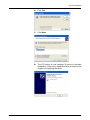
3.1.1 PCI driver update
Update the PCI driver as follows:
30
1.
Right-click My Computer and choose Manage
2.
Choose Device Manager
3.
Right-click II Serial link PCI driver
(SOREDEX devices)
4.
Click Update Driver…
5.
Select Install from a list. Click Next.
SOREDEX
207633 rev 2
3 Driver installation
207633 rev 2
6.
Select Don't search. Click Next.
7.
Click Have Disk and browse a new PCI driver
(DdxDrv.inf) from the software version 3.1.0 or later
DVD. Click Next.
8.
The PCI driver is now updated.
SOREDEX
31
3 Driver installation
3.1.2 Uninstalling the driver
If the driver installation fails, remove the driver and then
reinstall it. The procedure is as follows:
32
1.
Click Control Panel/System and select the hardware
tab. Click the driver and select Uninstall. Click OK.
2.
Click Add/Remove Hardware in the control panel.
SOREDEX
207633 rev 2
3 Driver installation
3.2 Intraoral camera installation
The software supports image capturing with WDM
(Windows Driver Model) and VFW (Video For Windows).
WDM is recommended for the software.
Install the video capture card and the drivers supplied with
your intraoral camera, following the intraoral camera’s
installation instructions.
To enable intraoral camera capture select IntraCam in
Tools ⇒ Settings ⇒ Installed devices. Clicking Intraoral
camera capture opens the intraoral camera window. Click
Settings to open the settings dialog.
To hide intraoral camera capture button de-select
IntraCam in Tools ⇒ Settings ⇒ Installed devices.
To achieve the best possible image quality, it is
recommended that the camera device is checked.
Click Settings to open the settings dialog.
Normally the device is selected automatically.
207633 rev 2
SOREDEX
33
3 Driver installation
Use ‘Close after image snap’ slide bar to specify how many
seconds a capture image stays top of the screen after
capturing.
Use ‘Capture Delay’ to prevent camera shake caused by
button press. It is the delay between IntraCam's button
click and actual image capture. Set the value in the Delay
editbox of IntraCam's settings dialog.
Use ‘Shortcuts’ to configure shortcut keys to start capture
session, snap image and end capture session. The default
values for the same are - Start capture F4
- Snap image F5
- End capture F6
NOTE! The software supports Dürr Dental’s PC-COM port
connectable 3-button foot pedal.
3.2.1 Video Format dialogs
Click Format to open the window.
.
Select the used Video Standard on Video Decoder tab.
These alternatives vary according to camera manufacturer
and country.
34
SOREDEX
207633 rev 2
3 Driver installation
Adjust e.g. the brightness, contrast, hue and saturation.
These alternatives vary according to camera manufacturer.
3.2.2 Video Source dialog
Open the Video source dialog by clicking Source.
Select the requested dimensions for the camera window
from the Output Size list.
Select the requested color setting from the Color Space
list. It is recommended to use 24-bit RGB. These
alternatives vary according to camera manufacturer and
country.
207633 rev 2
SOREDEX
35
3 Driver installation
3.2.3 Video Input dialog
Click Input to open the window.
Select the used input video connector from the Input list,
S-video is recommended.
36
SOREDEX
207633 rev 2
3 Driver installation
3.2.4 Link the software to Intra camera event
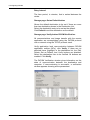
If Intra Camera supports events, link the software to the
Intra camera event, e.g. "Snapshot Button Pressed" event.
When the Intra camera's snapshot button is pressed, the
software retrieves an image automatically.
207633 rev 2
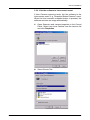
1.
Open Scanners and camera properties in the Control
Panel. Select your Intra Camera from the devices list
and click Properties.
2.
Select Events Tab.
SOREDEX
37
3 Driver installation
3.
Select "New Picture Requested" from the Camera
Events list and Enable SCANORA option from the
lower list.
4.
Change the Camera event to "Snapshot Button
Pressed" and Enable SCANORA option.
5.
Before the configuration is valid reboot your PC.
NOTE! If the Events tab is not displayed, then this feature
is not available for the selected Intra Camera.
38
SOREDEX
207633 rev 2
4 Configuring DICOM
4 Configuring DICOM
Before using the software DICOM features the DICOM
option must have been installed and the system should be
configurated.
NOTE! The software DICOM is a licensed feature. A
DICOM license key must have been given in either during
the software client installation or in the software Manager
application, after the installation.
To perform the software DICOM configuration, you need
the following information (this information is normally
provided by the local network administrator):
Network configuration information for the software
workstation
Port numbers for DICOM configurations
IP addresses
AE titles for the software entities
AE titles, Port numbers and IP addresses for the
needed DICOM devices
- Storage server
- Storage Commitment
- Printer
- Worklist
- Query/retrieve
The IP addresses, port numbers and AE titles for all
connections can be obtained from the hospital´s ADP
personnel & suppliers.
NOTE! Access to the DICOM configuration settings is
allowed to administrator users only. Either run the software
explicitly with administrator rights or in Windows XP use an
Windows user account that has administrator rights.
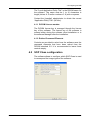
The DICOM configuration window
The tabbed pages
The DICOM configuration window includes a tabbed setup/property page for each of the features selected when
the DICOM addition was installed. If all four features were
selected, there are six tabbed set-up/property pages.
These are:
General
Print
Query/Retrieve
SOP Classes
207633 rev 2
SOREDEX
Storage
Worklist
Storage SCP
39
4 Configuring DICOM
The main configuration buttons:
After making configuration changes, click Apply or OK at
the bottom of the DICOM configuration window to accept
the changes.
Apply button
Click to save changes. The DICOM configuration
remains open.
Cancel button
Changes are not saved and the DICOM configuration
closes.
OK button
Click to save changes. The DICOM configuration
closes.
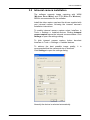
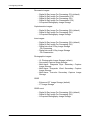
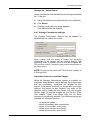
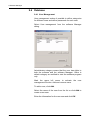
4.1 General page
The General page gives an overview of the Local DICOM
parameters.
40
SOREDEX
207633 rev 2
4 Configuring DICOM
The "Local Application Entity Title” is the DICOM name for
the software. The name must be 1 to 16 characters in
length (letters A -Z and/or numbers 0 -9) with no spaces.
Contact the (hospital) administrator to obtain the correct
“Application Entity Title” (AE-title).
4.1.1 DICOM License number
The DICOM license key is managed through the license
key of the software. The license key of the software is
entered either during the software client installation or in
the software Manager after the installation.
4.1.2 Retired Command Elements
Controls are provided to select how the software uses the
command elements that have been retired from the
DICOM standard 3.0. It is recommended to leave these
controls empty.
4.2 SOP Class configuration
The software allows to configure which SOP Class is used
to correspond the image types of the software.
207633 rev 2
SOREDEX
41
4 Configuring DICOM
Panoramic images:
–
–
–
–
–
Digital X-Ray Image For Processing (PX) (default)
Digital X-Ray Image For Presentation (PX)
Digital X-Ray Image For Processing (DX)
Digital X-Ray Image For Presentation (DX)
Computed Radiography Image Storage
Cephalometric images:
– Digital X-Ray Image For Processing (DX) (default)
– Digital X-Ray Image For Processing (DX)
– Computed Radiography Image Storage
Intra images:
– Digital X-Ray Image For Processing (DX) (default)
– Digital X-Ray Image For Processing (DX)
– Digital Intra-oral X-Ray Image Storage
-For Processing
– Digital Intra-oral X-Ray Image Storage
-For Presentation
Photographic images:
– VL Photographic Image Storage (default)
– Secondary Capture Image Storage
– Multi-frame Grayscale Byte Secondary Capture
Image Storage
– Multi-frame Grayscale Word Secondary Capture
Image Storage
– Multi-frame Truecolor Secondary Capture Image
Storage
CB3D
– Enhanced CT Image Storage (default)
– CT Image Storage
CB3D scout
– Digital X-Ray Image For Processing (DX) (default)
– Digital X-Ray Image For Processing (DX)
– Computed Radiography Image Storage
42
SOREDEX
207633 rev 2
4 Configuring DICOM
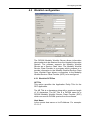
4.3 Worklist configuration
The DICOM Modality Worklist Server allows information
about patients to be obtained from the Hospital Information
System. The software supports the Modality Worklist
Service as a Service Class User. The Modality Worklist
Service Class Provider is a program which purpose is to
provide information to the Modality Worklist Service Class
User. Worklist Page allows a connection to the Modality
Worklist Service Class Provider (SCP) to be configured.
4.3.1 WorkList SCP Box
AE Title
This option specifies the Application Entity Title for the
SCP application.
The AE Title is a characters string with a maximum length
of 16 characters. The AE Title is a DICOM name for a
DICOM Modality Worklist Service Class Provider (SCP)
which can receive DICOM queries from the software.
Host Name
Is the remote host name or its IP-Address. For example:
10.1.1.0.
207633 rev 2
SOREDEX
43
4 Configuring DICOM
Port
Is the TCP port on which the remote DICOM system listens
for connections. The default DICOM port number is 104.
Obtain from the (hospital) administrator.
Polling interval (sec)
Specifies the polling interval in seconds, the software
makes queries to the Modality Worklist SCP.
If 0 seconds is set here, no polling is done. The user has to
update the contents of the worklist dialog with the Refresh
button when needed. This setting is not available in the
Search from worklist SCP mode.
Refresh Timeout
This value specifies the timeout, that the application waits
for the worklist service to finish the refreshing. The value is
given as seconds.
Search method
If Refresh from worklist SCP mode is selected, the manual
refreshing of the worklist, cause the worklist query (CFIND) to be sent to the Worklist SCP. This is the
recommended option for cases, where the C-FIND
operations are fast or the user wants full control of the
refreshing.
If Refresh from local database mode is selected, the
manual refreshing does not send a Worklist query, but only
reads the latest data from the local worklist database. This
local database has the results of the worklist polling done
on the background. Note: make sure the polling is enabled.
This is the recommended option for cases, where the CFIND operations take a relatively long time.
If Search from worklist SCP mode is selected, the Worklist
SCP is searched directly for worklist items using only the
filters provided in the worklist search dialog. There is no
automatic polling, but the C-Find query is sent only when
the user initiates the search. This mode is potentially the
slowest, but provides the most control for the user.
The Verify Button
See the Storage Page in this manual for more information.
44
SOREDEX
207633 rev 2
4 Configuring DICOM
4.3.2 Search for worklist items by date
Set the number of day(s) before and after today that are
taken into account in worklist search. Using values 0 and 0
here, means that only worklist items scheduled for today
are queried from the worklist server. This setting is not
available in the Search from worklist SCP mode.
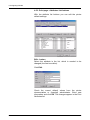
4.3.3 Modalities Box
Checking the modality boxes allows the chosen modalities
to be retrieved from the Modality Worklist SCP.
Modality
DX
IO
PX
CR
XC
CT
Other
SOP Class Name
Digital Radiography
Intraoral Radiography
Panoramic X-Ray
Computed Radiography
External camera Photography
Computed Tomography
User-defined modlity:
can be left empty, in which case
modality is not used as a search
criteria.
Also several modalities can be
defined (separated by a space).
This setting is not available in the Search from worklist
SCP mode.
4.3.4 Scheduled Station
This option can be used to retrieve only the items
scheduled for the specified workstation (AE Title). This
setting is not available in the Search from worklist SCP
mode.
4.3.5 Worklist Page buttons
Columns button
Define the attributes and the order in which they appear in
the Worklist window in the “Set Columns” dialog. Click
Columns and the “Set Columns” window opens. The Set
Columns window is divided into two lists:
207633 rev 2
1.
Hidden Attributes List.
2.
Shown Attributes List.
SOREDEX
45
4 Configuring DICOM
The "Shown Attributes" list includes the attributes that
appear in the software Worklist window. The attributes in
the hidden attributes list does not appear in the window.
To move the attributes from one list to another:
– Click on the attribute to move (the attribute changes
color). Click the arrow to move the attribute in the
direction required.
or
– Click on the attribute to activate it. Without releasing
the mouse button, drag the attribute to the other list
or within the list to change the place of the attribute,
then release the mouse button (drag and drop).
NOTE! All the changes made in the 'Columns' window
remains temporary after clicking OK. To save the changes
permanently, click OK or Apply in the DICOM Worklist
configuration tab.
Colors button
Click Colors and the “Set Colors” window appears. To
change a status color, click the appropriate arrow button
beside each color.
A “Color selection” window appears.
46
SOREDEX
207633 rev 2
4 Configuring DICOM
Select a basic or custom color for the required status and
click OK.
NOTE! All the changes made in the 'Color' window remains
temporary after clicking OK. To save the changes
permanently click OK or Apply in the DICOM Worklist
configuration tab.
207633 rev 2
SOREDEX
47
4 Configuring DICOM
Advanced button
The "Log Files" and "Performance" pages provide
parameters for adjusting the low level settings of the
DICOM network services. There are similar settings for all
the DICOM network services. See chapter 4.8, Log File
and Performance Settings.
4.3.6 Other options
Hide following worklist items
Choose the option that suits best.
Option
None
Older than current date
Stored
(older than current date)
Effect
Items are not hidden
All items older than current
date are hidden
All items that are stored
and older than current date
are hidden
Copy Scheduled Procedure Step Description to Study
Description
If this option is selected then Scheduled Procedure Step
Description is copied automatically to the Study
Description tag.
Copy Requested Procedure Description to Study
Description
If this option is selected then Requested Procedure
Description is copied automatically to the Study
Description tag.
Study date/time
This setting controls how the Study Date and Study Time
tags of a new study are filled, when the study is created
from a worklist item, that lacks the Study Date and Study
Time values.
48
SOREDEX
207633 rev 2
4 Configuring DICOM
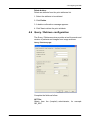
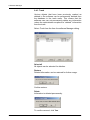
4.4 Storage and Storage Commitment
configuration
The Storage page allows the storage and storage
commitment parameters to be defined. When this page is
opened for the first time after installation, two empty lists
appear.
-The Storage Destination List (upper).
-The Storage Attributes List (lower).
The Storage Destination List (upper).
Add storage servers to the storage server destination list,
e.g. DICOM ARCHIVES.
The Storage Attributes (Tag) List (lower).
Add and edit DICOM Tag information to the tag list.
207633 rev 2
SOREDEX
49
4 Configuring DICOM
4.4.1 Storage page - Destinations
Storage page - Add new... button
Allows a new destination for the images to be added. Click
Add new and the “Add New Destination” window appears.
Fill in the fields as follows:
1.
Destination: Section describing a remote DICOM
application. Client refers to the destination by a
DICOM Application Entity Title (AE Title) and this is the
same way it is referred to in the application profile. A
destination name can be, for example, DICOMArchive.
2.
AE Title: The AE Title is a string of 16 characters or
less with no spaces, for example, STORAGE_SCP
NOTE! The AE Title string is case sensitive
3.
IP Address: a remote host name or its IP address, for
example, 10.0.0.2.
4.
Port: a TCP port which the remote DICOM system
listens to. The default DICOM port number is 104.
Obtain from the (hospital) administrator.
5.
If Storage Commitment -feature is used, define the
Storage Commitment SCP settings: either choose the
"Use the same destination for Storage Commitment" option or define the Storage Commitment SCP AE
Title, IP address and TCP port explicitly. (Note! Port
number must not be greater than 65535).
When defined the storage destination, click OK. The
storage page appears with the new destination in the upper
list and the attributes in the lower list.
This indicates that you have successfully added a new
destination to the storage application.
Repeat the above steps each time to add a new
destination.
50
SOREDEX
207633 rev 2
4 Configuring DICOM
Storage page - Delete button
Allows a destination to be deleted from the destination list.
To do this:
1.
Select the destination to be deleted, the line is
highlighted.
2.
Click Delete.
3.
A delete confirmation message appears.
Click Yes to delete the destination.
Storage page - Edit... button
Allows the destination information in
destination list to be changed. To do this:
the
storage
1.
Select the destination to be edited, the line is
highlighted.
2.
Click Edit.
3.
The Edit Destination window appears.
4.
Edit the destination information.
5.
Click OK to accept the changes. The destination
information in the storage window is updated.
Storage page - Advanced... button
The "Log Files" and "Performance" pages provide
parameters for adjusting the low level settings of the
DICOM network services. There are similar settings for all
the DICOM network services. See chapter 4.8, Log File
and Performance Settings.
In addition to the settings common to all services, there are
following Storage SCU specific settings:
Retry count
The number of retry attempts to made if the storing of an
image has failed. Use 0 to disable the retrying.
207633 rev 2
SOREDEX
51
4 Configuring DICOM
Retry interval
The time period, in minutes, that is waited between the
retries.
Storage page -Set as Default button
Allows the default destination to be set if there are more
than two destination places in the Destination List.
Select the destination entry to be set as the default.
Click Default to set this destination as the default.
Storage page -Verify button DICOM Verification:
All communications and image transfer with the remote
application are accomplished using the DICOM protocol
over a network using the TCP/IP protocol stack.
Verify application level communication between DICOM
application entities (AE's), click Verify. If there are no
selected items (highlight) in the destination list, the Edit,
Delete, Set as Default, and Verify buttons are disabled.
Select the destination item to be verified. All buttons are
enabled. Click Verify.
The DICOM Verification window gives information on the
state of communication between the destination and
computer. If communication is successful, a verification
window appears showing all the parameters.
52
SOREDEX
207633 rev 2
4 Configuring DICOM
The 'DICOM parameters' are from the destination. The
'Network Parameters' are parameters that provide
information about the status of the communication with that
remote entity. If communication fails, the 'Network status' is
Failure, and the 'Association status' explains the cause of
the failure, for example "Failed to connect to remote host".
NA appears in both the Remote Implementation Class UID
and Remote Implementation version and the list of
services is empty.
The results of the communication between entities can be
printed or saved.
To save select File ⇒ Save as... or click Save.
To print select File ⇒ Print or click Print.
4.4.2 Storage page -Attributes List buttons
If the focus of the window is in one of the destinations in
the storage destination list, only Add New is enabled.
Once the focus (the line is selected) is put into one of the
attributes in the storage attributes list, the rest of buttons
are enabled.
The Attributes list includes default attributes for the DICOM
application. Add and edit the attributes or delete them from
the list.
207633 rev 2
SOREDEX
53
4 Configuring DICOM
Attributes list - Add new... button
To add a new attribute to the storage attribute list, click
Add New. The “Add New Tag” window appears:
A message is constructed from attributes having values,
and each attribute is identified by a tag. An attribute is a
unit of data (e.g., Patient's Name, Patient 10, ...). A tag is a
4-byte number identifying an attribute (e.g., 00100010H for
Patient's Name, ...).
A tag is usually written as an ordered pair of two-byte
numbers. The first two bytes are sometimes called a group
number, and the last two bytes are called an element
number (e.g., (0010,0010), (0038, 001C),...). This
terminology is partly a remnant of the DICOM Standard.
DICOM specifies Information Object Definitions (IOD's) as
being composed of modules. Each module contains
attributes. Attributes can be required, optional, or only
required under certain conditions (conditional attributes).
Conditional attributes are always specified along with a
condition.
Storage list - Edit... button
To change information of one of the destinations' attributes
that is already in the storage attributes list, perform the
following steps:
54
1.
Select the attribute to be changed (the line is
selected).
2.
Click Edit. The Modify Tag window appears.
3.
Enter the new information and click OK. The changes
appear in the storage attributes list.
SOREDEX
207633 rev 2
4 Configuring DICOM
Storage list - Delete Button
Allows an attribute to be deleted from the storage attributes
list. To do this:
1.
Select the attribute to be deleted (the line is selected).
2.
Click Delete.
3.
A delete confirmation message appears.
Click OK to delete the attribute.
4.4.3 Storage Commitment settings
The Storage Commitment -feature can be enabled or
disabled with the check box control.
When enabled, both the storing of images and requesting
commitment for the images use the software Storage SCU
Application Entity. The details of this AE must be configured: AE
Title and Port number. Contact the local system administrator to
get these values.
NOTE! Do not use the same AE Title and port number as
in Storage SCP.
Automatic delete for committed images
When the Storage Commitment -feature is enabled, an
automatic image deletion can be defined. Only the images
that are successfully committed are affected by this
feature. If the patient is left with no images after the image
deletion, the patient is also deleted. Log entry of the
deletions will be made into the System Log, see chapter
System Logs. All deleted images are put into the Trash
(see chapter Trash), from where they can be either
restored or permanently deleted. The following options are
available for automatic deletion:
–
–
–
–
–
207633 rev 2
no automatic delete
delete immediately after commitment
delete 12 hours after commitment
delete 24 hours after commitment
delete 48 hours after commitment.
SOREDEX
55
4 Configuring DICOM
NOTE! Use this feature carefully, since it removes
captured X-ray images from the software without user's
explicit acceptance for each image, and the images may
need to be retrieved from the PACS, if they are needed.
Storage Commitment - Advanced
Maximum retry count for failed Commitment attempts
This parameter defines the number of retries to be made if
the Storage Commitment attempt fails for some reason.
Use 0 to disable the retry feature.
Retry interval for failed commitment attempts
This parameter defines the wait time period between the
retries. Minutes are used.
Wait for commitment report in N-ACTION Association
Some Storage Commitment SCPs are able to send the
Storage Commitment report within the same association as
the Storage Commitment request. This attribute defines
the time period, in seconds, that the software Storage
Commitment SCU waits for the report message. Use 0 to
always require separate association to be used for the
Storage Commitment report.
Wait time for storage commitment report
The time period, in minutes, that Storage Commitment
SCU waits for Storage Commitment report after requesting
it. After this time period expires, the status of the Storage
Commitment task goes either into Waiting for Storage
Commitment Retry,if the retrying is enabled and there are
retries left, or to Storage Commitment Failed. Reports can
still be received, and they are processed, even after this
timeout has expired.
Delay between storage and commitment
The time period that Storage Commitment SCU waits after
Storage before sending the Storage Commitment request.
56
SOREDEX
207633 rev 2
4 Configuring DICOM
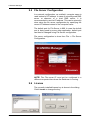
4.5 Print configuration
Open this page for the first time after installation, and see
two empty lists.
1.
The Print Destination List.
2.
The Print Attributes List.
Print Destination List.
To the Print Destination List add DICOM printers.
Print Attributes (Tag) List
To the Print Tag List add settings for every DICOM printer,
e.g. media size.
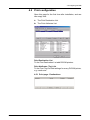
4.5.1 Print page - Destinations
207633 rev 2
SOREDEX
57
4 Configuring DICOM
Print page - Add new... button
Add a new DICOM printer by clicking Add new.
Complete the fields as follow:
1.
Printer name:
Application refers to the printer by a DICOM
Application Entity Title (AE Title) and this is the same
way it is referred to in the application profile. In this
field, enter a name for AE Title, for example
DICOM_PRINTER.
2.
AE Title:
Obtain from the (hospital) administrator, for example
PRINT_SCP.
3.
IP address:
Obtain from the (hospital) administrator, for example
10.0.0.3.
4.
Port:
The TCP port on which the remote DICOM system
listens for connections. The default DICOM port
number is 104. Obtain from the (hospital)
administrator.
5.
Capabilities:
If the DICOM printer supports grayscale OR color
printing, select
– Basic Grayscale Print Management
– Basic Color Print Management
If the printer supports both printing modes, select either or
both modes. Refer to the operating manual supplied with
the DICOM printer for more information.
Click OK after entering all the required information.
A print page appears, which indicates that a new printer
has been successfully added to the list.
58
SOREDEX
207633 rev 2
4 Configuring DICOM
The top list shows the configuration information that has
been entered. The bottom list shows all the printer's
attributes and their characteristics (Tag number, Name,
Module, Type and default value).
Repeat the above procedure each time to add a DICOM
printer.
Print page - Edit... button
Change the information in the printer list.
1.
Select the printer to be edited.
2.
Click Edit.
3.
The Edit Printer Properties window appears.
Enter new printer information.
4.
Click OK to accept the changes. The destination
information in the printer destination window is
updated.
Print page - Delete button
Delete a printer from the print list.
1.
Select the printer to be deleted.
2.
Click Delete.
3.
A delete confirmation message appears.
Click Yes to delete the printer.
Print page - Advanced... button
The "Log Files" and "Performance" pages provide
parameters for adjusting the low level settings of the
DICOM network services. There are similar settings for all
the DICOM network services. See chapter 4.8, Log File
and Performance Settings.
Print page - Verify button
Verify DICOM printer connection.
207633 rev 2
SOREDEX
59
4 Configuring DICOM
4.5.2 Print page - Attributes List buttons
With the attribute list buttons you can edit the printer
default settings.
Edit... button
Select the attribute in the list, which is needed to be
changed (the line turns blue).
Click Edit.
Check the correct default values from the printer
documentation or (hospital) administrator. Enter new
information and click OK. The changes appear in the Print
Attributes list.
60
SOREDEX
207633 rev 2
4 Configuring DICOM
Delete button:
Delete an attribute from the print attributes list.
1. Select the attribute to be deleted.
2. Click Delete.
3. A delete confirmation message appears.
4. Click Yes to delete the print attribute.
4.6 Query / Retrieve configuration
The Query / Retrieve service provides a tool for search and
retrieve of patients and images from image archives.
Query / Retrieve page:
Complete the fields as follow:
AE Title:
Obtain from the (hospital) administrator, for example
QR_SCP.
207633 rev 2
SOREDEX
61
4 Configuring DICOM
IP address:
Obtain from the (hospital) administrator,
10.0.0.2.
for example
Port:
The TCP port on which the remote DICOM system listens
for connections. The default DICOM port number is 104.
Obtain from the (hospital) administrator.
Verify button
See the Verify button in the previous chapters of this
manual for more information.
Application Entity Title for Move Service
Specify the AE Title of the target Application Entity, i.e. the
AE where the retrieved images are sent. Typically, this is
the local Storage SCP AE.
Query Model
Select either Patient Root or Study Root.
Failed Retrieve Retry Count
This is the limit for the retry attempts that would made after
retrieving is failed. 0 means that not retries are done if the initial
retrieve attempt.
Retry interval
This is the time interval in minutes, that will be waited between
the retries.
The Advanced Button
See or make any changes to the patient/image search,
click Advanced. The Advanced window appears.
62
SOREDEX
207633 rev 2
4 Configuring DICOM
The Advanced window shows default patient search
criteria, normally these can be left empty.
4.6.1 Query options
Editing default Query / Retrieve messages
From the module and level scroll boxes choose different
types of query levels.
In these boxes the following information can be found:
Module
207633 rev 2
Level
Patient Root
–
–
–
–
Study Root
– Study
– Series
– Image
SOREDEX
Patient
Study
Series
Image
63
4 Configuring DICOM
Add, Edit and Remove buttons
Click Add to increase the items in one of the lists (request
or response).
The following dialog appears which allows relevant
information to be entered into the fields.
Remember that a Tag is usually written as an ordered pair
of two-byte numbers. The first two bytes are sometimes
called a ‘group’ number, with the last two bytes being
called an ‘element’ number (e.g., (0010, 0010), or (0038,
001C)).
The VR or Value Representation can be thought of as the
‘type specifier’ for the values that can be assigned to an
attribute. This includes the data type, as well as its format.
The Value is the variable to which the value stored in the
attribute is assigned.
To change or remove one of the list items, first select the
item in the list and then click the corresponding button.
The edit or remove dialog appears with the fields
containing the data of the item to be changed or removed.
64
SOREDEX
207633 rev 2
4 Configuring DICOM
After the changes, click OK to accept them.
To remove an item, the following confirmation message
appears.
Up and Down buttons
These buttons are located in the bottom left-hand corner of
the advanced dialog in the C-Find Response group box.
They can only be used with that list.
With the Up and Down buttons change the order of the list
items. Select the item to move up or down the list and then
click UP/DOWN.
4.6.2 The Log Files and Performance pages
The "Log Files" and "Performance" pages provide
parameters for adjusting the low level settings of the
DICOM network services. There are similar settings for all
the DICOM network services. See chapter 4.8, Log File
and Performance Settings.
207633 rev 2
SOREDEX
65
4 Configuring DICOM
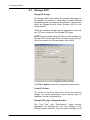
4.7 Storage SCP
Storage SCP page
The Storage SCP page allows the storage parameters to
be defined. The service is used when a remote DICOM
application sends the images to the software. The software
works as Storage Service Class Provider (SCP) to the
remote system.
Define the software storage service application entity title
and TCP port number on the Storage SCP page.
NOTE! Do not use the same AE Title and Port numbers for
Storage SCP and Storage SCU (in chapter 4.4.3) services.
Also port number must not be greater than 65535.
Click OK or Apply to save the configuration parameters.
Temp File Folder
The folder on the local hard drive, where the retrieved
images are saved temporarily before saving them to
database, can be configured here.
Storage SCP page - Advanced button
The "Log Files" and "Performance" pages provide
parameters for adjusting the low level settings of the
DICOM network services. There are similar settings for all
66
SOREDEX
207633 rev 2
4 Configuring DICOM
the DICOM network services. See chapter 4.8, Log File
and Performance Settings.
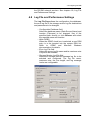
4.8 Log File and Performance Settings
The Log File Page allows the configuration, the database,
the error log file or the storage service log file destinations
and parameters to be changed.
– Configuration Database field:
Allows the database name (Data Source Name) and
location (Filename) to be changed. Key in the
specified path directly or click Browse and select
the required name and location.
– Write ODBC:
When the ODBC check box is selected, a new DSN
entry is to be inserted into the system DSN list.
Refer to ODBC and Microsoft Windows
documentation for details.
– Error Log File field:
Allows the errors log file name and its maximum size
in bytes to be selected.
– Storage Service Log File field:
Allows the Storage Service message log file to be
selected and configured. The log file name,
maximum size, the line length, and log message
levels are configurable.
207633 rev 2
SOREDEX
67
4 Configuring DICOM
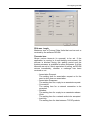
The Log message levels are as follows:
– Error level:
This level logs error messages. These messages
mainly occur when the network fails, or when
reading in or writing DICOM messages.
– Warning level:
This level logs warning messages.
– Info level:
This level logs informational messages.
– T1 level: not used
– T2 level:
This level logs the entire contents of messages sent
or received over the network.
– T3 level:
This level logs information related to association
negotiation.
– T4 level:
This level logs information when incoming
associations are being rejected.
– T5Ievel:
This level logs information when a message is
validated.
– T6 level:
This level logs the contents of the Merge tool kit
configuration.
– T7 level:
This level logs the contents of a the command
elements (group 0) for received and sent messages.
– T8 level:
This level logs warning messages related to
streaming in or out messages and files.
– T9 level:
This level logs information about PDUs sent or
received.
– Blank fill log file:
If this feature is selected the log file size is to be
expanded to the maximum possible size.
– Backup old log files:
If this feature is selected old log files are backed up.
– Historical log files:
To select the number of historical log files saved.
The Performance Page allows various parameters to be
changed to improve performance.
68
SOREDEX
207633 rev 2
4 Configuring DICOM
PDU max. length:
Maximum size of Protocol Data Units that can be sent or
received by the software DICOM.
Timeouts box:
Allows various timeouts (in seconds) to be set. If the
application is running in a multi-tasking environment, the
process is blocked during this waiting period and the
system processor is available for other processes. If all the
timeouts are set to 0 this is equivalent to polling, as DICOM
returns immediately, whether a message has been
received or not.
– Association Request:
The waiting time for association request or for the
peer to shut down an association.
– Association Response:
The waiting time for a reply to an associate request.
– Connection:
The waiting time for a network connection to be
accepted.
– Release:
The waiting time for a reply to an associate release.
– Write:
The waiting time for a network write to be accepted.
– Inactivity:
The waiting time for data between TCP/IP packets
207633 rev 2
SOREDEX
69
4 Configuring DICOM
Buffers:
This box allows various buffers to be configured to improve
performance.
– Work Buffer:
This option sets the buffer size before DICOM
application stores the data or passes it. Setting
higher values for this option increases performance.
– Send Buffer:
This option sets the TCP/IP send buffer size. Higher
values for this buffer increases the network
performance of the tool kit for client (SCU)
applications. This value is larger than the PDU max
length.
4.9 Glossary
ACR:
American College of Radiology; Initiated the DICOM
standardization effort in the early 80's
ACR-NEMA:
Predecessor of the DICOM standard defined by the ACR
and NEMA; two versions were defined 1.0 and 2.0
AE:
Application Entity; a software process which implements
DICOM. Most implementations use multiple AE's when
implementing multiple Service Classes.
Attribute:
Attributes are the components of an information object
definition (100), describing its properties.
DICOM:
Digital Imaging and Communications in Medicine standard.
IOD:
Information Object Definitions.
MergeCOM-3:
Merge Technologies Inc. provided toolkit performing lowlevel DICOM communication.
Modality:
Acquisition system such as a CT, MR, US, NM, CR.
NEMA:
National Electrical Manufacturing Association.
70
SOREDEX
207633 rev 2
4 Configuring DICOM
PDU:
Protocol Data Unit, a packet that is created at the DICOM
lower-level protocol.
SCP:
Service Class Provider
SCU:
Service Class user
SOP:
Service Object Pair
TCP/IP:
Transmission Control Protocol/Internet Protocol.
UID:
Unique Identifier.
207633 rev 2
SOREDEX
71
4 Configuring DICOM
72
SOREDEX
207633 rev 2
5 Software database
5.1 Installing the software database to
existing MS SQL server
If MS SQL Server software already exists on the computer
where the software database is to be installed:
Microsoft SQL Server 2005 or
Microsoft SQL Server 2008 SP1
Microsoft SQL Server 2008 R2
(Workgroup/Standard/Enterprise Edition)
NOTE! EDBI is not supported in a 64-bit MS SQL Server.
The software database can be installed to existing
Microsoft SQL Server database engine instead of using
Microsoft SQL Server 2008 Express Edition engine, which
is provided by the software installation package (the
"Database engine" feature). If more advanced
configuration
options
are
needed,
see
the
ADBIinstallation.pdf located in the "ADBI" folder of the
software DVD.
A named instance is required for the software database.
An instance can be created during Microsoft SQL Server
Setup. Installation to default (unnamed) instance is not
supported.
The SQL server must be configured to use mixed mode
authentication. In addition, the TCP/IP protocol and named
pipes must be enabled. To use mixed mode authentication,
start SQL Server Management Studio. In Vista, SQL
Server Management Studio should be run as an
administrator. In SQL Server Management Studio Object
Explorer, select server and then right click for properties.
On the security page under Server Authentication select
"SQL Server and Windows Authentication mode" and click
OK. Then click OK on the dialog stating the need to restart
SQL server. To restart the server, select the server and
then right click for Restart. If an SQL Server Agent is
running, it must be restarted also.
207633 rev 2
SOREDEX
73
5 Software database
74
1.
See chapter 2, Software installation, to follow
instructions until the "Select Features" screen is
shown.
2.
Select the "Database" feature and remove the
"Database engine" selection, i.e. only the "Common"
sub-feature is selected. Click Next.
3.
Select folder for database media files and click Next.
4.
Select the database server that you want to install the
software database to. Available instances are shown
in the drop down menu. Make sure, that the "Connect
using" setting is "SQL Server authentication using
Login ID and password below". Fill in the correct Login
ID and Password and click Next.
SOREDEX
207633 rev 2
5 Software database
5.
The software installation program is now ready to start
copying files. Click Next.
6.
Click Finish to complete the installation and restart the
computer.
NOTE! In the case of "Default log-in to database doesn't
work, please authenticate manually" message appearing
during the installation press the OK button to continue and
proceed with the installation.
NOTE! Connection to the MS SQL Server, in step 4 above,
may not work if the password contains special characters.
In that case change the password to one without having
special characters and then continue.
207633 rev 2
SOREDEX
75
5 Software database
5.2 Changing the software database location
NOTE! If content of local database needs to be moved,
see chapter 5.4, Restoring database to a new installation
and/or location.
5.2.1 Changing database location by uninstalling local
database using Modify
This procedure removes the database from the local
computer, where the software client is installed. If you do
not want to remove the local database, see chapter 5.2.2,
Changing database location by modifying ODBC alias.
76
1.
Go to Control Panel ⇒ Add or Remove Programs
(Programs and Features in Vista).
2.
Select SCANORA and click Change.
Wait for the software Setup Maintenance program
screen to load.
3.
Select “Modify” and click Next.
4.
Unselect "Database" feature and click Next.
5.
A question "If database is uninstalled, all patient data
is going to be deleted from the database tables. Are
you sure you want to continue?" is shown.
Click Yes.
6.
Select or enter the database server, where remote the
software database resides e.g. enter the value under
key "hostname" from server's DataSource.ini and click
Next (default location of DataSource.ini in the server is
C:\ScanoraData\Client).
7.
Wait while Microsoft SQL Server 2008 database
engine is being uninstalled.
8.
When restart is suggested, select “Yes, I want to
restart my computer now” and click Finish.
9.
Log on to Windows using an account
administrator rights to finish maintenance.
SOREDEX
with
207633 rev 2
5 Software database
5.2.2 Changing database location by modifying ODBC
alias
Client computer is configured to use other than local
database, and the local database is kept installed although
the software client is no longer using it.
1.
Go to Control Panel ⇒ Administrative Tools ⇒ Data
Sources (ODBC).
2.
Select "System DSN" tab.
3.
Select SCANORA and click Configure.
4.
Modify the "Server" field to correspond with the new
database location.
Change "(local)\SCANORA" to "SERVER\SCANORA"
(or you can use the drop down menu which shows all
available SQL Servers).
5.
When the new SQL Server is written in the "Server"
field, click Next.
6.
Select "With SQL Server authentication using a login
ID and password entered by the user." Also, check
"Connect to SQL Server to obtain default settings for
the additional configuration options." and fill in a valid
Login ID/Password (admin/admin by default).
Click Next.
7.
Click Next, Finish and OK.
After both cases 5.2.1 and 5.2.2 client computer is
configured to use the external software database.
207633 rev 2
SOREDEX
77
5 Software database
5.2.3 Changing Standalone database to Network
database using Modify
Client and database are installed on modality workstation
and the database is not shared, i.e. database has been
installed without the "Database sharing" feature. The
standalone database is modified so that it is shared to
network and clients installed on other computers are able
to connect to it.
78
1.
Go to Control Panel ⇒ Add or Remove Programs
(Programs and Features in Vista).
2.
Select SCANORA and click Change. Wait for the
software Setup Maintenance program screen to load.
3.
Select "Modify" and click Next.
4.
Select "Database sharing" feature under Database title
and click Next.
5.
If license key is asked, enter your license and click
Next and Next.
6.
When restart is suggested, select "Yes, I want to
restart my computer now" and click Finish.
7.
Log on to Windows using an account
administrator rights to finish maintenance.
8.
Now the database is shared to network and other
client computers can be configured to use it. See
chapter 5.2.2, Changing database location by
modifying ODBC alias.
SOREDEX
with
207633 rev 2
5 Software database
5.3 Database backup and restore
Database backup and restore utilities are installed under
Tools folder in the software installation directory, e.g.
\Program Files\SCANORA\Database\Tools\. The backup
of the ScanoraData folder, including all subfolders, can be
made with any backup software and media type that the
user has available.
NOTE! This describes a procedure, as an example, to
backup both the database tables and medical images.
Therefore ensure that all the ScanoraData contents fit in
the backup media – it can be up to several gigabytes. The
necessary backup software is supplied with the backup
device (e.g. Magneto optical tape drive).
5.3.1 Making instant backup from the software
database
NOTE! If you use 32-bit SQL Server in 64-bit Windows, do
a following modification into BackupDB.bat before
executing it. Replace instance of Program Files with
Program Files (x86) in OSQLEXE definition.
NOTE! It is highly recommended that all users are logged
off the software database.
NOTE! Running the backup/restore batch files under the
Tools directory could fail under Windows Vista operating
system due to missing permissions to create files under the
Program Files directory. In such cases the problem can be
circumvented by e.g. adjusting permissions or moving the
Tools folder under some other directory.
207633 rev 2
1.
Run BackupDB.bat (located in the Tools folder
mentioned in the beginning of the chapter).
In Windows 7 run file in command line opened with
"Run as administrator".
2.
Enter the administrator password in the command-line
(=admin by default).
3.
The software database file is backed
('pidbmsde.dat' in the backup directory, e.g.
\ScanoraData\Backup).
4.
Make a backup of the image directory
(e.g. C:\ScanoraData),
INCLUDE ALL CONTENTS!
5.
Mark the backup media with the current date and store
it in a safe place.
SOREDEX
up
79
5 Software database
5.3.2 Restoring the software database from the
backup
NOTE! If you use 32-bit SQL Server in 64-bit Windows, do
a following modification into ImportDB.bat before executing
it. Replace instances of Program Files with Program Files
(x86) in OSQLEXE and SQLCMD definitions.
NOTE! This procedure overwrites any existing patient data
stored in the software database.
NOTE! This procedure does not restore users and creates
default users. Use the software Manager to recreate users.
80
1.
Make sure that all users have been logged off the
software database (restore does not succeed if the
database is in use) e.g make sure that "PaloDEx 3D
Reconstruction Service" and "SCANORA Database
Backup Service" are not running.
2.
Restore the image directory (e.g. C:\ScanoraData)
from the backup, INCLUDE ALL CONTENTS!
3.
Run ImportDB.bat (located in the Tools folder).
In Windows 7 run file in command line opened with
"Run as administrator".
4.
Enter the administrator password in the command-line
(=admin by default).
5.
The database along with all the image data is now
restored.
SOREDEX
207633 rev 2
5 Software database
5.4 Restoring database to a new installation
and/or location
NOTE! This procedure has to be applied whenever MS
SQL Server database has been re-installed. Otherwise the
new database installation does not read any of the existing
data or images but is running the newly created empty
database.
5.4.1 How to restore a database to another installation
or new location
NOTE! If you use 32-bit SQL Server in 64-bit Windows, do
a following modification into BackupDB.bat before
executing it. Replace instance of Program Files with
Program Files (x86) in OSQLEXE definition.
NOTE! If you use 32-bit SQL Server in 64-bit Windows, do
a following modification into ImportDB.bat before executing
it. Replace instances of Program Files with Program Files
(x86) in OSQLEXE and SQLCMD definitions.
NOTE! In Windows 7 run the files BackupDB.bat and
ImportDB.bat in command line opened with "Run as
administrator".
(MS SQL Server 2005 Express/Workgroup/Standard/
Enterprise Edition supported)
If you already have an up-to-date backup of the whole
image folder (ScanoraData) and you have a matching
‘pidbmsde.dat’ file there in the Backup folder, skip step 1.
1.
Make backup from the existing database (source) by
running the backup batch file (location e.g.
"C:\Program Files\SCANORA\Database\Tools\
BackupDB.bat”, Username/Password: admin/admin by
default).
2.
Make a backup of the image folder
(e.g. "C:\ScanoraData"),
INCLUDE ALL CONTENTS!
3.
Install the software database to the new computer
(destination) and restart the computer when asked.
NOTE! For the system to work correctly the Database
tables and Database media files must be located in the
same computer.
207633 rev 2
SOREDEX
81
5 Software database
4.
Delete the whole “Files” folder under the image folder
on the destination computer
(location e.g. "C:\ScanoraData\DB\Files").
5.
Copy the database backup file ‘pidbmsde.dat’ from
source (=your backup) to the Backup folder on the
destination
(location e.g. "C:\ScanoraData\Backup").
Replace existing ‘pidbmsde.dat’ if a file with that name
already exists.
6.
Copy the whole “Files” folder including all files and
subfolders from source (=your backup) to destination
(e.g. "C:\ScanoraData\DB\Files").
7.
In case the database backup is from the same
software database version as the new database,
perform step A). In case the database backup is from
the older software database version than the new
database, perform step B).
A) Run ImportDB.bat
(location e.g. "C:\Program
Files\SCANORA\Database\Tools\ImportDB.bat") and
enter Username/Password (= admin/admin by
default).
B) See Old Backup Importer instructions found in
installation media under Tools\OldBackupImporter to
import a backup from SCANORA 3.0.0.12 or later to
current version of the software.
8.
Reconfigure the database connection (ODBC) of the
clients as explained in the next chapter 5.4.2, How to
reconfigure Database connection (ODBC).
(clients = all SCANORA 3.2 or later software on
workstations and server if any).
NOTE! Make sure that nobody uses the software before
the database connection has been completely
reconfigured (otherwise some data is saved to the old
database).
82
SOREDEX
207633 rev 2
5 Software database
5.4.2 How to reconfigure Database connection (ODBC)
207633 rev 2
1.
Open Start (⇒ Settings) ⇒ Control Panel (⇒ Switch to
Classic View) ⇒ Administrative Tools ⇒ Data Sources
(ODBC).
2.
Select the "System DSN" tab.
3.
Select SCANORA and click Configure.
4.
Select "[The new server]\SCANORA" from the list and
click Next.
5.
Select "With SQL Server authentication using a login
ID and password entered by the user." Also "Connect
to SQL Server to obtain default settings for the
additional configuration options." must be checked.
Write username (by default: admin) to the "Login ID"
field and password (by default: admin) to the
"Password" field and click Next.
6.
Click Next (again).
7.
Click Finish, OK and OK.
SOREDEX
83
5 Software database
5.5 Renaming Database Computer
There are certain steps that need to be taken when
renaming computer, which hosts the software database
with database sharing. These steps are done after the
renaming is completed.
5.5.1 Configuring the file server
To configure file server to use the new computer name,
open the software manager and select File ⇒ File Server
Configuration. In the File Server Configuration dialog
change the ‘IP or computer name’ to match the new
computer name and then click Save.
5.5.2 Modifying Datasource.ini
Modifying the Datasouce.ini is essential to new clients that
are installed after renaming the database computer.
Datasource.ini is located at the folder
ScanoraData\ClientConfiguration\.
File should contain the following lines:
[Data Source]
hostname=OLD_COMPUTER_NAME\Scanora
OLD_COMPUTER_NAME should be replaced with the
new computer name.
84
SOREDEX
207633 rev 2
5 Software database
5.5.3 Modifying Already Installed Clients to Use New
Database Computer Name
NOTE! This step must be done in every client computer.
To modify already installed clients to use new database
computer, open Control Panel and select Administrative
Tools. In the Administrative Tools open Data Sources
(ODBC) and go to System DSN page. Now select a system
data source named SCANORA and click Configure.
Replace the OLD_COMPUTER_NAME with the new one
and click finish.
207633 rev 2
SOREDEX
85
5 Software database
86
SOREDEX
207633 rev 2
6 Upgrading the software
6 Upgrading the software
WARNING! Before you start upgrade, back up database
and images.
NOTE! Before you start upgrade, update the latest service
pack for the computer operating system.
6.1 Upgrading the software from version 3.1
or newer
1.
Insert the software DVD into the DVD-ROM.
2.
The installation program starts automatically. If the
installation program does not appear, double-click the
SCANORASetup.exe file on the DVD to start the
software installation.
3.
Follow the on-screen instructions to install the
software.
4.
Initialization screen "Preparing to Install...".
Wait for the package to be extracted.
5.
"Welcome to the InstallShield...". Click Next.
6.
"License Agreement". Read the software license and
click Yes.
7.
"Start copying files". Verify the selected features and
folders and click Next to continue.
8.
Setup status dialog. Wait until software files are
upgraded.
9.
"InstallShield Wizard Complete". Restart the computer
if asked and click Finish.
NOTE! In the case of upgrade being done for an existing
Network environment with Firewall enabled, add a new
Inbound Rule or Exception for the software File Service in
the Database Computer. Remember to update the correct
path of SQL Server in the Inbound Rule or Exception also.
(Refer the note related to Firewall in section 2.0.2 for
more).
207633 rev 2
SOREDEX
87
6 Upgrading the software
88
SOREDEX
207633 rev 2
7 Adding features
It is possible to add features or modalities at any time after
the installation (e.g. DICOM).
7.1 Adding devices
X-ray device support in the software is installed during the
software installation. You can add a new X-ray device at
any time after the installation. Add devices in the software
by selecting Tools ⇒ Installed devices.
NOTE! IntraCam is in the dialog only when Intra Camera is
installed to the PC.
Only with CRANEX D: To use an X-ray device, install also
the sensor-specific gain file by using Gain Installer:
Start ⇒ Programs ⇒ SCANORA ⇒ Tools ⇒ GainInstaller
Insert the Gain file media and browse the Gain file. Select
all the gain files and click Install. Remember to copy the
gain files for each camera and sensor.
NOTE! The DIGORA Toto gain files are installed
automatically, when the DIGORA Toto image capturing is
started for the first time.
If the gain files need to be updated, click Update to copy
the files to local workstations.
207633 rev 2
SOREDEX
89
7 Adding features
7.2 Adding options
You can add a new option (e.g. DICOM) at any time after
the installation.
1.
Start ⇒ Settings ⇒ Control Panel ⇒ Add or Remove
Programs (Vista: Programs and Features)
2.
Select SCANORA. Click Change.
3.
The software Setup Maintenance program starts.
Select Modify and click Next.
4.
See already installed features in the Select Features
dialog. Add features by selecting the needed features.
Click Next.
5.
InstallShield Wizard may ask:
Do you want to reconfigure external database
selection?
Click No if you continue using the same database as
before. Click Yes if you change the database.
See chapter 5.3, Database backup and restore.
6.
If you are adding a Database, restart your computer.
Select ‘Yes, I want to restart my computer now’ and
click Finish.
Re-log into Windows using administrator rights.
If you are adding other features than Database,
maintenance is complete. Click Finish.
90
SOREDEX
207633 rev 2
8 Uninstalling
8.1 Uninstalling the software
To uninstall the software, select Start ⇒ Settings ⇒
Control Panel. Double click Add or Remove Programs
(Vista: Programs and Features), select SCANORA and
click Remove (Vista: "Uninstall"). Follow the instructions
on the screen.
If older versions of the software has been installed, do not
remove the software before verifying that the software is
working and the converted database can be used.
The software uninstallation leaves directories on the hard
drive and saves the database and images. Uninstallation is
for removing the software only. The software uninstall does
not remove any device drivers such as PCI drivers.
CAUTION! Connection between all images and patient
data is lost when the software with the database is
uninstalled.
207633 rev 2
SOREDEX
91
8 Uninstalling
92
SOREDEX
207633 rev 2
9 Software Manager
9 Software Manager
The software Manager is used to archive images, restore
archives, alter image saving format, define data directory
(images) location, manage users, schedule backups,
manage trash and logs.
9.1 Login
The software Manager can be launched from
Start ⇒ Programs ⇒ SCANORA ⇒ Tools ⇒ Manager.
The software Manager is password protected to prevent
unauthorized usage.
Enter the user name, password and click OK.
Default user name is admin, and password is admin.
207633 rev 2
SOREDEX
93
9 Software Manager
9.2 Archiving
To release hard disk storage space on the server, the
unused images can be copied or moved to an archive
media. The information and scout images of these images
remain in the database, allowing easy retrieval whenever it
becomes necessary to view any of the archived images.
9.2.1 Create archive
1.
To archive images, select Create from the software
Manager dialog.
2.
Select media type for archiving. Select the temporary
archival folder.
3.
Define the time for inactive patients. For example, if
you select inactive patients or data within the past six
months, the program offers all images of those
patients to be archived.
4.
Select the patients whose images you want to archive.
Also select if you want those images to be removed
from the patients image folder on the hard disk.
Otherwise the archived images are shown as archived
images in the patients image folder.
5.
To start the archiving, click Start.
6.
Archive
operation
creates
archive
folders
(SCANORA_xxx) in the temporary archival folder. To
burn archived images to DVD-ROM, use DVD-disk
software and burn SCANORA_xxx folders to DVD.
NOTE! Store the software installation and archive DVD’s
very carefully.
94
SOREDEX
207633 rev 2
9 Software Manager
9.2.2 Restore archive
207633 rev 2
1.
To restore the archive, select Restore from the
software Manager dialog. To restore an archive from
another path than the default, click Restore from.
2.
Select the archive to be restored and click Restore.
3.
Click Yes.
4.
After clicking Restore from, browse the directory for
archives.
5.
Select a folder and click Yes.
SOREDEX
95
9 Software Manager
9.3 Images
9.3.1 Remove archived
NOTE! Removing archived images can be done
automatically after archiving by checking the Remove
images from image folder after archiving box on the
“Create Image Archives” dialog.
Previously archived images can be removed from the
server to free up more storage space. Select the removal
criteria between 0 to 12 months of time during which the
patient´s images have not been reviewed.
To remove the archived images from the patient image
folder, select Remove achieved from the software Manager
dialog.
96
1.
Select the appropriate time and click Start.
2.
Click Yes to start removing the archived images.
SOREDEX
207633 rev 2
9 Software Manager
9.3.2 Settings
Select PNG or JPG as the saving format.
Select 60%—100% quality for JPG.
Compressing images may decrease the image quality.
9.3.3 Image folder location
NOTE! Do not use drive mapping when changing the data
directory. The software database backup will not work
when a mapped network drive is used to access the
ScanoraData folder. If you have a network installation,
please only use an UNC path to define the data directory
location in the software Manager.
207633 rev 2
1.
To change data directory (images), select Location
from the software Manager dialog.
2.
Create a new data directory and share it (if network
installation).
3.
Copy all files and subdirectories from main directory
(e.g ‘ScanoraData’) to the new data directory.
4.
Browse the new data directory and click Save.
SOREDEX
97
9 Software Manager
NOTE! Be sure that the software is not used when
changing the data directory.
9.3.4 Report, Exposure statistics
1.
To create an exposure statistics report, select Report
from the software Manager main view.
2.
Enter the report parameters and click Generate to
create a report.
Viewing report
Open *.htm file (e.g. Report.htm) with Internet Explorer.
The report contains the following data:
– Header: 'Exposure statistics', Report date
(e.g. SCANORA 2006-01-30)
– Total count of images by modality
– Date Range
– Image list with values: Image Date, Modality, Patient
name, Exposure values and DAP value
98
SOREDEX
207633 rev 2
9 Software Manager
The image list is sorted by modality and image date.
Export Data
The easiest way to export data is to use the clipboard as
following:
– Select Edit ⇒ Select All (Ctrl+A) from Internet
Explorer
– Select Edit ⇒ Copy (Ctrl+C)
– Open third party software (e.g. Word or Excel)
– Select Edit ⇒ Paste (Ctrl+V)
Make your own report
It is also possible to make your own style sheet, but XML
skills are required.
Choose Style Sheet for a report
– Click 'Settings…' on Image Report dialog
– Browse or enter Style Sheet path and click 'Save'
The software Manager remembers the last used style
sheet.
207633 rev 2
SOREDEX
99
9 Software Manager
9.4 Database
9.4.1 User Management
User management makes it possible to define categories
for different users and define passwords for each user.
Select User management from the software Manager
dialog.
Administrator category means that the user has rights to
both the software and the software Manager. Users in
default category are entitled to start the software program
only.
Mark the upper left corner to activate
management function. Add and remove users.
the
user
To add a user, click Add.
Select the name of the user from the list or click Add to
create a new user.
Enter the information for the new user and click OK.
100
SOREDEX
207633 rev 2
9 Software Manager
To change the password for user click Set Password.
Fill in the fields and click OK.
9.4.2 Database backup
Choose the schedule for automated backup of the
Database tables.
NOTE! This function does not create a backup of the
images. See Chapter 5.3, Database backup and restore.
Define the schedule and click Save.
Click Yes.
207633 rev 2
SOREDEX
101
9 Software Manager
9.4.3 Trash
Various objects that have been previously marked as
deleted in the software can be permanently deleted from
the database in the trash menu. This means that the
software user can not permanently delete any information
unless the administrator empties the “deleted” information
from the trash.
Select Trash from the from the software Manager dialog.
Select all
All objects can be selected for deletion.
Restore
Deleted information can be restored for further usage.
Confirm restore.
Delete
Information is deleted permanently.
To confirm removal, click Yes.
102
SOREDEX
207633 rev 2
9 Software Manager
9.4.4 System Logs
To view user actions in the software, select Logs from the
software Manager dialog.
9.4.4.1
Search logs
It is possible to restrict search results with the following
filters: Object, Action and number of ‘last days’.
Select Object where action is targeted as: All, Database,
Image, Patient, Study or User.
Select Action. The following combinations are possible:
Object
All
Database
Image
Patient
Study
User
All Actions
Update
Archive, Capture, Delete, Hide, Import and
Restore
Delete and Hide
Delete and Hide
Login and Logoff
Define the number of days you want to look back for the
software system logs.
If ‘1’ is selected then today’s logs are shown, and if ‘2’ is
selected then today’s and yesterday’s logs are shown, and
so on.
To start searching logs, click Search. The search list can
show 500 items at a time. If more items exist, it is
necessary to restrict search with filters or by removing log
items.
207633 rev 2
SOREDEX
103
9 Software Manager
9.5 File Server Configuration
In a network configuration, as a default, computer name is
used instead of IP address. In case of misconfigured DNS
server or absence of a local DNS server, it is
recommended to use the IP address. This can be manually
done using the file server configuration by specifying the
correct IP address instead of the computer name.
The default port for File Server is 899. In case the defualt
port is being used by some other application, default port
can then be changed using File Server configuration.
File server configuration is done from File ⇒ File Server
Configuration.
NOTE! The File server IP must not be configured to a
different computer than where the Database is running.
9.6 License
The currently installed license key is shown in the dialog.
Click License to change the key.
104
SOREDEX
207633 rev 2
9 Software Manager
Fill in the license key provided with the software.
207633 rev 2
SOREDEX
105
9 Software Manager
106
SOREDEX
207633 rev 2
10 Using practice management interface
10 Using practice management interface
NOTE! If patient data is tranferred in to the software by
other software, this software must conform to applicable
local
laws and regulations on patient information
softwares.
10.1 Introduction
The software
SCANORA.ini.
uses
an
initialization
file
called
The file is installed in the software settings directory, which
is operating system specific:
– Windows XP: C:\Documents and
Settings\All Users\Application Data\SCANORA
– Windows Vista: C:\ProgramData\SCANORA
However, for compatibility reasons, the software still uses
the old CliniView.ini file path, in Windows XP, if the practice
management software continues to write data to it. This file
is installed in %windir% folder, and %windir% is the folder
where Windows is installed, for example C:\Windows
(Windows XP).
Viewing System Variables (e.g. %windir%)
1.
Click Start, point to Settings, and then click Control
Panel.
2.
Double-click System.
3.
On the Advanced tab, click Environment Variables.
4.
All current system variables and their associated
values are listed in the lower list.
The installation directory and executable path are defined
in Windows registry.
HKEY_LOCAL_MACHINE\SOFTWARE\Soredex\
SCANORA
– ProgramDir - SCANORA
C:\Program Files\SCANORA
path,
for
example
– ExeFile - SCANORA executable,
for
example
C:\ProgramFiles\SCANORA\SCANORA.exe
207633 rev 2
SOREDEX
107
10 Using practice management interface
When starting the software, the settings are read from the
SCANORA.ini configuration file. It is allowed to run only
one instance of the software on a computer at a time. If
starting the software while the software is already running,
no additional instances of the program are started.
However, the already running the software reads the
Practice Management Interface section of the
SCANORA.ini file and acts accordingly. Finally, the
software sets all entries in the Practice Management
Interface section to 0.
The Practice Management Interface section in the
SCANORA.ini file is described below.
The mandatory fields are:
USE_PRACTICE_MANAGEMENT:
If set to 1, the software reads the Practice Management
Interface section at startup and on activation and users are
not allowed to change or add new patients manually from
the software user interface
CLEAR_PRACTICE_MANAGEMENT_AUTOMATICALLY:
If set to 1, the software resets
USE_PRACTICE_MANAGEMENT and the patient keys
every time the software reads the SCANORA.ini file. If set
to 0, the software does not reset (to 0) the keys.
PATID:
Patient ID shall be unique and defined by PMS software.
Practice Management Interface PATBD defines date of
birth, which shall be formatted as defined in system
regional settings.
CLEAR_PRACTICE_MANAGEMENT_AUTOMATICALLY
=1 USE_PRACTICE_MANAGEMENT= 1
PATID = 00000
PATLNAME = 0
PATMNAME = 0
PATFNAME = 0
PATSOCSEC = 0
108
SOREDEX
207633 rev 2
10 Using practice management interface
PATBD = 0
PROVIDER1 = 0
PROVIDER2= 0
ADDRESS1 = 0
ADDRESS2= 0
CITY = 0
STATE = 0
ZIP = 0
HOMEPHONE = 0
WORKPHONE = 0
FAX = 0
EMAIL1 = 0
EMAIL2 = 0
Some PMS software that uses previous versions of the
software might require that
USE_PRACTICE_MANAGEMENT is permanently set by
the user to 1 and that
CLEAR_PRACTICE_MANAGEMENT_AUTOMATICALLY
=0.
It is recommended that the PMS application sets both
USE_PRACTISE_MANAGEMENT=1 and
CLEAR_PRACTISE_MANAGEMENT_AUTOMATICALLY
=1.
The software can read patient information from any ini file if
the
following
line
is
added
to
[PracticeManagementInterface]- section:
BRIDGEFILE_LOCATION_OVERRIDE =C:\my_ini_file.ini.
207633 rev 2
SOREDEX
109
10 Using practice management interface
10.2 How to use SCANORA.ini
Set
CLEAR_PRACTICE_MANAGEMENT_AUTOMATICALLY
=1,
if
the
PMS
software
automatically
sets
USE_PRACTICE_MANAGEMENT = 1. Otherwise, set the
key to 0.
To add a patient:
– Set USE_PRACTICE_MANAGEMENT = 1 ·
– Set PATID to a patient ID that does not exist in the
software database yet.
– Fill in the patient data fields
– (Re)start the software
To alter patient information:
– Set USE_PRACTICE_MANAGEMENT = 1
– Set PATID to match the patient whose information is
to be changed.
– Fill in the patient data fields to be changed.
– If the content of a specific data field is not needed to
be changed, set its value to 0.
– (Re)start the software
To preselect a patient:
–
–
–
–
Set USE_PRACTICE_MANAGEMENT = 1
Set PATID to match the patient to be preselected.
Set all data fields to 0.
(Re)start the software
To disable the practice management interface:
– Set USE_PRACTICE_MANAGEMENT = 0
110
SOREDEX
207633 rev 2
10 Using practice management interface
10.3 Interface to access image information
NOTE! If images are brought into another software and to
be used for diagnostic purposes, this software must
conform to applicable local laws and regulations on patient
information softwares.
The software supports external application called PMSif
which provides direct access to images in the software
database. SCANORA.ini has four fields which can be used
together with PMSif to export the image.
[Image]
ActiveImageGUID=
ActiveImageID=
LastCaptureGUID=
ActiveImageIndex=
Use ActiveImageGUID or ActiveImageID to export the
image visible in currently active image window from
database.
ActiveImageGUID
is
preferred
over
ActiveImageID (retried). Use LatestCapturedImageID to
export latest captured (saved) image from database.
Only the latest ID’s of the saved images are shown.
LastCaptureID and LastCaptureGUID are visible after the
first image is captured.
See Soredex web page to get additional information about
PMS interface.
207633 rev 2
SOREDEX
111
10 Using practice management interface
112
SOREDEX
207633 rev 2
11 Software license
11 Software license
THIS DOCUMENT IS A LEGAL AGREEMENT BETWEEN
YOU, AS THE <LICENSEE>, AND PALODEX GROUP OY
(THE <LICENSOR>) GOVERNING YOUR RIGHT TO
USE THE SCANORA SOFTWARE (<Software>).
IF YOU AGREE TO BE BOUND BY THE TERMS AND
CONDITIONS OF THE SOFTWARE LICENSE AND THIS
PARAGRAPH, PLEASE PRESS <I Agree> AT THE
PROMPT BELOW IN WHICH CASE YOU AGREE THAT
THIS AGREEMENT IS ENFORCEABLE LIKE ANY
WRITTEN NEGOTIATED AGREEMENT SIGNED BY
YOU. IF YOU DO NOT CONSENT TO THE SOFTWARE
LICENSE AND THIS PARAGRAPH, PLEASE PRESS
<Cancel> AT THE PROMPT BELOW, IN WHICH CASE
THE SOFTWARE WILL NOT OPERATE AND RETURN
THE SOFTWARE AND THE ACCOMPANYING ITEMS TO
YOUR PLACE OF PURCHASE FOR A REFUND.
1.
Subject-matter of the Software License
This Software License governs the use of the
Software. Software means the software product
specified above including new versions or updates of
the Software made generally available to other
licensees of such Software free of charge, if any.
2.
Software License Grant
2.1 Licensor hereby grants you a non-exclusive and
non-transferable license to use during the term of this
Software License (i) the Software, in object code form
only and in accordance with the terms of this Software
License and (ii) manuals and other documentation
related to the Software. You have no right to
sublicense the Software and you are under the
obligation to return the same to Licensor upon the
expiration or termination of this Software License.
2.2 You are entitled to use each licensed Software
only on a single computer or terminal at any one time
and, if necessary for use on such computers or
terminals, to modify the Software or merge them into
another program, all portions of the program
continuing to be subject to this Software License in full.
Such other program must, however, conform to all
applicable local laws regulations on patient imaging
systems. Licensor shall not be held liable for any
damages resulting directly or indirectly from a
modification or merger of the Software made by you,
207633 rev 2
SOREDEX
113
11 Software license
even if Licensor approved such modification or
merger.
2.3 You are granted no rights hereunder other than
those expressly set out hereinabove and,
consequently, all other activities related to the
Software are prohibited. Such prohibited activities
include but are not limited to (i) the deleting, adding to,
copying, modifying or transferring the Software or any
part thereof, or any copy or merged portion thereof, in
whole or in part, except as expressly provided for
herein or authorized in advance by Licensor in writing
and (ii) the renting or leasing of the Software to
another party.
3.
Software License Limitations and Conditions
3.1 You hereby expressly agree that Licensor and its
software suppliers own throughout the world all right,
title and interest in the Software, any copies thereof
and all intellectual property rights contained or
embodied therein including the ownership to any
modifications or translations of the Software and that
such ownership or rights shall not be transferred to
you.
3.2 With respect to any software of third party
suppliers contained or to be contained in the Software,
you agree to the ownership of Licensor's suppliers
hereunder and accept that Licensor's suppliers are
direct and intended third party beneficiaries of this
Software License with rights solely against you,
including (without limitation), on reasonable prior
notice to and consent of Licensor, the right to directly
enforce and/or terminate your license to use the
Software. Further, you agree that Licensor's suppliers
have no liability or obligations towards you arising out
of or in connection with this Software License. You
agree to execute any such amendments to this
Software License as may be required from time to time
in order to comply with terms and conditions of any
third party software suppliers.
3.3 Your license to use the Software shall commence
upon the execution of this Software License, and shall
thereafter remain in effect unless you fail to comply
with the terms and conditions of this Software License,
including any amendments thereto. Upon termination
by Licensor or its suppliers of this Software License,
you shall, within two (2) business days thereafter,
certify to Licensor that in accordance with instructions
from Licensor or its suppliers, all copies of the
114
SOREDEX
207633 rev 2
11 Software license
Software have been either destroyed or returned to
Licensor, whether same is in tangible or intangible
form and you shall further certify that all use thereof is
and shall remain terminated.
3.4 You agree to comply with all applicable export and
re-export restrictions and regulations, including the
ones imposed by the government of the United States
or of the country to which the Software is shipped to
you. You shall not commit any act or omission, which
will result in a breach of any such export requirements.
3.5 Should you receive any copy of the Software to
upgrade a previous version of such Software such
upgraded version of the Software shall be the only
version you are entitled to use unless otherwise
agreed and, unless expressly otherwise permitted by
Licensor, you shall destroy or erase all program
material and related documentation, including all
copies and modifications, relating to the previous
Software.
4.
Copyright
4.1 The Software shall be delivered subject to all
restrictions and protections provided for under the
applicable copyright and other laws and treaties.
Except as otherwise may be agreed by Licensor in
writing, you have no right to reproduce or otherwise
duplicate the Software or any part thereof for any
purpose or to allow any third parties to do the same
without the prior written consent of Licensor.
Notwithstanding the above, you may make one copy of
the Software for back-up purposes provided that such
copy and the media thereof shall include the same
copyright and other proprietary notices or legends
included on the Software when it was shipped to you.
You agree not to remove any Software identification,
copyright notices or other notices or proprietary
restrictions from the Software.
5.
Confidentiality
5.1 The Software contains proprietary and confidential
information of Licensor and its suppliers and is
considered by Licensor and its suppliers to constitute
valuable trade secrets. You agree to hold the Software
in confidence and protect the Software with at least the
same degree of care with which you protect your own
similar confidential information but in no event less
than a reasonable standard of care. You agree that
your officers and employees shall protect the
207633 rev 2
SOREDEX
115
11 Software license
confidentiality of the Software and all confidential and
non-public information relating thereto and shall not
disclose such information to any third party. This
obligation of confidentiality shall survive the
termination of the Software License.
5.2 You agree not to decompile, reverse assembles or
reverse engineers the Software or otherwise attempt
to derive source code from the Software. The
prohibition in the foregoing sentence shall apply only
to the extent permitted by applicable law. When
information of the internal structure of the Software is
necessary in order to obtain interoperability of the
Software with other software programs, you shall
immediately contact Licensor.
6.
Disclaimer of Warranties
6.1 To the maximum extent permitted by applicable
law, Licensor and its suppliers provide the
SOFTWARE <as is> and hereby disclaim all
warranties and conditions, either express, implied or
statutory, including, but not limited to, any (if any)
implied warranties or conditions of merchantability, of
fitness for a particular purpose, compatibility, of lack of
viruses, of accuracy or completeness of responses, of
results, and of lack of negligence or lack of
workmanlike effort, all with regard to the SOFTWARE
and any part thereof, and the provision of or failure to
provide support services. There is also no warranty or
condition of correspondence to description or noninfringement with regard to the SOFTWARE or any
part thereof. Licensee shall bear the entire risk as to
the quality or compatibility of or arising out of use or
performance of the SOFTWARE.
6.2 To the maximum extent permitted by applicable
law, in no event shall Licensor or its suppliers be liable
for any actual or special, incidental, indirect, or
consequential damages whatsoever (including, but not
limited to, damages for loss of profits or confidential or
other information, for business interruption, for
personal injury, for loss of privacy, for failure to meet
any duty including of good faith or of reasonable care,
for negligence, and for any other pecuniary or other
loss whatsoever) arising out of or in any way related to
the use of or inability to use the Software, the provision
of or failure to provide support services, or otherwise
under or in connection with any provision of this
Software License even in the event of the fault, tort
(including negligence), strict liability, breach of contract
or breach of warranty of Licensor or any of its
116
SOREDEX
207633 rev 2
11 Software license
suppliers, and even if Licensor or any of its suppliers
has been advised of the possibility of such damages.
7.
Applicable Law and Jurisdiction
7.1 This Software License to be construed governed
by and interpreted in accordance with the laws of
Finland, excluding the UN Convention on Contracts for
the International Sale of Goods.
7.2 Disputes arising from or in connection with this
Software License are to be settled by arbitration by
one arbitrator. The Board of Arbitration of the Central
Chamber of Commerce of Finland shall appoint the
arbitrator and the Rules of the said Board are to be
followed in the arbitration proceedings. The arbitration
shall be held in Helsinki, Finland and conducted in the
English language.
7.3 Notwithstanding the foregoing, Licensor and its
suppliers shall have the right, but not the obligation, to
undertake legal proceedings in a court of your
domicile, principal place of business or other
appropriate court to: (i) settle any issue or dispute
arising out of or relating to monies due by you to
Licensor; (ii) protect or enforce any patent, trademark,
copyright or other intellectual property right,
confidential information or trade secrets; or (iii)
proceed with litigation commenced by a third party.
7.4 Judgment upon the award rendered may be
entered in any Court having jurisdiction or application
may be made to such Court for a juridical acceptance
of the award and an order of enforcement, as the case
may be.
8.
General
8.1 This Software License (together with license terms
of third party suppliers of Licensor, if any) constitute
the entire agreement with respect to the subject matter
hereof between you and the Licensor and supersedes
all previous oral or written communications or
agreements relating to the same. Only a written
instrument expressly agreed to by the parties hereto
may modify this Software License.
8.2 The failure of Licensor to enforce any provision of
this Software License shall not be considered a waiver
of any subsequent breach of that provision or as a
waiver of any other provision hereof.
207633 rev 2
SOREDEX
117
11 Software license
118
SOREDEX
207633 rev 2