1
I-TECH
CDMPANYJ
WCM 4.0 Guide
for Content Creation
"Created your own Unique Digital Signage Advertisement"
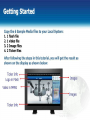
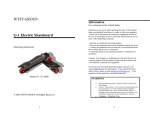
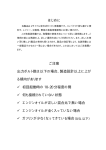
Getting Started
Copy the 6 Sample Media files to your Local System:
1 . 1 flash file
2 . 1 video file
3. 2 Image files
4. 2 Ticker files
After following the steps in this tutorial, you will get the result as
shown on the display as shown below:
Ticker Info
Logo in Flash
Images
Video in MPEG
Images
Ticker Info
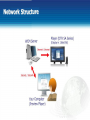
Network Structure
WCM Server
Internet/ Intranet
Internet / Intranet
Your Computer
(Preview Player)
Player (DTR SA Series)
(Display in 1366x768)
WCM 4.0 Installation (Quick Setup)
1. Download Java SDK 1.6 or Later
2. Quick Setup to Install
W r I' I i Mill" III M . l l i . i , ; - !
4
0
Setett installing mod*
Web
Content Mai
■> BukkSrlup
y. .-;f ,,» thtinformitton wl be Mtgntd tfth difofl veto* (RtcomindMQ
O Customized Setup
Let user select the component andtfputthe cioimatw
lrrt*l Web
1
Content Manager 4.0 to:
i
a-"E:
'C:\P-off am Fl«\
I
<6*ck
||
t»xt>
| |
(wil
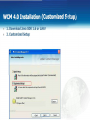
Please use IE Explorer to setup WCM
WCM 4.0 Installation (Quick Setup)
1. Download Java SDK 1.6 or Later
2. Quick Setup to Install
3. Default Service Account and Password
We*ContTDt M < D I ^ [ 4 0
Ready t o J m t a f l (he Program
l/V&O Content Manager
Ihe « t » d * read* to begn nstalatjon*
C M total tobegn the nstalatton.
ff you want to review or change any of your rtitaftabon settings, ckk Back. Cfcck Cancel to
Server Irfomarjcn:
r^alCcrrooriwits Database Server Content Server. PuMsh Server,
Irtrtal Peth;C\r>ogram H w \ p T fie*eaich\WebOT Content Managed
Share FoWer:C:l^ogram Hes\DT ftetearch»We60T Content Manage«\L**WY\
Supermtr pajajrrjrd:IO*S
Database Superuser: dbadmin
Database Superuser Password ; 12345
Database service account; Postgres
Database service password : Post_~gres
tattMK
Service Account rijmePostojw
Database Service Account Password Post_^jres
HHBBaTTOTTW^T
[Wet Server Port:f»l
Web Server Port: 80
<*atk
Intel
1 [
Cancel
Please use IE Explorer to setup WCM
|
WCM 4.0 Installation (Customized Setup;
1. Download Java SDK 1.6 or Later
2. Customized Setup
r
|>?
Web Content Manager 4 0
X
Select imtaOingmode
. _<_
,.
t
a-
IV&£) Content Manager
O Qufck Setup
J C S Most of the ^formation wJ be aswgned w<h oWa^ values. (R«onwended)
® C u j t omi/ed Set up
JI1
Lrtu*e*s«tetthecorTCtfr^andnputtto
Instal WobDT Content Manager 4.0 to:
^ C V r o g r ^ F M
l 3 * S - l
<B»*
Ue-t>
Caned
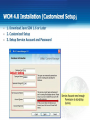
WCM 4.0 Installation (Customized Setup;
1. Download Java SDK 1.6 or Later
2. Customized Setup
3. Setup Service Account and Password
Web C o n t e n t MftUjgei 4 0
l/Vfe>0 Content Manager
Database Information
Database por t
Default Setti
£
5uperyser flame:* POMOTTO
The super user name and password are
used for creetng and operating the
database.
Superuser Password: IU545
Service Recount Name;
Account Contain:
Account Password:
The service account name and password
are for running the database server ♦ Please
ensure you have created the account wth
inflffllQfti
If the account does not betong t o any
domain, leave the Account Domain fieW
empty.
t>>
rjext >
I I
Cancel
)
Service Account need enough
Permission to start/stop
Service
WCM 4.0 Installation (Customized Setup)
1.
2.
3.
4.
Download Java SDK 1.6 or Later
Customized Setup
Setup Service Account and Password
Web Server Port
fl?
Web Control M u u j p i 4 0
|^C
W&b Content Manager
Web Server I n f o r m a t i o n
Input Web Server Wormabon
Support S5L Server: Q M d SSI for Web Server
[
Webserver Port: ( J "
You can set Another Port
Number if 80 Port b<: used
Service Account need enough
Permission to start/stop
Service
<6*k
II
M»*t>
Cancel
Change Password for
Administrator Security
For WCM Security, Please Change the Password of Administrator
You can Login WCM Index Page or Use
http://127.0.0.1/installhelp/Start.html to Change Password
E n t v p n n Etitton
■
Web Content Man;ager
©H* |
LtflguaorUMfiD:
Prtvwofd
OrQtnirtOft
Engtan
****»*{
MWOtrMlOfl
1
i*
*
Admmtralor
l»0" 1
CtarmPutwoftf
ol IJ80 X 1014 or higlw « t*«mm«ndMl)
Default Administrator Setting
User ID : administrator
Password : Admin
Organization: administration
Change Password for
Administrator Security
For WCM Security, Please Change the Password of Administrator
You can Login WCM Index Page or Use
http://127.0.0.1/installhelp/Start.html to Change Password
User ID : administrator
Old Password : Admin
New Password : xxxxxx
Confirm New Password : xxxxxx
Organization : administration
[fc'lllMl P*UPM WH * * # * ' • *««™ntf«fl
1
LOQin
|
Chang* PJMWW i
(A r*K*4H>n of I200 X 10M or N g i w n r*camm«nd*0)
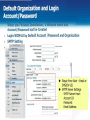
Default Organization and Login
Accou n t / Password
When you Finished installation , a
Account/ Password had be Created
Login WCM4.0 by Default Account /Password and Organization
Web
Content Manager
Howloloiim?
Idngudoe:
English
User ■>: manage!
OrfMbUkm: my site
User ID : manager
Password : 123456
Organization: My site
Default Organization and Login
Account/ Password
When you Finished installation , a wensite
Account/ Password had be Created
■ Login WCM4.0 by Default Account /Password and Organization
■ SMTP Setting
Player A c e * * * P » t w o r t
*r ■*#•■ 5 tf*»fr?n
Cortwm Pa i * wv* d
0
0
n*f«iiPi.triitv
Wjflpappr
Purr** P r o g r m B«r
SUrl Time
h
Always
fn
tmvm
PlMvErrorAttrt
lent
w
h
M i 5 3 L J M I *
WftvOukng
♦
SUTP J#T*K HOftt OTCOmlW
S o f t m r * Upgr*oto
SO«t
♦
<xw©xwcomT*
logCc—oon
Account M4n*Q*m«n1
ACC
Account ID:
ftH
$#1|MttW0fdl0+fnptr
imMAittm:
[]
xmxQxHComr*
P I M M choot* one Knag*
tO*rJ*Q iMf>hO*»f*N0 • * * * * & * • <
**
\A
Player Error Alert: Email or
SMS(for US)
SMTP Server Settings
SMTP Server Host:
Account ID:
Password:
Email Address:
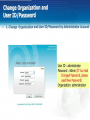
Change Organization and
User ID/Password
1. Change Organization and User ID/Password by Administrator Account
User ID : administrator
Password : Admin (If You Had
Changed Password, please
used New Password)
Organization: administration
v
1
login
|
Chanot P « u v d
<A r + w A A o n of 1 2 0 0 X 1024 or t*Qfr* * *fCOmm«ndod)
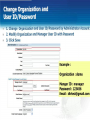
Change Organization and
User ID/Password
1. Change Organization and User ID/Password by Administrator Account
■ 2. Modify Organization and Manager User ID with Password
■ 3. Click Save
Sue information T r * * M a
•CXgonuabonr my Site
Drones
c
Z*C«J«
Example:
C-xmuyRagk*:
Organization : demo
Account SyswmTyp* Weo Contenl Manager Account System
WefcDT Center* Uanaoci Account S^iiem
-uanacwf u*er ft manager
<AiMia
ftMl
Conitrtn PMVMtt
Lul
FrrutfActtr***
(Jf@XWC0O(
UoMePncf*:
MftrrrMMf C * r * i » * * » r t tor W
r
Othe# Providers
Emu Content LBnquaQ*: Engl&h
^
**
^ l c f r v » - 4 i a SMft » i w i * " v^*-jt*-g H
Manger ID : manager
Password : 123456
Email; [email protected]
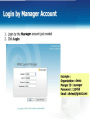
Login by Manager Account
1. Login by the Manager account just created
2. Click Login
jHOfftolOQUl?
ijnguto*
UMttt
OrgaruMcn
-
Engteh
Example:
Organization : demo
Manger ID : manager
Password : 123456
Email: [email protected]
manager
flemo
1
Logn
'
Chanot Pus word
(A reioJubon of 1280 * 1024 or Ngh*r * r«comm«ft<S*o*l
JjMtm
jftapon
^S—fO
Tumo«$cfM<c Never
Pnn&awgmtCMU
pnm BrngiaMi
(01
App. V e r s i o n
■'
■:
V:
1102261
ipnormil
34>0.0P*tdi
I*
3BuM961vl
GfcxipWto
ti
GrouvNo
4.0.0.0 6o«d 10
*24|
pmi
10.0.2 990*2
Apnormjl
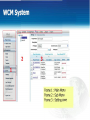
Frame 1 : Main Menu
Frame 2 : Sub Menu
Frame 3 : Setting zone
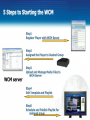
5 Steps to Starting the WCM
Stepl
Register Player w i t h WCM Server
Step2
Assigned the Player to Desired Group
WCM server
Step3
Upload and Manage Media Files to
WCM Server
Step4
Edit Template and Playlist
Steps
Schedule and Publish Playlist for
assigned group
Register Player with WCM
Player Register to WCM Server
1. You will have to exit the player by pressing Ctrl + Shift + Space keys.
2. Navigate to Start | All Programs | Web Signage Player and click
Register Web
Signage Player Again.
-• tUytt
Regulation
Wi'Irome to
W*'b < ontent Manager
Language: [Engnth
*}
•Player Nam*: D e m o Player
Group Nam#:
•Organization Nam*:
Player Accts* Password:
Demo
123456
•Publish SarverURy:
Ex.
http://slgnage,
or
http://192.168.1.2:port
arch.com:port number/publish
\ , ■ .-nflijon
number/publish
OK
Cancel
Player Register to WCM Server
The Web
Player is registered and a confirmation window displays.
If it fails to register, please check if the Internet/network connection and
the firewall settings work properly.
Player Registration
Welcome to Web
Content M a n a f l f
The plater is registered as
Name
Group
Demo Player
Organization
Demol
This window will automatically d o s e in 10 seconds
The plaver wilt then start playing if there are contents from the server
Once the placer starts you can press Ciri*Shrft*Spate 10 e*rt the pia.er
and go back to your windows DosMop
Start Creating Groups
and
Assign Players to Desired Group
Create a Group
1.
^ M M
Web
k\*pn*r«
M***
/-•***
Folder ■ * » * • « * ■
ijfecon
i#wch
'lotttrltaft* Group
P I N M «Wtff|
0
P i « t f (*!!■* C#*l
10 I 50 3)
N » W Group tr>v
3
DEMO-A
"*QM
<<ko*M««* W:MO A
[»MMC*on
C M « * * : mantgtr
(
»
II <**«
1. Click "Player Group"
2. Click "New Group"
3. Input DEMO - A as Group name
Assign Player
Web
^ ^ H
Ft
/tt
fe*frOl
A t t t g n FUytr to Curr#nl Group
Oro^tfMiH OouptttlKVA
Iron
2
rtiwp***
Dwto
AiugrwM
/
OHMHWH
CEfD3lM? L
s*
1. Click "Assign Player"
2. Select the player and assign by clicking
Note:
Before you assign players to your group, the players will be in the Not Assigned group by default
Web
w*u>
V *****
CM
4* **»?
2
o * / W*H>T«QPi*vwv«CrUm «m ff 10 1 W 20
RXT* X±fi5J1
EUpKrw
IEEE
QTVT«r
£ fl W.10T he™. thyti r«
a t B O T S ' 151MB
rt 10.1.90.20
3
*>ne> I f f f ®
11
w
»»W
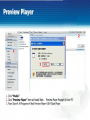
1. Click "Media"
2. Click "Preview Player" then will install Web Preview Player Program to your PC
3. From Start-> All Programs-> Web Preview Player 4.0-> Start Player
Preview Player
Web
1
%*m
BMcuucM tium
QimM
Q0M
2
mas
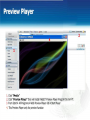
1. Click "Media"
2. Click "Preview Player" then will install WebDT Preview Player Program to your PC
3. From Start-> All Programs-> Web Preview Player 4.0-> Start Player
4. This Preview Player only for preview function
Preview
Web
;ri!SJ»'
I t f i l l l
l*«npton
Ot S4e Maia-je'
'tmai A d d r n *
Hm£w4<om
!
* tor " t i n C k f i * * i «
nwn
t * M i * A * 4 ■-•
f *:■ ■ » . ■ , " '
*-.
i
J
t B ail m
[aM*P><AW*5
HE®
r;oroei»*iotHiiui
E
Imattonwuianguaga EflgMh
1 Click "Account Management"
2. Select the Account you belonged to
3. Click
then a window pop up.
4. Select the player you registered (or other players) to add in as the Preview Player (s)
5. Your selected Preview Player (s) will be listed.
6. Save the settings
Upload and Manage Media files
Upload Media to WCM Server
Bate* Uptood
1)9™
[jSowAi
Durattact
logo
■ I Ptdurts 0 1
«A Scttwo
S**Cft
MCOtVU
OMcnpoon:
C r * * l o r manager
Auo*o
■ Hffl^lrte:
Hvmtfc URL;
TK*M
* i f l E<«cuUt*t *p^K^aoo
QTYTuw
*» l . Click "Media"
s^ 2. Click "New Folder" to Create Media Folder for you Management
uw Select "New Folder" then Click "New" and "New Media"
* * 3. Click "Browse" to find the Image files
4. Input file Name as Image 1 and set the Duration as 6 seconds for each image file
5. Click "Save", so you can see the file uploaded on left side - tree view panel.
U'di
6. Repeat the steps for uploading the video and Flash file.
ii
Note: The image files (BMP, JPG, etc) should be put under Image category,
Multimedia files (SWF, MPG, AVI, URL, PPT etc) should be put under the Multimedia
category. If you placed files in the wrong category, the files won't be displayed .
Batch Upload Media
. Jtowftai|(Lfcto*3~
Web
\
Hi'i-r
\ S M
r*i*v*A*
Q
£*Mcn
■id"iill»iiii>^>iii
lUlfiJ
&***>
w*00r Con*»ot U*n*g*f ftju* upioto
G37J®
fdo»S*ft«r
Luift*
~ _P_
asu
» a.
mi
- .a
BE
- a
r^n
1. Select any Folder of Media
2. Click "Batch Upload" Then pop a Windows
3. Click "Browse" to find the Image files
4. You can Change the Folder for your Upload Media
Create a Ticker
» ■ * UtaT W**»*» O ^ * *
-
*
***<*
* P r r m V ****** *Wi*«
iy(*
T*rt
v |
o
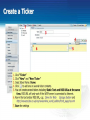
1. Click "Ticker"
2. Click "New" and "New Ticker"
3. Input ticker Name: Demo
4. Click
to add one or several ticker contents.
5. You can create several tickers including Static Text and RSS URLs at the same
time. RSS URL will only work if the WCM server is connected to Internet
6. Key-in the text and/or RSS URL, e.g.: Demo for Web Signage System and
http://newsrss. bbc, co. uk/rss/newsonline_ world_ edition/front_page/rss. xml
7. Save the settings
»
Edit Template and Playlist
Create a Template
Add in Ticker Zone
Web
3ODQLIJB0
SOW
Mow lent
Ol
Tv»« 7 a u ?
z-OnUr
' Ttftar Z<y* 2
f kfct-r / o n * I
T*Ch#fZOO«AttnBu» -■-
TfdW&Ml
l^QMcm
6
Pit—gi* 4>t# PU>*tf Pm4»y-
■
SSQCs
2
font Anat
r«MCtfer
spMtf Meovm
O
Ceil
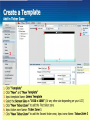
1. Click "Template"
2. Click "New" and "New Template"
3. Input template Name: Demo Template
4. Select the Screen Size as "1920 x 1080" (Or any other size depending on your LCD)
5. Click "New Ticker Zone" to add the First ticker zone
6. Input ticker zone Name: Ticker Zone 1
7. Click "New Ticker Zone" to add the Second ticker zone, Input zone Name: Ticker Zone 2
Create a Template
Add Zones
Web
Altrttulc
Nnv/(»QDf
ror<*r
SQQ&
2
TtXfJowJ
s.
if*
4j
ill K J H - O -
*0«*4
I0n#3
EJ) '
Em 3
L- 0 000 %
* 74W *
r
74*29 %
13JM %
M * 0 M 0000
V
$000
*
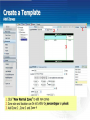
1. Click "New Normal Zone" to add new zones
2. Zone size and location can be set either by percentages or pixels,
3. Add Zone 2 , Zone 3 and Zone 4
rtta
ruiScrM^Zoot
Create a Template
Translucent Logo Function
Web
i d TtcnpUftt
MliH
'
'HimK
0*moT«rr^4li
Screen tiretfufcn 1970x1(40
v
Vnit f V t * *
TiC»»rZf'*:
19202*00*-U
Zttt2
U
ftntJ
tt**4
F ;*mf4**#
TK»»t ZOTit 1
2-Ofd#f
Zorv» Attrtfcut# <r*#
® Q E
Ikfl ■ EBTM :
T<tvZor**2
Z ~ .
ccnu*tfch«nQ»
1:0 000 S
J
J
£
20 202 %
*74W8\
* 92 999 *
rVW*7*929\
%
HSp*t«0 000 \
MScretnZor*
t-M^qht ;2 ; ^ \
i ^ 3 9 # L ^ 9 > D T R CC1 pig
*
r—3
ZOft« J
S
V Spmtv
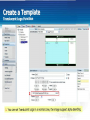
1. You can set Translucent Logo in a normal zone, the image support alpha blending.
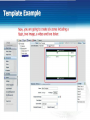
Now, you are going to create six zones including a
flash, two image, a video and two ticker.
KM
fjs«* QimA*
s**rc*
OMM*
0 - n o r impute
*
Efcj**
1
-fl ********
Vrt+nHiwftjtoK
1TCQ&1QH
v
IWt ^^»nt
Itl'J.I^ViJ
T*mpH1. Altnbut^.w
CfM**: m * * * * .
P M * 0 » t t | *****
|
1
lAflfCTMnZftftt
Create the Template
The Ticker Zone
»-
H i - ^^-*.
« «
»
M
*
-
^
^
W I ; M - I
CTT"
M
" —
"—
| . —
1.
2.
3.
4.
5.
.--.. »
Keep unit as "Percent"
Click "New Ticker Zone" to add a zone and name it as Ticker Zone 1
Set ticker zone attributes including color/ size/ direction/ speed/ background
Input position percentages for the demo zones: L: 0.00 R: 99.99 T: 93.00 B: 99.99
Repeat Produce 1~4 to Add Ticker Zone 2
The zone size and position can be set either by percentages or pixels. See
Appendix for more information.
BWHBf
_ .
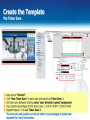
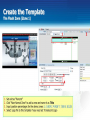
Create the Template
The Flash Zone (Zone 1)
T
I-Or^
"1M *
' *W
C 0
Mtf
E m4
ftntl
nit
|
d
u»
A«t T^L**
HI
1.
2.
3.
4.
PMviooa \
v-i*M«4iei %
Set unit as "Percent"
Click "New Normal Zone" to add a zone and name it as Title
Input position percentages for the demo zones: L: 0.00 R: 74.928 T: 7.00 B: 20.201
Select Logo file to this template if you need set Translucent Logo
tf&
©©GKi
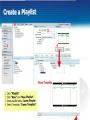
Create and preview your Playlist
Create a Play list
Mrt
******
r
PU,H*t
.
■ ■
D*nePWtf
PlILPtlW
in)
**i
r-*fc
' ■ ■ ' * *
1
***•
Demo Template
-'
rarr
J—i
*~<
1. Click "Playlist"
2. Click "New" and "New Playlist"
3. Input playlist Name: Demo Playlist
4. Select Template: "Demo Template*
A
Create a Playlist
' L-eiZ'^t:
DMMI
2mta
BMW.
UW*"^MI»»W
■ ^TVfM
Demo Template
"^
1 1
-a ".
-'
*-«
1. Click "Playlist"
2. Click "New" and "New Playlist"
3. Input playlist Name: Demo Playlist
4. Select Template: "Demo Template"
5. Click "Save"
r~»mns=n
Create a Playlist
Insert Media Files
T*mpUt# v*w
p i * i * * t --*
9MWM
p*i*»cfc itoO* RepeatmeaanipecfteOttTtt
T£«
l7flft* 3
S»J
£en* 4
<a
mufftf
MKM.
O
•>
lOOOtfi
M0O0O4O)
0000
»*>
1
oo»ftrt
*-* *—*—*—■—*—
use nggfg^nw
—*—*—*—*
oooocom
n
WW
DncrtpUon
*Dvr*ti«i
Io
* * ' t topwd lime
1. Click "Zone 3" the tab in lower panel
2. Select media file from tree view: Multimedia
3. Click 1 ^ * to add the fie to the zone
4> Save the settings
Repeat the process to add video and image files to another zones
f f*nuiLofi f Hecl/Dural
Create a Playlist
Insert Ticker
-4
Htt
•■■--" o»—
T#«plat» Vtttt
rc*DorcPt»ftof
a
h
1
MMtW
ituro □
lid*.
utc
now* ~
■3»
"te
f w 3
/on* 4
*
ini«BMtiiimw*wn.
r-
IKMf /I' .
1. Click the
tab in lower panel
2. Select Ticker file from tree view: Ticker
3. Click ; , ,., | to add the ticker file to Ticker Zone
4. Save une settings
lilDQEQti
Preview the Plavlist
£ ) D«l«l*
S*Jitt>
I- P i m m
'vPir*mi|i0r*f|
Web
9
;
I
Select r k y r i
<S CWnoofctfQI
e
5 Erfandt* moo* feme 1
Select Player
B
- MAft-A
hap//l01»20$l^mhin^k<t^rpcBv»»^k2«riip^s«>
T ^
■
/■'* )
E t f v t f t f mod* Mmo 2
0DT.ue7eUBCJ5NUE
zm
4
BWlVAILO
r- A#|**t
M M
n ■ t<<
" StftnUtng
)
S*tBng*
!
Soft<*«r*Upgr»on
togG*K»v.
Ant4
ncDoast*
i "
C2
«#mo01
C n Rsssec
■
d
Dc
Help
|
OK
h«p #10 1 9Q2Q81ftiataM» ^
1. After the Demo Playlist is created, click
Players
2. Select Players to Preview
]
Cancel
MR4W
J > 1 a windows will pop to show all Preview
Schedule and Publish playlist
Scheduling
i uv*s*vipm\
*>-:up«»>A
In*
w**
BSJQHESIM
—
01 « >
7
O
L *""
0J0O
«Mi
IflQttl
■I
II
0*00
■_■
»«o
»oo
•F«*
~ ~
*mmm
7
1
«
i
1. Click "Scheduling"
2. Select "Demo-A" group
j . Select "Demo Playlist"
4. Select today's date and a specific time slot on the
calendar, then insert the playlist by did
5. Click _ | to edit more schedule details
6. Set up Start time and Duration (You
can dick Whole Day to have the playlist
scheduled to play whole day.)
7. You can check the Recurrence check
box and add preferred recurrence settings
8. Apply the settings, then Close window
Publish the Schedule
me
i
JV**
o™t»
* n t i : i . v r : : * W - i > CSpol
3
^ ^
t 1*t
t ■IMS
CTTJ
ID 14033
FW1MV
SaeorwtipctUM
■ w
AHKHWMM
SUrtDol*-
2
l«dl»< f t *
s
SlOluv
COI—Wl
IBI
fr'53
■* t «
aa
-
■ ■
Cotmnt
4
3
1
*
IMP*
H*
|
ll
hftJioiwxei****»«n
MM
PrtpvttoPUftrt
■*v^ -.-*-.. .
5
BM»IOE&
, , ^_^_ — -..>,
C*M
tapd
.^,
_ „ „ _
T
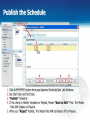
1. Click * App'W'p«»sh button then pop Approve Schedule/Spot List Windows
2. Set Start Date and End Date
3. "Publish" Schedule
4. If You Want to Modify Template or Playlist, Please "Back to Edit" First. The Media
Files Still Display on Players.
5. When you "Reject" Publish, The Media Files Will be Broken off on Players.
Publish Rule
Woo
3 AppiuvrSchHikC^Lm
i wm
AM**
0
flflti^
10I9G&
AppfQVfl StftKkft*
[§Appro*tSpotU«
i<1
SUrt Dote -
I
L nd Date
Stflta
*****
■ NMMI
'
Cwm
H.!;,
**uC**n
M
■.-,.;
Prtpirt to Ptftlth
,I||I»^IMWIHJIIIII^
e » »c toy
a w j i m a w moawHMPPfc^ a
R«FKt
Q m
i w
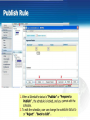
1. When a Schedule's status is "Publish" or "Prepare to
Publish", the schedule is locked, and you cannot edit the
schedule.
2. To edit the schedule, user can change the schedule status to
or "Reject" . "Back to Edit" .
Setting Default Playlist For
Group
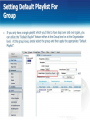
If you only have a single playlist which you'd like to have loop over and over again, you
can utilize the "Default Playlist" feature either at the Group level or at the Organization
level. At the group level, simply select the group and then apply the appropriate "Default
Playlist".
^ » w i
Web
Croup
SMTCftL ^ ^ ^ ^ ^ ^ ^ ^ ^ ^ ^ ^ ^ ^ ^ ^ ^ ^ ^ ^ ^ ^ ^ ^ ^ ^ M
<w-
AN0«Wtgr*M
/ - WitO-Ql
0**crlp»on:
Creator manager
prntfoQev
OHMPUytw
in'i e*l Scrsan:
$*•*»*
.1>laylf«1>mo P l a w - I
^ 0
Ticktf
KripUon
□ ai
DT4IZVJiCWJ3H
UTOMNCJ4I
w*p*p«r
v
tatatfjiftBMM
Group/DCM
OA
■
tfever
|
■
SttwSUbt
/
1
M
App. V t r i t O f t
C241
M*1u%
" *
S<h«tolr/S*K<
1 Oonnlojdcd
Congratulations!
You have learned how to quickly create
and manage your own
digital signage contents via WCM4.0
For more detailed information,
please read through our User Manual.
Appendix
Power Management Setting
Group Settings
Player Reboot / Remote Desktop Functions
Active Directory Support
Role/Privilege Management
Set Zone Attributes
Appendix - 1
Power Management Setting
Manage Power Settings for Your Signage Players
cAutgnn*^
* * Group
w% Hot A***7*d
■
:
U s * *
Croup
/
v
uo*
jRwn
£**itft
N-^wivhmtitt)
•r>ovp»«mr
06WO-A
DttcnpKrt
■
O H W f manage*
Prh—pre | OiMnw |
[ 0
T<k«
S c f t * M * Spot L » t
Summary
W*p»ptr
Sfto*»W*
Prvtaad UryanttJtti
3
I
SUrlup Tirrw
SOimr#Upgr**»
DUontoy
LOQC«tKK*i
ft la
□l
Uro»ntC4H
DFrM*f
lUrtupAt
VxiMo*nM
*
L*t**-m«A>pr
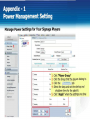
*" 1. Click "Player Group"
- 2. Click the Group that the players belong to
3. Click the
tab
4. Select the days and set the startup and
shutdown time for the players.
' 5. Click "Apply" when the settings are done
HO)
Accounl U 4 f t * g # n * n t
inuttwrnUm*
■(,-
Appendix - 2
Group Settings
Group Settings for Your Signage Players
^AM*»Kl>*
Web
.- m « «««
~v*m«<m 1
E3***
*«tft
, * W
Group - - * ■ ^*a
Ammonia
"Ijroupi
DBIM
■ man*}*'
E4pft$«rv*r
PTN*«grt
4
C«(*«tn«iM
ScftMtoiettUtt
^4«A?* 1
Turn o« S e w n : M e « r
3
Stfm»Y
4^0
b
W*p*p*r
V
4~
-
/
-
Pitmtfun}w*C«it
P ma ff.v^«j<*iit^T
■
f*n#
1. Click "Player Group"
2. Click the Group that the players belong to
3. You can choose a playlist as your default
C
a
G
H
M
■p
a
D
»
U**r
V**>?*m Tim*
M
playllst
A. You can choose an image as the default
wallpaper.
5. Schedule/Spot List: You can select
schedule/Summary/All to show the status
of Player and Scheduling
Appendix - 3
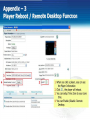
Player Reboot / Remote Desktop Funcuor
3
FUr*r ItfoiBabuft
*1rtHJ>
iqt«j)
P l i f t r information r** ■
•Pi»»*rr*#m*r 0T-MZVJVCWJ3HRT
intpvnot 2oiO*g§-34 00J*JJ
DMcnpMR
St«tu* Rwnng
Pm*«0»*: |_3WQ* i
l > r m w d $ » w .any.
lO 12)
l i t e r * * N O T * DT44ZVACWJJMRT
l«f«*o(»024«7M)
OSVtftOft 5*3000 J W _ 100703. W;UP,4 0,10*241
IP*-*****
flttSVcwn
10 t M 53
UACAd*M«: 0 0 » F 6 2C^A7E4
M
Apt> Vo'MOn; 4 00 09u*»0 10*241
itOM^O 01 M
Pautl I W I M : tJOfl*
3
Tmzon*
WWrTim«20l(K»»24CO3**2 g )
lOMTOiOOiPKiAcTmt^SiCinM*
(j
Currant Downl
*#mo*# D»*ftlop 0*tJCJ<o I
tfl
2
En*W#
(Or
w
P*bU*h*4 I lr-it
*Utui
C Sch#o\jl« from 2010-OtO) to 2010-0$ 23
3010-0*34 00 1933
Z UWJ4 from » t 0 - 0 # - 2 4 W 2QIQ-QM4
»I«M4003J40
«**"'1 [
1. When you click a player, you can see
the Player Information
2. Click i l l ] , the player will reboot
3. You can setup Time Zone to your zone
time.
4. You can Enable /Disable Remote
Desktop-
Appendix - 4
Active Directory Support
Ertffprrf * Edtoon
V«won: 4.0(107051)
WebContent
|.WX>M^
o*o»nrtk«
Manager
| nij'Ti
MmmtHrmon
I L °*"
Cfungt Pmword
1. Login WCM 4.0 by administrator account
(A r#io*ut>on of I ISO X 1024 or t v g h * «t r « o m r t t # n *
Appendix - 4
Active Directory Support
*****
&5mu*uo*m«nt
QDittcc
Swcn
* * * in»onnatM>ft.T—*I U I I ^ ■ ■ H
DHOMME
0%:
BpCaii
1 n*m»tt«J-*X
kccount SVMM I f p r
v
v
\MnOOw* A<tw* 0*r» <tof> Account System
WTCQT Ccmmnt U* ^aggf Account System
3
HfeHHH
•Port
*OonMnManw
ftfUNMM
■ O w n Account
4
3C9
•StottmOtrfeta
Brow**
c*-» ■*■«■■
l i ^ a ■* . w 9 * 4 n r * w »■*■>■ ■**• o* t-*> * * T** m «
Csnw: OffWf PfWOW
EnoWi
BMK **»*■
I
1
*
1. Login WCM 4.0 by administrator account.
2. Select Site Management
3. Account System Type : "Windows Active
i ■
Directory Account System'
4. Domain Name :
Domain Account:
Password :
Site Manager Role :
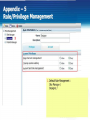
Appendix - 5
Role/Privilege Management
*
ftatt Ujn*p*m*frt
Rol# Information ■■
'Ham*: S*e Manage
* * Owgntr
- PuMttn liana?*
De*cnp%oo:
PiMffQn
ACCOWtf
CdOt S4rv«r* manjfl*mtnt
©W)W
OOtfly
C h a n g * s y s t e m setting
©*liow
Ootn*
Account a n d toJe m a n a g e m e n t
©*Jlow
O0w>y
■ ^vt ■
IOQG**CMI
ACCOM Uanaomcitf
UnaMCa*
1. Default Role Management;
Site Manager/
Appendix - 5
Role/Privilege Management
New
J Save
# Delete
Role Management
- Site Manager
asma 2
-
Publish Manager
Role Information tTh#Mn<jie*t»ti*quM«fi«i0i}
*Name: Designer
Descnption:
Pnvileges
Account
General Privileges
Ed(je Servers management
O Allow
©Deny
Change system setting
O Allow
©Deny
Account and role management
O Allow
©Deny
1. Default Role Management;
Site Manager /
Designer /
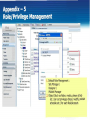
Appendix - 5
Role/Privilege Management
Mow
B*lCAUpK«0
U
S
M
!1J|SW»A*
Q Detoto
Folder t w w *
.■ mn
«r**sti
-Fo*de< I
* tftAuOO
S 4 j iMmeaa
cm 3pnviirp»" jrana
PrMtogJr
'■ ^ i
ralodtmo
* rfl ClOCK
101W30
P r i v i l e g e Setting
• *\ nun
E3
*W720P
S**cA
-
-tf
: .-*=«*
.-
rUme *
Q
ANY ROUE
720*430ffl
*
PuWisn Manage*
Ba*n*n*P
U 720i4*0mp{
U BaOtijn-Dai
U mpeg02mp^
D
ODeny
14
Pffl02.mil
TflMtPtffl
U TabMDrm*
U Usr>*<j*oaf*d
m
D
13
Tat>WQ*m
Acton*
U fUsh ti0«o O r t d
©Deny
2&
FuHCc***
"MM
* O
0Deny
U TjbWO«iwWe©_
Rfaiim«*d*o
Re«
>'<JTVTun«f
JS!L
Urgent C t t t
)'Al
1 '1
<■.:■
1, Default Role Management:
Site Manager /
Designer /
Publish Manager
2. Object (Such as folder, media, player group
etc.) can set privileges (Read, modify, publish
schedule etc-) for each Role/Account-
H
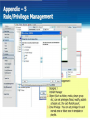
Appendix - 5
Role/Privilege Management
' ^
£ « * ■
'ii*—**
g o —
Uft^h
>■ TlMUII
tHV>'<m
3 / « w tiiYiv^f
V
ttfpW*-
0
to
Mfltta
m x
I M rrt»« « * c < * m Md *M to tr* ntf*
Mi
TH» N t t t Md #tt«WPtl CM • « UMAMCMT
1 - ; : ;
( 1 * Pubfcih Manage*
D A w o
■ : Ammg*
©&
ZOAal
OK
*
a3R MtMoiwgom
Q
nagement
fr^»j««HKWPMgl
TV T u n *
i_-»
MHOI»30(
i
Designer /
Publish Manager
Object {Such as folder, media, player group
etc.) can set privileges (Read, modify, publish
schedule etc.) for each Role/Account.
Zone Privilege : You can set privilege for each
normal zone or ticker zone in template or
playlist
Appendix - 6
Set Zone Attributes
Adjust Zone Size/Location
Arrange your layout by learning to count
each zone position by percentage or pixel
Zon» A t t n b u f TT***
>r—nmMimi^
Di
• H * m * Zo<w3|
IMII«Ils3H@Sl
u
000
%
T: o 00
S
* 16 66
ft
2219
Flash
%
r Wkrth: 16 67
%
S u »*9ftt 22 20
video
ZOH# A t t M b U t t (Th*-«*»<»••» r*0u**4**l<* )
n Mute
• I t a n t : Zoo#2
SlillHSSS]
T: 192
P«rf*
ft
576
pwtlt
MS 11 1 684
pueffl
u H*tght 385
putf*
Ticket Zone
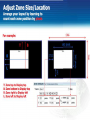
Adjust Zone Size and Location
Arrange your layout by learning to
count each zone position by parzzn'&ii'd
For example:
1366
c
Co
273.2 / 1366 = 20%
192 / 768 = 25%
T: Zone top t o Display top
B: Zone bottom t o Display top
R: Zone right t o Display left
L: Zone left t o Display left
Zone Attribute n*** indioaMiraquiMfMoi)
683/1366 = 50%
384 / 768 = 50%
• Name: Zoni
raHU Hi]S@[H
l : 20 00 %
R: 70 00 %
lr
WWOI: 50 01
T: 25 00
ft 75 00 %
t
Httflht 50 01 %
*
*
Adjust Zone Size/Location
Arrange your layout by learning to
count each zone position by p j j i a k
For example:
1366
^^^^^^^■■IF^^^^^I
3
CO
T: Zone
B: Zone
R: Zone
L: Zone
t o p t o Display top
bottom to Display t o p
right t o Display left
left to Display left
Zone Attribute i i N ' ^ a t M f w u ^ w * )
-Name: Zone2
Mute
■^273
T: 192
pixels
R: 956
pixels
r
WMth: 6ft4
plxetS
& 576
pixets
u HWJht 385
pixels
I-TECH
J
CDMPANYJ
THANK YOU!
Please contact our technical support team for further questions
i-Tech C o m p a n y LLC
infoSiiechlcd.com
(888)483-2418
www.ifechlcd.com