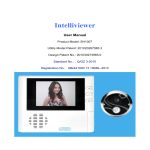
1
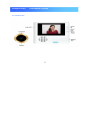
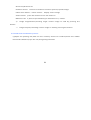
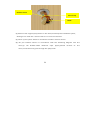
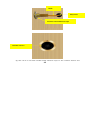
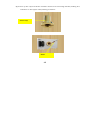
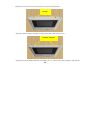
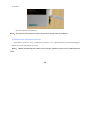
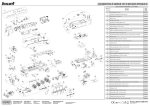
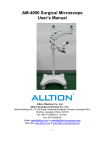
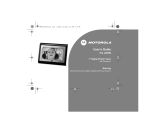
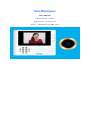
Intelliviewer
User Manual
Product Model:SH1010
Standard No.: Q /GZ 3-2010
ICP No.: QB/441900 13 10086--2010
Catalogue
Chapter one
Product introduction
1.1 Packing and accesories
1.2 Product design
1.3 Product features and functions
Chapter Two
Installation Process
2.1 Intelliviewer structure
2.2 Intelliviewer installation guide
Chapter Three
Chapter Four
Intelliviewer FAQ(Frequently asked questions)
Problems and solutions、notes
Notes:Please read user manual carefully before use,and keeping it for later reference.
2
Chapter One
Product Introduction
1.1 Packing and accessories
(1) 1 Unit Video host device for indoor
(2) 1Unit Video auxiliary device for outdoor(FPCB and connector included)
(3) 1 unit Host device mounting bracket.
(4) 1 pc screw cap
(5) 2pcs of screw
(6) 2pcs screw rubber stopper
(7) 3pcs AAA batteries
(8) Quality Warranty card
(9) One unit Cross-shaped screwdriver
(10) Product user manual
Pls contact us or our distributors if any accessories listed above less to ensure your
benefits.
3
1.2 Product Design
1.3 Products charaters and functions
Intelliviewer is a new product with visual camera-peep hole,it adopts digital chips
with newest technology,by its special connection way,the installation and usage are easy
under the premise without destroying the existing door structure. It’s a real practical
high-tech home security products.
4
Products features and functions:
(1) 2.8 inch LCD screen
(2) Nice design,multi-colors for option.
(3) Easy operation and installation,no need wiring.
(4) Indoor host device monitors outdoor dynamic directly.
(5) Radiationless and low power dissipation.
(6) 3X digital zoom
(7) High definition of 0.3Mega
(8) Automatically energy-saving mode
Product specifications:
Device
Indoor device size
109mm*96mm*16.5mm
information
Outdoor device size
Φ30mm*30mm
Switching board
82.3mm*51.5mm*9.3mm
Outdoor device
Adaptive environmental
environmental illumination
illumination
Within 20 lux~3500 lux
5
Indoor camera image solution
Camera
Image solution
information
(centre level)no less than 200
TVL(800 lux)。
0.3Mega
Camera solution
Width 640, Height: 480
Diagonal:129.5+/-5 degree;
Camera view angle
Horizontal:102+/-4 degree;
Vertical: 70+/-3 degree
Zooming
Display
Display Type
3X digital zoom
240(R+G+B)*320 Dots
2.8inch a-siTFT LCD screen
LCD Type
(no TP)
Viewing Direction
Backlight
6 O”colock
4LED white color
6
Chapter two
Installation guide
2.1 intelliviewer
7
Structures/buttons list
Outdoor device:camera surveillance outdoor dynamic,uptake image.
Indoor host device:watch visitors、display vistors image
Video switch:press the button to turn the video on
Batteries cell:a place to put batteries,pls attention its+/- makes.
┼:Image magnification,showing larger visitors image on LCD by pressing the
button.
—:image compact,shrinking visitors image on LCD by pressing the button.
2.2 Intelliviewr installation process
(1)Open the packing box,take out the auxiliary device for outdoor,throw the rubber
band of the FPCB out,spin the nut,and gently pull FPCB.
8
Rubber band
Screw cap
FPCB
(2) Remove the original peep holes on the door,and fixup the installation place,
drilling a hoe with dia 1.5mm if there is no hole on the door.
(3) Clean up the place where to install the outdoor camera device.
(4) Pls put outdoor device in accordance with the following diagram into the
door,rip off double-sided adhesive tape paper,posted vertical to the
door,connection line goes through the peep hole.
9
FPCB
Peep hole
Double-sided adhesive tape
Outdoor device
(5) Get rid of 6 anti-slide double-sided adhesive tape on the outdoor device and
10
switching board,and mounting the bracket for host device setting on the inside
door,showing as below:
Screw cap
bracket
Anti-slide
double-sided
Anti-slide
adhesive tape
double-sided
adhesive tape
11
(6) Screw up the cap and fasten outdoor device and mounting bracket,making the
indicator on the upper side,showing as below:
Screw cap
FPCB
12
(7) Buckle connectors indoor bracket and outdoor device(as FPCB containing
dedicated circuit,pls attention its intensity when fastening connector,to avoid
too much force to demage FPCB or connectors)
Mounting bracket
connector
FPC connector
Note:
Before seperating indoor bracket and outdoor devic,pls do not rotate outdoor
device,indoor host device or indoor bracket,as the circuitry problem is out of warranty.
(8)Pls keep indoor host device connector and bracket connector aligning,and fasten
indoor host device.
13
Indoor connector
Anti-slide
Anti-slide
Indoor device
double-sides tape
14
double-sides tape
(9)Screw up the indoor host device and mounting bracket.
Screw
(10) Use white rubber stooper to plug the holes with two screws.
Rubber stopper
(11)Pls put three AAA batteries according to +/- marks into the batteries cell,shows
15
as below:
(12) Installation completion。
Note:Pls remove the protective layer to get clear image after installation.
2.3 Intelliviewer demolition preocess
Demolition process and installation process are opposite,when disassembling,pls
follow reversal installation process.
Notes:When demoliting the indoor host unit,pls parallel to pull it out with balanced
force.
16
Chapter three Intelliviewer FAQ
1.How long will the image show after turn on video power?
A: around 4 sed.Cause system need to be started.
2.how long will the device turn off automatically,entering standby mode when
intelliviewer is under working mode?
A: 40s. Later it would turn off automatically,entering standby,to save energy.
3.How long can 3pcs AAA batteries last?
A: It can last for 5 months for video(5times/day,40s/time)
4. Why is the image not clear enough?
A: Pls get rid of LCD protective layer.
5.What is approximate door thickness for proper work of the intelliviewer?
A: Door thickness around 35mm ~ 55mm,65~85mm,85~105mm would be ok。
6.What is the problem if the image is tilted after installation?
A: When installation,there is direction indicator on the outdoor phone,adjusting slightly
until the image displays correctly.
17
Chapter four Problems and Solutions and Precautions
1.
Pls do not take sharp objects to touch indoor phone LCD to avoid any scratches.
2.
Pls pay attention to the +/- of AAA batteries,and use the right installation way.
3.
The noise would probably be louder after image maginification,it’s normal
4.
Pls press video power button when using it, then press talking power button after
phenomenon.
image shows.
5.
Pls follow above stated steps to operate.
6.
Pls do not rotate both indoor/outdoor device at ramdon to avoid any connection
problem
7.
Pls turn off the video monitor by pressing “video power button” after using it every
time to extend battery life.
8.
If the indicator light does not show or no image on the LCD screen after turn on the
monitor,pls check if bad batteries connection,pls replace new batteries if not.
9.
Pls replace all the used-up batteries to ensure work life.
10. Pls do not throw batteries to pollute environment.
11. To provent disconduct,pls note below before usage:
Please do not expose the products under sunshine directly.
18
Please do not heated,such as space heater,heat sink and heated lamp
Please do not expose to strong dry,such as central heating vents.
Remark:products photos are for reference only
19
20