1
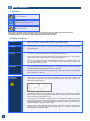
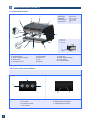
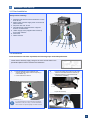
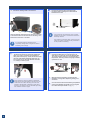
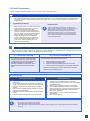
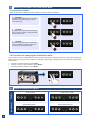
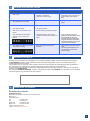
User Manual
Before operating this equipment, read the instructions for
usage and connection.
Ruby2
08548600
Manufacturer of coffee machines since 1952
Ver.27-09/2012
WARNING
RISK OF FIRE OR ELECTRIC SHOCK
DO NOT OPEN
!
WARNING. TO REDUCE THE RISK OF FIRE OR ELECTRIC SHOCK.
DO DOT REMOVE COVER (OR BACK)
NO USER – SERVICEABLE PARTS INSIDE
REPAIR SHOULD BE DONE BY AUTHORIZED SERVICE PERSONNEL ONLY
0.
Index
1. Safety indications
2
1.1 Symbols . . . . . . . . . . . . . . . . . . . . . . . . . . . . . . . . . . . . . . . . . . . . . . . . . 2
1.2 Safety indications . . . . . . . . . . . . . . . . . . . . . . . . . . . . . . . . . . . . . . . . . . 2 - 3
2. Descripción general Ruby 2
4
2.1 General Overview. . . . . . . . . . . . . . . . . . . . . . . . . . . . . . . . . . . . . . . . . . 4
2.2 Product Selection Buttons . . . . . . . . . . . . . . . . . . . . . . . . . . . . . . . . . . . 4
3. Installación and Start-up
5
3.1 Prior to Installation . . . . . . . . . . . . . . . . . . . . . . . . . . . . . . . . . . . . . . . . . 5
3.2 Installación . . . . . . . . . . . . . . . . . . . . . . . . . . . . . . . . . . . . . . . . . . . . . . . 5-6
3.3 Dose Programming. . . . . . . . . . . . . . . . . . . . . . . . . . . . . . . . . . . . . . . . . 7
4. Cleaning and Daily Care
7
4.1 External Cleaning. . . . . . . . . . . . . . . . . . . . . . . . . . . . . . . . . . . . . . . . . . 7
4.2 Cleaning of Parts . . . . . . . . . . . . . . . . . . . . . . . . . . . . . . . . . . . . . . . . . . 7
4.3 Daily Care. . . . . . . . . . . . . . . . . . . . . . . . . . . . . . . . . . . . . . . . . . . . . . . . 7
5. Selecting Pushbutton LED Illumination Mode
8
5.1 Illumination Modes . . . . . . . . . . . . . . . . . . . . . . . . . . . . . . . . . . . . . . . . . 8
5.2 Procedure for Changing Illumination mode. . . . . . . . . . . . . . . . . . . . . . . 8
6. Warning Signals
8
7. Incidents and Possible Causes
9
8. Guarantee conditions
9
9. Contact Information
9
1
1.
Safety Indications
1.1 Symbols
!
WARNING
May cause injuries.
i
INFORMATION
Important or useful information.
RISK OF FIRE OR ELECTRIC SHOCK
May cause injuries.
We ask you to carefully read this instruction manual before operating your new coffee machine for the first time.
Keep these instructions in a safe place where you can consult them when necessary.
The inappropriate use of this machine exempts Quality Espresso from any liability.
1.2 Safety indications
Installation
•
The machine should only be installed by authorized technical personnel. The manufacturer
declines any liability for possible injuries caused by inappropriate installation.
Transport
•
The use of gloves and a minimum of two people is recommended to manually move the machine
to its installation site.
Storage
•
The machine should be stored in areas with a temperature higher than 5º C.
•
In the event of storage or transport of the machine in temperatures lower than 0º C, and in order to
prevent freezing, the machine’s hydraulic circuit should be emptied first.
•
In the event of freezing, the machine should be placed in an area with a temperature higher than
10º C to wait for unfreezing. Under no circumstances should the machine be connected to the
electrical circuit before it is unfrozen.
•
It is recommended that the machine be installed in a spacious area, free of air currents and with a
solid base. Avoid installing the machine on a wet or hot surface.
•
Regulate the height of the machine with the support legs. Maximum inclination cannot be greater
than 1º between any of its axes.
•
Check that all of the electrical connection characteristics comply with the voltage, frequency and
wattage indications described on the machine’s specification plate. This plate is located on the
chassis under the drainage tray.
•
We consider the machine to be installed correctly when it has been connected to a magnetothermic omnipolar circuit breaker appropriate to the machine’s power, along with a differential that
does not exceed a residual current of 30 mA.
•
The machine must be installed in accordance with the current electrical regulations of your area.
You must make ensure that the electrical installation is reliably grounded in accordance with the
aforementioned regulations. The company declines any liability for possible injuries caused by a
defective installation or incorrect ground connection.
•
Extension cords or outlet adapters of any kind should not be used to connect the machine to the
power supply. The connection cable should never be rolled up, but instead it should be fully
extended to avoid possible overheating.
Placement
Electrical
Connection
2
Manipulation
!
- Any internal manipulation of the machine, except that which is specifically described in this manual
regarding cleaning processes, must be performed by an authorized service technician.
- Cleaning and preventive maintenance according to the frequency indicated for the machine or service
technician is required. The manufacturer declines any responsibility for possible damage to the
machine due to non-compliance with these requirements, as well as damage due to the incorrect or
inappropriate use of the machine.
- All machine components, including the connection cable, should only be replaced by original parts
supplied by the authorized service technician or the manufacturer.
- Before proceeding with any maintenance operations, disconnect the machine from the electrical supply
either through the mains general switch or by disconnecting the power cable.
•
Install the machine on a solid base.
•
The machine should be used exclusively by adults. Children do not recognize the
dangers associated with machines, hence it should be kept out of their reach or
they should be prevented from using it. People with physical or sensory disabilities
or decreased mental capacity, or people without experience should not use this
machine without the supervision of staff qualified for that purpose.
•
Do not use this machine outdoors unless it is protected from the external elements
(wind, rain, fog, etc.)
•
The equipment should not be exposed to running water or steam.
•
Do not touch the machine with wet, moist or bare feet, or with moist or wet hands.
•
The machine cannot be used for products other than those described in this manual.
•
Avoid possible burns by not touching the outlets before, during or after serving a
product.
Be careful with the containers used to serve the products (cups, jars, glasses, etc.)
because they may be hot.
•
Do not pour water or insert wet containers into the upper part of the machine. The
water may filter through the ventilation orifices and cause damage to the machine or
the people using it.
Consejos importantes
!
!
!
!
3
General Description of Ruby 2
2.
2.1 General Overview
Water Supply:
Water Pump:
Element Wattage:
4
2
1
3
Main Water Net
Pump Rot. 8-9 bar.
2.500 W (230 V)
1.500 W (115 V)
6,5 L.
Boiler Capacity:
12
5
11
10
A = 367 mm
B = 567 mm
C = 511 mm
6
A
9
8
7
B
C
1 - Hot Water knob
2 - Product Selection Buttons
3 - Steam Knob
4 - Cup Warmer Tray
5 - Power Switch
6 - Steam Arm
7 - Feet
8 - Drip tray
9 - Drain Tray
10 - Boiler Pressure Gauge
11 - Filter Holder
12 - Hot water Outlet
2.2 Product Selection Buttons
b
a
c
d
a - On Coffee
b - Continuous Coffee
c - Two Coffees
4
f
d - Boiler Water Level indicator
f - Heating Element Indicator
Installation and Start-up
3.
3.1 Prior Installation
Verify before Installing:
1. Drainage tube with an interior diameter no less
than 35 mm.
2. Mains water network supply tube connected to
water softener.
3. Stopcock with 3/8” G exit.
4. Grounded plug protected with a magnetothermic circuit breaker.
5. Water supply tube (supplied with machine)
from water softener.
6. Drain tube
7. Water softener
4
2
1
6
1
4
5
2
7
3
3.2 Installation
Once the machine has been unpacked, the following steps should be performed:
Check that the electricity supply voltage is the same as that listed on the
specification plate and in the machine’s documentation.
1
• Place the machine on the workbench and
connect the wáter supply from the stopcock (1) ,
to the softener (2).
• Let the wáter flow to clean it.
• Connect the water supply tube from the outlet
softener to the water inlet of the machine (3).
• Open the stopcock (1) and check that the
connection is not leaking.
2
4
2
3
1
1
• Open the steam tap.
2
i
It is recommended to use water with a hardness
between 5-8 dHº (8-14 fHº), to avoid calcification
and to obtain an optimal quiality of coffee and tea.
5
Connect the drainage tube to the machine
3
Lead the drainage tube through the opening at the base
of the machine and connect the tube to the fitting. Then,
lead the end of the tube to the drain.
i
i
6
7
i
6
If the control box does not detect an adequate
water level in the boiler within 6 minutes, the onecoffee and two-coffee LED keys plus the level
indicator LED will blink, indicating a water level
warning. This warning can be cancelled by turning
the machine off and on again.
You should not use extension cords or outlet
adapters of any kind to connect the machine to
electricity network.
The network connection cable, should never be
rolled up; instead, it should be fully extended to
avoid possible overheating.
.
It is important that the drainage tube is
completely straight with no angles in order to
facilitate good drainage.
Press the main power switch.
At start-up the electronic control box detects that
there is no water in the boiler and activates the
filling valve and the pump. These remain active until
the level probe detects adequate water level. As
soon as this occurs, the boiler element will switch
on, heating the entire system.
5
Connect the machine plug to the appropriate
connection base according the current electrical
standards of the area.
4
8
Place the filter holder in the group head, press the
continuous coffee button to purge the group, let
water flow for 30 seconds. Then wait approximalety
15 minutes until the machine is at normal working
temperature, observing whether the gauge indicates
a pressure of 1 bar.
While the machine is heating, proceed with the
installation of the grinder. Adjust the grinding point
and doses.
Once the machine has reached working temperature
and we have adjusted the grinder, we can program
the coffee doses (see section 3.3, pg. 7)
3.3 Dose Programming
• We can program the amount of coffee one the one-coffee and two-coffee pushbuttons.
Enter Program mode:
1
•
With the machine turned off, hold down the continuous coffee button. Turn on the machine and wait 4 seconds with the
continuous coffee key pressed until the selection button lights turn off. Only the one-coffee and two coffee buttons are
programmable.
Programming the Amount
2
Flowmeter alarm
a.
b.
c.
i
If we are programming the amount of coffee for one
coffee and two coffees and more than 15 seconds go by
without detecting counter impulses, the flowmeter
warning will be activate and the one-coffee and twocoffee keys will begin to blink. To turn off the blinking,
press any key, which will return you to programming
mode. If after trying again the warning signal appears,
call a service technician.
Cleaning and Daily Care
4.
•
Put the ground coffee or the capsule (according
to the model) in the filter holder for one or two
coffees and insert into the group head.
Press the one-coffee key of the left group for
more than 3 seconds until the coffee begins to
come out. When you have reached the desired
amount of coffee, press the same key again.
Repeat these steps on the two-coffee key.
To exit programming mode you must turn off
and turn on the machine again with the main
power switch. Doses of the first group are
copied to the second group.
Keep the machine in optimal conditions of cleanliness is a daily requirement for guaranteeing the necessary higiene and good
Quality of the final beverage, as well as a longer service life for the machine.
4.1 External Cleaning
Do not use any chemical or abrasive products
to clean the machine. Only use a cotton cloth
moistened with water. Pay special attention to
the pushbuttons and the areas related to
beverage preparation: the steam arm, the hot
water outlet and the filter holder and group
head.
4.2 Group Head Rinsing
Rinse the group head daily to maintain an optimal quality of coffee. To
clean the coffee holder, follow these instructions.
1.
2.
3.
4.
Put the blind filter in the filter holder.
Insert the filter holder into the part.
Press the continuous coffee key and wait 10 seconds.
Press the continuous key again to stop and wait 10 seconds.
Repeat this cleaning cycle 15 times, until the water comes out
clean thorough the discharge valve.
4.3 Daily care
At the beginning of the day
1.
Activate the group head for 20 seconds to urge the water
in the circuit.
Check that the water comes out through the shower in a
single, continuous stream. If it does not, clean it with the
blind filter. Replace the part and spout if the problem
persists.
Remove from the grinder dispense chamber any ground
coffee from the previous day.
Verify that the ground coffee dose and grinding point are
correct.
Prepare a coffee and verify that it comes out correctly.
2.
3.
4.
5.
1.
Limitar la cantidad
de end
caféof
a moler,
al consumo del
At the
the day
momento, ya que el café que queda molido de un día
1.
Limit the amount of coffee to be ground to single
servings since the ground coffee from one day should be
discarded the next.
Rinse the group head with the help of the blind filte.
Clean the filter and the filter holder with hot water and
hold it up to the light to make sure the filter holes are not
obstructed. Leave the filter holder in the group head
without over-tightening it.
Clean the steam arm with a damp cloth and purge it
several times.
Clean the drainage tray.
2.
3.
4.
5.
Practical Advice
i
-
Do not stack cups more than three cups high.
Avoid reheating milk. Heat in small amounts.
Before foaming milk, open the steam valve to purge it. Once the foaming is done, purge again and clean the tube with a
damp cloth.
7
Selecting Pushbutton LED Illumination Mode
5.
5.1 Illumination modes
We can choose between 3 different illumination modes for the product selection pushbuttons.
a. LED MODE 1
By default, all the pushbuttons are unlit. When
we press a button that key lights up and the
others remain unlit.
b. LED MODE 2
By default, all the pushbuttons are illuminated.
When a button is pressed, it remains illuminate
and the others turn off.
c. LED MODE 3
By default, all the pushbuttons are illuminated.
When a pushbutton is pressed, it will turn off
and the others will remain illuminated.
5.2 Procedure for changing the illumination mode
With the machine turned off, simultaneously press the one-coffee and continuous coffee keys of the group 1 (left). Without releasing the
buttons, press the mains power switch and wait for all tree lights to begin blinking, indicating that you have entered into the illumination
selection mode.
•
•
•
Press the one-coffee pushbutton to select “Mode1”.
Press the continuous coffee pushbutton to select “Mode 2”.
Press the two-coffee pushbutton to select “Mode 3”.
Indications
Alarms
6.
8
Alarm and Indication Signals
Flowmeter Alarm
Boiler Refilling Indicator
Boiler water level Alarm
Boiler Heating Element On
7.
Incidents and Possible causes
POSSIBLE CAUSES
SYMTOMS
COMMENTS
•
Noisy Pump
- Blocked pump.
- No water in the network.
- Obstruction in water supply.
- If the water has particles
suspended in it ori s too hard, you
should install a water softener
filter.
•
Slow dispensing, burnt coffee.
- Incorrect calibration of the pump.
- Check the pump pressure with a
gauge.
•
Slow dispensing.
- Grinding point too fine.
•
Burnt and cold coffee.
- Low pump pressure.
•
Dark cream, with a tendency to be
porous.
- Injector filter dirty, partially obstructed.
•
One coffee and two coffee lights
blinking, on any of both touchbuttons.
- Flowmeter does not work correctly.
- Coffee is excessively fine or there is no
water.
- If they are blinking and to know
whether it is due to the coffee, or due
to a lack of water or due to the
flowmeter, take out the filter holder
and press the Button, if the blinking
continues and water has come out, it
may be due to the flowmeter.
•
One coffee, two coffee keys and LED
level indicator blinking.
- Boiler water level alarm has been
activated.
- Check that the main water valve is
open.
- The warning will disappear once
the machine is turned off and
turned on again.
8.
Guarantee conditions
All components of the machine are guaranteed for 12 months (from installation) against any defect that affects correct operation.
The GUARANTEE exclusively covers replacement of parts with manufacturing defects. Under no circumstances does it imply
complete replacement of the machine.
This guarantee does not cover glass, rubber or plastic components or electrical parts that cause damage or affect the operation of
other components, due to fluctuations in the main voltage supply nor parts that are worn out by normal use.
Any machines that may have been manipulated by unauthorized personnel or those with indications of incorrect use, will forfeit all
conditions of this GUARRANTEE.
Only authorized TECHNICAL SERVICES, are able to offer guaranteed repairs using ORIGINAL parts. Any labour, travel and lodging
costs for the repair of any product are at the user’s expense.
9.
Información de contacto
Dirección de contacto
QualityEspresso S.A.
Fabricantes de máquinas de café espresso desde 1952
Motores, 1-9
08040 Barcelona
Tel.
+93 223 12 00
Fax
+93 223 20 17
Export Tel.
+34 933 946 305
Export Fax
+34 933 322 111
www.qualityespresso.net
e-mail: [email protected]
9