1
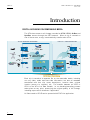
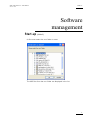
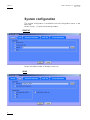
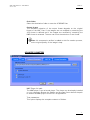
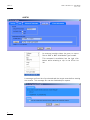
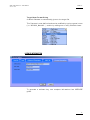
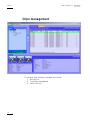
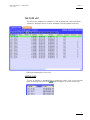
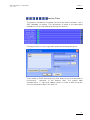
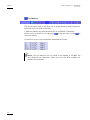
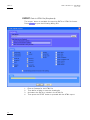
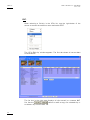
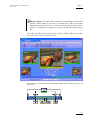
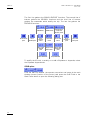
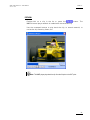
User's Manual - Version 1.01 - December 2006 Archive/Storage & Gateway Solutions www.evs.tv XFILE LITE Version 1.01 – User’s Manual Author: M. Lothaire Issue 1.0 Table of Contents Table of Contents .....................................................................................1 Introduction ...............................................................................................2 Configuration ............................................................................................3 Software installation .............................................................................................3 Software management.............................................................................5 Start-up (default) ..................................................................................................5 System configuration............................................................................................6 Clips management .............................................................................................10 DEFINING COLUMNS .......................................................................................12 FILTERS .............................................................................................................13 EXPORT Data to HTML file (Storyboard) ........................................................24 Folders ................................................................................................................28 Clip Info ...............................................................................................................30 Notes.......................................................................................................40 1 Issue 1.0 XFILE LITE Version 1.01 – User’s Manual Author: M. Lothaire Introduction DIGITAL ARCHIVING ON REMOVABLE MEDIA The XFile has access to all footage recorded on XT6U, XT4U, AirBox and SpotBox servers through the SDTI network. When a clip is created on one of the servers, a copy is automatically transferred to XFile. Each clip is saved as a separate file on the removable media, including not only video, audio and time code information, but also all metadata associated with that clip: name, descriptors, creation date, original location (server s/n, register), etc. The transfer between an XT6U or XT4U to the XFile is a data transfer, i.e. no decoding/encoding process takes place at any point, preserving the original quality of the footage, including super-motion character if applicable. All files saved to XFILE can be opened with XFILE Lite application. 2 Issue 1.0 XFILE LITE Version 1.01 – User’s Manual Author: M. Lothaire Configuration Software installation Run XFILE_Lite INSTALLER and then follow the steps of the Setup Wizard: 1. Accept the software license agreement; 2. Select the destination directory to install the new software; 3. Select the items to install: 3 Issue 1.0 XFILE LITE Version 1.01 – User’s Manual Author: M. Lothaire XFILE LITE XSecure Licensing Softwae MMEUniversalPlayer (for VGA preview). EVS Log collector. 4. Select the start menu folder to place the application’s shortcuts; 5. The last step of the process is the LOG_INSPECTOR installation. Press INSTALL to begin. 6. Then press QUIT for ending the installation process. The XFile lite installation is successfully completed and a XFILE lite shortcut is saved to your desktop. 4 Issue 1.0 XFILE LITE Version 1.01 – User’s Manual Author: M. Lothaire Software management Start-up (default) At first start select the root folder to scan: The MXf files from the root folder are displayed in the list. 5 Issue 1.0 XFILE LITE Version 1.01 – User’s Manual Author: M. Lothaire System configuration The system configuration is available from the Configuration menu in the Menu bar. Select Config… to open the following window: START UP Select the default folder to display at start-up GRAB 6 Issue 1.0 XFILE LITE Version 1.01 – User’s Manual Author: M. Lothaire Grab folder Select the destination folder to save the JPG/BMP files. Output format The automatic selection of the output format depends on the original format of the MXF files. If the images are not modified by stretching the JPG format is defined and if the images are modified by stretching the BMP format is selected. The user can force the selection of one format. Note: No compression artifact is added to this file creation process, so the original quality of the image is kept. ADVANCED PARAMETERS MME Player full path: The MME player is an universal player. The player can be already installed on your computer. Browse the folders and program files to define the path to access the MME player from XFile Lite application. Tree parameters: This option displays the complete contents of folders. 7 Issue 1.0 XFILE LITE Version 1.01 – User’s Manual Author: M. Lothaire AVID TM An external module allows the user to export files to OMF or MXF Avid Media Type formats. This command is available from the right click button while selecting a clip in the XFile Lite list. A message confirms the clip selected and the target name before starting the transfer. This message box can be disabled upon request. 8 XFILE LITE Version 1.01 – User’s Manual Author: M. Lothaire Issue 1.0 Target Name Format String A default filename is automatically given to the target file. This filename is user-defined and can be modified by typing a generic term (i.e.: WC2006_Match03…) and/or by adding one or many available items: LICENCE INFORMATION To generate a software key, see complete information from XSECURE guide. 9 Issue 1.0 XFILE LITE Version 1.01 – User’s Manual Author: M. Lothaire Clips management The Graphic user interface is divided into 3 areas: 1. the clips list 2. The folders management 3. and the file info 10 XFILE LITE Version 1.01 – User’s Manual Author: M. Lothaire Issue 1.0 THE CLIPS LIST The XFile Lite displays the contents of the selected path, the second tab ‘selection’ displays the list of clips selected (cut/copy/paste functions) Refining the selection in the List: SORTING CLIPS To sort a column in alphabetical or numerical order, click on the column and click again to invert the sorting. label to display the arrow icon 11 Issue 1.0 XFILE LITE Version 1.01 – User’s Manual Author: M. Lothaire DEFINING COLUMNS Use the right-click button of the mouse (into the list) to access this selection menu. All columns available are listed here. Select or unselect the item to be displayed or to be hidden. The Reset to Default option allows you to restore the standard display Note: Following the timecode and video systems, the timecode in the column is displayed with different characters: The duration for NTSC clips is always calculated on non-drop-frame basis. 12 Issue 1.0 XFILE LITE Version 1.01 – User’s Manual Author: M. Lothaire FILTERS The upper part of the XFILE list displays a list of icons. These icons give access to the different filters to be applied to the XFILE list. The filters are available in the four modes: Autobackup, Manual Backup, Restore and Maintenance modes. Filter inactive and hidden Filter is visible but inactive Filter is active : the RESET icon is present in all modes and resets all filters to default values (= ALL for most of filters) Click on the icon to display/hide the filter or use the right-click button of the mouse to access this selection menu. 13 Issue 1.0 XFILE LITE Version 1.01 – User’s Manual Author: M. Lothaire Creation date Note: The Creation date and the backup time are different values. The creation date depends on the date and time defined on your XT6U, XT4U, AirBox or SpotBox. Please check the date-time of your system before operating. ‘Last Hour’ and ‘Last Day’ are both quick shortcuts to display the clips created during the last hour or during the last 24 hours. A range of date-time can be defined to sort the clips creating during that period. Click on the ‘Range’ button to open the following dialog box: The ‘Creation date’ filter requires a date-time for the beginning and a date-time for the end to be valid. 1. In the calendar field select the month, and then select the day of the month. 2. In the time field select the hour, use the arrows to change the value displayed or directly type the value when the field lights green. 3. Press enter to confirm your selection. 4. Enter the second selection window to validate the values for the end 14 Issue 1.0 XFILE LITE Version 1.01 – User’s Manual Author: M. Lothaire limit. The filter is now active and the clips created in between the time range defined are displayed in the XFile list. Camera selection Select the squares representing the cameras and/or the PREFS cameras of the clips to be displayed in the XFile list. Selected cameras appear in a green square. Rating Select the squares representing the four levels of Rating. Selected items appear in a green square and the XFile list is refreshed to display the new selection of clips. 15 Issue 1.0 XFILE LITE Version 1.01 – User’s Manual Author: M. Lothaire Clipnames Clicking on the icon on the right side opens the following dialog box: 'Filter based on Prefix' allows defining a quick filter based on the first character or first-second-… character of a clipname. The system adds automatically a "*" sign while adding a prefix in order to mark the prefix out from the clipnames in the filter list. At start-up all clipnames assigned to the clips are extracted from the MXF files and are listed in the 'Filter based on existing Clipname' field. Select a clipname from the list and press 'Add' to fill out the filter list. Note 1: The number of clipnames/prefix in the list is restricted to 5 items. Note 2: The filter mode is not selectable In the Filter list, select an item and press ‘Remove selected’ to cancel the selection of this clipname. Press 'OK' to confirm your selection and to quit the dialog box. The new clipnames appear in the filter field. 16 Issue 1.0 XFILE LITE Version 1.01 – User’s Manual Author: M. Lothaire Keywords Clicking on the icon on the right side opens the following dialog box: 'Filter based on Prefix' allows defining a quick filter based on the first character or first-second-… character of a keyword. The system adds automatically a "*" sign while adding a prefix in order to mark the prefix out from the keywords in the filter list. At start-up all keywords assigned to the clips are extracted from the MXF files and are listed in the 'Filter based on existing Keyword' field. Select a keyword from the list and press 'Add' to fill out the filter list. Note: The number of keywords/prefix in the list is restricted to 5 items. In the filter mode field, select between the cross-selection mode (i.e. keyword 1 AND keyword2) and the global selection mode (i.e. Keyword 1 OR keyword 2) In the Filter list, select a keyword and press ‘Remove selected’ to cancel the selection of this keyword. Press 'OK' to confirm your selection and to quit the dialog box. The new keywords appear in the filter field. 17 Issue 1.0 XFILE LITE Version 1.01 – User’s Manual Author: M. Lothaire UmID Clicking on the icon on the right side opens the following dialog box: 'Filter based on Prefix' defines a quick filter based on the first character or first-second-… character of the UmID. The system adds automatically a "*" sign while adding a prefix in order to mark the prefix out from the UmID in the filter list. At start-up all keywords assigned to the clips are extracted from the MXF files and are listed in the 'Filter based on existing Keyword' field. Note: The list of existing UmID and the filter mode are not selectable. In the Filter list, select an UmID and press ‘Remove selected’ to cancel the selection of this UmID. Press 'OK' to confirm your selection and to quit the dialog box. The new UmID appear in the filter field 18 Issue 1.0 XFILE LITE Version 1.01 – User’s Manual Author: M. Lothaire Media / clips The MXF file is the file containing all data related to a common audio/video data. The first clip created with this A/V data is called the MasterClip and has the particularity to get the same code for the ID-material and for the IDlouth. All clips ensued from this masterclip, either by copy, or by update, or by modifying the short IN short OUT point are linked to the MXF file and a different ID-louth is defined for each them. Selecting ‘ALL’ in the MEDIA / CLIPS filter displays all the Clips. Selecting ‘MasterClip’ displays only the MasterClips Note: This filter is helpful when restoring clips in the studio, because it will only transfer the Original clips, and skip the copies. Selecting ‘Group’ displays both MasterClips and Clips linked by a “bracket” sign in the XFile list. 19 Issue 1.0 XFILE LITE Version 1.01 – User’s Manual Author: M. Lothaire Video Standards Select the squares representing the different video standards. Selected items appear in a green square and the XFile list is refreshed to display the new selection of clips. Video Codecs Select the squares representing the different video codecs. Selected items appear in a green square and the XFile list is refreshed to display the new selection of clips. Camera label Clicking on the icon on the right side opens the following dialog box: 'Filter based on Prefix' defines a quick filter based on the first character or first-second-… character of the Camera Label. The system adds automatically a "*" sign while adding a prefix in order to mark the prefix out from the Camera label in the filter list. 20 Issue 1.0 XFILE LITE Version 1.01 – User’s Manual Author: M. Lothaire Session Filters The session information is entered via the Config session window – tab 2 ‘MXF Metadata’ at startup. This information is saved to the descriptive metadata of all the clips backed up during the ‘session’. Clicking on the icon on the right side opens the following dialog box: 'Filter based on Prefix' defines a quick filter based on the first character or first-second-… character of the Session data. The system adds automatically a "*" sign while adding a prefix in order to mark the prefix out from the session data in the filter list. 21 Issue 1.0 XFILE LITE Version 1.01 – User’s Manual Author: M. Lothaire Clip Markers The clip markers allow to tag clips into a global selection and to keep this selection from one mode to another. 5 different markers are available and can be combined if necessary. to tag the clip or press Select a clip in the XFile list and press clear the marker. to In the XFile list the clips marked are displayed as follows: Note: The clip markers are not saved to the header of the MXF file and therefore are temporary. When you quit the XFile software all markers are removed. 22 XFILE LITE Version 1.01 – User’s Manual Author: M. Lothaire Issue 1.0 COUNTERS A counter of clips is available in all modes in the upper side of the list. The first value is the number of clips displayed in the list, the second value is the total amount of clips in memory (contents of path(s) + external folder + clips scheduled). The number of items in the different lists can affect the performance of the system. So it is advised to reduce the number of clips displayed in the lists. When the total amount of clips displayed in the list exceeds 2000 clips, the counter lights orange. When the total number of clips displayed in the list exceeds 4000 clips, the counter lights red. If the total number of clips exceeds 5000 clips, the refresh of the list stops and the counter displays + 5000+. 23 Issue 1.0 XFILE LITE Version 1.01 – User’s Manual Author: M. Lothaire EXPORT Data to HTML file (Storyboard) The ‘export’ button is available for exporting DATA to HTML file format. to open the following dialog box: Press 1. 2. 3. 4. 24 Enter a filename for the HTML file Then define a folder to save the thumbnails And select the DATA to include in the HTML file Then press the START button to proceed with the HTML export. Issue 1.0 XFILE LITE Version 1.01 – User’s Manual Author: M. Lothaire DELETE CLIP / DELETE FILE: As several clips are linked to a file the delete command has been split in 2 buttons: Delete File and Delete Clip: To mark the clips and the files out, it is advised to change the display to 'Group' in the ‘Media / Clips’ filter. The group of clips is represented with brackets in the XFile list. MULTI-SELECTION FOR DELETE FILE: 1. Press SHIFT or CTRL and select a batch of files from the XFile list 2. Press to open the following window: 3. This window allows the operator to review the files before deletion. Pay attention to the number of clips included in each file. Deleting the file will 25 Issue 1.0 XFILE LITE Version 1.01 – User’s Manual Author: M. Lothaire obviously delete all the clips included into this file. 4. Press ‘Delete All files’ to confirm the command or ‘Cancel’ to abort the operation. MULTI-SELECTION FOR DELETE CLIP: 1. Press SHIFT or CTRL and select a batch of clips from the XFile list to open the following window. This window allows the 2. Press operator to review the clips before deletion: 3. Press ‘Delete All Clips’ to confirm the command or ‘Cancel’ to abort the operation. 4. If one/several clips are the last clip into the MXF file, the following message notices the operator: 26 XFILE LITE Version 1.01 – User’s Manual Author: M. Lothaire Issue 1.0 5. Press ‘OK’ to close the message box and to switch to the 'Multi-Delete Files' window (shown on a red background) 6. Press 'Delete All files' to confirm the command or 'Cancel' to abort the operation. 27 Issue 1.0 XFILE LITE Version 1.01 – User’s Manual Author: M. Lothaire Folders The main screen displays the folders organization on the left part of the screen and the content of the selected folder on the right part of the screen. The root folder: 28 button opens the following dialog box in order to change the XFILE LITE Version 1.01 – User’s Manual Author: M. Lothaire Issue 1.0 In the folder list two additional functions has been added to ease the use of the folders list: Select a position in the folders tree to create a new folder then click on the ‘Create Folder’ button to open the following dialog box: Type the name of the new folder and press OK to validate. In the folder list, select a folder to delete and click on the ‘Delete Folder’ button. A message box requires a confirmation: 29 Issue 1.0 XFILE LITE Version 1.01 – User’s Manual Author: M. Lothaire Clip Info This area displays the current parameters and values saved to the descriptive metadata of the MXF file. The thumbnails: The thumbnails defined for each file are extracted from the MJPEG files. The first thumbnail shows the SHORT IN frame and the last is the SHORT OUT frame. The REF frame is automatically defined at the middle duration of the clip. The XFILE versions previous to the version 1.01.05 do not include the button to create new thumbnails thumbnails creation process. Use the or to update the current thumbnails. The thumbnail format respects the aspect ratio of the different video signals. SD clips are displayed with 4:3 aspect ratio. 16:9 SD clips are displayed with the usual black strips. 30 XFILE LITE Version 1.01 – User’s Manual Author: M. Lothaire Issue 1.0 HD clips are displayed with 16:9 aspect ratio. The Data: The MXF file is the file containing all data related to a common audio/video data. Different clips are therefore linked to the same MXF file. The first parameters (left area) display the common parameters, the A/V parameters given by the XNet: clip duration, TC IN and OUT excl., IDmaterial, creation date-time, the video standard and format, number of video signals (SLSM = 3), number of audio tracks, audio type and the number of clips included in this MXF file. The last parameters (right area) display the current values saved to the Session configuration window. These parameters are common for each clip. 31 Issue 1.0 XFILE LITE Version 1.01 – User’s Manual Author: M. Lothaire EDIT: When selecting a file/clip in the XFile list, use the right-button of the mouse to access the selection menu and select EDIT: The ‘XFile Edit clip’ window appears. The first tab shows all current data of selected file. The list box in the right area displays all clips saved in a common MXF buttons to make a copy of a selected clip or file. Use the to delete a clip into the MXF file. 32 XFILE LITE Version 1.01 – User’s Manual Author: M. Lothaire Issue 1.0 Important Note: The MXF doctor software is integrated to the Edit clip module. When editing a clip with a corrupted file index, the system automatically detects the error, notifies the user and starts the repair process. A progress bar appears in the file info tab while repairing the file. To modify shortIN and shortOUT points, to define a REF frame or to modify the aspect ratio, select the IN-OUT tab: The timeline in the bottom of the window allows you to search the clip in jog mode: 33 Issue 1.0 XFILE LITE Version 1.01 – User’s Manual Author: M. Lothaire The first line gathers the GRAB & EXPORT functions. The second line of buttons gathers the SEARCH functions and the third line of buttons gathers the commands which modify the clip. The last line gathers the PREVIEW functions: Go to File IN Go to point ShortIN point GRAB field GRAB frame Partial export of with new IN/OUT points Go to previous frame Go to REF frame Go to next frame Mark a new ShortIN point Define a new REF frame Mark a new ShortOUT point Start PREVIEW Go to ShortOUT point Go to File OUT point Stop PREVIEW To modify the ID louth, to modify or to add a ClipName or keywords, select the Clipname-keywords tab: GRAB option: From the Edit Clip module, the operator can select one image in the main window (current position of the cursor) and press the Grab Field or the Grab Frame button to open the following dialog box: 34 Issue 1.0 XFILE LITE Version 1.01 – User’s Manual Author: M. Lothaire File Select the filename and the destination folder to save the JPG/BMP files. Options: Stretch fi el d to fram e si ze Enabling this option will automatically stretch the ‘field image’ to the original ‘frame size’ Output form at The automatic selection of the output format depends on the previous option. If the images are not modified by stretching the JPG format is defined and if the images are modified by stretching the BMP format is selected. The user can force the selection of one format. Note: No compression artifact is added to this file creation process, so the original quality of the image is kept. EXPORT option: . A portion of clip can be extracted from its original clip and export to a different MXF file. In this case a different UmID is assigned to the new clip. When the shortIN and shortOUT points of the new clip are defined, press the Export button to open the following dialog box: 35 Issue 1.0 XFILE LITE Version 1.01 – User’s Manual Author: M. Lothaire File destination Select the filename and the destination folder to save the new MXF file. Options: Keep ori gi nal fi l e creati on date-ti m e Enabling this option will keep the creation date-time of the original clip even if the UmID is re-defined. Guardbands Define the duration of A/V material before and after the shortIN/ShortOUT points. Generate new Um I D Set this option to generate a new UmID for the new clip created. (default) Press the START button to create the new file. 36 XFILE LITE Version 1.01 – User’s Manual Author: M. Lothaire Issue 1.0 Select a clip in the list and then enter the new clipname or new keywords in the related field. The new clipname/keyword is updated in the upper list. Important note: All clips edited in the ‘XFile Edit Clip’ module are updated on the XFile disks but a few of them can be also present on the XNet. If those clips need to be updated at the same time, place a checkmark in the following box: The machine and position of the clip on the XNet are displayed in the XNet column: When editing an HD clip, a third tab is added to the Editclip module in order to play back the clip with full quality preview in a larger view. 37 Issue 1.0 38 XFILE LITE Version 1.01 – User’s Manual Author: M. Lothaire Issue 1.0 XFILE LITE Version 1.01 – User’s Manual Author: M. Lothaire PREVIEW: Double-click on a clip in the list or press the button. The MMEUniversal player module is loaded with the selected clip. Use the command buttons to play back the clip, to search material, to review the clip frame by frame, etc. Note: The MME player plays back the clip from the IN point to the OUT point. 39 Issue 1.0 XFILE LITE Version 1.01 – User’s Manual Author: M. Lothaire Notes 40 Headquarters EVS Broadcast Equipment - Liege Science Park - 16, rue Bois St-Jean - 4102 Ougrée - BELGIUM Tel-: +32 4 361 7000 - Fax-: +32 4 361 7099 - Tech. line-: +32 495 284 000 - Marketing-: [email protected] Technical support-: [email protected] - Recruitment-: [email protected] - Corporate & Investors relations-: [email protected] Sales and Support Offices NORTH AMERICA & LATIN AMERICA EVS Broadcast Equipment Inc - 9 Law Drive, Suite 200 – Fairfield, NJ 07004-3233 - USA Tel-: +1 973 575 7811 - Fax-: +1 973 575 7812 - Tech. line-: +1 973 575 7813 - [email protected] ASIA & PACIFIC EVS Broadcast Equipment Ltd - New Victory House, 15th Floor - 93-103 Wing Lok Street, Sheung Wan - HONG KONG Tel-: +852 2914 2501 - Fax-: +852 2914 2505 - Tech. line-: +852 94 01 23 95 - [email protected] EVS Broadcast Equipment - Canway Building, Rm.702A - 66 Nan Li Shi Lu - Beijing - CHINA Tel-: +86 10 6808 0248 - Fax-: +86 10 6808 0246 - Tech. line-: +86 139 1028 9860 - [email protected] EUROPE, MIDDLE EAST & AFRICA EVS Belgium s.a. - Liege Science Park - 16, rue Bois St-Jean - 4102 Ougrée - BELGIUM Tel-: +32 4 361 7000 - Fax-: +32 4 361 7099 - Tech. line-: +32 495 284 000 - [email protected] EVS France s.a. - 32-36 rue de Bellevue - 92773 Boulogne Billancourt CEDEX - FRANCE Tel-: +33 1 46 99 9000 - Fax-: +33 1 46 99 9009 - Tech. line-: +33 1 46 99 90 08 - [email protected] EVS Italy s.r.l. - Via Milano 2 - 25126 Brescia - ITALY Tel-: +39 030 296 400 - Fax-: +39 030 377 8945 - Tech. line-: +39 334 63 11 493 - [email protected] EVS Broadcast UK Limited - Kingfisher House - 21-23 Elmfield Road - Bromley - Kent BR1- 1LT - UNITED KINGDOM Tel-: +44 (0)20 8315 6551/2 - Fax-: +44 (0)20 8315 6560 - Tech. line-: +44 7768 792 217, +44 7973 317 414 - [email protected] www.evs.tv