1
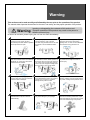
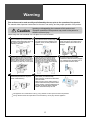
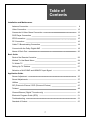
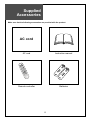
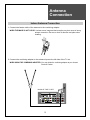
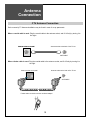
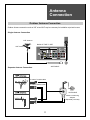
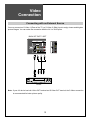
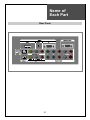
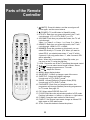
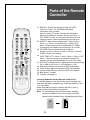
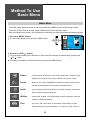
LCD TELEVISION
INSTRUCTION MANUAL
TFTV68HDT
TFTV81HDT
TFTV81PBHDT
TFTV93HDT
TFTV106HDT
Precaution about
LCD Panel
Precaution with Manipulation
• Refrain from strong mechanical shock and / or any force to the LCD panel. In addition to damage, this
may cause improper operation or damage to the module and FFL(CCFL) back-light.
• Note that the surface of LCD panel is very fragile and could be easily damaged. Do neither press nor
scratch the surface harder than a HB pencil lead.
• Wipe off water droplets or oil immediately. If you leave the droplets for a long time, staining and
discolouration may occur.
• If the surface of the LCD panel is dirty, clean it using some absorbent cotton or soft cloth.
• Desirable cleaners are water, IPA (Isopropyl Alcohol) or Hexane.
• Do not use Ketone type materials (ex. Acetone), Ethyl alcohol, Toluene, Ethyl acid or Methyl chloride. It
might permanent damage to the LCD panel due to chemical reaction.
• If the liquid crystal material leaks from the panel, it should be kept away from the eyes or mouth. In case
of contact with hands, legs or clothes, it must be washed away thoroughly with soap.
Precaution in Operation
• LCD products should be operated in standard environment.
The standard environment which is ;
- Temperature : 20 200C;
- Humidity : 65 5%; and
- Picture in Screen : Motion picture (avoid the still picture to prevent some afterimage)
• Avoid a direct ray of the Sun.
1
Caution
CAUTION
RISK OF ELECTRIC SHOCK
DO NOT OPEN
CAUTION : TO REDUCE THE RISK OF ELECTRIC SHOCK,
DO NOT REMOVE COVER (OR BACK).
NO USER-SERVICEABLE PARTS INSIDE.
REFER SERVICING TO QUALIFIED SERVICE PERSONNEL.
The lightning flash with arrowhead symbol within an equilateral
triangle, is intended to alert the user to the presence of uninsulated “dangerous voltage” within the product’s enclosure that may
be of sufficient magnitude to constitute a risk of electric shock.
The exclamation point within an equilateral triangle is intended to
alert the user to the presence of important operating and servicing instructions in the literature accompanying the appliance.
WARNING : TO REDUCE THE RISK OF FIRE OR ELECTRIC SHOCK HAZARD, DO NOT EXPOSE
THIS APPLIANCE TO RAIN OR MOISTURE.
CAUTION :TO PREVENT ELECTRIC SHOCK, MATCH WIDE BLADE OF PLUG TO WIDE SLOT, FULLY INSERT.
2
Important
Safeguards
Please read the following safeguards for your TV and retain for future reference.
Always follow all warnings and instructions marked on the television.
1. Read, Retain and Follow All Instructions
Read all safety and operating instructions before operating the TV. Retain them safely
for future reference. Follow all operations and instructions accordingly.
2. Heed Warnings
Adhere to all warnings on the appliance and in the operating instructions.
3. Cleaning
Unplug the TV from the wall outlet before cleaning. Do not use liquid, abrasive, or aerosol cleaners.
Cleaners can permanently damage the cabinet and screen. Use a lightly dampened cloth for
cleaning.
4. Attachments and Equipment
Never add any attachment and/or equipment without approval of the manufacturer as such additions may
result in the risk of fire, electric shock or other personal injury.
5. Water and Moisture
The apparatus shall not be exposed to dripping or splashing and that no object filled with liquids,
such as vases, shall be placed on the apparatus.
6. Setting
Do not place this TV on an unstable cart, stand or table. Placing the TV on an unstable base can
cause the TV to fall, resulting in serious personal injuries as well as damage to the TV. Use only a
cart, stand, bracket or table recommended by the manufacturer or salesperson.
7. Ventilation
Slots and openings in the cabinet are provided for ventilation and to ensure reliable operation of the TV and to
protect it from overheating. Do not cover the ventilations openings in the cabinet and never place the set in a confined
space such as built-in cabinet unless proper ventilation is provided. Leave a minimum 10 cm gap all around the unit.
8. Power Source
This TV should be operated only from the type of power source indicated on the marking label. If you are not
sure of the type of power supplied to your home, consult your appliance dealer or local power company.
9. Grounding or Polarization
This TV is equipped with a polarized alternating current line plug (a plug having one blade wider than the other). This
plug will fir into the power outlet only one way. This is a safety feature. If you are unable to insert the plug fully into
the outlet, try reversing the plug. If the plug should still fail to fit, contact you electrician to replace your obsolete
outlet. Do not defeat the safety purpose of the polarized plug. A warning that an apparatus with CLASS I construction
shall be connected to a MAINS socket outlet with a protective earthing connection.
10. Power-Cord Protection
Power-supply cords should be routed so that they are not likely to be walked on or pinched by items placed
upon or against them, paying particular attention to cords at plugs, wall outlets, and the point where they exit
from the TV. MAINS plug is used as the disconnect device, the disconnect device shall remain readily operable.
11. Lightning
For added protection for this TV during a lightning storm, or when it is left unattended and unused for long
periods of time, unplug it from the wall outlet and disconnect the antenna or cable system. This will prevent
damage to the TV due to lightning and power-line surges.
12. Wall or Ceiling Mounting
When mounting the product on a wall or ceiling, be sure to install the product using the designated
mounting tool according to the method recommended by the manufacturer.
3
Important
Safeguards
13. Power Lines
An outside antenna system should not be located in the vicinity of overhead power lines or other electric light
or power circuits, or where it can fall into such power lines or circuits. When installing an outside antenna
system, extreme care should be taken to keep from touching such power lines or circuits as contact with
them might be fatal.
14. Overloading
Do not overload wall outlets and extension cords as this can result in a risk of fire or electrical shock.
15. Object and Liquid Entry
Never push objects of any kind into this TV through openings as they may touch dangerous voltage points or
short-out parts that could result in fire or electric shock. Never spill liquid of any kind on or into the TV.
16. Outdoor Antenna Grounding
EXAMPLE OF ANTENNA GROUNDING
If an outside antenna or cable system is connected to the TV, be
sure the antenna or cable system is grounded so as to provide
some protection against voltage surges and built-up static charges.
Section 810 of the National Electric Code, ANSI /NFPA No. 70-1984,
provides information with respect to proper grounding of the mast
and supporting structure, grounding of the lead in wire to an antenna
discharge unit, size of grounding conductors, location of
antenna discharge unit, connection to grounding electrodes, and
requirements for the grounding electrode.
ANTENNA
LEAD IN WIRE
GROUND CLAMP
ELECTRIC
SERVICE
EQUIPMENT
ANTENNA
DISCHARGE UNIT
(NEC SECTION 810-20)
GROUNDING
CONDUCTORS
(NEC SECTION 810-21)
GROUND CLAMPS
NEC — NATIONAL ELECTRICAL CODE
POWER SERVICE GROUNDING
ELECTRODE SYSTEM
(NEC ART 250, PART H)
17. Servicing
Do not attempt to service this TV yourself as opening or removing covers may expose you to dangerous
voltage or other hazards. Refer all servicing to qualified service personal.
18. Damage Requiring Service
Unplug the TV from the wall outlet and refer servicing to a qualified service personnel under the following
conditions:
(a) When the power-supply cord or plug is damaged.
(b) If liquid has been spilled, or objects have fallen into the TV.
(c) If the TV has been exposed to rain or water.
(d) If the TV does not operate normally by following the operating instructions. Adjust only those controls
that are covered by the operating instructions as an improper adjustment of other controls may result in
damage and will often require extensive work by qualified technician to restore the TV to its normal operation
(e) If the TV has been dropped or the cabinet has been damaged.
(f) When the TV exhibits a distinct change in performance - this indicates a need for service.
19. Replacement Parts
When replacement part are required, be sure the service technician has used replacement parts specified
by the manufacturer or have the same characteristics as the original part. Unauthorised substitutions may
result in fire, electric shock or other hazards.
20. Safety Check
Upon completion of any service or repair to the TV, ask the service technician to perform safety checks to
determine that the TV is in safe operating condition.
21. Heat
The product should be situated away from heat sources such as radiators, heat registers, stoves,
or other products (including amplifiers) that produce heat.
4
Warning
This section must be read carefully and followed by the user prior to the operation of the product.
The manual states important instructions for the user's own safety, and the proper operation of the product.
Warning
Ignoring or disregarding the contents of this section and
improper operation of this product may result in the person’s
death or serious injury
In case of an accident, please unplug the unit from the outlet immediately.
To reduce the risk of electric shock, do
not remove cover or back. No user serviceable parts inside. Refer to qualified
service personnel for repair.
Do not put any object that contains water such as flowerpot - near to the unit.
The water may penetrate into the unit, and
be a cause of fire or hazardous electric
shock.
To prevent fire and damages to the product,
unplug the unit from the outlet during
lightning storm, or when it is left unattended
and unused for a long period of time.
Do not put on or use the product near
water and moisture-such as in a bathroom,
washbowl, etc. It may be a cause of fire
and electric shock hazards.
Slots and openings in the case are provided
for ventilation to ensure reliable operation of
the product. Never put in any item-such as a
coin, paper, match- through these openings
since it may touch dangerous voltage points
that could result in fire or shock hazard.
Do not let children hang on or climb on
the product since it may be a cause of
serious injury.
Hold the plug when unplugging the unit
from the outlet. The cord may cause fire
or electric shock if damaged.
Do not cause the product to lean or put it
in an unstable place since it may cause a
serious injury to a person, as well as
damage to the product if it falls.
Do not put volatile substance-such as
benzene, naphtha- near the product since it
may cause a change in the product's colour.
Do not spill water or drop the remote
controller since it may be a cause of
malfunctioning.
Do not view the TV too closely since it
may cause damage in your eyesight.
Refer servicing to qualified service
personnel for cleaning at least once a year
since dust inside the TV set may be a result
or fire and malfunctioning of the product.
5
Warning
This section must be read carefully and followed by the user prior to the operation of the product.
The manual states important instructions for the user's own safety, and the proper operation of the product.
Caution
Ignoring or disregarding the contents of this section and
improper operation of this product may result in the person’s
death or serious injury
Please keep the user's manual in a safe place for future reference.
Do not cover the top of the television set.
Ventilation will be prevented, and it may
be a cause of fire if the product is
internally overheated.
The product should be situated away from
any heat source-such as radiators, heat
registers, stoves, or other products that
produce heat.
Do not put on any heavy item on the
power cord since it may result in fire or
hazardous electric shock if the cord is
damaged.
Please be advised of electric wires and cables
when installing the antenna. It may be a cause of
hazardous electric shock and fire if the antenna
touches or falls on the electric wire; thus, it must
be installed firmly, and far away from the cables.
Unplug the power from the outlet and all the
related connections from the unit to prevent
electric shock. At least two people must work
together to move the TV set when transporting
to prevent the TV from falling, and consequently,
any serious injury or damage.
Do not touch the power cord with
moisturised or wet hands when plugging
to or unplugging from the outlet since it
may be a cause of electric shock.
Do not expose the product to a dusty or
moisturised place since it may be a
cause of malfunctioning.
The screen case of the product
(32C1/42C1) is scratched easily.
When cleaning, use the micro-fibre sheet
which enclosed.
When a force to give it cleans strongly, it
will be scratched and the product's colour
will be changed. If foreign material gets in
the fibre, the product will be scratched.
Shake off the fibre cleanly and use.
The appliance is not intended for use by young children or infirm persons without supervision.
Young children should be supervised to ensure that they do not play with the appliance.
6
Table of
Contents
Installation and Maintenance
Antenna Connection
9
Video Connection
12
Camcorder & Video Game Connection
13
DVD Player Connection
14
STB Connection
15
PC Connection
16
Cable TV Broadcasting Connection
18
Connect with the Dolby Digital AMP
19
Name of Each Part
20
Basic Guide
Parts of the Remote Controller
22
Method To Use Basic Menu
24
To Watch TV
25
Setting Up TV Stations
27
Selection of AV/COMP and HDMI/PC Input Signal
32
Application Guide
Screen Adjustment
35
Sound Adjustments
37
Utilities
41
PIP (Picture-In-Picture / POP (Picture-of-Picture)
47
Teletext
49
Channel Banner (Digital TV mode only)
50
Electronic Program Guide (EPG)
51
Troubleshooting
52
Standard of Product
55
7
Supplied
Accessories
Make sure that the following accessories are provided with the product.
AC cord
AC cord
Instruction manual
Remote controller
Batteries
8
Antenna
Connection
Indoor Antenna Connection
1. Connect the feeder cable of the antenna to the combining adapter.
WHEN THE IMAGE IS NOT CLEAR : Unclear screen image and bad reception may be a cause of wrong
antenna connection. Be sure to check its direction and place when
installing.
2. Connect the combining adapter to the antenna input at the left side of the TV set.
WHEN USING THE COMBINING ADAPTER: You may obtain the combining adapter at your closest
Service Centre.
BACK OF THE TV SET
Antenna Input
9
Antenna
Connection
CTV Antenna Connection
Such community TV Antenna installation may be found in most of co-op apartments.
When a coaxial cable is used: Plug the coaxial cable to the antenna socket, and fix it firmly by turning it to
the right.
Antenna socket on the wall
Antenna socket at the back of the TV set
ANT/CABLE
When a feeder cable is used: Plug the coaxial cable to the antenna socket, and fix it firmly by turning it to
the right.
Antenna socket on the wall
Antenna socket at the back of the TV set
ANT/CABLE
Feeder cable connection with the combined adapter
10
Antenna
Connection
Outdoor Antenna Connection
Outdoor Antenna connection-such as VHF or/and UHF-may be necessary for installation at private houses
Single Antenna Connection
VHF Antenna
BACK OF THE TV SET
UHF Antenna
ANT/CABLE
Separate Antenna Connection.
In case of coaxial cable
In case of feeder cable
ANT/CABLE
Antenna combining
Adaptor
(Separate purchase)
11
Video
Connection
Connecting with an External Source
You may connect an S-Video 1 (Rear of the TV) or S-Video 2 (Side) input to enjoy clearer and brighter
picture images. You can make the connection with the AV1 or AV2 inputs.
BACK OF THE TV SET
VIDEO
Note: If your AV device has both Video OUT terminal and S-Video OUT terminal, the S-Video connection
is recommended for better picture quality.
12
Camcorder & Video
Game Connection
Watching the Camcorder Recording or Video Game on TV
1. Prepare the S-video and RCA connector.
2. These connectors connect to AV1 or AV2 (S-Video 1 or 2) like below the picture.
3. Turn on the TV set and camcorder/video game.
4. Select AV1 or AV2 (S-Video 1 or 2) using the ”AV/COMP” button of the Remote controller or “
”
button of the TV set.
BACK AND SIDE OF THE TV SET
Camcorder
Video game
Note: If your AV device has both Video OUT terminal and S-Video OUT terminal, S-Video connection is
recommended for better picture quality.
13
DVD Player
connection
When connecting with a component cable
BACK OF THE TV SET
Note: When you connect with the component video, please check the colour of the cable between
the DVD and TV set.
When connecting with a S-VHS cable and RCA cable
BACK AND SIDE OF THE TV SET
SERVICE INPUT
L-AUDIO-R
Note: If your AV device has both Video OUT terminal and S-Video OUT terminal, S-Video connection
is recommended for better picture quality.
14
STB (Set Top Box)
Connection
When connecting with a HDMI cable
BACK OF THE TV SET
Set Top Box
Note: When the Set Top Box output is DVI signal, then the Audio cable should be connected.
When connecting with a component cable
BACK OF THE TV SET
Set Top Box
15
PC
Connection
When connecting with PC (D-Sub) cable.
1. Adjust PC resolution to available resolution in LCD TV.
2. Connect between PC and TV set using the D-Sub and Audio cable like below the picture.
3. Turn on the PC and TV set.
4. select PC mode by pressing "HDMI/PC" button on the remote control or "
" button of the TV set.
BACK OF THE TV SET
When connecting with a HDMI cable.
1. Adjust PC resolution to available resolution in LCD TV.
2. Connect between PC and TV set using the HDMI and Audio cable like below the picture.
3. Turn on the PC and TV set.
4. select HDMI mode by pressing "HDMI/PC" button on the remote control or "
" button of the TV set.
BACK OF THE TV SET
Note: If the graphic card of the PC only supports a DVI signal, you must connect the Audio cable
like above the picture.
16
PC
Connection
PC CONNECTION NOTES:
1) The resolution of the TV set is the best at 1360 z 768 (WXGA).
2) In order to display 1360 x 768 resolution, install the latest version of graphic card driver in your PC.
3) If there is a [Vertical Frequency] setting menu in the [Screen] Menu of the PC, adjust the frequency to 60Hz.
4) If the PC resolution is too high, it may be hard to read letters. Select a suitable resolution.
5) HDMI input port receives only digital Signal.
6) Depending on the graphic card when plug & unplug the HDMI connection, the screen may not display
correctly. Restart the computer if this happens.
Multi input resolution available in LCD TV.
Resolution
V-freq
HDMI
PC (D-Sub)
Component
Standard
60Hz
O
O
X
VESA Standard
72Hz
O
O
X
VESA Standard
75Hz
O
O
X
VESA Standard
60Hz
O
O
X
VESA Standard
72Hz
O
O
X
VESA Standard
75Hz
O
O
X
VESA Standard
60Hz
O
O
X
VESA Standard
70Hz
O
O
X
VESA Standard
75Hz
O
O
X
VESA Standard
1280 X 1024
60Hz
O
O
X
VESA Standard
1360 X 768
60Hz
O
O
X
VESA Standard
720 X 480P
60Hz
O
X
O
720 X 576P
50Hz
O
O
O
50Hz
O
O
O
60Hz
O
O
O
720 X 480i
60Hz
X
X
O
720 X 576i
50Hz
X
X
O
50Hz
O
O
O
60Hz
O
O
O
640 X 480
800 X 600
1024 X 768
1280 X 720P
1920 X 1080i
Note: • When you connect with component, PC (D-Sub), and HDMI, you must check the input resolution
of external devices.
17
Cable TV
Broadcasting
Connection
External Input Connection Source
Watching cable television is only possible after you have subscribed to the local broadcasting company
and installed a cable receiver. You may make the connection to any of the Component input, Video 1
input and Video 2 input.
Input
Cable TV
Broadcasting
Station
CATV Receiver
BACK OF THE TV SET
Antenna Input Connection
Watching cable television is only possible after you have subscribed to the local broadcasting company
and installed a cable receiver.
Coaxial Cable
Input
Output
Cable TV
Broadcasting
Station
Coaxial Cable
ANT/CABLE
CATV Receiver
18
Connect with the
Dolby Digital AMP.
If you connect the optical output to the Dolby digital AMP, you can listen to better sound.
BACK OF THE TV SET
Optical output
Dolby Digital AMP
L
Woofer
Centre
Surround L
R
Surround R
19
Name of
Each Part
Front / Side Panel
Buttons on the TV set have the same functions as those of the remote controller.
1
MENU
2
3
6
PR
Front Panel
4
5
Side Panel (Left)
Side Panel (Right)
Control Key Buttons.
1
Buttons: Each time you press this button, the TV will cycle through:
TV / Video 1 / Video 2 / Component 1 / Component 2 / HDMI / PC
2 MENU Button: Use this button to enter and exit the MENU.
3
Buttons: Use these buttons to change your TV’s volume or to move the cursor in the menu.
4
Buttons: Use these buttons to change channels on your TV or to move the cursor in the menu.
5
button: Use this button to TV STAND-BY mode/TV ON mode.
6 Remote controller signal receiver
The screen contains the remote controller signal receiving window; therefore, point the remote
controller towards the screen when using it.
Stand-by <LED Indicator>
Lights up red in Stand-By mode and Lights up green in TV on mode.
Lights up orange colour in On/Off timer mode.
20
Name of
Each Part
Rear Panel
21
Parts of the Remote
Controller
1.
2.
3.
4.
5.
6.
7.
8.
9.
10.
11.
12.
13.
14.
15.
16.
17.
18.
19.
20.
(MUTE): Press this button, and the sound goes off.
Press again, and the sound returns.
(POWER): TV on/off button in Stand-By mode.
DTV/ATV: Each time you press this button, the TV will
cycle through : ATV => DTV (DVB-T) => ATV
AV/COMP: Each time you press this button, the TV will
cycle through:
Video 1 => Video 2 => Comp. 1 => Comp. 2 => Video 1
HDMI/PC: Each time you press this button, the TV will
cycle through : HDMI => PC => HDMI
NUMBER: Press the numbers on this board, you can
select PR directly in TV mode. (EX. When you want to
select PR10, you should press down “1” and “0” within
2 second. If you only press down “1”, after 2 second, PR1
will be selected.)
Note.: When the current state is Stand-By mode, you
can turn on the TV using the digit key.
LOCK : Prevent the use of the TV set without the remote control.
: You can select sound mode in Mono, Stereo.
PR : Change programmes on TV mode.
VOL : Adjust the volume.
MENU: Menu display button.
OK/SELECT: Confirm to change a part of the menu.
SUBTITLE : Select the Subtitle Language.
It works only in DTV (DVB-T) mode.
GUIDE : Access Electronic Program Guide (EPG).
It works only in DTV (DVB-T) mode.
FAVOURITE: Each time you press this button, the
programme will change selected (favourite) programmes
on TV mode. See page 32.
PIP: Select either PIP/POP On or Off
P.POSITION: Move the sub window position in PIP mode.
Position: left bottom => left top => right top => right bottom
P.SWAP: Swap the main screen for sub screen.
P.INPUT: Sub Screen input mode change as follows PIP
table mode or POP table mode.
STILL: Press this button to freeze the picture.
22
Parts of the Remote
Controller
21. RECALL : Display the present modes (ATV/DTV,
Video 1/2, Comp. 1/2, PC/HDMI) and Signal
information for 4 seconds.
Note: In Analog TV mode, you can see information
about the Programme number, Sound, and Clock. In
DTV (DVB-T) mode, you can see information about a
channel number, name, broadcasting time and more.
22. ASPECT: Select screen aspect ratio : Wide [16:9] =>
Zoom 1 => Zoom 2 => Normal [4:3] => Wide [16:9]
Note. : When current mode is multimedia (PC, HDMI,
Component), the aspect only work as the 16:9 mode.
23. PICTURE: Picture modes change as follows:
Normal => Soft => Movie => User => Sharp => Normal
SLEEP: Sleep Timer setting.
24. SLEEP TIMER: OFF => 30min => 60min => 90min => 120min => OFF
Note. : If an active signal is not present for about 30
minutes, the set will automatically turn to ST-BY mode.
25. S.EFFECT: Using this button, Select the desired sound mode.
Off => BBE => M.Voice => 3D Panorama => Off
26. Red button: Delete the channel in EDIT and teletext.
27. Green button: Move the channel in EDIT and teletext.
28. Yellow button: Skip the channel in EDIT and teletext.
29. Blue button: Teletext.
30. Teletext: see page 51.
Inserting Batteries into the Remote Control Unit
To load the batteries, turn the remote control handset over
and open the battery compartment. Insert the batteries (Two
1.5v, type AAA).
Make sure that the polarity matches with the (+) and (-)
marks inside of the battery compartment.
Note: To avoid damage from possible battery leakage,
remove the batteries if you do not plan to use the
remote control handset for an extended period of time.
23
Method To Use
Basic Menu
Basic Menu
- The basic menu appears on the screen if you press the “MENU” button of the remote control.
- There are 5 items Picture, Sound, Install, Utilities and Time in the basic menu.
- Each item has sub-items under it. If the desired item is selected, the relevant sub-items are displayed upward.
1. Press the "MENU" button.
The main menu appears if you press the "MENU" button.
Normal
Mode
Picture
Sound
Brightness
50
Contrast
80
Colour
60
Tint
Install
0
Sharpness
50
Colour Temp
Utilities
Normal
Noise reduction
Off
Time
MENU
Exit
Position
Access
2. Press the " PR " button.
You may setup according to the directions on the screen after selecting the desired item by pressing the
" PR " button.
If the setup is completed, exit from the menu by pressing the "MENU" button.
Picture
: Mode (Normal, Soft, Movie, User, Sharp), Brightness, Contrast, Colour,
Sharpness, Tint (NTSC only), Noise Reduction and Colour Temp.
Sound
: Balance, AVC, Effect (Off/BBE/M.voice/3D Panorama), Digital Volume
and Move (Normal/User/Concert Hall/Live/Theater/Studio).
Install
: Auto Programme, Manual Programme, Programme Setup, Programme
Edit, Favourite and Signal Strength.
Utilities
: Aspect ratio, Subtitle, Lock (Set Password, Block programme, Parental
guidance), MGDI plus DEMO.
Time
: Auto clock, Set current time, On time/setup, O-time/setup, On time
PR/Volume and Time zone (NSW/ACT, VIC, QLD, SA, WA, TAS, NT).
24
To Watch TV
On/Off, Number, Mute, Recall,
/ ,
- Buttons with same name in the main body performs the same function.
Press the "
" button of the front or right side of the set
or the "Power" button of Remote controller.
You can also turn on the TV using “ PR ” or digit key in
the ST-BY mode.
Note:
The buttons of the remote control and the main body
operate only when AC power turn on.
You must pull out the plug of TV set to shut of the AC Power.
When pressing the Program button
Select two digits if using the number button for channel
selection.
For example, to watch the No.9 channel,
Press the number button "0" and "9".
If pressing only number "9" button, it takes longer time
to select the channel.
To suddenly turn sound off
Press the "MUTE" ( ) button.
No sound is heard if "MUTE ( )" is displayed on the
screen.
Sound is heard again if you press the "MUTE ( )"
button once again.
For example, please use this button when telephone rings
or when guest comes while watching TV.
Check of TV operation status
If pressing the “RECALL” button, status of channel or
clock broadcasting being currently watched or entry
status of video component is displayed on the screen.
25
/
To Watch TV
1. Press the "
POWER)" button of the front or right
side of the set or the "POWER" button of Remote
controller.
The Stand-By LED lamp turns on in red colour.
Press " / " buttons of the main body or "POWER"
button of the remote control.
2. Press the " PR " button.
Select the desired program by pressing the "
button or the number button.
POWER
AT V
PR
"
10
C-10
3. Adjust volume.
Sound reduces by pressing the " VOL" button.
Sound increases by pressing the "VOL " button.
Note: Sound mutes by pressing the "MUTE" (
) button.
4. Press the "
(POWER)" button of the front or right
side of the set or the “POWER” button of Remote
controller for turning the TV off.
TV turns off and the power lamp changes to red colour
26
POWER
Setting Up TV
Stations
Auto Programme for Analog Channel
- All analog channels that can be received are stored by this method. It is recommended that you use
Auto Programme during installation of this set.
1. Press the "MENU" button to select the Install menu.
Move the selection bar to the Install menu with
" PR " buttons.
Normal
Mode
Picture
Sound
Brightness
50
Contrast
80
Colour
60
Tint
Install
0
Sharpness
50
Colour Temp
Utilities
Normal
Noise reduction
Off
Time
MENU
2. Select the "Set ATS Broadcast".
Place the selection bar on Set ATS Broadcast and
select Analog, Digital or Analog+Digital with
" VOL " button.
Exit
Analog
Set ATS Broadcast
Picture
Sound
Auto Programme
Start
Manual Programme
Access
Programme Setup
Access
Programme Edit
Install
Access
Position
Access
Signal strength
Analog Channel
Utilities
Time
MENU
3. Select the "Auto Programme".
Place the selection bar on Auto Programme and press
the " VOL " button.
Prev.
Analog
Set ATS Broadcast
Picture
Sound
Auto Programme
Start
Manual Programme
Access
Programme Setup
Access
Programme Edit
Install
Access
Position
Access
Signal strength
Analog Channel
Utilities
Time
MENU
4. Please wait until the Programme Edit menu appears.
If you don’t want to edit the programs now, escape
from menu with the "MENU" button.
Prev.
Position
Access
Auto Programme
3 Channel found
Analog Channel S-12
26 %
MENU
Warning
This television has been factory pretuned to channels
2, 7, 9, 10 and 28. If the auto search function is
activated, these preset channels will be deleted and
new channels tuned.
27
Exit
OK
Finish
Setting Up TV
Stations
Manual Programme
The Manual Programme menu shows you information as follows:
- Band, Channel, Search, Programme number
Analog
Set ATS Broadcast
Picture
1. Locate the selection bar on the Manual Programme.
• Press the "MENU" button to select the Install menu.
• Move the selection bar to the Install menu with
" PR " buttons.
Place the selection bar on Manual Programme and
press the " VOL " buttons.
2. Searching for channel in the Manual Programme Menu
Move the selection bar to the Band with " PR " buttons.
Select the desired Band with " VOL " buttons.
Move the selection bar to the Channel with " PR " buttons.
Select the desired Channel with " VOL " buttons.
Move the selection bar to the Search with " PR " buttons.
Press the " VOL " buttons to search up or down.
Searching will be stopped automatically after finding
the next channel.
Sound
Auto Programme
Start
Manual Programme
Access
Programme Setup
Access
Programme Edit
Install
Access
Signal strength
Analog Channel
Utilities
Time
MENU
Prev.
Access
Position
Manual Programme
Picture
Sound
Band
V/UHF
Channel
33
Search
DOWN/UP
33
Programme
Install
Utilities
Time
MENU
Prev.
Access
Position
< Analog menu >
Manual Programme
Picture
Note:
Band active in Analog TV mode.
Signal strength active in Digital TV mode.
Programme is fixed (only viewing).
Channel
29
Search
Sound
Start
Strong
Signal strength
0 New Digital Programme Found
Install
Utilities
Time
MENU
Prev.
Position
< Digital menu >
28
Access
Setting Up TV
Stations
Programme Setup (Analog TV mode only)
1. Searching for channel f-inely
Move the selection bar to the Analog Pr with " PR "
buttons.
Select a programme number you want to tune -finely
with the " VOL " buttons.
Move the selection bar to the Fine.
Press the " VOL " buttons to adjust the fine tuning.
Programme Setup
Picture
Analog Pr
00
Name
Sound
_____
Fine
0
Install
Utilities
ABCDEFGHIJKLMNOPQRSTUVWXYZ
0 1 2 3 4 5 6 7 8 9 _ ".
Time
MENU
Note:
If you are unable to get a good picture or Sound
because of a poor broadcasting signal, adjustment of
Frequency might improve it.
Prev.
Access
Position
Programme Setup
Picture
Analog Pr
00
Name
Sound
_____
Fine
0
Install
Utilities
ABCDEFGHIJKLMNOPQRSTUVWXYZ
0 1 2 3 4 5 6 7 8 9 _ ".
Time
MENU
2. Enter a station name
Move to selection bar to the Name with " PR "
buttons.
Press the " VOL " buttons to enter the station name.
You can enter a station name with the " PR " and
" VOL " buttons.
29
Prev.
Access
Position
Programme Setup
Picture
Analog Pr
00
Name
Sound
AB___
Fine
0
Install
Utilities
ABCDEFGHIJKLMNOPQRSTUVWXYZ
0 1 2 3 4 5 6 7 8 9 _ ".
Time
MENU
Prev.
Position
Access
Setting Up TV
Stations
Programme Edit
The Programme Edit menu shows you information as follows:
- Broadcast : Analog / Digital
- Program position assignment: Program number, Station name and Skip.
1. Skipping the program positions
Move to Programme Edit in the Install menu.
Move the selection bar to program number to
skipping with the " PR " or " VOL " buttons.
Press the "Skip (Red)" button, then the colour of the
station name is changed to red.
2. Moving the program positions
Move to Programme EDIT in the Install menu.
Move the selection bar to program number to
Move with the " PR " or " VOL " buttons.
Press the "Move (Green)" button.
Move the selection bar to empty program number.
Press the "Move (Green)" button, then the
programs will be moved.
Edit
Pr
00
01
02
03
04
05
06
07
08
09
Picture
Sound
Install
Utilities
Analog
Ch.
- -- -- -- -- -- -- -- -- -- --
Pr
10
11
12
13
14
15
16
17
18
19
Ch.
- -- -- -- -- -- -- -- -- -- --
Ch.
- -- -- -- -- -- -- -- -- -- --
Time
MENU
Prev.
Position
D/A
Edit
Pr
00
01
02
03
04
05
06
07
08
09
Picture
Sound
Install
Utilities
Digital/Analog
Analog
Ch.
- -- -- -- -- -- -- -- -- -- --
Pr
10
11
12
13
14
15
16
17
18
19
Ch.
- -- -- -- -- -- -- -- -- -- --
Pr
20
21
22
23
24
25
26
27
28
29
Ch.
- -- -- -- -- -- -- -- -- -- --
Time
MENU
Prev.
Position
D/A
Edit
Pr
00
01
02
03
04
05
06
07
08
09
Picture
3. Deleting the Programs
Move to Programme EDIT in the Install menu.
Move the selection bar to program number to
deleting With the " PR " or " VOL " buttons.
Press the Delete (Yellow) button.
Pr
20
21
22
23
24
25
26
27
28
29
Sound
Install
Utilities
Digital/Analog
Analog
Ch.
- -- -- -- -- -- -- -- -- -- --
Pr
10
11
12
13
14
15
16
17
18
19
Ch.
- -- -- -- -- -- -- -- -- -- --
Pr
20
21
22
23
24
25
26
27
28
29
Ch.
- -- -- -- -- -- -- -- -- -- --
Time
MENU
Prev.
Position
D/A
Digital/Analog
Note :
You can move the selection bar 1 step with "
PR
30
" buttons and 1 page with the "
VOL
" buttons.
Setting Up TV
Stations
Favourite
1. Locate the selection bar on the Favourite.
Move to Favourite in the Install menu.
Press the " VOL " buttons.
Analog
Set ATS Broadcast
Picture
Auto Programme
Start
Manual Programme
Sound
Access
Access
Programme Setup
Programme Edit
Install
Access
Signal strength
Analog Channel
Utilities
Time
MENU
Prev.
Edit
2. Setting up the Favourite
Move the selection bar to the added/deleted Pr
with " PR " or " VOL "buttons.
Add/Delete the Pr with "Favourite" buttons.
Pr
00
01
02
03
04
05
06
07
08
09
Picture
Sound
Install
Utilities
Access
Position
Analog
Ch.
- -- -- -- -- -- -- -- -- -- --
Pr
10
11
12
13
14
15
16
17
18
19
Ch.
- -- -- -- -- -- -- -- -- -- --
Pr
20
21
22
23
24
25
26
27
28
29
Ch.
- -- -- -- -- -- -- -- -- -- --
Time
MENU
Prev.
Position
D/A
Edit
Pr
00
01
02
03
04
05
06
07
08
09
Picture
Sound
Install
Utilities
Digital/Analog
Analog
Ch.
- -- -- -- -- -- -- -- -- -- --
Pr
10
11
12
13
14
15
16
17
18
19
Ch.
- -- -- -- -- -- -- -- -- -- --
Pr
20
21
22
23
24
25
26
27
28
29
Ch.
- -- -- -- -- -- -- -- -- -- --
Time
MENU
3. Viewing the Favourite Pr
Whenever pressing "Favourite" button, the Pr
changes as the selected programme order.
GUIDE
Prev.
Position
D/A
Digital/Analog
FAVOURITE
PR-
Signal Strength (Digital TV mode only)
- Reveals how strong your DTV signal is and whether you need to adjust your antenna.
- The higher the signal strength, the less likely you are to experience picture degradation.
- Digital TV Signals; May not be available in all areas, nor broadcast all programmes.
1. Locate the selection bar on the Signal strength.
Move to Signal strength in the Install menu.
Display the strength status of digital signal.
Set ATS Broadcast
Picture
Sound
Install
Auto Programme
Analog
Start
Manual Programme
Access
Programme Setup
Access
Programme Edit
Access
Signal strength
1 [29]
Weak
2. Press the Recall button in DTV mode, then signal
strength is also displayed.
Utilities
Time
MENU
31
Prev.
Position
Selection of AV/COMP and
HDMI/PC Input Signal
When watching video, Camcorder, DVD, Cable TV with AV
- When pressing "
" button on the TV set, screen changes as follows:
DTV => ATV => Video 1 (or S-Video 1) => Video 2 (or S-Video 2) => Comp.1 => Comp.2 => HDMI => PC => DTV
1. Press the "AV/COMP" button on the remote controller.
Screen changes as follows whenever pressing the "AV/COMP" button.
Video 1 => Video 2 => Comp.1 => Comp.2 => Video 1
Note:
If sound signal is mono method, connect it to the L-terminal of the sound input terminal.
32
Selection of AV/COMP and
HDMI/PC Input Signal
When connecting PC, STB, DVD with Multimedia
1. Pressing the "HDMI/PC" button on the remote controller.
Screen changes as follows whenever pressing the “HDMI/PC” button.
HDMI => PC => HDMI
PC
HDMI
1360 X 768P 60Hz
720 X 480
HDMI & PC mode
1. For optimum picture quality, use 1360x768 computer at a 60Hz refresh rate. Using other formats or
refresh rates may result in reduced picture quality.
2. If the message ‘No signal’ appears on the screen, adjust the PC output to a format listed in the
Multimedia Input table.
Multimedia Input Format
Resolution
640 X 480
800 X 600
1024 X 768
1280 X 1024
1360 X 768
720 X 480P
720 X 576P
1280 X 720P
720 X 480i
720 X 576i
1920 X 1080i
V-freq
60Hz
72Hz
75Hz
60Hz
72Hz
75Hz
60Hz
70Hz
75Hz
60Hz
60Hz
60Hz
50Hz
50Hz
60Hz
60Hz
50Hz
50Hz
60Hz
HDMI
O
O
O
O
O
O
O
O
O
O
O
O
O
O
O
X
X
O
O
PC (D-Sub)
O
O
O
O
O
O
O
O
O
O
O
X
O
O
O
X
X
O
O
33
Component
X
X
X
X
X
X
X
X
X
X
X
O
O
O
O
O
O
O
O
Standard
VESA Standard
VESA Standard
VESA Standard
VESA Standard
VESA Standard
VESA Standard
VESA Standard
VESA Standard
VESA Standard
VESA Standard
VESA Standard
Selection of AV/COMP and
HDMI/PC Input Signal
Adjustment of Screen in PC mode
1. Press the "ASPECT" button.
2. Adjustment of the Auto setup
Press the "ASPECT" button and the PC Menu appears.
Move to Auto Setup in the PC Menu.
Press the " VOL " buttons to detect optimal
resolution automatically
PC Menu
AUTO
Auto Setup
Frequency
Phase
MENU
Exit
Position
Access
Auto Setup
AUTO
MENU
Prev.
3. Adjustment of the Frequency
Move to Frequency in the PC Menu.
Press the " VOL " buttons to adjust the
frequency of display image.
Access
Frequency
8
MENU
Prev.
4. Adjustment of the Phase
Move to Frequency in the PC Menu.
Press the " VOL " buttons to adjust the phase
to get a clearer picture.
Access
Phase
16
MENU
Prev.
Access
Note:
During the Auto Adjust, you must not alter a screen on the monitor.
During the moving picture, Auto Adjust is able to incorrectly work. So you must execute Auto
Adjust in still image.
Auto Adjust incorrectly work at a part graphic card or picture.
When Auto Adjust is not correctly working, you can adjust with frequency and phase.
34
Screen
Adjustment
When setting up various screen modes
- The user may select various screens designed for a good picture without adjusting the brightness, contrast
or colour individually.
1. Pressing the "PICTURE" button.
Screen changes as follows whenever pressing the "PICTURE" button.
Normal => Soft => Movie => User => Sharp
The screen adjustment status changes as the following screens are
displayed sequentially whenever pressing the "PICTURE" button.
The screen returns to the mode prior to turning power off when then
turning power on again.
Normal
Mode
Picture
Sound
50
Contrast
80
Colour
60
Tint
Install
50
Colour Temp
Utilities
Noise reduction
Sound
Brightness
45
Contrast
90
Colour
60
Tint
Install
55
Contrast
70
Colour
50
Tint
Install
0
Sharpness
40
Colour Temp
Utilities
Off
Normal
Noise reduction
Off
Exit
Access
Position
MENU
Exit
Access
Position
0
Sharpness
100
Colour Temp
Utilities
Brightness
Time
MENU
Sharp
Mode
Sound
Normal
Time
Picture
Picture
0
Sharpness
Soft
Mode
Brightness
Normal
Noise reduction
Off
Time
MENU
Exit
Position
Access
User
Mode
Picture
Sound
45
Contrast
90
Colour
60
Tint
Install
100
Colour Temp
Utilities
Sound
Noise reduction
Brightness
50
Contrast
85
Colour
60
Tint
Install
0
Sharpness
70
Colour Temp
Normal
Utilities
Off
Time
Normal
Noise reduction
Off
Time
MENU
Note:
Normal
Soft
Movie
User
Sharp
Picture
0
Sharpness
Movie
Mode
Brightness
Exit
Position
Access
: For a highly defined image in a normally bright room
: The LCD TV in a dimly lit environment
: Ideal for movies
: Allows the user to customise settings as desired
: For a clear-cut image emphasizing high contrast for sports viewing
35
MENU
Exit
Position
Access
Screen
Adjustment
When adjusting the screen to taste
- You can enjoy various screens by adjusting Brightness, Contrast, Colour, Sharpness, etc to the user’s taste.
1. Select "PICTURE" by pressing the "MENU" button.
The menu screen appears as follows.
Normal
Mode
Picture
Sound
Brightness
50
Contrast
80
Colour
60
Tint
Install
2. Select and adjust each item.
Move to the PICTURE menu.
Whenever pressing the " PR " button, you can select in
order Brightness, Contrast, Colour, Sharpness and N.R.
You can adjust all items by pressing the " VOL " buttons.
0
Sharpness
50
Colour Temp
Utilities
Normal
Noise reduction
Off
Time
MENU
Exit
Access
Position
Note:
Brightness : Adjusts the whole of screen brighter or darker.
Contrast : Adjusts difference between brightness and darkness between objects and background
on the screen.
Colour
: Adjusts colour thinly or thickly.
Tint
: Adjust the natural tint of the image.
Sharpness : Adjusts outline of the screen smoothly or sharply.
N.R.
: Reduce the noise in the picture due to poor reception or poor picture quality (Only in
TV, AV1/2, S-Video mode).
Note:
Tint activates when receiving a NTSC signal.
The adjusted levels are stored automatically in User mode.
Adjustment of Colour Temperature in TV
- Through colour temperature control, you can change the tone of colour.
1. Move to the Colour Temp menu with " PR " buttons.
Using the " VOL " buttons, select the desired Colour Temperature.
Sound
Note:
Normal
Warm
Cool
Normal
Mode
Picture
Brightness
50
Contrast
80
Colour
60
Tint
Install
0
Sharpness
50
Colour Temp
: Normal White
: Reddish White
: Bluish White
Utilities
Normal
Noise reduction
Off
Time
MENU
36
Exit
Position
Access
Sound
Adjustment
When selecting various sound modes
1. Sound mode selects what you want.
Press the "S-EFFECT" button, then the sound status changes as
followed:
Normal => User => Concert Hall => Live => Theater => Studio
Balance
Picture
Sound
Install
Utilities
Time
Off
Install
Utilities
Time
Off
Mode
User
Install
Utilities
0
300 Hz
0
1 kHz
0
3 kHz
0
3 kHz
10 kHz
0
DTV Volume
Exit
Install
Utilities
Time
Access
Position
0
300 Hz
0
1 kHz
0
0
0
DTV Volume
MENU
Exit
50
Access
Position
Balance
0
AVC
100 Hz
10 kHz
50
Off
Picture
0
AVC
Off
Effect
Off
Effect
Off
Mode
Studio
Mode
Concert Hall
Sound
100 Hz
0
300 Hz
0
1 kHz
0
3 kHz
0
10 kHz
0
DTV Volume
Exit
Install
Utilities
Time
Access
Position
Off
Effect
Off
Mode
Theater
0
300 Hz
0
1 kHz
0
3 kHz
Exit
Sound
Off
Mode
Live
0
0
0
3 kHz
0
3 kHz
Install
Utilities
100 Hz
0
300 Hz
0
1 kHz
0
0
10 kHz
0
50
Position
0
Off
Effect
1 kHz
Exit
Access
Position
AVC
300 Hz
MENU
0
50
Balance
Picture
100 Hz
DTV Volume
0
DTV Volume
MENU
0
AVC
100 Hz
10 kHz
50
10 kHz
Time
Sound
100 Hz
Balance
Sound
Off
Effect
Normal
MENU
Picture
0
AVC
Off
Mode
Balance
Sound
Picture
Effect
MENU
Picture
Balance
0
AVC
Time
Access
MENU
Note:
"Mode" function is available in Effect Off mode.
37
0
DTV Volume
Exit
50
Position
Access
Sound
Adjustment
When adjusting sound to taste
- The user can enjoy various the sound by adjusting Balance, AVC, Effect, Equaliser and Digital Volume.
1. Adjust the Balance
Move to Balance in the Sound menu.
Adjust the balance level by using the "
buttons.
Balance
Picture
VOL
Sound
"
0
AVC
Off
Effect
Off
Mode
Theater
Install
100 Hz
0
300 Hz
0
1 kHz
0
3 kHz
Utilities
0
10 kHz
Time
MENU
2. Select AVC (Auto Volume Control)
Move to AVC in the Sound menu.
Select either AVC ON or OFF using the "
buttons.
0
DTV Volume
Exit
50
Balance
Picture
VOL
Sound
"
0
AVC
Off
Effect
Off
Mode
Theater
Install
100 Hz
0
300 Hz
0
1 kHz
0
3 kHz
Utilities
0
10 kHz
MENU
Exit
3. Sound mode selects what you want.
Move to Effect in the Sound menu.
Select desirable Effect using the " VOL " buttons.
Off => BBE => M.voice => 3D Panorama,
Balance
Sound
Install
Utilities
Time
Off
Effect
Off
Mode
Theater
Utilities
Off
Effect
BBE
Mode
Theater
100 Hz
0
0
0
1 kHz
0
3 kHz
0
3 kHz
0
10 kHz
0
0
1 kHz
DTV Volume
Exit
Install
Utilities
10 kHz
50
Time
Access
Position
M. voice
Mode
Theater
Exit
50
Access
Position
Balance
Picture
Off
Effect
0
DTV Volume
MENU
0
AVC
Sound
0
AVC
Off
Effect
3D Panorama
Mode
Theater
0
100 Hz
0
300 Hz
0
300 Hz
0
1 kHz
0
1 kHz
0
3 kHz
0
10 kHz
Time
0
AVC
300 Hz
0
100 Hz
Install
Sound
100 Hz
Balance
Sound
Picture
300 Hz
MENU
Picture
Balance
0
AVC
Exit
Utilities
50
Position
3 kHz
0
10 kHz
0
DTV Volume
MENU
Install
Time
MENU
Access
38
0
DTV Volume
Exit
50
Position
0
DTV Volume
Time
Picture
Access
Position
Access
50
Position
Access
Sound
Adjustment
4. Adjust the Audio Equalizer
Move to Balance in the Sound menu.
Adjust User mode using the " VOL " buttons.
Select and use the relevant frequency by pressing the
" PR " buttons.
You can adjust the degree of the frequency by using
the " VOL " buttons.
Balance
Picture
Sound
Install
Utilities
0
AVC
Off
Effect
Off
Mode
User
100 Hz
0
300 Hz
0
1 kHz
0
3 kHz
0
10 kHz
Time
0
DTV Volume
MENU
Exit
50
Adjust
Position
Note:
Equalizer adjustment is available in User mode.
Equalizer: High quality sound range adjustment
method used for audio product.
100 Hz, 300 Hz: Low sound range
1 kHz, 3 kHz: Middle sound range
10kHz: High sound range
Balance
5. Adjust the Digital volume
Move to Digital volume in the Sound menu.
Adjust the Digital volume level by using the
" VOL " buttons.
Picture
Sound
Install
Utilities
0
AVC
Off
Effect
Off
Mode
User
100 Hz
0
300 Hz
0
1 kHz
0
3 kHz
0
10 kHz
Time
MENU
Note:
Digital volume is available in DTV (DVB-T) mode.
39
0
DTV Volume
Exit
50
Position
Adjust
Sound
Adjustment
Stereo and MPEG/Dolby Digital (Digital TV mode only)
1. Mono Sound Selection
In Stereo reception if the stereo is weak, you can switch to MONO by
pressing the "
" button. The OSD character will be change
to "F Mono".
In Mono reception, the depth of sound is improved.
To switch back to stereo, press the "
" button again.
F Mono
Mono
Note.
"
" only works in RF mode.
2. MPEG/Dolby Sound Selection
In DTV (DVB-T) broadcast reception, you can switch MPEG to Dolby
Digital by pressing the "
" button repeatedly.
40
Utilities
Adjustment of Aspect ratio in TV/Video/Component mode
1. Press the "ASPECT" button
The screen changes as below whenever pressing the "ASPECT" button.
Wide [16:9] => Zoom 1 => Zoom 2 => Normal [4:3]
2. Adjust the Aspect ratio
Move to Aspect Ratio in the Utilities menu.
Aspect ratio changes as below by pressing the
" VOL " buttons.
Wide[16:9]
Aspect ratio
Picture
Sound
Subtitle
Off
Lock
Access
MGDI plus DEMO
Demo
Install
Utilities
Time
MENU
Wide[16:9]
Zoom1
Normal[4:3]
Zoom2
Exit
Position
Note:
Wide[16:9]
: 16:9 will display a true 16:9 (anamorphic) picture with no aspect distortions.
Zoom 1
: Enlarge vertical size of the Wide[16:9] picture.
Zoom2
: Move the Zoom1 picture to the upper direction.
Normal [4:3] : General TV screen currently broadcasted.
"Aspect" function is not available in Multimedia (PC and HDMI) mode.
41
Access
Utilities
Subtitle (Digital TV mode only)
1. Setup of Subtitle
Move to Subtitle in the Utilities menu.
Select Subtitle to "On/Off" using the "
Wide[16:9]
Aspect ratio
Picture
VOL " button.
Sound
Subtitle
Off
Lock
Access
MGDI plus DEMO
Demo
Install
Utilities
Time
MENU
Exit
Access
Position
Lock
Move to Lock in the Utilities menu.
If Lock is already set, enter the password as requested.
Whenever pressing the " PR " buttons, you can
select in the order of set password, Block programme,
and parental guidance.
You can adjust all items by pressing the " VOL "
button.
Note:
The TV is set up with the initial password ‘0000’.
Wide[16:9]
Aspect ratio
Picture
Sound
Subtitle
Off
Lock
Access
MGDI plus DEMO
Demo
Install
Utilities
Time
MENU
Exit
Wide[16:9]
Aspect ratio
Picture
Access
Position
Subtitle
Off
Lock
Sound
Access
MGDI plus DEMO
EnterDemo
Password
*
*
*
*
Press Number Key
Install
Utilities
Time
MENU
1. Set password
Move to Set password in the Lock menu.
Press the " VOL " buttons to access the Set Password.
Change the password by inputting a new password twice by
pressing the “0 ~ 9” Number buttons.
Picture
Exit
Access
Position
Set password
Access
Block Programme
Access
Parental guidance
Off
Sound
Install
Utilities
Time
MENU
Exit
Access
Position
Set password
Picture
New
*
*
*
*
Confirm
*
*
*
*
Sound
Install
Utilities
Time
MENU
42
Prev.
0~9
Utilities
Lock
2. Block Programme
Move to Block Programme in the Lock menu.
Press the " VOL " buttons to access the Block
Programme.
Select a channel number that you wish to block by
pressing the "OK/SELECT" key.
PR+
Picture
MENU
VOL-
VOL+
Set password
Access
Block Programme
Access
Parental guidance
Off
Sound
Install
PRUtilities
Time
MENU
Exit
Access
Position
Block programme
Picture
Sound
Install
Utilities
Broadcast
Analog
Ch.
- -- -- -- -- -- -- -- -- -- --
Pr
00
01
02
03
04
05
06
07
08
09
Pr
10
11
12
13
14
15
16
17
18
19
Ch.
- -- -- -- -- -- -- -- -- -- --
Pr
20
21
22
23
24
25
26
27
28
29
Ch.
- -- -- -- -- -- -- -- -- -- --
Time
MENU
3. Parental guidance
Move to Parental guidance in the Lock menu.
Press the " VOL " buttons to access the Parental
guidance.
Select a grade by pressing the " VOL " key.
Prev.
Position
D/A
Digital/Analog
OK
Select
PR+
Picture
MENU
VOL-
VOL+
Set password
Access
Block Programme
Access
Parental guidance
Off
Sound
Install
PRUtilities
Time
MENU
Note:
Parental guidance (Digital TV mode only)
Prevents children from watching certain children’s TV
programs, according to the ratings limit set.
Blocking Off
R
AV
MA
M
PG
G
Access
Position
Block programme
Picture
Block level
Off
Off : Blocking off
Sound
R : Restricted
AV : Adult audiences
Install
MA : Mature adult audiences
M : Mature audiences
Utilities
: Permits all programs
: Restricted
: Adult audiences
: Mature adult audiences
: Mature audiences
: Parental guidance suggested
: General audience
Exit
PG : Parental guidance suggested
G : General audience
Time
MENU
If you forget your password, you should contact retailer or service agent
43
Prev.
Access
Utilities
Child Lock
1. Press the "LOCK" button
The lock changes either On or Off whenever pressing the "LOCK" button.
Note.:
This prevents the use of the TV set without the remote control.
If the Child Lock is "On", the set can only be switched back on using the remote control.
Hotel Lock
In the Hotel Lock mode, the Install menu is not displayed and the Volume controls is limited by 60.
If you want to set up Hotel Lock mode, contact your retailer or service agent.
Adjustment of Time
1. Setup of Auto Clock
Move to Auto clock in the Utilities menu.
Select Auto clock to "On/Off" using the " VOL
PR+
Off
Auto clock
Picture
MENU
VOL-
12 : 00 A.M.
On time
VOL+
" button.
Set Current time
Sound
Off
On time setup
12 : 00 A.M.
Off time
Install
PR-
Off
Off time setup
12 : 00 A.M.
On time PR
Utilities
DTV 0
On time volume
20
Time zone
NSW/ACT
Time
MENU
Exit
Access
Position
2. Setting the Current Time
Auto clock
Set Current time
Move to Set Current time in the Time menu.
On time
On time setup
To go to the Set Current time, press the " VOL " buttons.
Off time
Place the cursor to Month with " VOL " buttons.
Off time setup
On time PR
Set the Month with the " PR " buttons and then press the
On time volume
Time zone
Menu button to complete.
Place the cursor to Day with " VOL " buttons.
Set the Day with the " PR " buttons and then press the
Menu button to complete.
Place the cursor to Year with " VOL " buttons.
Set the Year with the " PR " buttons and then press the Menu button to complete.
Place the cursor to Clock with " VOL " buttons.
Set the Clock with the " PR " buttons and then press the Menu button to complete.
Place the cursor to Minute with " VOL " buttons.
Set the Minute with the " PR " buttons and then press the Menu button to complete.
Place the cursor to AM/PM with " VOL " buttons.
Set the AM/PM with the " PR " buttons and then press the Menu button to complete.
PR+
Off
12 : 00 A.M.
Picture
MENU
02
VOL-
VOL+
/
Sound
Install
02
2006
12
:
Off
00
A.M.
12 : 00 A.M.
Off
12 : 00 A.M.
DTV 0
PR-
Utilities
20
NSW/ACT
Time
MENU
44
Exit
Position
Access
Utilities
3. Setting the On time / On time Setup / On time PR /
On time Volume
Move to On Time in the Time menu.
Select the On time to "on" using the " VOL " button.
Picture
Set Current time
12 : 00 A.M.
On time
MENU
Sound
VOL-
On
Auto clock
PR+
VOL+
On time setup
On
12 : 00 A.M.
Off time
Install
Off time setup
Off
12 : 00 A.M.
On time PR
PR-
Utilities
DTV 0
On time volume
20
Time zone
NSW/ACT
Time
MENU
Move to On time setup with the " PR " buttons.
To go to On time setup, press the " VOL " buttons.
Place the cursor to Clock with " VOL " buttons.
Set the Clock with the " PR " buttons and then press
the Menu button to complete.
Place the cursor to Minute with " VOL " buttons.
Set the Minute with the " PR " buttons and then
press the Menu button to complete.
Place the cursor to AM/PM with " VOL " buttons.
Set the AM/PM with the " PR " buttons and then
press the Menu button to complete.
PR+
Set Current time
On
12 : 00 A.M.
On time
MENU
VOL+
Sound
On time setup
On
12 : 00 A.M.
Off time
Install
Off time setup
Off
12 : 00 A.M.
On time PR
PR-
Utilities
Access
Position
Auto clock
Picture
VOL-
Exit
DTV 0
On time volume
20
Time zone
NSW/ACT
Time
MENU
Exit
On
Auto clock
Picture
Set Current time
12 : 00 A.M.
On time
Sound
On time setup
On
12 : 00 A.M.
Off time
Install
Off time setup
Off
12 : 00 A.M.
On time PR
Utilities
Access
Position
DTV 0
On time volume
20
Time zone
NSW/ACT
Time
MENU
Move to On time PR in the Time menu.
Select the On time PR to desirable PR using the
" VOL " button.
PR+
Set Current time
On
12 : 00 A.M.
On time
MENU
VOL+
Sound
On time setup
On
12 : 00 A.M.
Off time
Install
Off time setup
Off
12 : 00 A.M.
On time PR
PRUtilities
Access
Position
Auto clock
Picture
VOL-
Exit
DTV 0
On time volume
20
Time zone
NSW/ACT
Time
MENU
Move to On time PR in the Time menu.
Select the On time PR to desirable PR using the
" VOL " button.
Exit
On
Auto clock
Picture
Set Current time
12 : 00 A.M.
On time
Sound
On time setup
On
12 : 00 A.M.
Off time
Install
Off time setup
Adjusts
Position
Off
12 : 00 A.M.
On time PR
DTV 0
On time volume
Note:
Time zone
Confirm the Current Time is set. The On time is only available
when the Current Time is set.
The set will be turned on at selected time.
If adjusted once, the On time continues to operate everyday unless cancelling setup or turn the AC power off.
It is a convenient method to wake you up in the morning.
LED colour is changed to orange colour in On/Off timer mode.
Utilities
20
NSW/ACT
Time
MENU
45
Exit
Position
Adjust
Utilities
4. Setting the Off time / Off time Setup
Move to Off Time in the Time menu
Select the Off Time to "On using the " VOL
PR+
Set Current time
12 : 00 A.M.
On time
MENU
VOL-
On
Auto clock
Picture
VOL+
Sound
" button.
On time setup
On
12 : 00 A.M.
Off time
Install
Off time setup
On
12 : 00 A.M.
On time PR
PRUtilities
DTV 0
On time volume
20
Time zone
NSW/ACT
Time
MENU
Move to On time setup with the " PR " buttons.
To go to On time setup, press the " VOL " buttons.
Place the cursor to Clock with " VOL " buttons.
Set the Clock with the " PR " buttons and then press
the Menu button to complete.
Place the cursor to Minute with " VOL " buttons.
Set the Minute with the " PR " buttons and then
press the Menu button to complete.
Place the cursor to AM/PM with " VOL " buttons.
Set the AM/PM with the " PR " buttons and then
press the Menu button to complete.
PR+
Set Current time
On
12 : 00 A.M.
On time
VOL+
Sound
On time setup
On
12 : 00 A.M.
Off time
Install
Off time setup
On
12 : 00 A.M.
On time PR
PRUtilities
Adjust
Position
Auto clock
Picture
MENU
VOL-
Exit
DTV 0
On time volume
20
Time zone
NSW/ACT
Time
MENU
Exit
On
Auto clock
Picture
Set Current time
12 : 00 A.M.
On time
Sound
On time setup
On
12 : 00 A.M.
Off time
Install
Off time setup
On
12 : 00 A.M.
On time PR
Utilities
Adjust
Position
DTV 0
On time volume
20
Time zone
NSW/ACT
Time
MENU
Exit
Position
Adjust
5. Press the "SLEEP" button
By pressing the "SLEEP" button on the remote controller repeatedly,
you can select one of the following settings:
Sleet Timer: Off => 30 => 60 => 90 => 120 => Off
Then set will turn off after the time you select.
Note:
Information of Auto clock is required to DTV (DVB-T) signal.
If an active signal is not present for about 30 minutes, the set will automatically turn to ST-BY mode.
46
PIP (Picture-In-Picture)/
POP (Picture-Of-Picture)
1. Watching PIP/POP
By pressing the "PIP/POP" button on the remote controller repeatedly,
you can select one of the following settings:
If you want to change the position of sub picture,
press the "P.POSITION" button.
47
PIP(Picture-In-Picture)/
POP(Picture-Of-Picture)
If you want to swap main for sub, press the “P.SWAP” button.
If you want to change sub screen input, press the “P.INPUT” button.
Sub screen change as followed : PIP/POP table
PIP/POP mode table.
Main
Sub ATV
X
X
X
X
O
O
X
X
ATV
DTV
Video1
Video 2
Comp.1
Comp.2
HDMI
PC
DTV
X
X
O
O
O
O
X
X
Video1 Video2
X
X
O
O
X
X
X
X
X
X
X
X
X
X
X
X
Comp.1 Comp.2 HDMI
O
O
X
O
O
X
X
X
X
X
X
X
X
X
X
X
X
X
X
X
X
X
X
X
48
PC
X
X
X
X
X
X
X
X
Teletext
Teletext
SWITCHING TELETEXT ON/OFF
Press the “TELETEXT” button ( ).
The index page or the page viewed last will appear.
Repeatedly press the “TELETEXT” button the mode in the following order:
TV=> TELETEXT => TV
NOTE: Teletext works only in TV/VIDEO mode.
COLOUR BUTTONS IN TOP/FLOF TELETEXT
A red, green, yellow and blue field is shown at the bottom of the screen.
If TOP or FLOF Teletext is transmitted by the station, pressing the corresponding colour button R,G,Y,B on the remote
controller, enables you to select the desired page easily.
SELECTING PAGES
The "NUMBER" buttons are used to enter a page number.
The selected page number appears at the top of the screen and the page appears after a short time.
The "PR" buttons increase or decrease the current page number by 1.
INDEX PAGE
You can switch directly to the programme preview (with TOP text) or the overview page of the station you are currently
viewing by pressing the “INDEX” button (
).
PAGE HOLD
Several sub pages can be combined under a page number and are scrolled at an interval determined by the television
station. The presence of sub pages is indicated by, for example, 3/6 beneath the time, which means that you are
looking at the 3rd page of a total of 6 pages.
If you want to look at a subpage for a longer period of time, press the "HOLD" button (
).
The HOLD symbol appears and the contents of the subpage shown are kept on the screen and no longer updated or
switched to other subpages. Pressing the "HOLD" button again, the current subpage appears.
CALLING UP SUBPAGE DIRECTLY
Pressing the “SUBPAGE” button (
) , " - - - - " appears.
Enter the subpage number that you want to call up with the "NUMBER" button, for example, the
2nd page, sequence 0002.
The desired subpage will eventually be displayed on the screen and holds it there.
Meanwhile whilst you are waiting, it is possible to go back to the TV picture by pressing the "CANCEL" button ( ) on
the remote and after a while, press the “CANCEL” button again to revert back to the saved Teletext sub page.
WATCHING TV DURING TELETEXT MODE
Some pages are continually updated, for example, stock market reports, sports announcements, and the latest news.
If you want to watch television and stay informed at the same time, press "CANCEL" button (
).
The regular programme is still visible and the updated Teletext page number appears at the top of the screen.
Pressing the "CANCEL" button again, the Teletext page appears with the updated information.
REVEAL ANSWER
This function can be used on certain pages to reveal the solution of riddles.
Press the "REVEAL" button (
) to reveal a hidden answer and press again to hide it.
DOUBLING CHARACTER SIZE
Repeatedly pressing the “SIZE” button ( ) doubles the character size in the following order:
Upper half of the page => Lower half of the page => Normal size => Upper half of the page
MIX
By pressing the "MIX" button ( ), the teletext pages will be separated with the TEXT on the left of the TV picture.
Press the "MIX" button again to return back to teletext pages.
49
Channel Banner
(Digital TV mode only)
Channel Banner
- The channel banner displays information about a channel number, name, broadcasting time, audio
service and more. You can see this banner by pressing "RECALL" button or " PR " buttons on the
Remote Control.
Digital five [1]
MPEG
-- / -- - -- --:--
The Streets of San Francisco [P.M. 02:35 ~ P.M. 03:37]
Strong
Five News Update [A.M. 01:38 ~ A.M. 03:39]
English
4. General Information
Channel number: Displays the current channel number
Channel name: Displays the current channel number
Program name: Displays the current Program number
Program time: Displays the current / next program time (start ~ end).
Parental guidance: Displays the current program rating.
Current time: Displays the current time
Audio status: Displays the current audio status.
50
Electronic Program
Guide (EPG)
- The DTV Electronic Program Guide (EPG) displays program information
about each channel, up to seven days ahead.
- You can edit your own profiles, and record programs.
- By pressing the "GUIDE" button to access EPG directly, you can see all
channels broadcasting now.
Note:
The EPG channel is only available when watching DVB channels.
1. Select a desired channel
Select a channel with the " PR " buttons.
Press the GUIDE button.
Move a programme with the " PR " buttons.
If you need detail information, press the "RECALL" button.
Channel information
ABC TV Sydney [2]
ABC News
The 7.30 Report
ABC HDTV [20]
ABC HDTV
The 7.30 Report
Blind Boys of Alabama
Second opinion
ABC TV [22]
No Broadcasting Info
No Broadcasting Info
ABC DiG Radio [200]
No Broadcasting Info
No Broadcasting Info
ABC DiG Jazz [20]
No Broadcasting Info
ABC2 [21]
MENU
51
Exit
Position
Recall
No Broadcasting Info
Detail
OK
Go
Troubleshooting
Symptoms and Solutions
Please check the following items before asking for repair service.
Symptom
Neither picture
nor sound
Check items
- Check the contact of sockets is all right.
- Check the TV main power is on.
Picture is OK
but no sound
- Check the Volume control is set to minimum or mute.
Sound is OK, but
no colour.
- Check the colour control and adjust it properly.
- Check the program is in colour and not in black & white.
The picture has
image.
- Check the antenna is installed correctly and if not, adjust the overlapped
antenna toward the broadcasting station.
Picture has "snow
noise".
- Check the antenna or its connection is correct and if not, correct the
antenna fault or connection cable fault.
- Check if car traffic or neon sign disturbs the sound effect.
Stripes on
picture.
- Check the susceptible interference by other electronic devices such
as radio and television and keep magnetic or electronic devices
away from the TV.
Bad stereo or Dual
sound.
- Long distance from the station or other radio waves can generate
bad sound reception. If so, change the mode to Mono.
Remote control
does not
work.
- Check if the batteries in the Remote control are dead.
- Check if any object between IR sensor of the TV and the Remote
control does not obstruct.
- Check if the TV is on Teletext mode.
52
Troubleshooting
In DVB-T mode
Some Problems will only occur when viewing DVB channels.
Due to the different techniques involved in digital reception, DVB signal quality can be poor even if you
appear to have a strong signal when viewing analogue porgrammes.
The DVB system requires a good quality signal to provide the best picture. When viewing analogue pictures,
interference such as reflection from nearby buildings or mountains causes 'ghosting' but still provides a
viewable picture. For the DVB system, interference such as this can disrupt the flow of data causing the picture
to be made up of large blocks, or to freeze intermittently. If the picture disappears completely, this could mean
that signal quality is very poor. If this happens often, you may need to improve your aerial system to provide a
better signal. This TV contains a complex microprocessor which enables you to view enhanced digital services.
Occasionally this device may need to be reset. This can be done by pressing the stand-by button on your
remote control or the power switch on the front panel.
Symptom
No DVB Channels listed in the
TV Guide after Auto Programme
Blocky interference.
Picture freezes intermittently
Check
Check that DVB transmissions are available from the
transmitter you are currently using. If not, try directing the
aerial at another local transmitter.
Check analogue transmissions. If picture quality is poor, you
will need to improve or change your aerial system to receive
DVB channels. Consult a local installer.
Blocky interference indicates that the signal quality is poor.
You should consider improving your aerial system.
To check the quality of your signal use the Signal strength
(See page 32).
53
Troubleshooting
In PC mode
Symptom
"Not available signal"
appears on
the screen.
"No signal"
appears on
the screen.
Image is not
clear.
Image is not
centred.
Check
- Check the resolution and frequency of your PC. Then, adjust them
to optimum condition for LCD TV.
- Refer to the table of PC mode input format.
(If registered resolution and frequency on the table no listed then
no picture will be displayed.)
- Ensure that the signal is firmly connected to PC and TV.
- Adjust the PHASE control.
- Ensure that the desktop area has no black area in outer side.
- Execute Auto Setup.
• AFTER SALES SERVICE
Do not hesitate to contact your retailer or service agent if a change in the performance of your product
indicates that a faulty condition may be present.
54
Standard of
Product
LCD Panel
Screen Size
68cm
81cm
93cm
106cm
Aspect Ratio
16:9
16:9
16:9
16:9
Resolution
1366 x 768 (WXGA)
1366 x 768 (WXGA)
1366 x 768 (WXGA)
1366 x 768 (WXGA)
Pixel Pitch
0.4215mm
0.51075 mm
0.6000 mm
0.6810 mm
Contrast Ratio
3000:1
3000:1
3000:1
3000:1
674 x 550 x 240 mm
806 x 574.5 x 240 mm
940 x 720.5 x 329 mm
1060 x 823 x 329 mm
Dimension (W x H x D) Set Dimension
TV System
Receiving
System
PAL-B/G, B/H, DVB-T, NTSC(AV)
220 -240V~, 50/60Hz
Power Source
Owing to our policy of continuous improvement, specifications may change.
55
PALSONIC CORPORATION PTY. LTD.
(Incorporated in NSW)
1 Joynton Avenue
WATERLOO NSW 2017
Telephone: 02 9313 7111 - Fax: 02 9313 7555
48586300E10H-R0