1
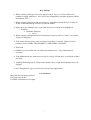
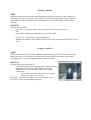
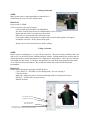
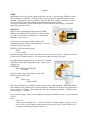
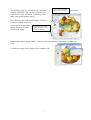
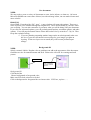
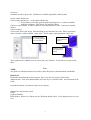
Sahli GIMP Tutorials
The Gimp is a free photo editing program similar to Photoshop but not. It has many of the same
tools at a fraction of the cost. Photoshop is a great program for professional designers and photo
enthusiasts. Gimp is a great program for educators and any home user who is willing to
experiment a bit. Gimp’s interface and tools can take some getting used to. It s not completely
user friendly but is incredibly useful. For those times when we become confused, Gimp has
thousands of users who are willing to help and guide through a variety of forum pages. some
good ones are below.
http://www.gimptalk.com
http://gimp-tutorials.net
http://registry.gimp.org/
http://www.ghuj.com/
http://gimpology.com/
http://docs.gimp.org/en/ (online gimp user’s manual)
This short 15 hour class will attempt to familiarize all with its tools and basic processes.
We first must become familiar with THE GIMP’S beginning interface. The identified icons will
be important for this class.
Rotate. Rotates and
spins image as needed.
Scale. Resizes the image or
layer. Make sure the “keep
aspect “ box is checked or hold
crtl to keep size consistent
Scissor Select tool. Used to
go around items. First and
last click should be same
place. Click in center to
completely select.
Crop tool. Click and drag to
make selection. Selection can
be adjusted with visible boxes.
Hit ENTER to crop to
selection.
Move tool. Used to move
items, layers or text. Make
sure your proper layer etc is
selected before using.
Bucket Tool. Fills in
selected area. Make sure
WHOLE selection is
identified.
Text Tool. Will act as a
layer Can be edited and
saved as text.
Eraser tool. Will be useful
when working with layers.
Erases selection to reveal the
layer behind. Can be set to
different transparencies.
Color Select. Selects similar
colors. Selections can then
be edited or deleted….etc
Paint Brush. Use to color
around items. Color can be
changed based on color
identifier.
Foreground (black)
background(white). Toggle
between the two using the buttons
below them. Clicking the color
will allow color change.
1
Gradient fill. Fills in
selected area through userselected gradients.
Keys and tips
When working with layers save early and save often. Save as .xcf to be allowed to
continue working with layers. Save as JPG for compatibility with other programs (Word,
PowerPoint, ETC..)
When working with picture and non text layers, immediately name the layer. Failure to
do this could flatten image and layer will not be usable.
Make sure Layer Dialogue box is open and layer to be working on is highlighted.
o Windows
Dockable dialogues
• Layers
When coloring a background after selection don’t forget to “Select” “Invert” or selected
image will disappear
If the eraser does not erase, make sure that correct layer is selected. If that is not the
problem, click LAYERS-TRANSPARNCY-ADD ALPHA CHANNEL
Edit-Undo
GIMP is not a text editor but can modify and enhance text…Layer information is
necessary.
Text enhancements are often times new layers, so they will not move or edit with original
text layer.
Anything Photoshop can do Gimp can do cheaper (free). High end Photoshop users will
disagree.
Save final photo as .jpg so it can be used by any other applications.
Coool features
Drag and drop opening of pictures
File create screen shot
It’s FREE Donations are accepted.
2
Resizing a PHOTO
NEED
Many documents do not need the super high quality that many cameras are now capable of.
How many times have we gone to a web page or received an emailed photo that took up too
much of the screen? Resizing to ease in sending and receiving and loading is an absolute
necessity.
PROCESS
Open picture in GIMP
File- Open put picture from school computer here with network options.
OR
Open folder with pictures and pull one over to the GIMP.
Click “layer” “scale layer” to open dialogue box
Identify size wanted. Place width in first box then click in second and ratio will stay the
same.
Cropping a PHOTO
NEED
Often times a photo does not fit the needed proportion requirements of a document or a print.
Other times, there are sections of the photo that are not needed in the picture (Uncle Bob).
Cropping allows removal and proportioning of those situations.
PROCESS
Click the crop tool (Exacto Knife)
Click on an approximate beginning area of photo and drag
diagonally across to other approximate area of crop.
Lighter area is what is selected. Darker area will be
cropped out.
Corner boxes will show up on release of mouse.
These boxes allow for resizing.
Hit “Enter” when lines are where you want the picture to be.
File- Save or Save as depending on purpose.
3
Cutting a Selection
NEED
Many pictures have a background that is unneeded or a
selection needs to be moved to another place.
PROCESS
Open picture in GIMP
Click on Scissor select tool (scissors)
Click around object needed to be highlighted
The more contrast from object to background the easier it will be
Begin and end in the exact same spot (same dot)
Move lines to correspond with contrasted image
Click in the middle of selection to complete the selection (Moving lines will appear
around the selection). If they do not-start again.
Image is now selected and ready for further editing.
Filing a selection
NEED
Photos used for writing have a very specific need and use. We must be able to identify that need
and use for it to be useful for the students and their readers. Backgrounds left in pictures that are
printed and used for instruction purpose are a hindrance to that purpose. I have become familiar
with GIMP for this reason. Cool layers and gradients are neat in the right application but often
we as educators do not need them. We need pictures that help with our instruction and
presentation.
PROCESS
Image should already be selected as identified above.
Click SELECT---INVERT to select background See note on page 2
Click the bucket
Make sure whole selection is selected and background or foreground is chosen
SELECT—NONE and crop as necessary
ERASE mistakes
Foreground color Fill
Background color Fill
Fill whole selection
If area is selected
Fill similar colors
If background has already been changed or deleted
4
Layers
NEED
Photographs used for a specific purpose often have needs. If you are using GIMP to create a
flyer, announce a celebration, or fool a relative, layers make it all possible and more easily
editable. Working with layers in GIMP is a process that can be tough to learn but worth it.
Layers will allow individual editing without adjusting the whole product.
The steps to familiarize oneself with the process will include layered images. Simplified
(hopefully) steps are below.
PROCESS
Begin with two photographs both opened in GIMP.
Identify which photo will be edited to be placed on the
top. Here we will place a pineapple on a fruit basket.
Pineapple will be on top.
Crop and select just image needed. Remove all
background from the item as discussed earlier. We now
need to copy selected image.
RIGHT CLICK on selected Image
EDIT
CUT or COPY
Original pineapple picture is now basically done unless errors are evident. Minimize window.
Do not close or change selection. We may need to right click edit copy again.
Bring Background picture back to working area. Here the
fruit basket will be the background image. Open Layer
dialogue box
WINDOWS
DOCKABLE DIALOGUES
LAYERS
We now need to paste the pineapple on the fruit.
RIGHT CLICK on the fruit
EDIT
PASTE AS
NEW LAYER
In the layer dialogue box, change the name of the newly pasted pineapple. This makes further
layer editing easier, and allows for continued editing. Double click on the newly pasted layer; it
may be called “clipboard”. Then change the name to something identifiable. I called the new
layer pineapple……hehehe
Save your new image. Image is not complete, but progress should be saved, so you do not have
to redo.
FILE
SAVE AS
Choose a name and add .xcf Dot xcf will allow for further editing of layers. If you
leave it JPG, you will flatten image and lose layer options, BUT it must be JPG to be
recognized in other applications (word etc…)
5
The following steps are concerned with editing the
merging when done. The top layer often does not
come in the correct orientation. It also may need
some color and brightness editing.
“Flip” If item needs some
flipping, this is the button
layers and
We will first resize (scale) the pineapple. This will
work best with the scale icon.
Click scale then image Pull
and push corners to where
you want the image.
“Keep Aspect” Box should
be checked unless you want
to hold the Crtl button
Rotating the image is pretty similar. Click the rotate icon and twist layer until it is where you
want.
To make the image perfect, adjust color, brightness etc…
6
New document
NEED
We may need to create a variety of documents to warn, invite, inform, or whatever. Of course
Microsoft WORD can create some of these, but with an image editor, one can make it better and
more colorful.
PROCESS
Open GIMP. From there hit “file” “new”. A new window will open with options. There are a
series of preset sizes available through the template box. These will be handy if you know what
you are doing. You can also customize if you know what you will be doing with your document.
If you click on “advanced options, you will get background options, resolution options, and other
options. For a full page document choose Letter then reduce size by an inch so 7.5 by 10. That
keeps the resolution strong.
If you are planning on putting another image on the new background, make sure
the size of your new document is not too large for your images you plan on
layering. IF the new layers are too small, they will become pixilated upon
enlarge.
Background fill
NEED
Strictly cosmetic I think. Regular color or gradients can add to the appearance of the document.
Gradients are nice for announcements and such. Plain color will work for warnings and wall
posters.
Plain color
One of a million
possible gradient
options
Background fill
Click the bucket
Choose background or foreground color
Make sure Fill whole selection is clicked
Click on background or foreground box to choose color. If FG box, top box……
7
Gradients
Gradients are fun to play with. Gradients are editable, adjustable, and layerable.
Jus the simple nickel tour
Click on the gradient box….to the right of the bucket.
It may then be easiest to open the gradient dialogue box…window-dockable
dialogues-gradients. This allows for possible editing
Choose a color scheme. It can be edited for color and pattern of color. Choices are literally
endless
Choose a shape.
Click on one area of the image Hold and drag in any direction you want. Pull it and release.
Some will take a while to blend. Allow time. This is where experimentation will be fun.
A line will appear
as you drag gradient
across document
Example of long
pull repetition of
pattern
Example of short
pull repetition of
pattern
These gradients are editable as far as colors and color schemes. It will not be covered on this
sheet.
Text
NEED
Any poster or announcement needs words to make the poster or announcement worthwhile.
PROCESS
Remember the limitations of the program. Have your text set in place before many
enhancements. Some text enhancements are a new layer so watch for that. Also remember Edit
Undo
Open the document you plan on using for text options.
Students for drop shadow on ad
Filters
Light and shadow
Drop shadow. Make two of these one two different altoids colors. Sizes depend on size of your
text.
8