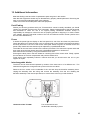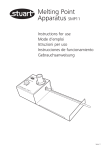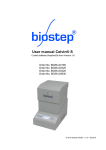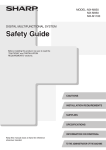
1
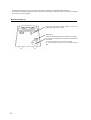
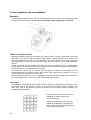
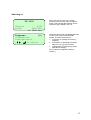
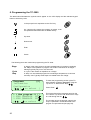
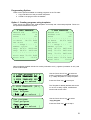
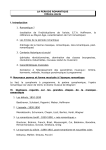
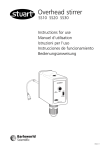
TC-3000 Operator’s Manual v1.0 2 Contents 1. Introduction..........................................................................................................5 Unpacking ..............................................................................................................5 Warning!.................................................................................................................5 2. Safety and installation.........................................................................................6 English ...................................................................................................................6 Français .................................................................................................................7 Deutsch ..................................................................................................................9 Español ................................................................................................................10 3. TC-3000 specification ........................................................................................14 4. User operation and consumables ....................................................................16 Heated lid .............................................................................................................16 Tubes or reaction vessels ....................................................................................16 0.5ml Tubes .........................................................................................................16 Switching on.........................................................................................................17 5. Front panel controls ..........................................................................................18 The LCD Display ..................................................................................................18 Indicators..............................................................................................................18 The keys...............................................................................................................19 6. Programming the TC-3000 ................................................................................20 Programming Options ..........................................................................................21 Option 1: Creating programs using templates ......................................................21 Option 2: Creating a new program .......................................................................25 Example programs ...............................................................................................26 Programming........................................................................................................26 To program increment or decrement temperature or time....................................29 To run a program .................................................................................................33 7. Information .........................................................................................................35 8. Configuration .....................................................................................................35 9. Running the TC-3000 from a PC .......................................................................38 Connecting one unit to the computer using an RS 232 cable...............................38 Connecting several units to the computer using the daisy chain cables ..............38 Upgrading the software in your TC-3000 .............................................................39 10. Notes on transferring protocols from other thermal cyclers .......................40 11. User maintenance............................................................................................41 Cleaning your TC-3000 ........................................................................................41 Heater Block removal...........................................................................................41 12. Some frequently asked questions..................................................................42 13. Additional information.....................................................................................43 Fault Finding ........................................................................................................43 Fuses ...................................................................................................................43 Interchangeable blocks ........................................................................................43 Accessories..........................................................................................................44 Replacement parts ...............................................................................................44 3 4 1. Introduction The TC-3000 provides the researcher with the means of accurately controlling the temperature profile of samples. It has many scientific applications, including DNA amplification1 and sequencing. The TC-3000 can cycle samples between 4°C and 99°C. The TC-3000 is programmed by means of an integral keypad and LCD display. A program, which can be recalled from memory, consists of: • a series of specified temperatures in °C • the times for which each specified temperature will be held (Hold Times) • the desired heating or cooling rates, in °C/sec, between each specified temperature • optional instructions as to whether the times and/or the temperatures are to increase or decrease when a cycle is repeated. The memory can store up to 80 programs. Before using the TC-3000 make sure you have read this manual carefully. If there is any doubt relating to the proper use of this equipment, the staff at Barloworld Scientific or your supplier will be happy to assist you. Unpacking When unpacking the unit, check that the following have been removed from the packing: • The TC-3000 unit • Mains cable • Guarantee card • The TC-3000 Operator’s Manual • The TC-3000 Reference Card Make sure you keep the original packing in case you ever need to return the unit for service or repair. Barloworld Scientific accepts no responsibility for damage incurred unless the unit is correctly packed and transported in its original packing. Warning! Position the unit so that the mains on/off switch is easily accessible and there is a minimum distance all around of 200mm from walls or other items. If a safety problem should be encountered, switch off at the mains socket and remove the plug from the supply. Never move or carry the unit when in use or connected to the mains electricity supply. The unit should be carried using both hands. Please note that the keypad on the TC-3000 is easily damaged by sharp objects such as pens, pencils and fingernails. Damage of this sort will be considered as misuse and will invalidate the guarantee on this component. Although the unit is designed to cool the samples to 4°C, prolonged incubations at this temperature may reduce the life of the cooling elements in the block. Where possible, it is advised to use an end of run hold temperature closer to ambient, e.g. 10ºC to 15°C in order to prolong the life of the cooling elements. 1 Aspects of the PCR process are claimed in USA Patent Nos. 4,683,195; 4,683,202, and 4,965,188. Use of the TC-3000 in such processes does not convey a licence to practice the processes themselves. 5 2. Safety and installation English Please read all the information in this manual before using the unit. Operator Safety All users of Techne equipment must have available the relevant literature needed to ensure their safety. It is important that only suitably trained personnel operate this equipment, in accordance with the instructions contained in this manual and with general safety standards and procedures. If the equipment is used in a manner not specified by Barloworld Scientific the protection provided by the equipment to the user may be impaired. All Techne units have been designed to conform to international safety requirements and are fitted with an overtemperature cut-out. On some models, the cut-out is adjustable and should be set to suit the application. On all other models the cut-out is preset to protect the unit. If a safety problem should be encountered, switch off at the mains socket and remove the plug from the supply. Warning HIGH TEMPERATURES ARE DANGEROUS: they can cause serious burns to operators and ignite combustible material. Barloworld Scientific have taken great care in the design of this unit to protect operators from hazards, but users should pay attention to the following points: • USE CARE AND WEAR PROTECTIVE GLOVES TO PROTECT HANDS. • DO NOT put hot objects on or near combustible material. • DO NOT operate the unit close to inflammable liquids or gases. • DO NOT place any liquid directly in your unit. Installation 1. All Techne units are supplied with a power cable. This may be integral or plug-in. 2. Before connecting the mains supply, check the voltage against the rating plate. Connect the mains cable to a suitable plug according to the table below. Note that the unit must be earthed to ensure proper electrical safety. Connections Live Neutral Earth 220/240V Brown Blue Green/yellow 110/120V Black White Green The fused plug supplied with the mains lead for use in the UK is fitted with the following value fuse to protect the cable: 230V UK, 10 AMP. The fuse in the unit protects the unit and the operator. Note that units marked 230V on the rating plate work at 220V; units marked 120V work at 110V. In both cases, however, the heating rate will degrade by approximately 8%. The rating plate is on the rear of the unit. 3. Plug the mains cable into the socket on the rear of the unit. 4. Place the unit on a suitable bench or flat workspace, or in a fume cupboard if required, ensuring that the air inlet vents on the underside are free from obstruction. 5. Note that the following symbol next to the indicator lamp on the front panel of the units and has the following meaning ~ : the power indicator 6. Symbols on or near the power switch of the unit have the following meanings: I : mains switch On O : mains switch Off The heated lid over-temperature cut-out The heated lid is fitted with an independent circuit to protect it from overheating. In the unlikely event of an overtemperature problem with the lid, the unit is fitted with a thermal fuse which will remove power to the heater plate should the maximum temperature be exceeded. Insulation testing This equipment is fitted with RFI suppression circuitry. Any check of the electrical insulation by means of high voltage dielectric testing (for example as in BS EN 61010-1) must be carried out using only a DC voltage. This unit contains semiconductor components which may be damaged by electric field effects. After use When you have finished heating samples, remember that parts of the unit – the tubes, block and associated accessories – may be very hot. Take the precautions listed earlier. 6 Guarantee The unit is guaranteed against any defect in material or workmanship for the period specified on the enclosed guarantee card. This period is from the date of purchase, and within this period all defective parts will be replaced free of charge provided that the defect is not the result of misuse, accident or negligence. Servicing under this guarantee should be obtained from the supplier. Notwithstanding the description and specification(s) of the units contained in the User’s Manual, Barloworld Scientific hereby reserves the right to make such changes as it sees fit to the units or to any component of the units. This Manual has been prepared solely for the convenience of Techne customers and nothing in this Manual shall be taken as a warranty, condition or representation concerning the description, merchantability, fitness for purpose or otherwise of the units or components. User maintenance NOTE THAT THIS EQUIPMENT SHOULD ONLY BE DISMANTLED BY PROPERLY TRAINED PERSONNEL. REMOVING THE SIDE, FRONT OR REAR PANELS EXPOSES POTENTIALLY LETHAL MAINS VOLTAGES. THERE ARE NO USER MAINTAINABLE PARTS WITHIN THE EQUIPMENT. In the unlikely event that you experience any problems with your unit which cannot easily be remedied, you should contact your supplier and return the unit if necessary. Please include any details of the fault observed and remember to return the unit in its original packing. Barloworld Scientific accepts no responsibility for damage to units which are not properly packed for shipping: if in doubt, contact your supplier. See the Decontamination Certificate supplied with your unit. 1. Cleaning Before cleaning your unit ALWAYS disconnect from the power supply and allow to cool below 50° C. Your unit can be cleaned by wiping with a damp soapy cloth. Care should be exercised to prevent water from running inside the unit. Do not use abrasive cleaners. 2. Fuses Your unit is protected by one or two fuses. These should only be changed by suitably qualified personnel. If the fuses blow persistently, a serious fault is indicated and you may need to return the unit to your supplier for repair. Français Veuillez lire attentivement toutes les instructions de ce document avant d’utiliser l’appareil. Sécurité de l’opérateur Tous les utilisateurs de produits Techne doivent avoir pris connaissance des manuels et instructions nécessaires à la garantie de leur sécurité. Important : cet appareil doit impérativement être manipulé par un personnel qualifié et utilisé selon les instructions données dans ce document, en accord avec les normes et procédures de sécurité générales. Dans le cas où cet appareil ne serait pas utilisé selon les consignes précisées par Techne, la protection pour l’utilisateur ne serait alors plus garantie. Tous les appareils Techne sont conçus pour répondre aux normes de sécurité internationales et sont dotés d’un coupecircuit en cas d’excès de température. Sur certains modèles, ce coupe-circuit est réglable pour s’adapter à l’application désirée. Sur d’autres modèles, il est pré-réglée en usine pour assurer la protection de l’appareil. Dans le cas d’un problème de sécurité, coupez l’alimentation électrique au niveau de la prise murale et enlevez la prise connectée à l’appareil. Avertissement DANGER DE TEMPERATURES ELEVEES : les opérateurs peuvent subir de graves brûlures et les matériaux combustibles risquent de prendre feu. Techne a apporté un soin tout particulier à la conception de ces appareils de façon à assurer une protection maximale des opérateurs, mais il est recommandé aux utilisateurs de porter une attention spéciale aux points suivants : PROCEDER AVEC SOIN ET PORTER DES GANTS POUR SE PROTEGER LES MAINS. • NE PAS poser d’objets chauds sur ou près de matériaux combustibles. • NE PAS utiliser l’appareil à proximité de liquides ou de gaz inflammables. • NE PAS verser de liquide directement dans l’appareil. Installation 1. Tous les appareils Techne sont livrés avec un câble d’alimentation qui peut être intégré à l’appareil ou à raccorder. 2.Avant de brancher l’appareil, vérifiez la tension requise indiquée sur la plaque d’identification. Raccordez le câble électrique à la prise appropriée en vous reportant au tableau ci-dessous. Il est important que l’appareil soit relié à la terre pour assurer la protection électrique requise. Connexions Phase Neutre Terre 220/240 V Marron Blue Vert/juane 110/120 V Noir Blanc Vert 7 Le fusible à l’intérieur de l’appareil est destiné à assurer la protection de l’appareil et de l’opérateur. Remarque : les appareils dont la plaque indique 230 V peuvent fonctionner sur 220 V, et ceux dont la plaque indique 120 V peuvent fonctionner sur 110 V. Dans les deux cas cependant, le capacité de chauffage diminuera d’environ 8 %. La plaque d’identification se trouve à l’arrière de l’appareil. 3. Raccordez le câble d’alimentation à la prise située à l’arrière de l’appareil. 4. Placez l’appareil sur un plan de travail ou surface plane, ou le cas échéant, dans une hotte d’aspiration, en s’assurant que les trous d’aération situés sous l’appareil ne sont pas obstrués. 5. Les symboles ci-dessous situés à côté des témoins lumineux sur la face avant de l’appareil ont la signification suivante: ~ : témoin d’alimentation 6. Les symboles situés sur ou à côté de l’interrupteur de l’appareil ont la signification suivante : O : arrêt l : marche Le couvercle de chauffage au-dessus du coupe-circuit de la température Le couvercle de chauffage est équipé d'un circuit indépendant pour le protéger contre la surchauffe. Dans l'événement peu probable d'un problème de surchauffe avec le couvercle, l'unité est équipée d'un fusible thermique qui coupera la puissance sur le plat de réchauffeur si la température maximale est excédée. Essai d'isolation Cet équipement est équipé des circuits de suppression d'IFR. N'importe quel contrôle de l'isolation électrique à l'aide du diélectrique à haute tension examinant (par exemple comme en BSEN 61010-1) doit être effectué en utilisant seulement une tension DC. Cette unité contient les composants de semi-conducteur qui peuvent être nuis près effets de champ électriques. Après utilisation Lorsque vous avez fini de chauffer les échantillons, n’oubliez pas que certaines parties de l’appareil - les éprouvettes, leurs supports et autres accessoires - risquent d’être très chaudes. Il est donc recommandé de toujours prendre les précautions citées plus haut. Garantie L’appareil est garanti contre tout défaut ou vice de fabrication pour la durée figurant sur la carte de garantie, à compter de la date d’achat de l’appareil. Au cours de cette période, toutes les pièces défectueuses seront remplacées gratuitement, dans la mesure où la défaillance n’est pas due à une mauvaise utilisation, un accident ou une négligence. Toute réparation sous garantie sera effectuée par le fournisseur. Malgré la description et les spécifications de l’appareil données dans le manuel de l’utilisateur, se réserve le droit d’effectuer les changements nécessaires à l’appareil ou à tout élément qui entre dans sa composition. Ce manuel a été exclusivement rédigé à l’attention des clients de Techne, et aucun élément de ce guide d’instructions ne peut être utilisé comme garantie, condition ou représentation concernant la description, commercialisation, adaptation aux conditions d’utilisation ou autre des appareils ou de leurs composants. Entretien utilisateur IMPORTANT : CET APPAREIL NE PEUT ETRE DEMONTE QUE PAR DU PERSONNEL QUALIFIE. LORSQUE LES PANNEAUX AVANT, ARRIERE ET LATERAUX SONT DEMONTES, L’OPERATEUR EST EXPOSE A DES TENSIONS QUI PEUVENT ETRE MORTELLES. CET APPAREIL NE CONTIENT AUCUN ELEMENT QUI DEMANDE UN ENTRETIEN DE LA PART DE L’UTILISATEUR. Dans le cas peu probable où votre appareil présente un défaut de fonctionnement auquel il est difficile de remédier, il est alors préférable de contacter votre fournisseur et, le cas échéant, de renvoyer le matériel. Veuillez inclure une description détaillée du problème constaté et retourner l’appareil dans son emballage d’origine. Techne ne sera pas tenu responsable des dommages subis par tout appareil dont l’emballage est inadéquat pour le transport. Pour plus de sûreté, contactez votre fournisseur. Voir le certificat de décontamination livré avec le produit. 1. Nettoyage Avant de nettoyer l’appareil, assurez-vous TOUJOURS que le câble d’alimentation est déconnecté et laissez la température redescendre en dessous de 50 °C. Utilisez un chiffon imprégné d’eau savonneuse pour nettoyer l’appareil. Veillez à ne pas introduire d’eau dans l’appareil. N’utilisez pas de produits abrasifs. 2. Fusibles La protection de l’appareil est assurée par un ou deux fusibles dont le remplacement ne peut être effectué que par un personnel qualifié. Si les fusibles sautent sans arrêt, il s’agit d’un problème sérieux. Nous vous conseillons dans ce cas de prendre contact avec votre fournisseur pour réparation. 8 Deutsch Bitte lesen Sie diese Bedienungsanleitung komplett bevor Sie dieses Gerät benutzen. Sicherheit des Anwenders Alle Benutzer von Techne Geräten müssen Zugang zu der entsprechenden Literatur haben, um ihre Sicherheit zu gewähren. Es ist wichtig, daß diese Geräte nur von entsprechend geschultem Personal betrieben werden, das die in dieser Gebrauchsanweisung enthaltenen Maßnahmen und allgemeine Sicherheitsbestimmungen und -vorkehrungen beachtet. Wenn das Gerät anders eingesetzt wird als vom Hersteller empfohlen, kann dies die persönliche Sicherheit des Anwenders beeinträchtigen. Die Geräte von Techne entsprechen den internationalen Sicherheitsbestimmungen und sind mit einem automatischen Übertemperaturabschalter ausgestattet. Bei einigen Modellen ist der Übertemperaturabschalter verstellbar und sollte je nach Anwendung entsprechend eingestellt werden. Bei allen anderen Modellen ist der Temperaturschutz voreingestellt um Schäden am Gerät zu vermeiden. Wenn ein Sicherheitsproblem auftreten sollte, muß das Gerät ausgeschaltet und vom Stromnetz getrennt werden. Warnung HOHE TEMPERATUREN SIND GEFÄHRLICH: sie können dem Bediener ernsthafte Verletzungen zufügen und brennbare Materialien können sich leicht entzünden. Techne hat bei der Konstruktion dieses Gerätes sehr darauf geachtet, daß der Bediener vor Gefahren geschützt ist. Dennoch sollten Sie auf die folgenden Punkte achten: • SEIEN SIE VORSICHTIG UND TRAGEN SIE SCHUTZHANDSCHUHE • Legen Sie heiße Gegenstände NICHT auf oder in die Nähe von leicht brennbaren Materialien; vermeiden Sie Arbeiten in der Nähe von leicht entzündbaren Flüssigkeiten oder Gasen. • Bringen sie KEINE Flüssigkeiten direkt in Ihr Gerät. • Benutzen Sie immer den normalen Menschenverstand. Installation 1. Alle Techne Geräte werden mit einem Stromanschlußkabel geliefert. Dieses ist entweder fest mit dem Gerät verbunden oder zum Einstecken. 2. Vergleichen Sie, ob die Spannung Ihrer Stromversorgung mit den Angaben auf dem Typenschild des Geräte übereinstimmen. Verbinden Sie das Stromanschlußkabel mit einer geeigneten Stromversorgung gemäß der nächstehenden Tabelle. Achtung: Das Gerät muß geerdet sein, um die elektrische Sicherheit zu gewährleisten! Verbindungen Stromführend Neutral Erde 220/240V Braun Blau Grün/Gelb 110/120V Schwarz Weiß Grün Geräte, die für 230 Volt ausgelegt sind, können auch bei 220 Volt arbeiten, Geräte für 120 Volt auch bei 110 Volt. In beiden Fällen verringert sich die Aufheizrate um ca. 8%. Das Typenschild befindet sich hinten am Gerät. 3. Stecken Sie das Stromkabel in die vorgesehene Buchse hinten am Gerät. 4. Stellen Sie das Gerät auf eine ebene Arbeitsfläche bzw. (falls erforderlich) unter einen Laborabzug. Beachten Sie, daß die Entlüftungsrippen an der Geräteunterseite immer frei zugänglich sind. 5. Wenn die Anzeigenlämpchen an der Vorderseite leuchten, hat dies folgende Bedeutung: ~ : Gerät ist eingeschaltet 6. Die Symbole auf oder neben dem EIN/AUS-Schalter an der Geräterückseite bedeuten: I : An O : Aus Die geheizte Kappe über Temperaturausschnitt Die geheizte Kappe wird mit einem unabhängigen Stromkreis gepaßt, um ihn vor der überhitzung zu schützen. Im unwahrscheinlichen Fall eines übertemperaturproblems mit der Kappe, wird die Maßeinheit mit einer thermischen Sicherung gepaßt, die Energie zur Heizung Platte entfernt, wenn die maximale Temperatur überstiegen wird. Isolierung Prüfung Diese Ausrüstung wird mit HF-Störung Ausgleichschaltkreis gepaßt. Jede mögliche überprüfung der elektrischen Isolierung mittels prüfenden des Hochspannungsnichtleiters (z.B. wie in BS EN 61010-1) muß mit nur einer DC Spannung durchgeführt werden. Diese Maßeinheit enthält Halbleiterbestandteile, die vorbei beschädigt werden können elektrische Feldwirkungen. Nach dem Gebrauch Vergessen Sie nicht, daß Teile des Gerätes (die Gefäße, die Blöcke und andere Zubehörteile) nach dem Erhitzen von Proben noch sehr heiß sein können. Bitte beachten Sie die oben genannten Vorsichtsmaßnahmen. 9 Garantie Die Garantiedauer des Gerätes ist auf der beiliegenden Garantiekarte angegeben und schließt Fehler im Material oder der Verarbeitung ein. Die Garantiedauer beginnt am Tag des Einkaufs. Sämtliche defekte Teile werden innerhalb dieses Zeitraumes kostenlos ersetzt unter der Voraussetzung, daß dem Defekt keine unsachgemäße Handhabung, Fahrlässigkeit oder ein Unfall zugrundeliegt. Der unter diese Garantie fallende Service wird vom Lieferanten geleistet. Ungeachtet der in dieser Gebrauchsanweisung enthaltenen Beschreibungen und Spezifikationen, behält sich Techne hiermit das Recht vor, Änderungen an den Geräten bzw. an einzelnen Geräteteilen durchzuführen. Diese Gebrauchsanleitung wurde ausschließlich dazu erstellt, um Kunden die Handhabung der Techne-Geräte zu erleichtern. Nichts in dieser Gebrauchsanleitung darf als Garantie, Bedingung oder Voraussetzung verstanden werden, sei es die Beschreibung, Marktgängigkeit, Zweckdienlichkeit oder sonstiges bezüglich der Geräte oder deren Bestandteile. Wartung durch den Bediener BEACHTEN SIE, DASS DIESES GERÄT NUR VON TECHNISCHEN FACHKRÄFTEN GEÖFFNET UND DEMONTIERT WERDEN DARF. DURCH ENTFERNEN DES GEHÄUSES ODER GEHÄUSETEILEN SIND BAUTEILE MIT LEBENGEFÄHRLICHEN SPANNUNGEN FREI ZUGÄNGLICH. IM INNERN DES GERÄTES BEFINDEN SICH KEINE TEILE, DIE VOM ANWENDER GEWARTET WERDEN MÜSSEN. Falls Ihr Gerät nicht ordnungsgemäß arbeitet, wenden Sie sich an Ihren Lieferanten oder senden Sie das Gerät wenn nötig zurück. Fügen Sie eine genaue Beschreibung des Defektes bei. Verpacken Sie das Gerät möglichst im Originalkarton. Bitte beachten Sie, daß Techne keine Haftung bei Transportschäden aufgrund unzureichender Verpackung übernnehmen. Setzen Sie sich im Zweifelsfall mit Ihrem Lieferanten in Verbindung. Bitte beachten Sie die Entgiftungsbescheinigung, die Sie mit dem Gerät erhalten haben. 1. Reinigen Bevor Sie Ihr Gerät reinigen, sollten Sie • zuerst den Netzstecker ziehen • das Gerät unter 50°C abkühlen lassen. Ein feuchtes Tuch mit Seifenlösung reinigt Ihr Gerät am besten. Achten Sie darauf, daß kein Wasser in das Gerät gelangt. Verwenden Sie keine Scheuermittel. 2. Sicherungen Die Stromzuleitung ist durch ein oder zwei Sicherungen geschützt. Diese sollten nur durch qualifiziertes Fachpersonal ausgetauscht werden. Wenn die Sicherung wiederholt durchbrennt, liegt ein größerer Defekt vor. Das Gerät muß zur Reparatur an Ihren Lieferanten eingesandt werden. Español Le rogamos lea cuidadosamente la información contenida en este folleto antes de manipular el aparato. Stepuridad del usario Todos los usuarios de equipos Techne deben disponer de la información necesaria para astepurar su stepuridad. De acuerdo con las instrucciones contenidas en este manual y con las normas y procedimientos generales de stepuridad, es muy importante que sólo personal debidamente capacitado opere estos aparatos. De no ser así, la protección que el equipo le proporciona al usuario puede verse reducida. Todos los equipos Techne han sido diseñados para cumplir con los requisitos internacionales de stepuridad y traen incorporados un sistema de desconexión en caso de sobretemperatura. En algunos modelos el sistema de desconexión es variable, lo que le permite elegir la temperatura stepún sus necesidades. En otros, el sistema de desconexión viene ya ajustado para evitar daños en el equipo. En caso de que surgiera un problema de stepuridad, desconecte el equipo de la red. Aviso LAS TEMPERATURAS ELEVADAS SON PELIGROSAS: pueden causarle graves quemaduras y provocar fuego en materiales combustibles. Techne ha puesto gran cuidado en el diseño de estos aparatos para proteger al usuario de cualquier peligro; aún así se deberá prestar atención a los siguientes puntos: • EXTREME LAS PRECAUCIONES Y UTILICE GUANTES PARA PROTEGERSE LAS MANOS. • NO coloque objetos calientes encima o cerca de objetos combustibles. • NO maneje el aparato cerca de líquidos inflamables o gases. • NO introduzca ningún líquido directamente en el aparato. Instalación 1. Todos los aparatos Techne se suministran con un cable de alimentación. Puede ser fijo o independiente del aparato. 2. Antes de conectarlo, compruebe que el voltaje corresponde al de la placa indicadora. Conecte el cable de alimentación a un enchufe adecuado stepún la tabla expuesta a continuación. El equipo debe estar conectado a tierra para garantizar la stepuridad eléctrica. 10 Conexiones 220/240V 110/120V Linea Marrón Negro Neutro Azul Blanco Tierra Verde/amarillo Verde El enchufe suministrado con el cable de alimentación viene equipado con un fusible del siguiente valor para proteger el cable: 230V Reino Unido 5AMP El fusible una vez instalado protege tanto al equipo como al usuario. Astepúrese de que los equipos marcados 230V en la placa indicadora funcionan a 220V y de que los equipos marcados 120V funcionan a 110V. No obstante, en ambos casos la velocidad de calentamiento se verá reducida en un 8% aproximadamente. La placa indicadora está situada en la parte posterior del equipo. 3. Conecte el cable a la toma de tensión en la parte posterior del equipo. 4. Sitúe el aparato en un lugar apropiado tal como una superficie de trabajo plana, o si fuera necesario incluso en una campana con extractor de humos, astepurándose de que las entradas de aire en la parte inferior no queden obstruidas. 5. Los símbolos, que pueden aparecer junto a las luces indicadoras en el panel frontal del equipo, tienen los siguientes significados: ~ : Indicador de potencia 6. Los símbolos que se encuentran en o cerca del interruptor de alimentación tienen los siguientes significados: I : Interruptor principal encendido O : Interruptor principal apagado La tapa calentada sobre el recorte de la temperatura La tapa calentada se cabe con un circuito independiente para protegerlo contra el recalentamiento. En el acontecimiento inverosímil de un problema de sobrecalentamiento con la tapa, la unidad se cabe con un fusible termal que quite energía a la placa del calentador si se excede la temperatura máxima. Prueba del aislamiento Este equipo se cabe con el trazado de circuito de la supresión de la IRF. Cualquier cheque del aislamiento eléctrico por medio del dieléctrico de alto voltaje que prueba (por ejemplo como BS EN 61010-1) se debe realizar usando solamente un voltaje de DC. Esta unidad contiene los componentes del semiconductor que se pueden dañar cerca efectos de campo eléctricos. Después de su uso Cuando haya finalizado el calentamiento de muestras, recuerde que las piezas del equipo, tales como tubos, bloques y demás accesorios, pueden estar muy calientes. Tome las precauciones mencionadas anteriormente. Garantia Este aparato está garantizado contra cualquier defecto material o de fabricación durante el periodo especificado en la tarjeta de garantía adjunta. Este plazo inicia a partir de la fecha de compra, y dentro de este periodo todas las piezas defectuosas serán reemplazadas gratuitamente siempre que el defecto no sea resultado de un uso incorrecto, accidente o negligencia. Mientras se encuentre bajo garantía las revisiones las debe llevar a cabo el proveedor. A pesar de la descripción y las especificaciones de los aparatos contenidas en el Manual del Usuario, Techne se reserva por medio de este documento el derecho a efectuar los cambios que estime oportunos tanto en los aparatos como en cualquier componente de los mismos. Este manual ha sido preparado exclusivamente para los clientes de Techne y nada de lo especificado en este folleto de instrucciones se tomará como una garantía, condición o aseveración de la descripción, comerciabilidad o adecuación para cualquier fin específico de los aparatos o sus componentes. Mantenimiento ESTE APARATO DEBE SER DESMONTADO SOLO Y EXCLUSIVAMENTE POR PERSONAL DEBIDAMENTE CAPACITADO. EL RETIRAR LOS PANELES LATERALES, FRONTALES O TRASEROS SUPONE DEJAR AL DESCUBIERTO TENSION DE LA RED PELIGROSA. EL EQUIPO NO CONSTA DE NINGUNA PIEZA DE CUYO MANTENIMIENTO SE PUEDA ENCARGAR EL USUARIO. En el caso improbable de que experimentara algún problema con su aparato que no pudiera resolver con facilidad, debería ponerse en contacto con su proveedor y devolverlo si fuera necesario. Indique de forma detallada todos los defectos que haya notado y devuelva el equipo en su embalaje original. Techne no aceptará responsabilidad alguna por daños causados en equipos que no estuvieran debidamente embalados para su envío; si tuviera alguna duda, póngase en contacto con su proveedor. Sírvase consultar el Certificado de Descontaminación suministrado con su aparato. 1. Limpieza Antes de limpiar su aparato, desconéctelo SIEMPRE de la fuente de alimentación y permita que se enfríe por debajo de los 50°C. Este aparato se puede limpiar pasándole un paño húmedo enjabonado. Hágalo con cuidado parae evitar que caiga agua dentro del mismo. No utilice limpiadores abrasivos. 2. Fusibles 11 Su aparato está protegido por uno o dos fusibles. Sólo deben cambiarlos personal debidamente capacitado. Si los fusibles se fundieran repetidamente, esto indicaría una avería grave y puede que tuviera que devolverle el aparato a su proveedor para su reparación. Before switching on Ensure that the voltage selector switch is set to the appropriate voltage for your supply; On/Off switch Ensure that the appropriate fuses are fitted for your supply. For 230V set the voltage selector switch set to 230V and fit T2.5A fuses. For 115V set the switch to 115V and fit T4A fuses. For 100V the switch will be set to 115V T4A fuses will be fitted. 12 Contact Information For technical, sales or servicing information, contact your local Techne dealer or: UK and Rest of World North and South America Barloworld Scientific Ltd Barloworld Scientific US Ltd Beacon Road, Stone Techne Staffordshire ST15 0SA 3 Terri Lane, Suite 10 Tel: +44 (0)1785 812121 Burlington, N.J. 08016 USA Fax: +44 (0) 1785 813748 Tel: 800-225-9243 e-mail: [email protected] Fax: 609-589-2571 www.barloworld-scientific.com e-mail: [email protected] www.techneusa.com France Italy Barloworld Scientific France SAS Barloworld Scientific Italia Srl ZI du Rocher Vert – BP 79 Via Alcide de Gasperi 56 77793 Nemours Cedex 20077 Riozzo di Cerro al Lambro France Milano, Italia Tel: +33 1 64 45 13 13 Tel: +39 (0)2 98230679 Fax: +33 1 64 45 13 00 Fax: +39 (0)2 98230211 e-mail [email protected] e-mail: [email protected] www.barloworld-scientific.com www.barloworld-scientific.it Middle East Germany Techne Middle East Ltd. Techne AG PO Box 27887, Engomi 2433 Obere Hauptstrasse 67b Nicosia D-09235 Burkhardtsdorf Cyprus Germany Tel: +357 22 660427 Tel: +49 (0)3721-271888 Fax: +357 22 660356 Fax: +49 (0)3721-270608 e-mail: [email protected] e-mail: [email protected] 13 3. TC-3000 specification Temperature Temperature range Temperature set point precision Block uniformity (over full range) Temperature accuracy End of program cooling below ambient 4°C to 99°C 0.1°C ± 0.5°C ± 0.5°C Yes Heating/Cooling Rate Heating rate, between 55°C and 90°C on a 50°C to 95°C step: 25 x 0.2 ml micro tubes 3.6°C/sec 20 x 0.5 ml micro tubes 3.6°C/sec Cooling rate, between 90°C and 55°C on a 95°C to 50°C step: 25 x 0.2 ml micro tubes 2.0°C/sec 20 x 0.5 ml micro tubes 1.8°C/sec Heated Lid Heated lid enable/disable Selectable heated lid temperature Over-temperature cut-out Temperature sensor Heater type Heater power Warm up time Yes 100°C to 115°C Fixed at 145°C Thermistor Etched foil 33W 4 min approximately (ambient to 105°C) The heated lid will only come on if the set temperature is above 35°C Programming Program naming using alpha keys Program password protection Number of programs (3 step) Maximum number of steps per stage Maximum number of stages per program Minimum hold time Maximum hold time Incremental/decremental temperature Incremental/decremental step hold time Programmable ramp rate (heat or cool) Programmable ramp rate resolution Yes Yes 80 35 25 1 sec 18 hrs Yes Yes Variable in 0.1°C/sec steps 0.1°C Running Programs Pause button Stop button End of program alarm Auto restart on power fail Yes Yes Yes Yes Interconnectivity Connection to PC control program Software updates from Techne web-site 14 Yes Yes Dimensions Height Width Length 190mm 170mm 330mm Serial Port This socket is provided for RS232 PC link to run “Gensoft” the PC control software. Power Power consumption 230W The units are voltage selectable by a slide switch. When the unit is set to 115V it will work at any voltage between 110V and 130V. When the unit is set to 230V it will work at any voltage between 198V and 252V. Units marked 100V will work at any voltage between 90 and 110V. The performance will vary and will not necessarily meet the above typical specification at the extremes of voltage. Working conditions The TC-3000 is designed to operate under the following conditions: For indoor use only Ambient temperature range +5°C to +40°C Altitude To 2000m Relative humidity Not exceeding 95% Mains supply fluctuations Not exceeding 10% Over-voltage category II IEC 60364-4-443 Pollution degree 2 This equipment must be earthed Electromagnetic Compatibility (EMC) Radiated Emissions and Immunity conform to the limits listed in EN 61326 (Electrical equipment for measurement, control and laboratory use) Note: The control specifications are quoted at an ambient temperature of 20°C. The specification may deteriorate outside an ambient temperature range of 18°C to 30°C. 15 4. User operation and consumables Heated lid To release the heated lid, lift the lid catch and the lid will open. To close the lid, push down gently until the catch clicks in place. Do not close the lid without tubes being fitted in the block. Tubes or reaction vessels Barloworld Scientific does not recommend any specific tube or reaction vessel other than those described in this manual. We recommend using reaction volumes between 20 and 200µl. The tubes must withstand a pressure of 1 atmosphere at 100°C. Any vessel must be able to withstand the temperatures you are using without any danger of them deforming to the point where they fracture. To test your tubes, put 25µl of water into each of 5 tubes and subject them to a typical thermal cycling protocol. At the end of the program, measure the volume remaining using a micropipette. A loss of more than 1 or 2µl indicates a vapour leak. The amount of volume loss you observe and the change in reactant concentrations you can tolerate determine the minimum volume that can be used. Typical volume losses of 1µl in 30 cycles allow the use of samples of 20µl or less. During the final cool-down, a ring of condensation may form above the liquid level but below the top of the sample block. This is normal and does not effect the reaction. 0.5ml Tubes The heated lid mechanism of the TC-3000 with the 0.5ml block is optimised for flat top tubes; it is not suitable for use with domed cap tubes. In order to fit the maximum number of tubes in the block, they need to be placed so that all the hinges are in the same relative orientation. An example is illustrated below. Place the tubes in the block in the same orientation in order to achieve the maximum capacity. Always make sure the pressure on the heated lid is balanced by spreading the tubes across the block or inserting some dummy tubes if necessary. 16 Switching on TC-3000 Version Block X.XX 25x0.2ml or 20x0.5ml Programs [0] Information Configuration [ , to select ] When you switch on the unit a screen similar to the one shown here will appear briefly. This indicates the software version and block type installed in the unit. When the initial screen has disappeared the screen shown here will automatically appear. There are three options: 1. ‘Programs’ for creating and running programs; 2. ‘Information’ for obtaining information about the unit e.g. serial number; 3. ‘Configuration’ for setting up program defaults and settings. Each of these is explained in detail in section 6. 17 5. Front panel controls Operation or Program lines Prompt line Programs [0] Information Configuration [ , to select ] Up Decimal Point & Insert Delete End Pause Down Status Power Enter Alpha/Numeric keys TC-3000 The LCD Display Programs [0] Information Configuration [ , to select ] -- Stage 1 ---------Number cycles 10 Step 94.0ºC 00m30 max [‘.’ to insert step ] [ , to edit ] [ to delete step ] The TC-3000 has a four line LCD display. The top three lines are information or program lines, while the bottom line is a prompt line. The active line flashes on screen and is shown in bold in this manual. The bottom line may change or flash between two or three different prompts depending upon which program line is active. An example of a prompt line which flashes between three different prompts is shown here. Indicators ~ i 18 Power: This indicator is lit when there is power to the TC-3000. Status: This indicator is lit when the TC-3000 is running a program. It is off when the unit is stopped. It will flash and beep slowly when the unit is paused. It will flash after a five second quick sequence of beeps when the unit reaches its final hold temperature. The keys The End, Finish or Exit key The “End” or “Finish” key is used to finish editing programs or to exit a program. It is also used to exit a sequence of key operations. The Up arrow key The “Up arrow” key is used for scrolling up through the lines on the screen. It is also used to increase certain fields when editing. The Down arrow key The “Down arrow” key is used for scrolling down through the lines on the screen. It is also used to decrease certain fields when editing. The Decimal Point and Insert key . The Delete key The “Delete” key is used during program editing to delete steps and stages. The Pause key The “Pause” key is used during program editing to insert a pause after a stage or to insert increment and decrement times and temperatures. It is also used to pause a program when it is running. The Enter or Accept key The “Enter” key is used to enter an operation or the edit mode. It is also used to ‘Accept’ a field or program change. The Alpha/Numeric keys 1 2 abc 4 ghi 7 8 tuv The “Alpha/Numeric” keys are used to enter numbers and letters during programming. If it is a numeric field then numbers will be inserted; if it is an alpha field then letters will be inserted. Each key will cycle through the letters shown on the key (0 will insert a space). To insert a number, press and hold the appropriate key. 3 def 6 nmo 9 wxyz 0 ] pqrs 5 jkl The “Decimal Point” key is used when editing numeric fields. It is also used as an Insert key during program editing to insert additional steps and other field sets. 19 6. Programming the TC-3000 The table below illustrates the symbols which appear on the LCD display and the relevant keypad button to which they refer. In the prompt line is equivalent to the “End” key. On a program line means the program is locked; it can be copied and then edited but not edited directly. Up arrow Down arrow Enter Pause The following terms are used when programming the TC-3000: Stage Cycle Step A ‘Stage’ is the name given to the main repeated part of a program containing the ‘Steps’ to be repeated. A program can contain a maximum of 25 stages although typically only one or two are used. A ‘Cycle’ is the number of repetitions of a ‘Stage’ A ‘Step’ is a user defined program line containing a temperature, a hold time and ramp rate. Typically three steps are created within one ‘Stage’. Programs [0] Information Configuration [ , to select ] * * New program ** [] 2 STEP TEMPLATE 501 3 STEP TEMPLATE 502 [ , to select ] 20 To enter the programming section of the TC3000 software, highlight ‘Programs’ using the “Up Arrow” or “Down Arrow” keys Press “Enter” This screen lists all the programs saved on the unit. Use the “Up Arrow” and “Down Arrow” keys to scroll through the list. The number next to the program name is the unique “Speed dial” number allocated to the program for rapid retrieval (see page 33). Programming Options There are two options available for creating programs on the TC-3000: 1. Copy and edit one of the pre-written templates. 2. Create a new program from the defaults. Option 1: Creating programs using templates There are two pre-written basic PCR templates: a two-step and a three-step template. These can be copied and modified as required. 2 STEP TEMPLATE Heated Lid 105ºC Preheat Lid on Pause off - - - - - - - - - - In denat 94.0ºC 5m00 Hot Start off - - - Stage 1 - - - Number cycles 30 Step 94.0ºC 0m30 max Step 68.0ºC 1m00 max - - - - - - - - - - Final Extn 72.0ºC 5m00 Final hold 10.0ºC 3 STEP TEMPLATE Heated Lid 105ºC Preheat Lid on Pause off - - - - - - - - - - In denat 94.0ºC 5m00 Hot Start off - - - Stage 1 - - - Number cycles 30 Step 94.0ºC 0m30 max Step 55.0ºC 0m30 max Step 72.0ºC 0m30 max - - - - - - - - - - Final Extn 72.0ºC 5m00 Final hold 10.0ºC Other templates available include Ice bucket (incubation at 4ºC), Ligation (incubation at 15ºC) and an RT-PCR template. * * New program * * * 2 STEP TEMPLATE 501 3 STEP TEMPLATE 502 [ , to select ] 2 STEP TEMPLATE [501] Run Program View Program [ , to select ] Run program View program Copy program [ , to select Use the “Down Arrow” key to select an existing ‘Template’ program from the menu, e.g. ‘2 Step Template’ or ‘3 Step Template’. Press the “Enter” key to accept it. The Template is already defined and can be run as it is or easily copied, modified and saved under a new name. Use the “Down Arrow” key ‘Copy Program’ Press the “Enter” key to select to accept it. ] 21 UNNAMED # Heated Lid 105ºC Preheat Lid on [ , to edit ] A new name can now be given to the copied program (see below). To give a program a name UNNAMED # Heated Lid 105ºC Preheat Lid on [ , to edit ] 1 2 abc 4 ghi 7 def 6 nmo 8 tuv The letters will scroll round with successive presses; for example the “2” key will give ‘A’ with one press; ‘B’ with two presses; ‘C’ with three presses and ‘2’ with four presses. Five presses will again give ‘A’. 9 wxyz 0 ] pqrs Using the keypad, type in the name you wish to give the program. 3 5 jkl To type in a name for the program, press "Enter" and a cursor will appear in the position shown. DONNA Heated Lid 105ºC Preheat Lid on [ , to edit ] [ to save ] When the name is complete, press "Enter" There are now two options: 1. Save the program and run it as it is or 2. Edit the program then save and run it. To save the program DONNA Heated Lid Preheat Lid [ SAVE ? [ YES or 105ºC on ] No ] DONNA [7] Run Program View Program [ , to select ] 22 A program can only be run once it has been saved. Press the “End” key. The prompt line will flash between 'SAVE?' and 'YES or NO'. Press “Enter” for ‘Yes’ to save the changes you have made. If you press “End” for ‘No’ then all the changes you have made will be lost. The program is now ready to run and will be allocated with a unique ‘Speed dial’ number which can be used to rapidly locate the program from the main start-up screen. “Up Arrow” or “Down Arrow” keys to scroll through the remaining list of options. To edit a field or step in an existing program Programs [0] Information Configuration [ , to select ] DAVID DONNA [ , 8 [D] 7 to select ] DONNA [7] Run program View program Edit program Copy program Delete program Set password [ , to select ] When the unit is switched on the display will show this screen. If known, type in the ‘Speed dial’ number for the required program and press “Enter” This will take you directly to the required program. If you do not know the ‘Speed dial’ number, press “Enter” to access the list of stored programs. Either: 1. Scroll to the required program using the “Up Arrow” or “Down Arrow” keys or 2. Type the first letter of the program name in the ‘New program’ field; this will then list all the program names beginning with that letter. Use the “Up Arrow” or “Down Arrow” keys to select the required program. Press “Enter” to accept The full set of options for a program is shown here; these are shown on the LCD screen three lines at a time. Use the “Down Arrow” and/or the “Up Arrow” keys to select the option you require. Press the “Enter” key to select the option. Edit a selected field or step DONNA Heated Lid 105ºC Preheat Lid on [ , to edit ] [ to save ] Select ‘Edit program’ and a screen similar to this will appear. Use the “Down arrow” and/or the “Up arrow” keys to select the field or step you want to edit. You can now edit the active field or step by first pressing the “Enter” key 23 DONNA Heated Lid 105ºC Preheat Lid on [ edit temperature ] [ to disable ] DONNA Heated Lid 105ºC Preheat Lid on [ to change ] [ turn on/off ] Pause off --------------------In denat 94.0ºC 00m30 [ edit temperature ] [ to disable ] Pause off --------------------In denat 94.0ºC 00m30 [ edit time ] [ . for hrs/mins ] --------------------Fin extn 72.0ºC 5m00 Fin hold 10.0ºC [ , to edit ] [ to save ] 24 To edit a temperature, type in the required temperature. In the example here, the heated lid temperature is being edited. Press “Enter” to accept. Use the “Down Arrow” and/or the “Up Arrow” keys to select the next field or step you wish to edit. To edit a field with on/off settings, first select the field and press “Enter” Use the “Up Arrow” and “Down Arrow” keys to toggle between the settings. Press “Enter” to accept. To edit a step with both a temperature and a time, first press “Enter” and type in the new temperature. Press “Enter” again. Now type in the new time. The default is minutes. 1. For whole minutes, type the number required then “Enter” 2. To toggle between minutes and hours, use the “Decimal Point” key. 3. For values less than 1 minute, first press the “Decimal Point” key followed by the number of seconds required. 4. For minutes and seconds, type the number of minutes followed by the “Decimal Point” key then the number of seconds. Once the values have been added, press “Enter” to accept. Once you have finished editing and you are happy with the changes, press the “End” key followed by the “Enter” key to save. If you press the “End” key a second time for ‘No’ then all the changes you have made will be lost. To copy a selected program UNNAMED # Heated lid 105ºC Preheat lid on [ , to edit ] [ to save ] If you select ‘Copy program’ a screen similar to this will appear and the software will automatically give the program the next number until it is named. Press “Enter” and type in a new name. You will then be able to edit the program as previously described. To delete a selected program If you select ‘Delete program’ a screen similar to this will appear. DONNA [ [ delete program SURE ? Yes or No ] ] Press “Enter” to delete the program or “End” to return to the program screen. To set a password for a selected program If you want to password protect the program so that other users cannot edit it, select ‘Set password’. A screen similar to this will appear. DONNA New passwd [ to accept [ to exit ] ] Type in the password you wish to give it and press “Enter” . The program list will then display the key symbol next to the name to show that it is locked. Other users will still be able to copy/view your program but not edit it. Option 2: Creating a new program A second option is to create a completely new program without using templates. UNNAMED # Heated lid 105ºC Preheat lid off Pause off - - - - - - - - - - In denat 94.0ºC 5m00 Hot Start off - - - - - - - - - - Fin extn 72.0ºC 5m00 Fin hold 10.0ºC A number of typical values are pre-entered including: Heated lid temperature Preheat lid Initial denaturation Hot start Final extension Final hold These values can be edited and the additional stages and steps required for cycling can be added by following the instructions detailed on the following pages. 25 Example programs A couple of example thermal cycling programs are shown below. Typical 3-Step PCR 3-Step PCR with multiple ‘Stages’ Heated Lid 105 Preheat Lid on Pause off - - - - - - - - - - - - - - - In denat 94°c 5min Hot Start off - - - - - - Stage 1 - - - - - Number Cycles 30 Step 94°c 0m30 max Step 55°c 0m30 max step 72°c 0m30 max - - - - - - - - - - - - - - - Final Extn 72°c 5m Final hold 4ºC 10m Heated Lid Preheat Lid Pause - - - - - - - - In denat 94°c Hot Start - - - - - - Stage Number Cycles step 94°c step 60°c step 72°c - - - - - - Stage Number Cycles step 94°c step 55°c step 72°c - - - - - - - - Final Extn Final hold 105 on off - - - - - - 5min off 1 - - - - - - 10 0m30 max 0m30 max 0m30 max 2 - - - - - 20 0m30 max 0m30 max 0m30 max - - - - - - 5m 72°c 4ºC 10m Programming * * New program ** [] 2 STEP TEMPLATE 501 3 STEP TEMPLATE 502 [ , to select ] UNNAMED # Heated lid 105ºC Preheat lid on [ , to edit ] [ to save ] Create a new program by selecting ** New Program ** from the menu and press “Enter” Give the program a name and edit any of the default fields as described above. To add a stage and then edit it In denat 94.0ºC 5m00 Hot Start off - - - - - - - - - - [ to insert stage ] 26 Use the “Down Arrow” key to scroll to the dotted line below ‘Hot Start’; it will start to flash. Press "Enter" to insert a stage -- Stage 1 ---------Number cycles Step 94.0ºC 00m30 max [ edit no. cycles ] -- Stage 1 ---------Number cycles 10 Step 94.0ºC 00m30 max [‘.’ to insert step ] [ , to edit ] [ to delete step ] A new stage will be inserted which consists of a ‘Number cycles’ field and one step. Edit the number of cycles by typing the number required then press "Enter" Use the “Down Arrow” step. key to move to the Press “Enter” to edit the step as described above. Press “Enter” again to accept. To insert additional steps -- Stage 1 ---------Number cycles 10 Step 94.0ºC 00m30 max [‘.’ to insert step ] [ , to edit ] To insert a new step before the first step, use the “Up Arrow” or “Down Arrow” keys to select ‘Number cycles’. Press the “Decimal Point” key to insert a new step. To insert a new step after an existing step, use the “Up Arrow” or “Down Arrow” keys to select the step. Press the “Decimal Point” key to insert a new step. To delete a step -- Stage 1 ---------Number cycles 10 Step 94.0ºC 00m30 max [‘.’ to insert step ] [ , to edit ] [ to delete step ] -- Stage 1 ---------Number cycles 10 Step 94.0ºC 00m30 max [ DEL STEP ? ] [ Yes or No ] Use the “Up Arrow” or “Down Arrow” keys to select the step you wish to delete. Press "Delete" to delete the step. The prompt line will flash between 'DEL STEP?' and 'YES or NO'. Press “Enter” or Press “End” to delete the step. to return to editing the step. 27 To add a new stage before an existing one -- Stage 1 ---------Number cycles 10 Step 94.0ºC 00m30 max [ to insert stage ] [ to delete stage ] Use the “Up Arrow” or “Down Arrow” keys to highlight the stage number. Press "Enter" A new stage will be added before the existing stage. The other stage numbers will be adjusted as appropriate. The new stage can now be edited as described above. To add a new stage at the end - - - - - - - - - - Fin extn 72.0ºC 5m00 Fin hold 10.0ºC [ to insert stage ] Use the “Up Arrow” or “Down Arrow” keys to highlight the dotted line below the last stage. Press "Enter" A new stage will be added with the next consecutive number. The new stage can now be edited as described above. To delete a stage -- Stage 1 ---------Number cycles 10 Step 94.0ºC 00m30 max [ to insert stage ] [ to delete stage ] -- Stage 1 ---------Number cycles 10 Step 94.0ºC 00m30 max [ DEL STAGE ? ] [ YES or No ] 28 Use the “Up Arrow” or “Down Arrow” keys to highlight the stage you wish to delete. Press "Delete" The prompt line will flash between 'DEL STAGE?' and 'YES’ or ‘NO'. Press “Enter” to delete the stage. To insert a ‘pause’ into a program To insert a pause after an existing stage, follow the steps for inserting a stage as above. Step 94.0ºC 00m30 max -- Stage 2 ---------Number cycles Step 94.0ºC 00m30 max [‘.’ to insert step ] [ , to edit ] Highlight the ‘Number cycles’ line then press “Pause” The prompt line will flash between ‘CHANGE TO PAUSE?’ and ‘YES or NO’. Step 94.0ºC 00m30 max -- Stage 2 ---------Number cycles 0 Step 94.0ºC 00m30 max [ CHANGE TO PAUSE ? ] [ Yes or No] Press “Enter” to insert a pause. The stage number will then be highlighted with ‘Pause’ as the only line. -- Stage 2 ---------Pause --------------------[ to insert step ] [ to delete step ] To program increment or decrement temperature or time. Under normal circumstances, the Hold Temperature of all steps is constant. However, it is possible to automatically increment or decrement the temperature of a specified step of a programme. 1 1 1 1 1 Temperature 3 3 2 Cycle 1 3 θ 2 Cycle 2 θ+∂θ 2 Cycle 3 3 θ+2∂θ 1 θ+3∂θ 2 Cycle 4 3 θ+4∂θ 2 Cycle 5 Temperature profile of incremented Hold Temperature at step 3 of each cycle The Hold Temperature of the incremented/decremented step is the defined Hold Temperature plus the summation of the increments/decrements. The first cycle is never incremented/decremented, 29 only subsequent cycles. If you select a decrement, the Hold Temperature is prevented from falling below 4°C. If you select an increment, the Hold Temperature is prevented from rising above 99°C. Similarly, under normal circumstances, the Hold Time of all steps is constant. However, it is possible to automatically increment or decrement the duration of a specified step of a program. 1 Temperature 1 3 3 2 Cycle 1 2 t 1 1 Cycle 2 3 2 t+∂t 1 Cycle 3 3 3 2 t+2∂t 1 Cycle 4 2 t+3∂t Cycle 5 t+4∂t Temperature profile of incremented Hold Time at step 3 of each cycle The Hold Time of the incremented/decremented step is the defined Hold Time plus the summation of the increments/decrements. The first cycle is never incremented/decremented, only subsequent cycles. If you select a decrement, the Hold Time is prevented from falling below one second. Number cycles 30 Step 94.0ºC 00m30 max Step 58.0ºC 00m30 max [ , to edit ] [ to delete step ] [‘.’ to insert step ] Number cycles 30 Step 94.0ºC 00m30 max Step 58.0ºC 00m30 max [ CHANGE STEP ? ] [ YES OR NO ] Use the “Up Arrow” or “Down” Arrow” keys to move to the step where you want an increment or decrement temperature or time. Press “Enter” to go into edit mode. Press “Pause” The prompt line will change to flash between ‘CHANGE STEP?’ and ‘YES’ or ‘NO’. Press “Enter” The cursor will again move into the edit mode. Now press the “Up Arrow” key Number cycles 30 Step 94.0ºC 00m30 max fst 55.0ºC 00m30 max [ , to edit ] [ to save ] 30 The step will change to ‘fst’, meaning “first”, and the software will insert another line after it entitled ‘lst’, meaning “last”. Press “Enter” twice to go into edit mode. Number cycles 30 Step 94.0ºC 00m30 max fst 65. ºC 00m30 max [ edit temperature ] Step 94.0ºC 00m30 max fst 65.0ºC 00m30 max lst 55.0ºC 00m30 [ , to edit ] [ to delete step ] [‘.’ to insert step ] Step 94.0ºC 00m30 max fst 65.0ºC 00m30 max lst 55.0ºC 1m30 [ edit time ] [ . For hrs/mins ] Use the “Alpha/numeric” keys to change the values of the ‘fst’ line to the first temperatures and/or times you require. Press “Enter” after each field you change. You will exit ‘Edit Mode’ when you reach the end of the line. Use the “Down Arrow” key the ‘lst’ line. Press “Enter” to move onto to edit the step. Use the “Alpha/numeric” keys to change the values of the ‘lst’ line to the final temperatures and/or times you require. Press “Enter” for each field you change. You will exit ‘Edit Mode’ when you reach the end of the line. When you run the program it will automatically increment or decrement in equal steps from the first time and/or temperature to the last over the number of cycles in the stage. For example: if the first temperature is 65°C and the last temperature is 55°C, over 30 cycles the temperature will decrease 0.33°C each cycle. Similarly, in the example shown, the time would increase from 30 seconds to 1 minute 30 seconds in 2 second increments. 31 To save the program -- Stage 1 ---------Number cycles 10 Step 94.0ºC 00m30 max [ SAVE ? ] [ Yes or No ] A program can only be run once it has been saved. Press the “End” key. The prompt line will flash between 'SAVE?' and 'YES or NO'. Press “Enter” for ‘Yes’ to save the changes you have made. If you press “End” for ‘No’ then all the changes you have made will be lost. GEORGE [10] Run Program View Program [ , to select ] The program is now ready to run and will be allocated with a unique “Speed dial” number which can be used to rapidly locate the program from the main start-up screen. Use the “Up Arrow” and “Down Arrow” keys to scroll through the list of options. Stopping what you are doing At any time during programming the TC-3000, when you are satisfied with the program, you can finish and accept what you have done by first pressing the “End” key. Then follow the instructions on screen. If you are not sure, wait for the instructions in the prompt line to scroll back to the first line that you see. 32 To run a program Programs [0] Information Configuration [ , to select ] Programs [7] Information Configuration [ , to select ] * * New program ** [] 2 STEP TEMPLATE 501 3 STEP TEMPLATE 502 [ , to select ] DAVID DONNA [ , 8 [D] 7 to select ] DONNA [7] Run Program View Program [ , to select ] When the unit is switched on the display will show this screen. If known, type in the ‘Speed dial’ number for the required program and press “Enter” This will take you directly to the required program. If you do not know the ‘Speed dial’ number, press “Enter” to access the list of stored programs. Next either: 1. Scroll down to the required program using the “Up Arrow” and “Down Arrow” keys. 2. Or type the first letter of the program name in the “New program” field; this will then list all the program names beginning with that letter. Use the “Up Arrow” and “Down Arrow” keys to select the required program. Press “Enter” to accept For example ‘Donna’. To run the program, select ‘Run program’ and press "Enter" A screen similar to this one will appear. DONNA Press “Enter” [ [ RUN PROGRAM ? Yes or No to start the run. ] ] 33 Cycle 4/30 56m08 Sample 58.0ºC Hold @ 58.0ºC 00m17 [ to STOP ] [ to PAUSE ] [ for info ] During the run the LCD screen will report: 1. The cycle number 2. The time remaining (counting down in seconds) 3. The sample temperature (whether holding or ramping) 4. The current step of the run 5. A count down of the hold time. An example is shown here. Manual pause Cycle 24/30 19m26 Sample 72.0ºC Hold @ 72.0ºC 00m10 [ PAUSE ? ] [ YES or NO ] To pause a program while it is running, press “Pause” The run will continue but the prompt line will alternate ‘PAUSE?’ and ‘YES or NO’ To confirm that you want the program to pause press “Enter” If you have pressed the “Pause” key by mistake and you want the program to continue, press “End” Cycle 24/30 19m26 Sample 72.0ºC Paused [ to STOP ] [ to CONTINUE ] [ for info ] The unit will emit a beeping sound while paused. To resume the run, press “Pause” followed by “Enter” to continue. Manual Stop Cycle 28/30 10m39 Sample 94.0ºC Hold @ 94.0ºC 00m10 [ STOP PROGRAM? ] [ YES or NO ] To stop a program while it is running, press “End” The run will continue but the prompt line will alternate ‘STOP PROGRAM?’ and ‘YES or NO’ To confirm that you want to stop the program press “Enter” If you have pressed the “End” key by mistake and you want the program to continue, press “End” again. When a program is stopped the unit will emit a beeping sound and the original program screen will appear. 34 Program Information DONNA Heated Lid on Status ramping [ to exit ] Pressing “Enter” while a program is running will give information about the current run including which program is actually running and the unit status e.g. holding or ramping. An example is shown here. 7. Information Programs [0] Information Configuration [ , to select ] Block 20x0.5ml Block s/n 139160-2 Unit s/n GP0000-01 S/w version 14.zz H/w version 01 Comms address 1 Unit cycles 624 Block cycles 69 The Information field on the front screen contains all the unit-specific information such as serial number and software version. Press “Enter” information. to access the unit The complete list is displayed here. Note that the “Comms address” must be unique for each unit if more than one cycler is linked to a PC using the Gensoft control software. 8. Configuration Warning! The Configuration software should only be accessed by designated personnel, as some parameters can be changed or may be lost when using it. Programs [0] Information Configuration [ , to select ] Access to the ‘Configuration’ set up is password protected. CONFIGURATION Password pad [ to accept [ to exit The Configuration field on the front screen allows a system administrator access to set up all the default settings for the programs, time and date settings and to change and remove passwords. ] ] To enter configuration, use the alpha keys to type in ‘pad’ Press “Enter” 35 Program defaults Settings Passwords Controller reset There are a number of options which can be changed; these are listed here. Use the “Up Arrow” and “Down Arrow” keys to select then press “Enter” to access any of the options. Each option is discussed in detail below. Program defaults Program defaults Settings Passwords Controller reset Heated lid 105ºC Preheat lid off Pause off - - - - - - - - - - In denat 94.0ºC 5m00 Hot start off - - - - - - - - - - Fin extn 72.0ºC 5m00 Fin hold 10.0ºC [ , to edit ] Highlight ‘Program defaults’ then press “Enter” The complete list of program defaults is given here. These are the values that all new programs will take when you start to create a new program. To edit any line use the “Up Arrow” or “Down Arrow” keys to select the line you wish to change. Press “Enter” then change the value using the numerical keys. Press “Enter” to accept the new value. To edit a field with on/off settings, first select the field and press “Enter” Use the “Up Arrow” and “Down Arrow” keys to toggle between the settings. Press “Enter” to accept. When you have set all the defaults, press the “Enter” key to go back to the Configuration menu. Note: altering the default values does not change existing programs. Settings Program defaults Settings Passwords Controller reset 36 Highlight ‘Settings’ then press “Enter” Set date xx/xx/xx Set time xx:xx Date format dmy Auto restart on Beeper on Coms address 1 Coms speed 4800 [ , to select ] The complete list of settings is given here. Auto restart “on” will allow the unit to restart from where it left off should there be a power failure and the power returns. The “Comms address” refers to the location of a unit in a daisy chain and must be unique if there are several units linked to each other. The optimum “Coms speed” is set at 4800. When using the Gensoft control software, ensure all cyclers are set to the same value. Edit any line as described for ‘Program defaults’ above. Press “Enter” to accept the new value. When you have finished, press the “Enter” key to go back to the ‘Configuration’ menu. Passwords The ‘Passwords’ function allows the administrator to change the ‘Admin password’ (which allows access to Configuration) and also to delete any passwords associated with programs. Program defaults Settings Passwords Controller reset Highlight ‘Passwords’ then press “Enter” ** Admin passwd ** DONNA GEORGE [ , to select ADMIN PASSWORD Password Confirm [ to accept The screen will appear as opposite. ] We suggest that you change the ‘Admin password’ at this stage in order to protect the configuration settings. Use the “Up Arrow” passwd’ ] key to highlight ‘Admin Press “Enter” and type in the new password. Repeat to confirm and accept. The screen will go back to the ‘Configuration’ menu. ** Admin passwd ** DONNA GEORGE [ DEL PASSWORD ? [ YES NO To delete a password associated with a program, use the “Up Arrow” and “Down Arrow” keys to highlight the program. ] ] Press “Enter” Press “Enter” again to delete the password. 37 Controller reset The ‘Controller reset’ will delete all saved programs from the unit. Program defaults Settings Passwords Controller reset CONTROLLER RESET This will delete all programs [ SURE ? [ YES NO Highlight ‘Controller reset’ then press “Enter” To delete all the programs, press “Enter” ] ] 9. Running the TC-3000 from a PC The TC-3000 can be run from a PC using Techne’s Gensoft software. This is available to download from the Techne web-site at www.techne.com. You will need ‘Winzip’ (which is available free of charge on www.winzip.com) to unzip the files. Instructions for using Gensoft are included in a separate Manual. Connecting one unit to the computer using an RS 232 cable If you are driving one TC-3000 unit you will need part number FGEN232 which includes a 9-pin female to female, null modem, RS232, fully screened cable, Gensoft on disk and an instruction sheet. Connecting several units to the computer using the daisy chain cables If you are driving two or more units then you will need part number FGEN485D, a 230V UK power pack set, or FGEN485E, a 230V European power pack set, or FGEN485P, a 120/100V USA power pack set. A power pack set includes: the connection to a computer (which also converts to RS485), a power pack, the necessary cables, a termination box and the software on disc with an instruction sheet. You will also need one or more of the following: 38 FGENTWO FGENFIVE FGENTEN FGENONE A two unit set which includes two connectors for the cyclers and a cable to interconnect them. A five unit set which includes five connectors for the cyclers and four cables to interconnect them. A ten unit set which includes ten connectors for the cyclers and nine cables to interconnect them. A one unit set for extending the daisy chain further which includes one connector for the cycler and one cable for connecting it to the daisy chain. Notice from the diagram that the cable connections to the cyclers are alternately bottom to top on the connector. Computer Computer connector/ RS485 converter Adaptor (if necessary) Connector Terminator Cables Power pack Power cable Upgrading the software in your TC-3000 Connect your TC-3000 to your computer using an RS232 lead. Log onto the Techne web-site at www.techne.com. Click on “Thermal Cycler Software Update” at the top of the page and you will find information on how to upgrade your software. Click on ‘Update Software’ and follow the instructions on the page to install the programs. 39 10. Notes on transferring protocols from other thermal cyclers The TC-3000 heats at over 3.6°C/s and provides the highest levels of temperature uniformity. Many slower machines have historically begun the countdown on hold times before the set temperature is reached in order to avoid any overshooting in sample temperature. The slower the heating rate the more significant the loss in hold time, i.e. if a 30 second hold time is set at 55°C then perhaps 5 to 10s will be lost in between the start of the time countdown and actually reaching the set temperature. The overall effect of this method of control is that your sample, if cooling from a higher temperature, is subjected to an environment with an elevated temperature compared to the target temperature for a significant part of the hold time. The TC-3000 provides the user with ‘what-you-program-is what-you-get’. Due to the rapid and responsive nature of the Peltier heating system, the time between the timer countdown initiating and actually reaching the set temperature has been reduced to as little as 1s. This ensures that the sample is only subjected to the exact temperature required. Taking the above into consideration it must therefore be noted that care must be taken when reoptimizing protocols from a slower machine. Trouble Shooting 1. The optimum annealing temperature may in fact be higher than the set temperature used in the slower machine. Try increasing it by 1 or 2°C. 2. The hold time can be reduced once the optimum temperature has been found. Try reducing it by 5 to 10s. 40 11. User maintenance Cleaning your TC-3000 The heating/cooling block, including wells and flat surfaces, should be cleaned regularly to ensure optimum heat transfer to the samples. Always clean the block if there has been a spillage. Use a cloth or cotton buds dipped in a fresh, 50:50 water/isopropanol solution and make sure that no deposits are left in the wells. In the case of radioactive spillages the heater block can be removed from the unit for more detailed cleaning. Barloworld Scientific recommends that you use a proprietary cleaning agent and follow the manufacturer’s instructions. The heating/cooling block is made of aluminium, therefore an agent such as Neutracon (from Decon Labs Ltd.), suitable for nonferrous metals should be used. However, remember that other parts of the unit are made of ferrous materials and may be damaged by spillage onto them. Heater Block removal Before cleaning your unit, disconnect from the power supply and allow it to cool to below 50°C. Remove the four screws on the underside of the unit and drop the block/fan assembly down. Unplug the assembly from the wiring and remove the assembly from the unit. Refitting the block/fan assembly is the reverse procedure; be careful of the wires as you refit the block. Underside of the TC-3000 Four screws which hold the block/fan assembly in place The outer case of the TC-3000 can be cleaned with a cloth dipped in water or ethanol (methanol or formaldehyde can also be used). No part of the case or cover should be immersed in the solvents. Do not use aggressive solvents such as acetone, or abrasive cleaners. Before using any cleaning or decontamination method except those recommended here, the responsible person should check with Barloworld Scientific that the proposed method will not damage the equipment. 41 12. Some frequently asked questions Q1 A1 What is the ‘Pause’ function at the start of the program used for? Some users prefer to preheat the heated lid before placing the samples into the unit. The pause feature is used to stop the unit after the 4 minute heated lid preheat step. It will also sound an audible alarm indicating that the machine is ready for the sample tubes or plate to be added. Pressing the “Pause” key followed by the “Enter” key will commence the remaining program. Q2 Why do you have to press some keys twice to make the unit do what you want it to do? With many of the program features there is a fail-safe function which asks if you are sure you want to perform a particular action. You are required to press one key to select a function followed by a second to accept it. A2 Q3 A3 What is ‘Hot Start’? A “hot start” is used for reducing non-specific product formation during the first cycle of amplification. The ‘Hot Start’ programming step is used to pause the instrument at a specific temperature, typically around 70ºC, after the initial template denaturation. The reason is to allow the manual addition of unmodified Taq DNA polymerase which may loose activity if added during the initial 5min denaturation. Heat-activated Taq or Hot Start enzymes do not require this step. Q4 A4 What is the incremental function? (See pages 29-31). Incremental timing and temperature are used to increase or decrease either the time or temperature incrementally over the number of cycles in a stage. Incrementation of extension time is used with ‘Long PCR’ which is when large template fragments are to be amplified (e.g. 27kb lambda DNA, 40kb genomic DNA). Decremental temperature is used for protocols such as ‘Touchdown PCR’ where one starts with a high annealing temperature in the first cycle and gradually decreases the temperature over the number of cycles in the stage. This ensures that only the specific product is amplified. Q5 The heat-up ramp-rate in the specification is 3.6°C/second yet I can only manually set it to 2.0°C/second. Why is this? If you set the ramp-rate to max the block will heat at 3.6°C/second the unit sets its own control parameters. If you program a ramp-rate the control parameters reduce the ramp-rate. This is a feature of the software and not the actual ramp-rate. A5 If you require further assistance please contact us at: [email protected] We are continually striving to improve our thermal cyclers and software. If you have any comments and suggestions on how we can do things better please send them to us at: [email protected] 42 13. Additional information Brief fault finding notes and a list of replacement parts are given in this section. Note that this equipment should only be dismantled by properly trained personnel. Removing the outer cover exposes potentially lethal mains voltages. There are no user serviceable parts within this equipment. Fault Finding Should you have any problems with your TC-3000 which cannot be easily remedied, you should contact your supplier and return the unit if necessary. Please include details of the fault observed and remember to return the unit in its original packing. Barloworld Scientific accept no responsibility for damage to units which are not properly packed for shipping: if in doubt, contact your supplier, giving the full serial number of the unit and software version number (shown when the unit is first switched on). Fuses If neither the power light nor display on the front panel is lit, one of the two fuses may have blown. Check that there is no external cause, such as a faulty plug or lead. Check both fuses and replace the faulty fuse with a new one of the correct value (fuse values are given on the label next to the power inlet). Note that fuses should only be replaced by a qualified electrician. The holder for the two fuses is built into the mains input socket. First remove the power cable and then gently prise the fuse drawer open with a flat-bladed screwdriver or similar tool. Each fuse can be removed by using the screwdriver as a lever. Exchange the faulty fuse in the fuse holder for a working fuse of the correct value. Finally, replace the fuse drawer in the fuse compartment and push the drawer shut. Fuses which blow repeatedly indicate a serious fault and you should return the unit to your supplier for repair. Interchangeable blocks The block can be removed and replaced by another of the same sort or of a different sort. The software will register the change and set up the unit for the new block. Remove the four screws on the underside of the unit and drop the block/fan assembly down. Unplug the assembly from the wiring and remove the assembly from the unit. Refitting the block/fan assembly is the reverse procedure; be careful of the wires as you refit the block. Underside of the TC-3000 Four screws which hold the block/fan assembly in place 43 Accessories The following accessories can be obtained from Barloworld Scientific or your local Techne dealer: Item No FTC3/02/B FTC3/05/B FTUB02TW FTUB05TW Description 0.2ml Tube Block for TC-3000 0.5ml Tube Block for TC-3000 0.2ml Micro tubes 0.5ml Micro tubes thin wall Quantity 1 1 Pack of 1000 Pack of 1000 Replacement parts The following replacement parts can be obtained from Barloworld Scientific or your dealer: Item No FCABRTUK FCABRTEU FCABRTUS 6501231 6500129 Description Mains cable and plug, 230V UK Mains cable and Schuko plug, 230V Europe Mains cable and 3-pin plug, 100V/120V US type Fuse T2.5A (230V units) Fuse T4A (120/100V units) Quantity required 1 1 1 2 2 Should the mains lead need replacement a cable of 1mm2 of harmonised code H0VV-F connected to an IEC320 plug should be used. IF IN DOUBT CONSULT A QUALIFIED ELECTRICIAN. 44