1
Music Masterworks
User Manual
Copyright (C) 1997-2007 Joseph Heimiller
Contents
I
Table of Contents
Foreword
0
Part I Index
8
Part II Introduction
9
Part III Views
9
Part IV Instruments, adding
10
Part V Adding instruments
10
Part VI Adding Tracks
10
Part VII MIDI
10
Part VIII Mouse Commands
11
Part IX Buttons
12
Part X Keyboard Commands
15
Part XI Beams
16
Part XII Ties
16
Part XIII Slurs
16
Part XIV Tutorial
17
Part XV Chords
21
Part XVI Trouble Shooting
21
Part XVII Entering Time Values
24
Part XVIII Accidentals
25
Part XIX Measure Width
25
Part XX Note Menu
26
Part XXI Open Space Menu
26
Copyright (c) 1997 - 2006 Joseph Heimiller
II
MusicMasterWorks
Part XXII Base Clef
27
Part XXIII Treble Clef
27
Part XXIV Printing
27
Part XXV Menus
27
Part XXVI Clef Type
30
Part XXVII Key Assignments
30
Part XXVIII Staff / Piano Roll Options, Options menu
30
Part XXIX New Song, File menu
31
Part XXX Close Song, File menu
32
Part XXXI Exit, File menu
32
Part XXXII Print, File menu
32
Part XXXIII Print Preview, File menu
32
Part XXXIV Print Setup, File menu
32
Part XXXV Rename Song, File menu
32
Part XXXVI Save As, File menu
32
Part XXXVII Save Song, File menu
33
Part XXXVIII Open Song, File menu
33
Part XXXIX Cascade
33
Part XXXX Tile
33
Part XXXXI Song Selection
33
Part XXXXII Undo
33
Part XXXXIII Redo
33
Part XXXXIV Cut
34
Copyright (c) 1997 - 2006 Joseph Heimiller
Contents
III
Part XXXXV Copy
34
Part XXXXVI Paste
34
Part XXXXVII Clear
35
Part XXXXVIII Insert Space
36
Part XXXXIX Delete Range
36
Part XXXXX Select All
36
Part XXXXXI Select Time Range
36
Part XXXXXII Delete Track
36
Part XXXXXIII Selection Velocity/Selection Properties
37
Part XXXXXIV Append Song
37
Part XXXXXV Transpose
37
Part XXXXXVI Quantize
37
Part XXXXXVII Output Options
37
Part XXXXXVIII Song Properties
38
Part XXXXXIX Track Properties
38
Part XXXXXX Tempo
38
Part XXXXXXI Time & Key Signature
38
Part XXXXXXII Insert Note Before Current
39
Part XXXXXXIII Add Note After Current
39
Part XXXXXXIV Add Note At End
39
Part XXXXXXV Add Note At Current
39
Part XXXXXXVI Pitch Up 1/2 Step
39
Part XXXXXXVII Sharping a note
40
Copyright (c) 1997 - 2006 Joseph Heimiller
IV
MusicMasterWorks
Part XXXXXXVIII Flatting a note
40
Part XXXXXXIX Pitch Down 1/2 Step
41
Part XXXXXXX Increase Duration
41
Part XXXXXXXI Decrease Duration
41
Part XXXXXXXII Properties, Note Menu
41
Part XXXXXXXIII Delete
42
Part XXXXXXXIV Clear
42
Part XXXXXXXV Move Right in time
42
Part XXXXXXXVI Move Left in time
43
Part XXXXXXXVII Select Next Current Note
43
Part XXXXXXXVIII Select Previous Current Note
43
Part XXXXXXXIX Complex/Normal Mode
43
Part XXXXXXXX Play On Hesitation
43
Part XXXXXXXXI Play Only Selected View
44
Part XXXXXXXXII Auto Rewind
44
Part XXXXXXXXIII Move Pitch To Key
44
Part XXXXXXXXIV Show Note Placement
44
Part XXXXXXXXV Show Lyrics
44
Part XXXXXXXXVI Snap-To Resolution
44
art XXXXXXXXVII View, New
45
art XXXXXXXXVIII New, View menu
45
Part XXXXXXXXIX View, Delete
45
Part XXXXXXXXX Delete, View menu
45
Copyright (c) 1997 - 2006 Joseph Heimiller
Contents
Part XXXXXXXXXI Show Controller Graph
V
46
art XXXXXXXXXII Tracks
46
art XXXXXXXXXIII Channels
46
art XXXXXXXXXIV Normal/Complex Mode
47
art XXXXXXXXXV Controller View
47
art XXXXXXXXXVI Drums
48
rt XXXXXXXXXVII Percussion Instruments
48
t XXXXXXXXXVIII Recording
50
art XXXXXXXXXIX Lyrics
51
art XXXXXXXXXX Bank Select
52
art XXXXXXXXXXI Note Duration
52
rt XXXXXXXXXXII Triplet Notes
52
t XXXXXXXXXXIII Staff Style View
53
t XXXXXXXXXXIV Piano Roll Style View
53
rt XXXXXXXXXXV Message Style View
53
t XXXXXXXXXXVI Program Change
54
XXXXXXXXXXVII Sustain
54
XXXXXXXXXXVIII Sostenuto
54
t XXXXXXXXXXIX Modulation
54
rt XXXXXXXXXXX Breath
54
t XXXXXXXXXXXI Balance
55
XXXXXXXXXXXII Pan
55
XXXXXXXXXXXIII Expression
55
Copyright (c) 1997 - 2006 Joseph Heimiller
VI
MusicMasterWorks
XXXXXXXXXXXIV Soft Pedal
55
XXXXXXXXXXXV Timbre
55
XXXXXXXXXXXVI Brightness
55
XXXXXXXXXXXVII Tremolo
56
XXXXXXXXXXVIII Chorus Depth
56
XXXXXXXXXXXIX Duration
56
XXXXXXXXXXXX Selecting a range of notes
56
XXXXXXXXXXXXI MIDI Echo
57
XXXXXXXXXXXXII Echo
57
XXXXXXXXXXXIII MultiTrack Recording
57
XXXXXXXXXXXIV Unlocking Music MasterWorks
57
XXXXXXXXXXXXV Purchase Music MasterWorks by Phone
58
XXXXXXXXXXXVI Purchase Music MasterWorks
58
XXXXXXXXXXXVII Buy Music MasterWorks
59
XXXXXXXXXXVIII Register Music MasterWorks
59
XXXXXXXXXXXIX Rests
59
XXXXXXXXXXXXX Audio
60
XXXXXXXXXXXXI Wave
60
XXXXXXXXXXXXII Record Wave
61
XXXXXXXXXXXIII Record Song to Wave File
62
XXXXXXXXXXXIV Voice To MIDI Notes
62
XXXXXXXXXXXXV Appending
XXXXXXXXXXXVI Filter
63
64
Copyright (c) 1997 - 2006 Joseph Heimiller
Contents
XXXXXXXXXXXVII Limits
VII
64
XXXXXXXXXXVIII Voice To Note Settings
64
XXXXXXXXXXXIX Metronome Settings
66
XXXXXXXXXXXXX Metronome
67
XXXXXXXXXXXXI Check your Singing
67
XXXXXXXXXXXXII Singing Analysis
67
XXXXXXXXXXXIII View Filter
68
XXXXXXXXXXXIV Music Theory Tutorial
68
Index
Copyright (c) 1997 - 2006 Joseph Heimiller
71
8
1
MusicMasterWorks
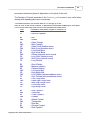
Index
Unlock / Buy Music MasterWorks - Support this Software!
Introduction
Menus
Views, and adding new instruments
Quick Keys
Mouse commands
Toolbar buttons and controls
MIDI music recording
Voice-to-Note translation
Check your singing
Printing
Audio/voice recording
Controller view
Entering time values
Drum / percussion instruments
Normal/Complex mode
Troubleshooting
Tutorial: Music Editing
Beginner's music theory lesson
Product of Aspire Software
Copyright © 1997-2007 Joseph Heimiller
All Rights Reserved
Copyright (c) 1997 - 2006 Joseph Heimiller
Introduction
2
9
Introduction
Music Masterworks is a music composition program that allows your inspirations to
come to life. Music Masterworks has been designed to be as easy to use as
possible, so you can concentrate on what you want to do - compose music. This
program is designed to allow you to create music very quickly through keyboard
commands much like a word processor. Or, if you prefer, you can just point and click
to create your compositions. Take a look at the Quick Keys and Mouse Commands
sections to start using Music Masterworks now!
Music MasterWorks allows you to open several songs at a time, and even allows you
to cut, copy and paste between them! Also, within a single song you can open up
multiple sub-windows(called views), each in a different track and/or instrument.
This program utilizes the MIDI functionality of your sound card. You will usually be
using the internal MIDI sound synthesis. However, if you have a MIDI compatible
musical keyboard/piano, you can hook it up using a USB MIDI Cable. This allows you
to play to your keyboard or record from it!
3
Views
Music MasterWorks allows multiple sub-windows within each song. These subwindows, called views, can show a different track and/or instrument. For instance,
when you want to add another instrument to your song, just select the 'View'-'New'
menu item and another sub-window will appear. Then select the instrument
combobox (the one that says 'Grand Piano') and select which instrument you would
like to hear. One thing to remember here, though, is that you must have some notes
in the current track/instrument to create a new track/instrument.
There are three types of views you can select from. The default is the normal staff
notation view. However, if you select the combobox in the upper left corner of the
view, you can select the Piano Roll or Message style views as well.
Views are very versatile. If you have multiple tracks in your song, you can select the
track button (the one that says something like 'Track 1') and select multiple tracks to
be shown in the same view! With this feature, you can edit multiple tracks at once.
For instance, you could cut the same section out of the guitar and drum tracks at the
same time.
Copyright (c) 1997 - 2006 Joseph Heimiller
10
4
MusicMasterWorks
Instruments, adding
See the section on Views.
5
Adding instruments
See the section on Views.
6
Adding Tracks
See the section on Views.
7
MIDI
MIDI, or Musical Instrument Digital Interface, is a standard that specifies how to transmit and
save music. It does this in the form of notes specifying a certain instrument, pitch and
volume (as opposed to an audio wave recording such as a '.WAV' or '.MP3'). For instance, a
note could be of instrument 'Violin' at middle C at a volume level of 96 (out of 127). MIDI
specifies a set list of 128 possible instruments, so the same instrument will be played no
matter what MIDI device is used to reproduce the sound (the MIDI device used determines
the quality of the sound). It also allows extra 'banks' of instruments for expanded sets of
instruments.
MIDI was originally designed as a way to connect electronic musical instruments together, so
that they could play in unison or so that one instrument could control another. This same
interface was adapted for personal computers. Music Masterworks saves your music files in
MIDI format (this is a standard format that almost all other music composition programs can
use).
To read more about recording from your MIDI keyboard/piano click here.
Select the MIDI synthesis device you wish to play to using the 'Device'-'MIDI Output' menu.
You will usually have an external USB MIDI option, and an internal sound synthesis
option(s), as well as the default selected Windows MIDI output option.
To record with Music Masterworks make sure the MIDI cable is connected correctly, and
then hit the record button. When you hit the record button, the record dialog will appear and
Music MasterWorks will immediately start recording. Don't worry about immediately jumping
over to your instrument to start playing, because the initial time wasted in the beginning is
deleted (if your song is blank to start with). When you are done, click on the 'Done' button.
Copyright (c) 1997 - 2006 Joseph Heimiller
MIDI
11
Through a MIDI cable, there are 16 different channels that music data can be sent through.
If you have several MIDI instruments chained together (using the THRU connectors) you can
have each instrument receive/transmit on their own channel(s). When you are using the
internal synthesis of the sound card, there is no MIDI cable involved but the sound card still
receives data on 16 different channels. Controller and note data is sent per channel.
Whether using the external or internal option, channel 10 is reserved for drum/percussion
sounds.
MIDI Compliance: Music MasterWorks reads and writes all types of MIDI messages.
The only exception to this is the informational (first) track of a multi-track (type 1)
'.MID' file. The first track is reserved for informational messages (according to the
MIDI spec) and so Music MasterWorks does not save non-information messages to
this track (this includes control changes, notes and aftertouch messages). It also
does not save delta times in the informational track. Also, Music MasterWorks does
not play system exclusive messages or aftertouch messages (although it does read
and write them in the '.MID' file and record them).
Music MasterWorks has a few added features not in the MIDI standard. These are:
slurs, split-by-pitch for the grand staff, and the addition of minor keys for the key
signature. Since these are not implemented in the MIDI specification, these are
implemented in Music MasterWorks through specially placed MIDI text messages
(which will be recognized by other sequencing software as only text).
8
Mouse Commands
Left click in open space to create a new note.
Left click in open space and drag the mouse to select a range of notes.
Left click on a note to select it.
Left click on a note and drag the mouse to move the note. Dragging over
another note creates a slur.
Right click on a note to bring up the note menu.
Right click in open space to bring up the open space menu.
Effect of the mouse in the Controller View:
Left click on the box to the left to change the controller type being viewed.
Left click to add a single controller change.
Copyright (c) 1997 - 2006 Joseph Heimiller
12
MusicMasterWorks
Left click and drag to put down a graph in a time range.
Right click to specify a specific numeric value at that time.
9
Buttons
- View Type Selector:
Use this to select how you want to view your composition.
You can select the Staff view, the Piano Roll view or the Message view .
The Piano Roll view shows where the notes are in relation to piano keys.
The Message view shows a low level raw data view of the MIDI messages.
- View Filter Button:
Brings up the view filter dialog which allows you to select which tracks you
want to see in this view.
- Instrument Selector:
This allows you to select the instrument used to play the notes in your track. If
you are in Normal Mode it will change all the notes in the track to the
instrument
selected.
At the end of the instrument list is the "Bank Select" option. If the MIDI
device you are using supports multiple instrument banks, use this to select the
bank.
- Note Duration Selector:
These buttons affect the duration of the CURRENTLY SELECTED NOTE. To
change the duration of a newly created note you need to select the duration
AFTER the new note has been put down.
The dot button on the end selects/deselects whether the note is dotted. The
'3' button on the end selects whether the note is a triplet.
- Track Selection Control (only in 'complex' mode):
This allows you to select the track that you want the notes you put down to be
in.
Copyright (c) 1997 - 2006 Joseph Heimiller
Buttons
13
- Channel Selector:
This allows you to select the channel that you want the notes you put down to
be in. If you are in Normal Mode you will not see this control. To change the
channel a track is on in Normal Mode, select the Track Properties menu
option under the Song menu item.
- Selecting this will close the view. The main song window will still stay open.
These next eight buttons are two-state buttons that mirror the various checkmarked
options on the 'Options' main menu item:
- Hesitate Play Button:
When this button is down (highlighted green), notes will sound when moved in
pitch and when placing new notes with the mouse.
- Play All/One View Button:
When this button is down only the currently selected view will play. When it is
up, all the views will play.
- Auto-Rewind Button:
When this button is down the playbar will go back to the beginning after hitting
the end.
- Move Pitch To Key Button:
When this button is down note placement and movement will stay within the
notes of the selected key signature.
- Note Placement Button:
When this button is down it will show where notes will be placed using the
mouse with a red note-head indicator (hit the left mouse button to put down a
note).
- Show Lyrics Button.
- Show Controller View Button:
Shows the controller view so you can change controllers (MIDI special
effects) such as 'Pitch Bend', 'Damper Pedal', etc...
Copyright (c) 1997 - 2006 Joseph Heimiller
14
MusicMasterWorks
- Play while Recording button:
Will play existing music in your song while recording new music.
- Pitch Indicator:
This text box shows the pitch of the currently selected note. This indicator does not
take into account the key signature, and always uses sharps instead of flats (for the
notes corresponding to black keys on the piano).
- VCR Controls:
These control the playing and recording of music. The record button in the middle is
for recording MIDI notes from an external musical keyboard or other MIDI instrument
(requires a special MIDI cable). The record button on the far right is to record your
voice or other wave audio in the form of a '.WAV' file.
- Record Song to Wave File button:
This will record your MIDI song to a wave audio file (wave audio files can be used to
create an audio CDs). This function will only work if the sound card in your computer
has a 'Stereo Mix', 'What U Hear', or similar recording device option.
- Voice to Note Button:
Pushing this button brings up a voice to note real-time translation window. Just sing
into your microphone and the pitch of your voice will be displayed in a graph format.
After you're done, hit the 'Done' button and it will be translated into notes for you.
- Wave File to Note Button:
Pushing this button brings up a file selection dialog, where you can select which wave
file ('.WAV' extension) will be translated into notes.
- Check your Singing / Singing Analysis button:
Select the range of notes you are going to sing first, then select this button to test how
close to the actual pitch you can sing the notes.
- Snap-To Button:
Pushing this button brings up the snap-to dialog that allows you to select at what
resolution you want to compose. This affects the grey vertical guidelines as well as
many commands, including the mouse selection and moving notes in time.
- Split View Button:
Pushing this creates another view within the song window. You can use this edit a new
Copyright (c) 1997 - 2006 Joseph Heimiller
Buttons
15
or different track(s)/instrument(s) within the song.
10
Keyboard Commands
*note: These keys can be configured by selecting the 'Options'-'Key Assignment'
menu item.
A
E
M
I
Delete Key
positions)
Shift-Delete Key
- Add a note right after the currently selected note
- Append a note to the very end of the view
- Add another note at the current time
- Insert note before the currently selected note
- Clear currently selected note(does not affect other note
'<' and '>'
',' and '.'
'+'
'-'
D
T
Ctrl-'+' or Ctrl-'>'
Ctrl-'-' or Ctrl-'<'
- Decrease and Increase note duration
- Decrease and Increase note duration
- Increase note duration
- Decrease note duration
- Dot currently selected note(duration 1&1/2 times longer)
- Triplet currently selected note(duration times 2/3)
- Increase the velocity/volume of the currently selected note
- Decrease the velocity/volume of the currently selected note
'C'
Shift-'C'
Alt-'C'
'V'
'U'
- Cycle through chords (must have base note selected)
- Cycle backward through chords
- Invert chord
- Anchor chord down(adds note one octave down from base)
- Anchor chord up (adds note one octave up from base)
'P'
'R'
Shift-'R' or Home
Ctrl-'R'
'F'
Shift-'F' or End
'S'
Space Bar
- Play the entire composition
- Rewind play/record line ¼ measure
- Rewind play/record line to beginning
- Record from MIDI input
- Fast forward play/record line ¼ measure
- Forward play/record line to end
- Stop playing
- Play a section around the currently selected note
Up Arrow
Down Arrow
Page Up
Page Down
Right Arrow
Left Arrow
- Move currently selected note up in pitch
- Move currently selected note down in pitch
- Move currently selected note up one octave
- Move currently selected note down one octave
- Move forward in time
- Move backward in time
- Delete the current note (this will condense the hole created)
Copyright (c) 1997 - 2006 Joseph Heimiller
16
MusicMasterWorks
Shift-Up Arrow
Shift-Down Arrow
Shift-Right Arrow
Shift-Left Arrow
Ctrl-Right Arrow
Ctrl-Left Arrow
'1'-'7'
'9'
'0'
- Move to the next note at your current location
- Move to the previous note at your current location
- Select a range of notes to the right
- Select a range of notes to the left
- Move note forward in time
- Move note backward in time
- Move currently selected note to musical note A-G
- Move currently selected note down one octave
- Move currently selected note up one octave
Shift-Ins or Ctrl-V - Paste the last copied selection of notes
Ctrl-Ins or Ctrl-C
- Copy a selection of notes
Ctrl-Del
- Clear the current note or selection of notes (leave hole)
Shift-Delete or Ctrl-X
- Delete a selection of notes
Alt-Backspace
11
- Undo the last command (if last command is undoable)
Beams
In the staff view, beams are horizontal lines that are used in place of flags when
notes (of 1/8th note duration and below) are connected together. Beams are
automatically placed in Music MasterWorks - there is no manual control of how
beams are placed.
12
Ties
Ties are automatically placed in Music MasterWorks when a note is created that
goes over a measure boundary.
13
Slurs
Connecting a group of notes with a slur, a curved line over or under a group of notes,
indicates that the notes should be played smoothly together. This usually means
playing the group of notes without resting in between (or even overlapping the
durations of the notes). Creating a slur does not change the duration of the notes, it
is only a notational feature. Fine-tuning the duration of notes should be done by right
clicking on the note, selecting 'Properties' and changing the duration 'number of
ticks'.
Copyright (c) 1997 - 2006 Joseph Heimiller
Slurs
17
You can create slurs in Music MasterWorks by either:
· Selecting a range of notes and using the 'Edit'-'Create Slur' menu item.
· Using the mouse, left clicking on a note and dragging (keep left mouse button
down) onto another note at a different time.
With the latter method, you can better choose which notes are used as a base
position for the slur (if there are multiple notes at the beginning or ending times).
With either method, you'll be presented with this dialog:
The 'From Pitch' and 'To Pitch' indicates which note the begin and end slur will be
drawn in relation to ('C5' refers to middle C). The vertical offset controls the position
of the slur in relation to the pitch, with plus going up and negative going down. The
offset is in increments of note positions, so +7 would draw the slur an octave above
the pitch. These settings are used to fine-tune the position for aesthetic purposes.
Check the 'Slur curves downward' to make the slur point down.
The 'Length' of the slur is usually not altered, and only changed for aesthetic
purposes.
Note: Ties, drawn over a long note that goes over a bar boundary, are created
automatically in Music MasterWorks.
Note: Slurs are not an intrinsic feature of MIDI and are supported in Music
MasterWorks by inserting a MIDI comment with a special text syntax.
14
Tutorial
This tutorial will guide you through the basic editing features of Music MasterWorks,
by creating the first few notes of the song 'For Elise' by Beethoven. You can use the
alt-Tab key combination to switch between this help file and the program. Action
Copyright (c) 1997 - 2006 Joseph Heimiller
18
MusicMasterWorks
items are highlighted in red text.
Music MasterWorks starts off with a completely blank staff view. Notice that the time
signature defaults to 4/4 time (4 quarter notes per measure/bar). For this song, we
will need 3/4 time. Select the 'Song'-'Time & Key Signature' menu item. This option
shows you a list of time and key signature changes throughout the song. Right now
there is only one time/key signature at the beginning of the song. Select the 'Change'
button. Now select '3' in the first drop-down list under 'Time Signature' instead of '4'.
Notice that you can change the key signature in this screen as well ('For Elise' is in C
Major, so nothing needs to be changed). Now hit OK, and OK again. Notice that
there are now only 3 quarter rests (rests are empty time, inserted automatically by
Music MasterWorks) per measure.
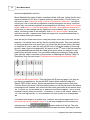
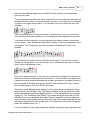
Now we can put down some notes. Using the mouse, move the cursor over the first
measure. You should see a red dot that moves with the mouse. This is an indicator
to show you where the note would go if you clicked the left mouse button. We want
to create an 'E' note to start the song off with, but to follow the notation of the song,
we don't want it right at the beginning. We want it at the 3rd beat of the first measure.
The gray dashed lines are there as a beat guide and to show you where you can
place notes using the mouse. You can always change the spacing of these guide
lines (and the snap-to resolution of the mouse) by selecting the 'Options'-'Snap-To
Resolution' from the main menu. Position the mouse (and the red dot) like this:
and click the left mouse button. This puts down the E note and plays it (as long as
you have your speaker on, the correct MIDI output device selected under the
'Device'-'MIDI Output' menu). Notice the play/record line has moved to that point.
This line shows you where it will start playing when you hit the play button and where
recordings will be inserted. Also notice the note letter guide down at the bottom says
'E6' (if it does not, hit the delete key to delete the note and try again). This is to help
beginners identify notes on the staff. The number '6' refers to the octave. Middle C is
'C5', the note right below it, B, is considered in the next octave so it is designated
'B4'.
The default note length is a quarter note. However, we need an eighth note, so hit
the minus key on your keypad 2 times. You can also change the note duration by
selecting one of the
duration buttons at the top. The note
duration buttons affect the currently selected note and new notes that are put down
Copyright (c) 1997 - 2006 Joseph Heimiller
Tutorial
19
using the mouse.
You can also see that the up & down gray dashed lines have changed - this is
because you changed the note to a smaller eighth note. This automatic change
allows you to place notes using the mouse on each 1/8th note beat. To change the
spacing of these guide lines (and the mouse snap-to resolution) you can select
'Options'-'Snap-To Resolution' from the main menu.
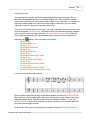
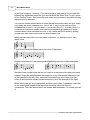
Now to add the other notes of the song. This time, instead of using the mouse, we'll
use the keyboard. Hit the 'A' key. This adds a note right after the currently selected
note. Now we need to change the pitch. Hit the down arrow key. This moves the
pitch down one half step (you can alternately move within the key signature by
selecting the
button). Now, to create more notes:
Hit the 'A' key.
Hit the up arrow key.
Hit the 'A' key.
Hit the down arrow key.
Hit the 'A' key.
Hit the up arrow key.
Hit the 'A' key.
Hit the down arrow key 5 times.
Hit the 'A' key.
Hit the up arrow key 3 times.
Hit the 'A' key.
Hit the down arrow key 2 times.
Hit the 'A' key.
Hit the down arrow key 3 times.
Hit the plus key on the keypad 2 times.
Your song should now look like this:
Now to make a note that will play at the same time as the last note: Hit the 'M' key.
We now have 2 notes at the same time (you can have as many notes as you want
play at the same time). Now we need to move the new note down. Hit the down
arrow 20 times. If you're tired of hitting the down arrow key, you can also drag and
drop the note using the mouse.
Now that the first notes of the song are complete, let's hear it! Select the rewind
Copyright (c) 1997 - 2006 Joseph Heimiller
20
MusicMasterWorks
button or hit shift-R. Then select the play button or hit the 'P' key. Hmmm, sounds a
little slow. Let's up the tempo a little bit. Select the 'Song'-'Tempo' menu item. Like
the time/key signature screen, this shows all the tempo changes throughout the
song. Select the 'Change' button. Change the number highlighted to 132. Hit OK,
and OK again. Play the song again.
Now let's change the instrument played, just for fun. Select the
instrument drop-down list and select 'Harpsichord'. This will change all notes in the
view to that instrument. Hit play again. Sounds a little dated? The MIDI standard has
128 musical instruments to choose from, so you shouldn't get bored. It also allows
for percussion sounds. The quality of the sound depends on the quality of the MIDI
synthesizer of your PC sound card (all computers should also have the 'Microsoft GS
Wavetable SW Synth' option which standardizes what you hear).
Wondering how to play more than one instrument at a time? Hit the
button in the
lower right and you'll get a new track with an independent musical instrument control.
You can also select the filter button to edit more than one track at a time.
To add, change or delete lyrics: right click where you want the lyrics to start. A popup menu will appear. Select 'Add Lyric'. A dialog will appear where you can enter the
lyrics you want displayed. You can also right-click on a note and a different menu will
appear.
Music MasterWorks has a many more features than this! For a complete list of
commands, refer to these help file topics:
Menus
Keyboard Commands
Mouse Commands
Music MasterWorks also has the capability to turn your singing into notes! It can
even check your singing against a tune you select. You can also record notes from
an external MIDI keyboard/piano.
And, if you purchase Music MasterWorks, you can access the special effect
controller view, to put in the 'sustain pedal' effect and make it sound a whole lot
better. Hit the
button. Now you'll see a black graph view. Click on the button to
the left marked 'Modulation' to change the effect selected. Scroll down in the list and
select '64 – Sustain/Damper Pedal' and hit OK. Now we'll need to turn on the sustain
pedal. Click in the black area at or before the first note and almost to the top of the
black area. You should see the green graph line rise up. Now play it again. The
notes should be sustained a little longer now, making them blend and sound better.
Copyright (c) 1997 - 2006 Joseph Heimiller
Chords
15
21
Chords
Chords can be created using the normal methods of putting down notes or can be
created using the chord commands:
'C' key – cycle through different chords
shift-'C' key – cycle backwards through different chords
alt-'C' key – invert chord
'V' key – Anchor chord by placing a note up one octave
'U' key – Anchor chord by placing a note down one octave
An individual note in a chord can usually be transposed up or down an octave and
still keep the chord sounding consonant (pleasing to the ear). You can move a note
of a chord up an octave using 'invert chord' command.
Adding a note up or down an octave from the chord base note is also often used,
and this can be done with the 'anchor' commands.
You can also always delete notes to simplify the chord.
The chord cycling commands use the 'chords.mid' file as a guide. This file is located
in your installation directory. You may open and change this file to change the chords
that are cycled through.
16
Trouble Shooting
Please contact us at [email protected] for technical support,
or call (within the U.S.): (303) 233-6791
Problem:
Can't place notes accurately in time using the mouse (or perform any other
function accurately using the mouse).
Answer:
Check your snap-to resolution setting. This can be accessed from the
'Options'-'Snap-to Resolution' menu item. All mouse functions 'snap-to' this
resolution setting, so the mouse action may not happen exactly where you
click. If you need more resolution, change this setting to something lower,
such as 16th note or less. The vertical dashed lines you see on the staff show
the snap-to resolution positions as a guide.
Problem:
Rests appear where you don't expect!
Answer:
Remember that you can overlap notes in Music Masterworks. For instance, if
Copyright (c) 1997 - 2006 Joseph Heimiller
22
MusicMasterWorks
4 quarter notes are placed on the staff, but each overlaps the next by 1/8th
note, you will see almost half the measure/bar has a rest. If you place them at
the correct 1/4th note intervals there will be no rest. The vertical dashed
guidelines are there to show you the time intervals (This is set using the
'Options'-'Snap-to Resolution' menu item, and also affects where mouse-click
actions occur). Use these guidelines to place notes correctly.
Problem:
Don't hear any sound when clicking on the play button!
Answer:
Make sure you have the correct output device selected under the 'Device''MIDI Output' menu.
If you do this and still do not hear any sound, check your Windows volume
control / sound mixer (select 'Device'-'Playback Volume' from the menu) to
see if the MIDI or Synth volume has been turned down or muted. Turn the
volume all the way up.
Also check to make sure your speakers are plugged in correctly, and check
the volume knob on your speakers.
Problem:
The microphone doesn't seem to record anything, or it is at a very low volume
level.
Answer:
First, make sure the microphone is selected under the Music MasterWorks
'Device'-'Wave Input' menu.
Make sure your microphone is securely plugged into your computer.
Also, check the 'Volume Control' settings of the microphone. Select 'Options''Recording Volume' from the menu. Make sure the volume on the microphone
is turned up. Some sound cards also have a 'boost' option under the
advanced volume control settings - turn that on.
Problem:
The MIDI record operation doesn't seem to record anything.
Answer:
Make sure you hit the 'Done' button after recording.
If you have selected the 'Done' button, make sure that you have your MIDI
cable hooked up correctly to your MIDI instrument. The 'IN' connector of your
cable should be hooked up to the 'OUT' port on the back of the instrument,
and the 'OUT' connector should be plugged into the 'IN' port on the back of
the instrument. It is 'reversed' because what is 'out' to the instrument is 'in' to
the computer.
Make sure you turn on/plug in your MIDI device before starting Music
Masterworks.
Make sure you have installed any software on CD that came with your sound
Copyright (c) 1997 - 2006 Joseph Heimiller
Trouble Shooting
23
card or USB midi device.
Make sure you do NOT have the 'Device'-'MIDI Recording Echo' menu option
set to the USB midi input device.
Problem:
Playing to an external MIDI instrument, nothing is played!
Answer:
Make sure you have the correct MIDI output device selected under the
'Device'-'MIDI Output' menu.
If you do this and it still does not work, make sure you have the MIDI cables
connected correctly. The 'OUT' connector of your cable should be hooked up
to the 'IN' port on the back of the instrument, and the 'IN' connector should be
plugged into the 'OUT' port on the back of the instrument. It may seem
reversed, but remember: what is 'out' to the computer is 'in' to the instrument.
If that doesn't work, refer to the documentation of your music keyboard. You
may have to select the input device (for example, changing serial input to midi
input) or you may have to change the channel(s) the keyboard receives on.
Problem:
There is something wrong with the display of the staff or the notes.
Answer:
Select 'Options'-'Staff/Piano Roll Options' to change how the staff is displayed,
such as the clef type, split-at-pitch for the grand clef, placement, etc.
Problem:
The musical instruments don't sound realistic.
Answer:
There is often more than one output device to choose from under the 'Device''MIDI Output' menu. If you have multiple options, try them all out. Remember,
the sound card inside your computer determines the quality of the MIDI
output.
Problem:
There is more than one track/instrument in the composition, but only one
instrument is played!
Answer:
First, make sure you do not have the 'Play only selected view' option set.
You may need to give each track a unique channel number. Do this for each
View/Track in your song by selecting the view sub-window and then selecting
'Song'-'Track Properties' off the menu and then select a different channel and
hit OK.
Another cause of this problem is that many low-end sound cards do not
support setting a different instrument per channel. To fix this problem, select
'Device'-'Select Device Type' off the menu and select "Basic Sound Card" and
hit OK.
Copyright (c) 1997 - 2006 Joseph Heimiller
24
MusicMasterWorks
Problem:
Music MasterWorks is not echoing my recorded input out my speakers.
Answer:
Make sure the proper device is selected off the 'Devices'-'MIDI Recording
Echo' sub-menu.
Problem:
I add lyrics and/or wave audio but nothing happens! I don't see it!
Answer:
The lyrics and wave audio will not display until you put down at least one note.
Problem:
Music MasterWorks blows up! (causes a UAE, performs an illegal operation,
causes a memory protection fault, etc, etc…)
Answer:
Contact Aspire immediately! Send an e-mail to:
[email protected]
Or call technical support at: 303-233-6791
Also, make sure you are using the latest version of your sound card drivers *This fixes most problems! The sound card is the part of your computer that
makes the music. Most sound card manufacturers have an internet site where
you can download the latest drivers. Follow the manufacturer's instructions for
updating the drivers.
Next, check to see if you have the latest version of Music MasterWorks. You
can download the latest version off of the Aspire web site at:
http://www.musicmasterworks.com/support.html
17
Entering Time Values
The insert space dialog is a good example for entering time values. It has both an 'at
time' and an 'amount of time' value.
Copyright (c) 1997 - 2006 Joseph Heimiller
Entering Time Values
25
For the 'at time', the bars(or measures) value starts at 1 for the first bar and does not
have an upper limit. In the staff view, the bar numbers are printed above the start of
each bar for reference.
The second value is the beats. In the 'at time' value, this number starts at 1 for the
first beat, and goes to however many beats are in a measure. If, for example, you
selected 3/4 time you would have 3 beats in a measure, so the value could go up to
3.
The last value is the 'remaining ticks'. This value is dependent on the 'ticks per
quarter note' value set in the song properties. In the insert space dialog shown, this
value is out of 384 ticks. That means that each quarter note is equal to 384 ticks. So
if you wanted to move the 'at time' value over another half a quarter note, you would
enter 192 in this field.
The 'amount of time' input is similar, except the bars and beats value start at
zero. For example, if you wanted to insert a bar and a half, and your time signature is
6/4, you would enter 1, 3 and 0.
18
Accidentals
Accidentals (sharps,flats,naturals) are inserted automatically by Music MasterWorks.
If the key signature has sharps, the accidentals are defaulted to sharps. If the key
signature has flats, the accidentals are defaulted to flats.
To change the accidentals from their defaults: right click on a note and select one
of the 'Force to' options. There is a choice of double flat (which moves the note down
2 half steps), flat, sharp, and double sharp (which moves the note up 2 half steps), or
the default. Some accidental options are not allowed, such as E#.
19
Measure Width
The width of the measure is controlled by the options from the 'Options'-'Staff / Piano
Roll Options' menu item. If you'd like the measures condensed select the 'Condense
measure when possible' option. If you'd like to have a maximum size for the
measure, or set all measures to the same size, select the appropriate option in the
'Measure Width' drop-down selection. These settings are on a per-track basis, so if
you have multiple tracks in your song you'll need to set each individually. You must
save the file to save these settings permanently (if these settings are changed it will
not force a save).
Copyright (c) 1997 - 2006 Joseph Heimiller
26
20
MusicMasterWorks
Note Menu
The note menu pops up when right clicking on a note. Its options are:
Delete: deletes the note and moves the rest of the music back to fill in the
void.
Clear: deletes the note but does not move the rest of the music.
Properties: brings up dialog to fine-tune duration and velocity(note volume).
Default Accidental: this will make the note use the default flat/sharp
depending on the key signature selected.
The following options will be grayed out if they are not possible with the
selected note:
Force to Double Flat: this will force the note to display as a double-flat.
Force to Flat: this will force the note to display as a flat.
Force to Sharp: this will force the note to display as a sharp.
Force to Double Sharp: this will force the note to display as a double sharp.
21
Open Space Menu
The open space menu pops up when you right click in open space on the staff.
Its options are:
Paste: pastes music that has been previously cut or copied. Brings up paste
dialog.
Insert Space: moves music down at location to make space.
Delete Range: brings up delete range dialog.
Set Play/Record Line: sets position where playing starts and where recording
is
inserted.
Add Lyric: adds a line of text at the location you click.
Change Lyric: changes lyric where you click, if a lyric exists there.
Delete Lyric: deletes lyric where you click, if a lyric exists there.
Add Audio: select a '.wav' file to insert into the song.
Change Audio: changes audio properties.
Delete Audio: deletes audio segment inserted.
Change Slur: changes slur properties.
Delete Slur: deletes slur.
See the Slur section about creating slurs.
Copyright (c) 1997 - 2006 Joseph Heimiller
Base Clef
22
27
Base Clef
To set the staff as just a Bass Clef, Select 'Options'-'Staff/Piano Roll Options' from
the menu and change the 'Clef Type'.
23
Treble Clef
To set the staff as just a Bass Clef, Select 'Options'-'Staff/Piano Roll Options' from
the menu and change the 'Clef Type'.
24
Printing
You can print sheet music (or a piano roll when using the piano roll style view) by
selecting the 'File'-'Print' menu option. To see a preview of what the printout will look
like select the 'File'-'Print Preview' menu option.
Printing will use only the currently selected view/track as a basis for what it prints. For
songs with multiple tracks, you will need to print each track individually or change the
view filter of the currently selected view to include all tracks.
To change the scale/size of what is printed, select the 'Option'-'Staff / Piano Roll
Options' menu item, and change the 'Printout Scale'. You can also change options
that affect the measure width as well.
25
Menus
File Menu
New Song
Open Song
Close Song
Save Song
Save As…
Rename Song…
Print Setup
Print Preview
Print
Copyright (c) 1997 - 2006 Joseph Heimiller
28
MusicMasterWorks
Exit
Edit Menu
Undo
Redo
Cut
Copy
Paste
Clear
Append Song
Insert Space
Delete Time Range
Select All
Select Time Range
Delete Track
Selection Velocity/Selection Properties
Transpose
Quantize
Create Slur
Device Menu
MIDI Output, MIDI Recording Echo,MIDI Recording Input,Wave Input
Song Menu
Song Properties
Track Properties
Tempo
Time & Key Signature
Note Menu
Add Note After Current - 'A' key
Add Note At End - 'E' key
Add Note At Current - 'M' key
Insert Note Before Current - 'I' key
Pitch Up 1/2 Step - up-arrow key (pitch up octave with: PageUp)
Pitch Down 1/2 Step - down-arrow key (pitch down octave with:
PageDown)
Increase Duration '+' key
Decrease Duration '-' key
Dot note - 'D'
Triplet note - 'T'
Properties - right-click on note head to bring up note menu
Delete - shift+delete key
Clear - delete key
Move Right in time ctrl-right arrow
Copyright (c) 1997 - 2006 Joseph Heimiller
Menus
29
Move Left in time ctrl-left arrow
Select Next Current Note right arrow
Select Previous Current Note left arrow
Accidental Commands
Options Menu
Key Assignments
Play on Hesitation
Play only selected View
Auto Rewind
Move Pitch to Key
Show Note Placement
Show Lyrics
Staff / Piano Roll Options
Snap-To Resolution
Voice-to-Notes Settings
Metronome Settings
Normal/Complex Mode
View Menu
New
Delete
Show Controller Graph
Play Record
This menu replicates the functionality of the VCR buttons.
Record Song to Wave File
Voice to MIDI Notes
Wave File to MIDI Notes
Check your Singing
Window Menu
Cascade
Tile
Song Selection
Unlock Menu
Click on these menu items to register/unlock/purchase Music MasterWorks.
There is also a Note Menu which will pop-up when right clicking on a note,
and an Open Space Menu which will pop-up when right clicking in open space
Copyright (c) 1997 - 2006 Joseph Heimiller
30
MusicMasterWorks
on the staff.
26
Clef Type
You can change the clef type(Grand/Treble/Bass/Alto/Tenor/Octave-Treble) with the
'Options'-'View / Print Options' menu item.
27
Key Assignments
This screen allows the configuration of the keyboard keys used in Music
MasterWorks and what commands they enact.
Click here to see the default key configuration.
28
Staff / Piano Roll Options, Options menu
This option will bring up different dialogs depending on what type of view you have
selected, either the Staff settings or the Piano Roll settings.
If you are in Staff view you have these options:
Clef Type: select either Grand/Treble/Bass/Alto/Tenor/Octave-Treble clef.
Split at pitch (for Grand Clef only): to change at which pitch it will place notes on the
bass or treble clefs (the default is middle C goes on the treble clef and notes below
that go on the bass clef). This can only be set per track, not per individual note.
Printout Scale: This decreases or increases the size of the staff when printing sheet
music.
Condense Measure when possible: to decrease measure width - this allows you to
see more measures at once, but may condense the notes too much.
Measure Width: options to set maximum or constant measure width. To not go
above a certain size/width select one of the 'Maximum size' options. To see a
constant width for every measure select one of the 'Always # beat' sizes.
Show Text Types, Lyrics/Comments/Other: Some text may just get in the way, so
this gives you the option of not displaying them.
These options can 'beautify' your sheet music by aligning notes that are slightly off
and beam together notes that are slightly off from their appropriate distance from
Copyright (c) 1997 - 2006 Joseph Heimiller
Staff / Piano Roll Options, Options menu
31
each other:
Time Group Merge %: Percent of quarter note between time groups that will merge.
Beam Note Tolerance %: Percent of note tolerance that beamed notes can be off by.
Color Changes With:
Always black: standard black for the note heads.
Volume: color will change with how loud the note is.
Instrument: color will change depending on the instrument selected.
Channel: color will change with the MIDI channel.
Consonance: color will change with how consonant the note is with the other notes at
the same time.
Track: color will change depending on the MIDI track the note is in.
Pitch: color will change with increasing pitch.
Octave: color will change with the octave it's in (octave changes at each 'C' note)
You have the options of these color schemes (the first color is the lowest value's
color):
Rainbow: black > grey > purple > bright purple > blue > bright blue > cyan > yellow >
orange > red
Contrast: purple > blue > cyan > green > yellow > army green > orange > red
Grey scale: black > light grey
Red scale: black > bright red
Green scale: black > bright green
Blue scale: black > bright blue
Yellow > Orange > Red
Red > Purple > Blue
Green > Cyan > Blue
If you are in Piano Roll view you have these options:
Print Piano Type: Depending on the type of piano you own, you may want to change
this to better fit it's size.
Color Piano Keys: color-codes piano keys to better show octaves.
Quarter Note display length: you can shorten or stretch the width of the display using
this.
Show Text Types: shows various types of text.
Color Changes With: see above for various color options.
29
New Song, File menu
This will create a new, empty song.
Copyright (c) 1997 - 2006 Joseph Heimiller
32
30
MusicMasterWorks
Close Song, File menu
This will close the currently selected song window.
31
Exit, File menu
This option will close down Music MasterWorks.
32
Print, File menu
This will bring up a print dialog that will allow you to select which page(s) you would
like to print, and then print the music to the printer attached to your computer.
This option will use the currently selected view/track as a basis for what it prints. For
songs with multiple tracks, you will need to print them individually.
33
Print Preview, File menu
This will show what the printout will look like, and allow scrolling through the pages of
the printout.
34
Print Setup, File menu
This will bring up the printer configuration dialog to set printer settings.
35
Rename Song, File menu
This will rename the currently selected song's file to a different name.
36
Save As, File menu
This will save the currently selected song to another name. The original song file will
not be affected.
Copyright (c) 1997 - 2006 Joseph Heimiller
Save Song, File menu
37
33
Save Song, File menu
This will save the currently selected song to disk. If the song does not have a name,
it will prompt you for one.
38
Open Song, File menu
This will bring up a file open dialog to browse for a ".MID" file.
39
Cascade
This command stacks all song windows and overlaps them so that each is the same
size as all others and only part of each underlying window is visible.
40
Tile
This command arranges your open windows from top to bottom so that they cover
the entire width of the screen without overlapping one another.
41
Song Selection
You can select between the different open songs using the 'Window' menu.
42
Undo
Un-does the last executed command. If the last command executed was not
undoable this option is not available.
This can also be done by hitting Alt+Backspace.
43
Redo
Re-executes the last undone command.
Copyright (c) 1997 - 2006 Joseph Heimiller
34
44
MusicMasterWorks
Cut
Cuts the currently selected range of notes. Cut will copy the selection before it
deletes it, so you can paste it afterward.
This can also be done by hitting Shift+Delete.
note: Cut will delete the time that the selection took up and move the rest of the
composition back to fill the space deleted. If you do not want the space deleted, use
the Clear function.
note: this will NOT copy tempo changes and time/key signature changes.
45
Copy
Copies the currently selected range of notes.
This can also be done by hitting Ctrl+Insert.
You can select more than one track at a time by selecting the 'Track #1' button and
changing the view filter.
You can select everything in a view by selecting 'Edit'-'Select All'.
You can select a long range of notes by selecting 'Edit'-'Select Range'.
note: this will NOT copy tempo changes and time/key signature changes.
46
Paste
The paste dialog allows you to select where and how you want your copied selection
pasted.
Paste At: the bars value starts at 1 for the first bar and does not have an upper limit.
In the staff view, the bar numbers are printed above the start of each bar for
reference.
The second value is the beats. In the 'at time' value, this number starts at 1 for the
first beat and goes to however many beats there are in a measure. If, for example,
you selected 3/4 time you would have 3 beats in a measure, so the value could go
up to 3.
The last time value is the 'remaining ticks'. This value is dependent on the 'ticks per
Copyright (c) 1997 - 2006 Joseph Heimiller
Paste
35
quarter note' value set in the song properties. This value is usually out of 384
ticks(which is the default). That means that each quarter note is equal to 384 ticks.
So if you wanted to move the 'Paste At' value over another half a quarter note, you
would enter 192 in this field.
Paste Method: determines what will happen to the notes being pasted over. The 'Mix'
option will keep the current notes; the 'Write Over' option will remove the current
notes; the 'Insert' option will move the rest of the notes (depending on the view filter)
over before performing the paste.
Track Placement: If you select 'Force to Current Track/Channel/Instrument' it will
change everything you pasted to be of the current track, and will change the channel
and instrument to what you have selected in the combo boxes above the view. If you
select 'Assign Tracks by Channel and Instrument' it will place what you copied
depending on which track best matches the instrument and channel. If there is no
good match, it will create a new track for each combination of channel and
instrument. You should use this option if you copied more than one track to keep the
instruments in separate tracks.
Number of Copies: field is usually left at 1, but if you want to repeat what you're
pasting, enter the number of times you want it repeated.
Space Between Copies: (in ticks) This field only comes into play if the number of
copies is greater than 1. If so, this field determines how much extra space is put
between the copies. If, for instance, you have selected 4/4 time(with the default of
384 ticks per quarter note) and are copying 3 quarter notes in a row, but want the
multiple copies to come out on even bar boundaries, you would enter 384 ticks in this
field.
If this value is 0, the next copy will be placed after the last note selected - taking the
last note's duration into account. So if, for instance, you are copying 4 quarter notes
in a row and you've selected 4/4 time, a copy would be placed every bar.
If this value is negative, the pasted sections will overlap.
Selection Duration: shows the duration of the notes that have been selected to copy.
This operation can also be executed by selecting Shift+Insert, or by selecting the
right mouse button in the staff area when not over a note.
47
Clear
Clear, unlike the delete, leaves a hole where the selection is deleted, and so does
not shift the position of other notes.
This can also be done by hitting Ctrl+Delete.
Copyright (c) 1997 - 2006 Joseph Heimiller
36
48
MusicMasterWorks
Insert Space
This option will insert space either before the currently selected note, or after the
currently selected note.
You can find the exact starting time of a note, and thereby do more precise editing,
by going to the Message View .
49
Delete Range
This option will delete a time range either at (and including) the currently selected
note, or after the currently selected note.
You can find the exact starting time of a note, and thereby do more precise editing,
by right clicking on the note and selecting 'Properties'. You can also find out times
using the Message View .
50
Select All
Select All will select all the notes(and other MIDI messages) in the current window,
using the window's filter.
51
Select Time Range
This option brings up a dialog where you can type in the starting time and duration of
what you want selected. See the Entering Time Values section to understand the
MIDI time system.
52
Delete Track
This option brings up a dialog where you can select which track you wish to delete.
Copyright (c) 1997 - 2006 Joseph Heimiller
Selection Velocity/Selection Properties
53
37
Selection Velocity/Selection Properties
This option brings up a dialog where you change the properties of the currently
selected range of notes all at once.
54
Append Song
This appends a complete MIDI song file to the end of the currently edited song. It will
bring up a file menu to select the song to append. This will put in tempo and key/time
signature changes as well, which makes it different than the paste command.
55
Transpose
Transpose changes the pitch of the notes in the currently selected range.
56
Quantize
Quantize cleans up your music so that it will fall neatly onto beat boundaries and/or
fit into a certain amount of time.
The 'Align' options make it possible to align all the selected notes to a specific beat
interval. This will give your music a steadier beat. If you want to align where the
notes start select 'Align note beginnings'. If you want to align the duration of the
notes select 'Align note durations'.
The fit-to-time options expand or condense your music in time. Use this if, say, you
recorded music is 11 bars long and it really should be 10 bars long. To use this
option, select the 'Fit to time' checkbox and fill in the amount of time you would like
the selected music to fill. Also, if you want to adjust the rest of the music around your
selection as well, make sure the 'Shrink/Expand rest of song' checkbox is checked.
57
Output Options
The 'MIDI Output' sub-menu lets you choose which MIDI synthesis device in your
computer you'd like to use to play your MIDI music. There may be multiple devices,
so try different ones until you get the best quality sound.
Copyright (c) 1997 - 2006 Joseph Heimiller
38
MusicMasterWorks
The 'MIDI Recording Echo' sub-menu lets you choose which MIDI synthesis device
to echo the recording out through your computer, to let you hear what you are
playing while recording. This is automatically set to the same device as the MIDI
output, but if there is a problem you may need to set this manually.
The 'MIDI Recording Input' lets you select a specific device to record MIDI music
from. The default is to record from all MIDI input devices at once.
The 'Wave Input' sub-menu lets you choose the device to record from for voice-tonote, singing analysis and audio wave recording.
58
Song Properties
This allows editing of the author, title, copyright and comments for the song. It also
allows the changing of the ticks-per-quarter-note value.
59
Track Properties
Use this to change the default channel and instrument for a track.
60
Tempo
Use this to edit tempo changes throughout the song.
61
Time & Key Signature
Use this to change time and key signature throughout the song.
About sharps and flats: If C Major or a key signature with sharps in it is selected only
sharps will be displayed by default. If a key signature with flats is selected only flats
will be displayed by default. For instance, the note 1/2 step up from C will be
displayed as C sharp in the key of C Major. However, that same note will display as
D flat if the key of F flat is selected (please note that C sharp and D flat refer to the
exact same note / pitch / key on the piano).
You can change the defaulted sharp or flat by right clicking on the note and selecting
Copyright (c) 1997 - 2006 Joseph Heimiller
Time & Key Signature
39
one of the 'Force to' options: double flat, flat, sharp, or double sharp.
62
Insert Note Before Current
Use this to insert a note before the currently selected note.
This can also be done by just hitting the 'I' key.
63
Add Note After Current
Use this to add a note right after the currently selected note.
This can also be done by just hitting the 'A' key.
64
Add Note At End
Use this option to add a note at the end of the music in the selected view.
This can also be done by just hitting the 'E' key.
65
Add Note At Current
This command adds a note at the same time as the currently selected note.
This can also be done by just hitting the 'M' key.
66
Pitch Up 1/2 Step
Use this option to move the selected note up 1/2 step. For instance, this will change
a C to a C sharp (or a D flat depending on the key signature selected).
This can also be done by just hitting the up arrow key.
Copyright (c) 1997 - 2006 Joseph Heimiller
40
MusicMasterWorks
Notes will default to a flat or sharp depending on the key signature. You can change
the default by right clicking on the note and selecting one of the 'Force to…' options
off the pop-up menu.
67
Sharping a note
You can move a note in pitch by half steps by using the up and down arrow keys.
The difference between a C and a C sharp note (or D flat), for example, is a half
step. The difference between an E and an F note is also only a half step because
there is no black key between them on a piano.
If you have the 'Move Pitch To Key' option on (which is off by default), using the up
and down arrow keys will keep the notes within the selected key signature, and will
therefore skip some notes.
Notes will appear as flats or sharps depending on the key signature. You can change
the default by right clicking on the note and selecting one of the 'Force to…' options
off the pop-up menu.
68
Flatting a note
You can move a note in pitch by half steps by using the up and down arrow keys.
The difference between a C and a C sharp note, for example, is a half step. The
difference between an E and an F note is also only a half step because there is no
black key between them on a piano.
If you have the 'Move Pitch To Key' option on (which is off by default), using the up
and down arrow keys will keep the notes within the selected key signature, and will
therefore skip some notes.
Notes will appear as flats or sharps depending on the key signature. You can change
the default by right clicking on the note and selecting one of the 'Force to…' options
off the pop-up menu.
Copyright (c) 1997 - 2006 Joseph Heimiller
Pitch Down 1/2 Step
69
41
Pitch Down 1/2 Step
Use this option to move the selected note down 1/2 step. For instance, this will
change a D to a C sharp (or a D flat depending on the key signature selected).
This can also be done by just hitting the down arrow key.
Notes will appear as flats or sharps depending on the key signature. You can change
the default by right clicking on the note and selecting one of the 'Force to…' options
off the pop-up menu.
70
Increase Duration
This option will increase the duration of the selected note. This will cycle through the
most used durations, including triplets.
This can also be done by just hitting the '>' or '+' key.
71
Decrease Duration
This option will decrease the duration of the selected note. This will cycle through the
most used durations, including triplets.
This can also be done by just hitting the '<' or '-' key.
72
Properties, Note Menu
This option will bring up a dialog box where you can fine-tune the duration of a note
and set the exact velocity(volume) of the note.
Note at time: This tells you exactly where your note is in time, showing
Bar/Measure:Beat:Ticks.
Duration: Shows you the duration of the note, both its symbol and its exact tick
duration. Ticks are usually 384-per-quarter-note (although the ticks-per-quarter-note
can be changed in the song properties menu item).
Copyright (c) 1997 - 2006 Joseph Heimiller
42
MusicMasterWorks
Velocity/volume - change how loud the note plays.
Note-Off velocity/volume - change how loud the note plays at the end of the note.
This is usually used for wind instruments to get more expressiveness. Not all
instruments support note-off (This depends upon the sound card in your computer).
73
Delete
This option will delete the currently selected note. Notes after the note deleted will be
moved back to fill in any space left.
This can also be done by just hitting the delete key.
74
Clear
This option will clear the currently selected note. This is different than delete in that it
will leave any empty space, and not affect the position of notes afterward.
This can also be done by just hitting Ctrl+Delete keys at the same time.
75
Move Right in time
This option will move forward in time to the next note, making it the currently selected
note (the selected note is the one that's flashing).
This can also be done by just hitting the right arrow key.
Copyright (c) 1997 - 2006 Joseph Heimiller
Move Left in time
76
43
Move Left in time
This option will move backward in time to the previous note, making it the currently
selected note (the selected note is the one that's flashing).
This can also be done by just hitting the left arrow key.
77
Select Next Current Note
This option will move to the next note at the currently selected location. If there is
only one note at the current time, nothing will happen.
This can also be done by just hitting Shift + Up Arrow.
78
Select Previous Current Note
This option will move to the previous note at the currently selected location. If there is
only one note at the current time, nothing will happen.
This can also be done by just hitting Shift + Down Arrow.
79
Complex/Normal Mode
Normal/Complex mode allows the switching between the two modes.
Normal Mode is recommended because it eliminates the complexities of tracks and
channels. In Normal Mode, there is only one instrument and one channel per track.
80
Play On Hesitation
When this setting is on you can hear what the notes will sound like when you move
them.
Copyright (c) 1997 - 2006 Joseph Heimiller
44
81
MusicMasterWorks
Play Only Selected View
Play only selected allows you to hear only the currently selected view. If this is off,
you will hear all the tracks/instruments of your song together.
82
Auto Rewind
This selects whether or not you want the playbar to go back to the beginning of the
song when it is finished playing the entire song.
83
Move Pitch To Key
This setting effects moving a note in pitch using the up and down arrow keys. It will
constrain the movement of the note to only the notes of the selected key signature.
84
Show Note Placement
This turns on/off the display of the red note dot when moving the mouse.
85
Show Lyrics
This turns on/off the display of lyrics in the song.
86
Snap-To Resolution
This option will bring up the snap-to resolution dialog. The resolution you select will
affect where the notes are placed using the mouse. For instance, if you select
'quarter' note resolution notes can only be placed at quarter note intervals. This will
also affect how much notes move when moved in time, and where controller
changes are placed in the controller view.
*Remember: you are allowed to overlap notes (so a note can play in the middle
of another note), so be careful with the note placement. For instance, if you
select eighth note resolution, you can place quarter notes every eighth beat,
Copyright (c) 1997 - 2006 Joseph Heimiller
Snap-To Resolution
45
allowing you to place 5, 6, 7, or even 8 quarter notes in a single measure with
4/4 time. If you don't want to overlap notes make sure to select the correct
snap-to resolution so this is not possible.
This setting will automatically change when you select a shorter note duration (to try
to avoid overlap of notes). If you don't want this setting to change automatically,
select a resolution setting yourself and it will stay at that setting (until you close Music
Masterworks).
You can also get to this option by selecting the
87
button.
View, New
This option will create another view. Use this option to create another
track/instrument in your song.
Each view can show a different track/instrument. You can even see multiple
tracks/instruments in the same view by selecting the button labeled 'Track #'.
This option is also activated by selecting the
88
button.
New, View menu
This option will create another view. Use this option to create another
track/instrument in your song.
Each view can show a different track/instrument. You can even see multiple
tracks/instruments in the same view by selecting the button labeled 'Track #'.
89
View, Delete
This will remove the currently selected view. Note that this will not delete the track(s)
the view is showing.
90
Delete, View menu
This will remove the currently selected view. Note that this will not delete the track(s)
Copyright (c) 1997 - 2006 Joseph Heimiller
46
MusicMasterWorks
the view is showing.
91
Show Controller Graph
This function brings up a controller view (within the currently selected view) so that
you can edit effects such as pan, vibrato or piano pedals.
92
Tracks
Tracks are used in MIDI files to organize music data. Usually, each track will use
only one instrument and transmit on only one channel. Tracks are used for
organizational purposes only and do not affect the MIDI data transmitted.
Tracks can use multiple instruments and/or channels, however this makes things
more confusing. Music MasterWorks starts out in 'Normal Mode' which allows only
one instrument and channel to be used within one track. You can, however, go into
'Complex Mode' to use multiple instruments and/or channels within a track.
The section on views describes how to add a track.
93
Channels
You can set the channel a particular track is on by selecting the 'Song'-'Track
Properties' menu option. In Normal Mode, this will change all notes in that track to
the specified channel.
If you are in complex mode (which allows more than one channel used in one track)
you can select the channel from the drop-down list.
Channel Tutorial:
Midi Cables are able to transmit 16 channels of music data. Depending on
the capabilities of the device, MIDI instruments can send or receive data on
one or all of the 16 channels. If you have several MIDI instruments chained
together (using the THRU connectors) you can have each MIDI instrument on
their own specific channel(s), so they do not interfere with one another.
Music MasterWorks transmits music data through the selected MIDI Device on the
'Device'-'MIDI Output' sub-menu. Using the 'internal' synthesis options, there is no
MIDI cable involved, and the music is piped out your computer's speakers. On most
sound cards there is a second output option - the MPU-401 port. This option sends
music data out of your computer and through the midi cable hooked up to the back of
your computer(if there is a cable hooked to your computer).
Copyright (c) 1997 - 2006 Joseph Heimiller
Channels
47
Both note and controller data are sent per channel. If you change a foot pedal
setting on channel 3, only the notes transmitted on channel 3 will be effected. There
are some sound cards, however, that do not recognize independent channels, so all
notes will be effected.
For both external and internal synthesis, Channel 10 is reserved for drum/percussion
sounds. Different types of percussion instruments can be heard by changing the
pitch of the notes played.
94
Normal/Complex Mode
Normal Mode is recommended because it eliminates the complexities of tracks and
channels. Complex mode is sometimes needed, especially when opening someone
else's MIDI files that use more than one channel or instrument per track, but complex
mode is not recommended for most uses.
MIDI files are divided up into tracks. Usually, each track uses only one channel and
one instrument. However, a track can make use of many channels or instruments. In
Music MasterWorks, the 'Normal Mode' restricts each track to one channel and one
instrument. This is the easiest mode to compose in, since you do not need to know
anything about tracks or channels. To add another instrument to your composition,
just add another view, and change the instrument type for that view. If you change
the instrument in a view, all the notes in that view will change to that instrument. If
you want to change the default channel for a view, select the 'Track Properties'
option off the 'Song' menu.
If you need more flexibility, however, you can go into the 'Complex Mode', which
allows you to select which channel and instrument you want for the notes you create.
This mode is more difficult however, because it will not automatically change all the
notes in the track to the channel and instrument you specify. If you select a new
channel or instrument only the new notes that you put down will have that channel or
instrument (the notes you have already put down will stay on the same channel or
instrument).
95
Controller View
This function brings up a controller view within the currently selected view, so that
you can add effects such as pan, vibrato or pedal changes.
Selecting this option will bring up a sub-window at the bottom of the currently
selected view. It shows a graph of the control changes of a single controller type.
The controller type is displayed on the box at the left edge. To change the type of
the controller, click on the box at the left edge. You will be able to select between
the controllers that have been defined for the selected MIDI device.
Copyright (c) 1997 - 2006 Joseph Heimiller
48
MusicMasterWorks
To make a single controller change, just left click in the graph area - inside the
measure guidelines.
The placement of your controllers changes are positioned using the note snap-to
resolution. Hit the
button to change the snap resolution.
To change a range of time at once, keep the left button down and drag the mouse.
A dialog box will appear that will allow you to select what kind of pattern you like to
put down. Click on the up and down buttons to select a different pattern type. The
scrollbars on the side change the starting and ending position of the graph.
Depending on the pattern type selected, you might see one or two adjustment
scrollbars near the bottom. They adjust different properties in the graph.
If you would like to erase the range you just selected, select the "Erase Range
Selected" option button and hit OK.
What is shown in a controller view are the control changes for the selected controller
for the selected channel. If you are experiencing problems with controllers interfering
with one another (or notes interfering with one another for that matter), you'll need to
put the controllers on separate channels. You can do this by using the 'Song'-'Track
Properties' menu option to give each track its own channel.
Note that what is shown in the controller view are the control changes for the
currently selected channel in the sub-window. It will only show control changes from
one channel, but these can be from all the tracks in the composition. It is shown this
way because even the control changes from other tracks will affect the current track.
Check your sound card / MIDI instrument manual to see what effects your device
supports.
note: If your MIDI device does not support the "Reset All Controllers(121) " MIDI
message, you will need to specifically set the value of each controller you use in the
very beginning of the song.
96
Drums
See Percussion Instruments
97
Percussion Instruments
You can play percussion instruments by placing notes in channel 10(which is
reserved for drum/percussion instruments). You can do this by selecting "Song""Track Properties" off the menu. This will put you into a dialog where you can select
the default channel for the track. Select channel 10 and then hit OK. Now, the notes
you put down will sound like different percussion instruments. Notice that the type of
Copyright (c) 1997 - 2006 Joseph Heimiller
Percussion Instruments
49
percussion instrument played is dependent on the pitch of the note.
The 'Number of Copies' parameter in the Pastemm_paste screen is very useful when
dealing with repeating percussion sequences.
The traditional drum set sounds start at C3 and go up to A4.
Here is a list of the usual Channel 10 percussion instrument mappings to note pitch
(Your sound card may have more or less sounds then listed here):
Pitch
Percussion Instrument Played on Channel 10
C#7
- Castanets
C7
- Sticks hit together
B6
A#6
A6
G#6
G6
F#6
F6
E6
D#6
D6
C#6
C6
- Bell
- Shaker
- Open Triangle
- Mute Triangle
- Open Cuica (brazilian drum)
- Mute Cuica (brazilian drum)
- Low Wood Block
- High Wood Block
- Claves (high pitch wood sound)
- Long Guiro (ratchet sound)
- Short Guiro (ratchet sound)
- Long Whistle
B5
A#5
A5
G#5
G5
F#5
F5
E5
D#5
D5
C#5
C5
- Short Whistle
- Maracas (shaker)
- Cabasa (shaker)
- Low Agogo Bell
- High Agogo Bell
- Low Timbale (african/caribbean drum)
- High Timbale (african/caribbean drum)
- Low Conga Drum
- Open High Conga Drum
- Mute High Conga Drum
- Low Bongo Drum
- High Bongo Drum
B4
A#4
A4
G#4
G4
F#4
F4
E4
D#4
- Ride Cymbal 2
- Vibra Slap
- Crash Cymbal 2
- Cowbell
- Splash Cymbal
- Tambourine
- Ride Bell
- Chinese Cymbal
- Ride Cymbal 1
Copyright (c) 1997 - 2006 Joseph Heimiller
50
98
MusicMasterWorks
D4
C#4
C4
- High Tom Drum
- Crash Cymbal 1
- High-Mid Tom Drum
B3
A#3
A3
G#3
G3
F#3
F3
E3
D#3
D3
C#3
C3
- Low-Mid Tom Drum
- Open Hi-Hat
- Low Tom Drum
- Pedal Hi-Hat
- High Floor Tom Drum
- Closed Hi-Hat
- Low Floor Tom Drum
- Electric Snare Drum
- Hand Clap
- Acoustic Snare Drum
- Side Stick
- Bass Drum
Recording
To record MIDI notes with Music Masterworks from a MIDI keyboard/piano make
sure the MIDI cable is connected correctly (remember, the 'in' plug goes into the 'out'
port), and then hit the record button(the button with the red circle and a note). When
you hit the record button, the record dialog will appear and Music MasterWorks will
immediately start recording (and playing what is already in the song so you can hear
how you're new part will fit). When you are done recording, click the 'Done' button.
You'll probably want to turn on the metronome to better synchronize your recording.
You'll also probably want to also turn on the Count-In beats, to give you extra time in
the beginning to prepare. These options can be accessed from the 'Options''Metronome Settings' menu item.
If the song is blank when you start recording, the record function will delete any initial
time wasted in the beginning of the recording. If the song is not blank, the rest of the
song will play while you record, so you can hear how your new recorded section will
blend in.
After you are done playing, hit the 'Done' button. Now you can (optionally) set these
fields (or just hit OK to insert the music you just recorded):
Place Recording At: is the timemm_timeval at which the recording will be placed in
the song. This defaults to where the play/record line was when you started recording.
The bars value starts at 1 for the first bar and does not have an upper limit. In the
staff view, the bar numbers are printed above the start of each bar for reference.
The second value is the beats. In the 'at time' value, this number starts at 1 for the
first beat and goes to however many beats there are in a measure. If, for example,
you selected 3/4 time you would have 3 beats in a measure, so the value could go
Copyright (c) 1997 - 2006 Joseph Heimiller
Recording
51
up to 3.
The last time value is the 'remaining ticks'. This value is dependent on the 'ticks per
quarter note' value set in the song properties. This value is usually out of 384
ticks(which is the default). That means that each quarter note is equal to 384 ticks.
So if you wanted to move the value over another half a quarter note, you would enter
192 in this field.
Placement Method: has two parts: The first determines what will happen to the
notes being pasted over. The 'Mix' option will keep the current notes; the 'Write Over'
option will remove the current notes; the 'Insert' option will move the rest of the notes
(depending on the view filter) over before performing the paste.
The second part determines which tracks the notes will be placed in and if the
channels and instruments will be changed. If you select 'Force to Current
Track/Channel/Instrument' it will change everything you pasted to be of the current
track, and will change the channel and instrument to what you have selected in the
combo boxes above the view. If you select 'Assign Tracks by Channel and
Instrument' it will place depending on which track matches the instrument and
channel the best. If there is no good match, it will create a new track for each
combination of channel and instrument. You should use this option if you copied
more than one track and what to keep the instruments intact.
Align: option alters the starting times and/or durations of the notes you have
recorded, to ensure they will fall on even beat boundaries.
Fit to time: option will shrink or expand your recording, if you have a set number of
measures you know the music should fit into.
Music MasterWorks echoes the recorded input (when it is recording) out the selected
device on the 'MIDI Recording Echo' sub-menu.
You can compare your recording to another song by either opening two song
windows (Music MasterWorks allows more than one song open at once) or you can
create a new View/Track in the original song window and record into it.
99
Lyrics
To add lyrics right click in open space in the staff (not on a note) where you want the
lyrics to start. When the menu pops up, select "Add Lyric". Type in your lyrics and hit
return.
To change lyrics you've already put down, right click where you put the lyrics you
want to change. You need to click on or a little after where the lyrics are located, and
you must be precise. When the menu pops up, select "Change Lyric". Type in what
you want to change it to and hit return.
Copyright (c) 1997 - 2006 Joseph Heimiller
52
MusicMasterWorks
To delete lyrics, right click where you put the lyrics you want to delete. You need to
click on or a little after where the lyrics are located, and you must be precise. When
the menu pops up, select "Delete Lyric".
100 Bank Select
If the MIDI device you are using supports multiple instrument banks, you can select
the bank by selecting the last option in the instrument pull-down list, called "Bank
Select". This will ask you if you want bank select, and which bank you would like.
If your MIDI device supports only controller zero to set the bank, you may have to
multiply the bank number by 128 (Music MasterWorks sends both controller #0 and
controller #32 to set the bank, as per the MIDI specification).
101 Note Duration
You can set a duration of a note after you put it down in several ways:
You can set the duration by selecting one of the note duration buttons at the top of
the window. In addition to that, you can select the dot or triplet buttons which multiply
the note duration by one and one-half and two thirds respectively.
You can also hit the '+' or '-' keys to change the duration, or the '<' and '>' keys.
You can also fine tune the note duration by right clicking on the note and selecting
the 'Properties' option. The 'ticks' entry field will show the duration of the note, in
MIDI ticks. With this method, you can fine tune the duration by adding or subtracting
a few ticks, or you could make a very long note by multiplying it.
'Ticks' is short for 'Ticks per Quarter Note', which is a standard MIDI measure. This
value defaults to 384 for songs created in Music MasterWorks, so 384 = quarter
note, 192 = eighth note, etc.
102 Triplet Notes
You can make triplet notes (duration changes so that 3 notes fit in the space of 2) by
selecting the triplet button (the small one with the '3' on it) or by selecting the '+' or '-'
keys to change the note duration until you get to a duration that has a '3' on top of
the note stem.
Copyright (c) 1997 - 2006 Joseph Heimiller
Staff Style View
53
103 Staff Style View
The staff style view is the default style. This type of view displays music in standard
staff notation. You can change the clef style and other settings by selecting the
'Options'-'Staff / Piano Roll Options' menu item. You can also choose Piano Roll or
Message Styles by selecting them in the drop down box on the left.
About sharps and flats: If C Major or a key signature with sharps in it is selected only
sharps will be displayed by default. If a key signature with flats is selected only flats
will be displayed by default. For instance, the note 1/2 step up from C will be
displayed as C sharp in the key of C Major. However, that same note will display as
D flat if the key of F flat is selected (please note that C sharp and D flat refer to the
exact same note / pitch / key on the piano).
You can change the defaulted sharp or flat by right clicking on the note and selecting
one of the 'Force to' options: double flat, flat, sharp, or double sharp.
104 Piano Roll Style View
You can select the piano roll style view, instead of the standard staff notation view,
by selecting it in the combobox in the upper left corner of the view. The Piano Roll
style view shows notes in relation to the keys on the keyboard. This view style is
especially good for those who do not know how to read music.
Each bar in the piano roll represents a note. The longer the bar, the longer the
duration of the note is. The pitch is shown in relation to the keys on a piano, with the
middle C octave's keys colored white.
You can change the color of the notes in this view by selecting the 'Options'-'Note Fill
Type' menu option. This option allows you to select different color gradients
depending on the note's velocity(volume), instrument or channel. This option is good
if you need to get a feel for the change in volume throughout the music.
You can also condense or expand the length of the note bars by selecting the 'View''Set Note Width' option.
105 Message Style View
In this view, you can see all the MIDI messages in your song. You can see their type
('Note','Control Change','Text','System Exclusive') and their low level MIDI parameter
numbers. These numbers cannot be edited, just viewed.
Copyright (c) 1997 - 2006 Joseph Heimiller
54
MusicMasterWorks
This view is useful to see at what exact times notes start at, so you can do precise
editing. Remember, though, that this view shows ALL MESSAGES regardless of
their track/channel/instrument - so you may have to do some searching to find the
note you are interested in.
106 Program Change
You can change the instrument of a view by selecting the instrument combobox at
the top of the view
Music MasterWorks will record program change messages and place each
channel/instrument combination's notes in a different track.
107 Sustain
You can sustain a note for more than one measure by right clicking on the note and
selecting the properties option.
To apply the sustain controller effect, use the controller view .
108 Sostenuto
To apply this MIDI controller effect, use the controller view .
109 Modulation
To apply this MIDI controller effect, use the controller view .
110 Breath
To apply this MIDI controller effect, use the controller view .
Copyright (c) 1997 - 2006 Joseph Heimiller
Balance
111 Balance
To apply this MIDI controller effect, use the controller view .
112 Pan
To apply this MIDI controller effect, use the controller view .
113 Expression
To apply this MIDI controller effect, use the controller view .
114 Soft Pedal
To apply this MIDI controller effect, use the controller view .
115 Timbre
To apply this MIDI controller effect, use the controller view .
116 Brightness
To apply this MIDI controller effect, use the controller view .
Copyright (c) 1997 - 2006 Joseph Heimiller
55
56
MusicMasterWorks
117 Tremolo
To apply this MIDI controller effect, use the controller view .
118 Chorus Depth
To apply this MIDI controller effect, use the controller view .
119 Duration
You can set a duration of a note after you put it down in several ways.
You can set the duration by selecting one of the note duration buttons at the top of
the window. In addition to that, you can select the dot or triplet buttons which multiply
the note duration by one and one-half and two thirds respectively.
You can also hit the '+' or '-' keys to change the duration, or the '<' and '>' keys.
You can also fine tune the note duration by right clicking on the note and selecting
the 'Properties' option. The 'ticks' entry field will show the duration of the note, in
MIDI ticks. With this method, you can fine tune the duration by adding or subtracting
a few ticks, or you could make a very long note by multiplying it. 'Ticks' is a MIDI
standard measure, and can be adjusted in the 'Song Properties' dialog.
120 Selecting a range of notes
You can select a range of notes by using the mouse or the keyboard.
Using the mouse, hold down the left mouse button where you want to start the
selection, and drag it to where you want the selection to end, then release the left
mouse button.
You can also use the menu item: 'Edit'-'Select Time Range'. This will pop up a
screen where you can select the starting time and duration of what you want
Copyright (c) 1997 - 2006 Joseph Heimiller
Selecting a range of notes
57
selected. See the Entering Time Values section to understand the MIDI time system.
To select more than one track (or channel or instrument) at once, you need to
change the view filter by selecting the view filter button, which will look something like
this:
121 MIDI Echo
Echoing of MIDI Input is done automatically when recording. It will echo to the device
selected on the 'Devices'-'MIDI Recording Echo' sub-menu (unless 'no echo' is
chosen).
122 Echo
Echoing of MIDI Input is done automatically when recording. It will echo to the device
selected on the 'Devices'-'MIDI Recording Echo' sub-menu (unless 'no echo' is
chosen).
123 MultiTrack Recording
Music MasterWorks can record and store multiple tracks. When recording in 'Normal
Mode', each channel/instrument will be put into a separate track automatically.
Also, while recording, Music MasterWorks plays your previously recorded tracks so
you can hear everything together.
See the section on Recording.
124 Unlocking Music MasterWorks
For secure online credit card ordering and other options, please visit this site:
http://www.musicmasterworks.com
To order by phone call:
Copyright (c) 1997 - 2006 Joseph Heimiller
58
MusicMasterWorks
U.S.: 1-303-233-6791
Call for information on educational discounts for schools.
To purchase by mail directly to Aspire Software, send a check or money order for
$34.95 U.S. (+$5 if you would like an installation CD mailed to you) and the personal
ID number that appears in the 'Help'-'About' dialog to:
Aspire
12556 West 7th Avenue
Golden, CO 80401
USA
Please make checks out to "Aspire".
REMEMBER to include:
Personal ID Number (from the initial pop-up screen, or 'Help'-'About' screen)
e-mail address or home address
Your name
If you include your e-mail address, you will receive an unlock code that you will need
to type into the 'about' dialog. This will give you the full functionality of Music
MasterWorks
If you include only your home address, or specify you want a installation CD, then it
will be sent to you by regular postal mail (remember to include +$5 for the CD's
shipping and handling).
125 Purchase Music MasterWorks by Phone
To purchase by phone, call (U.S.): 1-303-233-6791
If you wish to purchase through our secure internet ordering site follow the links at:
http://www.musicmasterworks.com/credit.html
126 Purchase Music MasterWorks
For secure online credit card ordering and other options, please visit this site:
http://www.musicmasterworks.com
To order by phone call:
U.S.: 1-303-233-6791
Call for information on educational discounts for schools.
Copyright (c) 1997 - 2006 Joseph Heimiller
Purchase Music MasterWorks
59
To purchase by mail directly to Aspire Software, send a check or money order for
$34.95 U.S. (+$5 if you would like an installation CD mailed to you) and the personal
ID number that appears in the 'Help'-'About' dialog to:
Aspire
12556 West 7th Avenue
Golden, CO 80401
USA
Please make checks out to "Aspire".
REMEMBER to include:
Personal ID Number (from the initial pop-up screen, or 'Help'-'About' screen)
e-mail address or home address
Your name
If you include your e-mail address, you will receive an unlock code that you will need
to type into the 'about' dialog. This will give you the full functionality of Music
MasterWorks
If you include only your home address, or specify you want a installation CD, then it
will be sent to you by regular postal mail (remember to include +$5 for the CD's
shipping and handling).
127 Buy Music MasterWorks
See Unlocking / Purchasing Music MasterWorks.
128 Register Music MasterWorks
See Unlocking / Purchasing Music MasterWorks.
129 Rests
Rests are created automatically in Music MasterWorks. For instance, if you use the
mouse to create a note away from other notes you will see the rests appear. Or, you
can move a note in time using Ctrl+LeftArrow or Ctrl+RightArrow and rests will
appear if you create a space.
Copyright (c) 1997 - 2006 Joseph Heimiller
60
MusicMasterWorks
130 Audio
You can add wave audio segments ('.WAV' files) to your composition by right clicking
in the staff where you want the audio segment to start and then selecting 'Add Audio'
in the popup menu.
You can also record wave audio segments using the 'Record Wave' button in the toolbar. This
will record from the device selected on the 'Device'-'Wave Input' menu.
To change the volume level of the microphone input, double-click on the speaker icon in the
Windows taskbar (if it is not there then open it from the Windows Start Menu: 'Programs''Accessories'-'Entertainment'-'Volume Control'). In the Volume Control app, select 'Options''Properties' from the menu. Select 'Recording' and hit OK. Now you will see all the recording
devices, as opposed to all the playback devices you were seeing before. Make sure the input
volume on the microphone is up. Also, if you have a non-powered microphone, you'll need to
turn up the volume even more.
If you have music already recorded it will play it while recording wave audio (if the play-onrecord setting is on). You'll probably want to wear headphones to listen to what's already
recorded, so that it does not get recorded again through the microphone.
Please note that wave audio support is limited in Music MasterWorks:
· If the wave segments are overlapped, only 1 audio segment will play at a time (the
newest one will interrupt the one currently playing).
· If the wave segments go beyond the end of the notes, they will be cut off (you can
avoid this by inserting a note or control change past the end of the wave segment).
Wave audio segments are not a feature of the MIDI standard or MIDI (.mid) files. They are
supported in Music MasterWorks by inserting a MIDI comment with a special text syntax that
refers to a separate wave (.WAV) file. These files can be edited using wave editing software,
and Music MasterWorks will automatically detect changes in the file (if the file's timestamp
changes) and reload it automatically.
131 Wave
You can add wave audio segments ('.WAV' files) to your composition by right clicking
in the staff where you want the wave audio segment to start and then selecting 'Add
Audio' in the popup menu.
You can also record wave audio segments using the 'Record Wave' button in the toolbar. This
will record from the device selected on the 'Device'-'Wave Input' menu.
To change the volume level of the microphone input, double-click on the speaker icon in the
Windows taskbar (if it is not there then open it from the Windows Start Menu: 'Programs''Accessories'-'Entertainment'-'Volume Control'). In the Volume Control app, select 'Options'Copyright (c) 1997 - 2006 Joseph Heimiller
Wave
61
'Properties' from the menu. Select 'Recording' and hit OK. Now you will see all the recording
devices, as opposed to all the playback devices you were seeing before. Make sure the input
volume on the microphone is up. Also, if you have a non-powered microphone, you'll need to
turn up the volume even more.
If you have music already recorded it will play while recording wave audio. You'll probably
want to wear headphones to listen to what's already recorded, so that it does not get recorded
again through the microphone.
Please note that wave audio support is limited in Music MasterWorks:
· If the wave segments are overlapped, only 1 audio segment will play at a time (the
newest one will interrupt the one currently playing).
· If the wave segments go beyond the end of the notes, they will be cut off (you can
avoid this by inserting a note or control change past the end of the wave segment).
Audio segments are not a feature of the MIDI standard or MIDI (.mid) files. They are
supported in Music MasterWorks by inserting a MIDI comment with a special text syntax that
refers to a separate wave (.WAV) file. These files can be edited using wave editing software,
and Music MasterWorks will automatically detect changes in the file (if the file's timestamp
changes) and reload it automatically.
132 Record Wave
This function records your voice (or other audio) from your PC microphone. Make
sure the microphone is securely plugged in to your computer – usually next to where
the computer speakers are plugged in. Also, make sure the microphone is selected
on the 'Device'-'Wave Input' sub-menu.
When using a microphone to record, do not sing directly into it. The force of your
breath may cause unwanted noise. It is better to direct your voice slightly above or
below the microphone. If it is a directional microphone, make sure it is pointed to
your mouth. Also, do not get too far away from the microphone, or it may not pick up
anything at all. If you have a powered microphone, make sure the volume (in the
Windows Volume Control) isn't too high or too low.
To change the volume level of the microphone input, double-click on the speaker
icon in the Windows taskbar (if it is not there then open it from the Windows Start
Menu: 'Programs'-'Accessories'-'Entertainment'-'Volume Control'). In the Volume
Control app, select 'Options'-'Properties' from the menu. Select 'Recording' and hit
OK. Now you will see all the recording devices, as opposed to all the playback
devices you were seeing before. Make sure the input volume on the microphone is
up. Also, if you have a non-powered microphone, you'll need to turn up the volume
even more.
If you have music already recorded it will play while recording audio. You'll probably
want to wear headphones to listen to what's already recorded, so that it does not get
Copyright (c) 1997 - 2006 Joseph Heimiller
62
MusicMasterWorks
recorded again through the microphone.
Recording is done at the fastest speed available, 16 bits per sample in mono(not
stereo). To use wave files of a different sample rate, or stereo wave files, you need
to record them in a different program (such as 'Sound Recorder' that comes with
Windows), and insert them into your song by right clicking in the staff and selecting
'Add Audio'.
Please note that wave audio support is limited in Music MasterWorks:
133 Record Song to Wave File
This function will record your song to a wave file (.WAV extension). Wave files can
be used to create an audio CD (although Music Masterworks does not have CD
burning functionality). This function will first ask you the name of the output wave file.
It will then play the entire song and record it to that wave file.
This function uses either the DirectX 'Wave Out Mix' recording option, or the sound
card's built-in wave out device (for SoundBlaster cards this is 'What U Hear', for other
cards it may be mono or stereo mix, or output mix). The device used to record what
you hear out your speakers is chosen automatically by Music Masterworks. If the
DirectX 'Wave Out Mix' option is used, you must select a software synthesizer such
as 'Microsoft GS Wavetable SW Synth' under the 'Devices'-'MIDI Output' sub-menu.
This is because the 'Wave Out Mix' option is not capable of recording hardware MIDI
synthesizers.
134 Voice To MIDI Notes
You can perform this feature by using the
button in the toolbar or by selecting
'Play/Record'-'Voice to MIDI Notes' from the menu. You may also want to try the
Singing Analysis function.
You can use this feature to sing a melody and have it changed into notes for you, for
quick and easy composing!
When the graphing view comes up, start singing! You should see green lines where
it has detected notes. The piano keys are there as a reference to the pitch. The
guide lines indicate where the pitch is correct for that note.
If your voice is not within the range shown, you can click on a piano key up or down
from the center to get a different range. You can also adjust the pitch range, which is
Copyright (c) 1997 - 2006 Joseph Heimiller
Voice To MIDI Notes
63
the number of notes detected from the center note (lowering the pitch range will
make it go faster).
When you sing into the microphone, remember:
· Check the volume indicator to the right to see if you are getting enough
volume with your singing. A volume level in the green area is good and the
higher the better, until it gets into the red area. In the yellow area is too
low. You may need to adjust the microphone's input volume in the
Windows volume control settings(see directions below).
· Longer notes are picked up better than shorter ones
· Get close to the microphone so your voice will be picked up
· Do NOT sing directly into the microphone, that causes 'wind noise' from
the force of your breath. It is better to sing over or under the microphone.
· Sing in even tones, do not sing in a quavering voice.
· Do not move the microphone, it may cause unwanted noise.
· Make sure the note range is correct for your voice (click on a piano key to
re-center the range to that note).
To change the volume level of the microphone input, select 'Device'-'Recording
Volume' from the menu. Make sure the input volume on the microphone is up. Also,
you may need to select the 'Advanced' button and then select the 'boost' option for
more recording volume.
Also, if your microphone has an on/off switch, turn it on (these types of dynamic
microphones don't do as well as regular PC microphones, so they're not
recommended).
Since the voice-to-note process is not a perfect one, you may want to adjust the
settings to get better results.
The audio wave input is taken from the device selected on the 'Device'-'Wave Input'
sub-menu.
The other option, wave file to MIDI, will take input from a wave file ('.WAV' extension)
instead of real-time through the microphone.
135 Appending
You can append segments or entire songs to another song. First, open both songs in
Music MasterWorks (it allows multiple songs to be open at once). Then, select the
segment you want to copy (either by using the mouse or by using the 'Edit'-'Select
Range' option), and select 'Edit'-'Copy' from the menu. Then select the other song
window, select the view you want to paste it into, right click where you want the
segment to go, and select 'Edit'-'Paste'.
Copyright (c) 1997 - 2006 Joseph Heimiller
64
MusicMasterWorks
To copy an entire song, you will need to perform an additional step. Since songs may
have multiple tracks in them, you will need to view all the tracks before copying it.
First, select the 'Track #1' button. Then select 'All Tracks', and then hit OK. Now you
will see all tracks displayed at once in the view. Now select 'Edit'-'Select All' from the
menu, and then 'Edit'-'Copy'. This will copy the entire song (excluding time/key
signatures and tempo changes). Then select the other song window, and when you
paste select the 'Assign Tracks by Channel and Instrument' option. This will create a
new track for each channel/instrument instead of forcing all the notes into the same
instrument.
136 Filter
You can filter what you see in a view by selecting the 'Track #1' button. A dialog will
come up where you can select which tracks you want to see together in the same
view.
note: This filter affects editing as well. For instance, if you insert a copied section it
will push over only the tracks you see in your view. In this way, you can edit many
tracks at once, or only the track you want to edit.
137 Limits
The following lists Music MasterWork's limitations:
Number Of Channels: 16
Number Of Tracks: 65536
Number Of Instruments: 16383 Banks x 128 instruments each
Number Of Simultaneous MIDI Messages: 1024
138 Voice To Note Settings
You can get to this screen by selecting 'Options'-'Voice to Note Settings' off the
menu.
These settings affect how the voice to notes function will interpret your recording or
wave file. Since converting voice to notes is a difficult process and not a perfect
science, these settings can help give better results:
Copyright (c) 1997 - 2006 Joseph Heimiller
Voice To Note Settings
65
Automatic Tuning Calibration: If you feel the pitch reported is off, click on this
button to auto-calibrate the tuning. Some sound cards may not record at the speed
requested, which throws off the tuning. This feature will correct that problem.
This feature requires at least 30 seconds to calibrate properly. You can click on the
'Internet Time Server' option - but this requires a speedy connection to the time
server to be reliable.
This setting is saved in the 'Tuner.INI' file (a text file) under 'FreqAdjust'. You may
edit this value if you want to adjust it manually.
Minimum Note Size Used: The minimum input note size that will not be ignored and
thrown out. This is needed especially when there is a lot of noise picked up and
turned into false notes. The detected note size needs to be smaller than the actual
note size.
Minimum Output Note Size: If notes are less than this length, the processor will join
two adjacent notes of the same pitch to try to bring them up to this length.
Delete Rests Method: This specifies what to do with rests (dead space) between
notes. You can either have the time unmodified, have only the beginning dead space
taken out, or have all dead space taken out and have the notes played right after one
another.
Include Pitch-Bend Changes: This option will include MIDI pitch-bend controller
changes if it is clicked. This will adjust the pitch of the note throughout the note. This
can increase the realism of the converted notes.
Use computed velocity/volume for notes: This will compute the volume of each
note from the 'power' of the waveform of the note. If this is not clicked, every note will
get the same volume/velocity setting.
Use expression/volume changes throughout notes: This will include MIDI
expression controller changes to adjust the volume of the note throughout the note,
for more accuracy and realism.
Time Resolution: This setting sets the detail of the analysis and will usually result in
better results the more detailed the analysis. How, the more detailed the analysis the
slower it will go. Only use the most detailed setting if you have a fast computer, or
are willing to wait.
Noise Threshold Level: This is the minimum sample level where it will start looking
for notes. Pick a higher setting if you are getting notes caused by noise. Pick a lower
setting if it is not picking up enough notes (or better yet, increase the input volume!).
Accuracy Tolerance: Some notes are detected with a higher 'confidence' level than
others. This setting specifies what level is acceptable. A higher level will tend to
create more notes, but the pitch of the extra notes will become increasingly
Copyright (c) 1997 - 2006 Joseph Heimiller
66
MusicMasterWorks
unreliable.
Lowest & Highest Pitch Detected: This is the range of pitch detected by the voice
to note algorithm. Because the algorithm is not perfect, you may need to limit this to
get better results. This will depend on your normal voice range. If you are whistling
into the microphone, you will need to set the range up higher. *Note: the voice to midi
uses a different setting, changed directly in the voice to midi window (the 'Note
Range' value – you can also click on a piano note to make that the middle pitch
recognized to move the range up and down).
Used for singing analysis only:
Save singing to allow for Replay: This will save your singing to a wave audio file so
you can hear your beautiful voice over and over.
Used for singing analysis only:
Delay Start until Singing Start: This will delay the start of the analysis on the song
until you start singing (until it reaches a certain volume level), to better line up your
voice with the notes and give you time to mentally prepare.
139 Metronome Settings
You can get to this screen by selecting 'Options'-'Metronome Settings' off the menu.
These settings affect when and how the metronome plays while recording.
Metronome on while recording MIDI: If you want the metronome on while
recording MIDI notes, click this checkbox.
Metronome on while recording Wave: If you want the metronome on while
recording Wave audio, click this checkbox. You should wear headphones while
recording, or the metronome clicks will be recorded through the microphone as well.
Count-In Beats: This option will add extra beats in the beginning before recording to
give you time to prepare and to give you a sense of the beat. Any note recorded
during these count-in beats will be ignored.
Metronome Note Section:
Channel: This is the channel the metronome note/beat will play on. This defaults to
10 because channel 10 is the MIDI 'percussion' channel. On this channel percussion
instruments are played, and the pitch determines which instrument is used (the
instrument field is ignored on channel 10).
Instrument: This is the MIDI instrument the metronome note/beat will play as,
starting with 0 for Grand Piano.
Copyright (c) 1997 - 2006 Joseph Heimiller
Metronome Settings
67
Pitch: This is the pitch of the metronome note/beat. 60 is middle C.
Volume: This is the volume/velocity of the metronome note/beat, from 1 to 127.
Use First Time Signature For Beat: When this option is checked, the time
signature's denominator (the lower number) will be used to figure out the metronome
interval and duration. For instance, if the denominator is 4 the metronome will sound
every quarter note interval, if 8 it will sound every eighth note interval. This setting
overrides the 'Beat Every' and 'Beat Note Duration' fields.
Beat Every: This determines the interval of the metronome. This number is in 'ticks'.
If the ticks per quarter note (set in the 'Song'-'Song Properties' menu item) is set to
the default, then 384 ticks = 1 quarter note.
Beat Note Duration: This is the 'ticks' duration of the metronome note. This is
usually shorter than the interval, to give the metronome a quick tick.
140 Metronome
The metronome is turned on or off by the settings from the 'Options'-'Metronome
Settings' menu item. It can be turned on or off for both MIDI and wave recording. You
can specify Count-In beats in the settings to give you some time to prepare before
recording. You can also override when the metronome plays and what the
metronome will sound like.
The metronome beat, by default, is determined by the time signature's bottom
number. If you are using 4/4 time, the metronome will beat every quarter note. If you
are using 6/8 time, the metronome will beat every eighth note. If you start recording
between beats (for instance, 1/8th note past the start of a bar, using 4/4 time), the
first metronome beat will not play at your starting point, but at the next even beat.
141 Check your Singing
See the Singing Analysis section.
142 Singing Analysis
You can use this feature to check to see how close you can sing a tune. First, select
a range of notes to specify the tune you are going to sing. You can do this using the
mouse (by left clicking, keeping the left mouse button down, and dragging the mouse
Copyright (c) 1997 - 2006 Joseph Heimiller
68
MusicMasterWorks
over the notes you'd like to select) or by using the keyboard (hold the shift key down
while moving right or left with the arrow keys). Then select this button:
.
To use this feature effectively, you'll need to do 2 things to the tune you are singing.
First, you'll probably need to transpose the tune up or down in pitch based on the
range of your voice (you can find the range of your voice using the voice-to-note
feature). Second, you'll probably need to elongate the notes to give yourself time to
sing each note (you can do this by changing the tempo of the song or using the
Quantize feature).
The singing analysis uses Music MasterWork's voice-to-note technology. With this
technology, longer notes are picked up better than shorter ones. Also, make sure to
keep the microphone stationary(to keep the noise down) and do not sing directly into
the microphone because the force of your breath will create unwanted noise.
One of the voice-to-note settings (from the 'Options'-'Voice-to-Note Settings' menu
item) applies to singing analysis: 'Save Singing to allow for Replay'. If this option is
on, it will save your singing to a file (called 'TempPlayback.wav' in your installation
directory). Just hit the 'Replay' button after you're done to hear yourself singing. This
option will slow down the singing analysis, however, so you may want to turn this off.
The audio wave input is taken from the device selected on the 'Device'-'Wave Input'
sub-menu.
143 View Filter
You can filter what you see in a view by selecting the 'Track #1' button. A dialog will
come up where you can select which tracks you want to see together in the same
view.
note: This filter affects editing as well. For instance, if you insert a copied section it
will push over only the tracks you see in your view. In this way, you can edit many
tracks at once, or only the track you want to edit.
144 Music Theory Tutorial
The first step in creating a composition is to select a time and key signature. This can
be done by selecting the 'Song' sub-menu and then selecting the 'Time and Key
Signature' option. This will bring up the list of time/key signatures in your music.
There is a list of these because the time and key signatures can actually change
throughout the song. However, there is usually only one time and key signature.
Select the 'Change' button from here. This will bring up another dialog where you can
Copyright (c) 1997 - 2006 Joseph Heimiller
Music Theory Tutorial
69
enter the time and key signature you would like. Note that you can change these
options at any time.
The time signature specifies how many beats will fit into one measure (measures are
delineated by the vertical lines going through the staff). If you select 4/8, for example,
you can fit four eighth notes (that is, 1/8 of a whole note) into a measure, as in this
example:
Use the time signature to keep your music to an even beat. If you find your music
does not keep to the time signature, you can change the time signature at any time.
Then select the key signature. The key signature puts certain 'default' note pitches
into the music. These defaults are specified as sharps or flats in the beginning of the
composition. The G Major key, as in this example, will default all F notes to be
sharped.
In this example the notes on the top staff line are sharped. You can tell you went
outside the key signature if you see a sharp, flat or natural before a note you've put
down. Here is an example of this:
Both the 'A' natural and the 'G' flat notes are outside the key signature. Note that the
third note is exactly the same pitch as the second. It does not have a flat sign before
it because the staff notation assumes that all notes after and on the same line are of
the same pitch. If the third note was a normal 'G' note instead of a 'G' flat, it would
have a natural sign in front of it (like the first note).
There are several different scale options to choose from in the key signature. Most
popular songs use the 'Major' key. The 'Harmonic Minor' is the more popular of the
minor scales because it has an upbeat sound to it. The 'Natural Minor' has a darker
quality to it. The 'Pentatonic' and 'Whole Tone' scales are much more rare, but are
included so you can experiment with them. The note specified in the key signature
section is the note the scales start on. Note that many more scales exist that are not
included in these options (the melodic minor, the twelve note serial scale, the gypsy
scale, the Hassidic minor, etc…).
It is not unheard of to put notes outside the 'defaults' setup by the key signature, and
Copyright (c) 1997 - 2006 Joseph Heimiller
70
MusicMasterWorks
in fact most songs do. However, if you are a beginner and want to find out what the
different key signatures sound like, you should select the 'Move Pitch To Key' option
off the 'Options' menu. This forces the new notes you put down to stay within the key
signature you've selected.
You can put chords (combinations of notes played at the same time) into your music
very easily with Music MasterWorks. Just hit the 'C' key to cycle through chord
combinations (or shift-'C' to cycle back). You can also hit ctrl-'C' to invert a chord. A
chord and its inversions makes for a harmonious sounding progression of music.
Another useful chord command is in the 'V' key, which anchors a chord by putting
another note one octave down from the chord's base note.
Many melodies can come out of the notes of a chord. For example, this is the C
Major chord:
…and this is a melody created using the notes of that chord:
Another technique is to use passing and neighboring notes as in these examples:
Melodies often contain notes that do not conform to the chord from which they were
created. Notes that pass between the notes of a chord often sound harmonious (as
in the example to the left). Also, notes that momentarily go up or down from the
notes of the chord also usually sound harmonious (as in the example to the right).
Music theory can get very complicated, and this is just a start. Sometimes notes that
do not sound good played at the same time work fine within the flow of a
composition. The rules were made to be broken, and remember: If it sounds good do
it!
Copyright (c) 1997 - 2006 Joseph Heimiller
Index
Delete 42
View menu 45
Delete Range 36
Delete Track 36
Drums 48
Duration 56
Index
-AAccidentals 25
Add Note After Current 39
Add Note At Current 39
Add Note At End 39
Adding instruments 10
Adding Tracks 10
Append Song 37
Appending 63
Audio 60
Auto Rewind 44
-BBalance 55
Bank Select 52
Base Clef 27
Beams 16
Breath 54
Brightness 55
Buttons 12
Buy Music MasterWorks
-EEcho 57
Entering Time Values
Expression 55
24
-FFilter 64
Flatting a note
40
-I-
59
Increase Duration 41
Index 8
Insert Note before Current
Insert Space 36
Instruments 10
adding 10
Introduction 9
-C-
-K-
Cascade 33
Channels 46
Check your Singing 67
Chords 21
Chorus Depth 56
Clear 35, 42
Clef Type 30
Complex/Normal Mode 43
Contents 8
Controller View 47
Copy 34
Cut 34
Key Assignments 30
Keyboard Commands 15
-DDecrease Duration
41
Copyright (c) 1997 - 2006 Joseph Heimiller
-LLimits
Lyrics
64
51
-MMeasure Width 25
Menus 27
Message Style View
Metronome 67
Metronome Settings
MIDI 10
53
66
39
71
72
MusicMasterWorks
MIDI Echo 57
Modulation 54
Mouse Commands 11
Move Left in time 43
Move Pitch To Key 44
Move Right in time 42
MultiTrack Recording 57
Music Theory Tutorial 68
Recording 50
Redo 33
Register Music MasterWorks
Rests 59
-SSelect All 36
Select Next Current Note 43
Select Previous Current Note 43
Select Time Range 36
Selecting a range of notes 56
Selection Velocity/Selection Properties
Sharping a note 40
Show Controller Graph 46
Show Lyrics 44
Show Note Placement 44
Singing Analysis 67
Slurs 16
Snap-To Resolution 44
Soft Pedal 55
Song Properties 38
Song Selection 33
Sostenuto 54
Staff / Piano Roll Options 30
Options menu 30
Staff Style View 53
Sustain 54
-NNew 45
View menu 45
Normal/Complex Mode
Note Duration 52
Note Menu 26
47
-OOpen Space Menu 26
Output Options 37
-PPan 55
Paste 34
Percussion Instruments 48
Piano Roll Style View 53
Pitch Down 1/2 Step 41
Pitch Up 1/2 Step 39
Play On Hesitation 43
Play Only Selected View 44
Printing 27
Program Change 54
Properties Note Menu 41
Purchase Music MasterWorks 58
Purchase Music MasterWorks by Phone
-QQuantize
37
-RRecord Song to Wave File
Record Wave 61
59
37
-T-
58
Table of contents 8
Tempo 38
Ties 16
Tile 33
Timbre 55
Time & Key Signature 38
Track Properties 38
Tracks 46
Transpose 37
Treble Clef 27
Tremolo 56
Triplet Notes 52
Trouble Shooting 21
Tutorial 17
62
Copyright (c) 1997 - 2006 Joseph Heimiller
Index
-UUndo 33
Unlocking Music MasterWorks
57
-VView 45
Delete 45
New 45
View Filter 68
Views 9
Voice To Note Settings
64
-WWave 60
Wave To MIDI Notes
62
Copyright (c) 1997 - 2006 Joseph Heimiller
73