1
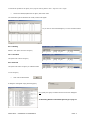
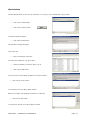
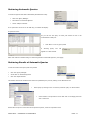
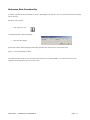
SOPHTLOGIC i
Automatic/Alert Queries
User Manual
For more information:
E: [email protected]
T: 01473 255552
Contents
Automatic / Alert Queries ................................................................................................................. 3
TO SET UP AN AUTOMATIC QUERY .......................................................................................................... 3
SETUP EMAIL ADDRESS....................................................................................................................... 6
SETTING UP AN ALERT QUERY ............................................................................................................... 9
Alerts button .......................................................................................................................... 10
RETRIEVING AUTOMATIC QUERIES ........................................................................................................ 12
RETRIEVING RESULTS OF AUTOMATIC QUERIES .......................................................................................... 12
REFERENCE DATE FUNCTIONALITY ......................................................................................................... 13
SOPHTLOGIC – COMMERCIAL IN CONFIDENCE
PAGE: 2
Automatic / Alert Queries
Scheduling queries allows a user to set up queries to be run at regular intervals. When a person logs in to pharOS they
will be prompted with any outstanding ‘Automatic Queries’. Once an ‘Automatic Query’ has been run the results are then
stored in the database and can be compared to other results of the same query run previously.
The Alert Button allows you to setup an Email Alert, so the User(s) is/are notified after a Query is Run.
To Set Up an Automatic Query
Find the Query you want to use, within Query Buster…
•
Open a Query
•
Click onto the Folder icon
•
Click onto the Saved Query
•
Click OK
In order to do this there must be a ‘Saved Query’.
•
Open the saved query
To set the (untitled) query to the ‘Automatic Queries’.
•
Click on the ‘Grid’ button
This will open the ‘Schedule for Automatic Query Applications’ window
•
Enter in a ‘Base Date’ i.e. date from which query is to start from
•
Enter in desired ‘Time’ for the query to be run e.g. 10:30
•
Enter in ‘Frequency’ of query whether it is in days or months
•
Click ‘OK’ to ‘Save Automatic Scheduling of Query’
For example: If you wish the query to run starting from the beginning of the year, with a frequency of every 7 days at
09.30, the ‘Base Date’ would be set at 01 04 2010, the frequency 7 with corresponding ‘Days’ radio button selected to
‘Days’ and time specified as 09.30, that query will automatically appear every seven days.
SOPHTLOGIC – COMMERCIAL IN CONFIDENCE
PAGE: 3
To refresh the system for the Query to set, log out then log back in: File > Log Out > File > Login.
•
Choose the ‘Office/Department’ the Query was saved under
The ‘Automatic Queries Scheduled for Today’ window will appear
As you can see the ‘Scheduled Query’ is in the reminder window
Exe > Running
Default - This option will ‘Run’ the Query
Can > Cancelled
This option will ‘Cancel’ the Query
Def > Deferred
This option will ‘Defer’ the Query to a different date
To run the Query
•
Click onto the Next button
A dialog box will appear saying Executing Query
Very quickly the Query will flash onto the screen then disappear
To Retrieving Results of Automatic Queries go to page 11
SOPHTLOGIC – COMMERCIAL IN CONFIDENCE
PAGE: 4
If you don’t want the Query to Run
•
Click onto the ‘Abort’ button
The ‘Automatic Queries Scheduled for Today’ window will close
Notice the heading has changed on your saved (automatic) query from <untitled> to <automatic> This allows the user to
know if the query has been setup as a to be automatically run
Also in the ‘saved Query’ window the ‘Status’ has changed
from ‘Ad-hoc’ to ‘Automatic’
SOPHTLOGIC – COMMERCIAL IN CONFIDENCE
PAGE: 5
Setup Email Address
If there are no email addresses within the ‘Set Alerts for Queries’ window you; if you have the privileges, will need to set
the emails up first before allocating the query to be sent to that persons email address. To do this…
In the Toolbar
•
Go to File
•
Scroll down and Click onto SOPHT.vault
•
Click onto Setup
The Vault Setup window will appear
•
Click onto the TUI Accounts window
•
Click onto the Green Tick icon
As you can see the personnel who have a TUI Account will appear
•
Click onto the Persons Name
•
Click onto the Amend button
If the persons name is not in the list
•
Click onto the Add button
The Gateway Interface window will appear with the person’s details
In the Interface window, under Gateway Tab
•
Enter the Cipher ID > this will be the Users Name
•
Enter the Cipher Number > this will be the Users Name
•
Enter the Effective From date > users start date
•
Enter the Expires As At date > this will be the date the licence
expires
•
Click onto the Parent Domain arrow
•
Select the Domain option
•
Click onto the Add button
SOPHTLOGIC – COMMERCIAL IN CONFIDENCE
PAGE: 6
This will open the Gateways Details window
•
Click onto the ‘Gateways’ arrow
•
Click onto the ‘Gateway’ option
•
Enter the ‘Username’ > users name
•
Enter the ‘Password’ > users name
•
Confirm the ‘Password’ > users name
•
Click into the ‘Gateway CIPHER Enabled’ check box
•
Click onto the ‘Email’ tab
•
Click onto the ‘Add’ button
•
Click onto the ‘Mail Servers’ arrow
•
Select the option in the list (should only be one)
•
Click into the Description box
•
Enter the Email Address
•
Click into the Account ID box
•
Re-enter the Email Address
•
Enter the Domain Name
Usually the Brigade i.e. Merseyside, Bedfordshire, Essex, Lothian etc
•
Enter a password - best to use the Post code
•
Confirm the Password
•
Click onto the OK button
As you can see the email information has been entered into the Installed
Email Account
•
Click onto the OK button
This will bring you back the Gateway Interface window
Again
•
SOPHTLOGIC – COMMERCIAL IN CONFIDENCE
Click onto the OK button
PAGE: 7
You should be back into the Vault Setup window
As you can see the TUI account has been set up
•
Click onto the ‘X’ in the top right hand corner to
close the window
To check the email is in the ‘Alerts Email’ list
•
Go to Query Manager
•
Click onto Query Buster
•
Click onto a Library
•
Click onto a Query
•
Click onto the Queries button
•
Click onto the Open Folder icon
•
Click onto the Saved Query
•
Click onto the Alerts button
•
Click onto the Add button
As you can see the Email that has been set up has appeared in the ‘Alerts’ list
•
Click onto the ‘OK’ button
SOPHTLOGIC – COMMERCIAL IN CONFIDENCE
PAGE: 8
Setting Up an Alert Query
Now you need to find the Query you want to use, within Query Buster…
•
Go to Query Manager
•
Click onto Query Buster
•
Create your ‘Query’
•
Click onto the ‘Saved’ icon
•
Click onto the ‘Library’
•
Select the ‘Query’
•
Click onto the ‘Queries’ button
•
Enter a ‘Name’ of the query
•
Click onto the ‘OK’ button
•
The saved query will appear in the box below
If the ‘Query’ has already been ‘Saved’
•
Click onto the ‘Folder icon
•
Click onto the ‘Saved Query’
•
Click ‘OK’
SOPHTLOGIC – COMMERCIAL IN CONFIDENCE
PAGE: 9
Alerts button
The Alert Button allows you to set up an ‘Email Alert’, so a ‘User(s)’ is/are notified after a ‘Query is Run’.
•
Click onto the ‘Saved Query’
•
Click onto the ‘Alerts’ button
The Alerts window will appear
•
Click onto the ‘Add’ button
The ‘Set Alerts’ window will appear
In the ‘Alert’ box
•
Enter a ‘Description of the Alert’
This will be the heading for your ‘Query Alert’
•
Select the ‘Emails you want the ‘Alert’ to go to
•
Click onto the ‘OK’ button
As you can see the ‘Alert Name’ will appear in the Alerts’ window
•
Click onto the ‘Close’ button
You should now be in the ‘Query Name’ window
Notice in the ‘Status’ has changed from ‘Adhoc’ to ‘Automatic’
•
Click onto the ‘OK’ button
You should now be back in the ‘Query Buster’ window
SOPHTLOGIC – COMMERCIAL IN CONFIDENCE
PAGE: 10
Now you need to set up when and what time you want the ‘Query’ to be sent
To do this
•
Click onto the ‘Blue Grid’ icon
The ‘Schedule for the Automatic Query’ window will appear
•
Enter the ‘Date’ you want the ‘Alert Query’ to start
•
Enter the ‘Time’ you want the ‘Alert Query’ to be sent
•
Enter the ‘Frequency’ of the ‘Alert Query’ i.e. daily (1 day), weekly
(7 days), monthly (1 month) etc…
•
Enter the ‘Next Date’ the ‘Alert Query’ is due
•
Click onto the ‘OK’ button
For example: If you wish the query to run starting from the beginning of the month/year, with a frequency of every 7
days at 09.30, the ‘Base Date’ would be set at 28 04 2010 or 04 05 2010, the frequency 7 with corresponding ‘Days’ radio
button selected to ‘Days’ and time specified as 09.30.
Notice the heading has changed on your saved (automatic) query from <untitled> to <automatic> This allows
the user to know if the query has been setup as a to be automatically run
Results of the ‘Alert Query’ will be ‘Emailed’ to the
‘Person(s)’ in an attachment as shown below.
•
Click onto the ‘Attachment’
The ‘Open Mail Attachment’ window will appear
•
Click onto the ‘Open’ button
The Excel window will open showing the results of the Query.
SOPHTLOGIC – COMMERCIAL IN CONFIDENCE
PAGE: 11
Retrieving Automatic Queries
To check the Queries that was Automatically Scheduled for Today
•
Click onto ‘Query Manager’
•
Scroll down to ‘Automatic Queries’
•
Check ‘Today’s Schedule’
If no queries are due to be run for that day, no window will display.
If queries do exist:
As you can see the query we have just created is now in the
‘Scheduled for Today’ list
•
A
Click ‘Next’ to run any query listed
‘Running
Query’
box
will
appear for a few seconds
Other wise close this window and go to ‘Retrieving Results of Automatic Queries’ (next page)
Retrieving Results of Automatic Queries
To see the results of the query that has just Ran
•
Click onto ‘Query Manager’
•
Scroll down to ‘Automatic Queries’
•
Click onto ‘Open Browser’
This window can also be accessed from within the published query view by clicking on the Binoculars icon.
•
Select query by clicking on the ‘+’ and any results of query run will be listed.
•
Select results to be printed to screen and click on the floppy disk icon
with a red arrow.
Results will now print to screen and can be printed to printer, saved or exported to excel.
SOPHTLOGIC – COMMERCIAL IN CONFIDENCE
PAGE: 12
Reference Date Functionality
A number of queries use this functionality to allow a ‘Date Range’ to be entered – then only records between the set dates
will be returned.
Within the query window
•
Click onto the ‘1’ icon
The ‘Reference Date’ window will appear:
•
Enter the ‘Date Range’
Queries that use the ‘Reference Date’ functionality generally have some note of it in the name of the
Query > ie ‘Current Postings Ref Date’.
The ‘Reference Date’ is set on a per user basis and is stored in the central database – so it will be stored for a user
regardless of which machine they use to log in from.
SOPHTLOGIC – COMMERCIAL IN CONFIDENCE
PAGE: 13