1
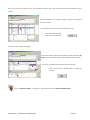
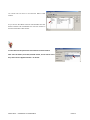
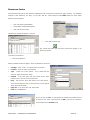
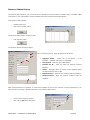
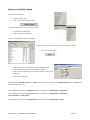
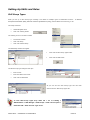
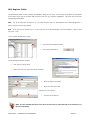
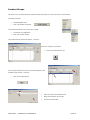
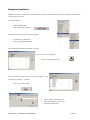
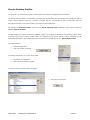
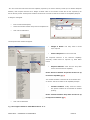
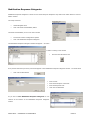
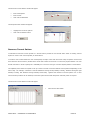
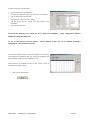
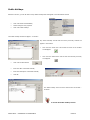
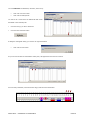
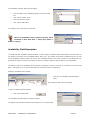
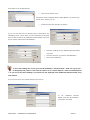
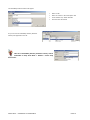
SOPHTLOGIC i
Rota & Availability Configuration
2059 SP13
User Manual
For more information:
E: [email protected]
T: 01473 255552
Table of Contents
SETTING UP ROTA’S AND AVAILABILITY .......................................................................................................................................................................3
ACCESS / START UP MIS............................................................................................................................................................................................................3
ACCESS ROTA & AVAILABILITY MODULE......................................................................................................................................................................4
GLOBAL NAVIGATOR .................................................................................................................................................................................................................4
Enter a Module into the Menu Toolbar ................................................................................................................................................................................4
Adding Shortcuts to the Menu Toolbar ................................................................................................................................................................................5
Remove a Module from the Menu Toolbar...........................................................................................................................................................................5
INTRODUCTION.........................................................................................................................................................................................................................6
SETTING UP ROTAS & AVAILABILITY ..............................................................................................................................................................................7
DUTY SYSTEM TYPES .................................................................................................................................................................................................................7
Create a New Duty System Type...........................................................................................................................................................................................7
DUTY SYSTEMS ..........................................................................................................................................................................................................................9
Amend a Record..................................................................................................................................................................................................................12
Duplicate a Record .............................................................................................................................................................................................................12
Pattern a Record .................................................................................................................................................................................................................13
ROTA CONFIGURATION ............................................................................................................................................................................................................15
MOBILISATION RESPONSE CATEGORIES ..................................................................................................................................................................................17
LOCATIONS ...............................................................................................................................................................................................................................18
BRIGADES AND ORGANISATION ...............................................................................................................................................................................................18
Adding a Brigade to Organisations List.............................................................................................................................................................................18
SETTING UP A LOCATION .........................................................................................................................................................................................................19
LINKING LOCATION TO ATTRIBUTES .......................................................................................................................................................................................21
CHECKING AN LOCATION .........................................................................................................................................................................................................23
RESOURCE TYPES ..................................................................................................................................................................................................................24
RESOURCE STATUS CODES ......................................................................................................................................................................................................26
RESOURCES INDEX ...................................................................................................................................................................................................................28
Resource Status History......................................................................................................................................................................................................29
RESOURCE REGISTER ...............................................................................................................................................................................................................31
STATION ACTIVITIES ................................................................................................................................................................................................................32
AS YOU CAN SEE THE STATION ACTIVITY TYPE YOU HAVE ENTERED HAS APPEARED IN THE ‘ACTIVITY TYPE’ WINDOW. ..................................................33
AVAILABILITY CONSTANTS .....................................................................................................................................................................................................34
AVAILABILITY KEYS ................................................................................................................................................................................................................36
Duty Rota Book ...................................................................................................................................................................................................................38
EMPLOYMENT CONDITIONS .....................................................................................................................................................................................................40
RESOURCE CAPABILITIES .........................................................................................................................................................................................................42
Resource Capability Setup..................................................................................................................................................................................................43
SETTING-UP SKILLS AND ROLES ......................................................................................................................................................................................45
SKILL GROUP TYPES ................................................................................................................................................................................................................45
SKILL MANAGER ......................................................................................................................................................................................................................46
Skill Group Folder ..............................................................................................................................................................................................................46
Skill Register Folder ...........................................................................................................................................................................................................47
INCIDENT GROUPS ....................................................................................................................................................................................................................49
RESPONSE CONDITIONS............................................................................................................................................................................................................51
SERVICE DELIVERY PROFILES..................................................................................................................................................................................................53
MOBILISATION RESPONSE CATEGORIES ..................................................................................................................................................................................57
RESOURCE TURNOUT SYSTEMS ...............................................................................................................................................................................................58
Resource Turnout Pattern...................................................................................................................................................................................................59
PUBLIC HOLIDAYS....................................................................................................................................................................................................................63
ATTENDANCE PLANNER PAYROLL ..........................................................................................................................................................................................65
SICKNESS SET-UP .....................................................................................................................................................................................................................69
AVAILABILITY CATEGORY (SICKNESS GROUPS) ...................................................................................................................................................................69
AVAILABILITY FIELD DESCRIPTION .........................................................................................................................................................................................70
AVAILABILITY OBJECT (BODY PARTS) ..................................................................................................................................................................................72
AVAILABILITY REASON (SICKNESS CAUSES) ......................................................................................................................................................................73
SOPHTLOGIC – COMMERCIAL IN CONFIDENCE
PAGE:2
Setting Up Rota’s and Availability
Access / Start Up MIS
Double click onto the Pharos icon
You may get a Database Logon box appear - if so –
•
Click the Cancel button
The Application Register window will open
The Application Register sometimes gives you more than one option
to choose from, if this is the case
•
Enter your Username
•
Enter your Password
•
Click onto the Servers arrow
•
Click onto a Station
•
Click onto the Pharos option
•
Click onto the Open Application button
If you only work at the one Brigade, then this option should be defaulted to your brigade.
•
Click onto the Login button
Depending on your Privileges
You may get a Select Office box appear – if so:
•
Select an Office
•
Click OK
The Global Navigator window will appear on your screen
SOPHTLOGIC – COMMERCIAL IN CONFIDENCE
PAGE:3
Access Rota & Availability Module
Global Navigator
The Global Navigator is the main menu of the system, providing access to each
module.
A user will only be able to access parts of the system that they have
privileges for.
The Global Navigator can be accessed at any time by
•
Pressing Ctrl & G on your keyboard at the same time
+
or by going to:
•
Navigation
•
Global Navigator
Enter a Module into the Menu Toolbar
On the Global Navigator menu
•
Click onto one of the Rotas and Availability button
The corresponding module will appear in the toolbar: As shown
This gives the user (you) a shortcut access to the sub-menus under that module
SOPHTLOGIC – COMMERCIAL IN CONFIDENCE
PAGE:4
Adding Shortcuts to the Menu Toolbar
•
Click the left mouse button onto ‘Rotas and Availability’
•
Move your mouse down to ‘Configure Duty System’
•
Move your mouse to the right
•
Move down and left click onto the ‘Menu Bar’
You have now added ‘Configure Duty System’ to your menu bar.
This now gives you shortcut access to anything within ‘Configure Duty System’
Remove a Module from the Menu Toolbar
•
Left click onto the module you want to remove from the menu toolbar
•
Move your mouse down the list of options
•
Left click onto the Menu Bar
The menu bar is at the bottom of majority of the drop down menus
Follow the same procedure as shown above to close any modules or sub-menus
SOPHTLOGIC – COMMERCIAL IN CONFIDENCE
PAGE:5
Introduction
The Rota and Availability system monitors past, present and future availability of Brigade resources e.g. appliances,
personnel and equipment. This provides Brigades with an accurate depiction of resource availability and can be used to
identify resource shortfalls or surplus’.
The availability system provides an efficient and effective mechanism for performing the complex task of maintaining
resource availability.
The Rota and Availability System is intrinsically linked to the Personnel System. It is necessary to have both systems
installed otherwise neither will function.
It is for this reason many e.g. personnel related functions will alter information held and displayed in the Rota and
Availability system and vice versa.
How is Availability Obtained/Calculated?
The availability is based upon the following calculation:•
Today’s Date minus the Rota Base Date
•
Divided by the number of days in the pattern, will give a number.
This number will locate the position into the pattern
e.g. in a pattern of
DDNNRRRR
SOPHTLOGIC – COMMERCIAL IN CONFIDENCE
3 would equal the first nightshift.
PAGE:6
Setting Up Rotas & Availability
Duty System Types
This is where you would setup the ‘Type of Shifts’ for example, Wholetime, Retained, Fexi Duty, Officer, APTC, Control,
Special Rescue Team and so-on. These Shift Types will display in drop down menus within the system.
To enable the Duty Rota system to function correctly the following must be setup.
•
Click onto Rotas and Availability
•
Select Configure Duty Systems
•
Click onto Duty System Types
The Duty System Types window will appear – as shown –
`
As you can see this is where you would set up the System Type.
What ever goes in here will appear, within the system, under ‘System Types’
Create a New Duty System Type
•
Click onto the New button
•
Enter a unique and meaningful Code and Description
The column number functionality is not relevant to this system.
If this System Type and the Duty Systems of this Type are to be used
with the Retained Pay Lite System then the Retained Pay Lite tick box
must be selected, alternatively…
•
Click onto the OK button
SOPHTLOGIC – COMMERCIAL IN CONFIDENCE
PAGE:7
You can now see ‘Di’s DST’ has been entered into at the bottom of the Duty System Types window list
To make any changes to the headings
•
Click onto the heading
•
Click onto the Amend button
‘Di’s Duty System Type’ heading is accessible within the ‘Duty Systems’
window under ‘System Type’ – as shown -
SOPHTLOGIC – COMMERCIAL IN CONFIDENCE
PAGE:8
Duty Systems
This is where you would setup the ‘Shift Patterns, for Wholetime Shifts: Red/White/Green/Blue, Retained Duty System,
Fexi Duty, Officer Duty System, APTC, Control Watch, Special Rescue Team and so-on. These ‘Shift Patterns’ will display
in ‘Data Rota Book’, ‘Duty Systems’ drop down menu and ‘Rota Configuration’ within ‘Rota Group’.
This sets up the Duty System Shift Patterns
•
Click onto Rotas and Availability
•
Select Configure Duty Systems
•
Click onto Duty System
The Duty System window will appear – as shown –
•
Click onto the New button
The Duty System window will appear
To indicate the Type of a Duty System e.g. Wholetime, Flexi Duty, Retained
etc, (I have chosen ‘Di’s Duty System Type’– this is the ‘Duty System
Type’ Heading I set up earlier).
•
Click onto the ‘System Type’ arrow
•
Select a ‘Type’ from ‘System Type’ drop down list.
•
Enter a unique and meaningful Code
•
Enter a Description of the Code.
•
The ‘Count’ will populate by the number of days in the ‘Shift Pattern’
set up. At this stage, the count should be showing ‘0’
SOPHTLOGIC – COMMERCIAL IN CONFIDENCE
•
Select a ‘System Type’
•
Select a ‘Associated Duty’
•
Click into one of the radio button Options
•
Click onto the OK button
PAGE:9
Here are a few more examples:
In order for an individual to display as a normal rider,
•
‘Include in Availability System’ radio button must be
checked
•
System Type of Whole time
•
Associated duty set to ‘Rider’
•
Whole time shift radio button must be checked
•
‘Include in Availability System’ radio button must be
In order for an individual to display as an Officer or Rider,
checked
•
System Type of Whole time
•
Associated duty set to ‘Officer’
•
Whole time shift radio button must be checked
In order for an individual to display as a rider but not to be displayed,
•
‘Exclude from availability system’ checkbox must be checked
•
Whole time shift radio button checked.
‘Exclude from availability system’ is a rider who dose not need to be
seen in the Availability System.
As you can see the ‘Di’s Duty System’ has now appeared at the
bottom of the ‘Duty System’ list.
Also:
The Total Entries is now showing 110 headings
SOPHTLOGIC – COMMERCIAL IN CONFIDENCE
PAGE:10
Let’s see where your Duty System headings are displayed…
Duty Rota Book:
‘Di’s Duty Syst Officer’ headings are now accessible within the ‘Rota Book’ under
‘Duty Systems’ – as shown -
Rota Configuration:
‘Di’s Duty
Syst
Officer’
is also accessible
in
‘Rota Group’
in
the ‘Rota
Configuration’ – as shown -
Let’s see what the other buttons do within the Duty System
SOPHTLOGIC – COMMERCIAL IN CONFIDENCE
PAGE:11
Amend a Record
•
Highlight the record you want to Amend
•
Click onto the Amend button
The Duty System record will appear for you to make any changed
Click OK
Duplicate a Record
•
Highlight the record you want to Duplicate
•
Click onto the Duplicate button
A dialog box will pop up asking you if you want to duplicate the record
•
Click on Yes
A duplication of the record will appear
•
Click onto the Amend button to change the name etc
SOPHTLOGIC – COMMERCIAL IN CONFIDENCE
PAGE:12
Pattern a Record
This is important, the ‘Duty System Pattern’ needs to be setup for the Shift Pattern to show in the Data Rota Book – don’t
forget to setup the ‘Base Date’ in the Rota Configuration (which is on the next page).
•
Highlight the record you want to Pattern
•
Click onto the Pattern button
A dialog box will pop up – as shown
You need to enter how many days you want in your pattern
•
Click into the box
•
Enter a number of days
•
Click OK
A ‘Processing Rota’ dialog box will appear
The number will change counting the number you had
entered in the ‘Days in Pattern’ box
SOPHTLOGIC – COMMERCIAL IN CONFIDENCE
PAGE:13
•
Enter the times of the shifts in the ‘Start Time’ and
‘Hours
The Colour column, determines what colour the square will be.
You can choose the colour you want the shift pattern for the Rota
When creating the Pattern
•
Enter the Start time
•
Enter the Hours of the shift
If the shift is:
8 hours put 7.99
10 hours put 9.99
15 hours put 14.99
24 hours put 23.99
The reason for this is that if you enter 8hr, 10hr, 15hr or 24hr etc the next shift will over lap and it will show that you have
two watches available for duty in the Rota Book when; in reality, you only have one watch available for duty.
By entering
the hours in 1 minutes earlier, gives the flexibility for the shift change.
In the Symbol box you can either enter the hours of that shift; as shown above, or Day, Night, Retained =
D D N N R R R R D D N N and so on – as shown above
Once completed the Pattern
•
Click onto the OK button
Whatever you enter in the Symbol box is what will appear on the Duty Rota
SOPHTLOGIC – COMMERCIAL IN CONFIDENCE
PAGE:14
Rota Configuration
For each ‘Duty System’ created there needs to be a ‘Configuration’ – an offset to ensure that everyone on a particular
‘Duty System’ works the same ‘Pattern’, but starting on different days.
•
Click onto Rotas and Availability
•
Select Configure Duty Systems
•
Click onto Rota Configuration
The Rota Configuration window will appear – as shown –
•
Click onto New/Amend…
A Rota is an instance of a Shift Pattern.
•
•
Enter the Name (code) of the ‘Shift Pattern’
•
Enter a Description of the Name (code)
•
Click onto the Rota Group arrow
•
Select one of the options from the drop down list
Enter the ‘Base Date’ – this determines when the pattern runs from.
The Colour Code specified here will be the colour shown on the Duty Rota Book.
•
Click onto the OK button
SOPHTLOGIC – COMMERCIAL IN CONFIDENCE
PAGE:15
i.e. Let’s say the start of the Base Date is 1st January 2007. You need to look at the first ‘Day’ shift, which, in this case, is
the Red watch.
Watch
M
T
W
TH
F
S
S
M
T
W
TH
F
Base Date
WSG
Whole Shift Green Watch
.
.
.
.
D
D
N
N
.
.
.
WSR
Whole Shift Red Watch
D
D
N
N
.
.
.
.
D
D
N
N
01/01/10
05/01/10
WSW
Whole Shift White Watch
N
N
.
.
.
.
D
D
N
N
.
.
07/01/10
WSB
Whole Shift Blue Watch
.
.
D
D
N
N
.
.
.
.
D
D
03/01/10
As you can see ‘Di’s Rota Config Officer Availability’ and
‘Di’s Rota Config Yellow Watch’ has been entered at the
bottom of the Rota Configuration list
To make any amendments
•
•
Today button
Click onto the Amend button
This functionality is presently not relevant to this system.
Remember - you need to Attach Personnel to the Watch and to a Resource for it to be
viewed in the Duty Rota Book or the Capability Analysis.
SOPHTLOGIC – COMMERCIAL IN CONFIDENCE
PAGE:16
Mobilisation Response Categories
This sets up the options within the Response drop down lists
•
Click onto Rotas and Availability
•
Choose Other Configuration Options
•
Click onto Mobilisation Response Categories
Mobilisation Response Categories window will appear
Click onto the New button
The Mobilisation Response Categories window will appear
Enter a Code
Enter a Description of the Code
Enter a Response Time
Click OK
As
you
can
see
the
category
I
have
just
entered:
‘Di’s
Mobilisation Response Code’ is now in the Mobilisation Response
Categories window.
The ‘Mobilisation Response Code’ heading will now show up in the
Response drop down lists within in the Resource Turnout Pattern. You
will find this drop down list in ‘Resource Turnout System’ window Click
onto
the
Pattern
button,
under
the
SOPHTLOGIC – COMMERCIAL IN CONFIDENCE
Responses
drop
down
menu.
PAGE:17
Locations
This section is where you can sets up the Locations of the Fire Brigades within your district; i.e. addresses telephone
numbers etc. You will also learn how to setup the Organisations list; which displays the area(s) the brigade(s) are in (i.e.
Suffolk Fire Service or Suffolk Fire and Rescue Service).
There are three steps in setting up a Location
Brigades and Organisation
This section is where you can sets up the Locations of the Fire Brigades within your District; i.e. Addresses Telephone
Numbers etc. You will also learn how to setup the Organisations list; which displays the Area(s) the Brigade(s) are in (i.e.
Norfolk Fire Service or Suffolk Fire and Rescue Service).
This is where you would set up the information in the Organisation box within Location window:-
The Personnel Configuration window will open
Click onto the ‘Brigades and Organisation’ folder
The information that has been previously entered into ‘Brigades and
Organisation’ window will appear – as shown –
•
Click onto the Add button
Adding a Brigade to Organisations List
Enter the information about the Brigade into the boxes – as shown
Once completed - Click OK
If this Brigade has agreed to Attend Incidents Over the Boarder, when called
out, put a Tick inside the ‘Section 2 Agreement Exists’ and/or ‘Section 12
Agreement Exists’ boxes.
As you can see the entry has now been entered into the Brigades and
Organisation folder – as shown –
SOPHTLOGIC – COMMERCIAL IN CONFIDENCE
PAGE:18
To close the window
Click onto the ‘X’ in the top right corner
The entry you have just entered in the ‘Brigades and Organisations’ folder, is
now accessible in the ‘Organisations’ box in the ‘Locations’ Folder.
Setting up a Location
Click onto Personnel
Scroll down to Establishment
Click onto Personnel Configuration
The Personnel Configuration window will open
Click onto the Locations folder
Click onto the Green Tick icon
The information that has been previously entered into the ‘Locations’ Folder will
appear in the window – as shown Click onto the Add button
Enter a Code & Estab Code
Enter the Name of the Location
Enter the Brigade Address
Choose a Type (Whole Time, Retained etc)
Enter a Division
Enter a Telephone Number
Choose an Organisation
This is what you entered in the Brigade & Organisation Folder
Enter a Availability Code
This allows you to see the Availability for that Station, within the Availability window
The ‘Effective From’ and ‘Effective To’ dates are used to Archive a Station.
You can enter an ‘Effective From’ date when setting up the Location. But when by entering in the ‘Effective To’ date
will make the Station no longer Active.
You will still be able to see the Location list but in the Archives Column it will change from ‘NO’ to ‘YES’
SOPHTLOGIC – COMMERCIAL IN CONFIDENCE
PAGE:19
Click onto OK
As you can see ‘Di’s Location Testing’ is now been entered into the
Locations window within the Locations folder.
You need to Assign Personnel to that Station to Activate
the Station within the Availability window.
To see if the Station appears within the Availability window.
Click onto the Rota & Availability button – Click onto Availability or
Station Resources – Click onto the AVA icon - you will see the Station
you had set up in Location, within the Availability window – as shown.
SOPHTLOGIC – COMMERCIAL IN CONFIDENCE
PAGE:20
Linking Location to Attributes
•
Go to Global Navigator
•
Click onto Personnel Button
The Personnel Button should now be situated on your toolbar
•
Click onto Personnel
•
Choose Establishments
•
Click onto Personnel Configuration
When you are setting up or adding a Location (Brigade), you need to set up the Location Attributes first.
•
Click onto the Location Attributes Folder
Within the Location Attributes window there may be some options to choose
from.
•
Click onto one of the options
It is highly recommended to Assign the Location attribute to the ‘Duty Rota Book’ - this is usually the most common
option.
You now need to Assign a Location to the ‘Rota Book’
•
Click onto the Assign button
The Location Assign window will appear
Here you can assign as many Locations to the option selected.
(in this example - Duty Rota Book)
•
Highlight the Location
•
Click onto the Select button
SOPHTLOGIC – COMMERCIAL IN CONFIDENCE
PAGE:21
As you can see, the Location has now appeared into the window on the left
Once you have finished selecting Locations
•
Click the OK button
Let’s have a look where your Location is available
Go into Duty Rota Book
As you can see, the Location Address is assessable within the Duty Rota Book
Location drop down list.
The Location you have set up is also assessable in…
Go into Capability Analysis
As you can see, the Location Address is also assessable within the ‘Capability
Analysis’ Location drop down list.
Go into Resource Index
Make sure your Resources are linked to the Location
Go into Attendance Planner
Go into Availability Programs - Allocate
Anywhere there is a Location Drop Down list you will see the Location you set up, but
only as long as you have personnel assigned to that Location.
SOPHTLOGIC – COMMERCIAL IN CONFIDENCE
PAGE:22
Checking an Location
You can also check and amend your location by…
•
Click onto Rotas and Availability
•
Choose Other Configuration Options
•
Click onto Locations
The Locations window will appear – as shown -
•
Click onto the Green Tick
Notice that the ‘Di’s Location Training’ is now entered into Locations.
•
Click on the Name bar to move the Brigades into alphabetic order.
•
Click onto Amend to make any changes.
•
Click onto the Close button
SOPHTLOGIC – COMMERCIAL IN CONFIDENCE
PAGE:23
Resource Types
This section will set up the Resources that will be available for each shift and how many Personnel needed to Man the
Appliance(s).
•
Click onto Rotas and Availability
•
Select Other Configuration Options
•
Click onto Resource Types
The Resource Types window will appear – as shown –
Click onto the Green Tick to see if any entries have been
made, if so they will appear in the Resources window
Click onto the Add button
The Appliance Type window will appear – as shown
•
Type - Enter a code - it could be letters or numbers
Description - Enter what the ‘Type’ code means
Groups - Click onto the arrow and choose oDI RTne of the options
Classification – Choose one of the options
Rp – Rescue Pump
Wt – Water Tender
Sp – Special
Off – Officer
Rp- OB – Rescue Pod Over the Border
Sp – OB – Special Over the Border
Symbol – can use the same code that is in ‘Type’
Riders – amount of personal needed to man the appliance
Min – minimum personal to man the appliance
Icon – you can copy and paste a picture
SOPHTLOGIC – COMMERCIAL IN CONFIDENCE
PAGE:24
As you can see the ‘Di’s Resource Type’ and ‘Di’s Officer Resource Type’ has now been entered into the Resource Types
window.
Also the information you entered is visible in the box at the bottom
left of the window.
To view what resources are linked to this Resource Type
Click onto Resources folder
Click onto the Show button
A Resource Types window will appear
A Resource window appear with the Resources that are linked (by
Type) to the ‘Di’s Resource Type’ and ‘Di’s Officer Resource Type’.
You can set up the Resources from the Resource window
•
Click onto the Add or Amend button to make any
changes.
Or go to ‘Resource Index’ –on page 35 ☺ But first let’s set up the ‘Resource Status Code’
SOPHTLOGIC – COMMERCIAL IN CONFIDENCE
PAGE:25
Resource Status Codes
This section sets up the drop down list for Appliance Status which lets you know what Resource are Available or
Unavailable.
•
Click onto Rotas and Availability
•
Choose Other Configuration Options
•
Click onto Resource Status Code
Resource Status Code window will appear – as shown -
As you can see this is where you would set up the Appliance
Resource Status Availability
To add another Status Code
Click onto the New Button
Another Resource Status Code box will appear – as shown
Enter the Code into the Sub-Status
Type in the Description of the Code
To make Available
Put a tick in both boxes
To make Un-Available
Take the ticks out of both boxes
Click OK
SOPHTLOGIC – COMMERCIAL IN CONFIDENCE
PAGE:26
You should now be back to the Resource Status Codes
window.
As you can see ‘Di’s Officer Resource Code Available’ and ‘Di’s
Resource Status Code Unavailable’ has now been entered in
the Resource Status Codes window.
You will find this drop down list in the Resource Index window
Click onto the Status, then New/Amend button, and it will be in the
drop down list for Appliance Status - As shown -
SOPHTLOGIC – COMMERCIAL IN CONFIDENCE
PAGE:27
Resources Index
The Resources Index sets up the Resources (Appliances) that are linked to the Resources Types (Groups). For Capability
analysis to work effectively, the ‘Duty’ e.g. WT, SRT, OFF etc… within Resource Index MUST match the ‘Code’ within
Resource Turnout System.
•
Click onto Rotas and Availability
•
Choose Other Configuration Options
•
Click onto Resource Index
The Resource window will appear – as shown –
Click onto the Green Tick
Any records that have been previously entered will appear in the
Resources window.
To create a new Resource
•
Click onto Add button
Resource Details window will appear - Enter the details into the boxes
Call Sign – enter a code - it could be letters or numbers
Location – enter the name of the Brigade
Type – choose one of the options – this is what links the
Resource Types and Resource Index
Position – if you have more than one position for the same
location, enter 1,2,3 etc into the position box
Duty – click onto the arrow and choose one of the options –
This links the Resource ‘Duty’ to the Resource Turnout System
‘Code’ (these must match)
Pager ID – if you don’t have a ID, leave blank
Click onto the OK button
As you can see, the ‘DI 1’ is now entered into the Resource window and will
be linked to any other record that has a ‘PMP’ Type and to a Resource
Turnout which has a ‘DI RTOS’ Duty
SOPHTLOGIC – COMMERCIAL IN CONFIDENCE
PAGE:28
Resource Status History
The Resource Status button is were you would setup or amend the Resource Status to Available (AVA), Unavailable (UNA)
or Off the Run, type of Shift Pattern, Minimum Ridership and when the Resource became Effective.
In the Resource Index window
Highlight a Resource
Click onto the ‘Status’ button
The Resource Status History window will open
Click onto New button
The ‘Resource Status’ window will appear
Fill in or amend the boxes - Enter the details into the boxes
Appliance Status – Choose one of the options – is the
Appliance - Available / Off the Run / Unavailable.
Duty System – enter the type of Shift Pattern
Effective As At – Enter the date this Resource becomes
Effective.
Status – Depending what you chosen in the Appliance Status
the Status will show AVA or UNA
Ridership Factor – Enter the max needed to Man the Appliance
Minimum Riders – Enter the minimum needed to Man the
Appliance
When entering Resource for an Officer, it is likely that an Officer will not use any resources or riding an appliance, so you
don’t need to put anything in the Ridership Factor or the Minimum Riders boxes.
The rest of the boxes are optional
Click onto the OK button when done.
SOPHTLOGIC – COMMERCIAL IN CONFIDENCE
PAGE:29
The information you have just entered is now in the ‘Resource Status History’ window, showing that this Resource is
Available and will be linked to the chosen Resource(s).
•
Click onto the Close button
The ‘Scale’ button is used to create a list of Equipment or Entitlement against a Location or Resource.
e.g.
Di RTOS can have 2 extra ladders.
This is very rarely used. This is explained in more detail in the ‘Equipment
Management’ Module
•
Click onto the Scale button
Your Resource Index Duty MUST matched the Resource Turnout System Code
SOPHTLOGIC – COMMERCIAL IN CONFIDENCE
PAGE:30
Resource Register
This section shows the register of the Resources Available.
•
Click onto Rotas and Availability
•
Choose Other Configuration Options
•
Click onto Resource Register
The Resource Register window will appear – as shown –
On the left side window give’s you the Groups/Headings
of the Appliances.
On the right side window shows you the Appliances by
Call Sign, that are under the Heading.
The Groups are all set up in the ‘Resources Types’ and the Call
Signs can be set up in ‘Resource Types’ or ‘Resource Index’.
You can Edit or View any of the Groups or Call Signs from this section.
SOPHTLOGIC – COMMERCIAL IN CONFIDENCE
PAGE:31
Station Activities
The Special Rescue Team is allocated shifts based on a weighting system. The weighting system will primarily be based on
the number of hours worked. E.g. the individual who have worked the least hours will be at the top of list and will be
allocated the shift first. There may also be a need to specify a weighting system against other criteria e.g. ‘Shifts worked’
these are setup via
•
Click onto Rota’s & Availability
•
Configure Duty Systems
•
Click onto Station Activity Types
The Station Activity window will appear
To ‘Add’ a ‘Station Activity’ to reflect the required weightings
•
Click onto the ‘Add’ button
NB: The Code entered must be the first three characters of the day of
the week e.g. Friday = FRI
•
Enter an appropriate description
•
Select the ‘Give’ check box
Give – A ‘Give’ should be selected for any activity that is considered to be of greater importance e.g. working
a Bank Holiday should be worth more than working a Thursday
Get – A ‘Get’ would be a weighting by working the shift benefits the individual, in this case the weighting
applied will be subtracted
Bid – is not currently used
The weighting applied will be added during automatic allocation.
•
Select ‘Flexible Rostering’ Rotation
Select the ‘Weighting’ pop up list select an appropriate weighting
from 1 – 10.
E.g.
PH – Bank Holiday – weighting = 3
FRI – Friday – weighting = 2
NB: The Reportable and Non Reportable radio buttons relate to the ‘Payroll
system.
SOPHTLOGIC – COMMERCIAL IN CONFIDENCE
PAGE:32
As you can see the Station Activity Type you
have entered has appeared in the ‘Activity Type’
window.
SOPHTLOGIC – COMMERCIAL IN CONFIDENCE
PAGE:33
Availability Constants
This is where you set up a breakdown for Leave, Flexi Duty, Training, Sickness, Medicals, Bank Holidays etc
•
Within Global Navigator Menu
•
Click onto Rotas and Availability button
Rotas and Availability will now appear in your toolbar at the top of the screen
•
Click onto Rotas and Availability
•
Click onto Configure Duty Systems
•
Click onto Availability Constants
The Availability Constants window will appear – as shown -
•
Click onto the Add/Edit…
Enter a Key
Enter an Internal Code
Enter a Description of what the code means
Click OK
SOPHTLOGIC – COMMERCIAL IN CONFIDENCE
PAGE:34
As you can see ‘Di’s Availability Constant’ Group Heading is now
been entered into the list of ‘Availability Constants’.
The Key column – These are some of the letters that will display on the Duty Rota Book Squares when the Availability
Constant has been chosen against an individual.
You will find this drop down list in the Availability Key window
Click onto a heading, and then New/Amend button and it will be in the drop
down list for Status - As shown –
You will find this drop down list in the Rota Book Status window
Open Rota Book, then Click onto one of the boxes, ‘Di’s Availability Constant’ will
be in the Status drop down list - As shown –
SOPHTLOGIC – COMMERCIAL IN CONFIDENCE
PAGE:35
Availability Keys
There are two ways to enter Availability Keys
One way is through the Availability Keys
Click onto Rotas and Availability
Click onto Configure Duty Systems
Click onto Availability Keys
The Availability Keys window will appear – as shown –
In the Availability Sub-Constants
•
Click onto the Add button
The Availability Key dialog box will appear – as shown
•
Click onto the Status Arrow
•
Choose one of the Options
As you can see the ‘Di’s Availability Constants’ is now available in the
‘Status’ drop down menu.
Also, after ‘Di’s Availability Constants’ there is a ‘(DI)’ that is the code that
you entered in the ‘Availability Constants’ window.
•
Enter an Internal Code and Key (usually the same)
•
Enter an Effective From and To Date
•
Enter an Allowance
SOPHTLOGIC – COMMERCIAL IN CONFIDENCE
PAGE:36
The ‘Effective from’, ‘Effective to’ and ‘Allowance’ fields all relate to the ‘Leave Allowance’
facility.
For Example: If individuals are allowed a maximum of 20 days summer leave for the year 2007, then a sub group record
for ‘Summer leave’ would need to exist where the ‘Effective from’ date = 01/04/2007, the ‘Effective to’ date = 31/03/2008
and the ‘Allowance’ = 20.
The ‘Availability’ System would then prevent any entries where ‘Leave’ entered via the ‘Duty Rota Book’ or the ‘Station
Resources’ exceeded in total ‘20’ for that year.
Available/Unavailable Radio buttons - This determines whether the person
will be Available or Unavailable whilst this Availability is occurring. There
are constants such as Training and Meetings where the person could be either Available or Unavailable – in this case you
can set up keys for each.
There are three check boxes:
Do not allow if confidence deflect – Tick this box
Include in Capability Analysis/Duty Rota Summary – Tick this box
Show Accepted/Declined – This is used for Self Rostering
The Key will show a ‘?’ until the Shift has been accepted. One the Shift has been accepted by the line manager the ‘?’ will
change to ‘letters’ that was chosen for this Key
SOPHTLOGIC – COMMERCIAL IN CONFIDENCE
PAGE:37
As you can see ‘Di Availability Keys is now available in the Availability Sub
Constants window.
The other way is….
Through the Availability Sub Constants
•
Click onto the Group Heading
•
Click onto Availability Sub Constants
•
Click onto the Show button
•
Click onto the Add button
Don’t for get to close the applications to re-set the systems data…
Duty Rota Book
To see how these ‘Keys’ work you will need to open the Duty Rota Book
•
Click onto the Rota and Availability
•
Click onto Duty Rotas
This will open the Duty Rota Book
•
SOPHTLOGIC – COMMERCIAL IN CONFIDENCE
Click onto the Location Arrow
•
Choose a Location
•
Click onto the Rota icon
•
Click onto one of the boxes
PAGE:38
•
Click onto the Status arrow
As you can see the ‘Di’s Availability Constants’ that was set up in the
‘Availability Constants’ is now displayed in the ‘Status’ drop down list
•
Scroll down and select your Group (heading)
•
Click onto the Remarks arrow
You should have a drop down list of the ‘Availability Keys’ that
you created earlier, to choose from.
•
Select one of the options
•
Select a Location, Post, Rank, Watch and Zone
Once you have completed filling in the boxes
•
Click onto the OK button
The Code that you entered in ‘Key’ in, Availability Keys, will now appear in the Duty Rota
SOPHTLOGIC – COMMERCIAL IN CONFIDENCE
PAGE:39
Employment Conditions
The SRT work 336 hrs over an 8 week period – an employment condition needs to be created against every SRT team
member to reflect this working pattern.
Employment Conditions are setup via ‘
•
Click onto the Personnel button
•
Click onto the Personnel Record Card
The Personnel Record Card will appear
Search for the Person you want to set the ‘Employment Conditions’ for
In the Sub Menu options
•
Click onto Employment Conditions’
An Employment condition can be created to reflect each 8 week period or
alternatively 1 employment condition can be created which is continuously
updated to reflect the current 8 week period.
Add an ‘Employment Condition’
•
Enter the ‘Effective from Date’ – the start date of the 8 week period e.g.
05/09/09
•
Enter ‘Hours per Week’ e.g. 42:00
The SRT work a 42 hour week e.g. 336/8 = 42:00
•
Enter the ‘Renewal Frequency’ – defines the number of weeks in the
period e.g. 8
•
The ‘Contract Phase’ and ‘Start’ and ‘Finish’ dates are automatically updated to
reflect the next 8 week period e.g. 03/02/10 – 28/03/10
•
Select the required ‘Availability Profile’ – A drop down list of all
‘Availability Profiles’ previously created will display e.g. SRT –
Crew Manager
SOPHTLOGIC – COMMERCIAL IN CONFIDENCE
PAGE:40
The ‘Availability Keys’ previously set as ‘Duty
Keys’ will display
Click onto the OK button
This will bring you back to the Personnel Record Card
As you can see, the ‘Employment
Conditions’ have now been entered
into the ‘Premises Record Card’.
SOPHTLOGIC – COMMERCIAL IN CONFIDENCE
PAGE:41
Resource Capabilities
Introduction
When creating the ‘Resource Capabilities’ that are required at an operational level, it is now possible to use the Duty Rota
Book as a tool for identifying which ‘Watches’ have ‘Shortages’ of particular ‘Skills’ based upon ‘Resource Capability
Profiles’ which have been setup for particular ‘Incident Response Types’.
For example a ‘Brigade’ may have a dedicated ‘Search and Rescue Team’ which have a requirement of a
•
EFAD Driver
•
Team Leader
•
First Aider
•
Minimum number of ‘Qualified Fire-fighters’
•
Senior Officers (SNRO)
•
Special Rescue Team (SRT)
This, and any number of ‘Response Profiles’, may be loaded into the MIS and assigned against a particular ‘Resource
Turnout System’.
When entering a Resources Capability element of class ‘SKILL’
(SKL) the ‘Capability Code’ should be the same as the ‘Skill Profile
Code’ visible from the…
Training > Administration > Skill Manager > Skill Register menu.
When entering a Resources Capability element of class ‘ROLE’ the
‘Capability Code’ should be the same as the First Two Characters of
the ‘Rank Code’ visible from the…
Personnel > Establishment > Personnel Configuration > Ranks
option.
The ‘Duty Rota Book’ can then be used to show, based on the ‘Appliances’ at each ‘Location’, the number of personnel on
‘Day and Night Watches’, and the number of ‘Shortages’ of personnel with the required ‘Skills’ to meet confidence to ride
those ‘Appliances’.
SOPHTLOGIC – COMMERCIAL IN CONFIDENCE
PAGE:42
Resource Capability Setup
These are setup as follows:
•
Global Navigator Menu
•
Click onto Incident Command button
The Incident Command is now in the menu toolbar
•
Scroll down to Configuration
•
Click onto Resource Capabilities
The Resource Capabilities window will appear
As you can see previous entries that have been entered will appear
•
Click onto the New button
•
Enter a Description of the Resource into the Description box
•
Enter a Description Code into the Capability Code box
•
Click onto the Profile Class; pick one of the options e.g Skill, Role,
Appliance…
•
Click onto the OK button
When entering a ‘Capability Code’ for a ‘Skill’, the code entered must match the ‘Skill Profile Code’ of the ‘Skill’ that
will have been setup. (pg 4)
Those Capabilities that relate to Appliances need to be assigned to a Profile Class of ‘Appliance’.
Those Capabilities that relate to Personnel need to be assigned to a Profile Class of ‘Uniformed’,
‘Non-uniformed’ or ‘Non-service’
Those Capabilities that relate to Specific Skills must be assigned the Profile Class of ‘Skill’.
SOPHTLOGIC – COMMERCIAL IN CONFIDENCE
PAGE:43
As you can see the ‘Di’s Resource Capabilities SKILL / ROLE’ are
entered in Resource Capabilities List.
You will locate this drop down list in the Response Profile in the
Service Delivery Profile window. (pg 54)
Open Service Delivery Profile, then Click onto one of the options, Click on New
/Amend
Select an option, click onto Add/ Amend - ‘Di’s Officer Resource
Capabilities’ & ‘Di’s Resource Capabilities’ will be in the Response Element drop
down list - As shown –
Capability Analysis window. (pg 66)
You can also locate ‘Di’s Officer Resource Capability’ and ‘Di’s Resource Capability’ in the ‘Resource Capability
Profile Element’ Option
SOPHTLOGIC – COMMERCIAL IN CONFIDENCE
PAGE:44
Setting-Up Skills and Roles
Skill Group Types
When you set up a ‘Skill Group Type’ heading it will allow for multiple types of Assessment Criteria – ie National
Occupational Standards (NOS), National Vocational Qualifications (NVQ), Internal Skills such as Driving, to be.
The setup as follows:
•
Global Navigator Menu
•
Click onto Training button
The Training is now in the menu toolbar
•
Scroll down to IPDS
•
Click onto Setup
•
Click onto General Setup
The IPDS Setup window will appear
•
Click onto the Skill Group Types Folder
•
Click onto the Add button
The Skills Group Type dialog box will open
•
Enter a Code
•
Enter the Name of the Code
•
Click onto the OK button
As you can see ‘Di’s Skill Group Type’ has now been
entered into the ‘Skill Group Types’ list.
To view Skill Group Types drop down list > Go to Training >
Administration > Skill Manager > Skill Groups > Click onto an option >
Click onto Add > Click onto the ‘Type’ arrow.
SOPHTLOGIC – COMMERCIAL IN CONFIDENCE
PAGE:45
Skill Manager
•
Within Global Navigator Menu
•
Click onto Training button
Training will now appear in your toolbar at the top of the screen
•
Click onto Training
•
Scroll down to Administration
•
Click onto Skill Manager
Skill Group Folder
The Skill Manager window will open
If you need to set up a Skill Group Heading
•
Click onto the Skill Group Folder
•
Click onto the Add button
The Skills Group dialog box will open
•
Click onto the Type arrow
•
Choose the Type of Skill Group
•
Enter a Code
•
Enter the Name of the Code
•
Click onto the OK button
As you can see ‘Di’s Skill Group Qualification’ has now been entered at the bottom
of the ‘Skill Group’ list.
You now need to set up different Skills within the Group you have just created
SOPHTLOGIC – COMMERCIAL IN CONFIDENCE
PAGE:46
Skill Register Folder
The Skill Register folder is where all Skills, Qualifications, NVQ’s etc are setup. When setting up the Skills the code MUST
be the same as the code of the Skills ‘SKL’ that have been set up in Resource Capabilities. Personnel must have been
assigned appropriate Skills.
Skill – can do as many skills as required i.e. if a person held the skill of a ‘Boat Operator’ and ‘Chainsaw Operator’ 1
person could cover both required skills.
Role – A role will only be counted once i.e. if there was the role of ‘Watch Manager’ and ‘Crew Manager’ 1 person could
only cover 1 role.
To set up Skills, Qualifications, NVQ’s
•
Click onto the Skill Register Folder
•
Click onto the Add button
The Skills Register window will open
•
Click onto the ‘Group’ Arrow
•
Double click onto one of the Skill ‘Group’ headings
•
Enter the ‘Name’ of the Skill
•
Enter the ‘Code’ of the Skill
If the Skill is a Driving Skill
•
Click the Driver Skill box
Make sure the relevant Skill Code is the same as the Code you want the Skill to be linked up to in
Resource Capability.
SOPHTLOGIC – COMMERCIAL IN CONFIDENCE
PAGE:47
The rest of the boxes are optional to fill in
•
Click onto the OK button
As you can see ‘Di’s Skill’– Code – ‘DI RC’ has been entered in
the Skill Register list.
Remember: When entering a Skills into the Skill Register Folder the ‘Skill Profile Code’ should be the
same as the ‘Capability Code’ element of class ‘SKILL’ (SKL) in Resources Capability window which is
visible from the…
Incident Command > Configuration > Resource Capabilities
Special Rescue Team Dev – SRTD
EFAD Driver – EFAD
Hazmat - HAZ
SOPHTLOGIC – COMMERCIAL IN CONFIDENCE
PAGE:48
Incident Groups
This will be were you would setup the Incident Groups drop down list in Services Delivery Profile window.
The setup as follows:
•
Global Navigator Menu
•
Click onto Incident Command
The Incident Command is now in the menu toolbar
•
Scroll down to Configuration
•
Click onto Incident Groups
The Incident Groups window will appear – as shown -
If there is nothing in the window
Click onto the Paint Brush icon
If any entries that where previously entered will appear in the
Incident Group window – as shown –
Click onto the New button
Enter the Code of the Incident Group
Enter the Description of the Code
Click onto the OK button
SOPHTLOGIC – COMMERCIAL IN CONFIDENCE
PAGE:49
As you can see the ‘Di’s Incident Group’ has now been
entered into the Incident Groups window
To see where the Incident Group is used
Go to Service Delivery Profiles window – Click onto option –
Click onto Amend – Click onto the Incident Groups arrow.
‘Di’s Incident Groups’ will be in the drop down list.
SOPHTLOGIC – COMMERCIAL IN CONFIDENCE
PAGE:50
Response Conditions
Response Conditions is were the user would setup the ‘Incident Conditions’ drop down list in the Response Profile window
in Service Delivery Profile.
The setup as follows:
•
Global Navigator Menu
•
Click onto Incident Command
The Incident Command is now in the menu toolbar
•
Scroll down to Configuration
•
Click onto Response Conditions
The Incident Groups window will appear – as shown -
If there is nothing in the window
Click onto the ‘Paint Brush’ icon
If any entries that where previously entered will appear in the
‘Incident Group’ window – as shown –
Click onto the ‘New’ button
Enter a ‘Incident Conditions Code’
Enter the ‘Description’ of the ‘Code’
Click onto the ‘OK’ button
SOPHTLOGIC – COMMERCIAL IN CONFIDENCE
PAGE:51
As you can see the ‘Di’s Incident Conditions’ has now been
entered into the Incident Conditions’ window
To see where the Incident Conditions’ would be used
To open Service Delivery Profile: Incident Command > Configuration
> Service Delivery Profile > Click onto option > Click onto Amend >
Click onto the Add button > Click onto the ‘Incident Conditions’ arrow
> ‘Di’s Incident Conditions’ will be in the drop down list. (pg 11)
SOPHTLOGIC – COMMERCIAL IN CONFIDENCE
PAGE:52
Service Delivery Profiles
The next task is to create Service Delivery Profiles against which Resource Capabilities can be assigned.
The Service Delivery Profile is a mechanism of grouping the required skills and roles together into a profile. In order to
create a Service Delivery Profile for a location or incident type the user should first enter a meaningful Code and
Description and select the relevant Incident Type Group from the dropdown list.
For example the Response Element required for the Search & Rescue Team is different to that which is required to
attend a Chemical Incident.
The MIS enables any number of Resource Capability profiles to be assigned to different Service Delivery Profiles Codes.
At present these Service Delivery Profiles Codes are independent from Service Delivery Profiles maintained via the
Operational MIS module, which enables other type responses to be created, such as the:- Special Rescue Team.
The setup as follows:
•
Global Navigator Menu
•
Click onto Incident Command
The Incident Command is now in the menu toolbar
•
Scroll down to Configuration
•
Click onto Service Delivery Profiles
The Service Delivery Profiles window will appear
Click onto the New button
SOPHTLOGIC – COMMERCIAL IN CONFIDENCE
PAGE:53
The user should then add each Resource Capability required by the Service Delivery Profile (this is labelled Response
Element). Each response element has a ‘Weight of Attack’ which is the number of each Skill or Role required by the
Service Delivery Profile. The Response Condition should be set to Generic as this has no effect on the Capability Analysis.
A dialog box will appear
Enter a Code and Description,
Select the Relevant Incident Group from the dropdown list.
Click onto the Add Button
The Response Profile window will appear
Weight of Attack: how many Skills or Roles
is/are required
Notes to Response: free text notes field
The
‘Response
Element’
is
the
‘Resource
Capability’
previously created select as required e.g. Swift Water
Rescue
Response Element: select from the drop down
list the relevant Resource Capability.
Notice: Resource Element drop down list was set up
in Resource Capability (pg 5)
The ‘Incident Condition’ should be left as the default value
of ‘Generic’ this has no effect on the ‘Capability Analysis’.
Incident Condition: usually would be ‘Generic’
but specific condition can be selected for detailed
profiling.
Notice: Incident Condition drop down list was set up
in Response Conditions (pg 9)
Click onto the OK button
e.g. The weight of attack for ‘Swift Water Rescue’ is ‘3’.
SOPHTLOGIC – COMMERCIAL IN CONFIDENCE
PAGE:54
As you can see ‘Di’s Resource Capability’ has appeared within the Response Elements window.
Enter a ‘Response Element’, for every type of ‘Role’ and/or ‘Skill’
that is required to respond to the Type of Incident being entered.
Once you have finished entering in your ‘Response Elements’
Click onto the OK button
Remember: ‘SRT – Service Delivery Profile’ code should now mirror the ‘Skill’ and ‘Role’ code requirements of
the ‘SRT’.
As you can see ‘Di’s Service Delivery Profile’ is now entered at the
bottom of the Service Delivery Profiles window
To locate ‘Di’s Service Delivery Profile’ > Go to Rotas &
Availability > Other Configuration Options > Resource Turnout
Systems > Click onto one of the options > Click onto the Patterns button
> Click on Amend > Look in Resource Capability Profiles. (pg 18)
SOPHTLOGIC – COMMERCIAL IN CONFIDENCE
PAGE:55
Service Delivery Profiles – Two Pump Station – Pump 1:
Service Delivery Profiles - Chemical Fire:
Service Delivery Profiles – Ship Fire:
Service Delivery Profiles – Fire Call:
Service Delivery Profiles and their associated Resource Capabilities must then be assigned to the Resource
Turnout System that should already have been setup via the Rotas and Availability Setup menu, if this is not
the case follow instructions on pg 16.
SOPHTLOGIC – COMMERCIAL IN CONFIDENCE
PAGE:56
Mobilisation Response Categories
Mobilisation Response Categories is where the user would setup the ‘Response’ drop down menu within Resource Turnout
Pattern window
The setup as follows:
•
Global Navigator Menu
•
Click onto Rotas and Availability button
The Rotas and Availability is now in the menu toolbar
•
Scroll down to Other Configuration Options
•
Click onto Mobilisation Response Categories
The Mobilisation Response Categories window will appear – as shown -
If there is nothing in the window
Click onto the Paint Brush icon
If any entries that where previously entered will appear in the Mobilisation Response Categories window – as shown above
Click onto the New button
•
Enter a Code
•
Enter the Description of the Code
•
Enter the Response Time
•
Click onto the OK button
As you can see ‘Di’s Mobilisation Response Categories’ is now
entered at the bottom of the Mobilisation Response Categories
window
SOPHTLOGIC – COMMERCIAL IN CONFIDENCE
PAGE:57
To locate ‘Di’s Mobilisation Response Categories’ > Go to
Rotas & Availability > Other Configuration Options >
Resource Turnout Systems > Click onto one of the options > Click
onto the Patterns button > Click on Amend > Click onto the
Response button.
Resource Turnout Systems
The Capability exists within the system to set up a Resource that has a base Location and a Duty System which has
associated Duty System Patterns.
Service Delivery Profiles are associated to a Resource and thus a Location via the
Resource Turnout System Pattern.
This provides the system with the flexibility of different profiles being active at different times of day and on different days
of the week.
For example, a Resource could be Wholetime during the day Monday to Friday, Retained during the night
Monday to Friday, and Retained during Saturday and Sunday.
Against each ‘Resource Turnout System’ one or more ‘Service Delivery Profiles’ can be selected, This means that the ‘Skill’
and ‘Role’ requirements could change over the course of the day and day of the week.
Turnout Systems are accessed via the
Click onto Rotas and Availability
Scroll down to Other Configuration options
Click onto Resource Turnout System
The Resource Turnout Systems window will appear – as shown –
To add a new Resource Turnout Pattern
Click onto the New button
SOPHTLOGIC – COMMERCIAL IN CONFIDENCE
PAGE:58
The Resource Turnout Pattern window will appear
Enter a Description
Enter a Code
Click onto the OK button
The Response Profile window will appear
Highlight the one of the options
Click onto the Pattern button
Resource Turnout Pattern
To associate a Resource Turnout System to a Service Delivery Profile the user should either select an existing Turnout
System or create a new Turnout System; as shown above.
To create a new Turnout Pattern the user should specify the days of the week and times of day the pattern is active and
then select the Service Delivery Profiles which will be active while the resource is on this Duty System Pattern. The user
should note that it is usual to specify 24-7 availability for a resource. This type of Turnout System pattern is shown below.
The capability exists within the system to set up a resource so that it can have different turnout patterns depending on the
time of day. For example, a ‘Resource’ could be ‘Wholetime’ during the day Monday to Friday, ‘Retained’ during the night
Monday to Friday, and ‘Retained’ during Saturday and Sunday.
Against each ‘Resource Turnout System’ one or more
‘Service Delivery Profiles’ can be selected, so that the system knows which ‘Response’ and ‘Skill’ profile is required.
The Resource Turnout Pattern window will appear
•
SOPHTLOGIC – COMMERCIAL IN CONFIDENCE
Click onto the New Button
PAGE:59
To setup a Resource Turnout Pattern
Enter a Heading into the Description
Click onto the Response button and choose one of the options
Tick the boxes of the Days needed
Enter a Times in the From and To boxes
Tick the Service Delivery Profiles Code that relates to the
Description
Click onto the OK button
To set up the ‘Response’ drop down list: Go to Rotas and Availability > Other Configuration Options >
Mobilisation Response Categories.
To set up the Resource Turnout Pattern - Service Delivery Profile box: Go to Incident Command >
Configuration > Service Delivery Profile.
This example indicates that any resource assigned to the Resource
Turnout Pattern of ‘Wholetime SRT’ will require the Capabilities and
Skills indicated the SRT Resource Capability Profile.
These resources are available 24 hours a day, 7 days a week as
indicated by the pattern above.
•
Click onto the Close button
SOPHTLOGIC – COMMERCIAL IN CONFIDENCE
PAGE:60
You should now be back in the Resource Turnout Systems window
The Resource Turnout Pattern is has now been set up and
linked to the Resource Turnout System.
•
Click onto the Close button
Your Resource Turnout System Code MUST matched the Resource Index Duty
For the ‘SKILLS’ and ‘ROLES’ to show in Capability Analysis, you will need to assign a Resource to the
Resource Turnout System/Pattern. To check a Resource has been assigned or to setup a Resource, follow the
instructions on how to check/setup ‘Resource Index’
SOPHTLOGIC – COMMERCIAL IN CONFIDENCE
PAGE:61
Here are some more examples of different Resource Turnout Patterns
Resource Turnout Pattern –Special Rescue Team:
This example indicates that any Resource assigned to the Resource
Turnout Pattern of ‘Special Rescue Team’ will require the Capabilities
and Skills indicated the SRT Resource Capability Profile.
These
resources are available 24 hours a day, 7 days a week as indicated by
the pattern.
Resource Turnout Pattern –Whole Time – with One Turnout Pattern:
This example indicates that any Resource assigned to the Resource
Turnout Pattern of ‘Whole Time’ will require the Capabilities and Skills
indicated the WT Resource Capability Profile.
These resources are
available 24 hours a day, 7 days a week as indicated by the pattern.
Resource Turnout Pattern –Whole Time – with Two Turnout Patterns – Day and Night:
This example indicates that any Resource assigned to the Resource
Turnout Pattern of ‘Whole Time Day and Night shift’ will require the
Capabilities and Skills indicated the WT Resource Capability Profile. You
can also setup the pattern for a Day and a Pattern for a Night as the
example below shows
SOPHTLOGIC – COMMERCIAL IN CONFIDENCE
PAGE:62
Public Holidays
Within this section, you will be able to setup Public Holidays that will appear in the Attendance Planner
•
Click onto Rotas and Availability
•
Select Configure Duty Systems
•
Click onto Public Holidays
The Public Holiday window will appear – as shown –
Any ‘Public Holidays’ entries that have been previously entered will
appear in the window.
Click onto the ‘Green Tick’ and all that is shown in the window
will disappear
Click onto the ‘Paint Brush’ and all that was entered previously
will reappear
Click onto the New button
Enter the date of the Public Holiday
Enter the Description of the Public Holiday
Click OK
The ‘Public Holiday’ have now been entered into the window –
as shown
To access the Public Holidays entries
SOPHTLOGIC – COMMERCIAL IN CONFIDENCE
PAGE:63
Click onto ‘Rotas & Availability’
‘Attendance Planner Payroll’
Click onto the ‘Analysis tab’
You will see a column ‘PH’ this is where your Public
Holiday, that you set up earlier, will appear
SOPHTLOGIC – COMMERCIAL IN CONFIDENCE
PAGE:64
Attendance Planner Payroll
To access the Public Holidays entries
•
Click onto Rota’s and Availability
•
Click onto Attendance Planner Payroll
The Attendance Planner window will appear
Select a Location
Select a Watch
Click onto the Green Tick
Personnel under the location and Watch will appear in the Attendance Planner window on the left hand side.
In the Summary Tab
Click onto one of the names
Any, Outdutys, Overtime and Public Holidays that
were entered in the Duty Rota Book will appear in
the window on the right.
SOPHTLOGIC – COMMERCIAL IN CONFIDENCE
PAGE:65
You can ‘Authorise’ the Outduties, Overtime, leave etc by
Click onto one of the name
Click onto the Analysis tab
You will see all entries form the Data Rota Book under
that dates in the Summary tab
Click onto one(s) you like to Authorise
Click onto the Authorise button
A dialog box will appear asking you if this is the right Transaction
Click onto the Yes button
As you can see the date of Authorisation and by who, has appeared in the first two columns.
Go to the Duty Rota Book, which shows the day(s) that have been authorised
SOPHTLOGIC – COMMERCIAL IN CONFIDENCE
PAGE:66
Open the Personnel Record Card
Click onto Personnel
Click onto Personnel Record Card
The Personnel Record Card window will appear
Click onto Search button
Enter the first letter of the Last name
Click onto the OK button
All records starting with the letter ‘M’ will appear
Choose the one you are looking for
Click onto the Open button
You need to click onto the ‘X’ to close this window
The information for the person you are looking for will
appear in the windows on the left – as shown -
SOPHTLOGIC – COMMERCIAL IN CONFIDENCE
PAGE:67
In the Sub-menu
Click onto Absence
Click onto the Show button
Notice the Public Holiday have been entered into the Absences window in the Sub-menu of the Personnel Record Card
SOPHTLOGIC – COMMERCIAL IN CONFIDENCE
PAGE:68
Sickness Set-Up
•
Global Navigator Menu
•
Click onto Rotas and Availability
•
Scroll down to Configure Duty System
•
Click onto Availability Setup
The ‘Availability Setup’ window will appear
There are four folders
•
Availability Category (sickness groups)
•
Availability Field Description (details links)
•
Availability Objects (body parts)
•
Availability Reasons (sickness causes)
Let’s have a look at each folder
Availability Category
(Sickness Groups)
Availability Category (Sickness Groups) is the main ‘Group’ heading and will appear in the ‘Category’ drop down menu
within the Sickness Record.
To set up Availability Category
•
Click onto the Availability Category folder
Any previously ‘Sickness Category’ entered will appear in this
window.
To ‘ADD’ a Category (group) to the list
•
Click onto the Add button
SOPHTLOGIC – COMMERCIAL IN CONFIDENCE
PAGE:69
The ‘Availability Category’ dialog box will appear
•
Enter the Name of the ‘Availability Category’ (Group) into the
box
•
Click onto the ‘Status’ Arrow
•
Select the ‘Sickness’ option
•
Click onto the ‘OK’ button
The ‘Category’ will now be linked to ‘Sickness’
This list of Availability Category (Sickness Groups) will be
assessable in Duty Rota Book > Specify Duty Status >
Details > Category.
Availability Field Description
To understand what ‘Availability Field Description’ is used to display customised Field Labels against the Fields shown on
the ‘Details’ Form access via the ‘Availability Status’ Entry Form. For example, for Sickness (avastatuscode=’S’) we could
set the ‘Availability Category’ label to be ‘Group’, the ‘Availability Reason’ to be ‘Cause’, ‘Objects’ to read ‘Body Parts’ etc.
By default the fields are referred to as Category, Reason, Description, Objects, Notes, Evidence (not customisable).
The ‘Status’ is where the ‘Availability Field Description’ information entered is linked to the ‘Constants’ in the ‘Duty Rota
Book’. This allows you to set up the fields within the ‘Sickness Record’ to be Mandatory.
Within the ‘Availability Setup’ window
•
Click onto the ‘Availability Field Description’
folder
Any setup previously entered will appear
To Add a ‘Availability Field Description’
•
Click onto the Add button
The ‘Availability Field Description’ window will appear
The ‘Status’ may defaulted to Sickness (this depends on your system setup)
SOPHTLOGIC – COMMERCIAL IN CONFIDENCE
PAGE:70
If the Status is not already selected
•
Click onto the ‘Status’ arrow
A drop down menu will appear with the Status Options e.g. Sickness {S},
Annual Leave, Training {T} etc…
•
Double Click onto the ‘Sickness {S}’ Option
As you can see there are Five different types of ‘Description’ and
‘Mandatory’ boxes. This is where you enter the Names of the Fields
that you want to show in the ‘Additional Sickness Details’ entry form
and, if needed, make those Fields Mandatory.
•
Enter the ‘Headings’ for the ‘Additional Sickness Details’
entry form
•
Click into the box(s) you want to make Mandatory
•
Click onto the OK button
To see if the headings are correct go to Rota & Availability > Duty Rota Book > Click onto a grey box >
In the Specify Duty Status > Click onto the ‘Status’ arrow > Select Sickness > Click onto Details button
> as you can see the field ‘Headings’ you entered are now displayed in the ‘Additional Sickness Details’ entry
form window.
As you can see here I have entered ‘Category Di’s Test’ etc
In
the
‘Additional
Sickness
Details’ entry form the headings I
entered are now visible.
SOPHTLOGIC – COMMERCIAL IN CONFIDENCE
PAGE:71
If you selected certain Field Headings to be Mandatory, In the Additional Sickness Details’ Entry Form
•
Enter information into certain fields; not the Mandatory fields.
•
Click onto the OK button
A dialog box will appear telling you that you must fill out ‘X’ field before you can confirm these changes.
To Set up the ‘Availability Constants’ > Click onto
Rotas and Availability > Scroll down to Configure Duty
System > Click onto Availability Constants > Add button.
Availability Object
(Body Parts)
The ‘Availability Object’ (Body Parts) is used to pin point; roughly, what parts of the body was hurt and/or damaged during
the Sickness / Accident.
•
Click onto the Availability Object folder
A list of all ‘Body Parts’ will appear in the ‘Description’ box
Any previously entered ‘Sickness Category’ will appear in this window
To Add Groups to the list
•
SOPHTLOGIC – COMMERCIAL IN CONFIDENCE
Click onto the ‘Add’ button
PAGE:72
•
Enter the Body Part in the Description box
•
In the Availability Status, Select Sickness
•
Click onto the OK button
As you can see the Availability Object (body part) has appeared in
the list
This list of Availability Object (Body Parts) will be assessable in Duty Rota
Book > Details > Body Part > Select
Availability Reason
(Sickness Causes)
The Availability Reason (Sickness Causes) is a break down of the ‘Availability Category’ (Sickness Groups)
•
Click onto the Availability Reason folder
A list of all Sickness Causes that have been previously entered will
appear in the ‘Availability Reason’ list.
To ‘Add’ to the list
•
Click onto the Add button
SOPHTLOGIC – COMMERCIAL IN CONFIDENCE
PAGE:73
The Availability Reason window will appear
•
Enter a Code
•
Enter the ‘Cause’ in the ‘Description’ box
•
In the ‘Status’ box, Select Sickness
•
Click onto the ‘OK’ button
As you can see the Availability Reason (Sickness
Causes) has appeared in the list
This list of Availability Reason (Sickness Causes) will be
assessable in Duty Rota Book > Details > Cause drop
down menu.
SOPHTLOGIC – COMMERCIAL IN CONFIDENCE
PAGE:74