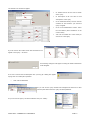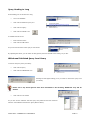
1
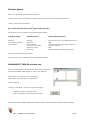
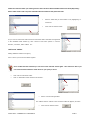
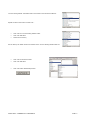
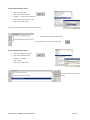
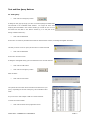
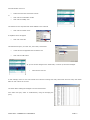
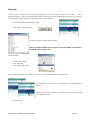
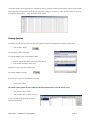
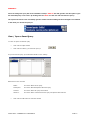
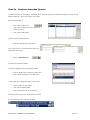
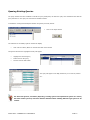
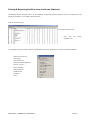
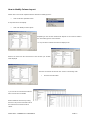
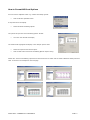
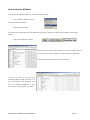
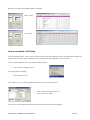
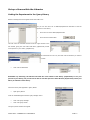
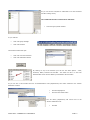
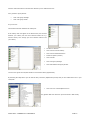
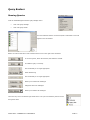
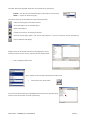
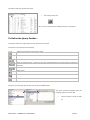
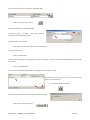
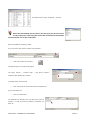
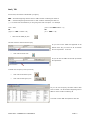
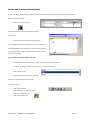
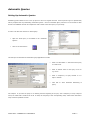
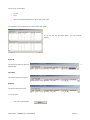
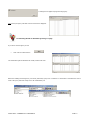
SOPHTLOGIC i
Personnel Query Reporting
2010a
User Manual
For more information:
E: [email protected]
T: 01473 255552
Table of Contents
INTRODUCTION.........................................................................................................................................................................................................................4
TYPES OF REPORT: ..................................................................................................................................................................................................................4
Reporting Windows...............................................................................................................................................................................................................4
QueryBuster ..........................................................................................................................................................................................................................4
User Defined Reporting ........................................................................................................................................................................................................4
PERSONNEL QUERIES (REPORTING).................................................................................................................................................................................5
CREATING A LIBRARY ................................................................................................................................................................................................................7
Add a Library........................................................................................................................................................................................................................7
CREATE A QUERY .......................................................................................................................................................................................................................8
AVAILABILITY TABLES: window one.................................................................................................................................................................................8
DEFINE RELATIONSHIP BUTTON ..............................................................................................................................................................................................11
INNER JOIN and OUTER JOIN ........................................................................................................................................................................................12
SELECTED COLUMNS: ........................................................................................................................................................................................................14
DEFINE SELECTED COLUMNS – WHERE: .................................................................................................................................................................................18
Add / OR Buttons ................................................................................................................................................................................................................19
Test and Run Query Buttons ...............................................................................................................................................................................................21
Count Of..............................................................................................................................................................................................................................22
Group By .............................................................................................................................................................................................................................24
SAVING QUERIES ......................................................................................................................................................................................................................25
View / Open a Saved Query ................................................................................................................................................................................................26
SAVE AS - DUPLICATE AMENDED QUERIES ............................................................................................................................................................................27
OPENING EXISTING QUERIES ...................................................................................................................................................................................................28
Printing & Exporting Facilities from the Brown Clipboard..............................................................................................................................................29
How to Modify Column Layout...........................................................................................................................................................................................30
How to Print a Report.........................................................................................................................................................................................................31
How to Format MS Excel Options......................................................................................................................................................................................32
How to Send to MS Excel....................................................................................................................................................................................................33
How to send data to CSV files ............................................................................................................................................................................................34
How to return to Factory Settings ......................................................................................................................................................................................35
QUERY MANAGER ..................................................................................................................................................................................................................36
SETTING UP THE LIBRARIES .....................................................................................................................................................................................................36
Add a Library......................................................................................................................................................................................................................37
SET-UP A USERS WITHIN THE LIBRARIES .................................................................................................................................................................................38
Linking the Department to the Query Library....................................................................................................................................................................38
LIST PUBLISHER .......................................................................................................................................................................................................................42
Query Heading to Long ......................................................................................................................................................................................................44
Withdrawal Published Query form Library .......................................................................................................................................................................44
QUERY BUSTERS.....................................................................................................................................................................................................................45
RUNNING QUERIES ...................................................................................................................................................................................................................45
Query Window ....................................................................................................................................................................................................................46
Verifying a Query is Correctly Formed..............................................................................................................................................................................48
Reasons That A Query May Not Run Correctly. ................................................................................................................................................................48
TO DEFINE THE QUERY FURTHER…........................................................................................................................................................................................50
And / OR..............................................................................................................................................................................................................................53
Saving and Opening a Saved Query ...................................................................................................................................................................................55
Delete, Duplicate, Rename a Saved Query ........................................................................................................................................................................56
AUTOMATIC QUERIES ..........................................................................................................................................................................................................57
Setting-Up Automatic Queries............................................................................................................................................................................................57
Retrieving Automatic Queries.............................................................................................................................................................................................60
RETRIEVING RESULTS OF AUTOMATIC QUERIES .....................................................................................................................................................................61
Reference Date Functionality .............................................................................................................................................................................................62
SOPHTLOGIC – COMMERCIAL IN CONFIDENCE
PAGE: 3
Introduction
The level of detail needed when entering data into pharOS means that the information available is very comprehensive.
Reports can be as simple or complex as necessary. This manual gives the user the tools to interrogate the database and
save commonly-used Queries.
Types of Report:
There are 3 levels of reporting within pharOS.
Reporting Windows
There are standard windows which provide reports to be run with little or no user intervention. At the most basic level a
reporting window would load, for example, all personnel who are due for a medical.
Most windows however will allow for search criteria to be entered in order to restrict the results. These generally include a
date range, and may include options to restrict location, rank, post type (ie Whole Time, Retained, APTC) or service
number/person’s name. This type of report is always specific to the individual modules and will be covered in detail in the
corresponding manuals.
QueryBuster
This is the next level in complexity, which also means greater flexibility.
Query Busters are standard reports that are
published by SOPHTLOGIC. The fields and search criteria can be defined by the user.
User Defined Reporting
This offers the greatest flexibility, but requires a higher level of competency. Reports have to be generated by choosing
the tables, fields and search criteria.
SOPHTLOGIC – COMMERCIAL IN CONFIDENCE
PAGE: 4
Personnel Queries (Reporting)
This option allows the user to build user defined reports. This is a very powerful tool, but requires an understanding of
how the database is made up.
•
Click onto the Personnel
•
Scroll down to Reports
•
Click onto Personnel Queries
The Personnel Queries window will appear
As you can see you have three windows
Available Fields - Window 1 - gives you all the
available tables and sub-tables within the Fire
Safety, Personnel and Training.
Window 1
Window 2
Selected Columns – Window 2 – By using the
Select button you can create the columns that
you want the information to appear in on the
Report.
Selected Columns – Window 3 – this is were
you define the query by using the ‘Where’, ‘AND’
Window 3
and ‘OR’ options.
Before we go any further, let’s see what the icons do in the toolbar
The Clear icon will remove all text that has been entered into all of the windows
The Open Icon will open the Libraries where your queries will be saved
The Save icon will save your query
The Save As icon will allow you to Save your query under a new name
SOPHTLOGIC – COMMERCIAL IN CONFIDENCE
PAGE: 5
The ‘Structured Query Language’ (SQL) executed when the Query is run
The Arrow icons allow you to move the fields
The Add icon at the top, allows you to add another Column – at the bottom, allows you to add a field
The Modify icon at the top, allows you to make changes to the columns – at the bottom, allows you
to modify the query
The Remove icon at the top, allows you to remove the fields – at the bottom, allows you to remove
the line of the Query
The Group by icon allows you to add another column
The Test Query icon allows you to test if there is any data behind the Query and ensures that the
Query has been formulated correctly prior to execution
The Run Query icon allows you to Run the query
The Add Table button allows you to add another Field folder to Available Fields
The Remove Table button allows you to Remove the Field folder from Available Fields
The Where button allows you to select the fields you want to break down your query
The Select button moves the chosen field and move it from the left window to the right
The AND button tells your query that you want data back for X and Y and Z
The OR button tells your query that you want data back for X or Y
The Brackets buttons allows you to break down a query more
When you are creating a query its good to write down what it is you want the
system to search for and return to you
SOPHTLOGIC – COMMERCIAL IN CONFIDENCE
PAGE: 6
Creating a Library
The ‘Personnel Queries’ system allows the user to section the information held within the system and ‘Save’ the query in a
Library, access to which is completely user-definable.
Users with access to books within these Libraries may then construct and ‘Save Queries’ and transport the data from those
queries into other applications (such as Microsoft Excel) where it may be formatted in any way that the host applications
allow.
The ‘Personnel Queries’ makes full use of graphical user interface facilities and data is made available using common
English terms rather than cryptic computer terminology.
There is no need for users of the system to learn query
languages.
Within ‘Personnel Queries’
•
Click onto the ‘Open’ icon
As you can see there is already a list of ‘Libraries’
Add a Library
•
Click onto the ‘New Library’ button
The ‘Library Setup’ box will appear
•
Enter the ‘Name’ of your library
•
Click onto the ‘OK’ button
As you can see, ‘Di’s Personnel Library’ in now been inserted
into the Libraries list.
•
Click onto the Library
As you can see here there are no queries saved in this Library
SOPHTLOGIC – COMMERCIAL IN CONFIDENCE
PAGE: 7
Create a Query
What is the Question you want to ask the system???
First you need to work out what data you want the Query to return as the two examples shown below
I want to create a Query that shows –
Q1: Leavers for the Year from 1st April (enter the year)
For this Query to work we will need all of what is displayed below
Availability Tables:
Selected Columns:
Defined Selected Columns:
Personnel
Current Posting Details
Service History
Surname
First Name
Service Number
Ava or Una, Leave Blank
Reason for Leaving
Finish Date
Value of Ava or Una, Leave Blank Equals to Ava
AND
Value of Finish Date Greater than or Equal to
01/04/enter the year
AND
Value of Reason For Leaving Is not Empty
Let’s go through this Query Step by Step
First we need to enter our tables into the ‘Available Fields’ window
AVAILABILITY TABLES: window one
In the ‘Fire Safety Queries’ window you will see the option of ‘General’ in
the left hand Available Fields window (1) with two sub options of
System Time – is the time the query was created
System Date - is the date the query was created
These are defaults
To bring up more fields – this is so we can define the query
•
Highlight the option of ‘General’ folder
•
Click on ‘Add Table’ button at bottom of window 1
This will open up the ‘Available Fields’ option window, which is a list of ‘All Tables’ of ‘Search Criteria’ available.
SOPHTLOGIC – COMMERCIAL IN CONFIDENCE
PAGE: 8
Under the ‘General’ folder you will be given the list of all the Tables available within ‘Fire Safety Reporting’.
All the other folders will only have sub-tables that are linked to that particular field.
•
Select a ‘Table’ that you wish ‘Search’ on by highlighting i.e.
‘Personnel’
•
Click onto the ‘Select’ button
As you can see ‘Personnel’ table and all the sub-fields within that table has appeared
in the ‘Available Fields’ window (1) with a choice of sub menu options i.e. ‘Service
Number’, ‘Surname’, ‘Date of Birth’ etc…
‘Add’ more ‘Tables’
Adding Additional Tables to the Query
Here is where you will link the tables together
Once a table has been selected you can not use the ‘General’ folder again. The reason for this is you
now need to link the tables to each other for your query to work.
•
Click onto the ‘Personnel’ folder
•
Click on ‘Add Table’ button at bottom of window 1
•
Select ‘Current Posting Details’
The ‘Tables’ that are ‘Linked’ to the ‘Personnel’ table will appear, as shown
•
SOPHTLOGIC – COMMERCIAL IN CONFIDENCE
Click onto the ‘Select’ button
PAGE: 9
‘Current Posting Details’ will attach itself to the bottom of the Personnel table list
Repeat the above instruction but this time…
•
Click onto the ‘Current Posting Details’ folder
•
Click onto Add Table
•
Select Service History
Service History will attach itself to the bottom of the ‘Current Posting Details’ table list
•
Click onto the Personnel folder
•
Click onto Add Table
•
Click onto Define Relationship button
SOPHTLOGIC – COMMERCIAL IN CONFIDENCE
PAGE: 10
Define Relationship Button
‘Define Relationship’ does two functions… It allows you to link stand alone tables/data to other tables (attributes) within
the system and/or use the ‘Inner Join’ / ‘Out Join’ options.
The ‘Define Relationship’ window will appear
On the left of the window there is a list of all the tables that are
in the ‘Personnel’ window.
Scroll down to the table
•
Select Ranks option
Let me explain the window in a little more detail, the first part…
From Column
The ‘From Column’ is a list of all the tables that are linked to the ‘Personnel’ folder in
‘Available Fields’ window (window1) you want to link a table to.
From Column > Select Personnel ID
To Column
The ‘To Column’ is a list that will change depending what folder you choose on the left of the
Define Relationship box. This is where you link the table to the table in the ‘From’ option.
To Column > Select Ranks ID
As you can see in the two examples below, the ‘To Column’ is different depending on what is selected from the list on the
left of the window.
Linking
the
‘Personnel
ID’
to
the
‘Absence Monitoring ID’ in the ‘Premises’
option.
SOPHTLOGIC – COMMERCIAL IN CONFIDENCE
Linking the ‘Personnel ID’ to the ‘@@Primary Key’
in the ‘Part 2 – Critical Equipment Failures (Health
& Safety – Personal Injury)’ attribute option.
PAGE: 11
This is where you join the stand alone tables e.g. ‘Audit Form’ ‘Health and Safety’, ‘Recruitment’, ‘Attributes’ or ‘Equal
Opportunity’ etc to a defined field.
‘Personnel’ tables are not stand alone tables they are linked within the system so this part of ‘Define
Relationship’ may not apply to the query.
INNER JOIN and OUTER JOIN
The second part of ‘Define Relationship’; ‘Inner Join’ and ‘Outer Join’, does apply to ‘Fire Safety’.
Look at the right hand
side of this window there are 3 option buttons. These are called ‘Join’ buttons. Each option will have an ‘Explanation’ box
with a brief description of what the ‘Inner Join’ options do
INNER JOIN
The ‘INNER JOIN’ only acts on rows were ‘All ‘Qualification’, ‘Attributes’ Absence
Monitoring etc….’ records where there are related ‘Personnel Records’.
OUTER JOIN
The ‘LEFT OUTER JOIN (FROM)’ only acts on rows were ‘All ‘Qualification’, ‘Attributes’
Absence Monitoring etc….’ records where there may or may not be related ‘Personnel
Records.’
The ‘RIGHT OUTER JOIN (TO)’ only acts on rows were ‘All Personnel Records’ where
there may or may not be related to any ‘Qualification’, ‘Attributes’ Absence Monitoring
etc….’
•
Click onto Right Outer Join (to) option
Once you have finished setting up the ‘Defined Relationship’
•
Click onto the ‘OK’ button
SOPHTLOGIC – COMMERCIAL IN CONFIDENCE
PAGE: 12
As you can see the ‘Defined Relationship’ Ranks has appeared at the bottom of the list
•
Click onto the ‘Table’
•
Click onto the ‘Select’ button
The window will automatically defaults to the top of the Ranks list.
Scroll down the left hand column
Ranks will attach itself to the bottom of the Service History table list
One difference…
There is a plus (+) sign next to the Ranks folder. This means that this table is
linked to the Available field.
Even though ‘Ranks’ table is linked to the ‘Current Posting Details’ table it may not be linked within
the system setup. Knowing what tables are linked to and what sub-options are associated to what
table go to ‘Personnel Tables and Links Manual’ to see the full listings of all ‘Tables’ and ‘Attribute
Groups’ that are in the ‘Personnel Queries’.
It is also important to have a very good knowledge of the system setup and know where the data
can be pulled from when creating these Reports from
‘Personnel Queries’
SOPHTLOGIC – COMMERCIAL IN CONFIDENCE
PAGE: 13
SELECTED COLUMNS: window two
To create the ‘Report’ you first have to select the
Window 1
information that you wish to return in report columns
Window 2
from the left window (1) into the right window (2).
•
This is done by – for this example query
Within the ‘Personnel’ folder
•
Double click onto the ‘Surname’ sub options
•
Click onto and highlight the ‘File Number’ sub options
•
Click onto the ‘Select’ button
Or
The ‘Select Value, Attributes’ window will appear
•
Select drop down arrow gives you options to
‘Value Of’, ‘Minimum’, ‘Average’, ‘Maximum Value Of’, ‘Sum Of’, ‘Count Of’ etc…
The ‘Label’ box allows you to change the heading name for that column
•
‘Justification’ drop down arrow will allow you to align the data
•
‘Width’ allow you to change the character length which determines the width of column
in report.
•
Click onto the ‘OK’ button
As you can see the ‘Surname’ has appeared in the ‘Select
Column’ window (2) on the right.
SOPHTLOGIC – COMMERCIAL IN CONFIDENCE
PAGE: 14
Within the Personnel folder
•
Click onto First Name > Value of
•
Click onto the Select button
This will open up the ‘Select Value Attributes’ window
•
Click onto the ‘OK’ button
As you can see the ‘First Name’ has appeared as column 2
under the ‘File Number’ column
By following the steps explained above…
Personnel folder
•
Click onto ‘Service Number’ > Value of
•
Click onto the Select button
This will open up the ‘Select Value Attributes’ window
•
Click onto the ‘OK’ button
As you can see Service Number’ has appeared as column 3 under the ‘First Name’ column
Current Posting Details folder
•
Click onto ‘Ava or Una, Leave blank’ > Value of
•
Click onto the Select button
This will open up the ‘Select Value Attributes’ window
•
Click onto the ‘OK’ button
As you can see ‘Ava or Una, Leave blank’ has appeared as column 4 under the ‘Service Number’ column
SOPHTLOGIC – COMMERCIAL IN CONFIDENCE
PAGE: 15
Service History folder
•
Click onto Reason for Leaving > Value of
•
Click onto the Select button
This will open up the ‘Select Value Attributes’ window
•
Click onto the ‘OK’ button
As you can see ‘Reason for Leaving’ has appeared as column 5 under the ‘Ava or Una, Leave blank’ column
Service History folder
•
Click onto Finish Date > Value of
•
Click onto the Select button
Date Range
The ‘Date Range’ fields are referencing the date attribute identified as a ‘Reference Date’.
It would be usual to only set one date as a ‘Reference Date’ in a single query. If multiple ‘Reference Dates’ are used both
dates will need to fall within the ‘Date Range’ defined.
E.g. where the ‘Inspection Created Date’ and ‘Inspection Finish Date’ falls within the ‘Date Range’ set.
If you enter a ‘Date’ criteria to your query the ‘Select Value, Attributes’ window will be a little different – as shown
This dialog box gives you the option to choose a different ‘Reference Date’
The default is ‘Within Date Range’
If you do wish to change this
•
Click onto the ‘Reference Date’ box
This will activate the options
•
Select one of the options
SOPHTLOGIC – COMMERCIAL IN CONFIDENCE
PAGE: 16
To grey out the other options
•
Remove the tick from the ‘Reference Date’ box
•
Click onto the ‘OK’ button
This will open up the ‘Select Value Attributes’ window
•
Click onto the ‘OK’ button
As you can see ‘Finish Date’ has appeared as column 6 under the
‘Reason for Leaving’ column
At this stage, not all queries need to be defined or set to a date range.
Ranks folder
•
Click onto ‘Code > Value of
•
Click onto the Select button
This will open up the ‘Select Value Attributes’ window
In the Label box I have added ‘Ranks’ to the column heading
•
Click onto the ‘OK’ button
As you can see ‘Code’ has appeared as column 4 under the ‘Finish Date’ column
SOPHTLOGIC – COMMERCIAL IN CONFIDENCE
PAGE: 17
Define Selected Columns – Where:
In the ‘Current Posting Details’ folder
•
Click onto ‘Ava or Una, Leave Blank’
•
Click onto the ‘Where’ button
•
Condition – Equal to
•
Value – ‘UNA’
•
Click onto the ‘OK’ button
This will open the value ‘Where’ window
The ‘Function’ box is always defaulted to ‘Value of’
•
Click onto the Functions Arrow
A drop down menu of options will appear
A drop down list will appear > change if necessary
For this query we want the ‘Function’ on ‘Value Of’ option
The Condition is always defaulted to ‘Equals to’
•
Click onto the Conditions Arrow
Equals to
= Numbers / Dates
•
A drop down menu of options
Not equals to
= Numbers / Dates
Greater that or equals to
= Numbers / Dates
Less than or equals to
= Numbers / Dates
Begins with
= Text
Ends with
= Text
Contains
= Text
Is empty
= Leave Blank
Is not empty
= Leave Blank
Does not begin with
= Text
For a Date Range: ‘Greater that or equals to’ and ‘Less than or
Does not end with
= Text
equals to’ is commonly used
Does not contain
= Text
For Text: ‘Begins with’ or ‘Contains’ are commonly used
SOPHTLOGIC – COMMERCIAL IN CONFIDENCE
PAGE: 18
Add / OR Buttons
When using the OR / AND buttons you need to ask yourself what the question you’re trying to ask is…
Use the And / Or buttons to breakdown your Query
AND = Surnames beginning with the letter S AND Location containing the letter N
OR =
Surnames beginning with the letter S OR Location containing the letter N
( ) = You would use the brackets if you are giving more than one option – For example
Year = 2007
(Year = 2007 AND Location = A)
OR
OR
(Type = A
AND
Location = B)
(X = Y AND A = B)
The AND button gives does not give you an option it wants all data within ‘Where’ i.e.
Sickness where the Value of ‘Finish Date’ is ‘Greater than or equal to’ ‘01/04/09’ AND Value of ‘Finish Date’ is ‘Less than or
equal to’ ‘31/03/10’
The OR button gives you conditions and usually us the brackets to separate the options i.e.
Sickness where the (Value of ‘Finish Date’ is ‘Greater than or equal to’ ‘01/04/09’ AND Value of ‘Finish Date’ is Less than or
equal to’ 31/04/09)
OR
Sickness where the (Value of ‘Date’ is ‘Greater than or equal to’ ‘01/08/09’ AND Value of ‘Date’ is Less than or equal to’
31/08/09)
Add in a Query Line
•
Click onto either the AND / OR button
For this example I am using the ‘AND’ button
You can either:•
Click onto the table through window (1) then
•
Click onto the ‘Where’ icon
Or you can…
•
Click on the ‘Add’ button
•
Select another option from ‘Available Fields’ window
Either way
SOPHTLOGIC – COMMERCIAL IN CONFIDENCE
PAGE: 19
In the ‘Service History’ folder
•
Click onto ‘Finish Date’
•
Click onto the Where button
•
Condition – Greater Than or Equal To
•
Value – Enter a 1/4/enter the year
•
Click onto the ‘OK’ button
As you can see the defined questions are now entered
•
Click onto either the AND / OR button
For this example I am using the ‘AND’ button
In the ‘Service History’ folder
•
Click onto ‘Reason for Leaving’
•
Click onto the Where button
•
Condition – Is Empty
•
Value – blank
•
Click onto the ‘OK’ button
Once all you have defined your
query
SOPHTLOGIC – COMMERCIAL IN CONFIDENCE
PAGE: 20
Test and Run Query Buttons
To ‘Test Query’
•
Click onto the ‘Test Query’ button
A dialog box may pop up saying you have not used anything from tables that
was selected in the ‘Available Fields’ window.
You might not have used
anything from that table in the column window (2) but did use one or so of
the fields from the table in the ‘Where’ window (3) or it was part of the
linking of tables. Either way…
•
Click onto the OK button
If there are no records to pull back which meet the search criteria entered, a message will appear as follows:
This lets you know not to run query as there are no records returned
•
Click onto the OK button
If there are records to return
A dialog box will appear letting you know that there were records returned
•
Click onto the ‘OK’ button
•
Click onto the ‘Run Query’ button
Same as above
•
Click onto the Yes button
The system will now search all the records for the answer for your
query. Depending on the size of the query, this could take a little
while…
As you can see in this example I had 377 records returned.
To close the results window
•
Click onto the ‘X’ in the top right hand corner
SOPHTLOGIC – COMMERCIAL IN CONFIDENCE
PAGE: 21
Count Of
Count of’ will count how many records they are to be counted e.g. Ranks
•
Double click onto the ‘Code’ column
•
Click onto the ‘Code’ column
•
Click onto the ‘Modify’ icon
or
The ‘Select’ box is a drop down box which defaults to the ‘Value Of’
•
Click onto the ‘Select’ arrow
A dropdown menu will appear
•
Click onto ‘Count Of’
This will allow the query to ‘Count’ how many; in this case, ‘Code’ were made for each ‘Rank’.
•
‘Count Of’ has now appeared into the ‘Select’ box
I have also changed the
•
‘Justification’ to ‘Centre’
•
‘Width’ from ‘6’ to ‘8’
•
Click onto the ‘OK’ button
As you can see the changes to the ‘Inspection Type Code’, in column 4, have been
changed.
•
Click onto the ‘Run Query’ button
As you can see 377 records have returned. The ‘Rank Code ’ has been
counted for each ‘each ‘Leaver’ for the Year.
‘Code’ heading has changed to ‘Count of Code’ and is now centred
.
SOPHTLOGIC – COMMERCIAL IN CONFIDENCE
PAGE: 22
Let’s add another ‘Count of’
•
Double click onto the ‘Finish Date’ column
•
Click onto the ‘Finish Date’ column
•
Click onto the ‘Modify’ icon
or
The ‘Select’ box is a drop down box which defaults to the ‘Value Of’
•
Click onto the ‘Select’ arrow
A dropdown menu will appear
•
Click onto ‘Count Of’
This will allow the query to ‘Count’ the; in this case, ‘Finish Date’
•
‘Count Of’ has now appeared into the ‘Select’ box
•
Click onto the ‘OK’ button
As you can see the changes to the ‘Finish Date’, in column 6, have been changed.
•
Click onto the Run icon
In this example, there are now 190 records have returned counting how many ‘Rank Code’ and how many with ‘Finish
Date’ for each ‘Leaver for the Year.
The ‘Finish Date’ heading has changed to ‘Count of Finish Date’.
Let’s make this query easier to understand by using the Grouping the
query
SOPHTLOGIC – COMMERCIAL IN CONFIDENCE
PAGE: 23
Group By
Usually a Query will show the data in the columns you have selected. ‘Group By’ allow you to create a
‘Three
Dimensional’ Query. To do a ‘Three Dimensional Report’, meaning you will have headings down the side (Y axis) and the
headings along the top (X axis) use the ‘Group By’ button. Like a line chart.
•
Click and highlight the ‘Finish Date’ Column
•
Click onto the ‘Group By’ button
The ‘Select Column to Add’ window will appear
Notice the tables available in this window are the same tables you selected in
Availability Fields (window one).
For this example:
•
Scroll down to ‘Ranks’
•
Click onto ‘Code’
•
Click onto the ‘OK’ button
Once you have selected all of your tables / columns it should look something like the example below
The selected field will now show in right window (2), (selected columns
window)
Repeat this until you have entered in all headings for columns that you wish
to be displayed in report.
•
Run the Report
SOPHTLOGIC – COMMERCIAL IN CONFIDENCE
PAGE: 24
You will still see the 190 records that have returned like before, except the system has entered the ‘Leavers’ down the side
of the page and the ‘Rank Codes’ across the top of the page, giving you a ‘Count by’ (total) of each ‘Leaver’. And the row
‘Grouped’ the data by ‘Rank’ – giving each Rank its own column.
Saving Queries
To enable to be save the query that you have just created for retrieval and subsequent execution at a later date
•
Click the ‘Save’ button
The Save Query window will display
The system defaults to the first field ‘Query Name’
•
Enter an appropriate ‘Name’ of the query being saved
•
Enter a ‘Brief Description’ of the query
Position the cursor in the ‘Query Status’ field
The system defaults to ‘Private’
If however, the query is to be accessible to all users
•
Select ‘Public’ option
The ‘Public’ option allows all users within the allocated department to see and use the query.
•
Click onto the ‘Library’ folder
•
Click the ‘OK’ button to ‘Save’ the query.
A query has been formulated and ‘Saved’ for
retrieval at a later date.
SOPHTLOGIC – COMMERCIAL IN CONFIDENCE
PAGE: 25
REMEMBER…
Users can change the query but must remember to always ‘SAVE AS’ this will give the user the option to give
the amended query a new name. By clicking onto the ‘SAVE’ icon the user will overwrite the query…
The system will return to the ‘Fire Safety Queries’ window and the heading will have changed from ‘Untitled’
to the name you ‘Saved’ the query at.
View / Open a Saved Query
To ‘View’ or ‘Open’ the ‘Saved’ query
•
Click onto the ‘Open’ button
•
Click onto the ‘Library’ you saved the query in
As you can see the query you created and saved is in the ‘Library’
Notice there is four columns
•
Name:
This is the ‘Name’ of the query
Description:
This is the ‘Brief Description’ about the query
Created:
This is the ‘Date’ the query was created
Last Run:
This is the ‘Date’ of the last time this query was opened and ‘Last Run’
Click onto the ‘OK’ button to close the window
SOPHTLOGIC – COMMERCIAL IN CONFIDENCE
PAGE: 26
Save As - Duplicate Amended Queries
To enable queries to be ‘Duplicated’ / ‘Amended’ queries using the same kind of data but allowing you to amend, add,
delete columns etc... And re-save under a new name.
Open the original Query
•
Click onto the ‘Open’ icon
•
Click onto the ‘Library’ the query is saved in
•
Select the ‘Query’
•
Click onto the ‘OK’ button
This will re-open the ‘Saved’ query
•
Make the ‘Amendments’ to the query
As you can see I have removed the last entry and
changed the date range
•
Click the ‘Save As’ button
The ‘Save as’ window will display
The system defaults to the first field ‘Query Name’
•
Enter an ‘NEW’ name of the query being saved
•
Enter a ‘Brief Description’ of the NEW query
If you would like to change the ‘Status’ of the query…
•
Select ‘Private’ or ‘View’ option
•
Click onto the Library Folder
•
Click the ‘OK’ button to Save the Query.
The system returns to the ‘Fire Safety Queries’ window
As you can see the query name has changed
SOPHTLOGIC – COMMERCIAL IN CONFIDENCE
PAGE: 27
Opening Existing Queries
The query window has been modified to include the query description, the date the query was created and the date the
query was last run. The query list now features sortable columns.
To enable the viewing and subsequent selection of Queries previously ‘Saved’
•
Click on the ‘Open’ button
The ‘Libraries for Fire Safety Queries’ window will display
•
Click onto the ‘Library Name’ on the left hand side of the window
The Queries Saved to the highlighted Library will appear
•
Highlight the relevant Query
•
Double click on the query
•
Or Click onto the ‘OK’ button
The query will appear in the FSQ window for you to execute, amend
etc…
The Personnel Queries, Fire Safety Reporting, Training Queries and Operational Queries are exactly
the same window just they reference different database tables enabling different type Queries to be
created.
SOPHTLOGIC – COMMERCIAL IN CONFIDENCE
PAGE: 28
Printing & Exporting Facilities from the Brown Clipboard
The following section describes how to use the standard ‘Printing and Exporting’ facilities which are incorporated in the
majority of windows e.g. ‘Fire Safety Queries Window’.
From the ‘Executed’ query
In the top left hand corner
•
Click
onto
the
Clipboard’ icon
The standard printing and export facilities, represented by the ‘Brown Clipboard’ icon include the following facilities:
Modify Column Layout:
Print Report:
Send to MS Excel:
MS Excel Formatting Options:
Send To .csv File…:
Letters and Mail:
Factory Settings:
Graph Results:
eQ Apollo:
Close:
SOPHTLOGIC – COMMERCIAL IN CONFIDENCE
PAGE: 29
‘Brown
How to Modify Column Layout
Please refer to the ‘Brown clipboard’ button entitled ‘Fire Safety Queries’
•
Click the ‘Brown clipboard’ button
A drop down menu will display
•
Click onto ‘Modify Column Layout’
Depending on the columns checked will depend on the columns visible in
the ‘Fire Safety Queries’ result window
i.e. only the above checked columns will display as so:
Remove the Ticks from the check boxes of the columns you ‘Do Not’
want displayed
The ‘Sort List’ button will ascend ‘Sort’ column in ascending order
•
Click onto the OK button
s you can see the columns that had the
ticks removed are now hidden
Restore Defaults check box by ticking
this box it will put the ticks back into all
the check boxes all columns will be
visible.
SOPHTLOGIC – COMMERCIAL IN CONFIDENCE
PAGE: 30
How to Print a Report
Please refer to the ‘Brown clipboard’ button entitled ‘Fire Safety Queries’
•
Click the ‘Brown clipboard’ button
A drop down menu will display
•
Select the second option ‘Print Report’
The system will automatically generate a report of the information currently displayed.
Please note the information included in the ‘Print’ or ‘Export’
will be the data retrieved from the single or multiple
searches previously performed.
•
To print the report click the ‘P’ button positioned in the top right hand corner
of the window.
A drop down menu will display.
•
Click onto ‘Print Report’
The ‘Print setup’ window will display.
Please note the ‘Print Setup’ window defaults to the printer previously
specified as the default printer via the ‘Settings’, ‘Printers’ option of the
‘Start’ button of Windows.
•
Click the ‘OK’ button to print the report.
The system returns to the screen report.
When the report has been viewed and is no longer required.
•
Double click the ‘8’ button positioned in the top left hand side of the window or click onto the ‘X’ positioned at the
top right hand side of the window.
The system returns to the ‘Fire Safety Queries’ window.
SOPHTLOGIC – COMMERCIAL IN CONFIDENCE
PAGE: 31
How to Format MS Excel Options
Go to the ‘Brown clipboard’ button e.g. entitled ‘Fire Safety Queries’
•
Click the ‘Brown clipboard’ button
A drop down menu will display
•
Select ‘MS Excel formatting options’
The system will open the ‘Excel formatting options’ window
•
Go to the ‘Auto formats’ list display
The ‘AutoFormat’ highlighted will display in the ‘Sample’ preview field
•
Select the required ‘Auto format’ option.
•
Click the ‘OK’ button if the Excel Formatting Options require saving.
Please note: the 'Excel Formatting’ option that is selected will not be visible until the ‘Send to MS Excel’ facility has been
used. As shown in the examples on the next page.
SOPHTLOGIC – COMMERCIAL IN CONFIDENCE
PAGE: 32
How to Send to MS Excel
Go to the ‘Brown clipboard’ button e.g. entitled ‘Fire Safety Queries’.
•
Click the ‘Brown clipboard’ button
A drop down menu will display
•
Select ‘Send to MS Excel’
The system will automatically open ‘Microsoft Excel’ which will be visible on the task bar at the bottom of the window
display.
•
Click the ‘Microsoft Excel’ button
Microsoft Excel will open and the information in the ‘Fire Safety Queries’
results window will now be displayed in a ‘Microsoft Excel’ spreadsheet.
In this example the headings have not been included…
If
this
is
the
case,
go
to
‘MS
Excel
Formatting Options’ make sure there is a
tick in the ‘Include Column Headings’ check
box in the ‘Optional Parameters’ or click
onto one of the ‘Auto Formats’ e.g. ‘simple’.
SOPHTLOGIC – COMMERCIAL IN CONFIDENCE
PAGE: 33
Below are a few ‘MS Excel Formatting Options’ examples.
‘Class 1’ layout
‘List 1’ layout
How to send data to CSV files
(Comma separated values – this is a text file that will open in Excel by default but can also be opened with a simple text
editor, such as notepad. This is a standard file type for imports into other applications, such as Access.)
Go to the ‘Brown Clipboard’ icon e.g. entitled ‘Fire Safety Queries’
•
Click the ‘Brown Clipboard’ button
A drop down menu will display
•
Select ‘Send to .csv file’
Upon selecting ‘.csv’, you will be prompted as to where you want to save the file to.
•
Enter a location and name for the file
•
Click onto the ‘OK’ button
You will see a working message and then Excel will open and the new file will be displayed.
SOPHTLOGIC – COMMERCIAL IN CONFIDENCE
PAGE: 34
PLEASE NOTE:
The default location when you start a new session is the application folder, but once you have changed this
once and saved it will bring up the last save location.
If you do not enter the extension ‘.csv’ after the file name, this will automatically be added.
You cannot enter a file name that already exists. If you wish to replace a file – delete it before you run this
export.
How to return to Factory Settings
When the modify column layout has been modified and there is a requirement to revert to the original layout, this can be
achieved by selecting the ‘Factory Settings’ menu option on the brown clipboard icon.
Example:
Modify Column layout
•
De-select the columns that you do not wish to be displayed by un-checking the
relevant checkboxes
•
Select ‘Factory Settings’ from the ‘Fire Safety Queries’ results window brown
clipboard.
The following message will be displayed
All Columns will then be displayed on the Fire Safety Queries results window once the window has been closed and reopened.
When the report has been viewed and is no longer required.
•
Double click the ‘8’ button positioned in the top left hand side of the window or the ‘x’ positioned at the top right
hand side of the window.
The system returns to the ‘Fire Safety Queries’ window.
These Features are currently not available.
Letter and Mail, Graph Results and eQ Allolo
SOPHTLOGIC – COMMERCIAL IN CONFIDENCE
PAGE: 35
Query Manager
Setting up the Libraries
The Query Buster system allows an administrator to section the information held within the system into Electronic
Libraries, access to which is completely user-definable. Access is granted to Administrative Units who are then deemed to
own the data held within those Libraries.
Administrative Unit supervisors may then publish the data held within the libraries to other users of the system who
require access to it.
Users with access to books within these Libraries may then construct and Save Queries and transport the data from those
Queries into other applications (such as Microsoft Excel) where it may be formatted in any way that the host applications
allow.
The Query Builder makes full use of graphical user interface facilities and data is made available using common English
terms rather than cryptic computer terminology. There is no need for users of the system to learn query languages.
On the ‘Global Navigator’
•
Click onto the ‘Query Manager’ button
The ‘Query Manager’ button will appear in the
toolbar
First of all let’s look at ‘Query Buster’ to see what ‘Libraries’
(departments) you are able to see
•
Click onto ‘Query Manager’
•
Click onto ‘Query Buster’
As you can see you can see ‘Sickness’ and ‘Training’ libraries
•
Close the ‘Query Buster’ window
•
Click onto ‘Query Manager’
•
Click onto ‘Libraries’
SOPHTLOGIC – COMMERCIAL IN CONFIDENCE
PAGE: 36
The ‘Libraries’ window will appear
As you can see there is already a list of ‘Libraries’
To add a library
Add a Library
•
Click onto the ‘NEW’ button
The ‘Library Setup’ box will appear
•
Enter the ‘Name’ of your library
•
Click onto the ‘OK’ button
As you can see, ‘Di’s Reporting Library’ in now been
inserted into the Libraries list.
•
Click onto the Subscribers button
SOPHTLOGIC – COMMERCIAL IN CONFIDENCE
PAGE: 37
Set-up a Users within the Libraries
Linking the Department to the Query Library
Based on what Queries the Brigade wants their staff to see
As you can see there are no Offices/Departments selected to view the
Queries in this Library.
•
Click onto one of the Offices/Departments
•
Click onto the Select Button
This will move the selected Libraries from the right window to the
left window, giving the user within that library (department) access
to the queries in your Library (department).
Or hold down the ‘Ctrl’ key and click onto the libraries you want to
‘Select’
•
Click onto the OK button
Remember: By ‘Selecting’ the libraries will able the users linked to that library (department) to see your
queries in your library, but you will not be able to see their queries in their libraries (department) unless your
library is selected to their library.
Check the Library has appeared in Query Buster
•
Open Query Buster
From the Global Navigator load the Query Manager menu.
•
Click onto Query Manager
•
Click onto Query Buster
The Query Buster window will appear
SOPHTLOGIC – COMMERCIAL IN CONFIDENCE
PAGE: 38
As you can see the User/Post is authorised to use the ‘Personnel
and Di’s Testing’ Library
Let’s authorise the user to access more ‘Libraries’.
•
Close this Query Buster window
In your tool bar:
•
Click onto Query Manager
•
Click onto Libraries
The Libraries window will open
•
Click onto one of the Libraries
•
Click onto Subscribers button
By clicking on any of the Libraries your will see the same options – Fleet,
Personnel, Water, Sickness FP and OPS - The reason for this is in the ‘User
Administration’ these are the Offices you allocated to the Username.
As you can see in this window there are six Administrative Units (departments) have been selected to the ‘Chosen
Subscriber’ window.
•
Click and Highlight FP
•
Click onto the Select button
The ‘FP’ library (department) has moved over to the
‘Chosen Subscribers’ list’
•
SOPHTLOGIC – COMMERCIAL IN CONFIDENCE
Click OK
PAGE: 39
Continue instruction above to access other libraries you are authorised to see
Let’s go back to ‘Query Buster’
•
Click onto Query Manager
•
Click onto Query Buster
As you can see
The Libraries has been added to the Library list
If the Library does not appear in the libraries list, this could be
because your Library has not been selected within the e.g.
Leavers Library even though you have selected Leavers into
your Library.
•
Go back to Libraries
•
Click onto the Leavers Library
•
Click onto the Subscribe button
•
Select an Option (Leavers)
•
Click onto OK
•
Click onto Query Manager
•
Click and Refresh onto Query Buster
You have now given the User/Post access to see another Library (department).
By following the steps above you can add as many ‘Libraries’ (department queries) that you are authorised to use in your
‘User/Post’.
•
Click onto one of the Department icon
Any Queries that have been set up will be saved in that Library
SOPHTLOGIC – COMMERCIAL IN CONFIDENCE
PAGE: 40
Five steps to check that the Query Library has worked
1.
Have a look of what Administration Units the user has got – (Two Faces Icon)
2.
Setup and/or assign the department to the User/Post – (Privilege Profile)
3.
Subscribe the Query Buster Library to the Departments – (Library)
4.
In Query Buster you should see the Libraries – (Query Buster)
If you have selected too many Libraries follow the instructions above but this time:
•
Click onto the De-Select button
SOPHTLOGIC – COMMERCIAL IN CONFIDENCE
PAGE: 41
List Publisher
List Publisher allows you to publish lists, select required columns and put them in certain Libraries
•
Click onto Query Manager
•
Click onto List Publisher
The List Publisher window will open
The List Publisher window you will see a list of folders.
These folders relate to accounts e.g. ‘Fire Safety’, ‘Personnel’ related views
would be held in the SOPHT_FP, or SOPHT_PERSONNEL’ folder.
Please note ‘Account Name’ in the ‘Accessible Content’ list will be preceded by the ‘FRS’ abbreviated
name e.g. ‘BEDS_’, ‘MSB_’ etc…
•
Click onto one of the Folders
•
Click onto the Open icon
A list of published (in blue) and un-published (in black) - pre setup queries will appear
•
Click onto a ‘Query’
•
Click onto the ‘Publish’ icon
SOPHTLOGIC – COMMERCIAL IN CONFIDENCE
PAGE: 42
The ‘Publish List’ window will appear
•
In ‘Publish this list as’ box enter a ‘Name’
of the query
•
In ‘Description of list’ box enter a brief
•
In the ‘Publication library’ box tick into the
‘Description’ of the query
checkbox of the ‘Libraries’ you want this
query to appear
•
In the ‘To be Published As’ column - Enter
the Field Name (brief translation of the
column name)
•
Tick into the Visible box of the fields you
want to be in the Query
If you do not tick the ‘Visible’ check box the fields will not
appear in the Query – as shown -
A ‘Processing’ dialog box will appear counting the fields selected then
it will disappear
If no text is entered into the description box you may get a dialog box appear
saying there is no description specified
•
Click onto the OK button
As you can see the query selected has changed from black text to blue
with the path name where the query has been published.
As you can see the ‘Query’ has been ‘Published’ into your ‘Library’
SOPHTLOGIC – COMMERCIAL IN CONFIDENCE
PAGE: 43
Query Heading to Long
If the heading; like in this case is to long
•
Go to ‘List Publisher’
•
Click onto the folder the query is in
•
Click onto the ‘Query’
•
Click onto the ‘Publish’ icon
In ‘Publish this list as’ box
•
Enter a shorter name
•
Click onto the ‘OK’ button
As you can see the name of the query is now shorter
By repeating the above, you can insert as many queries; that are relevant to the Library, as you like.
Withdrawal Published Query form Library
To remove the query from your library
•
Click onto the query
•
Click onto the ‘Withdrawal’ icon
A dialog box will appear asking you if you want to remove the query from
your library
Please note if any ‘Saved Queries’ have been associated to the list being ‘Withdrawn’ they will be
deleted.
•
Click onto the ‘Yes’ button
As you can see the ‘Libraries’ that the query was posted to has been removed
form the ‘List Publisher’ and from the ‘Query Buster Library’.
SOPHTLOGIC – COMMERCIAL IN CONFIDENCE
PAGE: 44
Query Busters
Running Queries
From the Global Navigator load the Query Manager menu.
•
Click onto Query Manager
•
Click onto Query Buster
All of the Libraries that the current User/Post is authorised to view will
appear in the left window.
Before we continue lets take a look at what all these icons on the right of the window do
To use the Queries, within the Libraries, that has been created.
To Publish a Query to a Library
The functionality is no longer appropriate
Folder Referencing
The functionality is no longer appropriate
Allows you to amend the Catalogue
Categories within the Catalogue
Allows you to Delete the Catalogue
There is a ‘Key’ box in the bottom right hand corner to let you know what the pictures next to
the Queries mean.
SOPHTLOGIC – COMMERCIAL IN CONFIDENCE
PAGE: 45
Query Window
•
Select a Library and the Queries will appear.
•
Select a Query from the list
•
Click on Queries button.
The Query for list Leaver will appear – as shown
The ‘Query for list’ contains 3 windows
Window 2
Window 1 – List of the available Fields within the Query.
Multiple values can be selected from this list.
Window 1
Window 2 – Where the selected fields will be displayed
Window 3
Window 3 - Is where you can define the search
By changing this dropdown, the status of the saved
query will not automatically be saved.
By default this will select the Value Of the Fields, but
there are other options: some examples to follow
Value Of
Displays all details – most commonly used
Total Number Of
Gives a count of the number of records
Sum Of
Must be used against a number field – i.e. Sum of Total Hours
Minimum Value Of
Minimum Value of a number
Maximum Value Of
Maximum Value of a number
Average Value Of
Must be used against a number field – i.e. gives you an average of hours worked
Addition Of
Must be used against a number field
Distinct Count Of
Count of the number of different values in selected field
When one of these functions is used, other than ‘Value Of’, then the rest of the ‘Value Of fields’ will be grouped together –
each combination of values will only appear once.
SOPHTLOGIC – COMMERCIAL IN CONFIDENCE
PAGE: 46
The Public and Private dropdown shows the current status of the open Query.
Private = only the user who created the Query will be able to see the Query
Public = anyone can access the Query
The buttons at the top of this window have the following functions:
Clears the existing Query and Report Criteria
Set up Saved Query as an Automatic Query
Opens a Saved Query
Prompts for revision on an existing set of Data
Saves the current Query (Shift + Click can be used to Save As – so as not to overwrite an open saved Query)
Enter a Reference Date Range
Multiple values can be selected from this list by dragging the mouse
across the fields or use the Ctrl key and click onto the selected fields.
•
Click to highlight multiple lines.
Once, at least one line has been selected from the above list.
•
Click onto the blue arrow button
As you can see the two fields I have highlighted have moved to the right and will be
returned in the column table. As shown (window two)
SOPHTLOGIC – COMMERCIAL IN CONFIDENCE
PAGE: 47
The buttons in this section do the following:
Move Up and Move Down – select a line from the included fields then use these buttons to change the
field order.
Remove Line
Amend Line
Clear List
Verifying a Query is Correctly Formed
First before you ‘Run the Query’ you can check to see if the Query is correctly formed
•
Click onto the Thumbs Up button.
If the query is correctly formed the following message will
appear:
If the query has errors an error message will appear.
Reasons That A Query May Not Run Correctly.
1.
Normally errors are caused when the where clause is not correctly formed – i.e. there are open brackets without
close brackets. Check that the where clause always reads:
expression
and/or
expression
and/or
expression
2.
Functions may have been set incorrectly. For example a sum can only be performed on a number field. If a user
tries to sum any field other than a number then it will cause an error.
3.
There are errors in the underlying query. [Save first if required] To test this, take out any fields that have been
selected and remove the where criteria. Then press the Thumbs Up button. If there is still an error then this
should be reported to SOPHTLOGIC.
SOPHTLOGIC – COMMERCIAL IN CONFIDENCE
PAGE: 48
If the query is correctly formed then press the ‘Run Query’ button to execute the query.
•
Click onto the Run Query button
The outcome of the Query will appear – as shown
Let’s take a look at the top of this window and what
the buttons etc do…
The buttons on this window do the following:
Close results window
Export to Excel. It is much better to use the export option from he brown clipboard to do this
Prints the results
Print labels from the results in the list
Can be used to specify a title for the report
Save results to database
Create html document (must save query first)
Open as html document (must save query first)
Print as html document (must save query first)
Export to .csv (comma separated values) text file
•
Select ‘Display Record Count’ to view the number of records returned.
This will show at the bottom of the window
•
Select the ‘Specify Report Title’ check box to be able to enter a name for the report.
SOPHTLOGIC – COMMERCIAL IN CONFIDENCE
PAGE: 49
This will be used when printing the report.
•
Click onto the Print icon
As you can see the where the Heading would go in the Report
To Define the Query Further…
The bottom half of this window allows for the results to be restricted.
The buttons in this section do the following:
Adds an ‘And’ clause into the search criteria
Adds an ‘Or’ clause into the search criteria
Adds brackets to the search criteria
Move Up and Move Down – select a line from the included fields then use these buttons to change the
field order
Increase and Decrease Indent
Remove Line
Amend Line
Clear List
The Query Columns drop down list will show all of the available fields.
The Query Functions dropdown gives the
following options to restrict data.
•
Choose a field to restrict the data
by.
SOPHTLOGIC – COMMERCIAL IN CONFIDENCE
PAGE: 50
As you can see I have chosen ‘Surname’ and ‘Begins With’
•
Click onto the blue arrow button
The ‘Specify Query Line’ window will appear:
The Query Column – ‘Surname’ – and ‘Query Function –
‘Equals To’ have already been entered.
To change either of these boxes
•
Click onto the Arrow and choose from the dropdown list
In the ‘Field Value’ box
•
Enter your Field Value
The Field Value is basically were you asking the system a question – I want to know all ‘Surnames’ ‘Begins With’ the letter
‘S’ or ‘Smith’
•
Click onto the OK button.
As you can see the ‘Surname Begins With ‘S’ has appeared in the Query window
First before you ‘Run the Query’ you can check to see if the
Query is correctly formed
•
Click onto the Thumbs Up button.
If the query is correctly formed the following message will appear:
•
Click onto the Run Query button
SOPHTLOGIC – COMMERCIAL IN CONFIDENCE
PAGE: 51
The Results for the Query will appear – as shown
Notice that the headings are the same to the last Query we did. The reason
for this is the query is still using the criteria that we selected from the fields
and moved them over to the results table.
Now let’s breakdown the Query further
As you can see I have chosen ‘Location’ and ‘Contains’
•
Click onto the blue arrow button
The Specify Query Line window will appear:
The Query Column – ‘Location Code’ – and ‘Query Function –
‘Contains’ have already been entered.
To change either of these boxes
•
Click onto the Arrow and choose from the dropdown list
In the ‘Field Value’ box
•
Enter your Field Value
The Field Value is basically were you asking the system a
question – I want to know all ‘Locations’ ‘Containing’ the
letter ‘N’
SOPHTLOGIC – COMMERCIAL IN CONFIDENCE
PAGE: 52
And / OR
Use the And / Or buttons to breakdown your Query
AND = Surnames beginning with the letter ‘S’ AND ‘Location’ containing the letter ‘N’
OR =
Surnames beginning with the letter ‘S’ ‘OR’ ‘Location’ containing the letter ‘N’
( ) = You would use the brackets if you are giving more than one option – For example
Year = 2007
(Year = 2007 AND Location = A)
OR
OR
(Type = A
•
AND
Location = B)
(X = Y AND A = B)
Click onto the ‘AND’ (&) icon
This has now been entered into the query
As you can see the ‘AND’ has appeared at the
bottom of the list, you need it to be in between
the two expressions. To do this
•
Click onto the Arrow icon
As you can see the ‘AND’ has moved up between
the expressions.
To make sure the query is set up correctly
•
Click onto the Thumbs up icon
•
Click onto the Run Query icon
As you can see the Query has been broken down
and 13 results – for all Surnames beginning with ‘S’
AND are in the Location containing ‘N’
Let’s take out the ‘AND’ and replace it with ‘OR’
SOPHTLOGIC – COMMERCIAL IN CONFIDENCE
PAGE: 53
To remove the ‘AND’
•
Click onto the ‘AND’ (highlighted)
•
Click onto the ‘Remove Line’ icon
The ‘AND’ should now be removed
•
Now Click onto the ‘OR’ icon
Use the arrows to put the ‘OR’ in between the expressions –
as shown
To make sure the Query is set up correctly
•
Click onto the Thumbs up icon
•
Click onto the Run Query icon
As you can see there are a lot more records within this query
As you can see the Query has been broken down and
393 results – for all Surnames beginning with ‘S’ OR the
Location containing ‘N’
Once you have created your Query and you want to Save it…
SOPHTLOGIC – COMMERCIAL IN CONFIDENCE
PAGE: 54
Saving and Opening a Saved Query
By Saving a Query, the Field information and search criteria will be saved, and can then be restored using Open.
Within the Queries window
•
Click onto the Save As icon
The Open and Save window are basically the same:
When saving…
•
Enter a meaningful Description for the Query.
The open dialog box will not allow the user to type in this field.
All existing Queries would be shown in the list, and by selecting
one, the Description would be populated with the name of the
selected Saved Query.
Queries can be saved as Public or Private.
•
Everybody with access to the current Library will have access to Public Queries.
•
If a Query is saved as Private, then only the current user can see this.
•
Click onto the arrow
•
Specify the status before saving the Query.
The Query will be saved within this window
To View this Query
•
Click onto the Library
•
Open the Query you had open earlier
•
Click onto the Queries icon
•
Click onto the Open icon
SOPHTLOGIC – COMMERCIAL IN CONFIDENCE
PAGE: 55
As you can see your Saved Query is within this window
To change the status of a Query at a later date,
•
Bring up the Open dialog,
Delete, Duplicate, Rename a Saved Query
•
Go to the Open or Save dialog
•
Highlight the Saved Query
•
Click onto the Delete button
•
Duplicate button will prompt for a name for the new Saved Query
•
Rename button allows a Saved Query to be renamed without the need to Open and Save As.
The Status button allows you to change the Query from Private to
Public.
•
Click onto the Yes button
You may get a dialog box up saying that you did not create the
Query so you can not change its Status
•
Click on to the OK button
SOPHTLOGIC – COMMERCIAL IN CONFIDENCE
PAGE: 56
Automatic Queries
Setting-Up Automatic Queries
Scheduling queries allows a user to set up queries to be run at regular intervals. When a person logs in to pharOS they
will be prompted with any outstanding ‘Automatic Queries’. Once an ‘Automatic Query’ has been run the results are then
stored in the database and can be compared to other results of the same query run previously.
In order to do this there must be a ‘Saved Query’.
•
Open the saved query to be added to the ‘Automatic
Queries’.
•
Click on the ‘Grid’ button
This will open the ‘Schedule for Automatic Query Applications’ window
•
Enter in a ‘Base Date’ i.e. date from which query
is to start from
•
Enter in desired ‘Time’ for the query to be run
e.g. 09:00
•
Enter in ‘Frequency’ of query whether it is in
days or months
•
Click ‘OK’ to ‘Save Automatic Scheduling of
Query’
For example: If you wish the query to run starting from the beginning of the year, with a frequency of every 8 days at
09.00, the ‘Base Date’ would be set at 08 12 2009, the frequency 8 with corresponding ‘Days’ radio button selected to
‘Days’ and time specified as 09.00
SOPHTLOGIC – COMMERCIAL IN CONFIDENCE
PAGE: 57
For the query to take affect
•
Log out
•
Login
•
Choose the ‘Office/Department’ the Query was saved under
The ‘Automatic Queries Scheduled for Today’ window will appear
As you can see the ‘Scheduled Query’ is in the reminder
window
Deferred
This option will Defer the Query to
a
different date
Cancelled
This option will Cancel the Query
Running
This option will Run the Query
To run the Query
•
Click onto the Next button
SOPHTLOGIC – COMMERCIAL IN CONFIDENCE
PAGE: 58
A dialog box will appear saying Executing Query
Very quickly the Query will flash onto the screen then disappear
To Retrieving Results of Automatic Queries go to page
If you don’t want the Query to Run
•
Click onto the ‘Abort’ button
The ‘Automatic Queries Scheduled for Today’ window will close
Notice the heading has changed on your saved (automatic) query from <untitled> to <automatic> This allows the user to
know if the query has been setup as a to be automatically run
SOPHTLOGIC – COMMERCIAL IN CONFIDENCE
PAGE: 59
Retrieving Automatic Queries
To check the Queries that was Automatically Scheduled for Today
•
Click onto ‘Query Manager’
•
Scroll down to ‘Automatic Queries’
•
Check ‘Today’s Schedule’
If no queries are due to be run for that day, no window will display.
If queries do exist:
As you can see the query we have just created is now in the
‘Scheduled for Today’ list
•
Click ‘Next’ to run any query listed
Other wise close this window and go to ‘Retrieving Results of Automatic Queries’
SOPHTLOGIC – COMMERCIAL IN CONFIDENCE
PAGE: 60
Retrieving Results of Automatic Queries
To see the results of the query that has just Ran
•
Click onto ‘Query Manager’
•
Scroll down to ‘Automatic Queries’
•
Click onto ‘Open Browser’
This window can also be accessed from within the published query
view by clicking on the Binoculars icon.
•
Select query by clicking on the ‘+’ and any results of query
run will be listed.
•
Select results to be printed to screen and click on the
floppy disk icon with a red arrow.
Results will now print to screen and can be printed to printer, saved
or exported to excel.
SOPHTLOGIC – COMMERCIAL IN CONFIDENCE
PAGE: 61
Reference Date Functionality
A number of queries use this functionality to allow a ‘Date Range’ to be entered – then only records between the set dates
will be returned.
Within the query window
•
Click onto the ‘1’ icon
The ‘Reference Date’ window will appear:
•
Enter the ‘Date Range’
Queries that use the ‘Reference Date’ functionality generally have some note of it in the name of the
Query > ie ‘Current Postings Ref Date’.
The ‘Reference Date’ is set on a per user basis and is stored in the central database – so it will be stored for a user
regardless of which machine they use to log in from.
SOPHTLOGIC – COMMERCIAL IN CONFIDENCE
PAGE: 62