1
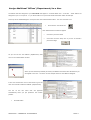
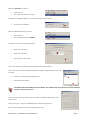
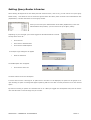
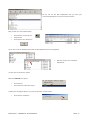
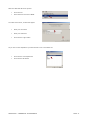
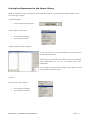
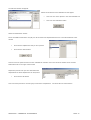
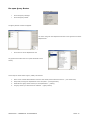
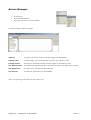
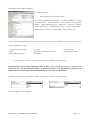
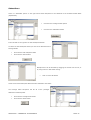
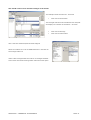
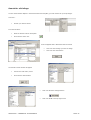
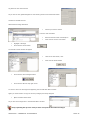
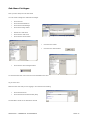
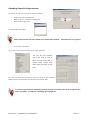
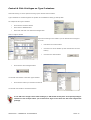
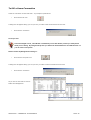
SOPHTLOGIC i
System Administration
Privileges
2010
User Manual
For more information:
E: [email protected]
T: 01473 255552
Table of Contents
Users Setup..............................................................................................................................................................................................3
Setting Up a New User Post Code......................................................................................................................................................3
User Administration Toolbar ........................................................................................................................................................4
New User.................................................................................................................................................................................................4
DBA - Database Administrator.....................................................................................................................................................5
Administrative Units.....................................................................................................................................................................5
New User Details ...............................................................................................................................................................................5
Assign Additional ‘Offices’ (Departments) to a User ........................................................................................................................6
Setting Query Buster Libraries ................................................................................................................................................................8
Administrative Units ..........................................................................................................................................................................9
Add a Department to a Location ...................................................................................................................................................9
Linking the Department to the Query Library..................................................................................................................................12
Re-open Query Buster.................................................................................................................................................................14
Privileges...............................................................................................................................................................................................15
User Administration - Privileges ......................................................................................................................................................15
Setting Up New User Privileges.......................................................................................................................................................15
Access Manager ....................................................................................................................................................................................16
Audit Log....................................................................................................................................................................................17
Privilege Profiles.........................................................................................................................................................................17
Subscribers..................................................................................................................................................................................20
Privilege Index .................................................................................................................................................................................22
Search for a Privilege..................................................................................................................................................................25
Sub-Menu Privileges ........................................................................................................................................................................27
Control & Click Privileges ...............................................................................................................................................................28
Checking Users Privilege Access................................................................................................................................................30
Control & Click Privileges on Personnel Record Card ...............................................................................................................31
Control & Click Privileges on Type 5 windows ..........................................................................................................................33
Remove a Privilege from a Post Code / User ...................................................................................................................................34
Privilege Report.....................................................................................................................................................................................35
For a User ...................................................................................................................................................................................35
For a Profile ................................................................................................................................................................................35
For a Privilege.............................................................................................................................................................................36
Reporting Problems..........................................................................................................................................................................37
To Kill a Users Connection ..............................................................................................................................................................38
SOPHTLOGIC – COMMERCIAL IN CONFIDENCE
PAGE: 2
Users Setup
This manual explains how to Efficiently Manage Access to the Sophtlogic pharOs system in order to maintain the
highest level of Data Integrity and conform to the Data Protection Act. Generally, Post Codes (recommended) are
used as the User Name for the system. This means that if a person moves into an existing Post the Privileges for
that Post will have already been set up and all that needs to be changed is the Passwords. You can have a person in a
certain post and give extra Privileges by using the ‘Users’ option instead of the ‘Profiles’ option, otherwise, you would
have to set up all the Privileges to each individual User each time someone Joins and Leaves the Post – very time
consuming; especially if you have a high turn over, and it is very easy to mistakenly give the wrong Privileges to a
User. By setting up the Privileges to the Post Code; as this only has to be done once, and move the person in and
out of the Post, fewer mistakes will occur.
Setting Up a New User Post Code
As a Database Administrator (DBA) you will be able to set up a New User/Post Codes, Allocate / Change
Offices/Departments and set up the Privileges to the Users Post Code.
At the top of the Global Navigator menu press the User Administration button - this
is a ‘two faces’ icon
•
Click onto the Two faced icon
The User Administration window will open
I will explain what each icon does within the toolbar
as we go along…. page 5
•
•
You can click onto the colunm heading to order the list
−
If there is more than one person in a Post then the Account may appear more than once
−
Account Name is the Oracle Account name that is assigned to a User (Post Name)
On the left-hand side, pictures will be shown to indicate who is logged in at the moment:
means that the user has one session open
means that the user has more than one session open
SOPHTLOGIC – COMMERCIAL IN CONFIDENCE
PAGE: 3
Heading
Description
Account name
User name (Post Code)
IP address
IP Address of local machine where this account last connected
Local user
If this account is for an occupied post then this will show the name of the person currently in this
post
Location
Location of person
As at
Date this person started their current post
C
Connect – allows the user to have access to the database. Should always be set to Yes
R
Resource – allows the user to use database resources. Should always be set to Yes
D
DBA – explained below
Created
Date account created
Verified as at
Date password last changed
Default
Should always be set to USER_DATA – if not then you may experience errors when creating the
tablespace
account
Temp tablespace
In previous versions of Oracle it was possible to specify the temp tablespace, but it now must be
set to TEMPORARY_DATA
User Administration Toolbar
Displays the
New User
Window
This Prints an
Overview of the User
with the Administrative
Units and Privileges
they have
Show the
details of the
selected
This is must be set
for a User to use
WAND. It Links the
user to their Oracle
account
Prints the Users
as they appear
on the screen
(Privileged)
Deletes the User and
all records about the
User such as any Audit
Logs
Kills the
Users
current
New User
When you setup a New User, it is recommended to set up the Persons User name as a Post code, this will pick up the
person that is assigned to that Post; if there is a person in that post… The reason for this is to make life easier. If you
set up by individual name you will have to set up that persons Privileges every time someone joins the Brigade. By
doing it by Post code, the Privileges are already set up. You can add additional Privliges by using the Persons name… I
will go into more detail.
SOPHTLOGIC – COMMERCIAL IN CONFIDENCE
PAGE: 4
DBA - Database Administrator
DBA stands for Database Administrator.
Users that are flagged as DBAs have access to every part of the system,
effectively bypassing the privilege system. Only DBAs can perform the functions within this document.
As DBAs have access to all parts of the system, only a very limited number of users should be given this level. Only
those people that need to perform the functions within this document should be DBAs, it is possible to allocate
privileges to all other users to allow them restricted access to the relevant modules and functionality.
Administrative Units
This specifies the Query Busters and User Defined Queries a user has access to.
The Administrative units should be reflective of the physical units/departments
within the brigade.
It is possible to have more than one unit for each
department – for example you may have a Personnel System Owner unit and a
Personnel User unit. Administrative Units are allocated to users via the User
Administration window.
New User Details
Generally, ‘Post Codes’ are used as the ‘User Names’ for the system. This means that if a person moves into an
existing Post then the Privileges will have already been setup.
•
Click onto New User icon if you are setting up a new personnel
•
Enter the Post Code as the User Name
•
Hit the tab key on your keyboard
The system will pick up the person that is in that post and
put them in the Local User box.
•
Enter a Password
•
Enter a Verification of the Password
•
Click into the Connect box
This allows the user to have access to the Database. Should always be set to Yes
•
Click into the Resource
This allows the user to use Database Resources. Should always be set to Yes
Only click into the ‘DBA’ box if the User have access to every part of the system
SOPHTLOGIC – COMMERCIAL IN CONFIDENCE
PAGE: 5
Assign Additional ‘Offices’ (Departments) to a User
The Offices that are assigned to your Post Code will appear in a ‘Select Office’ box – as shown – these offices are
assigned to you to run queries. i.e. you will be able to run queries and find information within FP and Ops.
At the top of the Global Navigator menu press the User Administration button - this is a ‘two faces’ icon
•
Click onto the Two faced icon
User Administrator window will appear
•
Click onto your User Name
•
Click onto the User Setup icon if you are to amend a
personnel usage
As you can see the two ‘Offices’ (departments) that
were on the ‘Select Office’ window
When you first started up PharOs (as shown) the Officers that have been allocated to you
will appear in the box – as shown. In this example there are two Officers assigned.
I have now clicked into more of the boxes to give the
User more access to different ‘Offices’ (departments).
The
list
on
the
left
hand
side
will
populate
automatically when you put personnel into certain
profiles.
•
Click OK button
SOPHTLOGIC – COMMERCIAL IN CONFIDENCE
PAGE: 6
Now let’s LOG OUT the system
•
Click onto File
•
Scroll down and Click onto Logout
A dialog box will appear asking if you want to close the current session
•
Click onto the Yes Button
Now let’s LOG back ON to the system.
•
Click onto File
•
Scroll down and click onto LOGIN
The ‘New Connections’, window will appear
•
Enter your Username
•
Enter your Password
•
Click onto the Login button
Let’s see if Personnel, Sickness have been added to the Office window.
As you can see, you have successfully added more ‘Offices’ (departments) for the user
to access.
•
Choose one of the ‘Offices’ (departments)
•
Click onto the OK button
The Offices allocated within the ‘Select Office’ box specifies the Query Busters and User Defined
Queries a User has access to.
So far all we have done is link the user to a location and assign departments to the
User account.
When you log out > login the ‘Global Navigator’ will still be greyed out
Now we need to assign the queries / privileges to the user
SOPHTLOGIC – COMMERCIAL IN CONFIDENCE
PAGE: 7
Setting Query Buster Libraries
When allowing what Queries the Fire Safety Services wants the Post / User to see, you will need to set up the Query
Buster Library. This allows the user to access the Queries within the Library which is linked to the Administration Unit
(departments). This also links them to receive group emails.
When you have set up the Administration Units desks (departments) in the User
Administration setup window, you now need to set up the Query Library.
Depending on your Privileges you must be logged into the Administration to access
the drop down menu list…
•
Click onto File
•
Scroll down to Administration
•
Click onto the Enable Options
A Developer Login dialog box will appear
•
Enter the Password
The Enable Option box will appear
•
Click onto the Close icon
The other buttons are for the Developers
If a User does not have a Privilege for an option then it will either not be displayed, the option will be greyed out or
upon selecting an option a message will appear explaining that the user does not have permission to use the relevant
option.
By Control & Clicking on options as a standard user or as a DBA (not logged into development tools) this will tell the
user what the Code is of the Privilege they do not have.
SOPHTLOGIC – COMMERCIAL IN CONFIDENCE
PAGE: 8
Administrative Units
As mentioned previously, Administrative Units determine which Queries and Reports can be viewed by a User. These
are generally setup for each Department within the Organisation.
Once you have accessed the drop down menu
•
Click onto File
•
Select Administration
•
Click onto Administration Units
Administration Units window will appear
Within this window are the Locations
As you can see some of the folders have + on them. This is to
let you know that some of the Location Folders have more than
one Administration Units desks (departments) linked to it.
•
Double Click on one of the Folders with the + on it
The list of Administration Units Desks (departments) for that
Location will appear.
Add a Department to a Location
To add a Department to a Location
•
Click onto the New Unit icon
•
Enter the name of the new Department Name
If you want the user to receive the group email
•
Put a tick in the Has Access to Mail box
•
Click onto the OK button
SOPHTLOGIC – COMMERCIAL IN CONFIDENCE
PAGE: 9
As you can see the New Department that you have just
entered has appeared in the list under that Location
Now go back into User Administration
•
Click onto the Two Faces icon
•
Find the User
•
Click onto the User Setup icon
As you can see in the Administrative Units the New Department has now appeared
•
Now tick into the box of the New
Department
You will need to refresh the system
Now let’s LOG OUT the system
•
Click onto File
•
Scroll down and Click onto Logout
A dialog box will appear asking if you want to close the current session
•
Click onto the Yes Button
SOPHTLOGIC – COMMERCIAL IN CONFIDENCE
PAGE: 10
Now let’s LOG back ON to the system.
•
Click onto File
•
Scroll down and click onto LOGIN
The ‘New Connections’, window will appear
•
Enter your Username
•
Enter your Password
•
Click onto the Login button
As you can see the department you had entered is now in the Office List
•
Click onto the new Department
•
Click onto the OK button
SOPHTLOGIC – COMMERCIAL IN CONFIDENCE
PAGE: 11
Linking the Department to the Query Library
Based on what Queries the Fire and Rescue Service wants their staff to see, the Administrator/DBA need to link the
user to the ‘Query Library’.
On Global Navigator
•
Click onto Query Manager button
This will appear in the toolbar
•
Click onto Query Manager
•
Click onto Query Buster
The Query Buster window will appear
As you can see there is no User Definable List of Libraries within
the Query Buster Libraries
This means the User Definable List of Libraries which are created to
reflect
Departments
can
not
see
any
Queries
from
other
Departments
You will need to set up the User Definable List of Libraries so that
the User/Post is allowed to access
To do this
Close the Query Buster window
•
Click onto Query Manager
•
Click onto Query Libraries
SOPHTLOGIC – COMMERCIAL IN CONFIDENCE
PAGE: 12
The Libraries window will appear
Within the window the User Definable List will appear
•
Click onto one of the options in the User Definable List
•
Click onto the Subscribes button
Within the Subscribers window
On the ‘Available for Selection’ list (left) are all the Admin Unit Departments that are in the Administrative Users
window
•
Click onto the Department that you set up earlier
•
Click onto the Select button
This will move the option chosen from the ‘Available for Selection’ list on the left of the window to the ‘Chosen
Subscribers’ list ion the right of the window
Repeat this process until you have selected all the
departments the ‘New’ Department can see/access
•
Click onto the OK button
This is the same process to remove Query Access from a Department. Just select the ‘De-Select’ button
SOPHTLOGIC – COMMERCIAL IN CONFIDENCE
PAGE: 13
Re-open Query Buster
•
Click onto Query Manager
•
Click onto Query Buster
The Query Buster window will appear
You have now given the Department access to see Queries from other
Departments.
•
Click onto one of the Department icon
Any Queries that have been set up will associate to that
Library
Three steps to check that the Query Library has worked
1.
Have a look of what Administration Units the User Name/ Post Code has access to – (Two Faces Icon)
2.
Setup and/or assign the Department to the User/Post – (Privilege Profile)
3.
Subscribe the Query Buster Library to the Departments – (Library)
4.
In Query Buster you should see the Libraries – (Query Buster)
SOPHTLOGIC – COMMERCIAL IN CONFIDENCE
PAGE: 14
Privileges
A privilege allows a User or Group of Users access sections of the system.
Privileges are broken down into the
following groups:
•
Modules
•
Menu options
•
Buttons
•
Functionality
User Administration - Privileges
The User Administration window shows a list of all the Privileges within the system. Although this can be used to View
and Amend a person’s Privileges, this is NOT the most efficient way to do so, as many mistakes can occur.
Setting Up New User Privileges
You have now set up the Post Codes and the User has been assigned to that Post.
If you log on with the User Name/Post Code and Password for that User.
The Global Navigator window will appear.
As you can see everything is greyed out.
This is because you have No Privileges set up under your User Name/ Post
Code.
Now you need to set up the Privileges to the User Name/ Post Code.
To Set Up the Privileges you now need to go back into Administrator and go to Access Manager…
Remember - In order to allocate Privileges, you must be logged into the Administrative Tools: pg
SOPHTLOGIC – COMMERCIAL IN CONFIDENCE
PAGE: 15
Access Manager
•
Click onto File
•
Click onto Administration
•
Scroll over and Click onto Access Manager
The Access Manager window will appear
Audit Log
This gives a full history of when users have Logged into the Database.
Privilege Index
All the Privileges within the system that can be set up to a Profile or User
Privilege Profiles
Privileges are associated to Profiles and then Profiles are associated to Users
User Administration
This functionality replicates that of the previously mentioned User Administration window.
User Registration
This shows every User/Post and their Password.
User Sessions
This shows all open Sessions on the Database.
Firstly, let’s go through each folder and see what they do…
SOPHTLOGIC – COMMERCIAL IN CONFIDENCE
PAGE: 16
Audit Log
This gives a full history of when users have logged into the
database.
To access the list
•
Click onto the Audit Log folder
•
Click onto the Green Tick
Privilege Profiles
The most efficient way to manage Privileges is by creating Privilege Profiles.
This is a grouping mechanism –
Privileges are associated to Profiles and then Profiles are associated to Post Codes/User Names.
‘Profiles’
generally relate to physical Offices (departments) within the Organisation i.e. Training, Personnel, Fire Safety, Fleet,
ICT etc…. A Office (department) may require a number of Privilege Profiles.
There may be an Administrator Profile that can setup all of the Static/Lookup data and a Standard User.
As you can see a list of Privilege Profiles has appeared
To Add, Amend or View another Privilege Profile
•
Click onto the Add or Amend button
SOPHTLOGIC – COMMERCIAL IN CONFIDENCE
PAGE: 17
The Privilege Profile window will appear
In the Description box
•
Enter the Name for the Privilege Profile
This could be Retained Watch Officers – FS District Managers – Control
Room Supervisor – Station Managers – Watch Officers – FS Inspecting
Officers - Fleet Management Group – Whole Time - Personnel – Sickness
Report Administration - Operational IPDS Users – Central Crewing Office Training Staff - ICT Dept - Occ Health Staff – Accounts Staff – etc…
The Personnel Data Restrictions determines which fields this User will be able to amend on the Personnel Record Card.
These are Mandatory columns
Personnel Sequence Number
Surname
Service Number
Initials
Upper Case Convention of Surname
Support Service Code
Scale - Mileage Category
Pin Number
•
To enable anymore columns – a check box you must be selected by ticking the boxes.
The Information Control Section determines what records a user in this profile can see – this forms the
basis of the who can See what Functionality. By default this will be set to Organisation so that the user
will be able to see Personnel and Fire Safety Premises across the whole Organisation.
The options are Organisation, Command, Location, Duty System, Rota, Post, Duty System Type.
.
On the next page are a few examples
SOPHTLOGIC – COMMERCIAL IN CONFIDENCE
PAGE: 18
Below are some examples of what Post Codes / Users will lint to which Team Scope in Privileges Profile.
Personnel:
Organisation
Fire Safety Premises:
Organisation
ICT Dept Staff / Equal Opps / Account Staff / Water Staff / Line
Manager / Retained Watch Officers / Divisional Managers /
Control Room Staff / Training Staff / Fleet Management Group /
Central Crewing Office / Occ Health Staff / Personnel / CHR
Transaction Team / Support Service Staff / Control Room
Supervisor / Principal Officers Group / Principal Off / Admin
Supp / Planning, Performance & Policy / Health & Safety / Fleet Workshop / Fleet Administration…
Personnel:
Location
Fire Safety Premises:
Organisation
FS District Managers / Inspection Officers / Station Managers /
Watch Officers / Administration Team / Admin Support /
Personnel:
Post
Fire Safety Premises:
Location
Non-Uniform IPDS Users
Personnel:
Command
Fire Safety Premises:
Organisation
Supervisory Officer’s
Personnel:
Duty System
Fire Safety Premises:
Organisation
FS View Only User’s
SOPHTLOGIC – COMMERCIAL IN CONFIDENCE
PAGE: 19
Subscribers
There is a Subscriber option on the right which allows Post/Users to be attached to the Selected Profile Office
(Department).
•
Click onto the Privilege Profile options
•
Click onto the Subscribers button
In the window on the right are the Post Codes/User Names
To select the Post Code/User Name you want to be allocated to this
Privilege Profile
•
Click onto the Post Code/User Name
•
Click onto the Select button
Multiple Users can be selected by dragging the mouse over the list, or
by using control or shift while clicking.
•
Click on to the OK button
These are the Post Codes/User Names that are allocated to the Profile
The Privilege Index sub-option will list all of the privileges
attached to selected profile.
•
Click onto the Privilege Index folder
•
Click onto the Show button
SOPHTLOGIC – COMMERCIAL IN CONFIDENCE
PAGE: 20
This should not be used to allocate Privileges to the Profile.
This example shows the Profile for - Personnel
•
Click onto the show button
The Privileges that have been allocated to this User/Post
will display in the window at the bottom – as shown
•
Click onto the Privilege
•
Click onto the Users button
Here it will show what User/Post has been assigned
Notice the ‘Profiles’ List in the ‘Available Selection’ is the same as
the Privilege Profile List
Under a New Privilege Profile there will be no Privileges allocated –
This must be done within Privilege Index and Control Click option.
SOPHTLOGIC – COMMERCIAL IN CONFIDENCE
PAGE: 21
Privilege Index
The Index Privileges are the Coding you need to set up to access the Privileges for all Sections, Buttons, Sub Menu etc
within the system.
•
Click onto File
•
Scroll down to Administration
•
Click onto Access Manager
Access Manager Window will appear
•
Click onto Privilege Index folder
•
Click onto the Green Tick icon
A list of all privileges functionality, which were previously set
up, will appear – as shown •
Click onto one of the Privileges
•
Click onto the Amend button
You will notice that the control & click privileges appear in this list.
If the sub-Menu option is not in the list then you need to set up the
coding –
•
Click onto the Add button
Please Call Sophtlogic before attempting to do this…It wouldn’t be usual for Fire & Rescue Services to
setup or amend their own Privileges – it is usual for Sophtlogic Support to set them up and for the FRS
just to allocate them.
SOPHTLOGIC – COMMERCIAL IN CONFIDENCE
PAGE: 22
Each Privilege will have its own coding – as shown in the tables below
What each column means
Field
Description
Privilege Code
This is the code that is used to identify the privilege. For existing control & click privileges, this should not
be changed. For manual privileges this must be entered exactly
Description
Free text description
Section
pharOS is broken down into modules. Each module has it’s own Section code. See below
Enabled
This must always be selected for current privileges. Old privileged can be turned off or archived
Procedure Command
If this privilege was created via the control & click method, this will show the line of code which created
the privilege. This is for debugging purposes and should not be manually changed
Linked to Duty System
Old functionality
Each Module has a ‘Section Code’
Section Code
S001
S002
S003
S004
S005
S006
S010
S011
S012
S034
S035
Module
Personnel
Training
Water
Support Services
Finance
Fire Safety
Rotas and Availability
Operational MIS
Mobilisation Interface
Fleet
Fire Reporting
In the table on the right there is a list of the
Section Codes.
As you can see the Section Codes are used in the Privilege Code
column.
Each ‘Section Code’ starts off with an S then a number.
There are some privileges which need to be allocated manually.
Sometimes these allow access to groups of
functionality, rather than having to allocate lots of individual privileges.
Other manual privileges might include
personal preferences on how the system operates the ability to over-ride system validation etc.
These codes are the Sub- Menu option codes. You must use code S000.0000 to view the Sub-Menu in the Personnel
Record Card and Fire Safety –Premises Record Card
This relates to all main Privilege Profiles for example: Training S000.0001 – Fleet Manager S034.0001 –Station
User S010.0002 – Finance S005.0001 - Fire Prevention S006.0001 – Query Library S042.0001 – Stores
S004.0002 – Support Services S004.0001 – Water Supplies S003.0001 – Strategy S079.0001 - Fleet Contractor
S034.1001 –
Others will have – Availability rota.manage – Operational MIS ops.mis – Fire Reports fire.reports – Incident
Command inc.comm – Equipment Manager equip.manage - Exchequer exch.access – Communications
Administrator communications.administrator – Your Own Menu your.own.menu
SOPHTLOGIC – COMMERCIAL IN CONFIDENCE
PAGE: 23
The
Main
Privilege
Profile
Headings
(above),
in
the
Procedure
Command,
all
end
…$window.wNavigator.wNavigator/302
The Coding below is for Premises Record Card.
Privilege Code
Description
S000.0000
S001.0002
S001.0004
S001.1001
S001.1002
S001.1003
S001.1005
S001.1006
S001.1007
S001.1008
S001.1009
S001.1010
S001.1011
S001.1012
S001.1013
S001.1014
S001.1015
S001.1016
S001.0017
S001.1018
S001.1019
S001.1020
S001.1021
S001.1031
S001.1041
S001.1042
S002.1001
Personnel.employment.conditions
Personnel.scale.issue
Personnel.pay.ref
Personnel.competence
Personnel.payroll.history
Personnel.tui.accounts
Personnel.sickness.monitoring
Personnel.religious.belief
Personnel.documents.images
If user does not have this then Personnel Record Card will be read-only
Update Personnel
Delete Personnel Record Cards
Personal Details
Service History
Posting Amendments
Next of Kin
Employer details
Mileage Claims
Sickness, Sickness Interviews, Absence
Accidents
Qualifications
Awards and Commendations
Probations
Display Ethnic Origin on PRC
Dependants
Contact Details
User Defined Events
Search Personnel Record Cards
Salary History
Sickness Interviews
Absence
Retained Pay Lite
Skill Profile
Medical Calendar and Medical Referrals
Medical Records
Training records (Section code S002)
Employment Conditions
Scales of Issues
Pay Reference
Role Based Competency
Payroll History
TUI Accounts
Sickness Monitoring
Religious Beliefs
Documents and Images
SOPHTLOGIC – COMMERCIAL IN CONFIDENCE
PAGE: 24
in
Search for a Privilege
To enter the Sub-Menu Option in the Premises Record Card (PRC) you first need to set up the privileges.
To do this…
•
Choose your search criteria
From the list above
•
Enter the Section code or description
•
Click onto the Green Tick
A list will appear that is associated with the search
•
Click onto the Privilege you want to assign
•
Click onto the Users button
The Access Control window will appear
•
Look for the Post Code / Users
•
Click onto the Select button
SOPHTLOGIC – COMMERCIAL IN CONFIDENCE
•
Click onto the Save Changes button
•
Click onto the X in the top right corner
PAGE: 25
Log back into the Users account
As you can see the ‘global Navigator is now showing access to the Personnel button
Go back to the DBA account
Add another Privilege Sub-Menu
•
Choose your search criteria
From the code list above
•
Highlight a Privilege
•
Click onto the Users button
•
Enter the Section Code or Description
•
Click onto the ‘Green Tick’ button
•
Look for the Post Code / User
•
Click onto the Select button
The Access Control window will appear
•
Click onto the Save Changes button
•
Click onto the X in the top right corner
To check to see if the Privileges are appearing into the PRC Sub-Menu window
Again you would need to re-login to see the privileges previously assigned
•
Open Premises Record Card
As you see the Privileges are in the PRC Sub-Menu window
Keep repeating this process until you have set up all the Sub-Menu Privileges
SOPHTLOGIC – COMMERCIAL IN CONFIDENCE
PAGE: 26
Sub-Menu Privileges
Once you have setup the new Post Code
You now need to assign the Sub-Menu Privileges
•
Click onto File
•
Click onto Administration
•
Click onto Access Manager
•
Click onto Privilege Index
•
Search for a Sub-Menu
•
Click onto the Sub-menu
•
Click onto the Users button
•
•
Click onto the Profile
•
Click onto the Select button
Click onto the Save Changes button
To check that the Sub- menu has now come available to the User
Log in as the User
Make sure the User that you are logging in as is linked to the Posting
•
Click onto Personnel
•
Click onto Personnel Record Card (PRC)
The Sub-Menu will be in the Sub-Menu window
SOPHTLOGIC – COMMERCIAL IN CONFIDENCE
PAGE: 27
Control & Click Privileges
Most menu options and buttons within the system are Control & Click Privileged.
From the Global Navigator
•
Hold down the Control button on the keyboard
•
Click onto the module you want to allocate.
In my example, I clicked onto the Personnel Button – this will enable the Personnel
Module Option. Most menu options will have privileges of their own e.g. ‘Personnel
Configuration’, Postings Diary etc…
You can define the access by Ctrl Click on the individual topics within Personnel
A dialog box will appear
•
Click onto the Yes button.
If the privilege does not exist then the user will be prompted:
Upon selecting Yes the following window will appear.
This is the standard Privilege Allocation window:
This window allows the allocation of individual Users and Profiles.
Multiple lines can be selected by dragging the mouse across records, or
by using control or shift while clicking.
In the right hand side window is a list of all the Privilege Profiles
•
•
Find the Privilege Profile that you set up
•
Click onto your Privilege Profile
Click onto the Select button
This will move the Privilege Profile from the list in the right side window
to the list in the left side window.
•
Click onto the ‘Save Changes’ button
SOPHTLOGIC – COMMERCIAL IN CONFIDENCE
PAGE: 28
You MUST click the Save Changes button before closing this window.
•
Click onto the X to close the window
It is advised that wherever possible profiles are used rather
than allocating privileges to users.
As you can see you can also allocate the privilege to individual Users. But
this is not recommended…
As you can see in access Manager - Privileges Profile folder
-
Privileges Index window – the Personnel Privilege has been
added to the Post Code / User
All the people who were allocated to the Privilege Profile
you set up will now be able to access the Personnel Module
SOPHTLOGIC – COMMERCIAL IN CONFIDENCE
PAGE: 29
Checking Users Privilege Access
To check if the User has access to the Personnel Module
•
Double click onto the Pharos icon
•
Enter the Users - Username and Password
•
Click onto the Login button
The Select Office will appear
Notice Personnel has now been added to the Select Office window – remember this is for Queries
•
Click onto the OK button
As you can see the Personnel button is no longer greyed out
You can see the sections
but if you click on any of
them you will not be able to
access
them
unless
they
have been Privileges to the
User
Let’s say you don’t want the User to have full access to the Personnel
Module and only have access to the Premises Record Card (PRC)
To have full access all the individual personnel privileges would have had to be assigned to the
user or profile. To remove a Privilege go to page 48
SOPHTLOGIC – COMMERCIAL IN CONFIDENCE
PAGE: 30
Control & Click Privileges on Personnel Record Card
In Global Navigator
•
Click onto Personnel button
The Personnel will appear in the toolbar
•
Ctrl Click onto the Personnel Record Card
A dialog box will appear
•
Click onto the Yes button.
The access control window will appear
•
Click onto Save Changes button
•
Click onto the X to close the window
•
Select the Post Code / User
•
Click onto the Select button
You will need to repeat the process by clicking onto each button, section etc to give the User the
privileges within the system.
SOPHTLOGIC – COMMERCIAL IN CONFIDENCE
PAGE: 31
All of the buttons circled are privileged. For each sub-option, each sub-option button has a separate privilege.
All privileges, regardless of how they are allocated, are stored in
the same place with a code and description. These can be viewed
via:
Once you have set up the privileges to the Post Code / User, you will need to set up the sub-menu options with in
Privilege Index
To set up the Sub-Menu options within PRC
SOPHTLOGIC – COMMERCIAL IN CONFIDENCE
PAGE: 32
Control & Click Privileges on Type 5 windows
Control & Clicking on menu options will bring up this Access Control window.
Type 5 windows are used throughout the system as a standard for setting up lookup data.
An example of this type of window:
•
Click onto the Personnel button
•
Scroll down to Establishment
•
Scroll over and Click onto Personnel Configuration
This is a Type 5 window
By Control Clicking on the buttons you can activate this Privilege to
the User
•
Hold down the control button
•
Click onto one of the buttons (I have clicked onto the View
button)
•
•
Click onto the Select button
Click onto the Save Changes button
You should now be back in the Main Type5 window
•
Click onto the button you Control & Clicked on
You should now be able to access that button
A non DBA can’t assign Control Click Privileges, a DBA would already have all required privileges.
Therefore in the example above you would need to logon as the User who has been assigned the
privilege.
SOPHTLOGIC – COMMERCIAL IN CONFIDENCE
PAGE: 33
Remove a Privilege from a Post Code / User
Within Access Manager
•
Click onto Privilege Profiles folder
•
Select the Post Code / User
•
Click onto Posting Index Folder
•
Click onto the Privilege
Do not Click onto the Remove button, but if you do
A dialog box will pop up
Warning you not to use this button to remove privileges and to
use the Users button
•
Click onto the NO button
•
Click onto the Users button
The access control window will appear
In the Left hand side window
•
•
Click onto the Post Code / User
Click onto the in
•
Click onto De-Select button
•
Click onto the Save Changes button
the top right hand corner to close the window
SOPHTLOGIC – COMMERCIAL IN CONFIDENCE
PAGE: 34
Privilege Report
The Privilege Report is a good functionality to check who’s in what Post and who has what Privileges
•
Click onto File
•
Scroll down to My System
•
Click onto Privilege Report
This report can display the following:
For a User
By default all Profiles are displayed to locate a User select the
Users button
This will show all the Profile and Privileges associated to the
selected User
Button
Will Show
Ind privs
Privileges that have been allocated directly to the selected user
Profiles
The profiles that the selected user is part of
All
All of the privileges that this user had, both individually allocated and allocated to the profiles which
this person is in
For a Profile
Selecting the ‘Profiles’ button displays a list of all Privilege Profile
setup in the system
This will show the all Users are Privileges associated to the
selected Profile
Button
Will Show
Users
Users that are part of the selected profile
Privs
Privileges associated to the selected profile
All
Both of the above
SOPHTLOGIC – COMMERCIAL IN CONFIDENCE
PAGE: 35
For a Privilege
Selecting the ‘Privileges’ button displays a list of all privilege
setup in the system.
This will show the all Users and Profiles associated to they
selected Privileges
Button
Will Show
Users
Users that have the selected privilege
Profiles
Profiles that have the selected privilege
All
Both of the above
SOPHTLOGIC – COMMERCIAL IN CONFIDENCE
PAGE: 36
Reporting Problems
There are 3 main types of problem that users are likely to experience:
Data is not being returned as expected –eg reports missing off some records
Error messages – eg Server object cannot be found
Software bugs – a series of events causes the system to not perform as expected
The procedure when a problem is found should be as follows:
•
Make a note of the exact record that caused the problem – for a problem with a person make a note the
•
Note the location of the window or report where the problem occurred
•
Try to go back into the record and see if the problem can be recreated
service number and surname – ideally a screenshot can be taken (Print Screen and then paste into e-mail)
If it is a problem with data not being returned as expected
•
Check to make sure the setup related to that record has been done correctly
•
Specify whether the problem found is preventing the user from working
•
Report the problem
It is up to the IT department to specify how they want support issues to be handled. There are various options:
•
All correspondence to go directly from the user to SOPHTLOGIC
•
All correspondence to go directly from the user to SOPHTLOGIC, but IT are CC’d
•
Users send problem to IT who log the problem and then send to SOPHTLOGIC, then SOPHTLOGIC can go
directly to the user for more information if necessary
•
All correspondence goes through IT
Options 2 and 3 seem to work best.
When SOPHTLOGIC receive a problem, an LSN (Log Serial Number) will be created and sent back.
This is the
SOPHTLOGIC reference for the issue and should be quoted when enquiring about any outstanding issues.
The problem will may be rectified in one of the following ways:
•
User error – a member of the SOPHTLOGIC team will contact the user and inform them of why the problem
occurred and, if necessary, will either correct the data or inform the user of how to do this
•
Data problem – SOPHTLOGIC will rectify the data that is incorrect and investigate what has caused the
problem
•
Error messages – it may be necessary for SOPHTLOGIC to align the database (see alignment section)
•
Software bug – depending on urgency
•
If urgent – the test system will be patched and the user will be asked to test the problem there.
If the
problem is rectified then it will be copied out to the relevant users if not urgent – the problem will be rectified
in the next release of the software.
SOPHTLOGIC – COMMERCIAL IN CONFIDENCE
PAGE: 37
To Kill a Users Connection
To Kill the connection for the Post Code - my example is postcode Z1
•
Click onto the Kill icon
A dialog box will appear asking you are you sure you want to Kill all Connections for the User
•
Click onto the Yes button
To Drop a User
This is Privileged access, I would NOT recommend you use this button, unless you really know
what you are doing. By using the Drop User you will loose all information to do with the User. If
you do want to ‘Drop User’
Please contact Sophtlogic before doing so.
•
Click onto the Drop User icon
A dialog box will appear asking you are you sure you want to kill all connections for the User
•
Click onto the Yes button
As you can see the Post Z1 and Joe
Public have disappeared
SOPHTLOGIC – COMMERCIAL IN CONFIDENCE
PAGE: 38
The privileges are
Privilege Code
Section
Description
can.drop.users
S001
Show the Drop User button
can.exclude.non.dba
S001
Show the Exclude non DBA’s from logon check box
can.enable.application.security
S001
Show the Application security enabled check box
Application Security Enabled
If selected the privilege system is turned off. Every user then has access to everything, effectively becoming DBAs.
This should never get used and SOPHTLOGIC would recommend that nobody be given this privilege.
Exclude non DBA’s from logon
This option restricts access to the system to DBAs only. This should be set before an update or new release is to be
rolled out.
SOPHTLOGIC – COMMERCIAL IN CONFIDENCE
PAGE: 39