1
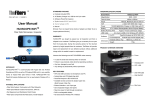
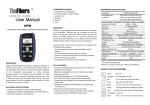
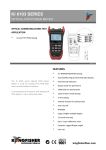
TheFibers
STANDARD PACKAGE
C R E AT I V E F I B E R S
HARDWARE SPECIFICATIONS
a. Power Meter (included Battery)
Parameter
b. AC Power Adaptor / Battery Charger
PON Wavelength
3λPON
ONU: 1310nm/Upstream
OLT: 1490nm/1550nm/Downstream
c. Leather Pouch
User Manual
3λPON
d. Necklace
Measurement Range
WARRANTY
3λPONTM you bought is passed our all inspection and then is
shipped to the customers. TheFibers give you a warranty for one
year from the buying date. During the warranty period, the returned
product by freight prepaid from the customer, TheFibers will provide
repair and replacement for any defective product without additional
charge which is needed to repair or replacement.
INTRODUCE
1310+/-50nm (1260~1360nm)
1490+/-10nm (1480~1500nm)
1550+/-10nm (1540~1560nm)
f. Case
TM
3-Lambda PON Power Meter
Spectral Passband
e. Manual
-50dBm ~ 10dBm
Accuracy
+/-0.5dB @-20dBm
Resolution
0.01dB
Unit
dBm, dB, nm
Fiber type
Singlemode 9/125um
Optical Interface
SC/PC or SC/APC or FC/PC or FC/APC
Operation Mode
Power Meter / Insertion Loss Meter
Photodetector type
InGaAs
Display
2.1 inch LCD (with LED backlight)
Battery
3.7V Rechargeable Lithium Ion Battery
However please careful that the following are expressly NOT
Battery Life
COVERED under warranty:
Battery Charging Time
▪ Any loss, damage by using un-approved Battery and AC Adaptor
Data Storage
▪ In case the serial or warranty sticker is removed
Operating Temperature
▪ Failure to use products under abnormal operating conditions
Dimension
▪ Any loss, damage by user fault
Weight
10 hours (continuous usage)
3 hours
300 measurements
-10 ~ +50 ℃ (Humidity 0 ~ 90%)
138 (H) x 73 (W) x 30 (D) mm
205g
▪ Any damage by disassembly without permission
TheFibers 3-Lamda PON Power Meter (3λPON) is designed to
measure both wavelength and optical power of 3 wavelength
optical signals in FTTx, BPON, EPON and GPON. Also Optical
Insertion Loss Measurement is available. 3λPON is used for optical
installation and Maintenance with FTTH service activation &
troubleshooting. 3λPON is suitable for outdoor field application.
AVAIABLE APPLICATIONS
▪ Fiber To The Home (FTTH) and FTTx, BPON, EPON, GPON
▪ Fiber Optic Installation and Maintenance
▪ Fiber Optic Product Manufacturers and Installers
▪ FTTH Service Activation & Troubleshooting
PRODUCT BUTTON OVERVIEW
KEY FEATURES
• Simultaneous measurement of 1310/1490/1550nm
(Voice/Data/Video)
• Auto Wavelength Detection type
• Handheld compact size and lightweight and cost-effective
and easy operation
• Applicable for wavelength optical network such as FTTH / PON
• Also Works as a typical Insertion Loss (I/L) Meter
• Pass/Fail function available
• A robust, shock-proof, splash-proof design for field operation
• Auto power-off for low power consumption
• Data Storage upto 300 measurements
Power
ON / OFF
Backlight
LCD backlight ON / OFF
Up
For up value and check saved data
Enter
Save button in SET Mode
Down
For down value and check saved data
Mode
Change mode between PM and IL Mode
Zero
For Decontrol mode, Zero Set, Data Deletion
Wavelength Select wavelength
Store
Save or Check button for measured data
OPERATION
[Factory Reset] If you push “ENTER” for over 2 seconds instead
3) Data Store Procedure
of the above e, “rSET” is indicated as Factory Reset.
▪ Data Store or Data Check
1) PM (Power Meter) Mode
When the power of 3λPON is on, tester’s initial operating mode, PM
2) IL (Insertion Loss Meter) Mode
to change to IL (Insertion Loss Meter) mode, push “MODE” button.
▪ Set Threshold Value for PASS/FAIL
a. Push “ZERO” button.
The value of 1310nm is blinked.
b. By “UP/DOWN”, select value.
c. Save the value by “ENTER” button.
Data Store or Check is available
in PM mode and IL mode both.
(Power Meter) mode, is displayed on LCD screen. When you want
▪ Measuring method in IL mode
a. Push “STORE” button.
a. Select the IL mode by using “MODE” button.
b. All 3 values are blinked.
b. Connect the cable or the DUT (Device Under Test) between
c. Save the measured value
the external Laser Source and 3λPON.
c. Turn on and set the output power of the laser source.
d. Carry out the “Zero Set” process as described in the section
of “Zero Set” below.
In case change of wavelength without “ENTER”, the value is
e. Measure the insertion loss.
not saved.
※ Prior to IL test process, “Zero Set” should be preceded.
by “ENTER” button.
d. By “UP/DOWN”, you can check
all the saved data.
e. By “WAVELENGTH” button, you
can check the saved data per wavelength.
f. Decontrol Store or Check mode by push “STORE”.
d. To set other wavelength, push “WAVELENGTH” button and
repeat the above b and c.
e. Decontrol Set mode by push “ZERO”.
▪ Set Threshold Value for PASS/FAIL
a.Push “ZERO” button.
The value of 1310nm is blinked.
▪ Calibrate Offset
b. By “UP/DOWN”, select value.
▪ Data Deletion
a. Individual Deletion: Select data which you want to delete in
Data Check mode by using “UP/DOWN” and push “ZERO”.
b. Whole Deletion: In the Data
If the measured value is different from the actual optical power, it
c. Save the value by “ENTER” button.
Check mode, push “ZERO”
can be adjusted by using the external laser source which power
d. To set other wavelength, push “WAVELENGTH” button and
for over 2 seconds and then
value is known.
a. Connect 3λPON to the external Laser Source by using a
repeat the above b and c.
4) Battery Indicator
reference optical cord.
b. Turn on and set the output power of the external laser source.
c. Push “ZERO” for over 2 seconds. Then disappear PASS/FAIL
indication and the value of 1310nm is blinked.
d. By using “UP/DOWN” button, select the actual power value of
the external laser source.
e. Save the value by “ENTER” button.
f. To offset other wavelength, connect to the other wavelength
laser source and push “WAVELENGTH” button and repeat the
above d and e.
g. Decontrol Set mode by push “ZERO”.
show the right picture.
e. Decontrol Set mode by push “ZERO”.
▪ Zero Set
a. Connect the reference cord (master cord) between the
external laser source and 3λPON.
Battery Indicator shows three stages. In case that battery is
very low status, Indicator is flashing a one second interval.
Full
Low
Very Low
b. Turn on and set the output power of the laser source.
c. After stabilization of laser, push “ZERO” for over 2 seconds.
d. Push “ENTER” button and then the display value is changed
to “0.00dB”.
e. To zero set other wavelength, push “WAVELENGTH” button
and repeat the above c and d.
f. Decontrol Set mode by push “ZERO”.
TheFibers Inc.
A-1109 Keumkang Penterium IT Tower
282 Hagui-ro, Anyang-City, Korea
Tel: +82-31-381-6108
Fax: +82-31-381-6109
[email protected]
www.thefibers.com